


 Loading...
– Please Read –
Important Cordless Telephone Installation Information
DS1000/2000 900 MHz Cordless Telephone Installation Tips
•The cordless telephone base unit plugs into a digital station port.
•For best results, the base unit should be placed in line-of-site with its handset.
•Cordless telephone range and reception can vary from site to site. Some of the things that may adversely affect range and reception are:
-Placing the base against or close to a wall (particularly if the wall has metal studs).
-Positioning the base close to a device that emits Electromagnetic Interference (EMI), such as a TV, radio, computer, fluorescent light, fax machine, or printer.
-Installing the base close to other 900 Mhz devices, such as Symbol or Telex hand-held inventory devices.
-Installing the base above a ceiling that uses foil-backed insulation.
-Installing the base behind a door which can be closed, tinted windows, or one-way glass which will separate the base from the handset.
•Always raise the base unit antenna to its full vertical position.
•When installing more than one cordless telephone in the same site:
-Be sure the base units are at least 15 feet apart.
-After installation, change each telephone’s channel by pressing CH on the handset. This will minimize interference between your cordless telephones. There are 30 available channels.
•The handset must charge 5-8 hours in its charger prior to initial use.
•The Nickel Metal Hydride Rechargeable Battery Pack is recyclable. If you replace a battery pack, always dispose of the old pack along with your other recyclable materials.
Cordless Telephone
User Guide
(03.14.00)
This manual has been developed by NEC America, Inc. It is intended for the use of its customers and service personnel, and should be read in its entirety before attempting to install or program the system. Any comments or suggestions for improving this manual would be appreciated. Forward your remarks to:
NEC America, Inc., Corporate Networks Group
4 Forest Parkway
Shelton, CT 06484
cng.nec.com
Nothing contained in this manual shall be deemed to be, and this manual does not constitute, a warranty of, or representation with respect to, any of the equipment covered. This manual is subject to change without notice and NEC America, Inc. has no obligation to provide any updates or corrections to this manual. Further, NEC America, Inc. also reserves the right, without prior notice, to make changes in equipment design or components as it deems appropriate. No representation is made that this manual is complete or accurate in all respects and NEC America, Inc. shall not be liable for any errors or omissions. In no event shall NEC America, Inc. be liable for any incidental or consequential damages in connection with the use of this manual. This document contains proprietary information that is protected by copyright. All rights are reserved. No part of this document may be photocopied or reproduced without prior written consent of NEC America, Inc.
©2004 by NEC America, Inc. All Rights Reserved. Printed in U.S.A.

Table of Contents
Table of Contents
Chapter 1: Installation. . . . . . . . . . . . . . . . . . . . . . . . . . . . . . . . . . . . . . . . . . . . .1
Introduction . . . . . . . . . . . . . . . . . . . . . . . . . . . . . . . . . . . . . . . . . . . . . . . . . . . . . . . . . . . 1
DS1000/2000 900 Mhz Cordless Telephone. . . . . . . . . . . . . . . . . . . . . . . . . . . . . . . . . . . .1
Overview . . . . . . . . . . . . . . . . . . . . . . . . . . . . . . . . . . . . . . . . . . . . . . . . . . . . . . . . . . .1
Programming . . . . . . . . . . . . . . . . . . . . . . . . . . . . . . . . . . . . . . . . . . . . . . . . . . . . . . . .1
1802-Ring Down Destination . . . . . . . . . . . . . . . . . . . . . . . . . . . . . . . . . . . . . . . 1
The Basics . . . . . . . . . . . . . . . . . . . . . . . . . . . . . . . . . . . . . . . . . . . . . . . . . . . . . . . . . . . . 2
Basic Operation . . . . . . . . . . . . . . . . . . . . . . . . . . . . . . . . . . . . . . . . . . . . . . . . . . . . . . . . . .2
Using the Basic Features . . . . . . . . . . . . . . . . . . . . . . . . . . . . . . . . . . . . . . . . . . . . . . .2
Answering Calls . . . . . . . . . . . . . . . . . . . . . . . . . . . . . . . . . . . . . . . . . . . . . . . . . 2
Placing Calls . . . . . . . . . . . . . . . . . . . . . . . . . . . . . . . . . . . . . . . . . . . . . . . . . . . . 2
Hanging Up . . . . . . . . . . . . . . . . . . . . . . . . . . . . . . . . . . . . . . . . . . . . . . . . . . . . . 2
Changing Channels . . . . . . . . . . . . . . . . . . . . . . . . . . . . . . . . . . . . . . . . . . . . . . . 2
Standby Mode . . . . . . . . . . . . . . . . . . . . . . . . . . . . . . . . . . . . . . . . . . . . . . . . . . . 2
Traveling Out Of Range . . . . . . . . . . . . . . . . . . . . . . . . . . . . . . . . . . . . . . . . . . . 2
Using the Base Cordless and Desk Buttons . . . . . . . . . . . . . . . . . . . . . . . . . . . . 2
Low Battery. . . . . . . . . . . . . . . . . . . . . . . . . . . . . . . . . . . . . . . . . . . . . . . . . . . . . 2
Using Your Handset . . . . . . . . . . . . . . . . . . . . . . . . . . . . . . . . . . . . . . . . . . . . . . . . . .3
Installation . . . . . . . . . . . . . . . . . . . . . . . . . . . . . . . . . . . . . . . . . . . . . . . . . . . . . . . . . . . . 4
Installing the Base . . . . . . . . . . . . . . . . . . . . . . . . . . . . . . . . . . . . . . . . . . . . . . . . . . . . . . . .4 Connecting the Base . . . . . . . . . . . . . . . . . . . . . . . . . . . . . . . . . . . . . . . . . . . . . . . . . .4 Wall-Mounting the Base . . . . . . . . . . . . . . . . . . . . . . . . . . . . . . . . . . . . . . . . . . . . . . . . . . .7 Mounting the Base on the Wall . . . . . . . . . . . . . . . . . . . . . . . . . . . . . . . . . . . . . . . . . .7 Mounting the Base to a Wall Plate . . . . . . . . . . . . . . . . . . . . . . . . . . . . . . . . . . . . . . .8 Installing the Battery . . . . . . . . . . . . . . . . . . . . . . . . . . . . . . . . . . . . . . . . . . . . . . . . . . . . . .9 Installing the Battery in your Handset . . . . . . . . . . . . . . . . . . . . . . . . . . . . . . . . . . . . .9 Charging the Handset . . . . . . . . . . . . . . . . . . . . . . . . . . . . . . . . . . . . . . . . . . . . . . . . . . . .10 Installing the Charger and Charging the Handset . . . . . . . . . . . . . . . . . . . . . . . . . . .10 Cleaning the Battery Charger Contacts . . . . . . . . . . . . . . . . . . . . . . . . . . . . . . . . . . .10 Wall-Mounting the Charger . . . . . . . . . . . . . . . . . . . . . . . . . . . . . . . . . . . . . . . . . . .11 Using the Belt Clip . . . . . . . . . . . . . . . . . . . . . . . . . . . . . . . . . . . . . . . . . . . . . . . . . . . . . .12 Installing the Belt Clip . . . . . . . . . . . . . . . . . . . . . . . . . . . . . . . . . . . . . . . . . . . . . . . .12
Using the Earloop Style
Headset with your Cordless Telephone . . . . . . . . . . . . . . . . . . . . . . . . . . . . . . . . . . . . . . .13 Installing Headset P/N 750638 (M145 Earloop Style) . . . . . . . . . . . . . . . . . . . . . . .13 Earloop Installation . . . . . . . . . . . . . . . . . . . . . . . . . . . . . . . . . . . . . . . . . . . . . . 13 Ear Cushion Installation . . . . . . . . . . . . . . . . . . . . . . . . . . . . . . . . . . . . . . . . . . 14 Connecting the Headset and Using the Controls. . . . . . . . . . . . . . . . . . . . . . . . 15
Using the Headband Style Headset with your Cordless Telephone . . . . . . . . . . . . . . . . .16 Installing Headset P/N 750637 (M175 Headband Style) . . . . . . . . . . . . . . . . . . . . .16 Optional Earloop Installation . . . . . . . . . . . . . . . . . . . . . . . . . . . . . . . . . . . . . . 16 Connecting the Headset and using the Controls . . . . . . . . . . . . . . . . . . . . . . . . 18 Specifications and Parts. . . . . . . . . . . . . . . . . . . . . . . . . . . . . . . . . . . . . . . . . . . . . . . . . . .19 Specifications . . . . . . . . . . . . . . . . . . . . . . . . . . . . . . . . . . . . . . . . . . . . . . . . . . . . . .19 Parts and Accessories . . . . . . . . . . . . . . . . . . . . . . . . . . . . . . . . . . . . . . . . . . . . . . . .20
DS1000/2000 Cordless Telephone User Guide |
Table of Contents 1 |

Table of Contents
Chapter 2: Features. . . . . . . . . . . . . . . . . . . . . . . . . . . . . . . . . . . . . . . . . . . . . .21
Feature Operation . . . . . . . . . . . . . . . . . . . . . . . . . . . . . . . . . . . . . . . . . . . . . . . . . . . . . 21
Barge In . . . . . . . . . . . . . . . . . . . . . . . . . . . . . . . . . . . . . . . . . . . . . . . . . . . . . . . . . . .21
Call Coverage Keys . . . . . . . . . . . . . . . . . . . . . . . . . . . . . . . . . . . . . . . . . . . . . . . . . .21
Call Forwarding . . . . . . . . . . . . . . . . . . . . . . . . . . . . . . . . . . . . . . . . . . . . . . . . . . . . .22
Call Forwarding Off Premise . . . . . . . . . . . . . . . . . . . . . . . . . . . . . . . . . . . . . . . . . .22
Call Waiting / Camp On . . . . . . . . . . . . . . . . . . . . . . . . . . . . . . . . . . . . . . . . . . . . . .22
Callback . . . . . . . . . . . . . . . . . . . . . . . . . . . . . . . . . . . . . . . . . . . . . . . . . . . . . . . . . . .23
Caller ID . . . . . . . . . . . . . . . . . . . . . . . . . . . . . . . . . . . . . . . . . . . . . . . . . . . . . . . . . .23
Central Office Calls, Answering . . . . . . . . . . . . . . . . . . . . . . . . . . . . . . . . . . . . . . . .23
Central Office Calls, Placing . . . . . . . . . . . . . . . . . . . . . . . . . . . . . . . . . . . . . . . . . . .23
Conference . . . . . . . . . . . . . . . . . . . . . . . . . . . . . . . . . . . . . . . . . . . . . . . . . . . . . . . . .24
Directed Call Pickup . . . . . . . . . . . . . . . . . . . . . . . . . . . . . . . . . . . . . . . . . . . . . . . . .24
Distinctive Ringing . . . . . . . . . . . . . . . . . . . . . . . . . . . . . . . . . . . . . . . . . . . . . . . . . .25
Do Not Disturb Override . . . . . . . . . . . . . . . . . . . . . . . . . . . . . . . . . . . . . . . . . . . . . .25
Extension Hunting . . . . . . . . . . . . . . . . . . . . . . . . . . . . . . . . . . . . . . . . . . . . . . . . . . .25
Forced Trunk Disconnect . . . . . . . . . . . . . . . . . . . . . . . . . . . . . . . . . . . . . . . . . . . . .26
Group Call Pickup . . . . . . . . . . . . . . . . . . . . . . . . . . . . . . . . . . . . . . . . . . . . . . . . . . .26
Group Ring . . . . . . . . . . . . . . . . . . . . . . . . . . . . . . . . . . . . . . . . . . . . . . . . . . . . . . . .26
Hold . . . . . . . . . . . . . . . . . . . . . . . . . . . . . . . . . . . . . . . . . . . . . . . . . . . . . . . . . . . . . .26
Hotline . . . . . . . . . . . . . . . . . . . . . . . . . . . . . . . . . . . . . . . . . . . . . . . . . . . . . . . . . . . .27
Intercom . . . . . . . . . . . . . . . . . . . . . . . . . . . . . . . . . . . . . . . . . . . . . . . . . . . . . . . . . . .27
Last Number Redial . . . . . . . . . . . . . . . . . . . . . . . . . . . . . . . . . . . . . . . . . . . . . . . . . .27
Meet Me Conference . . . . . . . . . . . . . . . . . . . . . . . . . . . . . . . . . . . . . . . . . . . . . . . . .28
Message Waiting . . . . . . . . . . . . . . . . . . . . . . . . . . . . . . . . . . . . . . . . . . . . . . . . . . . .28
Microphone Mute . . . . . . . . . . . . . . . . . . . . . . . . . . . . . . . . . . . . . . . . . . . . . . . . . . .28
Monitor / Silent Monitor . . . . . . . . . . . . . . . . . . . . . . . . . . . . . . . . . . . . . . . . . . . . . .28
Night Service / Night Ring . . . . . . . . . . . . . . . . . . . . . . . . . . . . . . . . . . . . . . . . . . . .29
Off-Hook Signaling . . . . . . . . . . . . . . . . . . . . . . . . . . . . . . . . . . . . . . . . . . . . . . . . . .29
Paging . . . . . . . . . . . . . . . . . . . . . . . . . . . . . . . . . . . . . . . . . . . . . . . . . . . . . . . . . . . .29
Park . . . . . . . . . . . . . . . . . . . . . . . . . . . . . . . . . . . . . . . . . . . . . . . . . . . . . . . . . . . . . .29
Prime Line Preference . . . . . . . . . . . . . . . . . . . . . . . . . . . . . . . . . . . . . . . . . . . . . . . .30
Privacy Release Groups . . . . . . . . . . . . . . . . . . . . . . . . . . . . . . . . . . . . . . . . . . . . . . .30
Programmable Function Keys . . . . . . . . . . . . . . . . . . . . . . . . . . . . . . . . . . . . . . . . . .30
Removing Lines and Extensions . . . . . . . . . . . . . . . . . . . . . . . . . . . . . . . . . . . . . . . .32
Reverse Voice Over . . . . . . . . . . . . . . . . . . . . . . . . . . . . . . . . . . . . . . . . . . . . . . . . . .33
Ringing Line Preference . . . . . . . . . . . . . . . . . . . . . . . . . . . . . . . . . . . . . . . . . . . . . .33
Save Number Dialed . . . . . . . . . . . . . . . . . . . . . . . . . . . . . . . . . . . . . . . . . . . . . . . . .33
Speed Dial . . . . . . . . . . . . . . . . . . . . . . . . . . . . . . . . . . . . . . . . . . . . . . . . . . . . . . . . .34
Split . . . . . . . . . . . . . . . . . . . . . . . . . . . . . . . . . . . . . . . . . . . . . . . . . . . . . . . . . . . . . .34
Tandem Trunking . . . . . . . . . . . . . . . . . . . . . . . . . . . . . . . . . . . . . . . . . . . . . . . . . . .35
Transfer . . . . . . . . . . . . . . . . . . . . . . . . . . . . . . . . . . . . . . . . . . . . . . . . . . . . . . . . . . .35
Trunk (Line) Queuing and Callback . . . . . . . . . . . . . . . . . . . . . . . . . . . . . . . . . . . . .36
Voice Mail . . . . . . . . . . . . . . . . . . . . . . . . . . . . . . . . . . . . . . . . . . . . . . . . . . . . . . . . .36
Voice Over . . . . . . . . . . . . . . . . . . . . . . . . . . . . . . . . . . . . . . . . . . . . . . . . . . . . . . . . .37
Volume Control . . . . . . . . . . . . . . . . . . . . . . . . . . . . . . . . . . . . . . . . . . . . . . . . . . . . .37
Walking Class of Service . . . . . . . . . . . . . . . . . . . . . . . . . . . . . . . . . . . . . . . . . . . . .38
Feature Summary . . . . . . . . . . . . . . . . . . . . . . . . . . . . . . . . . . . . . . . . . . . . . . . . . . . . . 39
Cordless Telephone Feature Summary . . . . . . . . . . . . . . . . . . . . . . . . . . . . . . . . . . .39
2 Table of Contents |
DS1000/2000 Cordless Telephone User Guide |
Introduction
Chapter 1:
Installation 1
Introduction
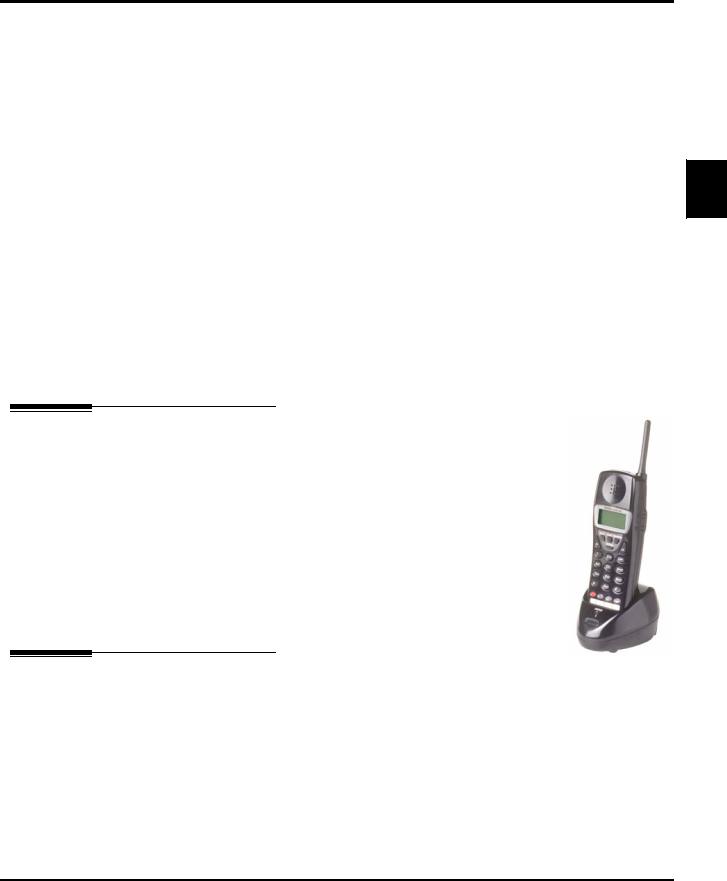
DS1000/2000 900 Mhz Cordless Telephone
DS1000/2000 900 Mhz Cordless Telephone
Overview
The DS1000/2000 900 Mhz Cordless Telephone (P/N 80683)is a 900 Mhz digital narrow band FM cordless telephone that provides mobility, flexibility and convenience for those who spend much of the workday away from their desk. Fully integrated with the DS1000/2000 system, DS1000/2000 900 Mhz Cordless Telephone offers many standard features such as Call Forwarding, Call Coverage, Hotline, and Voice Mail. Complemented by 4 fully programmable function keys (with LEDs), the DS1000/2000 900 Mhz Cordless Telephone achieves a whole new level of convenience and mobility. An easy- to-read 16-character by 2-line LCD display (with four status icons), volume controls, a rechargeable Nickel Metal Hydride Battery Pack, and a handy belt clip round out the elegant and affordable DS1000/2000 900 Mhz Cordless Telephone.
The DS1000/2000 900 Mhz Cordless Telephone auto-IDs in 1801-Extension Circuit Type with circuit type 50. No additional programming is required for basic feature operation.
Programming
1802-Ring Down Destination
For the cordless telephone extension number, use this option to designate the extension associated with the base unit Desk button. By default, there is no entry for this option.
DS1000/2000 Cordless Telephone User Guide |
Chapter 1: Installation 1 |

The Basics
Basic Operation
The Basics
Basic Operation
Using the Basic Features
Answering Calls
■Outside calls: Ring with 2 short rings followed by a long ring.
■Intercom calls: Ring with 1 long ring.
■To answer a call: Press TALK or the flashing line key.
-If your handset is in the charger, lifting the handset answers the incoming call.
Placing Calls
■Intercom calls: Press TALK + Dial co-worker’s extension or *8 for Voice Mail.
■Outside calls: Press TALK + Dial trunk access code + Dial outside number, or Press line key + Dial outside number
Hanging Up
■ Press TALK or place the handset in the charger.
Changing Channels
If the installation site has more than one DS1000/2000 900 Mhz Cordless Telephone, set up each telephone to operate on its own channel.
■While on a call, press CH.
-The TALK icon flashes briefly while the handset changes channels. There are 30 channels max.
-If you select a channel that is already in use, you see SYSTEM BUSY.
Standby Mode
■When the handset is out of the charger, it will go into Standby Mode after about 5 minutes. Standby mode blanks the display to conserve power.
■Placing or answering a call automatically cancels Standby Mode.
Traveling Out Of Range
■If you try to place a call while out of range (beyond the range of your handset):
-ACQUIRING LINK flashes in your display.
-You hear five quick beeps.
-NO SERVICE flashes in your display.
■If you travel out of range while on a call:
-You hear five quick beeps.
-Your handset goes into standby mode.
-The call disconnects.
Using the Base Cordless and Desk Buttons
■While on a call at your cordless handset: Press Desk to transfer the call to your desk extension.
■While on a call at your desk extension: Press Cordless to transfer the call to your cordless handset.
■While idle at your cordless handset: Press Desk to call your desk extension on the Intercom.
■While idle at your desk extension: Press Cordless to beep (locate) for cordless handset.
Low Battery
If the LOW icon displays:
■If on a call, press TALK to hang up as soon as possible so your call is not interrupted.
■Recharge or replace the battery before placing or answering another call.
2 Chapter 1: Installation |
DS1000/2000 Cordless Telephone User Guide |

The Basics
Basic Operation
Using Your Handset
Ringer |
Ring Volume |
● On when ring is turned off
|
|
2-line, 16 |
|
|
character display |
|
|
Voice Mail |
Talk |
Battery |
● On if you have |
a Voice Mail message |
||
● Off while idle |
On when |
or Message Waiting. |
● On while on a call |
battery is low |
● Dial *8 to respond |
●Flashes while microphone muted
●While idle, press to select ring type or vibrate
●While on a call, press to change handset receiving volume
Ring On/Off Mute |
1 |
|
●While on a call, press to mute microphone
●While idle, press and hold
5 seconds to turn ringer on or off
Headset jack
Conference
While on a call,
press CONF to set up a conference
Hold
Press HOLD to put your call on hold
Talk
●While idle, Press TALK for Intercom dial tone
●While busy, press TALK to hang up
Last Number Redial
Press REDIAL to redial your last call
Note: ACQUIRING LINK means your handset is setting up a connection
with the base
While on a call
Press to transfer |
Press to transfer |
call to handset |
call to desk extension |
|
|
While idle |
|
|
|
Press to locate |
Press to call |
|
|
(beep) handset |
desk extension |
|
|
Transfer |
|
|
|
● TRANSFER + Extension |
|
|
|
transfers call to a co-worker |
|
|
|
● TRANSFER + 700 transfers |
|
|
|
call to Voice Mail |
|
|
|
Channel |
|
Line1 Line2 Line3 Line4 |
|
● Press CH to change channels |
|
|
1 - 80683 |
if you hear interference |
|
|
● 30 separate channels |
|
|
|
|
|
|
Microphone |
|
Programmable Keys |
|
|
● Line keys 1-4 by default |
|
|
Picks up your voice |
|
|
|
● Can optionally be programmed for other features
Figure 1: Using Your Handset
DS1000/2000 Cordless Telephone User Guide |
Chapter 1: Installation 3 |

Installation
Installing the Base
Installation
Installing the Base
Connecting the Base
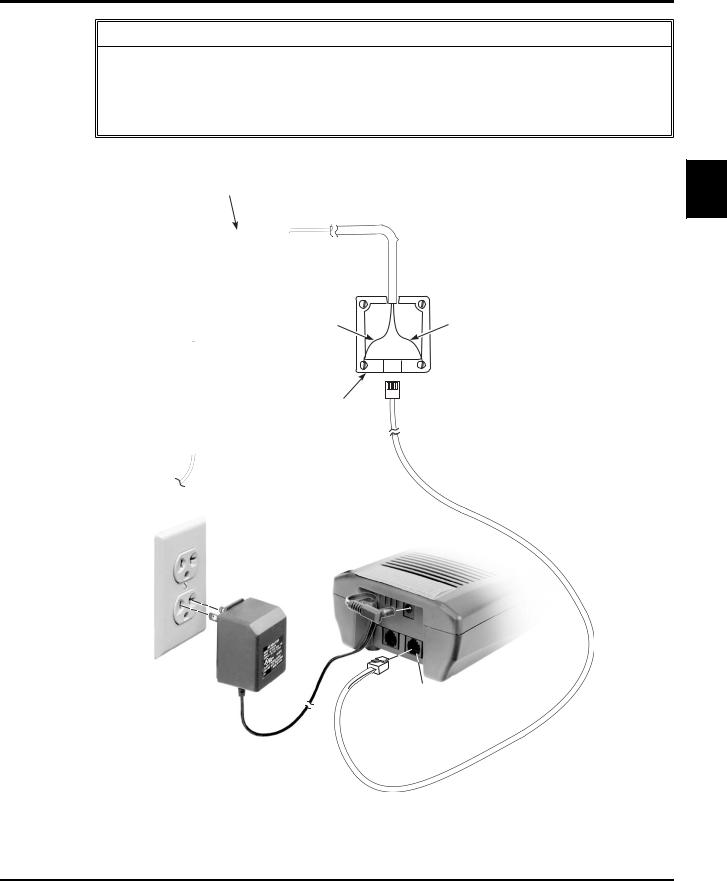
To connect the base to the DS1000/2000 system (Figure 2: Installing the Base):
Be sure to review Guidelines for Placing the Base, Figure 3: Correct Installation Methods, and Figure 4: Incorrect Installation Methods prior to connecting the base unit to the system.
1.Install a modular jack within 6 feet of the base and within 6 feet of an available standard (NEMA 5-15R) 120 VAC outlet.
2.Run a single pair of 24 AWG station cable from the cross-connect block to the modular jack.
3.Terminate the station cable WHT/BLU - BLU/WHT leads to the RED and GRN lugs on the modular jack.
4.Back at the main equipment location, run one pair of cross-connect wire between an available digital station port pins on the extension block and cross-connect block to complete the installation.
5.Install bridging clips as required.
6.Plug one end of a modular line cord into the base LINE IN jack; plug the other end of the line cord into the modular jack.
■The DS1000/2000 900 Mhz Cordless Telephone auto-IDs in 1801-Extension Circuit Type with circuit type 50. No additional programming is required for basic feature operation.
To connect the AC Adaptor to the base:
1.Run the AC adaptor cord under the strain relief on the back of the base as shown.
2.Plug the AC adaptor into AC outlet.
3.Be sure the base antenna is in the vertical position.
Checking the Base LEDs
Normal Operation
■The Power LED is on.
■The Cordless and Desk LEDs are off. Troubleshooting
■If the Power LED is off, the base power supply is not properly connected.
■If the Desk LED is flashing, the base is not correctly connected to a digital station circuit in the main equipment.
Guidelines for Placing the Base
•For best results, the base unit should be placed in line-of-site with its handset.
•Cordless telephone range and reception can vary from site to site. Some of the things that may adversely affect range and reception are:
-Placing the base against or close to a wall (particularly if the wall has metal studs).
-Positioning the base close to a device that emits Electromagnetic Interference (EMI), such as a TV, radio, computer, fluorescent light, fax machine, or printer.
-Installing the base close to other 900 Mhz devices, such as Symbol or Telex hand-held inventory devices.
-Installing the base above a ceiling that uses foil-backed insulation.
-Installing the base behind a door which can be closed, tinted windows, or one-way glass which will separate the base from the handset.
4 Chapter 1: Installation |
DS1000/2000 Cordless Telephone User Guide |
Installation
Installing the Base
Guidelines for Placing the Base (Cont’d)
•Always raise the base unit antenna to its full vertical position.
•When installing more than one cordless in the same site: - Be sure the base units are at least 15 feet apart.
•After installation, change each telephone’s channel by pressing CH on the handset. This will minimize interference between your cordless telephones.
One-Pair
Cross Connect (To digital keyset port)
|
|
|
|
|
|
|
|
|
|
|
|
|
|
|
|
|
|
|
|
|
|
|
|
|
|
|
|
|
|
|
|
|
|
|
|
|
|
|
|
|
|
|
|
|
|
|
|
|
|
|
|
|
|
|
|
|
|
|
|
|
|
|
|
|
|
|
|
|
|
|
|
|
|
|
|
|
|
|
|
|
|
|
|
|
|
|
|
|
|
|
|
|
|
|
|
|
|
|
|
|
|
|
|
|
|
|
|
|
|
|
|
|
|
|
|
|
|
|
|
|
|
|
|
|
|
|
|
|
|
|
|
|
|
|
|
|
|
|
|
|
|
|
|
|
|
|
|
|
|
|
|
|
|
|
|
|
|
|
|
|
|
|
|
|
|
|
|
|
|
|
|
|
|
|
|
|
|
|
|
|
|
|
|
|
|
|
|
|
|
|
|
|
|
|
|
|
|
|
|
|
|
|
|
|
|
|
|
|
|
|
|
|
|
|
|
|
|
|
|
|
|
|
|
|
|
|
|
|
|
|
|
|
|
|
|
|
|
|
|
|
|
|
|
|
|
|
|
|
|
|
|
|
|
|
|
|
|
|
|
|
|
|
|
|
|
|
|
|
|
|
|
|
|
|
|
|
|
|
|
|
|
|
|
|
|
|
|
|
|
|
|
|
|
|
|
|
|
|
|
|
|
|
|
|
|
|
|
|
|
|
|
|
|
|
|
|
|
|
|
|
|
|
|
|
|
|
|
|
|
|
|
|
|
|
|
|
|
|
|
|
|
|
|
|
|
|
|
|
|
|
|
|
|
|
|
|
|
|
|
|
|
|
|
|
|
|
|
|
|
|
|
|
|
|
|
|
|
|
|
|
|
|
|
|
|
|
|
|
|
|
|
|
|
|
|
|
|
|
|
|
|
|
|
|
|
|
|
|
|
|
|
|
|
|
|
|
|
|
|
|
|
|
|
|
|
|
|
|
|
|
|
|
|
|
|
|
|
|
|
|
|
|
|
|
|
|
|
|
|
|
|
|
|
|
|
|
|
|
|
|
|
|
|
|
|
|
|
|
|
|
|
|
|
|
|
|
|
|
|
|
|
|
|
|
|
|
|
|
|
|
|
|
|
|
|
|
|
|
|
|
|
|
|
|
|
|
|
|
|
|
|
|
|
|
|
|
|
|
|
|
|
|
|
|
|
|
|
|
|
|
|
|
|
|
|
|
|
|
|
|
|
|
|
|
|
|
|
|
|
|
|
|
|
|
|
|
|
|
|
|
|
|
|
|
|
|
|
|
|
|
|
|
|
|
|
|
|
|
|
|
|
|
|
|
|
|
|
|
|
|
|
|
|
|
|
|
|
|
|
|
|
|
|
|
|
|
|
|
|
|
|
|
|
|
|
|
|
|
|
|
|
|
|
|
|
|
|
|
|
|
|
|
|
|
|
|
|
|
|
|
|
|
|
|
|
|
|
|
|
|
|
|
|
|
|
|
|
|
|
|
|
|
|
|
|
|
|
|
|
|
|
|
|
|
|
Station |
|
Cross |
||||||||||
Block |
Connect |
|||||||||||
|
|
|
|
|
|
|
Block |
|||||
1
|
Digital Keyset Jack |
YEL |
BLK |
BLU-WHT |
WHT-BLU |
|
|
RED |
GRN |
625 Modular Jack
80683 - 3
AC Adaptor
Line  out
out
Line in
Figure 2: Installing the Base
DS1000/2000 Cordless Telephone User Guide |
Chapter 1: Installation 5 |
Installation
Installing the Base
80683-7
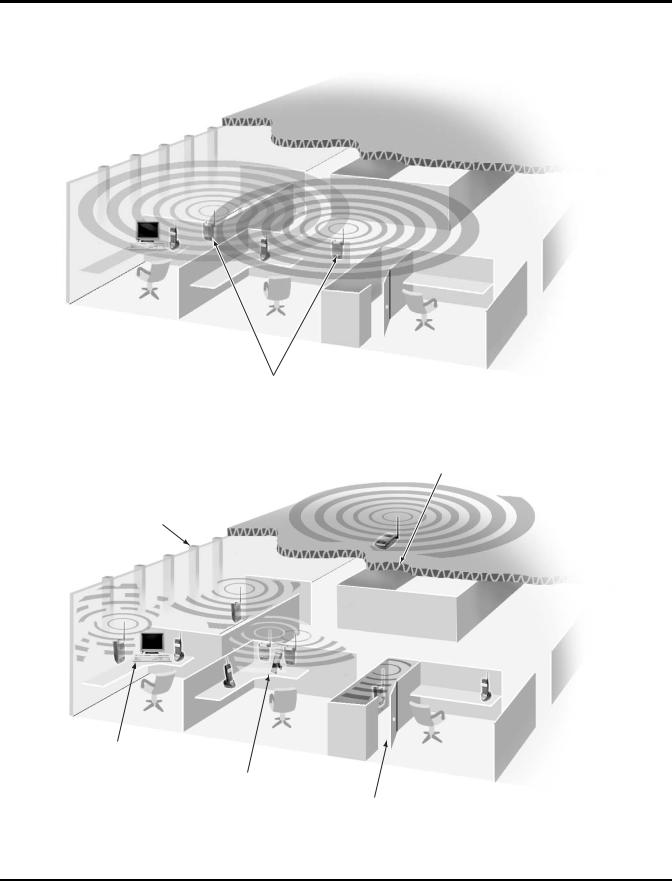
Correct line-of-site installation, away from devices that cause interference or locations that block signal.
Figure 3: Correct Installation Methods
Foil backed insulated ceiling
Metal studs
80683-6
Too close to another device that emits EMI
Too close to other 900 Mhz devices
Behind a door that
can be closed, tinted windows or one way glass
Figure 4: Incorrect Installation Methods
6 Chapter 1: Installation |
DS1000/2000 Cordless Telephone User Guide |
|
|
|
|
|
|
Installation |
|
|
|
|
|
|
|
|
Wall-Mounting the Base |
|
|
|
|
|
|
|
|
|
|
|
Wall-Mounting the Base |
|
|
|
|
||||
|
|
|
|
|
|
|||
|
|
|
|
|||||
|
|
Mounting |
the Base on the Wall |
|
||||
|
|
|
|
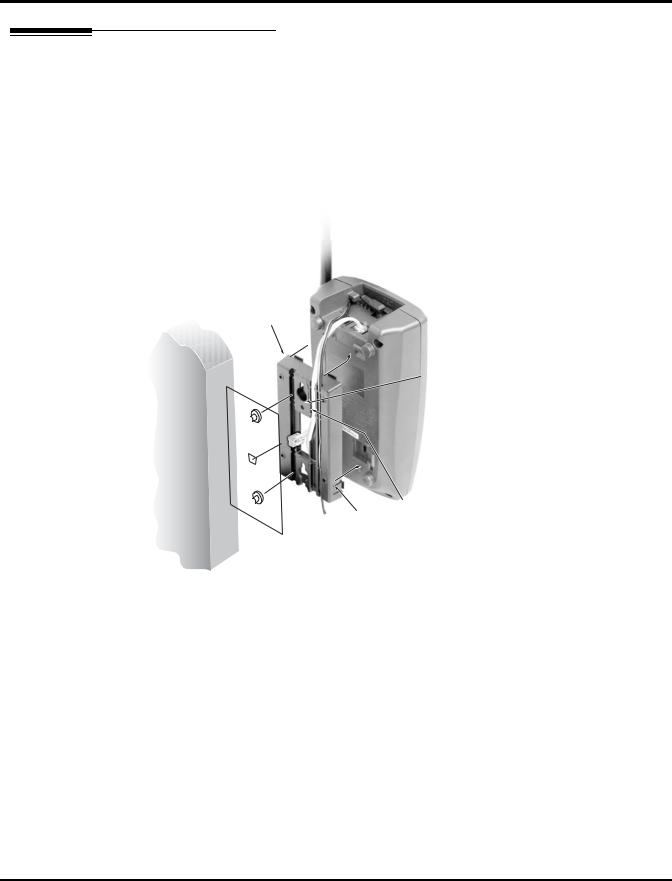
To mount the base on the wall (Figure 5: Mounting the Base on the Wall): |
|
|||
1. |
Run the base line cord in the wide wire channel as shown, but do not plug it into the base. |
|
||||||
2. |
Run the AC adaptor cord in the narrow wire channel as shown, but do not plug it into the base. |
|
||||||
3. |
Using suitable fasteners, attach the wall-mount bracket to the wall in the desired location. |
|
||||||
4. |
- To make the base easier to remove later on, consider not tightening the fasteners all the way. |
1 |
||||||
Snap the base onto the wall-mount bracket. |
||||||||
5. |
- Make sure the mounting ears fit all the way into their slots and the mounting tabs snap into place. |
|||||||
Connect the base line cord and AC adaptor cord to the base. |
|
|||||||
|
||||||||
Mounting ear
80683-14
Line cord in wide channel
AC adaptor cord
in narrow channel
Mounting tab
Wall
Figure 5: Mounting the Base on the Wall
To remove the base from the wall:
-If you did not tighten the fasteners, you can slide the base off the wall before going to the next step.
1.Unplug the line cord and AC adaptor cord from the base.
2.Press the mounting tabs to release the wall-mount bracket from the base.
DS1000/2000 Cordless Telephone User Guide |
Chapter 1: Installation 7 |
Installation
Wall-Mounting the Base
Mounting the Base to a Wall Plate
To mount the base on a standard wall plate (Figure 6: Mounting the Base to a Standard Wall Plate):
1.Snap the base onto the wall-mount bracket.
-Make sure the mounting ears fit all the way into their slots and the mounting tabs snap into place.
2.Run a customer-provided short line cord in the wide wire channel as shown and plug it into the base.
3.Run the AC adaptor cord in the narrow wire channel as shown and plug it into the base.
4.Plug the other end of the short line cord into the wall plate modular jack.
5.Slide the wall-mount bracket onto the wall plate.
Mounting ear
- 80683 15
Line cord in wide channel
|
AC adaptor cord |
Mounting tab |
in narrow channel |
|
Wall Plate
Wall
Figure 6: Mounting the Base to a Standard Wall Plate
To remove the base from the wall:
1.Slide the wall-mount bracket off of the wall plate.
2.Unplug the short line cord from the wall plate.
3.Unplug the short line cord and AC adaptor cord from the base.
4.Press the mounting tabs to release the wall-mount bracket from the base.
8 Chapter 1: Installation |
DS1000/2000 Cordless Telephone User Guide |
|
|
|
|
|
|
Installation |
|
||
|
|
|
|
|
|
Installing the Battery |
|
||
|
|
|
|
|
|
|
|
|
|
Installing the Battery |
|
|
|
|
|||||
|
|
|
|
|
|
||||
|
|
|
|
||||||
|
|
Installing |
the Battery in your Handset |
|
|||||
|
|
|
|
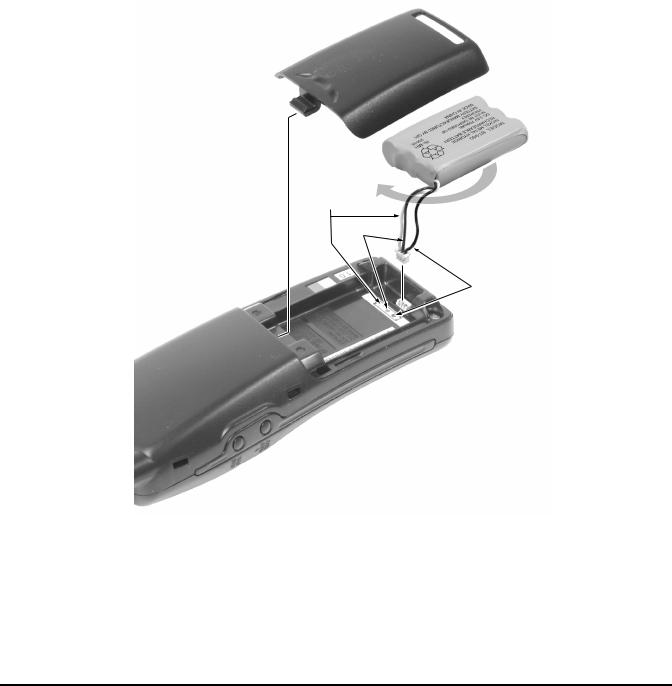
To install the battery in your handset (Figure 7: Installing the Handset Battery): |
|
||||
1. |
Slide the battery cover off of the handset. |
|
|||||||
2. |
Insert the battery lead into the battery connector. Be sure to observe the polarity of the connection by lin- |
|
|||||||
|
|
|
|
|
ing up the black dot with the black wire. |
|
|||
3. |
Turn the battery around to it fits into the battery compartment. |
|
|||||||
1 |
|||||||||
4. |
Slide the battery cover back onto the handset until it snaps into place. |
||||||||
|
|||||||||
|
|
|
|
|
|
|
|
|
|
White wire
Red wire
After inserting jack, turn battery to fit into battery compartment
Black wire
2 - 80683
Figure 7: Installing the Handset Battery
DS1000/2000 Cordless Telephone User Guide |
Chapter 1: Installation 9 |

Installation
Charging the Handset
Charging the Handset
Installing the Charger and Charging the Handset
To connect the AC Adaptor to the charger (Figure 8: Installing the Charger):
1.Run the AC adaptor cord under the strain relief on the back of the charger as shown.
2.Plug the AC adaptor cord into the charger.
3.Plug the AC adaptor into AC outlet.
4.Insert the handset into the charger.
The handset must charge 5-8 hours in its charger prior to initial use.
When the handset is correctly inserted into the charger, the CHARGE LED on the charger is on.
Strain Relief
AC Adaptor
80683-4
Figure 8: Installing the Charger
Cleaning the Battery Charger Contacts
To clean the battery charger contacts (Figure 9: Cleaning the Battery Charger Contacts):
●Use a pencil eraser or soft cloth to periodically (once a month) clean the battery contacts.
Figure 9: Cleaning the Battery Charger Contacts
10 Chapter 1: Installation |
DS1000/2000 Cordless Telephone User Guide |
Installation
Charging the Handset
Wall-Mounting the Charger
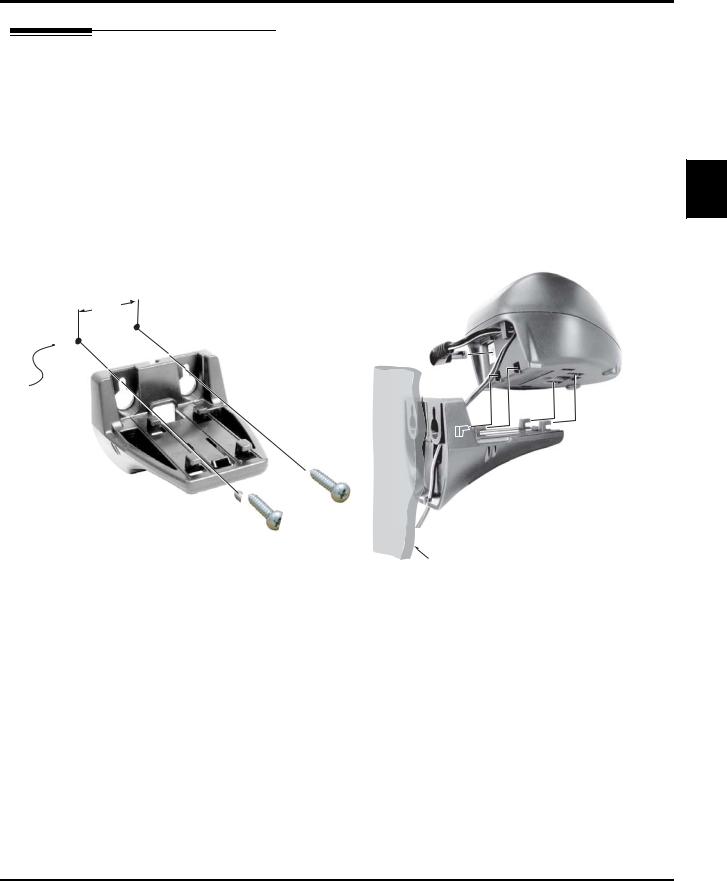
To wall-mount the charger (Figure 10: Wall-Mounting the Charger):
1.Choose a suitable location for the charger wall-mount bracket within 6 feet of an AC outlet.
2.Install suitable fasteners 1 3/16” apart, leaving the heads out about 1/4”.
3.Run the AC adaptor cord through the notch in the bottom of the wall-mount bracket and up through the rectangular cutout in the bracket.
4. |
Place the wall-mount bracket on the fasteners and tighten. |
1 |
|
||
5. |
Run the AC adaptor cord through the strain relief on the back of the charger, then plug the |
|
|
cord into the charger. |
|
|
|
|
6. |
Snap the charger onto the wall-mount bracket. |
|
7. |
Plug the AC adaptor into the AC outlet. |
|
1-3/16"
Wall
80683-11
80683 - 13
Wall
Figure 10: Wall-Mounting the Charger
DS1000/2000 Cordless Telephone User Guide |
Chapter 1: Installation 11 |
Loading...