


DLP Cinema® Projector
NC2500S
User’s Manual
NEC Viewtechnology, Ltd.
Important Information
WARNING
TO PREVENT FIRE OR SHOCK HAZARDS, DO NOT EXPOSE THIS UNIT TO RAIN OR MOISTURE. ALSO DO NOT USE THIS UNIT’S POLARIZED PLUG WITH AN
EXTENSION CORD RECEPTACLE OR OTHER OUTLETS,
UNLESS THE PRONGS CAN BE FULLY INSERTED. REFRAIN FROM OPENING THE CABINET AS THERE ARE HIGH-VOLTAGE COMPONENTS INSIDE. REFER SERVICING TO QUALIFIED SERVICE PERSONNEL.
CAUTION
RISK OF ELECTRIC SHOCK
DO NOT OPEN
CAUTION
TO REDUCE THE RISK OF ELECTRIC SHOCK, DO NOT OPEN COVER. NO USER-SERVICEABLE PARTS
INSIDE. REFER SERVICING TO QUALIFIED SERVICE
PERSONNEL.
This symbol warns the user that uninsulated voltage within the unit may have sufficient magnitude to cause electric shock. Therefore, it is dangerous to make any kind of contact with any part inside of this unit.
This symbol alerts the user that important literature concerning the operation and maintenance of this unit has been included.
Therefore, it should be read carefully in order to avoid any problems.
DOC compliance Notice
This Class A digital apparatus meets all requirements of the
Canadian Interference-Causing Equipment Regulations.
Precautions: Please read this manual carefully before using your
NC2500S and keep the manual handy for future reference.
WARNING
This is a Class A product. In a domestic environment this product may cause radio interference in which case the user may be required to take adequate measures.
CAUTION
•In order to reduce any interference with radio and television reception use a signal cable with ferrite core attached. Use of signal cables without a ferrite core attached may cause interference with radio and television reception.
•This equipment has been tested and found to comply with the limits for a Class A digital device, pursuant to Part 15 of the FCC Rules. These limits are designed to provide reasonable protection against harmful interference when the equipment is operated in a commercial environment.
This equipment generates, uses, and can radiate radio frequency energy and, if not installed and used in accordance with the installation manual, may cause harmful interference to radio communications.
Operation of this equipment in a residential area is likely to cause harmful interference in which case the user will be required to correct the interference at his own expense.
Important Safeguards
These safety instructions are to ensure the long life of your projector and to prevent fire and shock. Please read them carefully and heed all warnings.
Installation
1.Place the projector on a flat, level surface in a dry area away from dust and moisture. Tilting the front of the projector up or down from level could reduce lamp life.
Do not put the projector on its side when the lamp is on.
Doing so may cause damage to the projector.
2.Do not place the projector in direct sunlight, near heaters or heat radiating appliances.
3.Exposure to direct sunlight, smoke or steam could harm internal components.
4.Handle your projector carefully. Dropping or jarring your projector could damage internal components.
5.To carry the projector, a minimum of five persons are required.
Do not hold the lens part and the anamorphic lens part with your hand. Otherwise the projector may tumble or drop, causing personal injury.
6.Do not place heavy objects on top of the projector.
Power Supply
1. The projector is so designed that it operates with the power supply voltage described below.
• Projection Head : 0.95 kW 5A AC200-240V 50/
60Hz Single-phase
• Lamp Power Supply Unit :
8.0kW 28A AC200-230V 50/
60Hz Three-phase (Star connection),
8.0kW 16A AC380-415V 50/
60Hz Three-phase (Star connection)
Ensure that your power supply fits this requirement before attempting to use your projector.
2.Consult your dealer for installing the power cord to the projector. DO NOT install the power cord by yourself.
Doing so may cause a fire or electric shock.
3.Handle the power cord carefully and avoid excessive bending. Do not place any heavy objects on the power cord. A damaged cord can cause electric shock or fire.
4.If the projector will not be used for an extended period of time, shut down AC power.
5.Placing the power cord and the signal cable closely to each other can cause beat noise. If this happens, keep the two separated so that beat noise is not generated.
Beat noise is corruption of the picture often seen as a rolling band moving through the image.
6.Do not touch the projector during a thunder storm. Doing so can cause electrical shock or fire.
Cleaning
1.Shut down AC power to the projection head and the lamp power supply unit before cleaning.
2.Clean the cabinet periodically with a damp cloth. If heavily soiled, use a mild detergent. Never use strong detergents or solvents such as alcohol or thinner.
3.Use a blower or lens paper to clean the lens, and be careful not to scratch or mar the lens.
E-1

Important Information
Fire and Shock Precautions
1.Ensure that there is sufficient ventilation and that vents are unobstructed to prevent potentially dangerous concentrations of ozone and the build-up of heat inside your projector. Allow at least 8 inches (20cm) of space between your projector and a wall. Allow at least 20 inches (50 cm) of space between the ventilation outlet of the lamp power supply unit and an object.
Connect the projector exhaust outlet with the exhaust equipment having a capacity of 16m3/min or more.
2.Prevent foreign objects such as paper clips and bits of paper from falling into your projector. Do not attempt to retrieve any objects that might fall into your projector. Do not insert any metal objects such as a wire or screwdriver into your projector. If something should fall into your projector, disconnect it immediately and have the object removed by a qualified service person.
3.Do not place any liquids on top of your projector. Refer servicing to qualified service personnel if liquid has been spilled.
4.Keep any items such as magnifying glass out of the light path of the projector. The light being projected from the lens is extensive, therefore any kind of abnormal objects that can redirect light coming out of the lens, can cause unpredictable outcome such as fire or injury to the eyes.
5.Do not cover the lens with the supplied lens cap or equivalent while the projector is on. Doing so can lead to melting of the cap and possibly burning your hands due to the heat emitted from the light output.
6.When using a LAN cable:
For safety, do not connect to the connector for peripheral device wiring that might have excessive Voltage.
CAUTION: High Pressure Lamp May Explode if Improperly
Handled. Refer Servicing to Qualified Service Personnel.
Lamp Caution: Please read before operation
Due to the lamp being sealed in a pressurized environment, there is a small risk of explosion, if not operated correctly.
There is minimal risk involved, if the unit is in proper working order, but if damaged or operated beyond the recommended hours, the risk of explosion increases. Please note that there is a warning system built in, that displays following message when you reach a preset operating time “Bulb Over Time”.
When you see this message please contact your dealer for a replacement. If the lamp does explode, smoke will be discharged from the vents located on the back of the unit. Do not stand in front of the vents during the operation. This smoke is comprised of glass in particulate form and Xenon gas, and will not cause harm if kept out of your eyes. If your eyes have been exposed to this gas, please flush your eyes out with water immediately and seek immediate medical attention. Do not rub your eyes! This could cause serious injury.
WARNING:
1.Do not look into the lens while the projector is on. Serious damage to your eyes could result.
2.When main body is damaged, cooling fluids may come out of internal part. DO NOT touch and drink the cooling fluid. When the cooling fluids are swallowed or contacted with your eyes, please consult with doctors immediately.
CAUTION
Never unplug the projection head power plug from the outlet or disconnect the breaker connected to the AC power cord of the lamp power supply unit under the following conditions.
Doing so can damage the projector.
•While projecting images
•While cooling after the projector has been turned off. (The POWER indicator blinks in orange while the fan is rotating, and the LCD screen is displaying “cooling...”. The cooling fan continues to work for 5 minutes.)
Remote Control Precautions
•Handle the remote control carefully.
•If the remote control gets wet, wipe it dry immediately.
•Avoid excessive heat and humidity.
•Do not heat, take apart, or throw batteries into fire.
•If you will not be using the remote control for a long time, remove the batteries.
•Ensure that you have the batteries’ polarity (+/-) aligned correctly.
•Do not use new and old batteries together, or use different types of batteries together.
•Dispose of used batteries according to your local regulations.
Disposing of your used product
EU-wide legislation as implemented in each
Member State requires that used electrical and electronic products carrying the mark (left) must be disposed of separately from normal household waste.
This includes projectors and their electrical accessories or lamps. When you dispose of such products, please follow the guidance of your local authority and/or ask the shop where you purchased the product.
After collecting the used products, they are reused and recycled in a proper way. This effort will help us reduce the wastes as well as the negative impact to the human health and the environment at the minimum level.
The mark on the electrical and electronic products only applies to the current European Union Member States.
For questions relating to unclear points or repairs
Contact your dealer or the following support branches for questions relating to unclear points, malfunctions and repairs of the product.
In Europe
NEC Europe, Ltd. / European Technical Centre
Address: Unit G, Stafford Park 12, Telford TF3 3BJ, U.K.
Telephone: +44 1952 237000
Fax Line: +44 1952 237006
In North America
NEC Corporation of America
Digital Cinema Division
Address: 4111 West Alameda Avenue Suite 412 Burbank,
CA 91505
Telephone: 818 557 2500
*If the above line is busy, please dial as below; Telephone: 866 632 6431
E-2
Important Information
Précaution: lire attentivement ce manuel avant d’utiliser le NC2500S et le conserver à portée de main pour future référence.
AVERTISSEMENT
POUR EVITER UN INCENDIE OU UN RISQUE D’ELECTROCUTION NE PAS EXPOSER CET ENSEMBLE A LA PLUIE OU A L’HUMIDITE; DE MEME, NE PAS BRANCHER LA PRISE POLAIRE AVEC UNE RALLONGE A MOINS QUE LES BROCHES DE LA PREMIERE NE S’Y INSERENT PLEINEMENT.
EVITER D’OUVRIR LE COFFRET CAR IL Y A, A L’INTERIEUR DES COMPOSANTS SOUMIS A UNE HAUTE-TENSION; POUR LES REPARATIONS, S’ADRESSERAUN PERSONNEL QUALIFIE.
ATTENTION
RISQUE D’ELECTROCUTION
NE PAS OUVRIR
ATTENTION
POUR EVITER LES RISQUES D’ELECTROCUTION, NE
PAS OUVRIR LE COUVERCLE. AUCUN DES
ELEMENTS INTERNES NE DOIT ETRE REPARE PAR L’UTILISATEUR. NE CONFIER L’ENTRETIEN QU’A UN
PERSONNEL QUALIFIE.
L’éclair fléché dans un triangle équilatéral est destiné à avertir l’utilisateur de la présence, dans l’appareil, d’une zone non-isolée soumise à une haute-tension dont l’intensité èst suffisante pour constituer un risque d’électrocution.
Le point d’exclamation dans un triangle
équilatéral est destiné à attirer l’attention de l’utilisateur sur la présence d’informations de fonctionnement et d’entretien importantes dans la brochure accompagnant l’appareil.
DOC avis de conformité
Cet appareil numérique de la classe A respecte toutes les exigences du Réglement sur le Matériel D’interférence du
Canada.
Recommandations importantes
Ces instructions de sécurité ont pour but d’assurer une longue vie à votre projecteur et d’éviter un incendie ou une décharge
électrique. Prière de les lire attentivement et de tenir compte de tous les avertissements.
Installation
1.Placer le projecteur sur une surface plane et de niveau, et dans un endroit sec et à l’abri des poussières et de l’humidité.
2.Ne pas exposer le projecteur aux rayons directs du soleil, ni le placer près d’un chauffage ou de dispositifs de radiation de chaleur.
3.L’exposition aux rayons directs du soleil, à la fumée ou à la vapeur pourrait endommager des composants internes.
4.Manipuler le projecteur avec précaution. La chute du le projecteur ou lui donner des chocs pourrait endommager des composants internes.
5.Le transport du projecteur doit être effectué par cinq personnes au minimum.
Ne pas saisir le projecteur par son objectif ni par les des anamorphoseurs. Le cas échéant, le projecteur risque de se renverser ou de tomber et d’être à l’origine d’un accident corporel.
6.Ne pas poser d’objets lourds sur le dessus du projecteur.
Alimentation
1.Le projecteur est conçu pour fonctionner sous la tension d’alimentation ci-dessous.
• Tête de projection : 0.95 kW 5A CA 200-240V 50/60
Hz Monophasé
• Unité d’alimentation de la lampe :
8.0kW 28A CA200-230V 50/60Hz
Triphasé (Branchement étoile),
8.0kW 16A CA380-415V 50/60Hz
Triphasé (Branchement étoile) S’assurer que la tension du secteur soit conforme à ces caractéristiques avant d’utiliser le projecteur.
2.Pour l’installation du cordon d’alimentation électrique sur le projecteur, voir le concessionnaire. NE PAS intaller le cordon d’alimentation électrique soi-même. Il y a risque d’incendie ou d’électrocution.
3.Manipuler le cordon d’alimentation avec précaution et
éviter des flexions excessives. Ne placez pas d’objets lourds sur le cordon d’alimentation. Un cordon endommagé peut occasionner une décharge électrique ou un incendie.
4.Si le projecteur n’est pas utilisé pendant une longue période, coupez l’alimentation CA.
5.Placer le cordon d’alimentation et le câble de signal tout prés l’un de l’autre peut occasionner un bruit de battement. Si cela se produit, les maintenir séparés jusqu’à ce que le bruit de battement disparaisse.
6.Ne pas toucher le projecteur pendant un orage. Cela pourrait causer un choc électrique ou un incendie.
Nettoyage
1.Couper l’alimentation CA de la tête de projection et de l’unité d’alimentation de la lampe avant de nettoyer.
2.Nettoyer régulièrement le boîtier extérieur avec un chiffon humide. S’il est trés sale, utiliser un détergent doux. Ne jamais utiliser de détergent forts ou de solvants tels que de l’alcool ou du diluant.
3.Utiliser un souffleur ou du papier pour objectif pour nettoyer l’objectif, et veiller à ne pas rayer ou endommager l’objectif.
Précautions contre l’incendie ou la décharge
1.S’assurer qu’il y ait une ventilation suffisante et que les ouvertures ne soient pas obstruées afin d’éviter des concentrations potentiellement dangereuses d’ozone et l’accumulation de chaleur à l’intérieur du projecteur. Laisser au moins 20 cm d’espace entre le projecteur et un mur. Laisser au moins 50 cm (20 pouces) d’espace entre l’orifice de ventilation de l’unité d’alimentation de la lampe et tout objet. Connecter la sortie d’air du projecteur
à l’équipement d’échappement ayant une capacité de
16m3/min ou plus.
F-1

Important Information
2.Empêcher tous cocps étrangers tels que des attaches trombones ou des morceaux de papier de tomber à l’intérieur du projecteur. Ne pas essayer de récuperer des objets qui seraient tombés dans le projecteur. Ne pas introduire d’objets métalliques tels que fil ou un tournevis dans le projecteur. En cas de chute d’objet dans le projecteur, le débrancher immédiatement et faire enlever l’objet par un technicien agréé.
3.Ne pas poser de liquides sur le dessus du projecteur. Confier la réparation à du personnel technique qualifié si du liquide a été renversé.
4.Maintenez tout ce qui s’apparente à une loupe en dehors du faisceau lumineux du projecteur. La lumière projetée par l’objectif est très puissante, de sorte que tout objet en opposition pourrait dévier le faisceau provenant de l’objectif, ce qui pourrait avoir des conséquences imprévues telles qu’un incendie ou une lésion occulaire.
5.Ne bouchez pas l’objectif avec son couvercle fourni lorsque le projecteur est allumé. Faire cela pourrait faire fondre le couvercle et peut-être brûler vos mains à cause de la châleur émise par le faisceau lumineux.
ATTENTION: La lampe à haute pression peut exploser si elle est manipulée incorrectement. Confier l’entretien à du personnel d’entretien qualifié.
Précautions avec la lampe : lire avant l’utilisation
La lampe a été scellée dans un environnement sous pression, et il y a donc un petit risque d’explosion, si elle n’est pas utilisée correctement. Le risque est minime si l’appareil est en bon ordre de marche, mais s’il est endommagé ou utilisé au-delà du nombre d’heures recommandées, le risque d’explosion augmente alors. Il est à noter l’existence d’un systéme d’avertissement intégré, lequel affiche le message “Bulb Over
Time” lorsqu’un temps de fonctionnement préréglé est atteint. Si la lampe explose, de la fumée peut étre produite par les fentes d’aération situées sur l’arrière de l’appareil. Ne vous tenez pas devant les évents pendant l’opération. Cette fumée est composée de verre sous forme de particules et de gaz de Xenon, et n’est pas nuisible si elle est maintenue à distance des yeux. Si les yeux sont exposés a ce gaz, les rincer immédiatement à l’eau courante et con sulter tout de suite un médecin. Ne pas se frotter les yeux ! Cela pourrait provoquer une grave blessure.
AVERTISSEMENT:
1.Ne pas regarder dans l’objectif lorsque le projecteur est allumé. De sérieux dommages aux yeux pourraient en résulter.
2.Lorsque le corps principal est endommagé, du liquide de refroidissement peut s’échapper des parties internes. NE
PAS toucher ou avaler le liquide de refroidissement.
Si le liquide de refroidissement est avalé ou qu’il rentre en contact avec vos yeux, veuillez consulter un médecin immédiatement.
ATTENTION
Ne jamais débrancher la prise d’alimentation à tête de projection ni débrancher le disjoncteur connecté au cordon d’alimentation de l’unité d’alimentation dans les conditions suivantes. Cela pourrait endommager le projecteur.
• Lors de la projection d’images
•Pendant le refroidissement après que le projecteur ait été éteinte. (Le voyant POWER clignote en orange lorsque le ventilateur fonctionne, et l’écran ACL affiche « cooling... ». le ventilateur du refroidissement continuent à tourner pendant 5 minutes.)
Précautions se rapportant á la télécommande
•Manipuler la télécommande avec précaution.
•Si la télécommande est mouillée, I’essuyer immédiatement.
•Evitar toute chaleur chaleur excessive et l’humidité.
•Ne pas chauffer, démonter ou jeter les piles au feu.
•Si la télécommande n’est pas utilisée pendant une longue période, retirer les piles.
•S’assurer de respecter la polarité (+/–) des piles.
•Ne pas utiliser des piles neuves et des piles usagées en méme temps et ne pas utiliser des piles de différents types ensemble.
•Mettre les piles usagées au redut d’parés la réglementation locales.
Mise au rebut du produit usagé
La législation européenne, appliquée dans tous les Etats membres, exige que les produits
électriques et électroniques portant la marque
(à gauche) doivent être mis au rebut séparément des autres ordures ménagères. Ceci inclus les projecteurs et leurs accessoires électriques ou lampes. Lorsque vous mettez au rebut ces produits, veuillez suivre les recommandations des autorités locales et/ou demandez conseil au magasin qui vous a vendu le produit.
Une fois ces produits mis au rebut, ils sont recyclés et de manière appropriée. Cet effort nous aidera à réduire les déchets et à maintenir au niveau minimum leurs conséquences négatives sur la santé humaine et sur l’environnement.
La marque figurant sur les produits électriques et électroniques ne s’applique qu’aux Etats membres actuels de l’Union Européenne.
Si vous avez des questions concernant des points peu clairs ou des réparations
Contacter votre distributeur ou les branches d’assistance suivantes si vous avez des questions concernant des points
à éclaircir, des défauts et des réparations du produit.
En Europe
NEC Europe, Ltd. / European Technical Centre
Adresse : Unit G, Stafford Park 12, Telford TF3 3BJ, U.K.
Téléphone : +44 1952 237000
Fax : +44 1952 237006
En Amérique du Nord
NEC Corporation of America
Division Cinéma Numérique
Adresse : 4111 West Alameda Avenue Suite 412 Burbank,
CA 91505
Téléphone : 818 557 2500
*Si la ligne ci-dessus est occupée, essayer le numéro suivant ;
Téléphone : 866 632 6431
F-2
Important Information
Maschinenlärminformations-Verordnung – 3. GPSGV,
Der höchste Schalldruckpegel beträgt 70 dB(A) oder weniger gemäß EN ISO 7779.
WARNUNG
ZUR VERMEIDUNG VON FEUER UND ELEKTRISCHEN SCHLÄGEN DARF DAS GERÄT WEDER REGEN NOCH
FEUCHTIGKEIT AUSGESETZT WERDEN. DER
POLARISIERTE STECKER DIESES GERÄTES DARF NUR DANN IN EIN VERLÄNGERUNGSKABEL ODER IN EINE
STECKDOSE EINGESTECKT WERDEN, WENN DIE
STECKKONTAKTE VOLLSTÄNDIG EINGESTECKT WERDEN KONNEN. UNTERLASSEN SIE, DAS GERÄT ZU
OFFNEN, DA DADURCH IM GERÄT FREILIEGENDE
HOCHSPANNUNGSFÜHRENDE TEILE BERÜHRT WERDEN KÖNNEN. LASSEN SIE DEN KUNDENDIENST NUR VON HIERFÜR QUALIFIZIERTEN PERSONEN DURCHFÜHREN.
ACHTUNG
GEFAHR DURCH ELEKTRISCHEN
SCHLAG
NICHT ÖFFNEN
ACHTUNG
ZUR VERMEIDUNG EINES ELEKTRISCHEN SCHLAGES
ÖFFNEN SIE NICHT DAS GEHÄUSE. INNERHALB DES
GEHÄUSES BEFINDEN SICH KEINE FÜR DIE
BEDIENUNG DES GERÄTES ERFORDERLICHEN TEILE. LASSEN SIE DEN KUNDENDIENST NUR VON HIERFÜR QUALIFIZIERTEN PERSONEN DURCHFÜHREN.
DIESES SYMBOL WARNT DEN BEDIENER,
DASS INNERHALB DES GERÄTES
UNISOLIERTE TEILE VORHANDEN SIND, DIE HOCHSPANNUNG FÜHREN UND DEREN BERÜHRUNG EINEN ELEKTRISCHEN
SCHLAG VERURSACHEN KANN.
DIESES SYMBOL MACHT DEN BËDIENER DARAUF AUFMERKSAM, DASS WICHTIGE, DEN BETRIEB UND
DIE WARTUNG DES GERÄTES BETREFFENDE SCHRIFTEN BEIGEFÜGT
SIND. UM IRGENDWELCHE PROBLEME
ZU VERMEIDEN, SOLLTEN DIESE BESCHREIBUNGEN SORGFÄLTIG GELESEN WERDEN.
Vorsichtsmaßnahmen: Lesen Sie sich dieses Handbuch bitte sorgfaltig durch, bevor Sie den NC2500S benutzen, und bewahren Sie das Bedienungshandbuch in greifbarer Nahe als spatere Referenz auf.
Wichtige Sicherheitshinweise
Diese Sicherheitshinweise sollen eine lange Lebensdauer Ihres Projektors sicherstellen und vor Feuer und elektrischen
Schlägen schützen. Lesen Sie diese Hinweise sorgfältig durch und beachten Sie alle Warnungen.
Installation
1.Stellen Sie den Projektor auf eine flache, waagerechte Fläche in einer trockenen Umgebung; frei von Staub und Feuchtigkeit.
2.Stellen Sie den Projektor weder in direktes Sonnenlicht noch in die Nähe einer Heizung oder sonstiger Hitze abstrahlender Einrichtungen.
3.Wenn das Gerät direktem Sonnenlicht, Rauch oder Dampf ausgesetzt wird, können interne Komponenten beschadigt werden.
4.Behandeln Sie Ihren Projektor vorsichtig. Fallenlassen oder starkes Schutteln kann interne Komponenten beschädigen.
5.Zum Tragen des Projektors werden mindestens fünf Personen benötigt.
Den Projektor nicht am Linsenbereich ode den anamorphotischen Linsenwelle tragen.
Anderenfalls kann der Projektor umkippen oder herunterfallen und Verletzungen verursachen.
6.Legen Sie keine schweren Gegenstände auf den Projektor.
Spannungsversorgung
1.Der Projektor wurde so konzipiert, dass er mit der unten aufgeführten Netzspannung läuft.
•Projektionskopf: 0.95kW 5A 200-240V Wechselstrom
50/60Hz einphasig
•Stromversorgungsgerät der Lampe:
8.0kW 28A 200-230V Wechselstrom 50/60Hz dreiphasig (Star-Anschluss),
8.0kW 16A 380-415V Wechselstrom
50/60Hz dreiphasig (Star-Anschluss)
Stellen Sie sicher, dass die vorhandene Spannungsversorgung diesen Vorgaben entspricht, bevor Sie versuchen, Ihren Projektor zu betreiben.
2.Zum Installieren des Netzkabels am Projektor wenden
Sie sich bitte an Ihren Fachhändler. UNTER KEINEN UMSTÄNDEN versuchen, das Netzkabel selbst zu installieren. Brandund Schlaggefahr.
3.Behandeln Sie das Netzkabel vorsichtig und vermeiden Sie Knicke. Legen Sie keine schweren Gegenständde das Netzkabel. Ein beschädigtes Netzkabel kann elektrische Schläge oder einen Brand verursachen.
4.Wenn der Projektor über eine längere Zeit nicht genutzt wird, schalten Sie die Stromversorgung ab.
5.Wenn Sie das Netzkabel und das Signalkabel in unmittelbarer Nähe zueinander platzieren, kann Überlagerungsrauschen auftreten. Vergrößern Sie in einem derartigen Fall denAbstand zwischen diesen beiden Kabeln.
6.Berühren Sie den Projektor auf keinen Fall während eines Gewitters. Wenn Sie dies nicht beachten, kann dies zu einem elektrischen Schlag oder einem Feuer führen.
Reinigung
1.Schalten Sie die Stromversorgung zum Projektionskopf und zum Stromversorgungsgerät der Lampe vor der Reinigung ab.
2.Reinigen Sie das Gehäuse regelmäßig mit einem feuchten Tuch. Bei starker Verschmutzung verwenden
Sie ein mildes Reinigungsmittel. Reinigen Sie das Gerät niemals mit starken Reinigungsoder Lösungs-mitteln wiez.B. Alkohol oder Verdünner.
3.Reinigen Sie die Linse mit einer Blaseinrichtung oder einem Linsentuch. Beachten Sie dabei, dass die
Linsenoberfläche weder zerkratzt noch auf andere Weise beschädigt wird.
G-1

Important Information
Vorsichtsmasnahmen zur Vermeidung von Bränden und elektrischen Schlägen
1.Sorgen Sie für ausreichende Belüuftung und stellen Sie außerdem sicher, dass die Lüftungsschlitze frei bleiben, damit sich innerhalb des Projektors kein Hitzestau bilden kann. Lassen Sie mindestens 20 cm Abstand zwischen Ihrem Projektor und der Wand. Lassen Sie mindestens 50 cm Abstand zwischen der Belüftung des Stromversorgungsgeräts der Lampe und anderen Gegenständen.
Schließen Sie den Entlüftungsanschluss des Projektors an die Entlüftungsanlage an, die eine Kapazität von 16m3/ min oder mehr hat.
2.Vermeiden Sie, dass Fremdgegenstande wie Büroklammern und Papierschnipsel in den Projektor fallen. Versuchen Sie nicht, in den Projektor gefallene Gegenstände selbst zu entfernen. Stecken Sie keine Metallgegenstände wie einen
Draht oder Schraubendreher in Ihren Projektor. Wenn etwas in den Projektor gefallen ist, müssen Sie sofort den Netzstecker ziehen und den Gegenstand von qualifiziertem Servicepersonal entfernen lassen.
3.Stellen Sie keine mit Flüssigkeit gefüllten Gefäße auf Ihren
Projektor. Überlassen Sie die Reparatur ausschließlich qualifiziertem Servicepersonal, wenn Flüssigkeit verschüttet worden ist.
4.Lichtkegel des Projektors fern. Da das von der Linse projizierte Licht umfassend ist, können alle abnormalen
Gegenstände, die in der Lage sind, das aus der Linse austretende Licht umzulenken, unvorhersehbare Ereignisse wie z.B. einen Brand oder Augenverletzungen verursachen.
5.Bedecken Sie die Linse nicht mit der mitgelieferten Linsenkape o.ä. wärend der Projektor eingeschaltet ist. Dies kann ein
Schmelzen der Kappe verursachen. Darüber hinaus würden
Sie sich aufgrund der vom Lichtausgang abgestrahlten Hitze wahrscheinlich die Hände verbrennen.
VORSICHT: Bei unsachgemäßer Handhabung kann die Hochdrucklampe explodieren. Überlassen
Sie die Reparatur ausschließlich qualifiziertem Servicepersonal.
Vorsichtsmaßnahmen bezüglich der Lampe: Bitte vor dem Betrieb durchlesen
Aufgrund der unter Druck luftdicht verschlossenen Lampe besteht bei falscher Handhabung eine geringe
Explosionsgefahr. Wenn sich das Gerät in einwandfreiem Zustand befindet, ist dieses Risiko minimal; die Explosionsgefahr erhöht sich jedoch im Falle einer Beschädigung oder bei einer Benutzung über die empfohlenen Betriebsstunden hinaus. Beachten Sie bitte, dass im Gerät ein Warnsystem integriert ist, das bei Erreichen der voreingestellten Betriebsdauer die nachfolgende Meldung anzeigt: “Bulb Over Time”.
Im Falle einer Lampenexplosion tritt aus den Lüftungsschlitzen der Rückseite des Gerätes Rauch aus. Stehen Sie nicht vor den Entlüftungsöffnungen während des Betriebes. Dieser Rauch besteht aus einer ganz besonderen Form von Glas und aus Xenon-Gas. Solange dieser Rauch nicht in die Augen gelangt, bestehen keinerlei gesundheitliche Risiken.
Wenn Ihre Augen dem Gas ausgesetzt worden sind, spülen
Sie die Augen bitte sofort mit Wasser aus und konsultieren
Sie einen Arzt. Reiben Sie die Augen nicht!
Dies könnte ernsthafte Verletzungen zur Folge haben.
WARNUNG:
1.Schauen Sie nicht in die Linse, wenn der Projektor eingeschaltet ist. Dies könnte schwereAugenverletzungen zur Folge haben.
2.Wenn das Hauptteil beschädigt ist, kann
Kühlungsflüssigkeit aus dem Inneren austreten. Berühren Sie die Flüssigkeit NICHT, und trinken Sie sie NICHT. Wenn die Kühlungsflüssigkeit geschluckt wurde oder in Augenkontakt kam, rufen Sie bitte sofort einen Arzt.
VORSICHT
Ziehen Sie den Projektor-Hauptnetzstecker nicht vom Ausgang ab, und trennen Sie den Unterbrecher, der am
Netzkabel der Lampenstromversorgungseinheit angeschlossen ist, unter den folgenden Bedingungen nicht ab. Anderenfalls kann der Projektor beschädigt werden.
•Während der Projizierung von Bildern
•Während des Abkühlens, nach dem Projektor ausgeschaltet worden ist. (Die POWER-Anzeige blinkt orange, während das Gebläse in Betrieb ist, und auf der LCD-Anzeige wird “cooling...” angezeigt. Das abkühlende fan fährt fort, für 5
Minuten zu arbeiten.)
Vorsichtsmaßnahmen zur Fernbedienung
•Behandeln Sie die Fernbedienung mit Sorgfalt.
•Wischen Sie die Fernbedienung sofort trocken, wenn sie einmal nass geworden sein sollte.
•Vermeiden Sie übermäßige Hitze und Feuchtigkeit.
•Erhitzen Sie die Batterien nicht, nehmen Sie sie nicht auseinander und werfen Sie sie nicht ins Feuer.
•Nehmen Sie die Batterien heraus, wenn Sie beabsichtigen, die Fernbedienung über einen Iängeren Zeitraum hinweg nicht zu benutzen.
•Stellen Sie sicher, dass die Batteriepole (+/-) richtig ausgerichtet sind.
•Verwenden Sie niemals verschiedene Batterietypen oder neue und alte Batterien zusammen.
•Entsorgen Sie leere Batterien entsprechen den an lhrem Wohnortgeltenden Bestimmungen
Entsorgung Ihres benutzten Gerätes
Die EU-weite Gesetzgebung, wie sie in jedem einzelnen Mitgliedstaat gilt, bestimmt, dass benutzte elektrische und elektronische Geräte mit dieser Markierung (links) getrennt vom normalen Haushaltsabfall entsorgt werden müssen.
Dies schließt Projektoren und deren elektrisches Zubehör oder ihre Lampen mit ein. Folgen Sie beim Entsorgen eines solchen Gerätes bitte den Anweisungen Ihrer örtliche Behörde und/oder konsultieren Sie den Händler, bei dem Sie das
Gerät erworben haben.
Nach der Sammlung benutzter Geräte werden diese erneut verwendet und entsprechend den Umweltbestimmungen recycelt. Das trägt dazu bei, die Abfallmenge zu reduzieren sowie die negativen Auswirkungen auf die menschliche
Gesundheit und die Umwelt möglichst gering zu halten.
Die Markierung auf elektrischen und elektronischen
Geräten gilt nur für die gegenwärtigen Mitgliedsstaaten der Europäischen Union.
G-2

Important Information
Bei Fragen, die sich aus unklaren Punkten oder Reparaturarbeiten ergeben
Bei Fragen, die sich aus unklaren Punkten, Fehlfunktionen oder Reparaturarbeiten am Produkt ergeben, wenden Sie sich an Ihren Händler oder an eine der folgenden Niederlassungen.
In Europa
NEC Europe, Ltd. / European Technical Centre Addresse: Unit G, Stafford Park 12, Telford TF3 3BJ, U.K. Telefon: +44 1952 237000
Fax-Nummer: +44 1952 237006
In Nordamerika
NEC Corporation of America Digital-Cinema-Abteilung
Adresse: 4111 West Alameda Avenue Suite 412 Burbank, CA 91505
Telefon: 818 557 2500
*Falls die oben aufgeführte Leitung besetzt sein sollte, wählen
Sie bitte die folgende Nummer; Telefon: 866 632 6431
G-3

Table of Contents |
|
Table of Contents ............................................................................ |
1 |
1.What’s in the Box? and the Names of the Projector Parts............. |
2 |
1-1. Features .................................................................................................................................................................... |
2 |
1-2. What’s in the Box? ................................................................................................................................................... |
4 |
1-3. Names of the Projector Parts .................................................................................................................................. |
6 |
1-4. Names on the Remote Control .............................................................................................................................. |
12 |
2.Installation and Connection ....................................................... |
15 |
2-1. Steps for setting up and connecting .................................................................................................................... |
15 |
2-2. Connecting the image input terminals ................................................................................................................. |
16 |
2-3. Connecting the various control terminal ............................................................................................................. |
17 |
3.Projection of Images (Basic Operation) ...................................... |
18 |
3-1. Steps of projecting images ................................................................................................................................... |
18 |
3-2. Turning your projector on ..................................................................................................................................... |
19 |
3-3. Selecting the title of input signal .......................................................................................................................... |
21 |
3-4. Adjusting the position and the size of projected screen .................................................................................... |
22 |
3-5. Turning your projector off ..................................................................................................................................... |
24 |
4.Using Menus .............................................................................. |
25 |
4-1. Basic operation with adjustment menus ............................................................................................................. |
25 |
4-2. Table of adjustment menus ................................................................................................................................... |
29 |
4-3. Title Select .............................................................................................................................................................. |
30 |
4-4. Configuration .......................................................................................................................................................... |
31 |
4-5. Title Setup ............................................................................................................................................................... |
31 |
4-6. Information .............................................................................................................................................................. |
32 |
5.Maintenance of Your Projector ................................................... |
36 |
5-1. Cleaning the Cabinet .............................................................................................................................................. |
36 |
5-2. Cleaning the Lens .................................................................................................................................................. |
36 |
6.Appendix .................................................................................... |
37 |
6-1. Troubleshooting ..................................................................................................................................................... |
37 |
6-2. Indicator display list ............................................................................................................................................... |
38 |
6-3. Error code list ......................................................................................................................................................... |
40 |
6-4. Operation using an HTTP browser ....................................................................................................................... |
42 |
6-5. Outline Drawing ...................................................................................................................................................... |
44 |
6-6. Specifications ......................................................................................................................................................... |
46 |
6-7. Pin Assignment and Functions of Terminal ......................................................................................................... |
49 |
6-8. Related products list .............................................................................................................................................. |
54 |
1

1.
What’s in the Box? and the Names of the Projector Parts
1-1. Features
• DLP Cinema® dedicated projector that supports large screen needs
NEC has applied its mounting technology and leading imaging technology to newly develop lamp and optical systems as well
as a cooling system to support large screen needs.
• Equipped with easy to use functions
(1)Lens memory function that can be operated with one touch, and lamp power memory function
The DLP Cinema® projector is provided with a lens memory function for storing lens zoom positions and shift positions to set screens sizes for each input signal. It is also provided with a lamp power memory function for storing the brightness of the images on the screen for each input signal.
Even if you are projecting multiple images that have different settings for image sizes and brightness, you can project them with the conditions pre-registered for each signal, simply by selecting the corresponding signal.
(2)Equipped with a lamp output control function
You can set to any brightness setting, from low brightness to high brightness. This function makes it possible to minimize the fluctuation (*) in brightness as brightness of the lamp decreases as a result of long-term lamp usage.
*The time for maintaining fluctuations in brightness depends on the setting value for brightness.
(3)Easy lamp replacement
The lamp can be replaced from the backside of the projector, so the lamp can be easily replaced even in narrow locations when a film projector is setup on the side and there is not much space on the projector side.
(4)Registered signal selection buttons
The projector has been equipped with new 8 signal selection buttons that make it easy to select registered signals. To this projector, 100 titles at most can be registered (input signal registration). Among the registered titles, any 8 titles can be assigned to the buttons <1> to <8>.
(5)Touch panel (Optional)
An optional touch panel is available to enable easy operation of all projector functions.
(6)Supports various contents and types of usage by applying a separately-sold multimedia switch.
By connecting an optional multi-media switcher (MMS), you can input RGB/VIDEO analog signals, and digital signals in formats not supported by the projector.
2
1.What’s in the Box? and the Names of the Projector Parts
•DMD Face Dust Protection Structure
A dust contral shield is arranged between each DMD chip of R, G and B, and the spectroscopic/condenser prism to prevent dust and dirt in the air, and oily particles in smoke associated with event halls from coming into contact with the face of the DMD and causing operating problems.
• Efficient cooling of the heat from the DMD unit by the cooling structure
The DMD unit uses a highly efficient liquid cooling method. This efficiently eliminates heat applied to the DMD by the complete dust contral structure and high light output, thereby ensuring the reliability of the projector.
• Up-to-date functions of DLP Cinema® available
This projector supports CineLinkTM, CineCanvasTM, CinePalletteTM and CineBlackTM which are the new functions for security,
subtitles, etc., developed by Texas Instruments Incorporated.
(1)CineLinkTM: Security management
This function supports encryption of the local link between server and projector, adds a “watermark” to enable the tracing of pirated films (illegal copying), and provides other functions.
(2)CineCanvasTM: Image management
This function enables insertion of subtitles and captions, correction of distortion, changing of resolution, etc.
(3)CinePalletteTM: Color management
This function allows extension of color range, correction of color, etc.
(4)CineBlackTM: Contrast management
This function realizes a color tone scale from pitch black to pure white.
•DLP, DLP Cinema and their respective logos are trademarks or registered trademarks of Texas Instruments.
•CineLink, CineCanvas, CinePallette, and CineBlack are trademarks of Texas Instruments.
3

1. What’s in the Box? and the Names of the Projector Parts
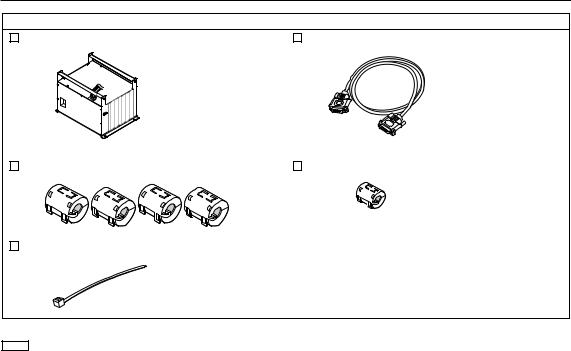
1-2. What’s in the Box?
Check the content of the accessories. The accessories are packed into two boxes. One is for the main unit, and the other contains the lamp power supply unit.
Contents of main unit box
NEC2500S projector |
Lens holder (NC-PH01) |
|||
|
|
|
|
|
|
|
|
|
|
Exhaust outlet protective sheet x 1
Remote control (RD-371E)
Exhaust outlet protective sheet fastening band x 4
UM-3 AA size battery (for the remote control) x 2
Small iris x 1
Remote cable (16 m) x 1
Lamp door key x 2
Ferrite clamp core for DVI-D signal cable x 2
Sheet of title labels (for 20 labels) x 2
Band x 2
User’s Manual (This document)
User’s Manual
4
1. What’s in the Box? and the Names of the Projector Parts
Contents of lamp power supply unit Box
Lamp Power Supply (With power cord) |
Dedicated interface cable x 1 |
Ferrite clamp cores for AC power code x 4 |
Ferrite clamp core for dedicated interface cable x 1 |
Band x 1
TIP In the event that you did not receive all of the accessories outlined above, or some are damaged, contact your dealer/distributor.
Differs slightly from the drawings in this manual, but there is no problem in actual use.
5
1. What’s in the Box? and the Names of the Projector Parts
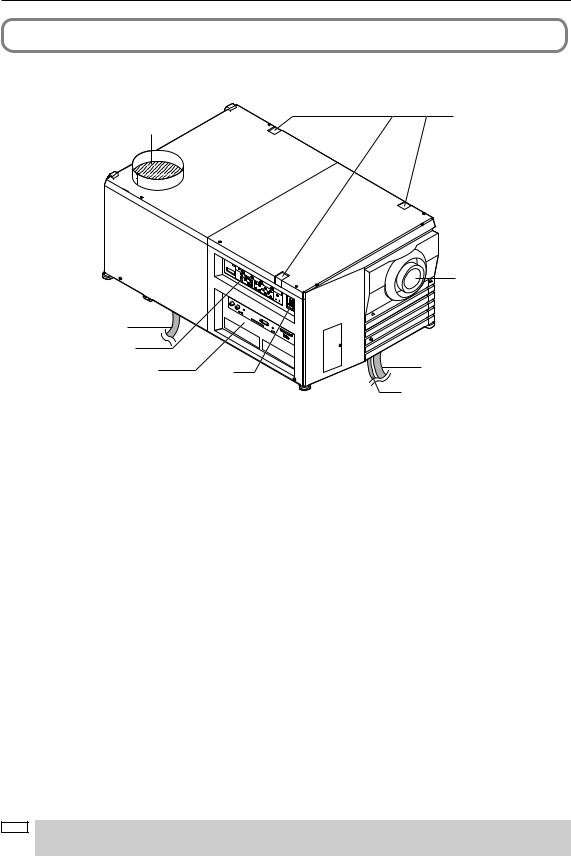
1-3. Names of the Projector Parts
1-3-1. Front of the projector
6
1
5


 10 7
10 7 


2
3 |
4 |
9 |
|
|
8 |
1. Air outlet
Connects to an exhaust device to exhaust heat from the lamp. Please contact your dealer/distributor to install the exhaust device.
2. Control panel
On the control panel, power to your projector is turned on or off, titles are selected, and various adjustments are made of projected screen. (See page 10)
3. Connection terminals
Various image signal cable are to be connected here. (See page 9)
You can expand signal input terminals by installing an optional multi-media switcher (MMS).
4. Main power switch
While AC power is being supplied, set the main power switch to ON, then your projector will enter a standby state.
5. Lens (optional)
Images are projected from the lens. Request your dealer/distributor to install or replace the lens.
6. Touch panel mounting opening (three position on top)
Use the holder arm for the touch panel to attach the touch panel (optional).
7. Lamp power cord
This is the power cord that connects with the lamp power supply unit. Request your dealer/distributor to connect/disconnect the power cord.
8. Dedicated interface cable
This is the interface cable that connects with the lamp power supply unit.
9. AC power cord (For projector)
This is the cord that supplies AC power to the projector head. The AC power cord is not an accessory. Consult with your dealer/distributor about the AC power cord.
10. Interlock connector (Inside front of projector)
This is the connector for the projector safety device. This is used to control the projector from an external source. Consult with your dealer/distributor about using this.
NOTE Do not touch the air outlet and backside of the main unit when your projector is operating. Otherwise, the high temperature may cause burns.
6
1. What’s in the Box? and the Names of the Projector Parts
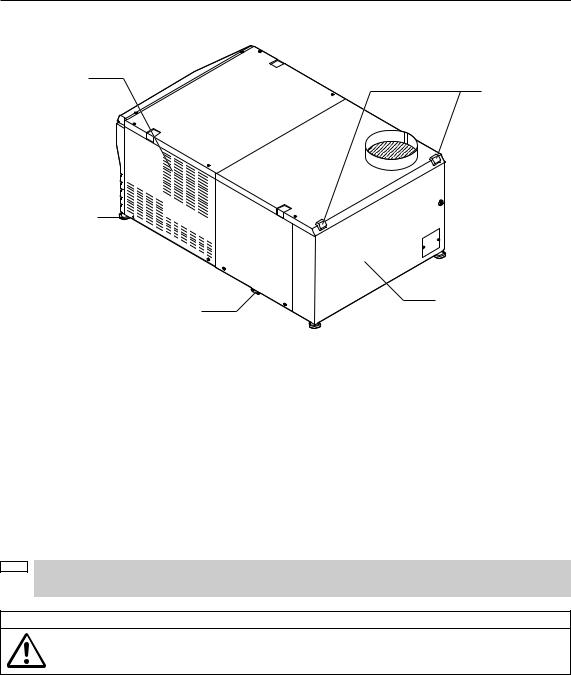
1-3-2. Rear of the projector
1
5
2
4
3
1. Air inlet
Air is taken in here to provide cooling of the projector. Do not cover the air inlet.
2. Level adjusters (in four positions on bottom)
In the ordinary installation, you can adjust the projector inclination at 4 positions.
3. Tilt feet (in two positions on bottom)
These adjust the tilting angle of the projector. Please contact your dealer/distributor to setup and adjust this projector.
4. Lamp door
This opens to allow the lamp to be replaced. Please contact your dealer/distributor to install and to replace the lamp bulb and lamp house.
5. Rear status indicator
These indicate the status of the projector. When the projector is operating normally, these light/blink in green or orange. When an error occurs, they light/blink in red. When an error occurs, check the contents of the display on the LCD screen. (See page 39)
NOTE • Do not cover the air inlet and outlet during operation. Inadequate air intake may lead to a rise in inside temperature, thus causing a free or serious projector failure.
Caution:
Only service personnel should open the lamp door.
7
1. What’s in the Box? and the Names of the Projector Parts
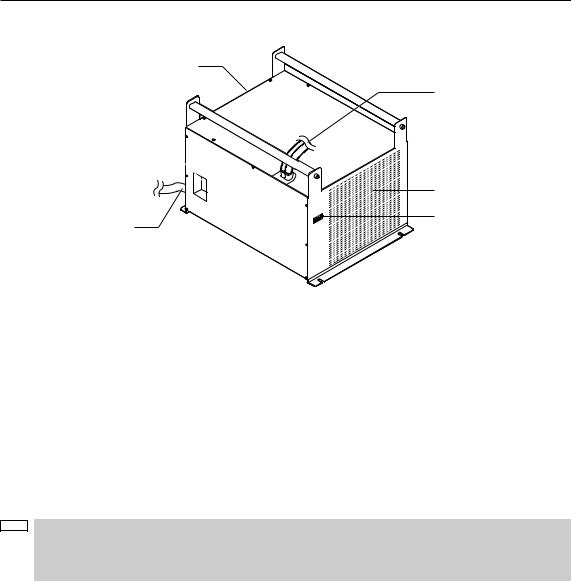
1-3-3. Lamp power supply unit (LPSU)
1(Rear)
4
2
6
5
3
1. Air outlet
This exhausts heat from the lamp power supply unit.
2. Main power switch
This is the main power switch for the lamp power supply unit.
3. AC power cord
The AC power cord is not an accessory. Request service personnel to connect the power cord.
4. Two lamp power cords
These connect to the lamp power supply input terminals of the projector. Request service personnel to connect the power cord.
5. Control terminal (Dedicated interface cable)
This connects to monitor the status of the lamp power supply unit from the projector head.
6. Air inlet
Outside air is taken in here to lower the temperature inside the projector. Do not cover this inlet.
NOTE • Do not touch the air outlet and backside of the main unit when your projector is operating. Otherwise, the high temperature may cause burns.
•Do not cover the air inlet and outlet during operation. Inadequate air intake may lead to a rise in inside temperature, thus causing a free or serious projector failure.
8

1. What’s in the Box? and the Names of the Projector Parts
1-3-4. Connection terminals
1 |
2 |
|
|
3 |
4 |
|
5 |
SDI-A |
SDI-B |
|
|
DVI-A |
DVI-B |
|
GPI/O |
|
|
|
|
|
|
|
LAN-A LAN-B |
|
|
|
CINEMA |
|
|
|
|
|
REMOTE |
|
SYSTEM |
|
|
|
|
|
|
RS-232C |
|
PCCARD |
USB |
|
|
|
IN |
|
|
|
|
|
|
|
6 |
7 |
8 |
|
9 |
10 |
11 |
1. HDSDI A input terminal (SDI-A) (BNC)
Connect a Video Server of Video source to this terminal. Use a 75Ω coaxial cable.
2. HDSDI B input terminal (SDI-B) (BNC)
Connect a Video Server or Video source to this terminal. Use a 75Ω coaxial cable.
3. DVI-D A input terminal (DVI-A) (DVI-D 24P)
Connect the DVI-D output terminal of a PC to this terminal. Use a commercially available DVI-D signal cable (Single Link).
4. DVI-D B input terminal (DVI-B) (DVI-D 24P)
Connect the DVI-D output terminal of a PC to this terminal. Use a commercially available DVI-D signal cable (Single Link).
5. External control terminal (GP I/O) (D-Sub 37P)
Use this terminal when controlling your projector from an external switcher. (See page 51)
6. Remote control input terminal (REMOTE IN) (Stereo mini)
Connect the remote control of the projector, using the supplied remote control cable.
Memo
•The projector’s remote control can be used by connecting with the remote control cable. (See page 14)
7.PC control signal switch (CINEMA/SYSTEM)
Use this to set data on the projector.
8. PC control terminal (RS-232C) (D-Sub 9P)
This is used when the service personnel sets the data for the projector or operates the projector from PC via RS-232C. Use a commercially available RS-232C straight cable to connect the projector to the PC.
9.PC card slot
•Set a wireless LAN card, and you can control the projector from a PC, using a wireless LAN. Please inquire your dealer/distributor about a wireless LAN card that can be used.
•Use this slot when doing maintenance on your projector.
10.USB port (USB) (type A)
Use this port when doing maintenance on your projector.
11. Ethernet port (LAN-A, LAN-B) (RJ-45)
Use this port when controlling your projector in LAN connection from a PC. Use a commercially available LAN cable (10Base-T/100Base-T) to connect the projector to the PC.
9
1. What’s in the Box? and the Names of the Projector Parts
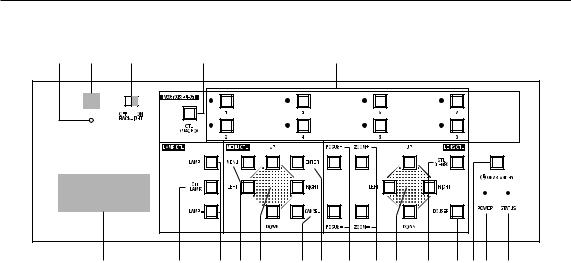
1-3-5. Control panel |
|
|
|
|
|
|
|
|
||
3 |
1 |
2 |
|
8 |
|
9 |
|
|
|
|
|
MMS |
|
|
|
|
|
|
|
|
|
|
STATUS |
|
|
|
|
|
|
|
|
|
|
|
4 |
10 |
11 12 13 |
14 15 |
16 |
17 18 |
19 |
20 5 6 |
7 |
1. Remote control light reception unit
This receives signals from the remote control.
2. BACKLIGHT switch
Operate this switch to turn on/off the back light of the LCD screen and operation panel.
3. MMS STATUS indicator
This indicates the link status of the optional multi-media switcher (MMS).
Off |
When not using multi-media switcher. |
|
|
Green lighting |
When linked to built-in multi-media switcher. |
|
|
Orange lighting |
When linked to external multi-media switcher. |
|
|
Green or Orange blinking |
Preparing link with multi-media switcher. |
|
|
Red blinking |
When a link error occurs. |
|
|
4. LCD screen
The liquid crystal display screen shows menus and setting values for the operation of your projector.
5. POWER button
Press this button to turn on or off (standby) he power to your projector. Press this for more than three seconds.
When turning on the power to the projector, first set the main power switch to the main unit and the LPSU to ON, thereby setting the projector in a standby state. (See page 19)
6. POWER indicator
|
|
Green lighting |
When power is on. |
|
|
|
|
|
|
Green blinking |
When the douser is closed. |
|
|
|
|
|
|
Orange lighting |
When the power is off (in standby state). |
|
|
|
|
|
|
Orange blinking |
When the cooling fan(s) is running immediately after power-off. |
|
|
|
|
7. |
STATUS indicator |
|
|
|
|
|
|
|
|
Off |
When the projector is operating normally. |
|
|
|
|
|
|
Red blinking |
When an error has occurred. |
|
|
|
An error code is displayed on the LCD screen. |
|
|
|
|
8. |
CTL (MACRO) button |
||
Press the CTL (MACRO) button together with MACRO SELECT 1 to 8 buttons.
MACRO SELECT<1> to <8> button does not work individually.
10

1. What’s in the Box? and the Names of the Projector Parts
9. 1 to 8 buttons
Press the 1 to 8 buttons while depressing the CTL (MACRO) button to select titles (input signals) assigned to each button. To this projector, 100 titles at most can be registered (input signal registration). Among the registered titles, any 8 titles can be assigned to the buttons <1> to <8>.
The indicator to the left of the buttons show the assigned/selected status of titles.
Green lighting |
When any title is assigned to the button. |
|
|
Orange lighting |
When title is selected. |
|
|
Off |
When any title is not assigned to the button. |
|
|
10. CTL (LAMP) button
Press the CTL (LAMP) button together with the LAMP +/- buttons. <LAMP +/-> button does not work individually.
11. LAMP +/- buttons
Press the LAMP +/- buttons while depressing the CTL (LAMP) button to adjust the output (brightness) of the lamp. (See page 23)
12. MENU button
Press this button, and menus for various settings and adjustments will be displayed. (See page 26)
13. [MENU CTL] UP/DOWN/LEFT/RIGHT buttons
Press the [MENU CTL] UP/DOWN/LEFT/RIGHT buttons when the menu is displayed to select menu items.
14. CANCEL button
Press the CANCEL button to return to previous menu item.
15. ENTER button
Press the ENTER button, and the displayed menu item is actioned.
16. FOCUS +/- buttons
Press the FOCUS +/- buttons while depressing the CTL (LENS) button to adjust the focus of the projected image. (See page 23)
17. ZOOM +/- buttons
Press these buttons while depressing the CTL (LENS) button, for fine adjustment of the size of projected image. (See page 23)
18. [LENS CTL] UP/DOWN/LEFT/RIGHT buttons
Press the [LENS CTL] UP/DOWN/LEFT/RIGHT buttons while depressing the CTL (LENS) button to move (lens shift) the position of the projected image up, down, left and right. (See page 22)
19. CTL (LENS) button
Press the CTL (LENS) button together with the FOCUS +/- button, the ZOOM +/- button, the [LENS CTL] UP/DOWN/LEFT/ RIGHT button and the DOUSER button.
The FOCUS +/-, ZOOM +/- [LENS CTL] UP/DOWN/LEFT/RIGHT and DOUSER buttons do not function when pressed alone.
20. DOUSER button
Press the DOUSER button while depressing the CTL (LENS) button to open and close the douser.
11
1. What’s in the Box? and the Names of the Projector Parts
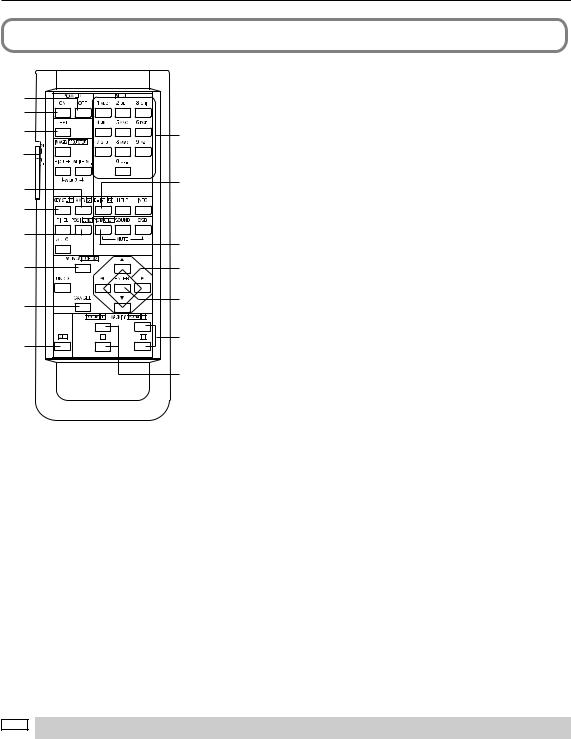
1-4. Names on the Remote Control
2 |
|
1. POWER ON button |
|
|
Operate this button to turn on the power to your projector. |
||
1 |
|
Press it three seconds or longer. |
|
|
|
||
4 |
3 |
When turning on the power to your projector, first set the main |
|
|
power switch to the main unit and the LPSU to ON, which puts |
||
17 |
|
||
|
your projector on standby. (See page 19) |
||
|
|
||
6 |
7 |
2. POWER OFF button |
|
Operate this button to turn off (standby) the power to your |
|||
|
|||
|
|
||
5 |
|
projector. Press it three seconds or longer. |
8
9
10 |
|
11 |
13 |
|
12 |
|
|
|
- |
- |
15 |
16 |
|
|
|
|
14 |
3. Numeric buttons (1 to 0 buttons)
Use these buttons to enter alphanumeric characters. (See page 28)
4.TEST button
•Press this button, and a test pattern will be displayed.
Check the test pattern on the LCD screen by pressing the SELECT / button, then press ENTER to set your
selection.
To cancel the test pattern display, reselect the signal to project.
5.KEYSTONE / R button
Press the KEYSTONE(R) button while depressing the CTL button, then the red (R signal) of the test pattern will be turned off temporarily. Press this button again while depressing the CTL button, and the red (R signal) will be projected again.
6. AMPLITUDE / G button
Press the AMPLITUDE (G) button while depressing the CTL button, then the green (G signal) of the test pattern will be turned off temporarily.
Press this button again while depressing the CTL button, and the green (G signal) will be projected again.
7. ENTRYLIST / B button
Press the ENTRYLIST (B) button while depressing the CTL button, then the blue (B signal) of the test pattern will be turned off temporarily.
Press this button again while depressing the CTL button, and the blue (B signal) will be projected again.
8. POSI / LENS button
Press the POSI/LENS button while depressing the CTL button, to adjust the position of projected screen (Lens Shift Mode). (See page 28)
9.PICT / SHUT button
•Press this button to turn off image projection temporarily. Press it again, and the image will be projected again.
•Press the PICT / SHUT button while depressing the CTL button, then the douser sill operate to shut off the light for projection. The POWER indicator blinks in green while the douser is operating. Press this button again while depressing the CTL button to cancel the operation of the douser.
NOTE When GPIO Control is set to “Enable”, it is not possible to turn the power on/off and the douser function.
10. MENU button
Operate this button, and menus for various settings and adjustments will be displayed on the LCD screen. (See page 26)
12
 Loading...