


OPERATING
GUIDE FOR YOUR MAGNUM ALERT-825/
MAGNUM ALERT-825HS SECURITY SYSTEM
0 1880, NAPCO |
N A P C O |

Abort Delay
A delay period that allows the system to be reset before it reports to a central station.
Alarm Plan
ldentifies the areas of your premises protected by each zone of protection and lists zone features. (See page 15)
Ambush Code
A one or two-digit code used before an arm/ disarm code that causes a silent report to be sent to a central station. (Optional)
Arming/Disarming
Turning your system ON or OFF. This can be done by entering a code on the DigitKey keypad, or by turning an optional keySwitch.
Arm/Dlsarm (Personal) Codes
Up to 4 four-digit codes used to arm and disarm the system from the keypad.
Battery
Stand by battery Is placed in the Control Center box to provide backup protection in the event of a power loss.
Central Station
Monitors incoming burglary and emergency messages from the Digital Communicator, and alerts the proper authorities. (Optional feature)
Control Center
The heart of the Magnum Alert-825 security system: it controls all system functions.
Dlgltal Communicator
Reports burglary and emergencies directly to the central station over telephone lines.
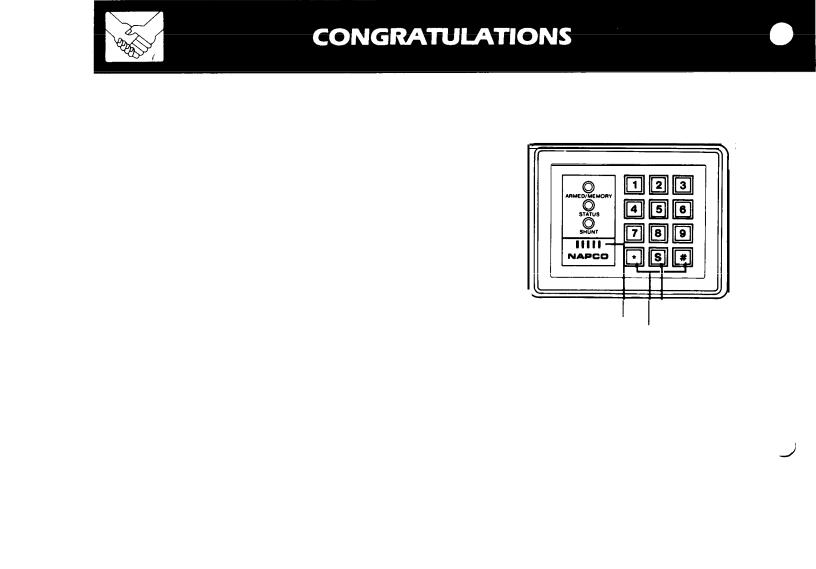
Napco’s Digit-key keypad puts Control Center functions at your fingertips. It can be mounted either at the Control Center or anywhere in your premises.
Exlt/Entry Delay
Lets you exit and enter your premises without setting off an alarm after the system is armed.
Hold Down Functlon
Digit keys have secondary functions which are activated by holding down a digit until a beep is heard.
Fallback Code
A pre-programmed four-digit code that may be used to disarm your system should all user codes be erased (as after an extended
power failure).
Mlnl-Sounder
Buzzer at each Napco Digit-Key keypad warns that entry delay time has started. It also sounds when you attempt to arm the system if a particular zone is in “trouble”. It also verifies contact with a central station when a closing signal is sent (optional).
Panic Buttons
Two buttons (* and #) on the Digit-Key keypad which will alert the central station of an emergency.
Report
A communication sent to a central station indicating a specificchange in condition of
the security system (alarm, trouble, low battery, etc.). (optional)
Shunt |
Button |
|
Labelled "S" on the Digit-Key keypad. Lets |
|
|
you manually remove one or more protective |
|
|
zones from the system. |
|
|
Zones |
|
|
Independent, circuits that protect specific |
|
|
areas of your premises. |
|
|
Auto Shunted Zone: A zone capable of |
|
|
being automatically bypassed (shunted) |
|
|
out of the protection system if it is in |
|
|
“trouble” (faulty) when you attempt |
|
|
to arm the system. |
|
|
Burglary Zones: Detect intrusion. |
|
|
Day Zone: A zone programmed to cause |
|
|
visual and audible ( optional) indication at |
|
|
the Digit-Key keypad when it is in ”trouble” |
|
|
during the disarmed period. |
|
|
Exlt/Entry Follower Zone: Provides |
|
|
exit and entry delay for interior devices. |
|
|
Entry delay only occurs if re-entry takes |
|
|
place through the normal exit/entry door. |
|
|
Group Shunt Zones: A group of zones |
|
|
programmed so they can be manually by |
|
|
passed (shunted) all at once. |
|
|
Priority Zones: When a zone selected |
|
|
for the feature is in “trouble” it will be |
|
|
impossible to arm the Control Center. |
|
|
Selectlve Shunted Zones: Zones that |
|
|
can be individually bypassed (shunted) |
|
|
using the Shunt Button. |
|
|
Trouble Zones: Zones that cannot be |
|
|
armed becauseof an open window, door |
|
|
or other problem in the area. |
|
|
24 Hour Zone: Are always armed and |
|
|
ready at all times to respond to an emer- |
3 |
|
gency situation. |
|
|

Keys
NOTICE:Keys1,2,3,4,5,9 and S must be held down for 2 seconds (until mini-sounder beeps) to perform their desianated ‘HoldDown " (“Key”) functions.
Key 1: TEST
Momentarily sounds the burglar alarm from the battery. If no alarm is heard, or if it is weak, the battery may need replacing. Use this test
weekly. (To perform this function the key must be held down until a
beep is heard.)
Key 2: ALARM HISTORY
This will flash the red ARMED/ MEMORY light to indicate the last alarm condition. Count the number of flashes to determine the zones violated. This feature does not reset; after the system is rearmed, the previous alarm history will remain in alarm memory until automatically reset by a new alarm condition. To perform this function the key must be held down until a beep is heard, and then continued to be held down until all information has been displayed.
Key 3: STATUS INDICATION RESET
This will stop the green STATUS light flashing. To turn STATUS flashirig back on, hold down Key 3
aaain. (To oerform this function the key must be held down until a beep
is heard.)
Key 4: INSTANT PROTECTION
Cancels the exit/entry delay periods when arming. The delay is restored after you disarm the system.
See page 10. (To perform this function the key must be held down until
a beep is heard.)
Key 5: DOOR CHIME
This will initiate a feature that sounds a chime In the keypad each time the entry door on zone 1 is opened. This feature only works when the alarm system is disarmed (off). To eliminate the door chime feature, press this key again. A lengthy “chime” may be reset using Key 9
(MA-825HS only). (To perform these functions, the key must be held down
until a beep is heard.)
Key 9: RESET
Used to reset a Dav Zone MiniSounder indication (MA-825HS only), a lengthy door “chime” (MA-825HS only). or the AC Failure indication (all three indicatora flashing), and to ’ bypass a troubled zone deaignated as a “Priority withBypass Zone.” (To
reset any function, the key must be
held down until a beep is heard.)
Key S: SHUNT
This will flash the vellow SHUNT light to indicate the zone(s) shunted. Count the number of flashes to determine the zone(s) shunted.
To perform this function the key must be held down until a beep is heard, and continued to be held down until all information has been displayed. The key does not have to be held down for either the Selective Zone Shunting feature (see page 10) or when selecting a new code (see page 7).
Keys * and #: PANIC BUTTONS
Activates the panic zone. Refer to “Panic Zone”, page 10 for more information.
 Loading...