


OPERATING GUIDE for your
GEM-K1CA KEYPAD
GEMINI |
|
SYSTEM READY |
|
||
|
09/15/05 |
12:05 AM |
|
|
|
STATUS |
|
NEXT / YES |
|
ARMED |
|
|
||
R 1 2 3 UPPRIOR / NO |
||||
|
||||
|
B 4 5 6 |
Q |
||
|
|
|
AREA |
|
|
C 7 8 9 0G |
|||
COMPUTERIZED SECURITY SYSTEM |
|
|||
© NAPCO 2005 |
OI279D 5/05 |
|
1 |

INTRODUCTION
The GEM-K1CA is a “smart” userfriendly, interactive menu-driven keypad designed for your Napco control panel. Its alphanumeric screen will not only display the status of your system, but will also give you step-by-step instructions to guide you through all operations.
This booklet contains important information about the operation of your system with this GEM-K1CA Keypad. Read it carefully and keep it handy for
future reference. Check the Glossary for an explanation of terms that may be unfamiliar to you.
You'll probably find subjects mentioned in this booklet that do not apply to your system. Napco control panels have such a wide variety of features that few security systems, if any, will ever need them all. Your alarm professional has chosen appropriate features for your particular needs.
Regardless of how your system has been configured, rest assured that it has been carefully designed and engineered to the highest industry standards. To assure optimum safety and security, familiarize yourself with this equipment. Periodically check its condition and state of readiness by testing it at least once a week in both the ac/battery and batteryonly modes (ask your alarm professional how to make these tests).
IMPORTANT - TEST YOUR SYSTEM WEEKLY
Test your sounding device and backup battery |
Test your central station communicator |
||
(These tests should only be performed on weekends or at a time |
(Activate Dialer Test programmed? YES NO) |
||
designated by your alarm company.) |
1. |
Notify your Central Station of the impending test. |
|
1. While disarmed, press R. |
|||
2. |
While disarmed, enter your User Code and press R. |
||
2. Answer NO (press Q) until “ACTIVATE BELL TEST” appears in |
|||
3. |
Answer NO (press Q) until “ACTIVATE DIALER TEST” appears |
||
the window. |
|||
|
in the window. |
||
3. Press YES (P) to execute the test. The alarm will sound for about |
4. |
||
Press YES (P) to send a test code to the central station. |
|||
two seconds. |
|||
• If the test is not successful, “COMM FAIL E03-00 SERVICE” will |
|||
• If the alarm does not sound, call for service. |
|||
• If the battery is low, “LOW BATTERY E02-00 SERVICE” will appear |
|
display, indicating a communication failure. Call for service. |
|
|
|
||
in the display indicating a low battery condition. Allow 24 hours for |
Note: Any subsequent successful transmission will clear a “Failure to |
||
the battery to recharge. If the trouble continues, call for service. |
|||
Communicate” system trouble. |
|||
2

TABLE OF CONTENTS
TABLE OF CONTENTS |
|
Section |
Page |
KEYPAD CONTROLS & INDICATORS............................................ |
4 |
ARMING AWAY: SETTING THE ALARM WHEN LEAVING ............ |
6 |
ARMING STAY: PROTECTING YOURSELF AT HOME ................. |
8 |
TURNING OFF THE ALARM (DISARMING) WHEN RETURNING... 10 |
|
FIRE PROTECTION......................................................................... |
11 |
FUNCTION MENU ........................................................................... |
15 |
CENTRAL-STATION MONITORING ................................................ |
20 |
ADVANCED FEATURES ................................................................. |
21 |
PROGRAMMING USER CODES ..................................................... |
22 |
ENTER ZONE DESCRIPTIONS -- "CELL PHONE STYLE" ............. |
24 |
SETTING THE DATE AND TIME ................................................... |
26 |
KEYPAD MESSAGES...................................................................... |
27 |
GLOSSARY ..................................................................................... |
30 |
SYSTEM TROUBLE ERROR CODES ............................................. |
33 |
TROUBLESHOOTING ..................................................................... |
38 |
TO SILENCE AN ALARM, ENTER YOUR
CODE, AND PRESS U.
FOR SERVICE, CALL: _____________________
CENTRAL STATION: _____________________
EXIT DELAY: ___________________________
ENTRY DELAY: _________________________
FIRE ALARM SOUND*:
_____________________________________
BURGLAR ALARM SOUND*:
_____________________________________
KEYPAD FIRE ENABLED? |
YES |
NO |
KEYPAD PANIC ENABLED? |
YES |
NO |
KEYPAD AUX. ENABLED? |
YES |
NO |
*FIRE HAS PRIORITY OVER BURGLARY.
3

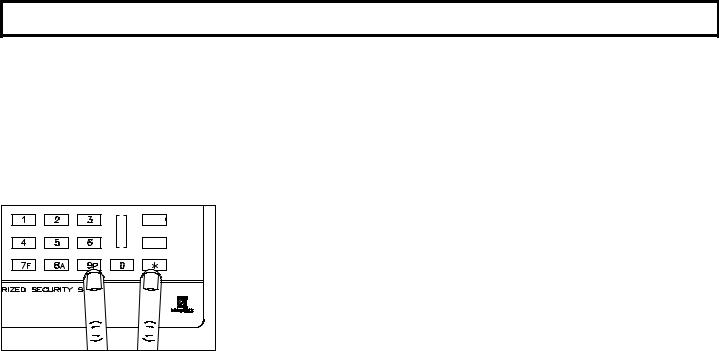
KEYPAD CONTROLS & INDICATORS

 1
1 


 GEMINI
2 |
SYSTEM ARMED |
|
|
|
|
|
|
||
3 |
09/01/05 12:00 AM |
|
|
|
|
|
7 |
||
|
|
|
||
|
STATUS |
|
8 |
|
|
ARMED |
|
||
4 |
R 1 2 3 U |
P |
||
9 |
||||
5 |
B 4 5 6 |
Q |
|
|
6 |
C 7 8 9 0 G |
10 |
||
11 |
||||
|
COMPUTERIZED SECURITY SYSTEM |
|
||
|
|
|
||
|
12 |
|
|
|
4
KEYPAD CONTROLS & INDICATORS
|
|
|
|
|
|
|
|
|
Window. Displays system status |
|
|
|
||||||
|
|
1 |
|
|
|
|
|
|||||||||||
|
|
|
|
|
|
|
|
|
|
messages, zone descriptions, etc. |
|
|
|
|||||
|
|
|
|
|
|
|
|
|
|
|
|
|||||||
|
|
|
|
|
|
|
|
STATUS Light. Lights (green) to |
|
|
|
|
|
|
|
|
||
|
|
2 |
|
|
|
|
|
|
|
|
|
|
6 |
|
|
|||
|
|
|
|
|
|
|
|
|
|
indicate that the system is ready |
|
|
|
|
||||
|
|
|
|
|
|
|
|
|
|
|
|
|
|
|||||
|
|
|
|
|
|
|
|
|
|
for arming. If a zone is not |
|
|
|
|||||
|
|
|
|
|
|
|
|
|
|
secured the light will be off and |
|
|
|
|||||
|
|
|
|
|
|
|
|
|
|
the zone will display in the |
|
|
|
|
|
|
|
|
|
|
|
|
|
|
|
|
|
|
|
|
|
|
|
7 |
|
|
|
|
|
|
|
|
|
|
|
|
|
window. If a zone has been |
|
|
|
|
||||
|
|
|
|
|
|
|
|
|
|
|
|
|
|
|
||||
|
|
|
|
|
|
|
|
|
|
bypassed, the STATUS light will |
|
|
|
|||||
|
|
|
|
|
|
|
|
|
|
blink while armed. |
|
|
|
|
|
8 |
|
|
|
|
|
|
|
|
|
|
|
|
ARMED Light. Lights (red) to |
|
|
|
|||||
|
|
3 |
|
|
|
|
|
|
|
|
||||||||
|
|
|
|
|
|
|
|
|
|
indicate that the system is armed. |
|
|
|
|||||
|
|
|
|
|
|
|
|
|
|
|
|
|
||||||
|
|
|
|
|
|
|
|
|
|
If an alarm has occurred, the |
|
9 |
|
|
||||
|
|
|
|
|
|
|
|
|
|
ARMED LED will be flashing. |
|
|
|
|
|
|
||
|
|
|
|
|
MENU Button. Selects available |
|
|
|
||||||||||
|
|
4 |
|
|
|
|
|
|||||||||||
|
|
|
|
|
|
|
|
|
|
system functions as displayed in |
|
|
|
|||||
|
|
|
|
|
|
|
|
|
|
|
|
|
||||||
|
|
|
|
|
|
|
|
|
|
the window. The selected function |
|
|
|
|||||
|
|
|
|
|
|
|
|
|
|
is executed by pressing the U |
|
|
|
|||||
|
|
|
|
|
|
|
|
|
|
button. |
|
|
|
|||||
|
|
|
|
|
|
BYPASS Button. (1) Deactivates |
|
|
|
|||||||||
|
|
5 |
|
|
|
|
|
|
||||||||||
|
|
|
|
|
|
|
|
|
|
selected zones from the system. |
|
|
|
|||||
(2) Unbypasses a bypassed zone (GEM-P3200/9600 panels only).
RESET Button. (1) Resets various system troubles, displays, etc. (See text.) (2) Resets residential smoke detectors.
Numerical Keys (1-9, 0). Used to enter codes, zone numbers, etc.
ENTER Button. Entry key. Causes the entered code or selected function to be executed.
STAY Button. (1) Bypasses all Interior Zones simultaneously ("STAY Mode") to allow free movement within the premises. Hold down P when the
system is armed in "STAY Mode" to cancel entry delay on Exit/Entry Zones, causing an instant alarm upon violation. (2) Scrolls the window display forward (NEXT).
(3) Answers “YES” to questions in
the window display.
 10
10
 AWAY Button. (1) Arms all zones in the system, with display indicating the exit time remaining.
(2) Scrolls window display backward (PRIOR). (3) Answers “NO” to questions in the window display.
 11
11
 AREA Button (G). Selects
other areas and is used with emergency buttons.
 12
12
 Emergency Buttons. Used with the G button to signal an
emergency, as follows:
Press the 7 and the G buttons for Fire Emergency.
Press the 8 and the G buttons for Auxiliary Emergency.
Press the 9 and the G buttons for Police Emergency.
5

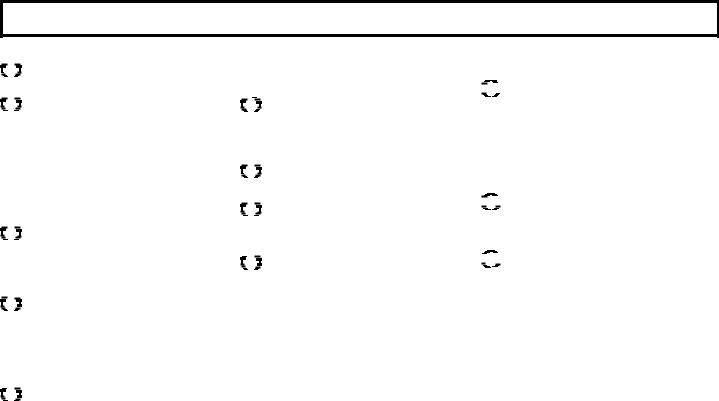
ARMING AW AY: SETTING THE ALARM WHEN LEAVING
SYSTEM READY
E X I T TI M E 0 60
P L E AS E L E AV E NOW
CAN’T ARM SYSTEM
ZONES FAULTED
Z O NE S F AU L TE D
02 BACK DOOR
BYPASSED B YP AS S E D
BYPASSED 02 BACK DOOR
Arming the System
1 Check the keypad. The green STATUS light must be on in order to arm. If the green light is off, “ZONES FAULTED” will display in the window followed by the number and description of each faulted zone. Note each problem zone and secure it by closing a window, door, etc. When all zones are secure, the green STATUS light will come on and the window will display “SYSTEM READY”.
2 Arm the system. Enter your code and press Q. The green STATUS light
Z O N E S F A U L T E D
will go off, the red ARMED light will come on and the window will display “EXIT TIME XXX”, “PLEASE LEAVE NOW” (where “XXX” represents the exit time remaining, in 10-second steps). Note: If you enter a wrong code, the keypad will display “INVALID ENTRY,0 2 B A CTRYK DAGAIN”O O R .
3 Leave the premises. Leave through the exit door before exit time expires.
Priority Arming |
B Y P A S S E D |
BYPA SSED |
|
If you attempt to arm with a faulted Zone, a 3-second tone will sound at the keypad. “CAN'T ARM SYSTEM” and “ZONES FAULTED”, will display in the window,
indicating that the faulted zone(s) must be secured before the panel can be armed. |
|
BYPA SSED |
0 2 B A C K D O O R |
|
|
Selectively Bypassing Zones
If you cannot locate or repair the problem yourself, call for assistance. If you cannot get immediate help, bypass the problem zone(s) from the system by pressing B,
then the zone number (or vice versa).
Note: Bypassed zones are unprotected. If armed with zones bypassed, be sure to have the system checked as soon as possible
6

ARMING AW AY: SETTING THE ALARM WHEN LEAVING
SYSTEM TROUBLE
SYS/TRBL
L O W B AT TE R Y
E02-00 SERVICE
SYS/TRBL
C AN ’ T ARM S YS TE M
P R E SS R E SE T K EY
SYS/TRBL
EXIT TIME 060 PLEASE LEAVE NOW
CAN’T ARM SYSTEM AREA X IN TROUBLE
System Trouble
If you attempt to arm with a “SYSTEM TROUBLE” display alternating with an indicated trouble code (e.g. “E02-00” (low battery); see SYSTEM TROUBLE ERROR CODES), a 3-second tone will sound at the keypad. The window will display “CAN'T ARM SYSTEM, PRESS RESET KEY”. If you cannot correct the problem immediately, pressing Cwill enable you to arm in this
condition. Be sure to call for service as soon as possible.
Area Arming (Optional)
Some systems may be divided, or partitioned, into smaller independent subsystems, which are referred to as Areas. In a system that has been partitioned into multiple areas, one or more area may be armed while others remain disarmed.
Manager's Mode (Optional)
The Manager's Mode allows the user to arm / disarm other areas in a partitioned system. To arm/ disarm a different area:
1.Press the numerical key representing the other area number.
2.Press Gfollowed by U. The keypad will now provide status and control of that area.
3.Enter your User Code followed by Qto arm or disarm the area.
4.Press Gfollowed by Uto return to the home area.
Global Arming (Optional) (Available only with the GEM-P3200/9600 panels)
To arm all areas simultaneously, press 9, Gand enter your code followed by U. To disarm all areas simultaneously, press 0, Gand enter your code followed by U.
•The User Code must be valid in all area(s).
•If any zone is not secured, the keypad will display “CAN’T ARM SYSTEM, AREA X IN TROUBLE”, where X indicates the number of the Area in trouble. All faulted zones in the respective area(s) must be secured or bypassed. Note: If a system trouble is indicated, the system cannot be armed using this method.
7

ARMING STAY: PROTECTING YOURSELF AT HOME
|
Arming in STAY Mode |
|
BYPASSED ARM E D S T AY |
||
Interior Zones, when bypassed, allow free movement within the home while the |
||
|
||
|
protection of armed perimeter zones is maintained. To bypass Interior Zones, enter |
|
|
||
|
your User Code and press P. |
|
|
Instant Protection |
|
S YS TE M ARM E D I |
||
When retiring for the evening, after all family members are home, you can cancel the |
||
|
||
|
entry delay on the Entry Zone(s). |
|
|
To arm with instant protection, press and hold down Pfor 2 seconds at any
time after the system is armed. When armed with Instant Protection opening the entry door will cause an immediate alarm.
•When arming with Instant Protection, the exit delay will remain in effect, allowing exit of the house just after arming. While armed, the window will display “SYSTEM ARMED” (“SYSTEM ARMED I” will display with the GEM-P9600/3200) and the red ARMED light will flicker rapidly to indicate instant protection.
8
ARMING STAY: PROTECTING YOURSELF AT HOME
Easy Exit (Optional - Easy Exit programmed? YES NO)
Your system may have been programmed for Easy Exit, which allows a user to exit the premises while the system is armed STAY. By activating Easy Exit while the system is armed STAY, the Exit Delay countdown will take place, during which time you are permitted to leave through the exit door. The Easy Exit Delay time will be identical to the Exit Delay time the system gives you each time it is armed STAY. This will allow, for example, an early morning commuter to exit the house, without having to disarm and rearm the system, awaking the family.
Press Uto activate Easy Exit on your system.
(GEM-P3200/GEM-P9600 V20 or greater, GEM-P816/P1632 V9A or greater)
E |
STAY |
N |
|
T |
|
E |
AWAY |
R |
Emergency Buttons (Only available if programmed)
The Blue Emergency Buttons (7,8& 9), if programmed, are always active,
whether the system is armed or disarmed. The emergency signal will only be transmitted when an Emergency Button and Gare pressed at the same time.
•Fire Emergency Simultaneously press 7and Gto alert the central station of a fire emergency. *(Fire Emergency programmed? YES NO)
•Auxiliary Emergency Simultaneously press 8and Gto alert the central station of an Auxiliary emergency. *(Auxiliary Emergency programmed? YES NO)
•Police Emergency Simultaneously press 9and Gto alert the central station of a police emergency. *(Police Emergency programmed? YES NO)
9

TURNING OFF THE AL ARM (DISARMING) WHEN RETURNING
|
Disarming the System |
|
D I S AR M S YS TE M |
1 Enter your premises through the Entry/Exit door. The keypad will sound a steady tone to |
|
E N TRY TI M E X X X |
remind you to disarm the system before your Entry Delay time expires. |
|
|
2 Enter your User Code and press U. The red ARMED light will go out, indicating that the |
|
|
||
|
system has been disarmed. If you enter an invalid code, the keypad will beep 4 times, |
|
I N V AL I D EN TRY |
||
signifying an error. Re-enter your code immediately. 10 seconds before Entry Delay expires, |
||
TR Y AG AI N |
the keypad will emit a pulsing warning tone. |
|
|
Alarm Indication / Silencing an Alarm |
|
|
||
|
If the red ARMED light is flashing and “ALARM” is displayed, an alarm occurred while you were |
|
**** AL AR M **** |
||
out. Proceed with caution! If you suspect that an intruder may still be on the premises, leave |
||
|
immediately and call authorities from a neighbor's phone. |
|
|
To silence an audible alarm: |
|
0 2 - B ACK DOO R |
1 Enter your code and press U. After the system is disarmed, the window will continue |
|
|
to display “ALARM” followed by the zone(s) violated. |
|
|
2 To reset the display, note the zones violated, then press C. |
|
0 3 - LI V IN G R OO M |
||
Ambush (Optional) Your Ambush Code Type is: TYPE 1 (Prefix) TYPE 2 (Unique) |
||
|
||
|
My Ambush Code is ___________________ |
|
|
If an intruder forces you to disarm your system, enter your Ambush Code and press U. There are two types of Ambush Codes: (1) A 2-digit code (prefix) entered just prior to your normal User Code and (2) A separate and unique User Code.
Example Type 1 (Prefix): If your User Code is 1234 and your Ambush Code is 99, press 991234U.
Example Type 2 (Unique): If your User Code is 1234 and your Ambush Code is 8899, press 8899U
Using your Ambush Code will send a silent alarm to the central station. The red ARMED light will go out and the window will display “SYSTEM READY” as if the system were normally disarmed. There will be no indication that a silent alarm has been sent.
10
FIRE PROTECTION
(Applicable only where local ordinance permits use of this alarm control panel for fire protection.)
|
|
Fire-Zone Alarm |
|
|
F I RE AL ARM |
||
FIRE |
If a fire is detected, “FIRE ALARM” will be displayed and the keypad sounder will pulse. |
||
|
|
|
|
|
|
1. |
If a fire is in progress, evacuate the premises immediately! If necessary, call the |
|
|
2. |
Fire Department from an outside phone. |
|
|
Press the Cbutton to silence the keypad sounder. |
|
|
|
3. |
If there is no evidence of a fire, enter your User Code and press Uto turn off the |
|
|
4. |
alarm. |
|
|
Check smoke detector(s). If a smoke detector tripped, its red alarm indicator light |
|
|
|
|
will be on. |
F I RE TRO UB LE
FIRE TBL
SYS TBL
After the alarm condition is corrected (thermostat cooled down; smoke cleared from detector; etc.), pressing Cagain will reset the keypad within about 10 seconds.
NOTE: When the Fire Zone is reset, the FIRE icon on the left side of the display will go out. If the FIRE icon is still displayed, the fire zone has not been properly reset. If you cannot clear this condition by pressing C, call for service.
Fire-Zone Trouble
1.If a problem in the fire-circuit is detected, “FIRE TROUBLE” will display and the sounder will pulse to signal a malfunction.
2.Press Cto silence the sounder. Call for service immediately!
11

FIRE PROTECTION
Preparing a Fire Escape Plan
Even with the most advanced fire alarm system, adequate protection requires an escape plan.
To prepare your plan, draw floor plans of your building. (Space is provided on the next page). Show two exits - a front or back door and a window from each room. (Make sure the window works. You may need a special fire-escape ladder if the window is high up). Write down your outside meeting place.
Family Rehearsal.
Rehearse each of the following activities: 1. Everyone in his room with the doors
closed.
2.One person sounds the alarm.
3.Each person tests his door.
4.Pretend the door is hot and use the alternate escape exit.
5.Everyone meets outdoors at the assigned spot.
Important! - Read Carefully
Discuss these escape procedures with all those who use the building:
1.In a residence, sleep with the bedroom door closed. A closed door will hold back deadly smoke while you escape.
2.When the fire alarm signals, escape quickly. Do not stop to pack.
3.Test the door. If it is hot, use your
alternate route through the window. If the door is cool, brace your shoulder against it and open it cautiously. Be ready to slam the door if smoke or heat rushes in. Crawl through smoke, holding your breath. Close the doors again on leaving to help prevent the fire from spreading.
4.Go to your specific outdoor meeting place so you can see that everyone is safe.
5.Assign someone to make sure nobody returns to the burning building.
6.Call the Fire Department from a neighbor's telephone.
Would You Like More Safety Information?
For more information on home fire detection, burn safety, and home fire safety, write to the National Fire Protection Association, Public Affairs Dept. 05A, Batterymarch Plaza, Quincy, MA 02269.
12
 Loading...