


 T532/T512
DVD / CD / MP3 Player
GB Owner’s Manual
Introduction
SAFETY PRECAUTIONS
WARNING : TO REDUCE THE RISK OF FIRE OR ELECTRIC SHOCK, DO NOT EXPOSE
THIS PRODUCT TO RAIN OR MOISTURE
CAUTION
THIS DVD RECEIVER EMPLOYS A LASER SYSTEM.
TO ENSURE PROPER USE OF THIS PRODUCT, PLEASE READ THIS OWNER’S MANUAL CAREFULLY AND
RETAIN FOR FUTURE REFERENCE, SHOULD THE UNIT REQUIRE MAINTENANCE, CONTACT AN
AUTHORIZED SERVICE LOCATION-SEE SERVICE PROCEDURE.
USE OF CONTROLS, ADJUSTMENTS OR THE PERFORMANCE OF PROCEDURES OTHER THAN THOSE
SPECIFIED MAY RESULT IN HAZARDOUS RADIATION EXPOSURE.
TO PREVENT DIRECT EXPOSURE TO LASER BEAM, DO NOT TRY TO OPEN THE ENCLOSURE. VISIBLE LASER
RADIATION WHEN OPEN THE ENCLOSURE. DO NOT STARE INTO BEAM.
THE APPARATUS SHALL NOT BE EXPOSED TO DRIPPING OR SPLASHING AND THAT NO OBJECTS FILLED
WITH LIQUIDS, SUCH AS VASES, SHALL BE PLACED ON THE APPARATUS.
WARNING : CHANGES OR MODIFICATIONS NOT EXPRESSLY APPROVED BY THE
PARTY RESPONSIBLE FOR COMPLIANCE COULD VOID THE USER’S AUTHORITY TO
OPERATE THE EQUIPMENT.
RECORD YOUR MODEL NUMBER (NOW, WHILE YOU CAN SEE IT)
The model and serial number of your new DVD player are located on the back of the DVD player cabinet.
For your future convenience, we suggest that you record these numbers here:
MODEL NO. ____________________________
SERIAL NO. ____________________________
This product is manufactured to comply with the radio interference requirements of EEC DIRECTIVE 89/336/EEC, 93/68/EEC and 73/23/EEC.
GB
2
INTRODUCTION |
|
Safety Precautions . . . . . . . . . . . . . . . . . . . . . . . . . . . . . . . . . . . . . . . . . . . . . . . . . . . . . . . . . . |
. . 2 |
Table of Contents . . . . . . . . . . . . . . . . . . . . . . . . . . . . . . . . . . . . . . . . . . . . . . . . . . . . . . . . . . . . |
. 3 |
Identification of Controls . . . . . . . . . . . . . . . . . . . . . . . . . . . . . . . . . . . . . . . . . . . . . . . . . . . . |
4-7 |
Front Panel/Display window . . . . . . . . . . . . . . . . . . . . . . . . . . . . . . . . . . . . . . . . . . . . . . . . . . . . 4 Rear Panel . . . . . . . . . . . . . . . . . . . . . . . . . . . . . . . . . . . . . . . . . . . . . . . . . . . . . . . . . . . . . . . . 5 Remote Control . . . . . . . . . . . . . . . . . . . . . . . . . . . . . . . . . . . . . . . . . . . . . . . . . . . . . . . . . . . . 6 Preparing the Remote Control . . . . . . . . . . . . . . . . . . . . . . . . . . . . . . . . . . . . . . . . . . . . . . . . . . 7 Operating with the Remote Control . . . . . . . . . . . . . . . . . . . . . . . . . . . . . . . . . . . . . . . . . . . . . 7
Notes on Discs . . . . . . . . . . . . . . . . . . . . . . . . . . . . . . . . . . . . . . . . . . . . . . . . . . . . . . . . . . . . . . . 8
CONNECTIONS
Connecting to Surround Sound System. . . . . . . . . . . . . . . . . . . . . . . . . . . . . . . . . . . . . . . . . .9-11
Enjoying Dolby Digital Sound . . . . . . . . . . . . . . . . . . . . . . . . . . . . . . . . . . . . . . . . . . . . . . . . . . . 9 Enjoying Dolby Pro Logic Surround Sound . . . . . . . . . . . . . . . . . . . . . . . . . . . . . . . . . . . . . . . . . 10 Enjoying 2 Channel Digital Stereo Sound . . . . . . . . . . . . . . . . . . . . . . . . . . . . . . . . . . . . . . . . . 11 Enjoying DTS Sound . . . . . . . . . . . . . . . . . . . . . . . . . . . . . . . . . . . . . . . . . . . . . . . . . . . . . . . . 11
Connecting to an Stereo System . . . . . . . . . . . . . . . . . . . . . . . . . . . . . . . . . . . . . . . . . . . . |
. . . 12 |
Connecting to a TV . . . . . . . . . . . . . . . . . . . . . . . . . . . . . . . . . . . . . . . . . . . . . . . . . . . . . . . |
. . . 13 |
INITIAL SETTINGS |
|
Selection of initial settings . . . . . . . . . . . . . . . . . . . . . . . . . . . . . . . . . . . . . . . . . . . . . . . . . . |
. . 14 |
Selecting disc Languages . . . . . . . . . . . . . . . . . . . . . . . . . . . . . . . . . . . . . . . . . . . . . . . . . . . |
. . 15 |
Selecting rating level and password . . . . . . . . . . . . . . . . . . . . . . . . . . . . . . . . . . . . . . . . . . |
16-17 |
Selecting Country Code . . . . . . . . . . . . . . . . . . . . . . . . . . . . . . . . . . . . . . . . . . . . . . . . . . . . |
. . .17 |
Selecting TV Aspect. . . . . . . . . . . . . . . . . . . . . . . . . . . . . . . . . . . . . . . . . . . . . . . . . . . . . . . . . . 18 |
|
Selecting Menu Language . . . . . . . . . . . . . . . . . . . . . . . . . . . . . . . . . . . . . . . . . . . . . . . . . . |
. . 19 |
Selecting Digital Audio Output . . . . . . . . . . . . . . . . . . . . . . . . . . . . . . . . . . . . . . . . . . . . . . |
. . 20 |
Others . . . . . . . . . . . . . . . . . . . . . . . . . . . . . . . . . . . . . . . . . . . . . . . . . . . . . . . . . . . . . . . . . . |
. . 21 |
Table of Languages and Their Abbreviations . . . . . . . . . . . . . . . . . . . . . . . . . . . . . . . . . . . . |
. . 22 |
Table of Country Codes and Their Abbreviations . . . . . . . . . . . . . . . . . . . . . . . . . . . . . . . . |
. . .22 |
BASIC OPERATIONS |
|
Basic Playback . . . . . . . . . . . . . . . . . . . . . . . . . . . . . . . . . . . . . . . . . . . . . . . . . . . . . . . . . . . |
23-24 |
Special Playback . . . . . . . . . . . . . . . . . . . . . . . . . . . . . . . . . . . . . . . . . . . . . . . . . . . . . . . . . . |
25-26 |
Still Picture . . . . . . . . . . . . . . . . . . . . . . . . . . . . . . . . . . . . . . . . . . . . . . . . . . . . . . . . . . . . . . . 25 Frame Advance . . . . . . . . . . . . . . . . . . . . . . . . . . . . . . . . . . . . . . . . . . . . . . . . . . . . . . . . . . . 25 Skipping chapters and tracks forward or back . . . . . . . . . . . . . . . . . . . . . . . . . . . . . . . . . . . . . 25 Scanning at High Speed . . . . . . . . . . . . . . . . . . . . . . . . . . . . . . . . . . . . . . . . . . . . . . . . . . . . . 26 Playing in Slow-Motion . . . . . . . . . . . . . . . . . . . . . . . . . . . . . . . . . . . . . . . . . . . . . . . . . . . . . . 26
OPERATION USING (GRAPHICAL USER INTERFACE) MENU ICONS |
|
General Information about GUI menu icons . . . . . . . . . . . . . . . . . . . . . . . . . . . . . . . . . . . |
. . . 27 |
Detailed description of each GUI menu icon . . . . . . . . . . . . . . . . . . . . . . . . . . . . . . . . . . . . |
. . 28 |
ADVANCED OPERATION |
|
Using a title menu . . . . . . . . . . . . . . . . . . . . . . . . . . . . . . . . . . . . . . . . . . . . . . . . . . . . . . . . |
. . 29 |
Using a DVD menu . . . . . . . . . . . . . . . . . . . . . . . . . . . . . . . . . . . . . . . . . . . . . . . . . . . . . . . . |
. . 29 |
Memorizing Settings for Viewed DVDs (Last Condition Memory) . . . . . . . . . . . . . . . . . . . |
. . 30 |
Changing subtitle language . . . . . . . . . . . . . . . . . . . . . . . . . . . . . . . . . . . . . . . . . . . . . . . . . |
. . 31 |
Changing audio soundtrack language . . . . . . . . . . . . . . . . . . . . . . . . . . . . . . . . . . . . . . . . . |
. . 31 |
Viewing from another angle . . . . . . . . . . . . . . . . . . . . . . . . . . . . . . . . . . . . . . . . . . . . . . . . |
. . 32 |
Producing a 3D Surround effect . . . . . . . . . . . . . . . . . . . . . . . . . . . . . . . . . . . . . . . . . . . . . . |
. . 32 |
Repeat Play . . . . . . . . . . . . . . . . . . . . . . . . . . . . . . . . . . . . . . . . . . . . . . . . . . . . . . . . . . . . . . |
. . .33 |
Storing markers in memory to be viewed (listened to) again . . . . . . . . . . . . . . . . . . . . . . |
. . 34 |
Zoom Feature . . . . . . . . . . . . . . . . . . . . . . . . . . . . . . . . . . . . . . . . . . . . . . . . . . . . . . . . . . . . |
. . 35 |
Random Play . . . . . . . . . . . . . . . . . . . . . . . . . . . . . . . . . . . . . . . . . . . . . . . . . . . . . . . . . . . . . |
. . 35 |
Program Play . . . . . . . . . . . . . . . . . . . . . . . . . . . . . . . . . . . . . . . . . . . . . . . . . . . . . . . . . . . . . |
. . 36 |
Playback with MP3 . . . . . . . . . . . . . . . . . . . . . . . . . . . . . . . . . . . . . . . . . . . . . . . . . . . . . . . |
37-38 |
REFERENCE |
|
Disc Requirements/Copyright Information . . . . . . . . . . . . . . . . . . . . . . . . . . . . . . . . . . . . . |
. . 39 |
Before Calling Service Personnel . . . . . . . . . . . . . . . . . . . . . . . . . . . . . . . . . . . . . . . . . . . . . |
. . 40 |
Specifications . . . . . . . . . . . . . . . . . . . . . . . . . . . . . . . . . . . . . . . . . . . . . . . . . . . . . . . . . . . . . |
. . 41 |
Introduction
TABLE OF CONTENTS
GB
3
Introduction
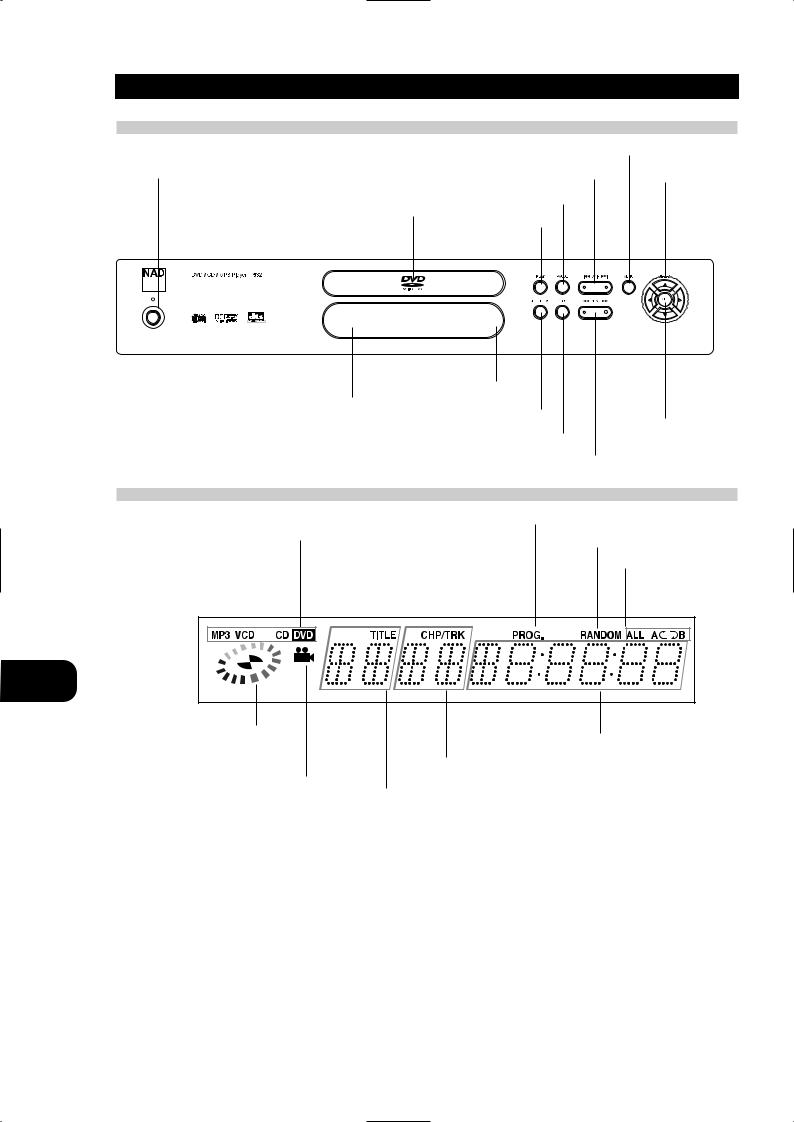
IDENTIFICATION OF CONTROLS
FRONT PANEL
|
MENU button |
|
POWER button and indicator |
SKIP buttons |
|
ARROW buttons |
||
|
||
|
PAUSE button |
|
|
Disc tray |
|
|
PLAY button |
Remote sensor |
|
Display window |
|
OPEN / CLOSE button |
SELECT / ENTER |
|
button |
STOP button |
|
SCAN buttons |
|
DISPLAY WINDOW
PROGRAM indicator
DVD indicator
RANDOM indicator
CD indicator
Repeat playback mode indicators
MP3 indicator
GB
Operating status indicator |
Total playing time / |
|
elapsed time indicators |
|
Chapter/Track number indicator |
Angle icon indicator |
|
|
Title number indicator |
4
Introduction
IDENTIFICATION OF CONTROLS
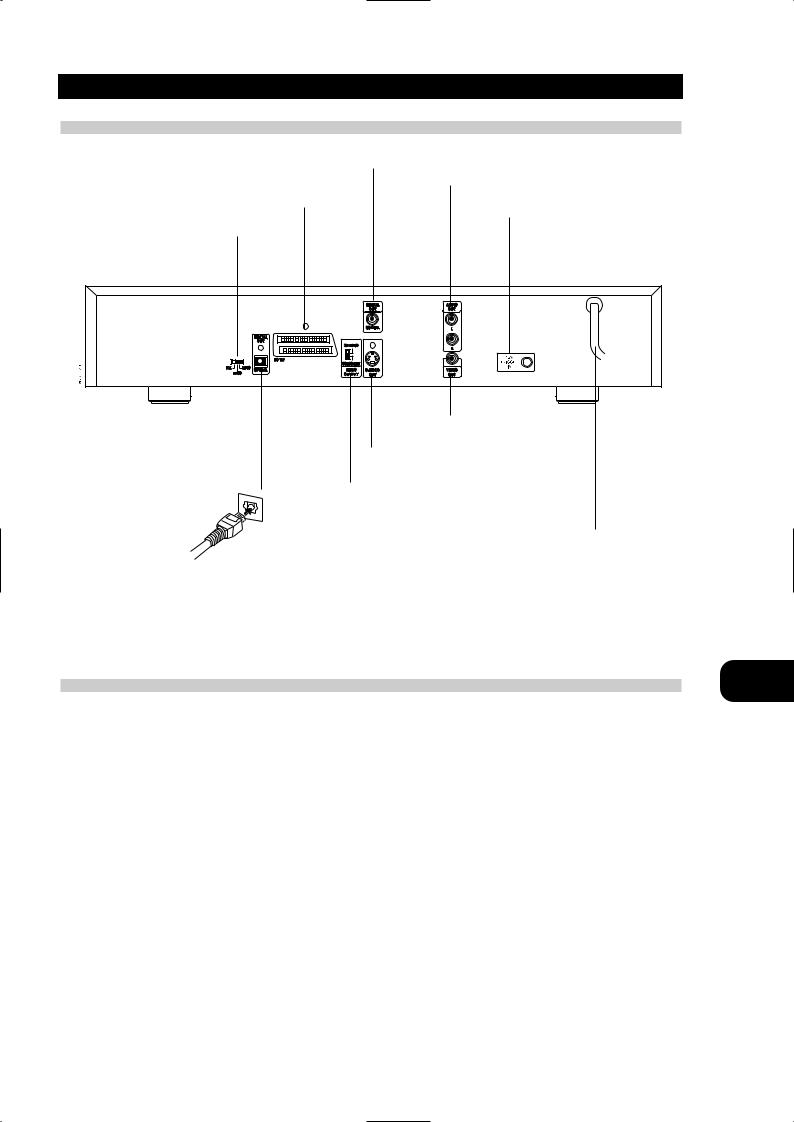
REAR PANEL
|
COAXIAL DIGITAL AUDIO OUT jack |
|
AUDIO OUT (L/R) jacks |
|
TO TV (SCART) jack |
|
12 V TRIGGER IN (T532 only) |
|
By connecting this DVD player to another NAD |
TV SYSTEM SELECT Switch |
audio component or system controller equipped |
Refer to explanation below |
with a 12V trigger output, you can remotely operate |
|
the T532 power ON/OFF. |
|
VIDEO OUT jack |
|
OPTICAL DIGITAL AUDIO OUT jack |
|
|
Remove the dust protection cap from the connector and |
S-VIDEO OUT jack |
|
connect the optical digital cable (not supplied) firmly so |
||
|
||
that the configurations of both the cable and the |
|
|
connector match. |
|
|
|
VIDEO OUTPUT SELECT Switch |
|
|
POWER CORD |
|
|
Connect to an AC 110-240V, 50/60Hz outlet only. |
TV SYSTEM SELECT
GB
You can enjoy NTSC or PAL discs by using your TV SYSTEM SELECT switch to choose the appropriate system. If you try to play back PAL disc with NTSC-TV. The player will not playback the disc.
When the selected TV SYSTEM SELECT switch does not coincide with the system of your TV, normal colour picture may not be displayed. Select the TV SYSTEM SELECT switch when the power is turned off.
When you playback NTSC disc with PAL-TV, some discs may produce black bands at the top and bottom of the screen.
Position of TV SYSTEM SELECT switch |
Connected TV |
Available disc |
PAL |
PAL |
NTSC/PAL DVD disc |
NTSC |
NTSC |
NTSC DVD disc |
AUTO |
MULTI SYSTEM TV |
NTSC/PAL DVD disc |
5
Introduction
IDENTIFICATION OF CONTROLS
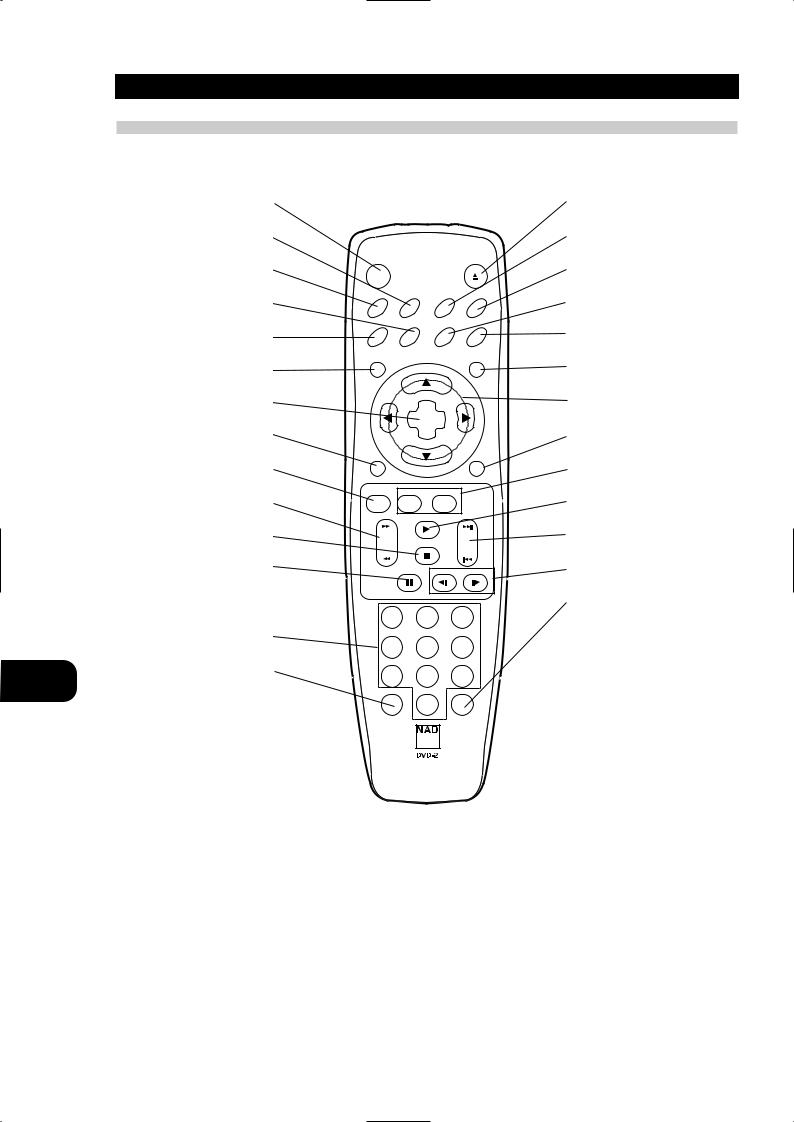
REMOTE CONTROL
You will find instructions for each of the remote control function in the appropriate sections of this instruction manual
GB
POWER button |
|
|
|
OPEN/CLOSE button |
REPEAT button |
|
|
|
A-B button |
POWER |
|
|
OPEN/CLOSE |
|
SETUP button |
|
|
|
RANDOM button |
SETUP |
REPEAT |
A-B |
RANDOM |
ANGLE button |
SUBTITLE button |
|
|
|
|
|
|
|
|
|
AUDIO |
SUBTITLE |
ANGLE |
SOUND |
SOUND button |
AUDIO button |
|
|
|
|
|
|
|
|
|
TITLE |
|
|
MENU |
|
*** TITLE button |
|
|
|
* MENU button |
|
|
|
|
|
SELECT/ENTER button |
|
|
|
** ARROW buttons |
|
SELECT |
|
|
|
|
ENTER |
|
|
|
DISPLAY button |
|
|
|
RETURN button |
|
|
|
|
|
DISPLAY |
|
|
RETURN |
|
ZOOM button |
|
|
|
MARKER-SEARCH button |
|
|
|
|
|
ZOOM |
MARKER – SEARCH |
|
|
|
FWD/REV SCAN button |
|
|
|
PLAY button |
SCAN |
PLAY |
|
SKIP |
|
STOP button |
|
|
|
FWD/REV SKIP button |
|
|
|
|
|
|
STOP |
|
|
|
PAUSE/SETUP button |
PAUSE/STEP |
SLOW |
SLOW button |
|
|
||||
PROGRAM button
1 2 3
Number buttons
4 5 6
CLEAR button
7 8 9
CLEAR |
PROGRAM |
0
*MENU BUTTON
Use the MENU button to display the menu screen included on DVD video discs. To operate a menu screen, follow the instructions in Using a DVD Menu (page 29).
** DIRECTIONAL ARROW BUTTONS
(up, down, left, right) for use in high-lighting a selection on a GUI menu screen, TITLE and MENU screen.
***TITLE BUTTON
Use the TITLE button to display the title screen included on DVD video discs. To operate a menu screen, follow the instructions in Using a Title Menu (page 29).
6
Introduction
IDENTIFICATION OF CONTROLS
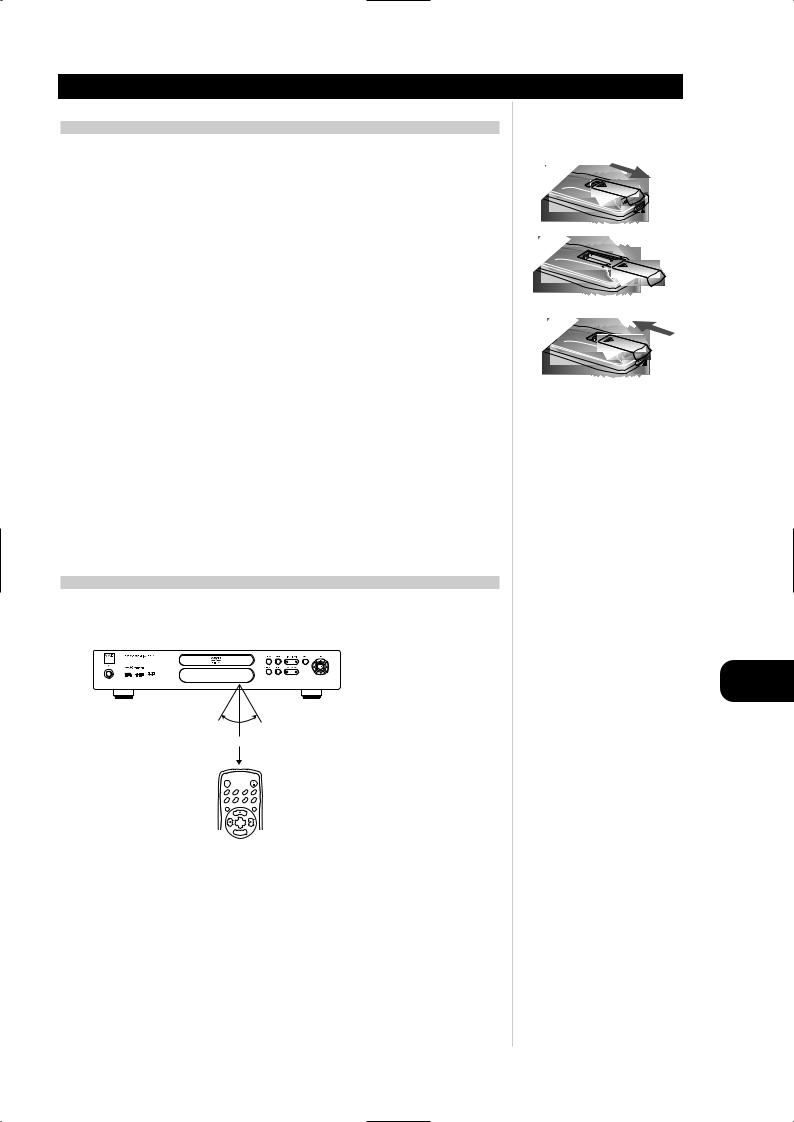
PREPARING THE REMOTE CONTROL
Insert the batteries into the remote control so you can use it to operate the DVD player.
1 Open the battery cover
2 Insert batteries (AAA size)
• Make sure to match the + and - on the batteries to the marks inside the battery compartment.
3 Close the cover
NOTES ON BATTERIES
•Improper use of batteries may cause battery leakage and corrosion.
•To operate the remote control correctly, follow the instructions.
•Do not insert the batteries into the remote control in the wrong direction.
•Do not charge, heat, open, or short-circuit the batteries.
•Do not throw the batteries into fire.
•Do not leave dead or exhausted batteries in the remote control.
•Do not use different types of batteries together, or mix old and new batteries.
•If you do not use the remote control for a long period of time, remove the batteries to avoid possible damage from battery corrosion.
•If the remote control does not function correctly or if the operating range becomes reduced, replace all batteries with new ones.
•If battery leakage occurs, wipe the battery liquid from the battery compartment, then insert new batteries.
•The batteries should last about one year with normal use.
OPERATING WITH THE REMOTE CONTROL
This section shows you how to use the remote control.
Point the remote control at the remote control sensor and press the buttons.
GB
|
30° 30° |
|
|
23 ft (7m) |
|
|
POWER |
OPEN/CLOSE |
|
SETUP |
REPEAT A-B RANDOM |
|
AUDIO |
SUBTITLE ANGLE SOUND |
|
TITLE |
MENU |
|
|
SELECT |
|
|
ENTER |
Distance: About 23 ft (7 m) from the front of the remote sensor |
||
Angle: |
About 30 in each direction of the front of the remote sensor |
|
•Do not expose the remote sensor of the DVD player to a strong light source such as direct sunlight or illumination. If you do so, you may not be able to operate the DVD player with the remote control.
NOTES ON THE REMOTE CONTROL
•Point the remote control at the remote sensor on the DVD player.
•Do not drop or give the remote control a shock.
•Do not leave the remote control near an extremely hot or humid place.
•Do not spill water or put anything wet on the remote control.
•Do not disassemble the remote control.
7
Introduction
NOTES ON DISCS
GB
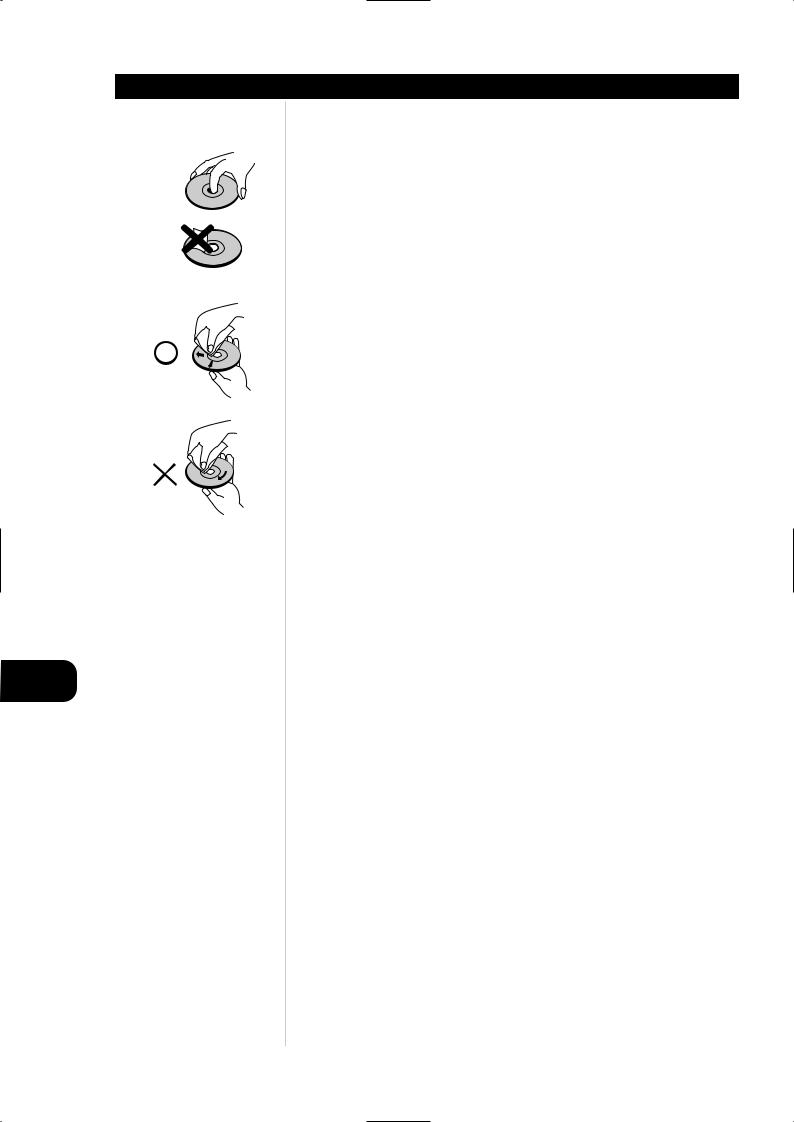
This section shows you how to handle, clean and store discs.
ON HANDLING DISCS
•Do not touch the playback side of the disc.
•Do not attach paper or tape to discs.
ON CLEANING DISCS
•Fingerprints and dust on the disc cause picture and sound deterioration. Wipe the disc from the centre outward with a soft cloth. Always keep the disc clean.
•If you cannot wipe off the dust with a soft cloth, wipe the disc lightly with a slightly moistened soft cloth and finish with a dry cloth.
•Do not use any type of solvents such as thinner, benzine, commercially available cleaners or anti-static spray for vinyl LPs. They may damage the disc.
ON STORING DISCS
•Do not store discs in a place subject to direct sunlight or near heat sources.
•Do not store discs in places subject to moisture and dust such as a bathroom or near a humidifier.
•Store discs vertically in a case. Stacking or placing objects on discs outside of their case may cause warping.
ABOUT THIS OWNER’S MANUAL
This owner’s manual explains the basic instructions of this DVD player.
Some DVD video discs have functions that may not be explained in this owner’s manual. Therefore, some instructions may differ from this owner’s manual, and there may be extra instructions. In this case, follow the instructions displayed on the TV screen or package.
 may appear on the TV screen during operation. This icon means the function explained in this owner’s manual is not available on that specific DVD video disc.
8
Connections
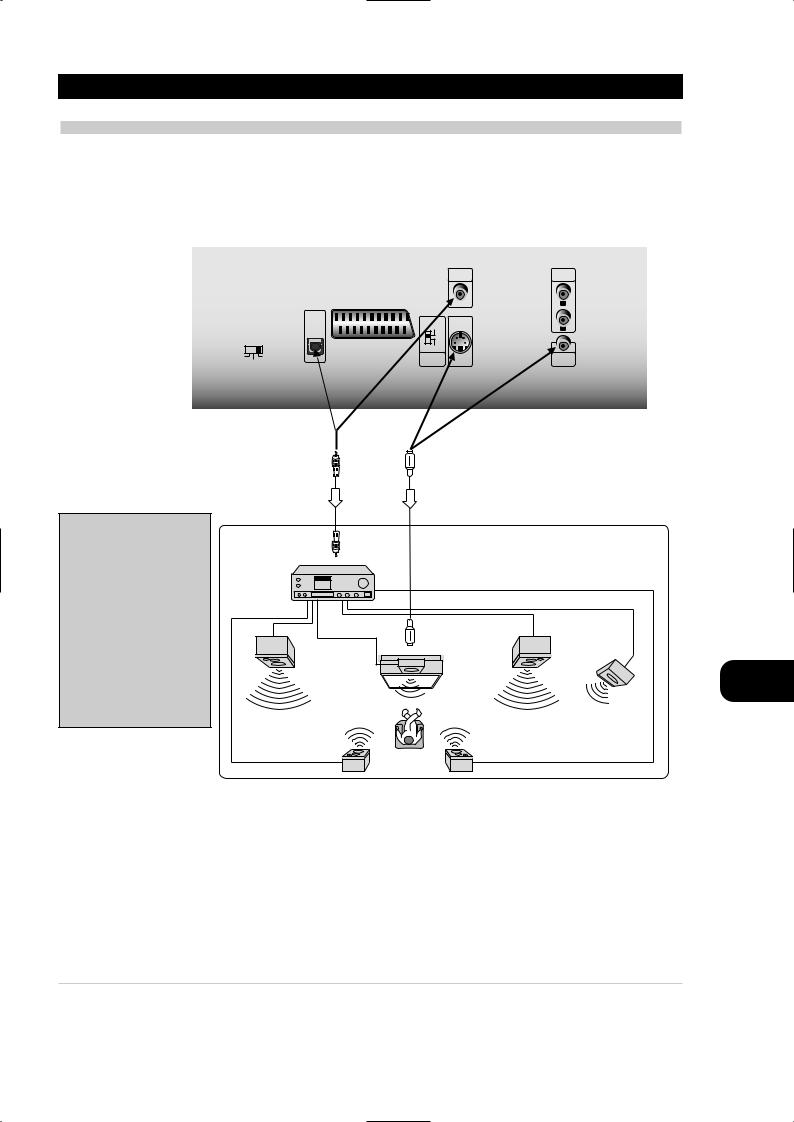
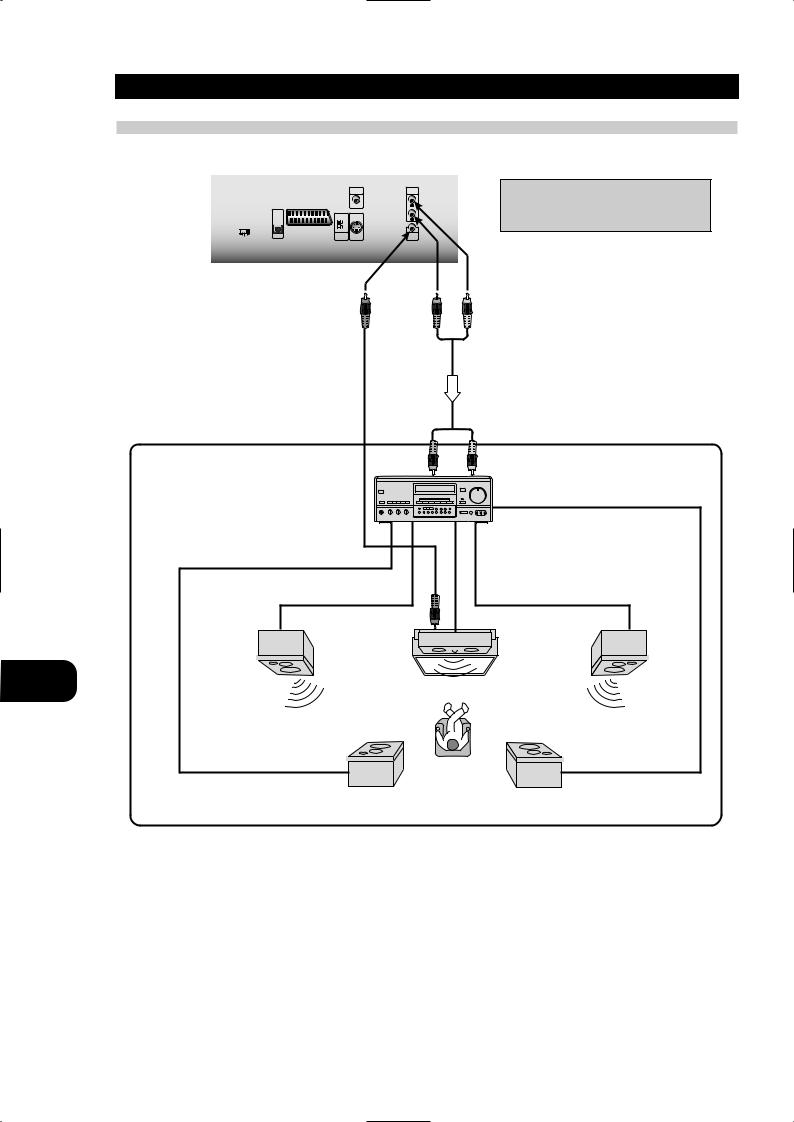
CONNECTING TO THE SURROUND SOUND SYSTEM
ENJOYING DOLBY DIGITAL SOUND
You can enjoy the high quality dynamic sound of Dolby Digital, Dolby Pro Logic and 2 Channel Digital Stereo.
DOLBY DIGITAL
Dolby Digital is the surround sound technology used in theatres showing the latest movies, and is now available to reproduce this realistic effect in the home. You can enjoy motion picture and live concert DVD video discs by connecting the DVD player to a 5.1 channel receiver equipped with a Dolby Digital decoder or Dolby Digital processor.
DIGITAL |
AUDIO |
OUT |
OUT |
COAXIAL |
L |
DIGITAL
OUT
S-VIDEO
R
TO TV |
COMPONENT |
PAL |
AUTO |
OPTICAL |
VIDEO |
S-VIDEO |
VIDEO |
|
NTSC |
|
OUTPUT |
OUT |
OUT |
To DIGITAL OUT
(COAXIAL OR OPTICAL)
75 ohm coaxial cable or optical cable
To S-VIDEO OUT or VIDEO OUT
S-Video cable or Video cable
To enjoy Dolby Digital sound from this DVD player you need the following:
•DVD recorded in Dolby Digital 5.1
•5.1 channel receiver equipped with a Dolby Digital decoder, or Dolby Digital processor and power amplifier
•5 speakers and 1 sub woofer
To enjoy Dolby Digital sound
You need to select Dolby Digital on the SETUP menu
To digital audio |
Connection example |
input. |
|
Receiver equipped with a Dolby Digital decoder.
To S-video input or
Video input
Front speaker |
|
Front speaker |
(left) |
Centre |
(right) |
|
speaker |
|
Subwoofer
Rear speaker |
Rear Speaker |
(left surround) |
(right surround) |
NOTES
GB
•Refer to the owner’s manual of your audio equipment as well.
•When you connect the DVD player to other equipment, be sure to turn off the power and unplug all of the equipment from the wall outlet before making any connections.
•The output sound of the DVD player has a wide dynamic range. Be sure to adjust the receiver’s volume to a moderate listening level. Otherwise, the speakers may be damaged by a sudden high volume sound.
•Turn off the receiver before you connect or disconnect the DVD player’s power cord. If you leave the receiver power on, the speakers may be damaged.
Manufactured under license from Dolby Laboratories.
Dolby, Pro Logic, and the double-D symbol are trademarks of Dolby Laboratories. Confidential Unpublished works. Copyright 1992-1997 Dolby Laboratories. All rights reserved.
9
Connections
CONNECTING TO THE SURROUND SOUND SYSTEM
ENJOYING DOLBY PRO LOGIC SURROUND SOUND
If your A/V receiver has a Dolby Pro Logic decoder, refer to the following connection diagram.
|
|
|
|
DIGITAL |
AUDIO |
|
|
|
|
OUT |
OUT |
|
|
|
|
COAXIAL |
L |
|
|
DIGITAL |
|
|
|
|
|
OUT |
|
|
|
|
|
|
S-VIDEO |
|
R |
|
|
|
|
|
|
|
|
|
TO TV |
|
|
|
|
|
COMPONENT |
|
|
PAL |
AUTO |
OPTICAL |
VIDEO |
S-VIDEO |
VIDEO |
|
NTSC |
|
OUTPUT |
OUT |
OUT |
To VIDEO OUT
Video cable
Connection example
Receiver equipped with
Dolby Pro Logic Surround
Connect one or two rear speakers.
Note: The surround effect is greatly enhanced by using two surround speakers
To AUDIO OUT
Audio cable
To audio input
GB
To video input |
Front Speaker (left) |
Rear speaker (left) |
Centre speaker |
Front speaker |
|
(right) |
TV
Rear speaker (right)
WITH A RECEIVER EQUIPPED WITH DOLBY DIGITAL
Connect the equipment the same way as described in Enjoying Dolby Digital Sound on page 9. Refer to that receiver’s owner’s manual and set the receiver so you can enjoy Dolby Pro Logic Surround sound.
WARNING
Do not set the Digital Audio Output of this DVD player to Dolby Digital unless you are connecting the DIGITAL OUT jack of this DVD player to an AV decoder that has the Dolby Digital decoding function. High volume sound may damage your hearing as well as the speakers (Refer to Selecting Digital Audio Output on page 20).
10

Connections
CONNECTING TO THE SURROUND SOUND SYSTEM
ENJOYING 2 CHANNEL DIGITAL STEREO SOUND
You can enjoy the dynamic sound of 2 Channel Digital Stereo by connecting this DVD player to a receiver equipped with a digital audio input and speaker system (right and left front speakers).
|
|
|
|
|
|
Connection example |
|
|
|
75 ohm coaxial cable or optical cable |
|
||
|
|
|
|
|
To S-video input |
To digital audio input |
|
|
|
|
|
or Video input |
|
|
To DIGITAL OUT |
|
|
To S-VIDEO OUT |
S-Video cable |
|
|
|
|
or Video cable |
Front speaker |
||
(COAXIAL or OPTICAL) |
|
|
or VIDEO OUT |
|||
|
|
|
(left) |
|||
|
|
|
|
|
|
|
|
|
|
DIGITAL |
AUDIO |
|
TV |
|
|
|
OUT |
OUT |
|
TV |
|
|
|
COAXIAL |
L |
|
|
|
DIGITAL |
|
|
|
|
|
|
OUT |
|
|
|
|
|
|
|
S-VIDEO |
|
R |
|
|
|
TO TV |
COMPONENT |
|
|
|
|
|
|
|
|
|
|
|
PAL AUTO |
OPTICAL |
VIDEO |
S-VIDEO |
VIDEO |
|
|
NTSC |
|
OUTPUT |
OUT |
OUT |
|
|
Receiver equipped with a digital audio input.
Front speaker (right)
ENJOYING DTS SOUND
Your A/V Receiver or processor must be equipped with a DTS Decoder
The digital output (see selecting digital output page 20) must be set to “stream”. The disc must have a DTS soundtrack
75 ohm coaxial cable or optical cable
To S-video input or Video input
To DIGITAL OUT |
To S-VIDEO OUT |
S-Video cable or |
|
Video cable |
|||
(COAXIAL or OPTICAL) |
or VIDEO OUT |
||
|
Connection example
Receiver equipped with a DTS decoder.
To digital audio input
Front |
|
Front speaker |
speaker (left) |
Centre |
(right) |
|
|
|
|
speaker |
|
DIGITAL |
AUDIO |
OUT |
OUT |
|
|
|
COAXIAL |
L |
|
Sub woofer |
|
DIGITAL |
|
|
|
|
|
|
OUT |
|
|
|
Rear speaker |
Rear speaker |
|
|
S-VIDEO |
|
R |
||
|
|
|
|
(left surround) |
(right surround) |
|
PAL AUTO |
OPTICAL |
VIDEO |
S-VIDEO |
VIDEO |
||
|
|
TO TV |
|
|
|
|
|
|
COMPONENT |
|
|
|
|
NTSC |
|
OUTPUT |
OUT |
OUT |
|
|
GB
NOTES
•Refer to the owner’s manual of your receiver as well.
•Before you connect the DVD player to other equipment, be sure to turn off the power and unplug all of the equipment from the wall outlet before making any connections.
•The output sound of the DVD player has a wide dynamic range. Be sure to adjust the receiver’s volume to a moderate listening level. Otherwise, the speakers may be damaged by a sudden high volume sound.
•Turn off the receiver before you connect or disconnect the DVD player’s power cord. If you leave the receiver power on, the speakers may be damaged.
DTS and DTS Digital Out are trademarks of Digital Theater Systems Inc.
11
Connections
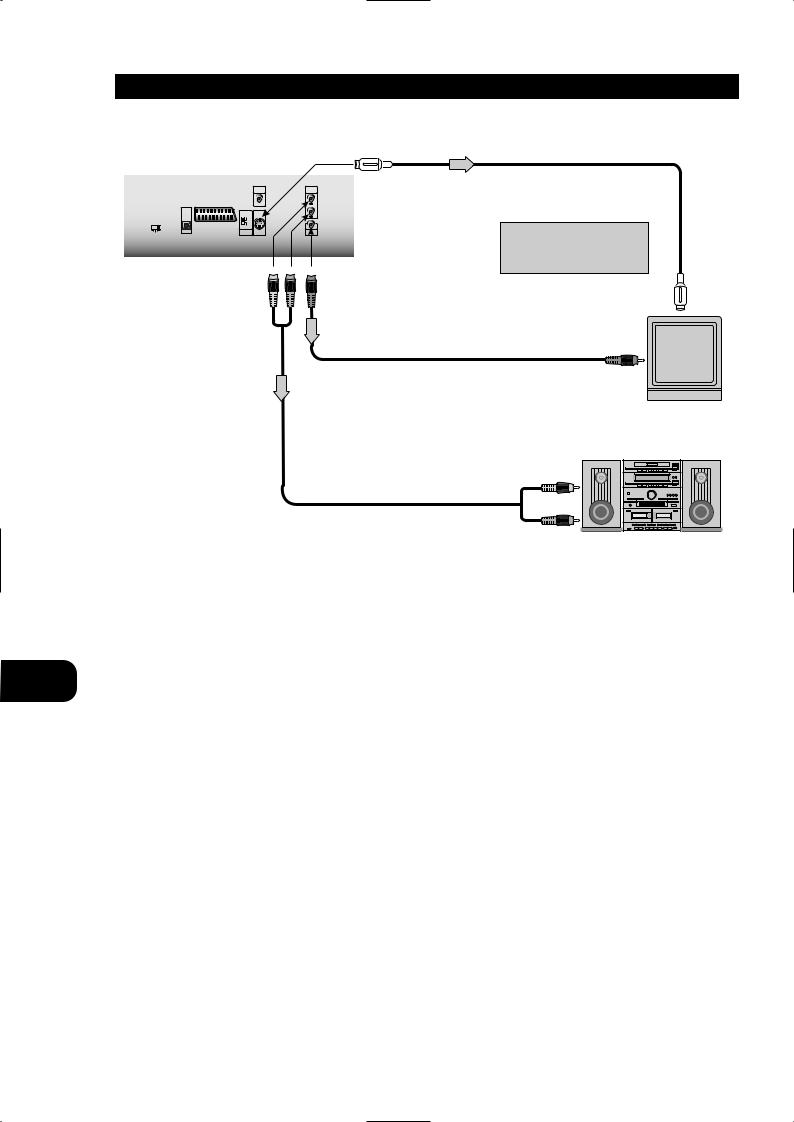
CONNECTING TO A STEREO SYSTEM
TO S-VIDEO OUT
|
|
|
|
DIGITAL |
AUDIO |
|
|
|
|
OUT |
OUT |
|
|
|
|
COAXIAL |
L |
|
|
DIGITAL |
|
|
|
|
|
OUT |
|
|
|
|
|
|
S-VIDEO |
|
R |
|
|
|
|
|
|
|
|
|
TO TV |
|
|
|
|
|
COMPONENT |
|
|
PAL |
AUTO |
OPTICAL |
VIDEO |
S-VIDEO |
VIDEO |
|
NTSC |
|
OUTPUT |
OUT |
OUT |
To AUDIO OUT (L/R) 

 To VIDEO OUT
Video cable (supplied)
Audio cable (supplied)
GB
NOTES
S-video cable
If the TV has an S-video input, connect the DVD player with the S-video cable.
To S-video input
To video input
TV or monitor with audio/visual inputs
To audio inputs of the amplifier
Audio system
•Refer to the owner’s manual of your audio system as well.
•Before you connect the DVD player to other equipment, be sure to turn off the power and unplug all of the equipment from the wall outlet before making any connections.
•If you place the DVD player near a tuner or radio, the radio broadcast sound might be distorted. In this case, move the DVD player away from the tuner and radio.
•The output sound of the DVD player has a wide dynamic range. Be sure to adjust the receiver’s volume to a moderate listening level. Otherwise, the speakers may be damaged by a sudden high volume sound.
•Turn off the receiver before you connect or disconnect the DVD player’s power cord. If you leave the receiver power on, the speakers may be damaged.
WARNING
Do not set the Digital Audio Output of this DVD player to Dolby Digital unless you are connecting the DIGITAL OUT jack of this DVD player to an AV decoder that has the Dolby Digital decoding function. High volume sound may damage your hearing as well as the speakers (Refer to Selecting Digital Audio Output on page 20).
12
Connections
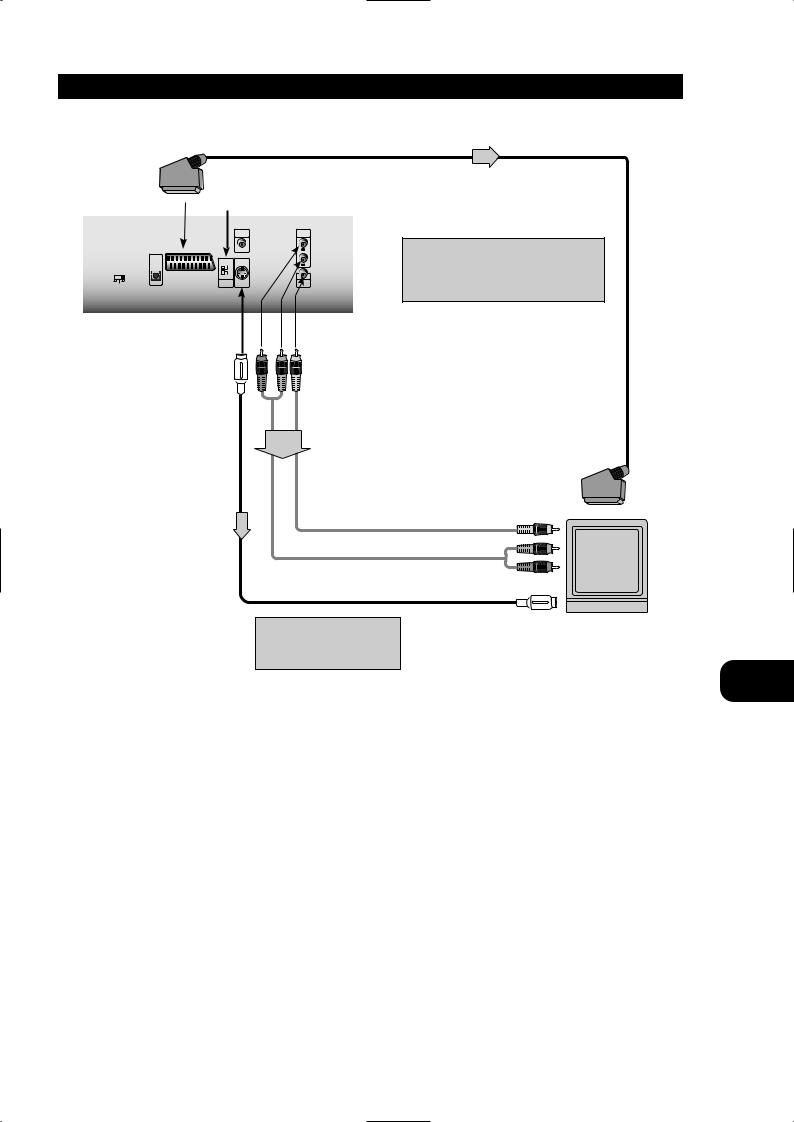
CONNECTING TO A TV
To SCART
21-pin SCART cable (not supplied)
VIDEO OUTPUT SELECT switch
|
|
|
|
DIGITAL |
|
|
|
|
OUT |
|
|
|
|
COAXIAL |
|
|
DIGITAL |
|
|
|
|
OUT |
|
|
|
|
|
S-VIDEO |
|
|
|
|
TO TV |
|
|
|
|
COMPONENT |
|
PAL |
AUTO |
OPTICAL |
VIDEO |
S-VIDEO |
|
NTSC |
|
OUTPUT |
OUT |
To S-VIDEO OUT
AUDIO
OUT
L
R
VIDEO
OUT
For using SCART’s RGB signal, set the VIDEO OUTPUT switch to COMPONENT or for using S-VIDEO OUT jack, set the VIDEO OUTPUT switch to S-VIDEO
To AUDIO (L/R)/VIDEO OUT
Audio/Video cable (supplied)
To 21-pin SCART socket
To video input
If the TV has an S-video input, connect the DVD player with the S-video cable.
NOTES
To audio input
To S-video input
TV or monitor with audio/video inputs
GB
•Refer to the owner’s manual of your TV as well.
•Before you connect the DVD player to your TV, be sure to turn off the power and unplug both units from the wall outlet before making any connections.
•Connect the DVD player to your TV directly. If you connect the DVD player to a VCR, the playback picture will be distorted because DVD video discs are copy protected.
•In case of the TV set corresponding to RGB signal, the RGB signal is automatically selected in the TV (Only when the VIDEO OUTPUT Switch is set to COMPONENT on the Rear Panel).
WARNING
Do not set the Digital Audio Output of this DVD player to Dolby Digital unless you are connecting the DIGITAL OUT jack of this DVD player to an AV decoder that has the Dolby Digital decoding function. High volume sound may damage your hearing as well as the speakers (Refer to Selecting Digital Audio Output on page 20).
13
 Loading...