


NAD L 40
VOLUME
Compact Disc Receiver L40 |
|
|
|
|
|
|
TONE |
BASS EQ |
|
|
|
|
|
|
|
REPEAT |
RANDOM |
DEFEAT |
|
|
|
RANDOM |
REPEAT 1 ALL |
TOTAL |
STEREO |
RDS |
|
|
|
|
|
|
PROGRAM |
ANTENNA |
REMAIN |
BASS EQ |
TONE DEFEAT |
|
|
|
|
|
|
|
|
|
|
|
kHz |
|
|
|
|
|
|
|
|
|
|
MHz |
CANCEL |
DISPLAY |
MONO |
|
|
|
|
|
|
|
STORE |
|
|
|||
STOP OPEN |
PLAY |
PAUSE |
SKIP/ PRESET |
INPUT SELECTOR |
|
|
TREBLE |
BALANCE |
BASS |
|
PHONES |
|
|
|
|
|
SEARCH / TUNE |
|
|
|
|
GB • OWNER'S MANUAL
F • MANUEL D'INSTALLATION
©1998. NAD ELECTRONICS LTD. L40
D• BEDIENUNGSANLEITUNG
E• MANUAL DEL USUARIO
I • MANUALE DELLE ISTRUZIONI
S • BRUKSANVISNING
P • MANUAL DO PROPRIETÁRIO
IMPORTANT SAFETY INSTRUCTIONS
CAUTION |
|
ATTENTION: |
RISK OF ELECTRIC |
|
RISQUE DE CHOC ELECTRIQUE |
SHOCK DO NOT OPEN |
|
NE PAS OUVRIR |
|
|
|
CAUTION: TO REDUCE THE RISK OF ELECTRIC SHOCK, DO NOT REMOVE COVER (OR BACK). NO USER SERVICEABLE PARTS INSIDE. REFER SERVICING TO QUALIFIER SERVICE PERSONNEL
Warning: To reduce the risk of fire or electric shock, do not expose this unit to rain or moisture.
lightning flash with an arrowhead symbol within an equilateral trianis intended to alert the user to the presence of uninsulated “danger-
ous voltage” within the product’s enclosure that may be of sufficient magnitude to constitute a risk of electric shcok to persons.
ATTENTION
POUR É VITER LES CHOC ELECTRIQUES, INTRODUIRE LA LAME LA PLUS LARGE DE LA FICHE DANS LA BORNE CORRESPONDANTE DE LA PRISE ET POUSSER JUSQU’AU FOND.
CAUTION
TO PREVENT ELECTRIC SHOCK MATCH WIDE BLADE OF PLUG
TO WIDE SLOT FULLY INSERT.
If an indoor antenna is used (either built into the set or installed separately), never allow any part of the antenna to touch the metal parts of other electrical appliances such as a lamp, TV set etc.
exclamation point within an equilateral triangle is intended to alert user to the presence of important operating and maintenance
(servicing) instructions in the literature accompanying the product.
Do not place this unit on an unstable cart, stand or tripod, bracket or table. The unit may fall, causing serious injury to a child or adult and serious damage to the unit. Use only with a cart, stand, tripod, bracket or table recommended by the manufacturer or sold with the unit. Any mounting of the device on a wall or ceiling should follow the maufacturer’s instructions and should use a mounting accessory recommended by the manufacturer.
An appliance and cart combination should be moved with care. Quick stops, excessive force and uneven surfaces may cause the appliance and cart combination to overturn.
Read and follow all the safety and operating instructions before connecting or using this unit. Retain this notice and the owner’s manual for future reference.
All warnings on the unit and in it’s operating instructions should be adhered to.
Do not use this unit near water; for example, near a bath tub, washbowl, kitchen sink, laundry tub, in a wet basement or near a swimming pool.
The unit should be installed so that its location or position does not interfere with its proper ventilation. For example, it should not be situated on a bed, sofa, rug or similar surface that may block the ventilation openings; or placed in a built-in installation, such as a bookcase or cabinet, that may impede the flow of air through its ventilation openings.
The unit should be situated from heat sources such as radiators, heat registers, stoves or other devices (including amplifiers) that produce heat.
The unit should be connected to a power supply outlet only of the voltage and frequency marked on its rear panel.
The power supply cord should be routed so that it is not likely to be walked on or pinched, especially near the plug, convenience receptacles, or where the cord exits from the unit.
Unplug the unit from the wall outlet before cleaning. Never use benzine, thinner or other solvents for cleaning. Use only a soft damp cloth.
The power supply cord of the unit should be unplugged from the wall outlet when it is to be unused for a long period of time.
Care should be taken so that objects do not fall, and liquids are not spilled into the enclosure through any openings.
This unit should be serviced by qualified service personnel when:
A.The power cord or the plug has been damaged; or
B.Objects have fallen, or liquid has been spilled into the unit; or
C.The unit has been exposed to rain or liquids of any kind; or
D.The unit does not appear to operate normally or exhibits a marked change in performance; or
E.The device has been dropped or the enclosure damaged.
DO NOT ATTEMPT SERVICING OF THIS UNIT YOURSELF. REFER SERVICING TO QUALIFIED SERVICE PERSONNEL.
Upon completion of any servicing or repairs, request the service shop’s assurance that only Factory Authorized Replacement Parts with the same characteristics as the original parts have been used, and that the routine safety checks have been performed to guarantee that the equipment is in safe operating condition.
REPLACEMENT WITH UNAUTHORIZED PARTS MAY RESULT IN FIRE, ELECTRIC SHOCK OR OTHER HAZARDS.
CAUTION
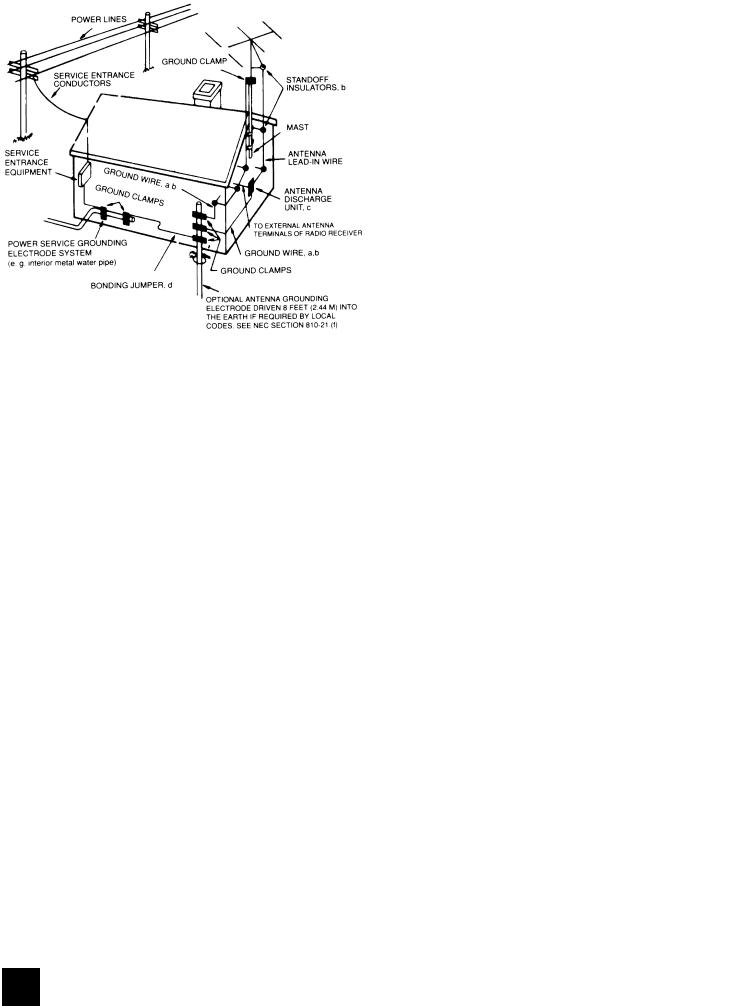
POWER LINES
Any outdoor antenna must be located away from all power lines.
OUTDOOR ANTENNA GROUNDING
If an outside antenna is connected to your tuner or tuner-preamplifier, be sure the antenna system is grounded so as to provide some protection against voltage surges and built-up static charges. Section 810 of the National Electrical Code, ANSI/NFPA No. 70-1984, provides information with respect to proper grounding of the mast and supporting structure, grounding of the lead-in wire to an antenna discharge unit, size of grounding conductors, location of antenna discharge unit, connection to grounding electrodes and requirements for the grounding electrode.
a.Use No. 10 AWG (5.3mm2) copper, No. 8 AWG (8.4mm2) aluminium, No. 17 AWG (1.0mm2) copper-clad steel or bronze wire, or larger, as a ground wire.
b.Secure antenna lead-in and ground wires to house with stand-off insulators spaced from 4-6 feet (1.22 - 1.83 m) apart.
c.Mount antenna discharge unit as close as possible to where lead-in enters house.
d.Use jumper wire not smaller than No.6 AWG (13.3mm2) copper, or the equivalent, when a separate antenna-grounding electrode is used. see NEC Section 810-21 (j).
EXAMPLE OF ANTENNA GROUNDING AS PER NATIONAL ELECTRICAL CODE INSTRUCTIONS CONTAINED IN ARTICLE 810 - RADIO AND TELEVISION EQUIPMENT.
NOTE TO CATV SYSTEM INSTALLER: This reminder is provided to call the CATV system installer’s attention to Article 820-22 of the
National Electrical Code that provides guidelines for proper grounding and, in particular, specifies that the ground cable ground shall be connected to the grounding system of the building, as close to the point of cable entry as practical.
NAD 2

REAR PANEL CONNECTIONS (Figure 1.)
1
R |
L |
|
|
|
FM 75 |
|
|
|
|
|
ANTENNA IN |
|
|
TAPE |
AUX |
PRE |
|
|
IN |
OUT |
IN |
OUT |
NAD LINK |
|
L |
|
|
|
OUT |
|
R |
|
|
|
IN |
2 3 4 5 6 7
FRONT PANEL CONTROLS (Figure 2.)
©1998. NAD ELECTRONICS LTD. L40
1 |
3 |
|
|
4 |
|
|
|
9 |
11 |
13 |
15 |
|
|
20 |
|
|
|
|
|
|
|
|
|
|
|
|
|
|
|
VOLUME |
L40 |
|
|
|
|
|
|
|
|
|
|
|
|
|
|
LTD. |
|
|
Compact Disc Receiver L40 |
|
|
|
|
|
|
|
|
|
TONE |
BASS EQ |
|
||
|
|
|
|
|
|
|
|
|
REPEAT |
RANDOM |
DEFEAT |
|
|||
|
|
|
|
|
|
|
|
|
|
|
|
|
|
|
|
|
RANDOM |
|
REPEAT 1 ALL |
TOTAL |
STEREO |
RDS |
|
|
|
|
|
|
|
|
|
|
PROGRAM |
|
ANTENNA |
REMAIN |
BASS EQ |
TONE DEFEAT |
|
|
|
|
|
|
|
|
|
|
|
|
|
|
|
|
kHz |
|
|
|
|
|
|
|
|
|
|
|
|
|
|
|
MHz |
|
STORE |
CANCEL |
DISPLAY |
MONO |
|
|
|
|
|
|
|
|
|
|
|
|
|
|
|
||||
|
STOP OPEN |
PLAY |
PAUSE |
SKIP/ PRESET |
INPUT SELECTOR |
|
|
|
|
|
TREBLE |
BALANCE |
BASS |
||
PHONES |
|
|
|
|
|
|
|
|
|
SEARCH / TUNE |
|
|
|
©1998.ELECTRONICSNAD |
|
|
|
|
|
|
|
|
|
|
|
|
|
|
|
|
|
2 |
5 |
|
6 |
7 |
|
8 |
10 |
12 |
17 |
|
14 |
16 |
18 |
19 |
|
REMOTE CONTROL
TUNER |
AUX |
STOP |
PLAY |
PAUSE |
MUTE DISPLAY
VOLUME
|
L 40 |
NL |
Batterij niet |
weggooien maar inleveren als KCA
SAFETY WARNING
CLASS 1 LASER PRODUCT
LUOKAN 1 LASERPLAITE
KLASS 1 LASERAPPARAT
THIS DIGITAL APPARATUS DOES NOT EXCEED THE CLASS B
LIMITS FOR RADIO NOISE EMISSIONS FROM DIGITAL APPARATUS AS SET OUT IN THE RADIO INTERFERENCE REGULATIONS OF THE CANADIAN DEPARTMENT OF COMMUNICATIONS.
LE PRESENT APPAREIL NUMVERIQUE N’EMENT PAS DE BRUITS RADIOELECTRIQUES DEPASSANT LES LIMITES APPLICABLES AUX APPAREILS NUMERIQUES DE LA CALSSE B
PRESCRITES DANS LE REGLEMENT SUR LE BROUILLAGE
RADIO ELECTRIQUE EDICTE PAR LE MINISTERE DES COMMU-
NICATIONS DU CANADA.
WARNING - INVISIBLE LASER RADIATION WHEN OPEN AND
INTERLOCKS DEFEATED. AVOID EXPOSURE TO BEAM.
VORSICHT! - UNSICHTBARE LASERTRAHLUNG TRITT AUS, WENN DECKEL GEÖFFNET UND WENN SICHERHEITSVERRIEGELUNG ÜBERBRÜCKT IST. NICHT DEM STRAHL AUSSETZEN.
ADVARSEL - USYNLIG LASERSTRÅLING VED ÅBNING, NÅR
SIKKERHEDSAFBRYDERE ER UDE AF FUNKTION. UNDGÅ
UDSÆTTELSE FOR STRÅLING.
ADVARSEL - USYNLIG LASERSTRALING NÅR DEKSEL ÅPNES OG
SIKKERHEDSLÅS BRYTES. UNNGÅ EKSPONERING FOR STRÅLEN.
VARING - OSYNLING LASERSTRÅLNING NÄR DENNA DEL ÄR ÖPPNAD OCH SPÄRRAR ÄR URKOPPLADE. STRÅLEN ÄR FARLIG.
VARO! - AVATTAESSA JA SUOJALUKITUS OHITETTAESSA OLET
ALTTINA NÄKTMÄTONTÄ LASERSÄTEILYLLE. ÄLÄ KAISO SÄTEESEEN.
NAD 3

|
|
|
|
|
|
|
|
|
GB |
|
|
INSTRUCTION MANUAL NAD L 40 |
|||
|
|
|
|
|
CD RECEIVER. |
|
|
QUICK REFERENCE GUIDE: |
|
|
|
||||
General: How to... |
Refer to: Chapter; |
Section: |
|||||
|
|
|
|
|
|
|
|
connect the loudspeakers |
Rear Panel connections |
1 |
|
||||
connect the FM antenna |
Rear Panel connections |
5 |
|
||||
connect and use NAD-Link |
Rear Panel connections |
6 |
|
||||
connect a tape recorder |
Rear Panel connections |
2 |
|
||||
connect extra sound source |
Rear Panel connections |
3 |
|
||||
(MiniDisc player, television) to AUX |
|
|
|
||||
switch Power on/off or to Stand-by/on |
Front Panel Control |
1 |
|
||||
use the headphones socket |
Front Panel Control |
2 |
|
||||
select a source |
|
Front Panel Control |
8 |
|
|||
use the Tone controls & Tone Defeat |
Front Panel Control |
13 & 18 |
|||||
use Bass EQ |
|
Front Panel Control |
15 |
|
|||
use the remote control |
Remote control |
|
|
||||
replace remote control handset batteries |
Remote control |
|
|
||||
Tuner: How to... |
|
|
enter a preset |
Front Panel Control |
10 |
delete a preset |
Front Panel Control |
12 |
add/change a name to a preset |
Front Panel Control |
11 |
tune to a radio station automatically (search) |
Front Panel Control |
17 |
tune to a radio station manually |
Front Panel Control |
17 |
tune to a weak radio station (mute off) |
Front Panel Control |
16 |
display RDS information |
Front Panel Control |
14 |
(PS; station name and RT; RadioText) |
|
|
CD: How to... |
|
|
load a CD |
Front Panel Control |
3 & 5 |
play a CD |
Front Panel Control |
6 |
pause a CD |
Front Panel Control |
6 |
skip to a different track |
Front Panel Control |
7 |
engage Repeat 1 and Repeat All mode |
Front Panel Control |
9 |
program for selective track listening |
Front Panel Control |
10 & 12 |
engage Random Play |
Front Panel Control |
11 |
display time information of CD |
Front Panel Control |
14 |
scan within tracks |
Front Panel Control |
17 |
NAD 4

NOTES ON INSTALLATION
Your L 40 should be placed on a firm, level surface. Avoid placing the unit in direct sunlight or near sources of heat and damp.
Allow adequate ventilation. Do not place the unit on a soft surface like a carpet. Do not put it in an enclosed position such as a bookcase or cabinet that may impede air-flow through the ventilation slots.
Switch the unit off before making any connections.
Use high quality RCA leads and connectors for optimum performance and reliability. Ensure that leads and connectors are not damaged in any way and all connectors are firmly plugged. The RCA connectors on your L 40 are colour coded red for Right audio and white for Left audio.
For the best performance, use quality speaker leads of 16 gauge thickness or more.
If the unit will not be used for some time, disconnect the plug from the AC socket.
Should water get into your L 40, shut off the power to the unit and remove the plug from the AC socket. Have the unit inspected by a qualified service technician before attempting to use it again.
Do not remove the cover, there are no user-ser- viceable parts inside.
Use a dry soft cloth to clean the unit. If necessary, lightly dampen the cloth with soapy water. Do not use solutions containing benzol or other volatile agents.
REAR PANEL CONNECTIONS
1. SPEAKERS
Outputs for speakers with an impedance of 4 ohm or more.
The 'RIGHT+' terminal should be connected to the '+' terminal on your right-hand loudspeaker and the 'RIGHT-' connected to the loudspeaker's '-' terminal.
Connect to the left-hand speaker the terminals marked 'LEFT+' and 'LEFT-' in the same way.
Heavy duty stranded wire or specialised speaker cables to connect the loudspeakers to your L 40 is recommended.
The high-current binding post terminals can be used as a screw terminal for cables terminated within spades or pin connectors, or for cables with bare wire ends.
GB
BARE WIRES AND PIN CONNECTORS
Bare wires and pin connectors should be inserted into the hole in the shaft of the speaker terminals. Unscrew the speaker terminal's plastic bushing until the hole in the screw shaft is revealed. Insert the pin or bare cable end into the hole and secure by tightening down the terminal's bushing.
Avoid any bare metal from speaker cables touching the back panel or another connector. Ensure that there is only 1/2" (1cm) of bare cable or pin and no loose strands of speaker wire.
2. TAPE IN, OUT
Connections for analogue recording and playback to an audio tape recorder of any type. Using a twin RCA-to-RCA lead, connect the left and right output (often labelled as “playback”, “Line out”, “Output”, “Analogue Output”) of the tape machine to the TAPE IN connectors of the L 40 for playback. Connect the left and right input (often labelled as “Record”, “Line in”, “Input”, “Analogue Input”) of the tape machine to the TAPE OUT connectors of the L 40 for recording.
3. AUX INPUT
Input for additional line level input signals such as a minidisc player. Use a twin RCA-to-RCA lead to connect the auxiliary unit's left and right line level outputs (often labelled as “Line out”, “Output”, “Analogue output”) to this input.
4. PRE OUT
Connections to an external power amplifier.
5. FM ANTENNA
A ribbon wire FM antenna is included and should be connected to the FM ANTENNA connector at the rear of the unit using the 'balun' adapter supplied. The ribbon aerial should be mounted on a vertical surface and placed so that it forms a 'T'.
Experiment with placement of the antenna to find the position that gives the best signal strength and lowest background noise.
An inadequate FM signal normally results in high level of hiss, especially with stereo reception, and interference from external electrical sources. The performance of tuner section can be improved by using an externally mounted FM antenna. A qualified aerial installer will be able to advise and fit a recommended aerial for your reception conditions.
SPADE CONNECTORS
These should be slotted under the terminal's screw bushings, which are then fully tightened. Ensure the connectors are tightly secured and there is no danger of bare metal from spade connectors touching the back panel or another connectors, as this may cause damage.
6. NAD-LINK IN, OUT
The NAD-Link connectors are used to pass commands from the remote control to and from other units fitted with NAD-Link connectors. This allows centralised control of a complete system or gives system control from more than one room and remote control operation of NAD units that are not remote controllable on their own.
NAD 5

GB
To function with other units, connect the L 40's NAD-LINK OUT to the NAD-LINK IN on the other unit. NAD-LINK connectors can be daisy-chained, IN to OUT, so that a whole system can be controlled from the remote control facilities of one unit.
7. AC POWER CORD
Connect the AC Power cord to a suitable AC outlet socket.
FRONT PANEL CONTROL
1. POWER
Press the POWER button to switch unit ON. The display and volume control LED will illuminate.
Pressing the POWER switch again will turn the unit OFF completely. The L 40 uses a memory back-up system to store preset station information for the tuner. This information is retained for several weeks, even the unit is switched off completely or unplugged.
REMOTE CONTROL:
STAND-BY button (green):
Press this button to switch the unit from operating to the Stand-by mode and vice versa: Press this button again to switch the unit on from Stand-by.
NOTE:
Stand-by mode is indicated by the amber light just over the green POWER button on the front panel (No. 1)
In Stand-by mode, the L 40 uses very little power. However, it is recommended that you switch the unit totally off if it is not going to be used for more than a couple of days. Switch off completely by pressing the POWER button on the front panel (No. 1), all lights will extinguish.
2. PHONES
A 1/4" stereo jack socket is supplied for headphone listening and will work with conventional headphones of any impedance. Inserting a headphone jack into this socket automatically switches off the loudspeakers. The volume, tone and balance controls are operative for headphones listening. Use a suitable adapter to connect headphones with other types of connectors, which have 3.5mm stereo 'personal stereo' jack plug.
NOTE:
Make sure the volume control is turned to minimum (fully anti-clockwise) before connecting headphones.
Listening at high levels can damage your hearing.
3. DISC DRAWER
To load a disc, press the STOP/OPEN (No. 5) button to open the disc drawer. Place the CD within the large circular recess in the drawer, with its transparent playing surface facing down. The label must face up.
NAD 6
Press OPEN again to close the drawer or press PLAY/PAUSE to close the drawer and start playback.
CD-3 discs (3-inch CD 'singles') can be played without the aid of an adapter. Place the disc in the drawer, centred in the smaller circular recess, with its label facing up.
NOTE:
This player is not designed to accommodate a 'damping disc' placed on a CD, nor two CDs stacked together. It plays audio CDs, but not discs identified as CD-V, DVD, CD-I, CD-ROM, or PHOTO CD.
4. DISPLAY (LCD)
The LCD display provides information on the selected input and status of the CD and Tuner.
IN CD MODE:
TRACK NUMBER. Each disc is segmented into numbered tracks when the recording is made; typically each numbered track will correspond to a different song, symphonic movement, etc.
These track numbers are identified on the CD package and are encoded in the disc by its manufacturer.
Normally the alpha-numeric section of the display shows the time elapsed since the beginning of the current track. Using the DISPLAY button (No. 14) you can switch the display to show the playing time remaining to the end of the disc.
A right-pointing arrowhead  , located near the left edge of the display, lights up during play. Two
vertical bars |
|
|
|
indicate that the player is in pause. |
|
|
In stop mode the display reverts to showing the number of tracks and total playing time of the disc.
“NO DISC” is indicated in the display when there is no disc in the drawer or when you load a disc that cannot be read (because it is dirty or is upside-down).
“REPEAT 1” lights up in the upper-left corner during repeat-play of a single track.
“REPEAT ALL” lights up during repeat play of the entire CD or all pre-programmed tracks.
Both “REPEAT 1” and “REPEAT ALL” can be engaged by pressing button No. 9.
“TOTAL REMAIN” lights up in the centre area of the display if you have pressed the DISPLAY button to show the remaining time in the disc.
“RANDOM.” When the L 40 is in random mode "RANDOM" will be shown in the display panel.

“PROGRAM” lights up when the CD player is being programmed to play a specific selection of tracks (using the STORE and CANCEL buttons; No’s. 10 + 12). PROGRAM also lights up during pre-pro- grammed play-back of a CD.
IN TUNER MODE:
The alpha numeric section of the display will normally show the preset number and station name if an RDS station is received, or the programmed name. If no name was programmed or it is a radio station without RDS, the reception frequency in Mega Hertz (MHz) will be displayed.
“ANTENNA”, and the horizontal bars directly underneath light up in the display to indicate the signal strength of the radio station received. The more bars are lit, the stronger the signal.
Centre Tune, as indicated by a dot directly over the “TONE DEFEAT” indicator lights up if the tuner is tuned exactly on the centre frequency of the radio station. Centre Tune also lights up when the unit receives a remote command.
“RDS”, in the top right hand corner, lights up when a radio station transmitting RDS information is received.
NOTE:
The RDS feature is totally dependent on the capability of the radio broadcast. Many stations do not yet broadcast in RDS. NAD can make no guarantee about local RDS availability. Please check with your local broadcasters.
GENERAL:
“BASS EQ” lights up in the display if BASS EQ has been selected (No. 15)
“TONE DEFEAT” lights up in the display if TONE DEFEAT has been selected (No. 13).
REMOTE RECEIVER. An infrared sensor, located at the left-hand portion of the display window, receives commands from the remote control. There must be a clear line-of-sight path from the remote control to this window; if that path is obstructed, the remote control may not work. When the unit receives a command from the remote control, this is indicated in the display by a blinking dot.
5. STOP/OPEN
Pressing this button once stops the CD playback, cancels any repeat-play cycle, and re-sets the pickup to the beginning of the disc. The display reverts to showing the number of tracks and total playing time on the disc.
Press this button again to open the disc drawer, press it again to close the drawer.
When the drawer is closed, the player scans the
GB
disc's 'table of contents' and displays the number of tracks and total playing time on the disc. If you press PLAY to close the drawer this information is skipped, and unit starts playing the CD at Track 1.
NOTE:
The disc drawer is opened and closed by an internal motor. Do not close the drawer by hand when the unit is powered off.
REMOTE:
On the remote control handset there is also a STOP button which performs almost the same function as the button on the front panel of the L 40, however this button does not open or close the tray door.
6. PLAY/PAUSE
Press the PLAY/PAUSE button to start playback of a CD, the PLAY mode is identified by a right-pointing
arrowhead  in the display.
Press PLAY/PAUSE again to momentarily stop playback (the CD player is now in “Pause” mode,
identified by two vertical bars |
|
|
|
in the display. |
|
|
To resume playback at the exact point where it was paused, press PLAY/PAUSE again. If you don't want to resume play at the same point, you may use the SKIP/PRESET (No.7) or SEARCH/TUNE (No. 17) controls to cue the pickup to a different starting point before pressing PLAY again.
On the remote control there is also a PLAY/PAUSE button. This button performs the same actions as the button on the front panel.
7. SKIP/PRESET
The SKIP/PRESET control actually operates two buttons either side of the control, indicated by little raised pips. To operate, press either one of the
desired pips; the left one for SKIP BACK 
 , the right one for SKIP FORWARD
 .
.
IN CD MODE:
SKIP BACK 

The SKIP 
 button causes the laser to jump backwards to the beginning of each numbered track on the disc. The first press skips back to the begin-
ning of the current track. Press SKIP 
 twice in rapid succession to skip back to the preceding track. Continuous pressure will cause the player to jump to preceding tracks repeatedly until the button is released.
SKIP FORWARD 

During play, pressing SKIP 
 will cause the laser to jump to the beginning of the next track and start play back there. Thus, to sample each song on a
disc, press PLAY and then tap SKIP 
 after you've heard a few seconds of each track. Continuous pressure will cause to player to jump to the higher numbered tracks repeatedly until the button is released.
NAD 7

GB
IN TUNER MODE:
PRESET
Press PRESET up or down to select one of the FM Preset stations. Each time these buttons are pressed, the display panel will show the preset number and the preset frequency, or station name if it is an RDS radio.
NOTE:
The RDS feature is totally dependent on the capability of the radio broadcast. Many stations do not yet broadcast in RDS. NAD can make no guarantee about local RDS availability. Please check with your local broadcasters.
On the remote control there are also a SKIP/PRESET buttons. These buttons perform the same actions as the buttons on the front panel.
8. INPUT SELECTOR
The INPUT SELECTOR control actually operates two buttons either side of the control, indicated by little raised pips. To operate, press either one of the desired pips.
Pressing the right side of the control causes L 40 to scroll through its inputs in the following sequence:
CD > Aux > Tape > Tuner > CD.
Pressing the left side of the control causes the L 40 to scroll through its inputs in reversed order:
CD > Tuner > Tape > Aux > CD.
Press either button repeatedly until the desired source is shown in the display.
REMOTE CONTROL:
The remote control has separate buttons for each input. Press the corresponding button for the desired input.
9. REPEAT
This button engages an endless-repeat cycle. Press the REPEAT button once to select the REPEAT 1 mode, which repeats only the current track over and over again.
Pressing the REPEAT button once again selects the REPEAT ALL mode, in which mode the entire disc or a pre-programmed selection of tracks is played from beginning to end, over and over again. Press the Repeat button a third time to cancel the repeat cycle and return to normal operation.
10. STORE
IN CD MODE:
The L 40 CD receiver allows you to pre-program the CD player to skip the tracks of a CD you do not want to hear (negative programming). Programming the CD player can only be done with a CD present in the tray and in Stop mode.
To engage Program mode, press STORE. Use the SKIP/PRESET buttons to choose the track you do not want to play; the track number is blinking in the display. Press CANCEL (No. 12) to confirm the track you wish to delete. The display confirms this first track cancellation by indicating “P--01”.
NAD 8
Select the next track you want to skip and press CANCEL again; the display indicates “P--02”. repeat this procedure until all the track you do not want to play have been selected.
After you have selected all tracks you do not wish to play, press the PLAY button to start playback of all remaining tracks. During Program Play, “PROGRAM” will be lit in the display.
NOTE:
Pressing STOP/OPEN (No. 5) will delete a program and disengage the Program mode. Changing to a different source (such as tuner, for example) will also delete any program and disengage Program mode.
IN TUNER MODE:
The L 40 CD Receiver allows you to store up to 30 radio stations (presets) in its memory.
To store a station as a preset, first tune to the desired radio station using the SEARCH/TUNE control buttons (No. 17).
Press the STORE button. The display panel will show the lowest available preset number for approximately 6 seconds.
Within these 6 seconds, press STORE again to store the station under this preset number.
If you wish to use a different preset number, use the SKIP/PRESET control buttons (No. 7) to select the desired number before pressing store again. Note that only empty preset numbers will be shown; should you wish to use a preset number already in use, you will have to clear that first (refer to section CANCEL, No. 12)
NOTE:
Apart from the radio station itself, the L 40 will also remember if Mono (No. 16) was selected. This is particularly useful if you wish to listen frequently to a weak station. The procedure is the same as described above, but after having selected the desired preset number, select MONO (No.16); “STEREO” will extinguish in the display. Press STORE.
NOTE:
The Store mode will automatically cancel itself after approximately 5 seconds if no other buttons are pressed.
11. RANDOM
IN CD MODE:
Pressing the RANDOM button will engage playback of all tracks on the CD in a random order. Press RANDOM either from the Stop or the Play mode and the L 40 will start to play the tracks on the CD in random order until all the tracks have been played.
Press the RANDOM button again to cancel random play and return the L 40 to the normal Play mode.

While the L 40 is in random mode 'RANDOM' will be shown in the Display.
RANDOM can be used together with the REPEAT ALL mode. The L 40 will continue with another cycle of random playback after completing a cycle of random playback.
NOTE:
RANDOM can not be used together with “Program Play” (refer to section No. 10).
IN TUNER MODE:
Many people find it difficult to remember which radio station belongs to what frequency. To avoid such confusion, you can give each preset a name of up to 8 characters. When calling up that preset, the name instead of the frequency will be displayed. For instance, 91.30 corresponds to BBC Radio 3; in this case the preset can be programmed to display “BBC R3” whenever it is called up.
There are two ways to name a preset; name and store the station in a preset at the same time, or name an already occupied preset.
TO NAME AND STORE A PRESET
Tune into the desired radio station using the SEARCH/TUNE control buttons (No. 17). Press the REPEAT button, apart from a flashing line, the display will go blank. Within the default time of 10 seconds you can now enter the first desired character.
Select the character using either one of the SKIP/PRESET control buttons (No. 7). Pressing the right SKIP/PRESET control button will scroll through the available characters in numeric and alphabetic order: (blank space) > 0 > 1 > 2 > 3 through to 9 > A > B > C through to Z > (blank space) > 0 > 1 > 2 > and so on. Press the left SKIP/PRESET control button to scroll through the characters in reverse order: Z > Y > X through to A > 9 through to 3 > 2 > 1 > 0 > (blank space) > Z > Y > X > and so on.
Use the right SEARCH/TUNE (No. 17) control button to move to the next position on the right to enter the second character and repeat selecting a character as described above.
Enter all the other characters using the SKIP/PRESET and SEARCH/TUNE control buttons as described above.
Once all characters have correctly been entered, press STORE (No. 10).
Press STORE again to assign a preset number (refer to section 10)
TO NAME AN ALREADY USED PRESET
Call up the preset you wish to name. Press the REPEAT button, apart from a flashing line, the display will go blank. Within the default time of 10 seconds you can now enter the first desired character.
Select the character using either one of the SKIP/PRESET control buttons (No. 7). Pressing the
GB
right SKIP/PRESET control button will scroll through the available characters in numeric and alphabetic order: (blank space) > 0 > 1 > 2 > 3 through to 9 > A > B > C through to Z > (blank space) > 0 > 1 > 2 > and so on. Press the left SKIP/PRESET control button to scroll through the characters in reverse order: Z > Y > X through to A > 9 through to 3 > 2 > 1 > 0 > (blank space) > Z > Y > X > and so on.
Use the right SEARCH/TUNE (No. 17) control button to move to the next position on the right to enter the second character and repeat selecting a character as described above.
Enter all the other characters using the SKIP/PRESET and SEARCH/TUNE control buttons as described above.
Once all characters have correctly been entered, press STORE (No. 10). The preset has now been named.
NOTE:
It is always possible to change a name. Use the same procedure as described under “To name an already stored preset”. Instead of a blank line, the first character will start to blink in the display upon pressing REPEAT; you can simply “overwrite” by selecting a new character.
NOTE:
It is not possible to rename an RDS radio station; the transmitted name (PS) will be stored and displayed automatically.
12. CANCEL
IN CD MODE:
The CANCEL button works in conjunction with the STORE button (No. 10) which will allow you to delete tracks you do not wish to hear.
Refer to the section STORE (No. 10) on how to program and engage Program Play.
IN TUNER MODE:
To delete a specific preset, select the preset and press CANCEL; the preset number in the display starts blinking. Within the default time of 6 seconds, press CANCEL again. To confirm that this preset number is now empty, the display will give the message: “PRESET CLEAR”.
13. TONE DEFEAT
The TONE DEFEAT button by-passes the tone control section of the L 40. If you normally leave the tone controls in the 12 o'clock position, then it is advisable to switch out the tone control section altogether by pressing the TONE DEFEAT button. To indicate that TONE DEFEAT is engaged, “TONE DEFEAT” will light up in the display. By-passing the tone control electronics ensures a slightly improved audio quality and unaltered frequency response.
NAD 9

GB
14. DISPLAY
IN CD MODE:
The DISPLAY button has three modes, as follows:
TIME: The elapsed time in minutes and seconds since the beginning of the current track. (This is the 'default' setting, selected automatically when the player is turned on.)
REMAIN: The total playing time that remains until the end of the disc and the total number of remaining tracks (including the current track), or the remaining number of tracks and time during program Play.
TOTAL: the total number of tracks and playing time of the disc.
IN TUNER MODE:
When receiving an RDS radio station, the DISPLAY button scrolls through three modes:
As the default, when tuned to an RDS radio station, the station name will be displayed (RDS PS).
Press the DISPLAY button once to show any Radio Text (RDS RT). Radio text information can consists of the program or presenter’s name, what song is playing, etc. The text scrolls continuously over the display. If the station doesn’t transmit any RadioText the display will show this by indicating “NO TEXT”.
Press the button again to show the station frequency and signal strength.
Press the button once more to revert back to the default display with the radio station name (RDS PS).
Pressing the DISPLAY button when tuned to a radio station without RDS the display will give the message “NO RDS” for 5 seconds before reverting back to the normal display again.
NOTE:
The RDS feature is totally dependent on the capability of the radio broadcast. Many stations do not yet broadcast in RDS. NAD can make no guarantee about local RDS availability. Please check with your local broadcasters.
15. BASS EQ
Small speakers typically are less capable of producing deep bass because of their physical limitations. The BASS EQ feature compensates for this roll-off, extending the useful response of the speakers significantly. Of course very low frequencies are not found in all music or recordings so the effect of BASS EQ won’t always be obvious. With music that contains a lot of deep bass information the effect will prove to be an obvious and dramatic improvement.
Press the BASS EQ button to engage; “BASS EQ” lights up in the display.
Press the BASS EQ button again to disengage.
NAD 10
NOTE:
The BASS EQ circuit also incorporates an infrasonic filter that rolls off the response below 25Hz to prevent inappropriate amplification of non-musical signals below the audio range. With music with extreme deep bass it is possible to overdrive either the L 40’s amplifier or speakers. This is noticeable as distortion; in such a case disengage BASS EQ and/or lower the volume level until the sound is undistorted again.
16. MONO
If a strong stereo FM signal is being received, your NAD L 40 will automatically switch to Stereo FM operation, which is shown by the STEREO indicator in the display, and the tuner will mute when searching between stations.
Weak stereo signals however, may have a high level of background hiss. Switching to Mono mode by depressing the MONO button will cancel most or all of this background noise. Press the MONO button again to return to Auto Stereo FM operation.
It is possible to add the MONO status to a preset. This way, if you listen frequently to a weak station you don’t need to set MONO manually everytime. Refer to section STORE (No. 10) for more information.
NOTE:
MONO works only on the tuner section of the L 40. With CD, Tape or Aux selected, the MONO button is inoperative.
17. SEARCH/TUNE
IN CD MODE:
SEARCH BACK 
The SEARCH  button causes the optical pickup of the CD player to scan backwards through the recording at high speed. This button works only while the player is in PLAY or PAUSE. After a STOP command, or after loading a new disc, you must press PLAY before the scan circuit will work.
If the scan is initiated while the player is in PAUSE the scan is silent and is approximately 15-20 times faster than normal playing speed. If Scan is initiated during PLAY the music will be heard in fragmentary form as the player scans through it. Use this 'audible scan' to cue the player precisely to the spot where you want to resume play.
If you scan back to the beginning of the disc while playing Track 1, the player automatically reverts to normal playback.
SEARCH FORWARD 
The SEARCH  button causes the optical pickup to scan rapidly forwards through the music. The behaviour of this function is similar to SEARCH
  .
.
If you scan forward to the end of the disc while playing the final track, the scan will stop and the display will show the table of contents. (There is no 'wrap-around' mode.)
IN TUNER MODE:
The L 40 allows you to tune to a radio station in two modes, manually or search automatically. To automatically search:Press either the  or
or  button on the SEARCH/TUNE control for over 1 second and release to respectively tune down or up the frequency band. The tuner will automatically search down or up the FM band to find the first station that is being received with a reasonably strong signal. Once it has found a reasonably strong signal it will stop and accurately tune itself to the radio station. The Centre Tune indicator (a single dot in the display) will light up when a station is correctly tuned.
To manually tune in to a radio station:
Press either  or
or  button on the SEARCH/TUNE control to respectively tune down or up the frequency band. The tuner will start to automatically search down or up the FM band. Once in the proximity of the desired frequency briefly press the other side of the SEARCH/TUNE control to stop searching.
With every repeated brief push of either one of the  or
or  SEARCH/TUNE buttons briefly, the tuner
will take a small tuning step of 0.025MHz.
The Centre Tune indicator (a single dot in the display) will light up to indicate that the radio station has accurately been tuned to.
NOTE:
Sometimes a radio station is so weak that its signal level falls below the muting threshold level (the muting circuits mutes the noise normally heard between radio stations) so that the radio station can’t be heard, even if it has been tuned to the exact frequency. In such a case press the MONO button (No. 16) to turn the muting circuit off.
18. BASS & TREBLE CONTROLS
The BASS and TREBLE tone controls adjust the tonal balance of your system.
The 12 o'clock position is 'flat' with no boost or cut and a detent indicates this position. Rotate the controls clockwise to increase, or anti-clockwise to decrease, the amount of Bass or Treble.
The Tone controls will not affect recordings made from the Tape outputs but will affect the signal going to the Pre-amp output (Pre Out).
GB
19. BALANCE
The BALANCE control adjusts the relative levels of the left and right speakers. The 12 o'clock position provides equal level to the left and right channels. A detent indicates this position.
Rotating the control clockwise moves the balance towards the right. Rotating the control anti-clockwise moves the balance to the left.
The BALANCE control does not affect recordings made from the Tape outputs but will affect the signal going to the Pre-amp output (Pre Out).
20. VOLUME
The VOLUME control adjusts the overall loudness of the signals being fed to the loudspeakers.
On the remote control handset there are two buttons for volume. Press the UP button to increase the volume level; press the DOWN button to decrease the volume level. When using either the DOWN or UP volume control button on the remote control handset, the display will indicate respectively “VOL DOWN” or “VOL UP”. The motorised volume control knob on the front panel will move down or up at the same time.
NOTE:
The volume control does not affect recordings made from the Tape output but will affect the signal going to the Pre-amp output (Pre Out).
REMOTE CONTROL HANDSET
INSTALLING AND REPLACING BATTERIES
The remote control requires two 1.5-volt AAA-size (i.e. UM-4 or IEC RO3) cells. Alkaline cells are recommended, to obtain maximum operating life.
To open the battery compartment, place your fingertip in the recess on the rear of the remote control , push against the flexible edge of the battery cover and lift the cover upwards. Install fresh cells, orienting them as shown on the diagram within the compartment. The coil springs should contact the (-) end of each cell. Push the battery compartment cover back and press gently until it latches.
In some cases, poor operation may be caused by corrosion or fingerprint oil on the battery contacts. Remove both cells, rub the metal contacts at both ends of each cell with a clean cloth or a pencil eraser, and re-install the cells, being careful to orient them correctly.
STAND-BY button (green):
Press this button to switch the unit from operating to the Stand-by mode and vice versa: Press this button again to switch to unit on from Stand-by.
NOTE:
Make sure that TONE DEFEAT (No. 13) is not engaged as the tone controls will not work (if it is, “TONE DEFEAT” lights up in display).
NOTE:
Stand-by mode is indicated by the amber light just over the green POWER button on the front panel (No. 1). In Stand-by mode the L 40 uses very little power.
NAD 11

GB
However, it is recommended that you switch the unit totally off if it is not going to be used for more than a couple of days. Switch off completely by pressing the POWER button on the front panel (No. 1), all lights will extinguish.
VOLUME UP and DOWN buttons:
On the remote control handset there are two buttons for volume. Press the UP button to increase the volume level; press the DOWN button to decrease the volume level. When using either the DOWN or UP volume control button on the remote control handset, the display will indicate respectively “VOL DOWN” or “VOL UP”. The motorised volume control knob on the front panel will move down or up at the same time.
MUTE button:
By pressing this button the overall volume level is significantly reduced (by 20dB). This can be useful to quickly lower the volume level to answer a telephone call, for instance. When the unit is muted, the display indicates “MUTE”, in whatever mode it is in.
Press MUTE again to restore the original volume level.
STOP button:
Press this button to stop CD playback or to clear “Program Play”. On the front panel there is also a STOP button which performs almost the same function as the button on the remote control handset, however this button also opens or closes the CD tray door.
CD, TUNER, AUX and TAPE buttons:
Unlike the front panel, the remote control handset has separate buttons for each input. Press the corresponding button for the desired input.
The PLAY/PAUSE, SKIP/PRESET, and DISPLAY buttons function in the same manner as those with the same name on the front panel of the unit (respectively No’s. 6, 7 and 14 on front panel drawing).
MAINTENANCE
At periodic intervals, open the disc drawer and wipe with a damp cloth to remove any loose dust.
HANDLING COMPACT DISCS
Handle Compact Discs with care. The playback of a disc will not be impaired by small dust particles, a few light fingerprints, or slight scratches. But large scratches, or a thick layer of oily fingerprints, can prevent the player from tracking the disc. (Incidentally,
although the tracking laser 'plays' the disc through its clear side, the actual data surface is embedded directly beneath the label, protected only by a very thin coating of lacquer. So a scratch that cuts through the label may damage the disc more than a similar scratch on the transparent 'playing' surface. Thus you should treat both surfaces of the disc with care.)
Severe scratches or fingerprints may cause the player to mis-track (skipping ahead, or repeating the same passage). Less severe damage may produce very brief bursts of high-frequency noise. The tracking and error-correction circuits of this NAD CD
NAD 12
Receiver are unusually sophisticated, providing secure tracking of flawed discs that are not playable on some other players. Nevertheless, the discs should not be abused or handled carelessly.
For best results, grasp the disc only by its edges. Another safe method is to put a finger in the centre hole, using the thumb at the edge to hold the disc steady.
Each disc should be kept in its protective storage case when not in use. To open the standard Philipstype plastic CD case, grasp the top and bottom of the case with the fingers and thumb of the left hand; then grasp the left and right edges of the case with the fingers and thumb of the right hand, and pull the case open with the right thumb.
The disc is held in place within the case by an expansion hub in its center hole. To remove the disc, press the hub with a finger to release the disc, then lift it out by gripping its edges between the fingers and thumb. To replace the disc in the case, simply align its center hole with the hub and press the disc onto the hub.
CLEANING DISCS
Soiled discs may be cleaned by wiping with a soft cloth, either dry or moistened with water. Do NOT use conventional LP record-cleaning products (cleaning solutions, sprays, treated cloths, or anti-static preparations), nor any kind of chemical solvent (alcohol, benzene, etc). A severely soiled disc may be washed in a warm-water spray, possibly with a small amount of a mild kitchen detergent added, and then wiped dry with a clean, soft towel.
When cleaning the disc, use only RADIAL strokes (from center to edge). Never use a circular wiping motion like that used for cleaning ordinary LP records, because in wiping the disc there is a risk of scratching it. A radial scratch will do the least harm because it affects only a small portion of each circular data track, which can be fully compensated by the player's error-correction circuits. But a circular scratch that follows a data track may damage such a long continuous segment of data that it cannot be corrected.
ABOUT THE LASER
The CD Receiver uses a solid-state semiconductor diode laser, mounted on a tracking servo mechanism, to play the disc. The laser illuminates the track of microscopic pits representing the digital data bits, while photo-diodes detect the reflected illumination from the disc and convert it into an electronic signal which is then decoded to recover the musical waveform in each stereo channel.
You cannot see the laser operating, because it operates at wavelength of 7800 Angstroms, which is in the infrared region and thus invisible to the human eye.
The CD Receiver is completely safe for children to use. The laser operates at very low power and is concealed within the player mechanism. Even when the player is disassembled, the laser remains sealed within an optical system that causes its light to focus only 1 millimetre from the lens and then diverge rapidly, reducing its intensity to negligible levels.

|
|
|
|
|
|
|
GB |
|
|
|
|
|
|
|
|
|
|
TROUBLESHOOTING |
|
|
|
|
|
|
|
|
|
|
|
|
|
|
|
|
|
|
SYMPTOM |
|
POSSIBLE CAUSE |
|
CORRECTION |
|||
|
|
|
|
|
|
|
||
• No Power when the |
• |
Poor or no power plug |
• Insert power plug firmly |
|||||
|
POWER button is set to ON. |
|
connection at the AC outlet. |
|
into the AC outlet. |
|||
|
|
• Power not switched on. |
|
|
|
|
|
|
|
|
|
|
|
|
|
||
• Disc play does not start. |
• |
The disc is loaded upside down. |
• Reload the disc with the |
|||||
|
|
|
|
|
label side UP. |
|||
|
|
• The disc is too dirty. |
• |
Clean the disc. |
||||
|
|
|
|
|
|
|
|
|
• |
No Sound. |
• |
Incorrect audio cable |
• Check inputs and speakers |
||||
|
|
|
connections. |
|
connection to L 40. |
|||
|
|
• Station not selected or weak |
• |
Re-tune. |
||||
|
|
|
signal. |
|
|
|
|
|
|
|
|
|
|
|
|
||
• Thermal cut out operated. |
• |
Switch off and reduce volume |
• Switch on after the unit has |
|||||
|
|
|
setting. |
|
cooled down. |
|||
|
|
|
|
• Internal fuse blown; consult |
||||
|
|
|
|
|
dealer. |
|||
|
|
|
|
|
|
|
|
|
• |
No sound in one channel. |
• |
Volume Control balance not |
• Reset balance Control to |
||||
|
|
|
even. |
|
centre detent position. |
|||
|
|
• Input lead disconnected or |
• Check leads and connections. |
|||||
|
|
|
damaged. |
|
|
|
|
|
|
|
|
|
|
|
|
|
|
• |
Sound skips. |
• |
The L 40 is subject to vibration |
• |
Change the installation |
|||
|
|
|
or physical shock from external |
|
location. |
|||
|
|
|
sources. |
|
|
|
|
|
|
|
|
|
|
|
|
|
|
• Remote control does not |
• |
Batteries in Remote Control |
• |
Replace batteries. |
||||
|
work. |
|
have expired. |
|
|
|
|
|
|
|
• |
Object obscuring remote |
• Remove any objects directly |
||||
|
|
|
sensor on the player. |
|
in front of the display window. |
|||
|
|
|
|
|
|
|
|
|
• A humming noise can be |
• |
Loose cable connection. |
• |
Check cable connections. |
||||
|
heard. |
|
|
|
|
|
|
|
|
|
|
|
|
|
|
|
|
• |
Weak bass; diffuse |
• |
Speakers connected to the |
• Check the "+" and "-" |
||||
|
stereo image. |
|
power amplifier wired out of |
|
connections to both |
|||
|
|
|
phase. |
|
speakers. |
|||
|
|
|
|
|
|
|
|
|
• |
Noisy, reception,hiss. |
• |
Weak signal. |
• |
Check station tuning. |
|||
|
|
|
|
• Adjust or replace antenna. |
||||
|
|
|
|
|
|
|
|
|
• |
Reception distorted. |
• |
Multi-path or interference |
• |
Check station tuning. |
|||
|
|
|
from another station. |
• Adjust or replace antenna. |
||||
|
|
|
|
|
|
|
|
|
• |
Reception with whistling, |
• |
Interference from other |
• |
Check station tuning. |
|||
|
buzzing noises. |
|
computers, games consoles. |
• Switch off or move the |
||||
|
|
|
|
|
source of electrical noise. |
|||
|
|
|
|
|
|
|
|
|
• No station found in Search |
• |
Insufficient aerial signal. |
• |
Check aerial connection. |
||||
|
Mode. |
|
|
• Adjust position of ribbon |
||||
|
|
|
|
|
antenna. |
|||
|
|
|
|
|
|
|
|
|
NAD 13

|
F |
|
MANUEL D’EXPLOITATION POUR |
||
|
|
|
RÉCEPTEUR CD NAD L 40. |
||
NOTICE DE CONSULTATION RAPIDE: |
|
|
|||
Généralités: Commént... |
Voir: Chapitre; |
Section: |
|||
|
|
|
|||
brancher les haut-parleurs |
Connexions sur Panneau Arriäre |
1 |
|||
brancher l’antenne FM |
Connexions sur Panneau Arriäre |
5 |
|||
brancher et utiliser la liaison NAD |
Connexions sur Panneau Arriäre |
6 |
|||
brancher le magnétophone |
Connexions sur Panneau Arriäre |
2 |
|||
brancher une source de son supplEmentaire |
Connexions sur Panneau Arriäre |
3 |
|||
(lecteur MiniDisc, télévision) Ö AUX |
|
|
|||
mettre en marche/arràt [Power on/off |
Commande sur Face Parlante |
1 |
|||
ou veille/marche [Stand-by/on] |
|
|
|||
utiliser la prise du casque |
Commande sur Face Parlante |
2 |
|||
sélectionner une source |
Commande sur Face Parlante |
3 |
|||
utiliser les commandes de Tonalité [Tone] et |
Commande sur Face Parlante |
13 et 18 |
|||
Tonalitét Neutre [Tone Defeat] |
|
|
|||
utiliser l’égalisation des tons graves [Bass EQ] |
Commande sur Face Parlante |
15 |
|||
utiliser la télécommande |
Télécommande |
|
|||
changer les piles de la tétlétcommande |
Télécommande |
|
|||
Tuner: Comment... |
|
|
|||
entrer une valeur prédéfinie |
Commande sur Face Parlante |
10 |
|||
effacer une valeur prédéfinie |
Commande sur Face Parlante |
12 |
|||
ajouter/changer un nom en une valeur prédéfinie |
Commande sur Face Parlante |
11 |
|||
rétgler automatiquement sur une station radio |
Commande sur Face Parlante |
17 |
|||
“Recherche” [search] |
|
|
|||
rétgler manuellement sur une station radio |
Commande sur Face Parlante |
17 |
|||
rétgler sur une station radio faible |
Commande sur Face Parlante |
16 |
|||
(silencieux éteint) [mute off] |
|
|
|||
afficher l’information RDS |
Commande sur Face Parlante |
14 |
|||
|
(PS; nom de la station et RT; RadioTexte) |
|
|
||
CD: Comment ... |
|
|
|||
introduire un CD |
Commande sur Face Parlante |
3 et 5 |
|||
passer un CD |
|
Commande sur Face Parlante |
6 |
||
arràter briävement le CD - pause |
Commande sur Face Parlante |
6 |
|||
faire un saut Ö |
une piste différente |
Commande sur Face Parlante |
7 |
||
activer le mode “Répétition 1” [Repeat 1] et |
Commande sur Face Parlante |
9 |
|||
le mode “Répétition Toutes” [Repeat All] |
|
|
|||
programme pour l’écoute sélective des pistes |
Commande sur Face Parlante |
10 et 12 |
|||
activer “Sétlection Aléatoire” [Random Play] |
Commande sur Face Parlante |
11 |
|||
afficher l’information de temps du CD |
Commande sur Face Parlante |
14 |
|||
rechercher parmi les pistes |
Commande sur Face Parlante |
17 |
|||
|
|
|
|
|
|
NAD 14

REMARQUES CONCERNANT L’INSTALLATION
Poser votre L40 sur une surface stable, plane et horizontale. Eviter les rayons directs du soleil et les sources de chaleur et d’humidité.
Assurer une ventilation adéquate. Ne pas poser cet appareil sur une surface molle, par ex. sur la moquette. Ne pas le placer dans un endroit enfermé, tel qu’une bibliothèque ou derrière des portes vitrées, où le flux d’air à travers les fentes de ventilation risque d’être entravé.
Mettre l’unité hors tension avant de réaliser les connexions.
N’utiliser que des câbles et des connecteurs RCA de trè s bonne qualité de maniè re à obtenir un branchement dont la fiabilité est parfaite et les performances optimales. Vérifier que les câbles et les connecteurs ne soient pas du tout abîmés et que tous les connecteurs soient bien enfoncés jusqu’en butée. Les connecteurs RCA de votre L 40 sont codés en rouge pour l’audio droite et en blanc pour l’audio gauche.
Pour obtenir les meilleures performances, utiliser des câbles pour haut-parleurs d’une épaisseur de calibre 16 ou plus.
Si l’appareil doit rester inutilisé pendant un certain temps, débrancher le cordon d’alimentation de la prise de secteur murale.
Si de l’eau pénètre à l’intérieur du L 40, couper l’alimentation de l’appareil et retirer la fiche de la prise secteur. Faire contrôler l’appareil par un technicien de service après-vente qualifié avant toute tentative de remise en service.
Ne pas retirer le couvercle. A l’intérieur, il n’y a aucun élément sur lequel l’utilisateur peut intervenir.
Utiliser un chiffon doux, sec et propre pour nettoyer l’appareil. Si nécessaire, humecter le chiffon avec un peu d’eau savonneuse.
Ne pas utiliser de solution contenant du benzol ou quelconque autre agent volatile.
LIAISONS SUR LE PANNEAU ARRIERE 1. HAUT-PARLEURS
Sorties pour haut-parleurs d’une impédance de 4 ohms ou plus.
La borne droite [RIGHT+] devrait être connectée à la borne [+] sur votre haut-parleur droit et la borne [RIGHT-] devrait être connectée à la borne [-] de votre haut-parleur.
Connecter de la même façon les bornes gauches [LEFT+] et [LEFT-] à votre haut-parleur gauche.
Il est conseillé d’utiliser un fil torsadé à haut rendement ou des câbles pour haut-parleurs spéciaux pour connecter les haut-parleurs à votre L 40.
F
Les bornes de câble à haute intensité peuvent servir comme borne à visser pour les câbles qui se terminent en cosses ou en connecteurs à broches, ou pour les câbles à fils nus.
COSSES
On intercale ces cosses sous les bagues à visser des bornes, avant de les serrer. Vérifier que les connecteurs sont bien serrés et qu’il n’y a aucun danger que le mé tal nu de la cosse touche le panneau arrière ou d’autres connecteurs, sous peine de provoquer des dégats.
FILS NUS ET CONNECTEURS A BROCHE
Les fils nus et les connecteurs à broche s’insèrent dans le trou percé dans la tige des bornes des hautparleurs. Dévisser la bague en plastique de la borne du haut-parleur jusqu’à ce que le trou dans la tige soit visible. Insérer la broche ou l’extrémité nue du câble dans le trou, puis fixer le câble en serrant la bague de la borne.
Veiller que le métal nu des câbles des haut-par- leurs ne touche pas le panneau arrière ou quelconque autre connecteur. Vérifier également qu’il n’y ait que 1 cm de câble nu ou de broche et qu’aucun fil des haut-parleurs ne soit désserré.
2. Magné tophone Entré e, Sortie [TAPE IN, OUT]
Les connexions pour l’enregistrement analogue et lecture vers un magnétophone de type quelconque. Au moyen d’un câble jumelé RCA-à-RCA, connecter la sortie gauche et droite (souvent nommée “lecture” [playback], “Sortie Ligne” [Line Out], “Sortie” [Output], “Sortie Analogue” [Analogue Output] du magnétophone aux connecteurs “Magné tophone Entré e” [TAPE IN] du L 40 pour la lecture. Connecter l’entrée gauche et droite (souvent nommée “Enregistrer” [Record], “Entrée Ligne” [Line In], “Entrée [Input], “Entrée Analogue” [Analogue Input] du magnétophone aux connecteurs “Magné tophone Sortie” [TAPE OUT] du L 40 pour l’enregistrement.
3.Entré e AUX [AUX INPUT]
Il s’agit de l’entrée pour les signaux d’entrée supplémentaires de niveau ligne, comme par exemple d’un lecteur de minidisc. Utiliser un câble RCA-à- RCA pour connecter les sorties gauche et droite de niveau ligne de l’unité auxiliaire (souvent nommées “Sortie Ligne” [Line Out], “Sortie” [Output], “Sortie Analogue” [Analogue Output] à cette entrée.
4. Pré -Sortie [PRE-OUT]
Connexions à un amplificateur de puissance extérieur.
5. Antenne FM [FM ANTENNA]
Une antenne FM, sous forme de câble plat, est livrée avec le L 40. Cette antenne se branche à l’arrière au connecteur “Antenne FM” [FM Antenna] à l’aide d’un adaptateur “Balun” fourni. L’antenne câble
NAD 15

F
plat doit être fixée sur une surface verticale, en forme de “T”.
Faire des essais en mettant l’antenne dans différentes positions, de manière à obtenir le meilleur signal possible avec un minimum de bruit de fond.
En général, un signal FM insuffisant entraîne un sifflement, surtout en réception stéréophonique, et génère des interférences en provenance de sources électriques extérieures. Il est possible d’améliorer les performances du tuner en utilisant une antenne FM montée à l’extérieur du bâtiment. Un installateur d’antennes qualifié pourra donner les conseils appropriés, et poser une antenne adaptée aux conditions de réception locales.
6. Entré e/Sortie Liaison-NAD [NAD-LINK IN, OUT]
Les connecteurs de Liaison-NAD [NAD-Link] servent à relayer les commandes de la télécommande vers et en provenance d’autres appareils équipés de connecteurs de Liaison-NAD. Cela permet d’assurer une commande centralisée pour tout un réseau, ou permet de télécommander la chaîne depuis plusieurs pièces et aussi de télécommander des unités NAD qui, seules, n’auraient pas cette facilité de télécommande.
Pour assurer le relais vers d’autres appareils, relier le connecteur de “Sortie Liaison-NAD” [NAD-Link OUT] du L 40 à “L’entrée Liaison-NAD” [NAD-LINK IN] de l’autre appareil. Il est possible de relier les connecteurs de Liaison-NAD [NAD-LINK] en chaîne, “Entrée” [IN] vers “Sortie” [OUT], et donc de commander tout un réseau d’appareils à l’aide de la télécommande d’un seul d’entre eux.
7. Cordon Alimentation Secteur [AC POWER CORD]
Brancher ce cordon à une prise murale secteur appropriée.
COMMANDES DE LA FACE PARLANTE 1. Marche/Arrê t [POWER]
Appuyer sur le bouton “Marche/Arrêt” [POWER] pour mettre l’unité sous tension (ON). L’affichage et le voyant de commande de volume s’allumeront.
Pour couper l’alimentation (OFF), appuyer à nouveau sur le bouton “Marche/Arrêt [POWER].
Le L 40 utilise une système de mémoire de réserve pour sauvegarder les informations de stations prédéfinies pour le tuner. Ces informations sont sauvegardé es en mé moire pendant plusieurs semaines, mê me si l’alimentation est tout à fait coupée ou l’unité est débranchée.
TELECOMMANDE:
Bouton vert “veille” [STAND-BY]:
Appuyer sur ce bouton pour permuter l’unité du mode “Marche” en mode “Veille” (Stand-By) et vice versa.
Appuyer à nouveau sur ce bouton pour mettre
NAD 16
l’unité en marche à partir du mode “Veille” [Stand-by].
NOTA:
Le mode “Veille” [Stand-By] est indiqué par un voyant orange juste au-dessus du bouton vert “Marche/Arrêt [POWER] sur la face Parlante (N° 1).
En mode Veille (Stand-By) le L 40 ne consomme que très peu de courant. Il est, toutefois, conseillé de mettre l’unité tout à fait hors tension si l’unité va rester inutilisée pendant plusieurs jours. Mettre l’unité complètement hors tension en appuyant sur le bouton “Marche/Arrêt [POWER] sur la face Parlante (N° 1), et tous les voyants s’éteindront.
2. CASQUE
Une prise stéréo pour fiche à jack de 1/4" est prévue pour l’é coute avec casque et convient aux casques conventionnels à impédance quelconque. Le simple fait d’insérer une fiche à jack pour casque dans cette prise coupe les haut-parleurs automatiquement. Les commandes de volume, de tonalité et d’équilibre sont également disponibles pour l’écoute avec casque.
Utiliser un adaptateur approprié pour brancher les casques pourvus de connecteurs différents et ayant une fiche à jack pour “chaîne stéréo personnelle” de 3,5 mm.
NOTA:
Veiller que la commande de volume soit au minimum (tout à fait dans le sens inverse horaire) avant de brancher le casque.
L’é coute à des niveaux sonores é levé s peut entraîner des dommages auditifs.
3. TIROIR-DISQUE
Pour insérer un disque, appuyer sur le bouton “Arrêt/Ouverture” [STOP-OPEN] (N° 5) pour ouvrir le tiroir-disque. Placer le CD dans le grand logement circulaire du tiroir, sa surface de lecture transparente vers le bas. L’é tiquette doit ê tre sur la face supérieure.
Réappuyer sur “Ouverture” [OPEN] pour fermer le tiroir ou appuyer sur “Lecture/Pause” [PLAY/PAUSE] pour fermer le tiroir et commencer la lecture.
Il est possible de passer les disques CD-3 (CD “singles” de 3 pouces) sans devoir utiliser un adaptateur. Placer le disque dans le tiroir en le centrant dans le petit logement circulaire, l’étiquette sur la face supérieure.
NOTA: Ce lecteur n’a pas été conçu pour être utilisé avec un “disque d’amortissement” placé sur un CD, ni avec deux CD l’un sur l’autre. Il est capable de lire les CD audio, mais non pas les disques identifiés comme des CD-V, DVD, CD-I, CD-ROM OU CD PHOTO.

4. AFFICHAGE (à cristaux liquides)
L’affichage à cristaux liquides fournit des informations concernant les entrées sélectionnées et l’état de lecture du CD et du tuner.
EN MODE CD:
NUMERO DE PISTE. Lors de l’enregistrement, chaque disque est divisé en pistes numérotées. En principe, chaque piste numérotée correspond à une chanson ou à un mouvement symphonique différents, etc ...
Ces numéros de piste, codés sur le disque par le fabricant, sont identifiés sur l’emballage du CD.
En gé né ral, la section alphanumé rique de l’affichage indique le temps écoulé depuis le début de la piste en cours de lecture. A l’aide du bouton “Affichage” [DISPLAY] (N° 14), il est possible d’obliger l’affichage à indiquer le temps d’écoute qui reste jusqu’à la fin du disque.
Une flèche  , qui pointe vers la droite et située près du bord gauche de l’affichage, s’allume au cours de la “Lecture” [PLAY].
Deux barres verticales |
|
|
|
indiquent que le lecteur |
|
|
|||
est en mode PAUSE. |
|
|
|
|
En mode “Arrêt” [STOP], l’affichage indique à nouveau le nombre de pistes et le temps total de lecture du disque.
“Pas de disque” [NO DISC] s’allume sur l’affichage si aucun disque ne se trouve dans le tiroir, ou bien si le disque chargé dans le tiroir est illisible (sale ou inséré à l’envers).
“Ré pé tition 1” [REPEAT 1] s’allume dans le coin supérieur gauche de l’affichage pendant la lecture répétée d’une seule piste.
“Ré pé tition toutes” [REPEAT ALL] s’allume pendant la lecture répétée du CD entier ou de toutes les pistes préprogrammées.
Aussi bien “Ré pé tition 1” [REPEAT 1] que “Ré pé tition toutes” [REPEAT ALL] peuvent être activées en appuyant sur le bouton N° 9.
“Total restant” [TOTAL REMAIN] s’allume au centre de l’affichage lorsque vous appuyez sur le bouton “Affichage” [DISPLAY] afin d’afficher le temps d’écoute total qui reste sur le disque.
“Ecoute alé atoire” [RANDOM]. Lorsque le L 40 est en mode “aléatoire”, l’affichage indique [RANDOM].
“Programmer” [PROGRAM] s’allume lorsque vous programmez le lecteur de disques pour passer une sélection bien précise de pistes (au moyen des boutons “Mémoriser” [STORE] et “Annuler” [CANCEL]; Numéros 10 + 12). “Programmer” [PROGRAM] s’allume également lors de la lecture préprogrammée d’un CD.
F
EN MODE TUNER:
En gé né ral, la section alphanumé rique de l’affichage indiquera le numéro prédéfini et le nom de la station radio lors de la réception d’une station RDS, ou elle indiquera le nom programmé. Si aucun nom n’a été programmé ou s’il s’agit d’une station radio sans RDS, l’affichage indiquera la fréquence de réception en Mégahertz (Mhz).
“Antenne” [ANTENNA] et les barres horizontales juste au-dessous s’allument sur l’affichage pour indiquer la puissance du signal de la station radio captée. Plus de barres sont allumées, plus le signal sera puissant.
Ré glage central [Centre Tune], indiqué par un petit point juste au-dessus de “Tonalité Neutre” [TONE DEFEAT], s’allume si le tuner est ré glé exactement sur la fréquence centrale de la station radio. “Ré glage central” [Centre Tune] s’allume également lorsque l’unité reçoit une commande par télécommande.
“RDS”, dans le coin supérieur de droite, s’allume lors de la réception d’une station radio transmettant les informations RDS.
REMARQUE:
La fonction RDS dépend entièrement de la capacité de l’èmission radio. Beaucoup de stations n’émettent pas encore avec le système RDS. NAD n’offre aucune garantie relativement à la disponibilité du système RDS dans votre localité. Veuillez vérifier auprès de diffuseurs locaux.
GENERALITES:
“Egalisation des tons graves” [BASS EQ] s’allume sur l’affichage si BASS EQ a été sélectionné (N° 15).
“Tonalité Neutre” [TONE DEFEAT] s’allume sur l’affichage si TONE DEFEAT a été sélectionné (n° 13).
RECEPTEUR DE TELECOMMANDE. Un capteur infrarouge, situé sur la partie gauche de la fenêtre d’affichage, reçoit des commandes en provenance de la télécommande. L’espace entre la télécommande et le récepteur doit être dégagé de tout obstacle, sinon la télécommande peut refuser de fonctionner. Un petit point clignotant indique que l’unité a reçu une commande de la télécommande.
5. “Arrê t/Ouverture” [STOP/OPEN]
Appuyer sur ce bouton pour arrêter la lecture du CD, pour annuler tout cycle de répétition et pour remettre la tê te de lecture au dé but du disque. L’affichage se remet à indiquer le nombre de pistes et la totalité du temps d’écoute restant sur le disque.
Ré appuyer sur ce bouton pour ouvrir le tiroirdisque; appuyer à nouveau sur ce bouton pour fermer le tiroir.
NAD 17

F
Lorsque le tiroir est fermé, le lecteur balaye “la table des matières” du disque et affiche le nombre de pistes et la totalité du temps d’écoute sur le disque. Si vous appuyez sur “Lecture” [PLAY] pour fermer le tiroir, l’unité n’indiquera pas ces informations et commencera à passer le CD à partir de la piste 1.
NOTA:
Le tiroir-disque s’ouvre et se ferme à l’aide d’un moteur interne. Ne jamais fermer le tiroir manuellement lorsque l’unité n’est pas alimentée en courant.
TELECOMMANDE:
Sur la télécommande il se trouve également un bouton “Arrêt” [STOP] qui a presque la même fonction que le bouton sur la Face Parlante du L 40, mais ce bouton ne sert pas à ouvrir ou fermer le tiroirdisque.
6. “Lecture/Pause” [PLAY/PAUSE]
Appuyer sur le bouton “Lecture/Pause” [PLAY/PAUSE] pour commencer la lecture du CD; le mode “Lecture” [PLAY] est indiqué sur l’affichage par
une flèche vers la droite
Ré appuyer sur le bouton “Lecture/Pause” [PLAY/PAUSE] pour arrêter temporairement la lecture (maintenant le lecteur de disques est en mode “Pause” [PAUSE], qui est indiqué sur l’affichage par
deux barres verticales |
|
|
|
. |
|
|
Pour reprendre la lecture à l’endroit exact où se trouvait la tête au moment de la pause, réappuyer sur “Lecture/Pause” [PLAY/PAUSE]. Si vous ne souhaitez pas reprendre la lecture au même endroit, vous pouvez utiliser les commandes “Saut/Pré sé lection” [SKIP/PRESET] (N° 7) ou “Recherche/Réglage” [SEARCH/TUNE] (N° 17) pour remettre la tête de lecture à un endroit de départ différent avant de réappuyer sur “lecture” [PLAY].
Sur la télécommande il se trouve également un bouton “Lecture/Pause” [PLAY/PAUSE]. Ce bouton a les mê mes fonctions que le bouton sur la Face Parlante.
7. “Saut/Pré sé lection” [SKIP/PRESET]
La commande “Saut/Présélection” [SKIP/PRESET] active en fait deux boutons de part et d’autre de la commande, indiqué s par deux petits points surélevés. Pour les activer, appuyer sur l’un ou l’autre point souhaité; le point gauche sert à faire un
“Saut en arrière” [SKIP BACK] 
 ; le point droit sert
àfaire un “Saut en avant” [SKIP FORWARD] 
 .
.
EN MODE CD:
“Saut en arriè re” [SKIP BACK] 

Le bouton “Saut” [SKIP] 
 fera sauter le laser en arrière jusqu’au début de chaque piste numérotée du disque. Une premiè re pression sur le bouton entraîne un saut en arrière jusqu’au début de la piste
NAD 18
en cours. Appuyer rapidement deux fois sur “Saut”
[SKIP] 
 pour faire un saut en arrière jusqu’à la piste précédente. Une pression continue sur ce bouton fera sauter la tête de lecture successivement aux pistes précédentes, jusqu’à ce que le bouton soit relâché.
“Saut en avant” [SKIP FORWARD] 

Au cours de la lecture, le fait d’appuyer sur “Saut
en avant” [SKIP] 
 fait sauter le laser jusqu’au début de la piste suivante et il commencera la lecture à cet endroit. Pour entendre chaque chanson sur le disque, appuyer sur “Lecture” [PLAY] et tapoter
ensuite sur “Saut” [SKIP] 
 après avoir entendu quelques secondes de chaque piste. Une pression continue fera sauter le lecteur successivement aux pistes ayant des numéros plus grands jusqu’à ce que le bouton soit relâché.
EN MODE TUNER:
“Pré sé lection” [PRESET]
Appuyer sur “Présélection” [PRESET] haut ou bas pour sé lectionner une des stations radio FM pré dé finies. Chaque fois que ces boutons sont activés, l’affichage indiquera le numéro prédéfini et la fréquence prédéfinie, ou le nom de la station s’il s’agit d’une radio RDS.
REMARQUE:
La fonction RDS dépend entièrement de la capacité de l’èmission radio. Beaucoup de stations n’émettent pas encore avec le système RDS. NAD n’offre aucune garantie relativement à la disponibilité du système RDS dans votre localité. Veuillez vérifier auprès de diffuseurs locaux.
Sur la télécommande se trouvent également des boutons “Saut/Présélection” [SKIP/PRESET]. Ces boutons ont les mêmes fonctions que les boutons sur la Face Parlante.
8. SELECTEUR D’ENTREE
La commande “Sélecteur d’entrée” [INPUT SELECTOR] active en fait deux boutons de part et d’autre de la commande, indiqué s par des petits points surélevés. Appuyer sur le point souhaité pour l’activer.
Une pression sur le côté droit de la commande entraîne le L 40 à faire défiler ses entrées dans la sé quence suivante: CD > Aux > Tape “Magnétophone” > Tuner > CD.
Une pression sur le côté gauche de la commande entraîne le L 40 à faire défiler ses entrées en sens inverse: CD > Tuner > Tape “Magnétophone” > Aux > CD.
Appuyer successivement sur un des boutons jusqu’à ce que la source souhaitée soit affichée.
TELECOMMANDE:
La télécommande est pourvue de boutons différents pour chaque entrée. Appuyer sur le bouton qui correspond à l’entrée souhaitée.

9. Ré pé tition [REPEAT]
Ce bouton active un cycle infini de répétitions. Appuyer une fois sur ce bouton pour sélectionner le mode “Répetition 1” [REPEAT 1], qui répète sans arrêt la piste en cours de lecture.
En appuyant à nouveau sur le bouton “Répétition” [REPEAT], vous sélectionnez le mode “Répétition Toutes” [REPEAT ALL]. Dans ce mode, le disque entier ou une sélection de pistes préprogrammée est lue du début jusqu’à la fin, sans arrêt. En appuyant sur le bouton “Répétition” [REPEAT] une troisième fois, le cycle de répétition s’annule et l’unité résume son fonctionnement normal.
10. “Mé moriser” [STORE]
EN MODE CD:
Le récepteur CD L 40 vous permet de préprogrammer le lecteur de disques pour éviter les pistes du CD que vous ne désirez pas entendre (programmation négative). La programmation du lecteur de disques ne peut s’effectuer que s’il y a un CD dans le tiroirdisque et lorsque le lecteur est en mode “Arrêt” [Stop].
Pour activer le mode “Programmer” [Program], appuyer sur “mémoriser” [STORE]. Utiliser les boutons “Saut/Présélection” [SKIP/PRESET] pour choisir la piste que vous ne souhaitez pas lire; le numéro de piste clignote sur l’affichage. Appuyer sur “Annuler” [CANCEL] (N° 12) pour confirmer la piste que vous souhaitez effacer. L’affichage confirme cette première annulation de piste en indiquant “P- -01”.
Sélectionner la piste suivante que vous souhaitez éviter et appuyer à nouveau sur “Annuler” [CANCEL]; l’affichage indique “P- -02”. Répéter ce processus jusqu’à ce que toutes les pistes à éviter aient été sélectionnées.
Après avoir sélectionné les pistes que vous ne souhaitez pas lire, appuyer sur le bouton “lecture” [PLAY] afin de commencer la lecture de toutes les pistes souhaité es. Au cours de “Programmer Lecture” [Program Play], “[PROGRAM]” sera allumé sur l’affichage.
NOTA:
Le fait d’appuyer sur “Arrê t/Ouverture” [STOP/OPEN] (N° 5) effacera un programme et désactivera le mode “Programmer” [Program]. Le choix d’une source différente (tel que le tuner, par exemple) effacera également tout programme et désactivera le mode “Programmer” [Program].
EN MODE TUNER:
Le récepteur CD L 40 vous permet de mettre en mé moire jusqu’à 30 stations radio (valeurs prédéfinies).
Afin de mé moriser une station comme valeur prédéfinie, il est d’abord nécessaire de se régler sur la station radio souhaitée au moyen des boutons de commande “Recherche/Réglage” [SEARCH/TUNE] (N° 17).
Appuyer sur le bouton “Mé moriser” [STORE].
F
L’affichage indiquera le numéro de présélection le plus bas disponible pendant env. 6 secondes.
Pendant ces 6 secondes, appuyer à nouveau sur “Mémoriser” [STORE] afin de mémoriser la station sous ce numéro prédéfini.
Si vous souhaitez utiliser un numéro prédéfini diffé rent, utiliser les boutons de commande “Saut/Présélection” [SKIP/PRESET] (N° 7) afin de sélectionner le numéro souhaité avant d’appuyer à nouveau sur “mémoriser” [store]. Veuillez noter que seuls les numéros de présélection disponibles seront affichés; si vous souhaitez utiliser un numéro de présélection qui est déjà mémorisé, il vous sera né cessaire de l’annuler d’abord (voir la section “Annuler” [CANCEL], N° 12).
NOTA:
En outre de la station radio même, le L 40 se rappellera si Mono (N° 16) avait été sélectionné. Ceci est particulièrement intéressant si vous souhaitez souvent écouter une station radio faible. Le processus est identique à celui décrit ci-dessus, mais après avoir sélectionné le numéro prédéfini souhaité, il sera né cessaire de sé lectionner MONO (N° 16); “STEREO” s’éteindra sur l’affichage. Appuyer sur “Mémoriser” [STORE].
NOTA:
Le mode “Mémoriser” [Store] s’annulera automatiquement après env. 5 secondes si aucun autre bouton n’est activé.
11. Alé atoire [RANDOM]
EN MODE CD:
Une pression sur le bouton “Aléatoire” [RANDOM] activera la lecture de toutes les pistes du CD en ordre aléatoire. Appuyer sur “Aléatoire” [RANDOM] en mode “Arrêt” [Stop] ou “Lecture” [Play] et le L 40 commencera à lire les pistes du CD en ordre aléatoire jusqu’à ce que toutes les pistes aient été lues.
Appuyer à nouveau sur le bouton “Aléatoire” [RANDOM] pour annuler la lecture aléatoire et pour remettre le L 40 en mode “Lecture” [Play] normal.
Lorsque le L 40 se trouve en mode aléatoire [random], “RANDOM” sera affiché sur l’affichage.
“Aléatoire” [RANDOM] peut être utilisé conjointement avec le mode “Répétition Toutes” [REPEAT ALL]. Le L 40 entamera un autre cycle de lecture aléatoire dès qu’il aura terminé un cycle de lecture aléatoire.
NOTA:
“Aléatoire” [RANDOM] ne peut pas être utilisé avec “Programmer Lecture” “[Program Play]” (voir la section N° 10).
EN MODE TUNER:
Beaucoup de personnes ont des difficulté s à mémoriser quelle fréquence appartient à quelle station radio. Afin d’éviter cette confusion, vous pouvez
NAD 19

F
donner à chaque valeur prédéfinie un nom de jusqu’à huit caractères. Lorsque vous demandez cette valeur pré dé finie, le nom sera affiché au lieu de la fréquence. Par exemple, 91.30 correspond à la BBC Radio 3; dans ce cas, la valeur prédéfinie peut être programmé e pour afficher “BBC R3” à chaque demande.
Vous pouvez désigner la valeur prédéfinie de deux manières; soit nommer et mémoriser simultanément la station sous une valeur prédéfinie, soit nommer une valeur prédéfinie déjà mémorisée.
POUR DESIGNER ET MEMORISER UNE VALEUR PREDEFINIE
Se régler sur la station radio souhaitée au moyen des boutons de commande “Recherche/Réglage” [SEARCH/TUNE] (N° 17). Appuyer sur le bouton “Répétition” [REPEAT] et, à part une ligne clignotante, l’affichage sera vierge. Dans le temps prédéfini de 10 secondes vous êtes à même d’entrer le premier caractère souhaité.
Sélectionner le caractère en utilisant un des deux boutons de commande “Saut/Pré sé lection” [SKIP/RESET] (N° 7). Une pression sur le bouton de commande droit “Saut/Présélection” [SKIP/RESET] fera défiler tous les caractères disponibles en ordre numé rique et alphabé tique: (espace) >0>1>2>3 jusqu’à 9 >A>B>C jusqu’à Z> (espace) 0>1>2> et ainsi de suite. Appuyer sur le bouton de commande “Saut/Présélection” gauche [SKIP/PRESET] pour faire défiler les caractères en ordre inverse: Z>Y>X jusqu’à A>9 jusqu’à 3>2>1>0> (espace) >Z>Y>X> et ainsi de suite.
Utiliser le bouton de commande droit “Recherche/Réglage” [SEARCH/TUNE] (N° 17) pour aller jusqu’à la position droite suivante afin d’entrer un deuxième caractère et de répéter la sélection du caractère suivant les directives ci-dessus.
Entrer tous les autres caractères au moyen des
boutons de commande |
‘”Saut/Pré sé lection” |
[SKIP/PRESET] et |
“Recherche/Ré glage” |
[SEARCH/TUNE] en suivant les directives ci-dessus.
Dès que tous les caractères ont été enregistrés correctement, appuyer sur “Mémoriser” [STORE] (N° 10).
Appuyer à nouveau sur “Mémoriser” [STORE] afin d’accorder un numéro prédéfini (voir la section 10).
POUR DESIGNER UNE VALEUR PREDEFINIE DEJA MÉ MORISÉ E
Appeller la valeur prédéfinie que vous souhaitez nommer. Appuyer sur le bouton “Ré pé tition” [REPEAT] et, à part la ligne clignotante, l’affichage sera vierge. Dans un temps prédéfini de 10 secondes vous êtes à même d’entrer le premier caractère souhaité.
Sélectionner le caractère en utilisant un des deux boutons de commande “Saut/Pré sé lection” [SKIP/RESET] (N° 7). Une pression sur le bouton de commande droit “Saut/Présélection” [SKIP/RESET]
NAD 20
fera défiler tous les caractères disponibles en ordre numérique et alphabétique: (espace) >0>1>2>3 jusqu’à 9 >A>B>C jusqu’à Z> (espace) >0>1>2> et ainsi de suite. Appuyer sur le bouton de commande “Saut/Présélection” gauche [SKIP/PRESET] pour faire défiler les caractères en ordre inverse: Z>Y>X jusqu’à A>9 jusqu’à 3>2>1>0> (espace) >Z>Y>X> et ainsi de suite.
Utiliser le bouton de commande droit “Recherche/Réglage” [SEARCH/TUNE] (N° 17) pour aller jusqu’à la position droite suivante afin d’entrer un deuxième caractère et de répéter la sélection du caractère suivant les directives ci-dessus.
Entrer tous les autres caractères au moyen des
boutons de commande |
‘”Saut/Pré sé lection” |
[SKIP/PRESET] et |
“Recherche/Ré glage” |
[SEARCH/TUNE] suivant les directives ci-dessus.
Dès que tous les caractères ont été entrés correctement, appuyer sur “Mémoriser” [STORE] (N° 10). Vous avez accordé un nom à la valeur prédéfinie.
NOTA:
Il est toujours possible de changer un nom, en utilisant le même processus tel qu’il est décrit dans “Désigner une valeur prédéfinie déjà mémorisée”. Au lieu de voir une ligne vierge, le premier caractère commencera à clignoter sur l’affichage dès que “Répétition” [REPEAT] est activée; il suffit de le “superposer” en sélectionnant un nouveau caractère.
NOTA:
Il n’est pas possible de renommer une station radio RDS; le nom transmis (PS) sera mémorisé et affiché automatiquement.
12. “Annuler” [CANCEL]
EN MODE CD:
Le bouton “Annuler” [CANCEL] fonctionne avec le bouton “Mémoriser” [STORE] (N° 10) et vous permet d’effacer des pistes que vous ne souhaitez pas écouter.
Voir la section “Mémoriser” [STORE] (N° 10) pour savoir comment vous pouvez programmer et activer “Programmer Lecture” [Program Play].
EN MODE TUNER:
Afin d’effacer une certaine valeur prédéfinie, sélectionner la valeur prédéfinie et appuyer sur “Annuler” [CANCEL]; le numéro prédéfini sur l’affichage commence à clignoter. Dans le temps prédéfini de 6 secondes, appuyer à nouveau sur “Annuler” [CANCEL]. Afin de confirmer que le numéro prédéfini est bien disponible, l’affichage indiquera le message: “Valeur prédéfinie libre” [PRESET CLEAR].
13. “Tonalité Neutre” [TONE DEFEAT]
Le bouton “Tonalité Neutre“[TONE DEFEAT] évite la section de réglage de tonalité du L 40. Si vous êtes habitué à laisser les commandes de tonalité en position médiane (12 heures), il est conseillé d’éviter
tout à fait la section de ré glage de tonalité en appuyant sur le bouton “Tonalité Neutre“ [TONE DEFEAT]. Pour indiquer que “Tonalité Neutre” [TONE DEFEAT] est activé, “Tonalité Neutre“[TONE DEFEAT] s’allume sur l’affichage. Le simple fait d’é viter toute l’é lectronique de réglage de tonalité assure une légère amélioration de la qualité audio et une réponse-fréquence non altérée.
14. “Affichage” [DISPLAY]
EN MODE CD:
Le bouton “Affichage” [DISPLAY] dispose de trois modes, tels que:
“Temps” [TIME]: indique le temps écoulé, en minutes et en secondes, depuis le début de la piste en cours. (Ceci est le réglage “prédéfini”, qui est sélectionné automatiquement lorsque le lecteur de disques est mis sous tension.)
“Restant” [REMAIN]: indique la totalité du temps qui reste jusqu’à la fin du disque et la totalité de pistes qui restent (y compris la piste en cours), ou la totalité de pistes et le temps qui restent au cours de “Programmer Lecture” [Program Play].
TOTAL: La totalité de pistes et de temps d’écoute disponible sur le disque.
EN MODE TUNER:
Lorsque vous recevez une station radio RDS, le bouton “affichage” [DISPLAY] fait défiler trois modes:
Lorsque vous êtes réglé sur une station radio RDS, le nom de la station sera affiché d’office (RDS PS).
Appuyer une fois sur le bouton “Affichage” [DISPLAY] pour afficher le Texte Radio (RDS RT). Les informations Texte Radio peuvent indiquer le programme ou le nom du speaker, le nom de la chanson qui passe etc... Le texte dé file en continu sur l’affichage. Si la station ne transmet pas de Texte Radio, l’affichage indiquera “pas de texte” [NO TEXT].
Appuyer à nouveau sur le bouton pour afficher la fréquence de la station et la puissance du signal.
Appuyer une fois encore pour retourner à l’affichage prédéfini indiquant le nom de la station radio (RDS PS).
Si vous appuyez sur le bouton “affichage” [DISPLAY] lorsque vous êtes réglé sur une station radio sans RDS, l’affichage indiquera le message “pas de RDS” [“NO RDS”] pendant 5 secondes avant de retourner à l’affichage normal.
REMARQUE:
La fonction RDS dépend entièrement de la capacité de l’èmission radio. Beaucoup de stations n’émettent pas encore avec le système RDS. NAD n’offre aucune garantie relativement à la disponibilité du système RDS dans votre localité. Veuillez vérifier auprès de diffuseurs locaux.
F
15. “Egalisation des Tons Graves” [BASS EQ]
Les petits haut-parleurs produisent en principe moins bien les sons très graves étant donné leurs restreintes physiques. La caractéristique “Egalisation des Tons Graves” [BASS EQ] corrige cet amortissement, et augmente de façon considérable la réponse utile des haut-parleurs. Naturellement les très basses fréquences ne sont pas présentes dans toutes les pièces de musique ou tous les enregistrements, et l’effet de “l’Egalisation des tons graves” [BASS EQ] n’est pas toujours évident. Mais pour la musique qui contient beaucoup de sons graves, l’on remarque sans aucun doute une amélioration spectaculaire.
Appuyer sur le bouton “Egalisation des Tons Graves” [BASS EQ] pour l’activer; “Egalisation des Tons Graves” [BASS EQ] s’allume sur l’affichage.
Appuyer à nouveau sur le bouton “Egalisation des Tons Graves” [BASS EQ] pour le désactiver.
NOTA:
Le circuit “Egalisation des Tons Graves” [BASS EQ] comprend également un filtre infrasonore qui atténue la réponse au-dessous de 25 Hz afin d’éviter une amplification inappropriée des signaux non musicaux au-dessous de la plage audio. Pour les pièces de musique avec des tons extrèmement graves, il est possible de surmoduler soit l’amplificateur ou les haut-parleurs du L 40. Cela donne de la distorsion. Dans ce cas il est né cessaire de dé sactiver “l’Egalisation des Tons Graves” [BASS EQ] et/ou de baisser le volume jusqu’à ce que la distorsion disparaisse.
16. MONO
Si votre unité reçoit un signal FM puissant, votre NAD L 40 adoptera automatiquement Stéréo FM, indiqué sur l’affichage par le voyant STEREO, et le tuner assurera le silencieux de recherche de stations.
Les signaux sté ré o faibles, toutefois, peuvent engendrer beaucoup de sifflements de fond. Le fait de changer en mode Mono, en appuyant sur le bouton MONO, annulera la plupart ou tout ce bruit de fond. Appuyer à nouveau sur ce bouton MONO pour regagner le fonctionnement Auto Stéréo FM.
Il est possible d’ajouter l’état MONO à une valeur prédéfinie. Ainsi, si vous écoutez souvent une station à signal faible, vous n’aurez pas besoin d’entrer le MONO manuellement chaque fois. Voir la section “Mémoriser” [STORE] pour obtenir plus d’informations.
NAD 21

F
NOTA:
Le MONO fonctionne uniquement sur la section tuner du L 40. Avec la sé lection du CD, TAPE (Magnétophone) ou AUX, le bouton MONO ne fonctionne pas.
17. “Recherche/Ré glage” [SEARCH/TUNE]
EN MODE CD:
“Recherche en arriè re” [SEARCH BACK  ]
]
Le bouton “Recherche  [SEARCH
  ] oblige la tête de lecture optique à lire l’enregistrement en arrière à grande vitesse. Ce bouton ne fonctionne que lorsque le lecteur est en mode “Lecture” [PLAY] ou PAUSE. Après une commande “d’Arrêt” [STOP], ou après avoir chargé un nouveau disque, il est nécessaire d’appuyer sur “Lecture” [PLAY] avant que le circuit de recherche ne puisse fonctionner.
Si le balayage est activé alors que le lecteur est en mode PAUSE, le balayage se fait dans le silence, à une vitesse 15 à 20 fois supérieure à la vitesse de lecture normale. Si le balayage est activé alors que le lecteur est en mode “Lecture” [PLAY], la musique s’entend sous une forme fragmentée au cours du balayage. Utiliser ce “balayage audible” pour positionner la tête de façon précise, à l’endroit où vous souhaitez reprendre la lecture.
Si vous faites une recherche en arrière jusqu’au début du disque pendant la lecture de la piste 1, le lecteur retournera automatiquement en mode de lecture normale.
“Recherche en avant  ” [SEARCH FORWARD
  ]
]
Le bouton “Recherche en avant  ” [SEARCH FORWARD
  ] oblige la tête de lecture optique à lire l’enregistrement en avant à grande vitesse. Le comportement de cette fonction est semblable à la “Recherche en arrière
  [SEARCH
  ].
].
Si vous effectuez une recherche en avant jusqu’à la fin du disque pendant la lecture de la dernière piste, la recherche s’arrête et l’affichage du temps indique la table des matières. (Aucun mode de “rebouclage” n’est prévu.)
EN MODE TUNER:
Le L 40 vous permet de vous régler sur une station radio en deux modes, manuellement ou chercher automatiquement. Pour chercher automatiquement:
Appuyer soit sur le bouton  ou
ou  sur la commande “Recherche/Réglage” [SEARCH/TUNE] pendant plus d’une seconde et le relâcher pour régler plus plus haut ou plus bas sur la bande de fréquence. Le tuner cherchera automatiquement plus haut ou plus bas sur la bande FM afin de trouver la première station émettant un signal suffisamment puissant. Dès qu’il aura trouvé un signal suffisamment puissant, il s’arrête et se réglera de façon précise sur la station radio. Le voyant “Réglage Central” [Centre Tune] (un simple point sur l’affichage) s’allume lorsqu’une station est réglée correctement.
NAD 22
Ré glage manuel d’une station radio:
Appuyer soit sur le bouton  ou
ou  de la commande “Recherche/Réglage” [SEARCH/TUNE] afin de régler plus haut ou plus bas sur la bande de fréquence. Le tuner cherchera automatiquement plus haut ou plus bas sur la bande FM. Dè s qu’il approche la fréquence souhaitée, appuyer brièvement sur l’autre cô té de la commande “Recherche/Réglage” [SEARCH/TUNE] afin d’arrêter la recherche.
Chaque nouvelle pression brève sur l’un des boutons “Recherche/Ré glage”  ou
ou  [SEARCH/TUNE] oblige le tuner à faire un petit pas de réglage de 0,025MHz.
Le voyant “Réglage Central” [Centre Tune] (un simple point sur l’affichage) s’allume pour indiquer que la station est réglée correctement.
NOTA:
Parfois le signal radio est si faible que le niveau du signal tombe au-dessous du seuil du silencieux de recherche (en général, les circuits du silencieux de recherche atténuent le bruit qui s’entend entre les stations radio). Par conséquent, la station radio ne sera pas audible mê me si elle est ré glé e sur la fréquence exacte. Dans ce cas, il est nécessaire d’appuyer sur le bouton MONO (N° 16) afin de couper le silencieux de recherche.
18. COMMANDES DES TONS GRAVES [BASS] ET AIGUS [TREBLE]
Les commandes des tons graves [BASS] et aigus [TREBLE] ajustent l’équilibre tonal de votre système. La position médiane (12 heures) est “plate” sans amplification ni atténuation et un léger déclic peut être ressenti dans le mouvement du bouton à cet endroit. Tourner les commandes en sens horaire pour augmenter, ou en sens inverse horaire pour diminuer le niveau des tons graves [bass] ou aigus [treble].
Les commandes de tonalité n’affecteront pas les enregistrements effectués en provenance des sorties “Magnétophone” [TAPE] mais affecteront bien le signal allant vers la sortie de Préamplification [Pre Out].
NOTA:
Veiller que la “Tonalité Neutre” [TONE DEFEAT] (N° 13) n’est pas activée puisque les commandes de tonalité ne fonctionneront pas dans ce cas (“Tonalité Neutre” [TONE DEFEAT] s’allume sur l’affichage).
19. “Equilibrer” [BALANCE]
La commande “Equilibrer” [BALANCE] règle les niveaux relatifs des haut-parleurs gauche et droit. La position médiane (12 heures) assure un niveau égal pour les voies gauches et droites. Un léger déclic peut être ressenti dans le mouvement du bouton à cet endroit.
En tournant le bouton en sens horaire, on déporte l’équilibre vers la droite. En tournant le bouton en sens inverse horaire, on déporte l’équilibre vers la gauche.

La commande “Equilibrer” [BALANCE] n’affecte pas les enregistrements en provenance des sorties “Magnétophone” [TAPE] mais affectera bien le signal allant vers la sortie de préamplification [Pre Out].
20. VOLUME
La commande de VOLUME sonore règle le volume global des signaux envoyés aux haut-parleurs.
Sur la télécommande se trouvent deux boutons pour le volume. Appuyer sur le bouton “haut” [UP] pour augmenter le volume; appuyer sur “bas” [DOWN] pour diminuer le volume. Lorsque vous utilisez soit le bouton de commande du volume [DOWN] ou [UP] sur la télécommande, l’affichage indiquera respectivement “volume bas” [VOL DOWN] ou “volume haut” [VOL UP]. Le bouton de commande de volume motorisé sur la Face Parlante montera ou descendra en même temps.
NOTA:
La commande du volume n’affecte pas les enregistrements provenant de la sortie “Magnétophone” [TAPE] mais affectera bien le signal allant vers la sortie de préamplification [Pre Out].
TELECOMMANDE
MISE EN PLACE ET REMPLACEMENT DES PILES
La télécommande fonctionne avec deux piles de 1,5 volts, type AAA (c’est-à -dire des piles de référence UM-4 ou IEC RO3). Il est conseillé d’utiliser des piles alcalines pour une longévité maximale.
Pour ouvrir le compartiment des piles, il faut poser le doigt sur le léger creux à l’arrière de la télécommande, et appliquer une pression contre le bord souple du couvercle des piles puis tirer le couvercle vers le haut. Insérer des piles neuves, en les orientant conformément au croquis se trouvant à l’intérieur du compartiment. Les ressorts hélicoïdaux doivent toucher l’extré mité né gative (-) de chaque pile. Repousser le couvercle du compartiment des piles et appuyer doucement jusqu’à ce qu’il s’enclenche.
Dans certains cas, un mauvais fonctionnement peut être dû à une légère corrosion ou à des traces grasses laissées par les doigts sur les contacts des piles. Retirer les deux piles, frotter les contacts métalliques aux deux extrémités de chaque pile avec un chiffon propre ou une gomme à crayon, puis réinsérer les piles en faisant attention de bien les orienter conformément au croquis se trouvant à l’intérieur du compartiment des piles.
Bouton “Veille” [STAND-BY] (vert):
Ce bouton permute l’unité entre le mode marche et le mode “Veille” [Stand-by] et vice versa. Appuyer à nouveau sur ce bouton pour mettre l’unité sur “marche” [ON] à partir de “veille” [stand-by].
NOTA:
Le mode “Veille” [stand-by] est indiqué par un voy-
F
ant orange juste au-dessus du bouton vert “Marche/Arrêt” [POWER] sur la face Parlante (N° 1). En mode “Veille” [Stand-by], le L 40 consomme très peu de courant. Il est, toutefois, conseillé de couper l’alimentation de l’unité entièrement si elle va rester inutilisée pendant un certain temps. Pour couper l’alimentation, appuyer sur le bouton “Marche/Arrêt” [POWER] sur la face Parlante (N° 1); tous les voyants s’éteindront.
Boutons de VOLUME “haut” UP et “bas” DOWN:
Sur la télécommande se trouvent deux boutons pour régler le volume. Appuyer sur le bouton “haut” [UP] pour augmenter le volume; appuyer sur “bas” [DOWN] pour diminuer le volume. Lorsque vous utilisez soit le bouton de commande du volume [DOWN] ou [UP] sur la télécommande, l’affichage indiquera respectivement “volume bas” [VOL DOWN] ou “volume haut” [VOL UP]. Le bouton de commande de volume motorisé sur la Face Parlante montera ou descendra en même temps.
Bouton “Silencieux de recherche” [MUTE]:
Si vous appuyez sur ce bouton, le volume global réduira de façon considérable (de 20dB). Ceci est très utile pour réduire rapidement le volume pour répondre au téléphone, par exemple. Lorsque le silencieux de recherche est activé, l’affichage indique “Silencieux de recherche” [MUTE], peu importe le mode actuel.
Appuyer à nouveau sur “Silencieux de recherche” [MUTE] afin de remettre le niveau de volume d’origine.
Bouton “Arrê t” [STOP]:
Appuyer sur ce bouton pour arrêter la lecture du CD ou pour remettre le “Programmer Lecture” [Program Play] à zéro. Sur la face parlante se trouve également un bouton “Arrêt” [STOP] qui a presque la même fonction que le bouton sur la télécommande. Toutefois, ce bouton ouvre et ferme également le tiroir-disque.
Boutons CD, TUNER, AUX et “Magné tophone” TAPE:
Contrairement à la face parlante, la télécommande a des boutons diffé rents pour chaque entré e. Appuyer sur le bouton qui correspond à l’entrée souhaitée.
Les boutons “Lecture/Pause” [PLAY/PAUSE], “Saut/Pré sé lection” [SKIP/PRESET] et “Affichage” [DISPLAY] fonctionnent de la même manière que ceux ayant la même désignation sur la face parlante de l’unité (respectivement les n° 6, 7 et 14 sur le plan de la face parlante).
NAD 23

F
MAINTENANCE
Ouvrir régulièrement le tiroir-disque et nettoyer avec un chiffon un peu humide afin d’enlever les poussières.
MANIPULATION DES COMPACT DISC
Manipuler les Compact Disc avec soin. La lecture du disque ne sera pas affectée par de petites particules de poussière, par quelques légères traces de doigts ou de petites rayures. Mais les rayures profondes ou une couche épaisse de traces de doigts grasses peuvent empêcher le lecteur de suivre les pistes du disque. (A propos, bien que le laser de suivi de la piste “lise” le disque à travers son côté transparent, la surface des données proprement dite est imprimée juste en dessous de l’étiquette, et n’est protégée que d’une mince couche de laque. Cela veut dire qu’une rayure qui traverse l’étiquette peut abîmer le disque de manière plus sérieuse qu’une rayure située sur la surface “de lecture” transparente. Il faut donc manipuler les deux faces du disque avec précaution).
Des rayures profondes ou d’importantes traces de doigts peuvent provoquer un mauvais suivi de la piste par le lecteur (ce qui se manifeste par des sauts en avant, ou la répétition d’une même partie). Une détérioration moins importante peut provoquer de très courtes occurrences de bruit de haute fréquence. Les circuits de suivi de piste et de correction d’erreurs sont, sur ce lecteur CD NAD, d’une sophistication peu courante, et assurent un suivi des pistes pré cis sur des disques dé fectueux que d’autres lecteurs sont incapables de lire. Cependant, il faut toujours respecter les Compact Disc et ne jamais les manipuler sans faire attention.
Le meilleur moyen de tenir ces disques est de les prendre uniquement par les bords. Une autre méthode sûre consiste à passer un doigt dans le trou central, et à utiliser le pouce pour maintenir le bord du disque.
Lorsqu’il n’est pas utilisé, chaque disque doit être conservé dans son boîtier de stockage en plastique. Pour ouvrir un boîtier de CD standard en plastique, de type Philips, tenir le haut et le bas du boîtier entre le pouce et les doigts de la main gauche et prendre ensuite les bords droit et gauche avec les doigts et le pouce de la main droite; ouvrir alors le boîtier en tirant avec le pouce de la main droite.
Le disque est maintenu en place dans son boîtier par un moyeu élastique en son centre. Pour sortir le disque, appuyer sur le moyeu avec un doigt pour le dégager, et le retirer ensuite en tenant ses bords entre le pouce et les doigts. Pour remettre le disque dans le boîtier, il suffit d’aligner son trou central avec le moyeu, et d’appuyer sur le disque pour l’engager sur ce dernier.
NETTOYAGE DES DISQUES
Pour nettoyer les disques sales, il suffit de les essuyer avec un chiffon doux, sec ou humecté d’eau. NE PAS utiliser de produit destiné au nettoyage des disques 33-tours traditionnels (solutions de nettoyage, pulvérisateurs, chiffons traités ou préparations
NAD 24
antistatiques), ni un quelconque solvant chimique (alcool, benzène, etc...). Un disque très sale peut être nettoyé sous une douchette d’eau tiède, avec une petite quantité de liquide vaisselle, puis essuyé avec une serviette propre et douce.
Lors du nettoyage du disque, n’appliquer que des mouvements RADIAUX (depuis le centre vers le bord). Ne jamais appliquer un mouvement d’essuyage circulaire comme pour le nettoyage des disques 33-tours traditionnels, car tout essuyage comporte un risque de rayure. Une rayure radiale sera la moins préjudiciable, puisqu’elle n’affectera qu’une petite partie de chaque piste circulaire, entièrement corrigible par les circuits de correction d’erreurs incorporés dans le lecteur. Par contre, une rayure circulaire qui suit une piste de données peut détériorer un segment de données long et continu, au point de rendre la correction impossible.
AU SUJET DU LASER
Le lecteur de Compact Disc utilise un laser à diodes semi-conductrices, monté sur un servomécanisme de suivi de piste pour la lecture du disque. Le laser é claire la piste de trous microscopiques représentant les bits de données numériques, alors que des diodes photosensibles détectent la lumière réfléchie du disque et la convertissent en un signal électronique; ce signal est ensuite décodé pour récupérer la forme d’onde musicale de chaque voie stéréophonique.
Il est impossible de voir fonctionner le laser, car il fonctionne sur une longueur d’onde de 7800 Angströms, ce qui correspond aux infrarouges invisibles à l’oeuil humain.
Le lecteur de Compact Disc est totalement sûr, et peut être utilisé par des enfants. Le laser fonctionne avec une puissance très faible, de plus il est caché à l’intérieur du mécanisme du lecteur. Même lorsque le lecteur est démonté, le laser reste scellé dans un dispositif optique qui oblige sa lumière à se focaliser à une distance de seulement 1 mm de la lentille, puis à diverger très rapidement de manière à diminuer son intensité à un niveau négligeable.

|
|
|
|
|
F |
|
|
|
|
|
|
|
|
||
DÉ PISTAGE DES ERREURS |
|
|
|
|
|
||
|
|
|
|
|
|
|
|
|
SYMPTÔ ME |
CAUSE POSSIBLE |
|
CORRECTION |
|||
|
|
|
|
|
|
|
|
• |
IL’unité n’est pas alimentée |
• La fiche est mal ou pas |
• Bien enfoncer la fiche dans la |
||||
|
en courant lorsque le bouton |
connectée à la prise secteur |
|
prise secteur murale. |
|||
|
“Marche/Arrêt” POWER es |
murale. |
|
|
|
|
|
|
mis sur “Marche” ON. |
• Le courant n’est pas mis. |
|
|
|
|
|
|
|
|
|
|
|||
• La lecture du disque ne |
• Le disque est chargé à l’envers. |
• Recharger le disque avec |
|||||
|
commence pas. |
|
|
l’étiquette vers le haut. |
|||
|
|
• Le disque est trop sale. |
• |
Nettoyer le disque. |
|||
|
|
|
|
||||
• |
Pas de son. |
• Mauvaise connexion des câbles |
• Vérifier les lignes entrée et les |
||||
|
|
audio. |
|
connexions des haut-parleurs |
|||
|
|
|
|
du L 40. |
|||
|
|
• La station n’est pas sélectionnée |
• |
Régler à nouveau la sélection |
|||
|
|
ou le signal est faible. |
|
de la station. |
|||
|
|
|
|
||||
• |
Coupe-circuit thermique. |
• Mettre hors tension et réduire le |
• Mettre sous tension dès que |
||||
|
|
volume. |
|
l’unité s’est refroidie. |
|||
|
|
• Mettre sous tension dès que |
• Le fusible interne a sauté; con- |
||||
|
|
l’unité s’est refroidie. |
|
sulter votre concessionnaire. |
|||
|
|
|
|
||||
• Pas de son sur une voie. |
• Le réglage du volume n’est pas |
• |
Centrer la commande |
||||
|
|
équilibré. |
|
[balance] “équilibrer” en |
|||
|
|
|
|
position médiane. |
|||
|
|
• Le cordon d’entrée est |
• Vérifier les câbles et les |
||||
|
|
débranché ou endommagé. |
|
connexions. |
|||
|
|
|
|
||||
• Le son fait des sauts. |
• Le L 40 est soumis à des |
• |
Changer l’endroit |
||||
|
|
vibrations ou des chocs. |
|
d’installation. |
|||
|
|
physiques provenant de |
|
|
|
|
|
|
|
sources externes. |
|
|
|
|
|
|
|
|
|
|
|||
• |
La télécommande ne |
• Les piles de la télécommande |
• |
Changer les piles. |
|||
|
fonctionne pas. |
sont vides. |
|
|
|
|
|
|
|
• Obstacle qui gêne le capteur |
• Enlever tous les objets qui |
||||
|
|
du lecteur. |
|
se trouvent directement |
|||
|
|
|
|
devant la fenêtre de |
|||
|
|
|
|
l’affichage. |
|||
|
|
|
|
||||
• |
Bourdonnements. |
• Connexion de câble desserrée. |
• Vérifier les connexions des |
||||
|
|
|
|
câbles. |
|||
|
|
|
|
|
|||
• Tons graves [bass] faibles; |
• Les haut-parleurs connectés aux |
• |
Vérifier les connexions |
||||
amplificateurs de puissance sont |
|
"+" et "-" des deux |
|||||
|
image stéréo diffuse. |
|
|||||
|
hors phase. |
|
haut-parleurs. |
||||
|
|
|
|||||
|
|
|
|
||||
• |
Brouillage, sifflement. |
• Signal faible. |
• Vérifier le réglage de la station. |
||||
|
|
|
• Ajuster or changer l’antenne. |
||||
|
|
|
|
||||
• |
Mauvaise réception. |
• Multivoie ou interférence d’une |
• Vérifier le réglage de la station. |
||||
|
|
autre station. |
• Ajuster or changer l’antenne. |
||||
|
|
|
|
||||
|
|
|
• Vérifier le réglage de la |
||||
• |
Réception avec sifflements |
• Interférence provenant d’autres |
|
station. |
|||
• Mettre les dispositifs hors |
|||||||
|
et bourdonnements. |
ordinateurs, consoles de jeux. |
|||||
|
|
tension ou déplacer la |
|||||
|
|
|
|
||||
|
|
|
|
source du bruit électrique. |
|||
|
|
|
|
|
|
||
• L’on ne trouve aucune |
|
• Vérifier la connexion de |
|||||
• Le signal d’antenne n’est pas |
|
l’antenne. |
|||||
|
station en Mode |
|
|||||
|
suffisamment puissant. |
• Ajuster la position de |
|||||
|
“Recherche” [Search]. |
||||||
|
|
|
l’antenne à ruban. |
||||
|
|
|
|
||||
NAD 25

|
D |
|
BEDIENUNGSANLEITUNG NAD L 40 |
||
|
|
|
CD RECEIVER. |
|
|
SNABB REFERENS GUIDE: |
|
|
|||
Allgemein: Wie Sie ... |
Siehe Kapitel: |
Abschnitt: |
|||
|
|
|
|||
die Lautsprecher anschließen |
Rückwandanschlüsse |
1 |
|||
die UKW-Antenne anschließen |
Rückwandanschlüsse |
5 |
|||
NAD-Link anschließen und verwenden |
Rückwandanschlüsse |
6 |
|||
ein Bandgerät anschließen |
Rückwandanschlüsse |
2 |
|||
weitere Tonquellen am AUX-Eingang anschließen |
Rückwandanschlüsse |
3 |
|||
(MiniDisc-Player, TV) |
|
|
|||
Netz Ein/Aus oder Ein/Stand-by schalten |
Frontplattenelemente |
1 |
|||
die Kopfhörerbuchse verwenden |
Frontplattenelemente |
2 |
|||
eine Tonquelle auswählen |
Frontplattenelemente |
8 |
|||
Klangeinsteller und “TONE DEFEAT” verwenden |
Frontplattenelemente |
13 & 18 |
|||
“BASS-EQ” verwenden |
Frontplattenelemente |
15 |
|||
die Fernbedienung verwenden |
Fernbedienung |
|
|||
die Batterien der Fernbedienung ersetzen |
Fernbedienung |
|
|||
Tuner: Wie Sie ... |
|
|
|
||
eine Sendervorwahl eingeben |
Frontplattenelemente |
10 |
|||
eine Sendervorwahl löschen |
Frontplattenelemente |
12 |
|||
einen Sendernamen hinzufügen/ändern |
Frontplattenelemente |
11 |
|||
einen Sender automatisch einstellen (Suche) |
Frontplattenelemente |
17 |
|||
einen Sender manuell einstellen |
Frontplattenelemente |
17 |
|||
einen schwachen Sender einstellen(MUTE aus) |
Frontplattenelemente |
16 |
|||
RDS-Information anzeigen |
Frontplattenelemente |
14 |
|||
(PS, Sendername und RT, RadioText) |
|
|
|||
CD: Wie Sie ... |
|
|
|
||
eine CD laden |
|
Frontplattenelemente |
3 & 5 |
||
eine CD abspielen |
Frontplattenelemente |
6 |
|||
eine CD anhalten |
|
Frontplattenelemente |
6 |
||
auf einen anderen Titel springen |
Frontplattenelemente |
7 |
|||
den Modus “REPEAT 1” und “REPEAT ALL” |
Frontplattenelemente |
9 |
|||
einschalten |
|
|
|
||
die Wiedergabe bestimmter Titel programmieren |
Frontplattenelemente |
10 & 12 |
|||
beliebige Wiedergabe einschalten |
Frontplattenelemente |
11 |
|||
die Zeitinformationen einer CD anzeigen |
Frontplattenelemente |
14 |
|||
innerhalb eines Titels suchen |
Frontplattenelemente |
17 |
|||
|
|
|
|
|
|
NAD 26
 Loading...