


PARTS AND OPERATION MANUAL
PLASTER/MORTAR MIXERS
WM-900S
WM-900P
© COPYRIGHT 2001, MULTIQUIP INC.
Revision #7 (03/17/06)
MULTIQUIP INC. |
PARTS DEPARTMENT: |
18910 WILMINGTON AVE. |
800-427-1244 |
CARSON, CALIFORNIA 90746 |
FAX: 800-672-7877 |
310-537-3700 |
SERVICE DEPARTMENT/TECHNICAL ASSISTANCE: |
800-421-1244 |
800-478-1244 |
FAX:310-537-3927 |
FAX:310-631-5032 |
E-mail:mq@multiquip.com • www:multiquip.com

PAGE 2 —WHITEMANWM-900S,900P — PARTS & OPERATION MANUAL — REV. #7 (03/17/06)

HERE'S HOW TO GET HELP
PLEASE HAVE THE MODEL AND SERIAL NUMBER ON-HAND WHEN CALLING
PARTS DEPARTMENT
800-427-1244 or 310-537-3700 FAX: 800-672-7877 or 310-637-3284
SERVICE DEPARTMENT/TECHNICAL ASSISTANCE
800-478-1244 or 310-537-3700 FAX: 310- 537-4259
WARRANTY DEPARTMENT
888-661-4279, or 310-661-4279 FAX: 310- 537-1173
MAIN
800-421-1244 or 310-537-3700 FAX: 310-537-3927
WHITEMAN WM-900S, 900P — PARTS & OPERATION MANUAL — REV. #7 (03/17/06) — PAGE 3

TABLE OF CONTENTS
Here's How To Get Help .......................................... |
3 |
Table of Contents .................................................... |
4 |
Parts Ordering Procedures ..................................... |
5 |
Rules for Safe Operation & Safety Decals .............. |
6 |
Warranty .................................................................. |
7 |
WHITEMAN—900S&900P
Operations ......................................................... |
8-10 |
Specifications ........................................................ |
11 |
Explanation Of Codes In Remarks Column .......... |
12 |
Suggested Spare Parts ......................................... |
13 |
Drum Head Assembly ...................................... |
14-15 |
Paddle Shaft Assembly .................................... |
16-17 |
Steel Drum (S) ................................................. |
18-19 |
Polyethylene Drum (P) ..................................... |
20-21 |
Gas Engines, Pulleys & Cab Assembly............ |
22-23 |
Electric Motor & Pulleys ................................... |
24-25 |
Axle & Wheel Group ......................................... |
26-27 |
Terms and Conditions Of Sale — Parts ................ |
28 |
NOTE: Specification and part number are subject to change without notice.
PAGE 4 —WHITEMANWM-900S,900P — PARTS & OPERATION MANUAL — REV. #7 (03/17/06)

Effective: June 1st, 2005 |
PARTS ORDERING PROCEDURES |
www.multiquip.com

Ordering parts has never been easier!
Choose from three easy options:
Best Deal! Order via Internet (Dealers Only):
Order parts on-line using Multiquip’s SmartEquip website!
■View Parts Diagrams
■Order Parts
■Print Specification Information
Goto www.multiquip.com and click on
Order Parts to log in and save!
If you have an MQ Account, to obtain a
Username and Password, E-mail us at: parts@multiquip.com.
To obtain an MQ Account, contact your
District Sales Manager for more information.
Use the internet and qualify for a 5% Discount on Standard orders for all orders which include complete part numbers.*
Note: Discounts Are Subject To Change
|
|
|
Order via Fax (Dealers Only): |
|
|
|
|
|
|
|
|
|
|
|
|
|
|
|
|
|
|
|
|
|
|
|
|
|
|
|
|
|
|
|
|
Fax your order in and qualify for a 3% Discount |
|||||||||||||||||||||||||||
|
|
|
|
||||||||||||||||||||||||||||
|
|||||||||||||||||||||||||||||||
|
|
|
All customers are welcome to order parts via Fax. |
|
on Standard orders for all orders which include |
||||||||||||||||||||||||||
|
|||||||||||||||||||||||||||||||
|
|
|
|
||||||||||||||||||||||||||||
|
|
|
Domestic (US) Customers dial: |
|
complete part numbers.* |
||||||||||||||||||||||||||
|
|||||||||||||||||||||||||||||||
|
|
|
1-800-6-PARTS-7 (800-672-7877) |
|
|
|
|
|
|
|
|
|
|
|
|
|
|
|
|
|
|
|
|
|
|
|
|
|
|
|
|
|
|
|
|
|
|
|
|
|
|
|
|
|
|
|
|
|
|
|
|
|
|
|
|
|
|
|
|
||||
Note: Discounts Are Subject To Change
|
|
|
|
|
|
|
|
|
|
|
|
|
|
|
|
|
|
|
|
|
Order via Phone: Domestic (US) Dealers Call: |
|||||||||||||||||||||||||||||||||||||||||||
|
|
|
|
|
|
|
|
|
|
|
|
|
|
|
|
|
|
|
|
|
||||||||||||||||||||||||||||||||||||||||||||
|
|
|
|
|
|
|
|
|
|
|
|
|
|
|
|
|
|
|
|
|
|
|
|
|
|
|
|
|
|
|
|
|
1-800-427-1244 |
|
|
|
|
|
|
|
|
|
|
|
|
|
|
|
|
|
|
|
|
|
|
|||||||||
|
|
|
|
|
|
|
|
|
|
|
|
|
|
|
|
|
|
|
|
|
|
|
|
|
|
|
|
|
|
|
|
|
|
|
|
|
|
|
|
|
|
|
|
|
|
|
|
|
|
|
|
|
|
|
|
|
|
|
|
|
|
|
|
|
|
|
|
|
|
|
|
|
|
|
|
|
|
|
|
|
|
|
|
|
|
|
|
|
|
|
|
|
|
|
|
|
|
|
|
|
|
|
|
|
|
|
|
|
|
|
|
|
|
|
|
|
|
|
|
|
|
|
|
|
|
|
|
|
|
|
|
|
Non-Dealer Customers: |
|
|
|
|
|
|
|
|
|
|
|
|
International Customers should contact |
|
|||||||||||||||||||||||||||||||||||||||||||||||
|
|
|
|
|
|
|
|
|
|
|
|
|||||||||||||||||||||||||||||||||||||||||||||||||||||
|
|
|
|
|
|
|
|
|
|
|
|
|||||||||||||||||||||||||||||||||||||||||||||||||||||
|
|
|
Contact your local Multiquip Dealer for |
|
|
|
|
|
|
|
|
|
|
|
|
|
|
|||||||||||||||||||||||||||||||||||||||||||||||
|
|
|
|
|
|
|
|
|
|
|
|
|
|
|
|
|
||||||||||||||||||||||||||||||||||||||||||||||||
|
|
|
|
|
|
|
|
|
|
|
|
|
|
|
their local Multiquip Representatives for |
|
||||||||||||||||||||||||||||||||||||||||||||||||
|
|
|
parts or call 800-427-1244 for help in |
|
|
|
|
|
|
|
|
|
|
|
|
|
|
|||||||||||||||||||||||||||||||||||||||||||||||
|
|
|
|
|
|
|
|
|
|
|
|
|
|
|
Parts Ordering information. |
|
||||||||||||||||||||||||||||||||||||||||||||||||
|
|
|
locating a dealer near you. |
|
|
|
|
|
|
|
|
|
|
|
|
|
|
|||||||||||||||||||||||||||||||||||||||||||||||
|
|
|
|
|
|
|
|
|
|
|
|
|
|
|
|
|
|
|
|
|
|
|
|
|
|
|
|
|
|
|
|
|
|
|
|
|
|
|
||||||||||||||||||||||||||
|
|
|
|
|
|
|
|
|
|
|
|
|
|
|
|
|
|
|
|
|
|
|
|
|
|
|
|
|
|
|
|
|
|
|
|
|
|
|
|
|
|
|
|
|
|
|
|
|
|
|
|
|
|
|
|
|
|
|
|
|
|
|
|
|
|
|
|
|
|
|
|
|
|
|
|
|
When ordering parts, please supply: |
||||||||||||||||||||||||||||||||||||||||||||||||||||
|
Dealer Account Number |
Specify Preferred Method of Shipment: |
|
|
Dealer Name and Address |
Fed Ex/UPS |
DHL |
|
Shipping Address (if different than billing address) |
■ Priority One |
Truck |
■ Ground |
|
||
|
Return Fax Number |
|
|
■ Next Day |
|
||
|
Applicable Model Number |
|
|
■ Second/ThirdDay |
|
||
Quantity, Part Number and Description of Each Part
Unless otherwise indicated by customer, all orders are treated asStandard Orders and will ship NOTE within24hours.WewillmakeeveryefforttoshipAirShipmentsthesamedaytheorderisreceived,
if received prior to 2PM PST. Stock Orders must be noted on fax or web order form.
WE ACCEPT ALL MAJOR CREDIT CARDS!
WHITEMAN WM-900S, 900P — PARTS & OPERATION MANUAL — REV. #7 (03/17/06) — PAGE 5
RULES FOR SAFE OPERATION & SAFETY DECALS
■Do not operate or service this equipment before reading the operating and maintenance instructions manual or serious injury may result.
■Do not operate this equipment unless all guards and safety devices are attached and in place.
■Stop the engine when leaving the equipment.
■Block the unit when leaving or when using on a slope
■Maintain this equipment in a safe operating condition at all times.
■Caution must be exercised while servicing this equipment. Rotating and moving parts can cause injury if contacted.
■Stop the engine before servicing, adding fuel and oil.
■When towing, an adequate safety chain must be fastened to the frame, refer to page 9.
■Keep all inexperienced and unauthorized people away from the equipment at all times.
■Unauthorized equipment modifications will void all warranties.
■Check all fasteners periodically for tightness. Also check towing tongue bolt, lock nut and wheel lug nuts for wear.
■Wear safety glasses at all times when working around machinery.
■Stop the engine and disconnect the spark plug before allowing anybody’s hands in the mixing drum.
■Never pour or spray water over the engine or electric motor.
■Always stand clear of dump handle when mixer is in operation. Any binding of material between the mixer blades and drum will cause drum and handle to quickly move in the discharge position.
The safety instruction decals shown must be on all Whiteman Mixers
CAUTION!
SHUT OFF ENGINE BEFORE PUTTING HANDS IN MIXING DRUM
Caution Decal is: P/N EM948423
 SAFETY INSTRUCTIONS
1.Read owners manuals before operating.
2.Keep unauthorized and untrained people away from machine during operation.
3.Make sure all safety devices are in place before this machine is started.
4.Make sure engine is turned off and spark plug wire is disconnected before cleaning the machine.
5.Keep hands and fingers away from moving objects.
6.Do not operate machine in an enclosed area. Proper ventilation is required.
7.Never leave machine unattended when operating.
8.Always stop engine and allow engine to cool before adding fuel or oil.
Ñ Ñ ,
The safety instruction decal is P/N 924801
PAGE 6 —WHITEMANWM-900S,900P — PARTS & OPERATION MANUAL — REV. #7 (03/17/06)

There are no warranties, express or implied, made by Multiquip Inc. hereunder on Products manufactured or distributed by it except the warranty against defects in material and workmanship on new Products to the original purchaser, as hereinafter set forth.
Multiquip Inc. warrants Products manufactured by it to be free from defects in material and workmanship under normal and proper use and servicing for the periods specified on the bottom of this page.Warranty on the engines supplied with the Products is limited to the warranty extended by the engine manufacturer. Multiquip Inc.’sole obligation under this warranty is limited to the replacement or repair, at its Carson, California facility, or such authorized facility, of only such part or parts thereof as shall appear to Multiquip Inc.upon inspection at such facility, to have been defective in material and workmanship.
A statement giving model and serial number of the Product, date of sale to original purchaser and date and description of failure shall accompany all parts.
Any part or parts determined by Multiquip Inc.to be defective will be replaced free of charge, F.O.B.Carson, California. Returned parts subject to warranty must be shipped prepaid to Multiquip Inc.within 30 days from the date the defective part or parts were removed.This warranty does not apply to any part or parts which have been subject to abuse or unauthorized repairs
Warranty with respect to Products, components and accessories not manufactured by Multiquip Inc. is limited to the warranty extended by the manufacturer of those items.
WARRANTY
There are no warranties, express or implied, in addition to the above except as may be provided in writing by Multiquip Inc. MULTIQUIP INC.SHALL NOT BE LIABLE FOR ANY SPECIAL, INDIRECT OR CONSEQUENTIAL DAMAGES.
THEFOREGOINGWARRANTIESAREINPLACEANDINLIEU OF ALL WARRANTIES OF MERCHANTABILITY AND FITNESS AND SETS FORTHTHE ENTIRE OBLIGATION OF MULTIQUIP INC.
To avoid misrepresentations with respect to Products sold hereunder, the Dealer agrees that no warranties, or other operating guaranties on any Products covered by this Agreement shall be made in excess of those made by Multiquip Inc.
Multiquip Inc. Warranty Periods:
WM-900 ........................ |
12 months |
WHITEMAN WM-900S, 900P — PARTS & OPERATION MANUAL — REV. #7 (03/17/06) — PAGE 7

GENERAL
The Whiteman WM-700 and WM-900 Series plaster and mortar mixers are quality mixers that have a batch capacity of 2.5 and 3.5 bags respectively.With proper care, they will give continuous service year-after-year.
BEFORE STARTING
Before starting the engine, read the engine owners manual and thoroughly understand the safety information.
Check the items listed below:
Oil Levels. Be sure to check the oil levels in the engine and engine reduction unit before starting the unit.
Hardware. Check all hardware on the mixer before starting. Periodically inspect all hardware. Loose hardware can contribute to early component failure and poor performance. Use the torque chart below as a general guideline and keep all hardware tight:
HARDWARE DIA |
TORQUE (LB./FT.) |
||
|
|
|
|
%/16"-18 |
14 |
||
#/8" -16 |
24 |
||
#/8" -24 |
37 |
||
½" |
- 13 |
39 |
|
½" |
- 13 (Grade 8) |
90 |
|
GASOLINE ENGINE CARE
For care and operation of the gasoline engine, refer to the engine manufacturer’s operating instructions furnished with the engine. We recommend draining and refilling the engine crankcase at least every thirty hours of operation. Check the engine oil level daily.
ELECTRIC MOTOR CARE
For lubrication care and operation of the electric motor, refer to your electric motor instruction booklet furnished with the motor.
Protect the electric motor from dust as much as possible and keep ventilating openings clean. Do not spray water on the electric motor.
WM-900S, 900P — OPERATIONS
Refer to the following chart. For recommend plug sizes.
MOTOR |
115 VOLT 1Ø |
230 VOLT 1Ø |
|||
WM 700 |
WM 900 |
||||
|
|||||
HORSE |
PIGTAIL CAP |
CONN BODY |
PIGTAIL CAP |
CONN BODY |
|
NEMA/ |
NEMA/ |
NEMA/ |
NEMA/ |
||
POWER |
|||||
WHITEMAN |
WHITEMAN |
WHITEMAN |
WHITEMAN |
||
|
|||||
|
|
|
|
|
|
1½ & 3 HP |
L5-30P/940545 |
L5-30R/940546 |
L6-15P/940550 |
L6-15R/940551 |
|
|
|
|
|
|
|
CONTROLS
KILL SWITCH: (Gasoline Engine Only) Located on the side of the engine cover.
ENGINETHROTTLE AND CHOKE CONTROLS: Please refer to the engine owners manual for specific instructions. The electric motor switch ( electric motor only) located on the motor
— is used to start and stop the mixer.
DUMP LATCH: To dump the tub, grasp the dump handle and lift the dump latch, then rotate the tub to discharge the mix. After, discharge, return the tub to the vertical mixing position.
CLUTCH
The paddle shaft and mixing blades are engaged and disengaged by tightening and loosening the drive belts with a spring loaded idler pulley.To engage the clutch, rotate the lever counterclockwise.The spring maintains the correct belt tension. To disengage the clutch, rotate the lever clockwise against the lever stop.The engine base is slotted to adjust for belt wear and to bring the idler pulley into operating range.
CAUTION: Stop the engine before allowing anybody to put their hands in the mixing drum.
WHEEL BEARINGS
After every 3 months of operation, remove the hub dust cap and inspect the wheel bearings. Once a year, or when required, disassemble the wheel hubs remove the old grease and repack the bearings forcing grease between rollers, cone and cage with a good grade of high speed wheel bearing grease (never use grease heavier than 265 A.S.T.M.penetration (“No.2.”) Fill the wheel hub with grease to the inside diameter of the outer races and also fill the hub grease cap. Reassemble the hub and mount the wheel. Then tighten the adjusting nut, at the same time turn the wheel in both directions, until there is a slight bind to be sure all the bearing surfaces are in contact. Then back-off the adjusting nut !/6 to ¼ turn or to the nearest locking hole or sufficiently to allow the wheel to rotate freely within limits of .001" to .010" end play.Lock the nut at this position. Install the cotter pin and dust cap, and tighten all hardware.
PAGE 8 —WHITEMANWM-900S,900P — PARTS & OPERATION MANUAL — REV. #7 (03/17/06)
BEARING BRACKET
Grease the bearing bracket every month.
COUNTERSHAFT
The countershaft rotates on two self-aligned pillow block bearings. Grease these every 40 hours using grade #1 Lithium Base grease.
GEAR ALIGNMENT
The countershaft and driven pinion are mounted on a slotted base.To align gears, loosen the pillow block mounting bolts and move them until the necessary alignment has been made.
GEAR LUBRICATION
The surface of the pinion and the bull gear should be very lightly greased every 250 hours.
IMPORTANT! AVOID OVER-GREASING.
EXCESS GREASE WILL ACCUMULATE
CONTAMINATES AND CAUSE PREMATURE WEAR.
IMPORTANT — DRUM HEAD SEAL CARE
Grease seals every 40 hours of operation using any grade #1 lithium base grease. Apply grease until visible inside of mixing tub (overgrease). This will purge seal system of contamination.
DRUM GRILL
The drum opening is covered by a steel grill that is hinged for easy cleaning.This grill should be closed at all times when mixer is in use. Do not remove the grill or grill opening bar. Keep the grill clean by washing it down daily.
CAUTION:Stop the engine before allowing anybody to put their hands in the mixing drum.
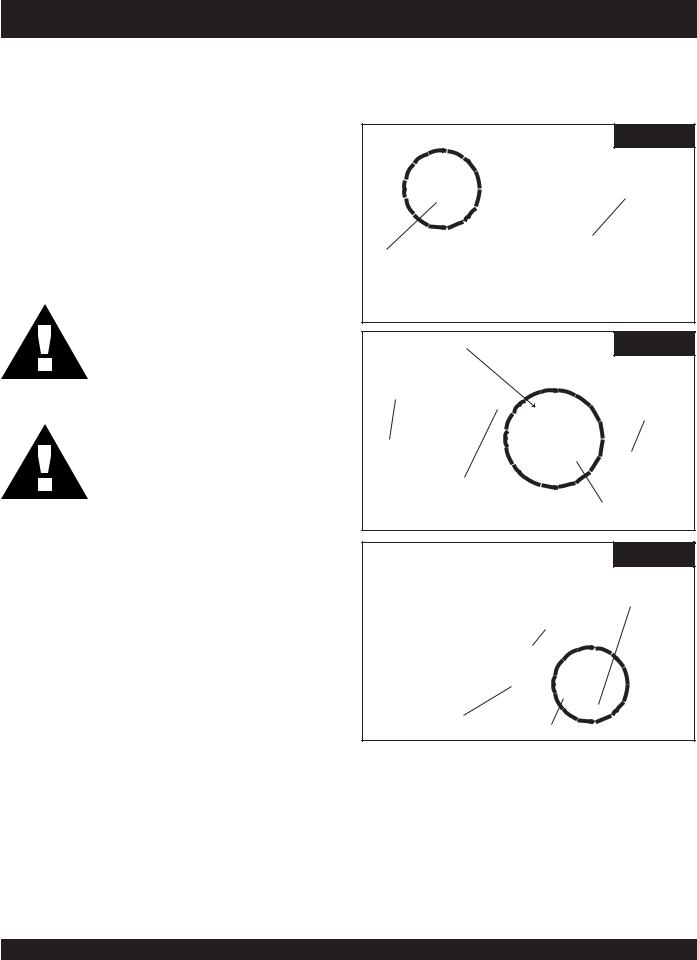
TOWING — Before towing, check with local and state laws for proper compliance.
The tow bar and chain must be properly attached to the mixer and towing vehicle prior to towing. Refer to the following installation instruction:
Step 1. Insert the Draw Bar into the main frame. Secure, utilizing the ¾" bolt (grade 5) and nylock nut.Tighten to 100 foot pounds.
Step 2. Install the chain through the hole located between the frame gusset and frame angle. Loop the chain together and place under the Draw Bar.Secure with connector link.
Step 3. Extend the chain along the length of the Draw Bar, remove excess chain (slack) and secure to bottom connector link. Secure the chain to the towing vehicle, using the connector link.
WM-900S, 900P — OPERATIONS
NOTE: It is critical that the length of chain be properly adjusted to prevent the Draw Bar and front mixer stand from
Draw
.
STEP 1
DRAW BAR
BOLT & NUT
2
DRAW BAR
STEP 3
LINK
DRAW BAR
REMOVE EXCESS CHAIN (SLACK)
BOTTOM CONNECTOR LINK
SAFETY CHAIN ......................................... |
P/N 3148 |
CONNECTOR LINK ................................... |
P/N 01004 |
WHITEMAN WM-900S, 900P — PARTS & OPERATION MANUAL — REV. #7 (03/17/06) — PAGE 9
 Loading...