


OPERATION AND PARTS MANUAL
 SERIES
WM120PM Series
POLY-MECHANICAL
WM120SM Series
STEEL-MECHANICAL
PLASTER/MORTAR MIXERS
Revision #7 (09/15/11)
To find the latest revision of this publication, visit our website at: www.multiquip.com
THIS MANUAL MUST ACCOMPANYTHE EQUIPMENT AT ALLTIMES.

PROPOSITION 65WARNING
Engine exhaust and some of its constituents, and some dust created by power sanding, sawing, grinding, drillingandotherconstructionactivities contains chemicals known to the State of California to cause cancer, birth defects and other reproductive harm. Some examples of these chemicals are:
 Leadfromlead-basedpaints.
 Crystallinesilicafrombricks.
 Cementandothermasonryproducts.
  Arsenicandchromiumfromchemically treatedlumber.
Your risk from these exposures varies, dependingonhowoftenyoudothistype of work. To reduce your exposure to these chemicals: ALWAYS work in a well ventilated area, and work with approved safety equipment, such as dust masks that are specially designed to filter out microscopic particles.
PAGE 2 — WM120PM/SM— OPERATION AND PARTS MANUAL — REV.#7 (09/15/11)
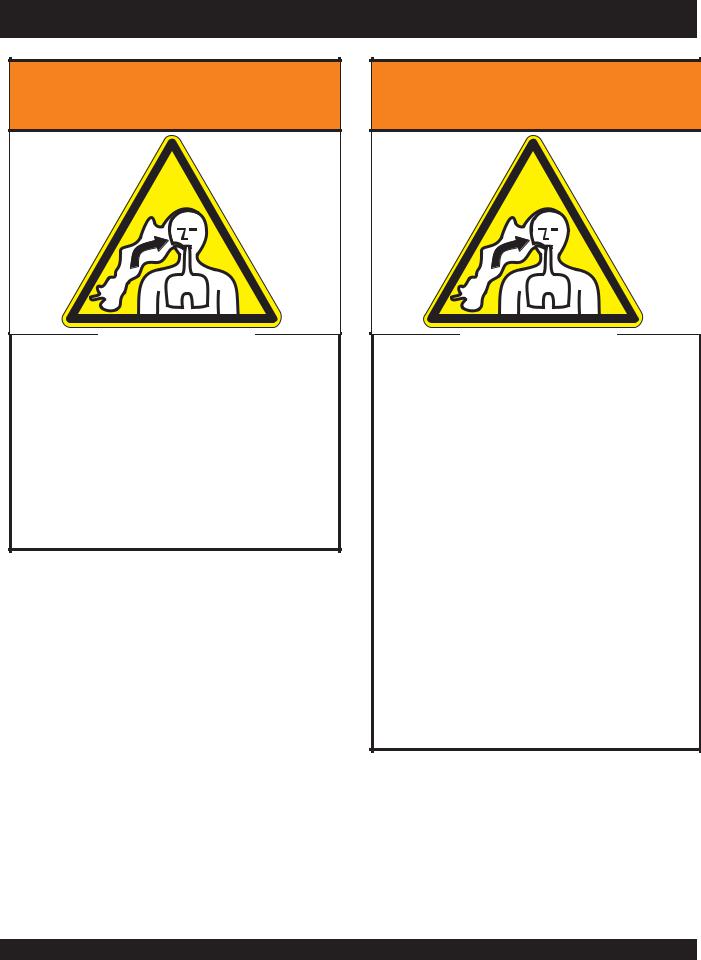
SILICOSIS/RESPIRATORYWARNINGS
 WARNING
SILICOSIS WARNING
Grinding/cutting/drilling of masonry, concrete, metal and other materials with silica in their composition may give off dust or mists containing crystalline silica. Silica is a basic component of sand, quartz, brick clay, granite and numerous other minerals and rocks. Repeated and/or substantial inhalation of airborne crystalline silica can cause serious or fatal respiratory diseases, including silicosis. In addition, California and some other authorities have listed respirable crystalline silica as a substance known to cause cancer. When cutting such materials, always follow the respiratory precautions mentioned above.
 WARNING
RESPIRATORY HAZARDS
Grinding/cutting/drilling of masonry, concrete, metal and other materials can generate dust, mists and fumes containing chemicals known to cause serious or fatal injury or illness, such as respiratory disease, cancer, birth defects or other reproductive harm. If you are unfamiliar with the risks associated with the particular process and/or material being cut or the composition of the tool being used, review the material safety data sheet and/or consult your employer, the material manufacturer/supplier, governmental agencies such as OSHA and NIOSH and other sources on hazardous materials. California and some other authorities, for instance, have published lists of substances known to cause cancer, reproductive toxicity, or other harmful effects.
Control dust, mist and fumes at the source where possible. In this regard use good work practices and follow the recommendations of the manufacturers or suppliers, OSHA/NIOSH, and occupational and trade associations. Water should be used for dust suppression when wet cutting is feasible. When the hazards from inhalation of dust, mists and fumes cannot be eliminated, the operator and any bystanders should always wear a respirator approved by NIOSH/MSHA for the materials being used.
WM120PM/SM — OPERATION AND PARTS MANUAL — REV. #7 (09/15/11) — PAGE 3

Here's How To Get Help ........................................... |
3 |
Table Of Contents .................................................... |
4 |
Parts Ordering Procedures ...................................... |
5 |
Operation and Safety Decals ................................... |
6 |
Rules For Safe Operation ..................................... |
7-8 |
Specifications ........................................................... |
9 |
General Information ............................................... |
10 |
Whiteman — Plaster/ Mortar
Mixer
Controls.................................................................. |
11 |
Electric Motor ......................................................... |
12 |
Towing .................................................................... |
13 |
Paddle Blade Adjustment .................................. |
14-15 |
Initial Start-Up ................................................... |
16-17 |
Maintenance ..................................................... |
18-19 |
Troubleshooting (Engine) ....................................... |
20 |
Troubleshooting (Engine/Mixer) ............................. |
21 |
Explanation Of Codes In Remarks Column ........... |
22 |
Suggested Spare Parts .......................................... |
23 |
Engine Side Paddle Assembly .......................... |
24-25 |
Tow Side Paddle Assembly ............................... |
26-27 |
Paddle Shaft Assembly ..................................... |
28-29 |
Polyethylene Drum Assembly ........................... |
30-31 |
Steel Drum Assembly........................................ |
32-33 |
Cab Assembly ................................................... |
34-35 |
Frame, Wheel, Tire and Hub Assembly ............ |
36-37 |
Name Plate and Decals .................................... |
38-39 |
NOTE
Specification and part number are subject to change without notice.
TABLE OF CONTENTS |
|
Engines |
|
Wisconsin Engine Assembly ............................. |
40-41 |
Honda Engine Assembly ................................... |
42-43 |
Motor |
|
Electric Motor Assembly.................................... |
44-45 |
Transmissions |
|
Transmission Assembly..................................... |
46-47 |
Terms and Conditions Of Sale — Parts ................. |
48 |
PAGE 4 — WM120PM/SM— OPERATION AND PARTS MANUAL — REV.#7 (09/15/11)
www.multiquip.com

PARTS ORDERING PROCEDURES
Ordering parts has never been easier! |
||
Choose from three easy options: |
||
|
Effective: |
|
|
January 1st, 2006 |
|
Best Deal! Order via Internet (Dealers Only): |
If you have an MQ Account, to obtain a Username |
|
Order parts on-line using Multiquip’s SmartEquip website! |
||
and Password, E-mail us at: parts@multiquip. |
||
N View Parts Diagrams |
com. |
|
N Order Parts |
To obtain an MQ Account, contact your |
|
N Print Specification Information |
District Sales Manager for more information. |
|
Goto www.multiquip.com and click on |
Use the internet and qualify for a 5% Discount |
Order Parts to log in and save! |
on Standard orders for all orders which include |
|
complete part numbers.* |
|
Note: Discounts Are Subject To Change |
|
|
|
|
Order via Fax (Dealers Only): |
|
Fax your order in and qualify for a 2% Discount |
|
|
|
|
|
|
|
|
|||
|
|
|
|
All customers are welcome to order parts via Fax. |
|
on Standard orders for all orders which include |
||
|
|
|
|
|
||||
|
|
|
|
Domestic (US) Customers dial: |
|
complete part numbers.* |
||
|
|
|
|
1-800-6-PARTS-7 (800-672-7877) |
|
|
|
|
|
Note: Discounts Are Subject To Change |
|||||||
|
|
|
|
|
||||
|
|
|
|
|
|
|||
|
|
|
|
|
|
|
|
|
Order via Phone: Domestic (US) Dealers Call:
1-800-427-1244
Non-Dealer Customers: |
|
International Customers should contact |
|||||
Contact your local Multiquip Dealer for |
|
||||||
|
their local Multiquip Representatives for |
||||||
|
|
|
|
|
|
|
|
parts or call 800-427-1244 for help in |
|
||||||
|
Parts Ordering information. |
||||||
locating a dealer near you. |
|
||||||
|
|
||||||
|
|
|
|
|
|||
When ordering parts, please supply: |
|||||||
R |
Dealer Account Number |
R Specify Preferred Method of Shipment: |
|
R |
Dealer Name and Address |
UPS/Fed Ex |
DHL |
R |
Shipping Address (if different than billing address) |
N Priority One |
Truck |
R |
Return Fax Number |
N Ground |
|
N Next Day |
|
||
R |
Applicable Model Number |
|
|
N Second/Third Day |
|
||
|
|
|
|
RQuantity, Part Number and Description of Each Part
 NOTICE
All orders are treated as Standard Orders and will ship the same day if received prior to 3PM PST.
WE ACCEPT ALL MAJOR CREDIT CARDS!
WM120PM/SM — OPERATION AND PARTS MANUAL — REV. #7 (09/15/11) — PAGE 5

OPERATION AND SAFETY DECALS
The safety instruction decals shown must be on all Whiteman Mixers
CAUTION!
SHUT OFF ENGINE BEFORE
PUTTING HANDS IN MIXING DRUM
P/N EM948423
 SAFETY INSTRUCTIONS
1.Read owners manuals before operating.
2.Keep unauthorized and untrained people away from machine during operation.
3.Make sure all safety devices are in place before this machine is started.
4.Make sure engine is turned off and spark plug wire is disconnected before cleaning the machine.
5.Keep hands and fingers away from moving objects.
6.Do not operate machine in an enclosed area. Proper ventilation is required.
7.Never leave machine unattended when operating.
8.Always stop engine and allow engine to cool before adding fuel or oil.
WHITEMAN CONCRETE PRODUCTS — A MULTIQUIP COMPANY — CARSON, CALIFORNIA
P/N 924801
PAGE 6 — WM120PM/SM— OPERATION AND PARTS MANUAL — REV.#7 (09/15/11)

CAUTION:
Failure to follow instructions in this manual may lead to serious injury or even death! This equipment is to be operated by trained and qualified personnel only! This equipment is for industrial use only.
The following safety guidelines should always be used when operating the WM-120PM or WM-120SM mixers:
GENERAL SAFETY
■DO NOT operate or service this equipment beforereadingthisentiremanual.
■This equipment should not be operated by persons under 18 years of age.
■NEVER operate this equipment without proper protective clothing, shatterproof glasses, steeltoed boots and other protective devices required by the job.
■NEVERoperatethisequipmentwhennot feelingwellduetofatigue, illnessor taking medicine.
■NEVERoperatethisequipment under the influence or drugs or alcohol.
■NEVER use accessories or attachments, which are not recommended by Multiquip for this equipment. Damage to the equipment and/or injury to user may result.
■Manufacture does not assume responsibility for any accident due to equipment modifications.
■Whenever necessary, replace nameplate, operation and safety decals when they become difficult read.
■Always check the machine for loosened threads or bolts before starting.
RULES FOR SAFE OPERATION
■NEVERtouchthehotexhaustmanifold,mufflerorcylinder. Allow these parts to cool before
servicing engine or mixer.
■HighTemperatures – Allow the engine to cool before adding fuel or performing service and maintenance functions. Contact with hot components can cause serious burns.
■The engine section of this mixer requires an adequate free flow of cooling air. Never operate the mixer in any enclosed or
narrow area where free flow of the air is restricted. If the air flow is restricted it will cause serious damage to the mixer or engine and may cause injury to people. Remember the mixer's engine gives off DEADLY carbon monoxide gas.
■Always refuel in a well-ventilated area, away from sparks and open flames.
■Always use extreme caution when working with flammable liquids. When refueling, stop the engine and allow it to cool. DO NOT smoke around or near the machine. Fire or explosion could result from fuel vapors, or if fuel is spilled on a hot engine.
■NEVER operate the mixer in an explosive atmosphere or near combustible materials. An explosion or fire could result causing severe bodily harm or even death.
WM120PM/SM — OPERATION AND PARTS MANUAL — REV. #7 (09/15/11) — PAGE 7

CAUTION:
Failure to follow instructions in this manual may lead to serious injury or even death! This equipment is to be operated by trained and qualified personnel only!This equipment is for industrial use only.
The following safety guidelines should always be used when operating the WM120S/WM120P Mixer:
GENERAL SAFETY
■Stop the engine when leaving the mixer unattended.
■Block the unit when leaving or when using on a slope.
■Maintain this equipment in a safe operating condition at all times.
■Always stop the engine before servicing, adding fuel and oil.
■NEVER Run engine without air filter. Severe engine may occur.
■Always service air cleaner frequently to prevent carburetor malfunction.
■Always be sure the operator is familiar with proper safety precautions and operations techniques before using mixer.
■Always store equipment properly when it is not being used. Equipment should be stored in a clean, dry location out of the reach of children.
■NEVER use accessories or attachments, which are not recommended by Multiquip for this equipment. Damage to the equipment and/or injury to user may result.
■NEVER Run engine without air cleaner. Severe engine damage may occur.
■Always read, understand, and follow procedures in Operator’s Manual before attempting to operate equipment.
■Always be sure the operator is familiar with proper safety precautions and operations techniques before using pump.
■Always store equipment properly when it is not being used. Equipment should be stored in a clean, dry location out of the reach of children.
CAUTION:
■ DO NOT operate this equipment unless all guards and safety devices are attached and in place.
RULES FOR SAFE OPERATION
■Caution must be exercised while servicing this equipment. Rotating and moving parts can cause injury if contacted.
■When towing, an adequate safety chain must be fastened to the frame, refer to page 14.
■Keep all inexperienced and unauthorized people away from the equipment at all times.
■Unauthorized equipment modifications will void all warranties.
■Check all fasteners periodically for tightness. Also check towing tongue bolt, lock nut and wheel lug nuts for wear.
■Stop the engine and disconnect the spark plug before allowing anybody’s hands in the mixing drum.
■Never pour or spray water over the engine or electric motor.
■Always stand clear of dump handle when mixer is in operation. Any binding of material between the mixer blades and drum will cause drum and handle to quickly move in the discharge position.
■Depending on type of mixer, test the ON/OFF switch for either the gasoline engine or electric motor before operating. The purpose of these switches is to shut down the engine or motor of the mixer.
Emergencies
■Always know the location of the nearest fire extinguisher and first aid kit. Know the location of the nearest telephone. Also know the phone numbers of the nearest ambulance, doctor and fire department. This information will be invaluable in the case of an emergency.
Maintenance Safety
■NEVERlubricate components or attempt service on a running machine.
■Always allow the machine a proper amount of time to cool before servicing.
■Keep the machinery in proper running condition.
■Fix damage to the machine immediately and always replace broken parts.
■Dispose of hazardous waste properly.Examples of potentially hazardous waste are used motor oil, fuel and fuel filters.
■DO NOT use food or plastic containers to dispose of hazardous waste. Emergencies
■Always know the location of the nearest fire extinguisher and first aid kit. Know the location of the nearest telephone. Also know the phone numbers of the nearest ambulance, doctor and fire department. This information will be invaluable in the case of an emergency.
PAGE 8 — WM120PM/SM— OPERATION AND PARTS MANUAL — REV.#7 (09/15/11)

WM120P/S — SPECIFICATIONS
Table 1. WM120P/S Series Mixers
SPECIFICATION PARAMETER |
WM120PM |
WM120SM |
|
|
|
Capacity - cu. ft (liters) |
12 (340) |
12 (340) |
|
|
|
Bag capacity - bags |
3.5 to 4 |
3.5 to 4 |
|
|
|
Weight - lbs (kg.) |
1,090 (494) |
1,090 (494) |
|
|
|
Length w/Tow Bar x W x H - in. (cm.) |
82 x 51 x 60 (208 x 130 x 152) |
82 x 51 x 60 (208 x 130 x 152) |
|
|
|
Height W/Dump Handle - in (cm.) |
75 (191) |
75 (191) |
|
|
|
Discharge Height - in (cm.) |
75 (191) |
75 (191) |
|
|
|
Drive |
Mechanical |
Mechanical |
|
|
|
Dump Action |
Manual |
Manual |
|
|
|
|
5 HP Single-Phase 230/460 Electric |
5 HP Single-Phase 230/460 |
|
5 HP Three-Phase 230/460 Electric |
Electric |
Power Sources |
11 HP Honda |
5 HP Three-Phase 230/460 Electric |
|
9.2 HP Wisc. AENLD-3 |
11 HP Honda |
|
|
9.2 HP Wisc. AENLD-3 |
|
|
|
NOTE
In accordance with our established policy of constant improvement, we reserve the right to amend these specifications at any time without notice.
WM120PM/SM — OPERATION AND PARTS MANUAL — REV. #7 (09/15/11) — PAGE 9

WM120P/S — GENERAL INFORMATION
GENERAL
The Whiteman WM-120PM and WM120SM Series plaster and mortar mixers are shipped completely assembled and have been factory tested.
The drum batch capacity of these mixers is between 3.5 and 4.0 bags. With proper care, they will give continuous service year-after-year.
These mixers can be powered by either gasoline or electric motors.The power from the engine is transmitted via the clutch/ reduction assembly directly to the paddle shaft. Therefore providing high mixer torque and eliminating V-belts .
BEFORE STARTING
Before starting the engine, read the engine owners manual and thoroughly understand the safety information.
Check the items listed below:
OIL LEVELS
Be sure to check the oil levels in the engine and engine reduction unit before starting the unit.
HARDWARE
Check all hardware on the mixer before starting. Periodically inspect all hardware. Loose hardware can contribute to early component failure and poor performance. Use the torque chart below as a general guideline and keep all hardware tight:
HARDWARE DIA |
TORQUE (LB./FT.) |
5/16"- 18 |
24 |
3/8" - 24 |
37 |
1/2" - 13 |
39 |
1/2" - 13 (Grade 8) |
90 |
GASOLINE ENGINE CARE
For care and operation of the gasoline engine, refer to the engine manufacturer’s operating instructions furnished with the engine. We recommend draining and refilling the engine crankcase at least every thirty hours of operation. Check the engine oil level daily.
GASOLINE MIXER OFF/ON SWITCH
This feature is on gasoline engine mixers only.Located on the side of the engine cover. The purpose of this switch is to start and stop the mixer in normal operation.
ELECTRIC MOTOR MIXER OFF/ON SWITCH
This feature is on electric motor mixers only.This switch is located on top of the motor.Lift the engine cover to gain access to this switch.The purpose of this switch is to start and stop the mixer in normal operation. Never use the electric motor in an explosive environment.
ENGINETHROTTLE AND CHOKE CONTROLS
Please refer to the engine owners manual for specific instructions.
PAGE 10 — WM120PM/SM— OPERATION AND PARTS MANUAL — REV. #7 (09/15/11)
WM-120P/S — CONTROLS
Figure 1. Mixer
Safety Grill — Provided for operator safety. This safety grill is designed to keep hands and solid objects out of the mixing drum when in use.This grill should be closed at all times when mixer is in use.DO NOT remove the grill or grill opening bar.Keep the grill clean by washing it down daily.
Bag Cutter— This feature allows compound mixing bags to be opened easily, therefore allowing the contents of the bag to fall directly into the mixing drum.
Mixing Paddles — Used in the mixing of material. This unit uses four different types of paddles to provide a fast uniform mix.
DumpHandle — Pull this handle downward to dump the contents of the drum. Push the handle upward to return the drum to its vertical position.
Zerk Fitting — There is, on each end of the mixing drum a zerk grease fitting.These fittings lubricate the dumping mechanism. Lubricate both fittings at least twice a week.
Mixing Drum — Made of either polyethylene or steel. Mixing materials such as concrete, mortar, plaster are to be placed into this drum for mixing. Always clean the drum after each use.
Tow Bar — When towing is required, connect tow bar to a vehicle Reference page 14.
Engine Cover — Lift this cover to gain access to the engine compartment.
ON/OFF Switch (gasoline) —This switch is provided on mixers with gasoline engines only and is located on the side of the engine cover. When activated it will shut down the engine.
ON/OFF Switch (electric) — This switch is provided on mixers with electric motors.To gain access to this switch, lift the engine cover.When activated it will shut down the electric motor.
Clutch Lever — Push the clutch lever forward, toward the tow tongue end of the mixer to engage clutch. Once clutch is engaged paddle shaft will rotate.To disengage clutch pull the clutch backwards towards the engine.
WM120PM/SM — OPERATION AND PARTS MANUAL — REV. #7 (09/15/11) — PAGE 11

ELECTRIC MOTOR
For lubrication care and operation of the electric motor, refer to your electric motor instruction booklet furnished with the motor.
Protect the electric motor from dust as much as possible and keep ventilating openings clean.
CAUTION:
■DO NOT spray water at any time on the electric motor.
■DO NOT operate electric motor in a explosive environment.
The electric motor for this mixer is available in either a 5 HP single-phase or 5 HP 3-phase configuration.The input voltage requirement for these motors is either 230 VAC or 440VAC only.
ELECTRIC MOTOR CONNECTION
A 12 inch electrical cable (Figure 2) with a pigtail at one end is provided with the electrical motor for hookup to a power source. Table 1. shows the required NEMA connector for the desired motor horsepower rating. In addition, Table 2 also shows the matching NEMA approved connector for the required extension cord.
WM-120P/S — ELECTRIC MOTOR
NOTE
It is strongly recommended that all electrical wiring be done by a licensed electrician. Special attention should be given to the electric switch as well as the over-and-under voltage protection devices as per regulations set forth in the local electrical safety code handbook.
Table 2. Electric Motor Wiring Information
Motor |
230 Volt - Single Phase |
||
Horsepower |
|
|
|
NEMA Plug Connector |
Mating NEMA |
||
Rating |
|||
|
Receptacle Connector |
||
|
|
||
|
|
|
|
3 HP |
L6-20P P/N 940539 |
L6-20R P/N 940540 |
|
|
|
|
|
5 HP |
L6-30P P/N 940547 |
L6-30R P/N 940548 |
|
|
|
|
|
Figure 2. Single Phase Electric Motor with 12 inch Pigtail Cable
PAGE 12 — WM120PM/SM— OPERATION AND PARTS MANUAL — REV. #7 (09/15/11)
NOTE
Before towing, check with local and state laws for proper compliance.
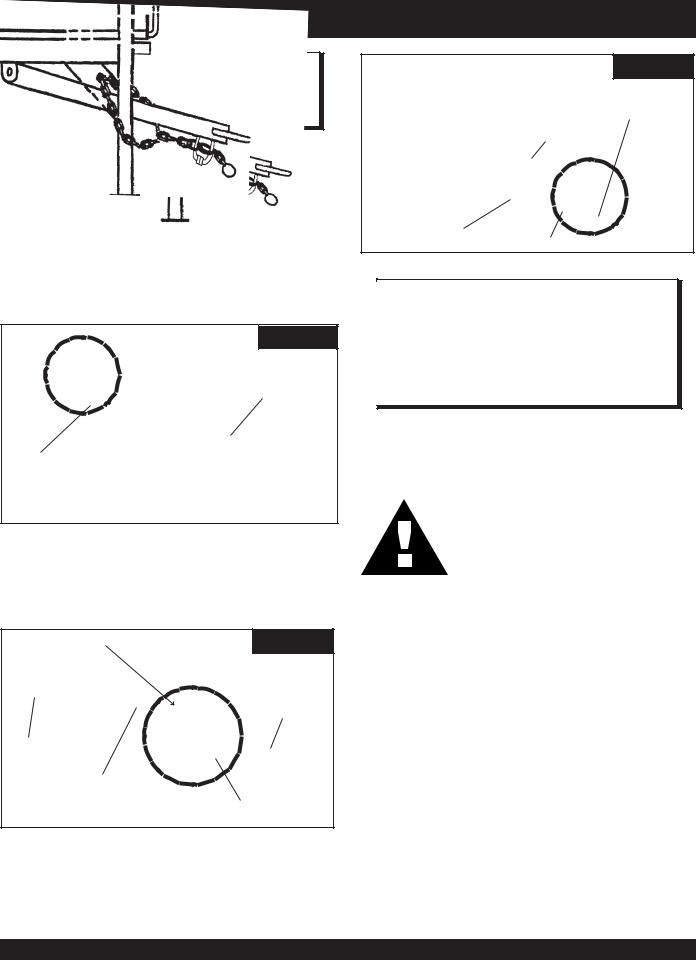
The tow bar and chain must be properly attached to the mixer and towing vehicle prior to towing. Refer to the following installation instruction:
Step 1.
Insert the Draw Bar into the main frame. Secure, utilizing the 3/4" bolt (grade 5) and nylock nut.Tighten to 100 foot pounds.
STEP 1
DRAW BAR
BOLT & NUT
Step 2.
Install the chain through the hole located between the frame gusset and frame angle. Loop the chain together and place under the Draw Bar.Secure with connector link.
2
DRAW BAR
WM-120P/S — TOWING
STEP 3
LINK
DRAW BAR
REMOVE EXCESS
CHAIN (SLACK)
BOTTOM CONNECTOR LINK
NOTE
It is critical that the length of the chain be properly adjusted, to prevent the Draw Bar and the front mixer stand from dropping to the ground (contact) in the event the Draw Bar becomes disconnected from the towing vehicle.
If a new safety chain is required use P/N 13363. For a new connector link use P/N 01004.
CAUTION:
■ Check the following before towing:
BALL HITCH COUPLER
1.Check vehicle hitch, ball, and coupler for signs of wear or damage. Replace any parts that are worn or damaged before towing.
2.Use only the 2" ball diameter as indicated on your coupler. Use of any other ball diameter will create an extremely dangerous condition which can result in separation of the coupler and ball or ball failure.
3.Be sure the coupler is secured to the hitch ball and the lock lever is down tight and locked.
Recheck tightness again after towing about 50 miles.
4.Check that trailer safety chains are properly connected.
Step 3.
Extend the chain along the length of the Draw Bar, remove excess chain (slack) and secure to bottom connector link. Secure the chain to the towing vehicle, using the connector link.
WM120PM/SM — OPERATION AND PARTS MANUAL — REV. #7 (09/15/11) — PAGE 13
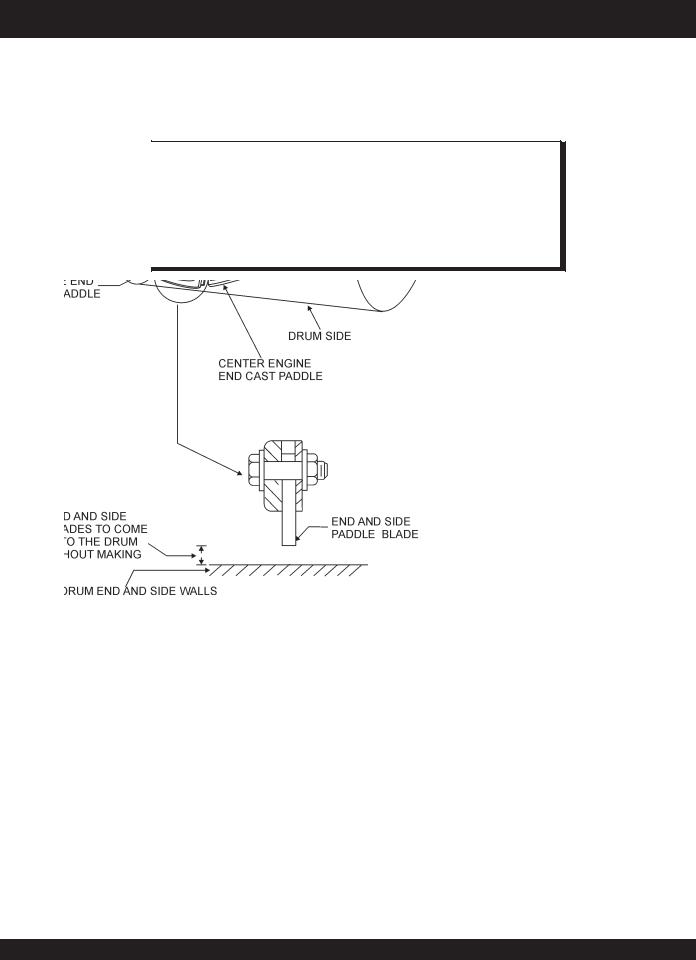
WM-120P/S — PADDLE BLADE ADJUSTMENT
Paddle blade adjustment is dependent on drum type, polyethylene or steel. Figure 3 illustrates the paddle blade adjustment when using a polyethylene drum. Figure 4 illustrates the paddle blade adjustment when using a steel drum. When using a polyethylene drum the paddle blade should come as close as possible to the drum end and side walls without making contact. If material builds up on the drum, use a rubber mallet to dislodge the material without adverse effect to the drum.
NOTE
EPOXY COMPATIBILITY - There are some epoxies and other chemicals used in certain applications that are not compatible with polyethylene drums.
Since Whiteman Industries cannot control the end user's application of this product, we will not assume responsibility for the resulting damages when exposed to incompatible chemicals.
Figure 3. Paddle Blade Adjustment, Polyethylene Drum
PAGE 14 — WM120PM/SM— OPERATION AND PARTS MANUAL — REV. #7 (09/15/11)

WM-120P/S — PADDLE BLADE ADJUSTMENT
Figure 4. Paddle Blade Adjustment, Steel Drum
WM120PM/SM — OPERATION AND PARTS MANUAL — REV. #7 (09/15/11) — PAGE 15
 Loading...