


 Loading...
FaxFinder® V.34 Fax Servers
FF Model Series
Client User Guide
Multi-Tech Systems, Inc. |
FaxFinder Client User Guide |
1 |

FaxFinder® Client User Guide
Fax Client Software for FaxFinder Series
PN S000406E, Version E
Copyright
This publication may not be reproduced, in whole or in part, without prior expressed written permission from Multi-Tech Systems, Inc. All rights reserved.
Copyright © 2008, by Multi-Tech Systems, Inc.
Multi-Tech Systems, Inc. makes no representations or warranties with respect to the contents hereof and specifically disclaims any implied warranties of merchantability or fitness for any particular purpose. Furthermore, Multi-Tech Systems, Inc. reserves the right to revise this publication and to make changes from time to time in the content hereof without obligation of Multi-Tech Systems, Inc. to notify any person or organization of such revisions or changes. Check Multi-Tech’s web site for current versions of our product documentation.
Revisions |
|
|
Level |
Date |
Description |
A03/15/06 Initial release for FF-420/820 models.
B03/02/07 Revised to add FF-120/220 models & generalized for all FF models.
C04/17/07 Revised tech support listing.
D11/20/07 Revised tech support listing, removed France office.
E07/11/08 Update content for new version. Update format.
Patents
This device covered by the following patent: 5,673,268
Trademarks
Multi-Tech Registered Trademarks: FaxFinder, Multi-Tech, and the Multi-Tech logo.
All other products and technologies are the trademarks or registered trademarks of their respective holders.
World Headquarters
Multi-Tech Systems, Inc. 2205 Woodale Drive
Mounds View, Minnesota 55112 Phone: 763-785-3500 or 800-328-9717 Fax: 763-785-9874
Technical Support |
|
|
Country |
By Email |
By Phone |
Europe, Middle East, Africa: |
support@multitech.co.uk |
(44) 118 959 7774 |
U.S., Canada, all others: |
support@multitech.com |
(800) 972-2439 or (763) 717-5863 |
Internet Address: http://www.multitech.com
Multi-Tech Systems, Inc. |
FaxFinder Client User Guide |
2 |

TABLE OF CONTENTS |
|
CHAPTER 1 – INTRODUCTION .................................................................................................................. |
4 |
ACCESSING THE FAXFINDER CLIENT SOFTWARE ........................................................................................... |
4 |
SENDING FAXES .......................................................................................................................................... |
5 |
RECEIVING FAXES........................................................................................................................................ |
6 |
RELATED MANUALS ..................................................................................................................................... |
6 |
CHAPTER 2 – FAXFINDER CLIENT SOFTWARE CONFIGURATION...................................................... |
7 |
INSTALLING FAXFINDER CLIENT SOFTWARE .................................................................................................. |
7 |
ESTABLISHING CLIENT USER’S ID IN SYSTEM .............................................................................................. |
12 |
ASSOCIATING CLIENT WITH SPECIFIC FAXFINDER UNIT(S) ........................................................................... |
13 |
DISASSOCIATING THE CLIENT FROM A SPECIFIC FAXFINDER UNIT ................................................................ |
15 |
DISABLING AND RE-ENABLING A CLIENT’S FAXFINDER SERVICE ................................................................... |
16 |
SENDING TEST FAX.................................................................................................................................... |
16 |
FAXFINDER FAX CLIENT SOFTWARE MENU COMMAND DEFINITIONS ............................................................. |
17 |
The FaxFinder Send Fax Screen......................................................................................................... |
18 |
CHAPTER 3: FAXFINDER CLIENT SOFTWARE OPERATION............................................................... |
29 |
INTRODUCTION .......................................................................................................................................... |
29 |
SENDING A FAX ......................................................................................................................................... |
30 |
SCHEDULING FAX TRANSMISSIONS ............................................................................................................. |
35 |
RE-SENDING A FAILED FAX ........................................................................................................................ |
36 |
PUTTING PENDING FAXES ON HOLD AND RESCINDING THE HOLD ................................................................. |
37 |
CANCELING A FAX...................................................................................................................................... |
40 |
SETTING FAX RETRY NUMBER AND INTERVAL.............................................................................................. |
40 |
SENDING ONE FAX CONTAINING MULTIPLE DOCUMENTS ............................................................................. |
41 |
FORWARDING A FAX................................................................................................................................... |
43 |
RECEIVING A FAX....................................................................................................................................... |
45 |
Receiving Faxes in Manual Routing Mode .......................................................................................... |
45 |
Receiving Faxes in Automated Routing Mode .................................................................................... |
47 |
USING THE MULTI-TECH TIFF VIEWER......................................................................................................... |
49 |
Frequently Used Commands – Toolbar Icons ..................................................................................... |
49 |
Importing Fax Images into Other Application Programs...................................................................... |
54 |
SETTING UP YOUR ADDRESS BOOK MANUALLY ........................................................................................... |
55 |
SETTING UP YOUR ADDRESS BOOK BY SYNCHRONIZING WITH OUTLOOK...................................................... |
58 |
What Synchronization Means .............................................................................................................. |
58 |
Synchronization Procedure.................................................................................................................. |
58 |
SETTING UP ADDRESS BOOKS WITH CSV FILES.......................................................................................... |
60 |
Exporting a FaxFinder Address Book to CSV File Format .................................................................. |
62 |
Importing CSV Files into FaxFinder Address Book with Fitted Template............................................ |
63 |
Importing CSV Files into FaxFinder Address Book with a Customized Template............................... |
66 |
Transferring an Established Standard FaxFinder Address Book to a New Client-User...................... |
72 |
USING STOCK COVER PAGES ..................................................................................................................... |
74 |
CREATING OR MODIFYING COVER PAGE STYLES ......................................................................................... |
79 |
Creating New Cover Page Templates ................................................................................................. |
79 |
Modifying Existing Cover Page Templates.......................................................................................... |
85 |
COVER PAGE GENERATOR MENU/ICON COMMAND DESCRIPTIONS............................................................... |
91 |
File Menu ............................................................................................................................................. |
91 |
Edit Menu............................................................................................................................................. |
92 |
Insert Menu .......................................................................................................................................... |
92 |
View Menu ........................................................................................................................................... |
93 |
Settings Menu ...................................................................................................................................... |
94 |
REPORTING FAILED FAXES TO THE ADMINISTRATOR .................................................................................... |
94 |
CHAPTER 4 – WARRANTY, SERVICE, & REPAIR ................................................................................. |
95 |
Multi-Tech Systems, Inc. |
FaxFinder Client User Guide |
3 |
Chapter 1 – Introduction
The FaxFinder Fax Client Software lets you deal with faxes in a new and convenient way. You can now send faxes simply by printing files from application programs (word processors, graphics programs, Notepad – essentially any program that can print). You receive fax messages as graphics file attachments to email messages from the FaxFinder Administrator or Attendant. You will view these graphics files (PDF or TIF) using either a PDF viewer or a TIFF viewer. The PDF viewer could be any commercial viewer or any open source PDF viewer. The FaxFinder is shipped with the Multi-Tech Tiff Viewer as part of the suite of FaxFinder client software. Other TIFF viewers are available from many different sources.
This arrangement lets you send and receive faxes at your own desk and deal with them entirely electronically if you so choose.
Accessing the FaxFinder Client Software
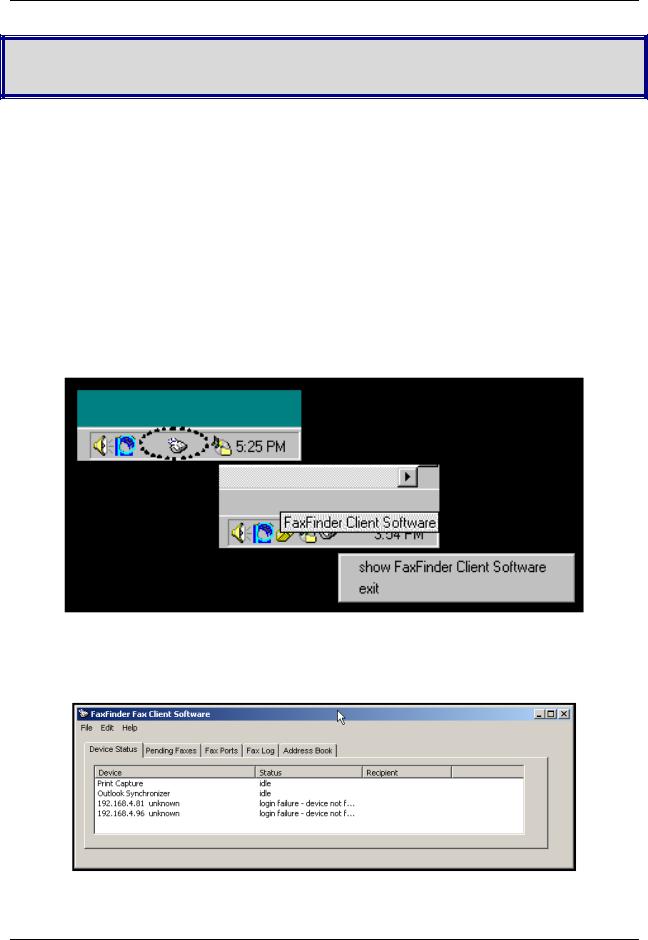
After the FaxFinder Fax Client Software has been installed, it will be on whenever your computer is running, unless you specifically turn it off. An icon for the FaxFinder Fax Client Software will appear in the ‘tray’ area in the lower right corner of your computer screen.
You must click on this icon and select “show FaxFinder Client Software” to make the program’s main screen visible. You can also start the FaxFinder client software from the Start | Programs menu.
Main Screen of FaxFinder Fax Client Software
However, you can send and receive faxes without viewing the main screen.
Multi-Tech Systems, Inc. |
FaxFinder Client User Guide |
4 |
Chapter 1: Introduction
Sending Faxes
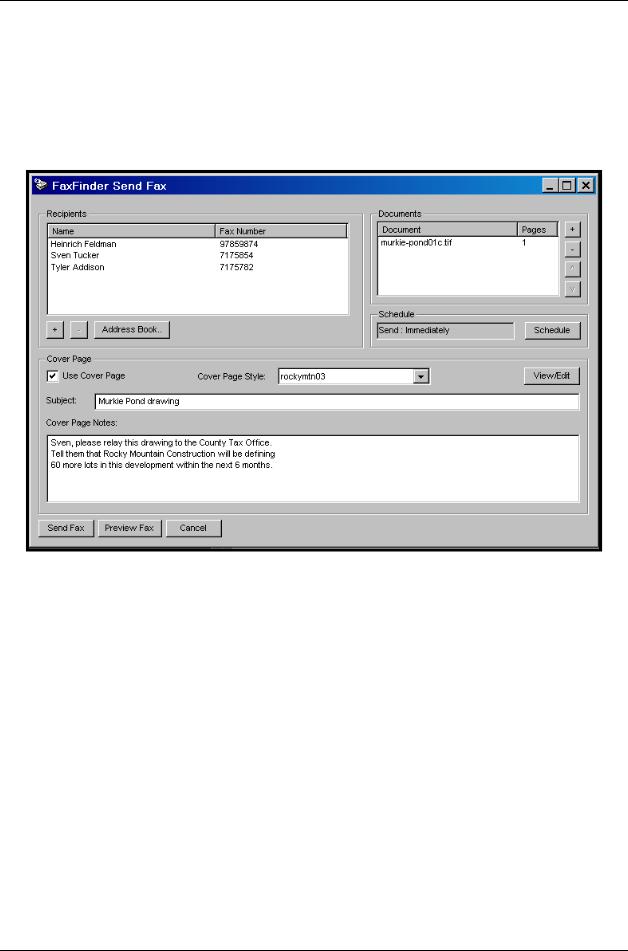
To send a fax from an application program, you must change that application program’s target printer to “Multi-Tech FaxFinder” (this option becomes available as soon as the FaxFinder client software is installed on your PC). Then, when you invoke the Print command from your application software, the document will be effectively scanned or “captured” electronically in preparation for going out as a fax -- instead of being printed on paper. Shortly after you invoke the Print command, the FaxFinder Send Fax screen will appear. That’s where you specify the recipient(s) of the fax message.
The FaxFinder Send Fax screen also lets you add common items to the fax message: a cover page, a brief comment, etc. The FaxFinder Fax Client Software also includes an Address Book in which you can store information about parties to whom you may regularly send faxes. The FaxFinder Send Fax screen gives you access to the Address Book so that all of the recipient’s contact information (company name, street address, voice phone number, etc.) can be added automatically.
Multi-Tech Systems, Inc. |
FaxFinder Client User Guide |
5 |

Chapter 1: Introduction
Receiving Faxes
To receive a fax from the FaxFinder system, you simply open the email message received from the FaxFinder Administrator or forwarded from a party who serves as a “FaxFinder Attendant” for your network. The way you receive fax emails (either directly from the Administrator or as forwarded from the Attendant) depends on the kind of phone service you have (whether through a PBX or not and depending also on PBX features). The fax email you receive will open either into the PDF viewer program, the MultiTech Tiff Viewer, or another TIF-viewing program that you specify. You can then view the fax message, print it, save it, forward it , etc., as needed. (Only TIF files can be forwarded; PDF files cannot be forwarded through the FaxFinder system.)
These are the basics about FaxFinder. The FaxFinder Fax Client Software has many capabilities. This manual describes them and shows examples of how they work. You will find sections on most common operations in the table of contents. We also present detailed descriptions of each software screen.
The FaxFinder is really pretty easy to use. We hope you enjoy it. If you have problems, call our Tech Support Department at 1-800-972-2439.
Related Manuals
The FF-120/220/420/820 FaxFinder hardware unit comes with 4 manuals that serve different purposes. A fifth reference manual is available on the Multi-Tech web site.
Title |
Format |
Purpose |
Administrator User Guide |
on CD |
Presents comprehensive info about FaxFinder |
|
|
unit, server software, & client software. |
|
|
|
Client User Guide |
on CD |
Comprehensive user info for FaxFinder clients. |
(this manual) |
|
|
Client Operation Primer |
on CD |
Brief instructions for sending and receiving |
|
|
faxes via the FaxFinder system. Multi-Tech |
|
|
recommends that you print out a copy of this |
|
|
document for each user. |
Cabling Guide |
in print |
FaxFinder Administrator should use this |
|
|
manual to make cabling connections for the |
|
|
FaxFinder unit. |
|
|
|
FaxFinder Reference Guide |
on MTS |
FaxFinder Administrator should use this |
(IP Office PBX Interface) |
web site |
manual to configure the FaxFinder unit in |
|
|
conjunction with the Avaya IP Office PBX. |
Client users of the FaxFinder system should expect to receive electronic files of the Client User Guide and the Client Operation Primer from the FaxFinder administrator. Print out these manuals in whole or in part as needed.
Multi-Tech manuals and other resources are available on the Multi-Tech Web page at http://www.multitech.com.
Multi-Tech Systems, Inc. |
FaxFinder Client User Guide |
6 |
Chapter 2 – FaxFinder Client
Software Configuration
To configure the FaxFinder Client Software, you must first install the software on a PC and then associate that installed client software with one or more specific FaxFinder hardware units.
Installing FaxFinder Client Software
A.Insert the FaxFinder Product CD into the CD-ROM drive of the client PC. If the CD does not auto start, use Windows Explorer to navigate to your CD drive and launch the installation program by double-clicking on cd_start.exe file on the CD. From the menu presented, click the Software button.
From the new screen presented, select the Client Software button to install the Multi-Tech FaxFinder Client software for using the FaxFinder unit.
Important: Should you have any old versions of the FaxFinder client software installed, please uninstall that prior to installing the new version. For your convenience, there is a mass uninstaller available for push uninstalls on the product CD. It is in the Software folder and is called ‘Remove_InstallShield_FFClient.msi’.
Multi-Tech Systems, Inc. |
FaxFinder Client User Guide |
7 |
Chapter 2: FaxFinder Client Software Configuration
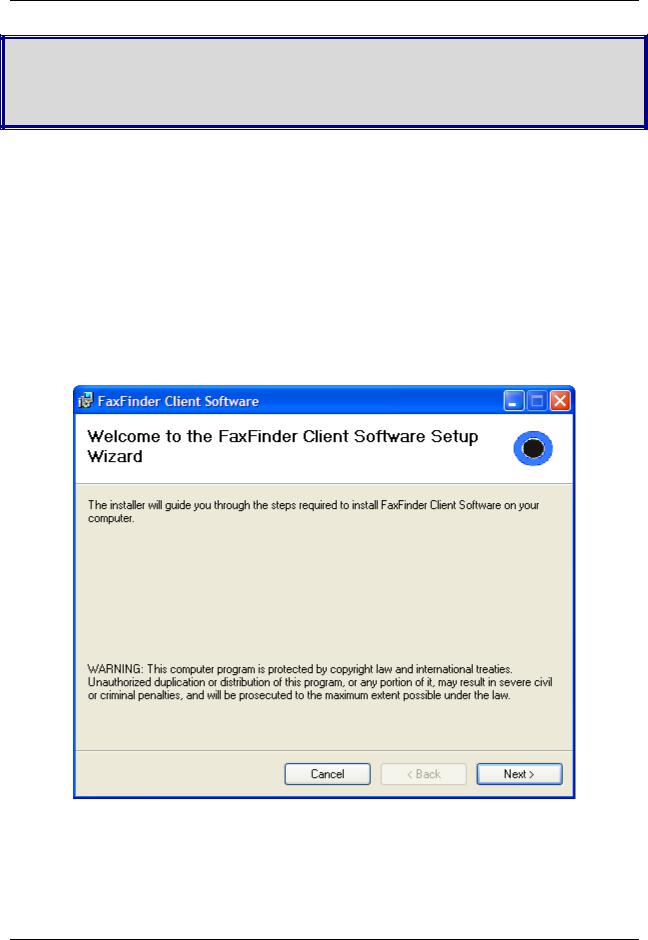
B. At the Welcome screen, click Next.
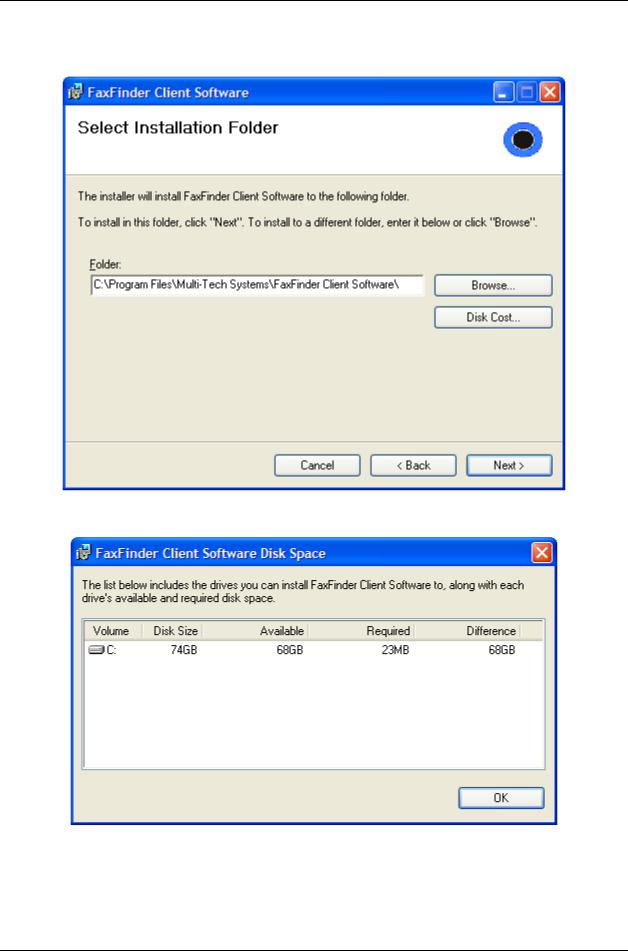
C.At the Select Installation Folder screen, browse to the desired file location for the FaxFinder client software. In most cases, the default file location is recommended.
Clicking on the Disk Cost button will show you the size of the software being installed as well as the available disk space of the target drive.
When the destination location is correct, click Next.
Multi-Tech Systems, Inc. |
FaxFinder Client User Guide |
8 |
Chapter 2: FaxFinder Client Software Configuration
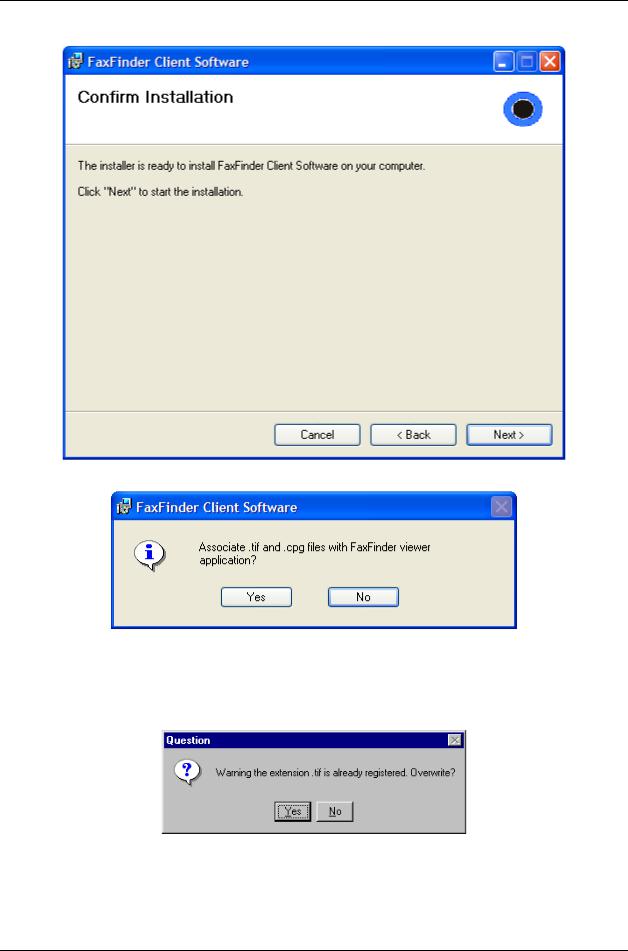
D. At the Confirm Installation screen, click Next to begin the installation..
E. A transient screen will appear while files are being copied.
F.You will be asked whether or not you want to associate .tif and .cpg files with the Multi-Tech Tiff Viewer. Click Yes (unless you prefer to use a different viewer program).
If a Question screen appears asking "Warning - the extension .tif is already registered, Overwrite?,” you must respond. Click Yes if you wish to use the TIFF viewer installed with the FaxFinder Client Software. Click No if you prefer to use a different software package for viewing .tif files.
Multi-Tech Systems, Inc. |
FaxFinder Client User Guide |
9 |
Chapter 2: FaxFinder Client Software Configuration
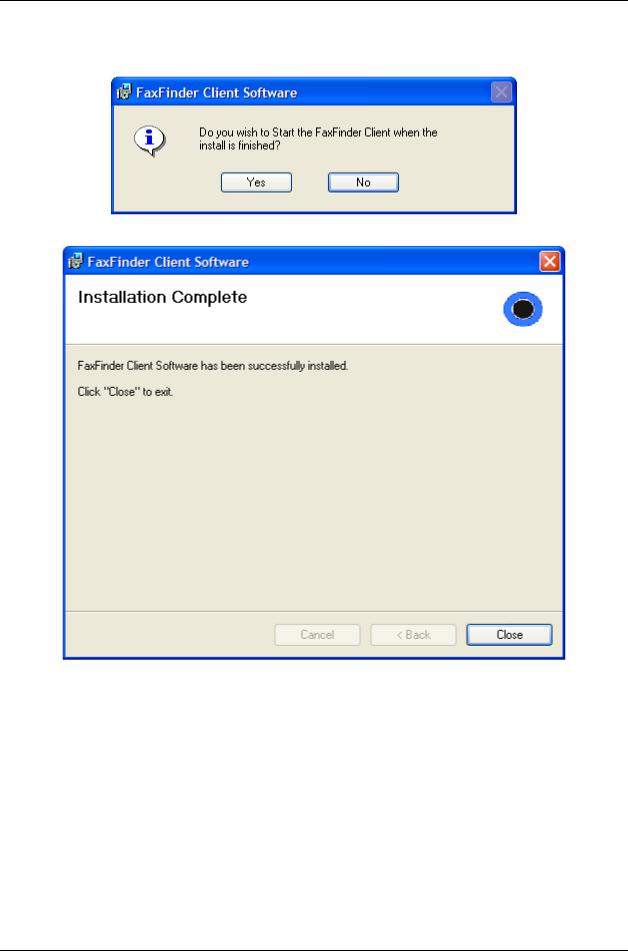
G.You will be asked if you want the Client software to automatically launch when the installation is complete. Select your preference.
H. Then the Installation Complete screen will appear.
Click Close.
Multi-Tech Systems, Inc. |
FaxFinder Client User Guide |
10 |
Chapter 2: FaxFinder Client Software Configuration
The FaxFinder Fax Client Software starts automatically when the installation is complete.
Icons for the FaxFinder software applications will appear in the Windows Start menu. After installation, the Client Software starts up whenever the computer is booted. A FaxFinder icon appears in the tray area at the lower-right corner of the screen. The FaxFinder Fax Client Software screen can be opened from either the Start menu icon or the tray icon. (If the Client Software is shut down, it can be re-opened from the Start menu or by double-clicking on the FF110.EXE file, which, following a typical, default installation, would be located at C:\Program Files \ Multi-Tech Systems\FaxFinder Client Software\.)
The FaxFinder Fax Client Software starts automatically when the installation is complete.
Multi-Tech Systems, Inc. |
FaxFinder Client User Guide |
11 |

Chapter 2: FaxFinder Client Software Configuration
Establishing Client User’s ID in System
When the FaxFinder Fax Client Software starts, you will be prompted to enter your own client user information in the Options | Identification screen. You will not be able to access or use the FaxFinder client until this step has been done.
The default value for the Options | Identification “Fax Header Local ID” field is the value taken from the “Fax ID” field (from the FaxFinder Server Modem Configuration screen) for the modem used in the fax transmission.
Icons for the FaxFinder software applications will appear in the Windows Start menu. After installation, the Client Software starts up whenever the computer is booted. A FaxFinder icon appears in the tray area at the lower-right corner of the screen. The FaxFinder Fax Client Software screen can be opened from either the Start menu icon or the tray icon. (If the Client Software is shut down, it can be re-opened from the Start menu or by double-clicking on a file named FF110.EXE (or something very similar), which, following a typical, default installation, would be located at C:\Program Files \ Multi-Tech Systems\FaxFinder Client Software\.)
Multi-Tech Systems, Inc. |
FaxFinder Client User Guide |
12 |
Chapter 2: FaxFinder Client Software Configuration
Associating Client with Specific FaxFinder Unit(s)
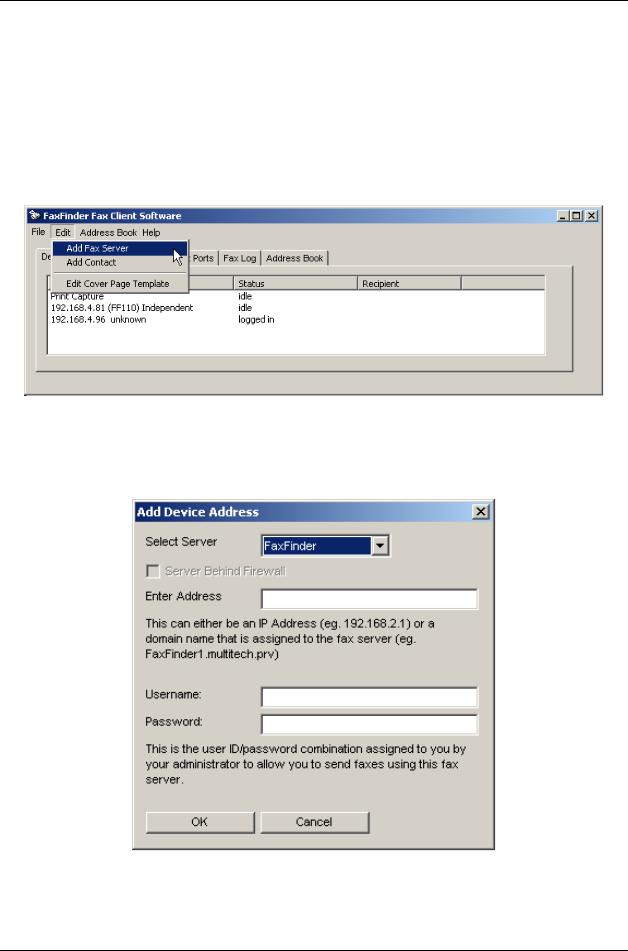
Sometimes more than one FaxFinder unit is connected to an Ethernet network. In some cases, certain client users might be assigned to some FaxFinder units and not assigned to others. After the FaxFinder client software is installed, you must associate it with one or more FaxFinder units. This procedure shows you how to make this association so that faxes may be sent from a particular FaxFinder unit to the email inbox of your PC. To do this procedure, you will need to know the IP address of the FaxFinder unit. Be aware that an individual FaxFinder client user can be associated with more than one FaxFinder unit. This could easily be the case in an office that is large and/or an office that has a great deal of fax traffic.
1. At the main screen of the FaxFinder Fax Client Software, click on Edit and select “Add Fax Server.”
2.At the Add Device Address screen, in the “Select Server” field, highlight “FaxFinder.”
In the “Enter Address” field, enter the IP address or domain name of the FaxFinder unit that the client will use.
A client can be associated with more than one FaxFinder unit, but the associations must be established one at a time.
3.Enter, in the appropriate fields, the Username and Password that the client will use when accessing this FaxFinder unit. If the client is to be associated with multiple FaxFinder units, a different Username and Password could be established for each. However, in most cases, it is advisable (for
Multi-Tech Systems, Inc. |
FaxFinder Client User Guide |
13 |
Chapter 2: FaxFinder Client Software Configuration
the sake of simplicity and convenience) to use the same Username and Password for all FaxFinder units.
NOTE: The Username entered here must match the entry used in the “User ID” field of the Phone Book screen in the FaxFinder Server Software. The password entered here must match the password entered for this client in the Password Administration screen in the FaxFinder Server software.
Click OK.
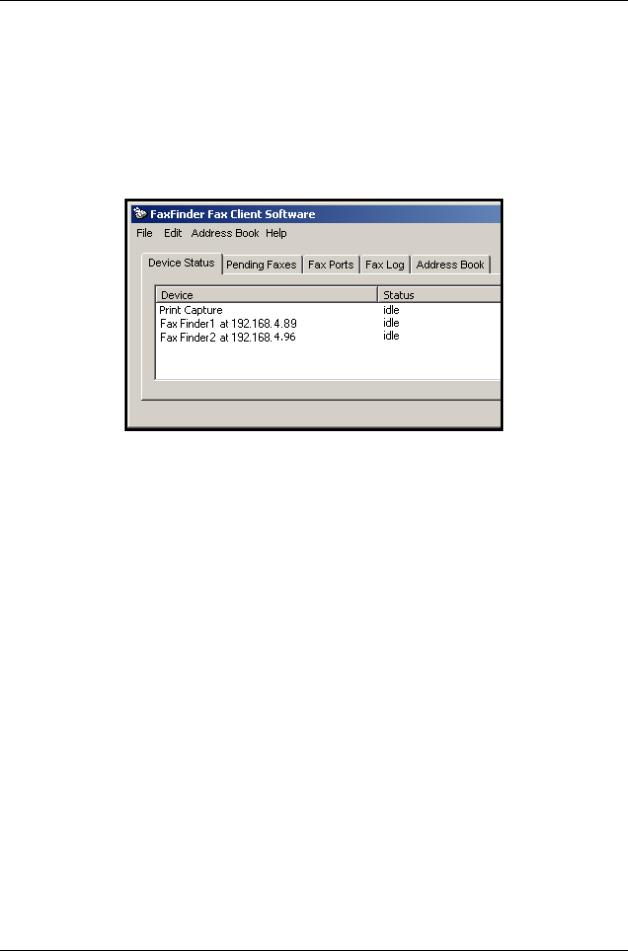
4.A new FaxFinder entry should appear on the “Device Status” tab of the FaxFinder Fax Client Software screen.
The status of the newly registered FaxFinder unit should momentarily go from “Logging in” to “Idle.” If it goes to Login Failure, then one of two things is wrong:
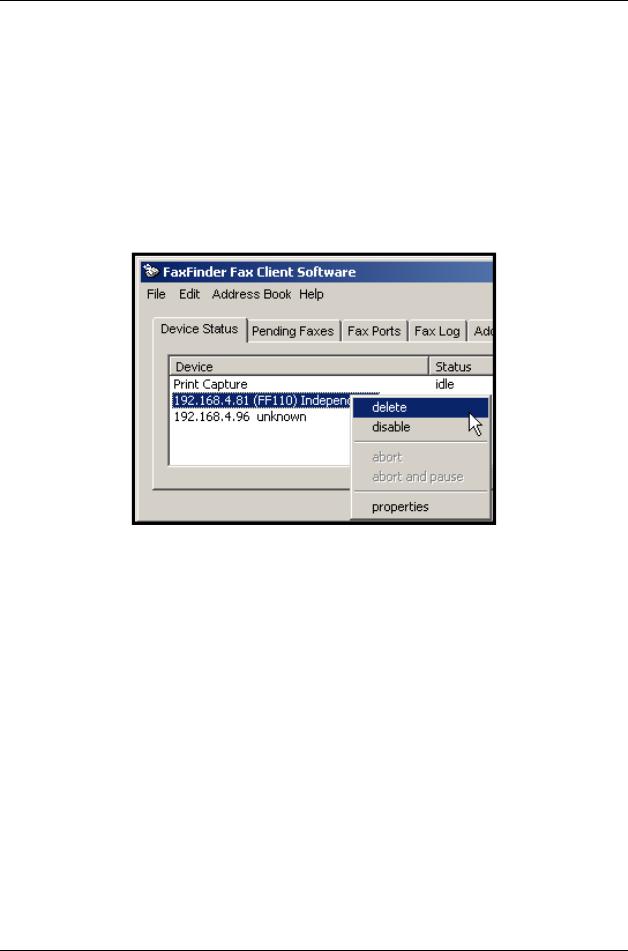
a.The IP address or domain name is wrong. If that is the case, delete that entry (by right-clicking DELETE), and enter a new one; otherwise,
b.The Username/Password combination may be wrong. Verify that the client Username/Password combination (accessible by right-clicking and selecting Properties on the FaxFinder listed in the Device Status tab of the client software) matches the User ID/Password combination assigned to the client-user by the FaxFinder Administrator.
Multi-Tech Systems, Inc. |
FaxFinder Client User Guide |
14 |
Chapter 2: FaxFinder Client Software Configuration
Disassociating the Client from a Specific FaxFinder Unit
In this procedure, you will un-do the procedure “Associating Client with a Specific FaxFinder Unit.” This situation might occur when changes are being made in the network faxing system. In any event, this procedure severs the tie between your PC and a specific FaxFinder unit so that you will no longer be connected to it for sending fax messages. (Faxes can be received in email form from the FaxFinder server, despite disassociating from the FaxFinder server, as long as the receiving party is entered in the FaxFinder Phone Book.) In cases where the client is currently associated with more than one FaxFinder unit, you will need to know the IP address of the specific FaxFinder unit from which you want to disconnect.
1.Open the FaxFinder Client Software program and go to the Device Status tab. Select the FaxFinder unit from which you want to disconnect (you can identify the FaxFinder unit by its IP address or domain name). Right-click on it and select delete.
2.Your FaxFinder Client Software will no longer be able to send faxes through this particular FaxFinder unit.
Multi-Tech Systems, Inc. |
FaxFinder Client User Guide |
15 |
Chapter 2: FaxFinder Client Software Configuration
Disabling and Re-Enabling a Client’s FaxFinder Service
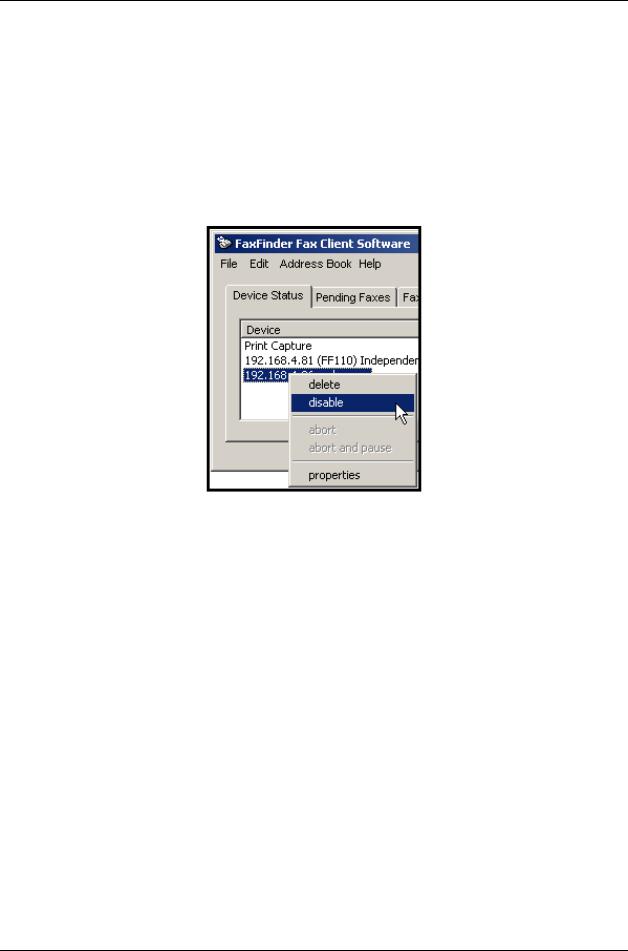
Disabling a FaxFinder’s service to a specific client is simply a temporary version of disassociating the client from that FaxFinder. When a client has disabled the FaxFinder’s service to that client, the client/user cannot send faxes through the FaxFinder. (Faxes can be received in email form from the FaxFinder server, despite this disabling, as long as the receiving party is entered in the FaxFinder Phone Book.) The client can easily re-establish FaxFinder service by toggling the Disable command (now shown with a “ ” beside it), thus enabling service once again.
1.Open the FaxFinder Client Software program and go to the Device Status tab. Select the FaxFinder unit from which you want to disconnect temporarily (you can identify the FaxFinder unit by its IP address or domain name). Right-click on it and select disable.
2.When disabled, a check mark will appear beside the disable command.
3.To re-enable the FaxFinder unit for your use, that is to avail your PC of its service once again, open
the FaxFinder Client Software program and go to the Device Status tab. Select the FaxFinder unit to which you want to re-connect. Right-click on it and select disable. You will now be re-connected to service by this FaxFinder unit.
Sending Test Fax
To verify that the software installation has succeeded, you should use the FaxFinder client software to send a fax to a regular fax machine (preferably a local fax machine). To do so, follow the instructions for the “Sending a Fax” procedure in Chapter 3.
Multi-Tech Systems, Inc. |
FaxFinder Client User Guide |
16 |
Chapter 2: FaxFinder Client Software Configuration
FaxFinder Fax Client Software Menu Command
Definitions
FaxFinder Fax Client Software Menu Command Definitions
Command Name |
Values |
Description |
File menu commands |
|
|
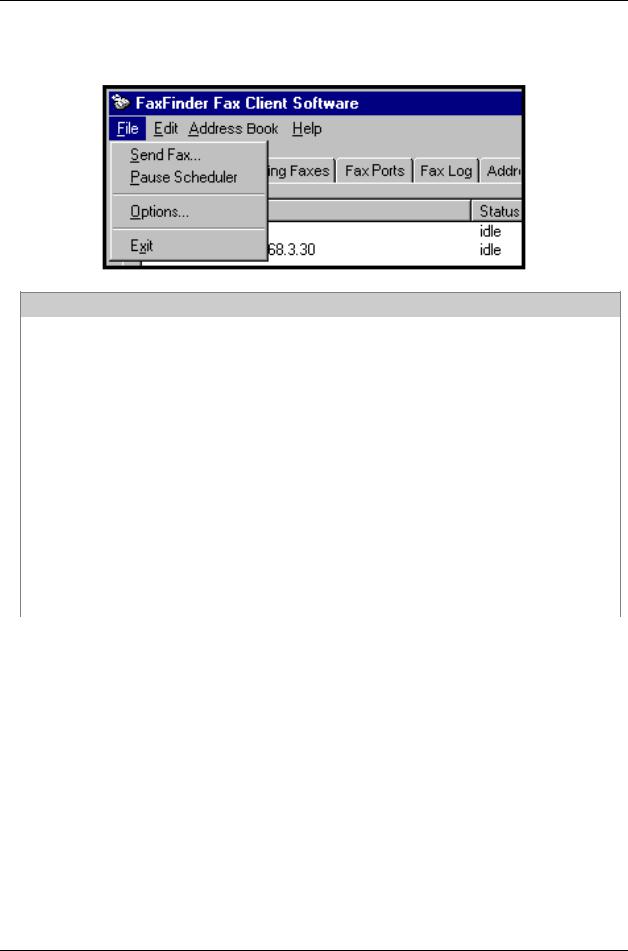
Send Fax |
-- |
Brings up the FaxFinder Send Fax screen, the |
|
|
first step in transmitting a fax message via the |
|
|
FaxFinder system. |
Pause Scheduler |
-- |
When you invoke the Pause Scheduler |
|
|
command, any faxes currently pending will not |
|
|
be sent and any fax transmissions attempted |
|
|
while this command is in force will not be sent. |
|
|
When the scheduler has been paused, you must |
|
|
select Pause Scheduler to rescind the |
|
|
command. That is to say, this command toggles |
|
|
on and off when selected repeatedly. |
|
|
If the computer is rebooted, the FaxFinder Fax |
|
|
Client Software will cancel the Pause Scheduler |
|
|
command at startup. Any faxes that had been |
|
|
paused and left unsent when the computer was |
|
|
turned off will be sent immediately when the |
|
|
computer is turned on again. |
Multi-Tech Systems, Inc. |
FaxFinder Client User Guide |
17 |
Chapter 2: FaxFinder Client Software Configuration
The FaxFinder Send Fax Screen
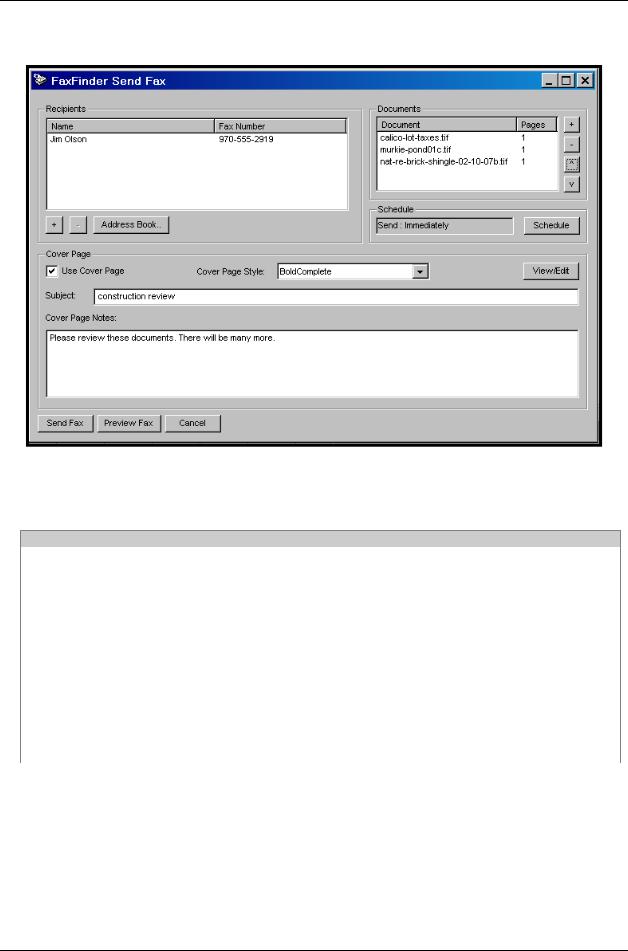
The FaxFinder Send Fax screen appears (a) when you ‘print to FaxFinder’ from any application program, or (b) when you select the Send Fax command from the File menu of the FaxFinder Fax Client Software screen.
FaxFinder Send Fax Screen Definitions
Command/Field Name |
Values |
Description |
|
|
|
Recipients pane |
|
|
Name (column) |
alphanumeric |
Party to whom the fax will be sent. You cannot |
|
|
type in this window. When a recipient is |
|
|
specified either from the Address Book or from |
|
|
the Enter a Fax Recipient window, that |
|
|
recipient’s name will appear in this field. |
Fax Number (column) |
numeric |
Fax number to which the fax will be sent. You |
|
|
cannot type in this window. When a fax number |
|
|
is specified either from the Address Book or |
|
|
from the Enter a Fax Recipient window, that fax |
|
|
number will appear in this field. |
|
|
|
Multi-Tech Systems, Inc. |
FaxFinder Client User Guide |
18 |
|
|
|
|
|
Chapter 2: FaxFinder Client Software Configuration |
|
|
|
|
|
|
|
|
|
|
|
|
|
|
|
|
|
FaxFinder Send Fax Screen Definitions (cont’d) |
|
|||
|
Command/Field Name |
|
|
Values |
Description |
|
|
|
|
|
|
|
|
|
Recipients pane |
|
|
|||
|
+ (button) |
|
|
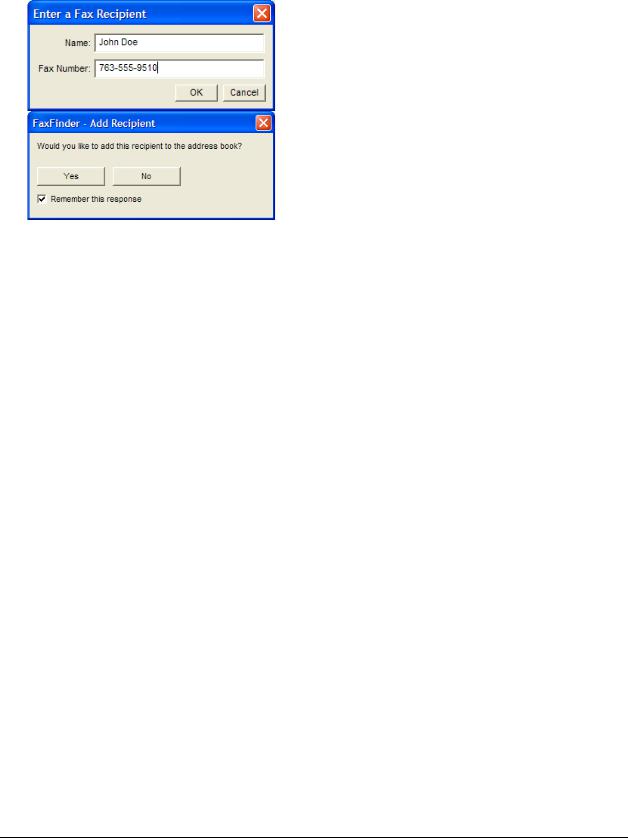
Brings up the Enter a Fax Recipient window. At this |
|
|
|
|
|
|
|
window, you enter the name and fax number of the party |
|
|
|
|
|
|
to whom the fax will be sent. After you click OK in this |
|
|
|
|
|
|
window, the FaxFinder-Add Recipient window will |
|
|
|
|
|
|
appear and prompt you as to whether or not you want to |
|
|
|
|
|
|
add this recipient to the Address Book. If you check the |
|
|
|
|
|
|
Remember this response box, the response you select |
|
|
|
|
|
|
will be remembered. In other words, if you check |
|
|
|
|
|
|
Remember this response, and click the No button, |
|
|
|
|
|
|
recipients added using the + button on the Send Fax |
|
|
|
|
|
|
Form will never be automatically added to the Address |
|
|
|
|
|
|
book. If you check Remember this response, and click |
|
|
|
|
|
|
the Yes button, recipients added using the + button on the |
|
|
|
|
|
|
Send Fax Form will always be automatically added to the |
|
|
|
|
|
|
Address book. |
|
|
|
|
|
|
|
|
|
- (button) |
|
-- |
Removes a selected entry from the Recipients list. You |
|
|
|
|
|
|
|
will be prompted (by the FaxFinder – Delete? screen) to |
|
|
|
|
|
|
confirm removal of the recipient from the list of recipients. |
|
|
Address Book (button) |
|
-- |
Brings up the Address Book screen from which a fax |
|
|
|
|
|
|
|
recipient can be chosen. |
|
|
Documents |
pane |
|
|
||
|
Document (column) |
|
entries are |
File name of document to be transmitted as a fax. |
|
|
|
|
|
|
alphanumeric |
|
|
|
|
|
|
with file-type |
|
|
|
|
|
|
extensions |
|
|
|
Pages (column) |
|
entries are |
Length (number of pages) of the fax to be transmitted. |
|
|
|
|
|
|
numeric |
|
|
|
+ (button) |
|
-- |
Click this button to add another document to the fax |
|
|
|
|
|
|
|
transmission. Only TIFF files can be added with this. |
|
|
- (button) |
|
-- |
Click this button to remove a document from the list of |
|
|
|
|
|
|
|
items to be faxed. You will be prompted (by the |
|
|
|
|
|
|
FaxFinder – Delete? screen) to confirm removal of the |
|
|
|
|
|
|
item from the fax queue. |
|
|
Λ (button) |
|
-- |
Clicking this button moves a selected document upward in |
|
|
|
|
|
|
|
the queue. For example, if the file jonesbill.tif is third in |
|
|
|
|
|
|
the Document list, clicking will cause it to be the second |
|
|
|
|
|
|
item faxed. |
|
|
V (button) |
|
-- |
Clicking this button moves a selected document |
|
|
|
|
|
|
|
downward in the queue. For example, if the file |
|
|
|
|
|
|
jonesbill.tif is fourth in the Document list, clicking will |
|
|
|
|
|
|
cause it to be the fifth item faxed. |
|
|
Schedule |
pane |
|
|
||
|
Send field |
|
“immediately” |
This field specifies when a fax will be sent. By default, the |
|
|
|
|
|
|
-or- |
fax will be sent immediately. If you click the Schedule |
|
|
|
|
|
at designated |
button and re-schedule the transmission, the time and |
|
|
|
|
|
later time |
date of the forthcoming transmission will be listed. |
|
|
Schedule (button) |
|
-- |
Click here to schedule a fax for transmission at a later |
|
|
|
|
|
|
|
time. This button brings up the Fax Scheduling screen. |
|
|
|
|
|
|
See the procedure “Scheduling Fax Transmissions” in |
|
|
|
|
|
|
Chapter 6. |
|
Multi-Tech Systems, Inc. |
FaxFinder Client User Guide |
19 |

|
|
|
Chapter 2: FaxFinder Client Software Configuration |
|
|
|
|
|
|
|
|
|
|
|
|
FaxFinder Send Fax Screen Definitions (cont’d) |
|
||
|
Command/Field Name |
Values |
Description |
|
|
|
|
|
|
|
Cover Page |
pane |
|
|
|
Use Cover Page |
Y/N |
Check this checkbox to include a cover page with |
|
|
|
|
your fax. |
|
|
Cover Page Style |
BoldComplete, |
If you have checked Use Cover Page, you can |
|
|
|
BoldComplete2, |
select a cover page style for your fax from this |
|
|
|
FaxComplete, |
drop-down menu. Six standard cover page |
|
|
|
LongComment, |
styles are standard. You can revise any one of |
|
|
|
PlainComplete, |
these or create a new cover page style using the |
|
|
|
PlainShort |
Template Editor program. |
|
|
View/Edit (button) |
-- |
Brings up the cover page Template Editor |
|
|
|
|
program where the chosen cover page template |
|
|
|
|
can be seen and/or altered. |
|
|
Subject |
alphanumeric |
Here you can type a brief description of the |
|
|
|
|
contents of the fax. The placement of this |
|
|
|
|
“Subject” description will depend on the cover |
|
|
|
|
page style that you use. |
|
|
Cover Page Notes |
alphanumeric |
Here you can type a lengthy comment about the |
|
|
|
|
fax or related topics. |
|
|
Send Fax (button) |
-- |
Click here to invoke the sending of the fax. |
|
|
Preview Fax (button) |
-- |
Click here to see a preview of the fax, including |
|
|
|
|
the cover page. This preview will appear in the |
|
|
|
|
TIFF viewer. |
|
|
Cancel (button) |
-- |
Click here to cancel the sending of the fax. |
|
Multi-Tech Systems, Inc. |
FaxFinder Client User Guide |
20 |

Chapter 2: FaxFinder Client Software Configuration
FaxFinder Fax Client Software Menu Command Definitions
Option tab |
Description |
Identification tab. The Fax Header Local ID can be used to set the ID of the Sending Modem when Sending a Fax using the FaxFinder Client. The Modem ID string is displayed in the header information of a sent fax. For many Fax machines, it is the phone number of the sending fax machine. The default is the Modem Fax ID which is set via Modem Configuration in the FaxFinder Server web interface. Phone Number will use the Identification Tab's Phone number field as the Modem ID string. Fax Number will use the Identification Tab's Fax number field as the Modem ID string.
Fax Retry tab. Here the client user can specify, for faxes that were not sent successfully on the first attempt, the number of subsequent attempts to be made, the interval between these attempts, when attempts should expire.
Date/Time tab. Here you enter the date and time formats for the fax header.
Server Priority tab. Here you choose to which fax server a sent fax would first be directed: to a FaxFinder, to a Hylafax, or to the first available. This applies only to special multiple-modem server systems that use both FaxFinder and Hylafax.
Advanced tab. Here you designate the circumstances that will make the Send Fax window become minimized and allow the enabling of the synchronization of the FaxFinder Address Book with a Microsoft Outlook address book. Trace Outlook Sync should only be selected when directed by Multi-Tech Support as it generates a large amount of logging information and should not be left on for extended periods of time. It will generate a debug log that can be be used to debug problems syncing address book entries with Outlook.
Logging tab. Select Save Log on Exit to ensure the Log file exists after the application is closed.
A Trace Level of 9 is the highest trace setting. A Trace Level of 1 is the lowest (least amount of trace) setting. Select Custom Log File to create a log file other than the default. You may Browse to an existing File Folder and type in the name of the custom log file in the edit field. Click Defaults to restore the Logging information to factory defaults.
Click View Log to view the existing log file.
Click Explore to start an explorer window to find existing log files.
Click Delete Log to erase the current log.
Click Delete All Logs to remove any previously existing Log Files.
Click OK to save your changes.
Click Cancel to Cancel any changes made.
Multi-Tech Systems, Inc. |
FaxFinder Client User Guide |
21 |
Chapter 2: FaxFinder Client Software Configuration
FaxFinder Fax Client Software Menu Command Definitions (cont’d)
Command Name |
Values |
Description |
Edit menu commands |
|
|
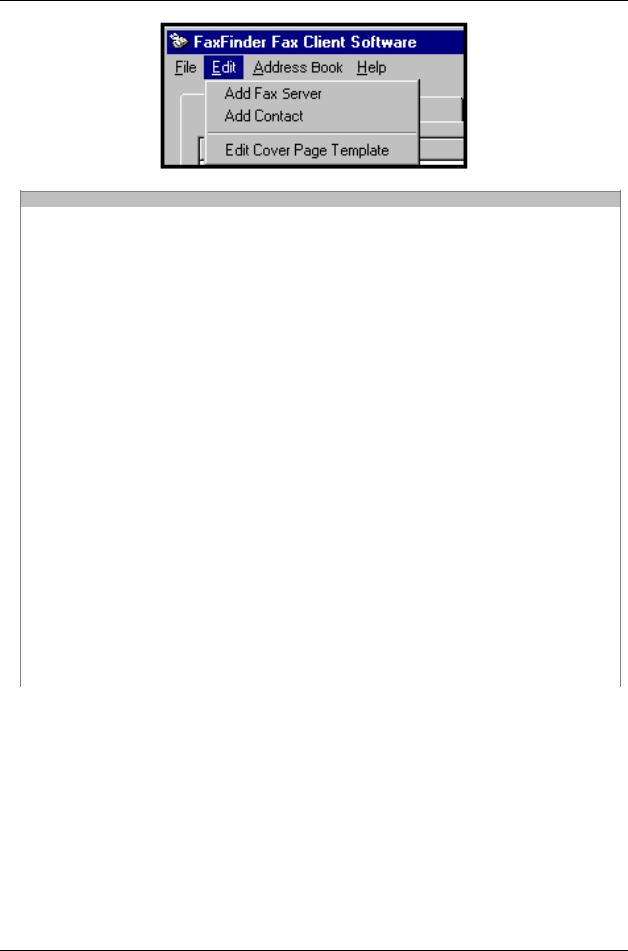
Add Fax Server |
-- |
Brings up the Add Device Address screen so |
|
|
that a FaxFinder or HylaFax server on the |
|
|
network can be associated with the client. A |
|
|
client can be served by more than one FaxFinder |
|
|
unit. See the procedure “Associating Client with |
|
|
Specific FaxFinder Unit(s)” earlier in this chapter. |
Add Contact |
-- |
Brings up the New Contact screen so that an |
|
|
recipient can be added to the Address Book. |
|
|
Once a recipient’s contact info has been entered |
|
|
into the Address Book, faxes sent to that party |
|
|
will have the destination fax number |
|
|
automatically conveyed to the FaxFinder unit. |
|
|
Info from recipient’s Address Book entry will also |
|
|
be included in automated fields on fax cover |
|
|
pages where applicable (for example, the voice |
|
|
phone number, company name, and city of the |
|
|
recipient might be two fields included on the |
|
|
cover page). See the procedure “Setting Up Your |
|
|
Address Book Manually” in Chapter 6. |
Edit Cover Page |
-- |
Brings up the Cover Page Generator (or |
Template |
|
Template Editor) program so that fax cover |
|
|
pages can be created or modified. See the |
|
|
procedure “Creating or Modifying Cover Page |
|
|
Styles” in Chapter 6. |
Help menu commands |
Online Help is not currently supported. See User |
|
|
|
Guides for detailed instructions. An “About” |
|
|
command brings up the FaxFinder Fax Client |
|
|
About screen, which identifies the software’s |
|
|
version. |
Multi-Tech Systems, Inc. |
FaxFinder Client User Guide |
22 |
Chapter 2: FaxFinder Client Software Configuration
FaxFinder Fax Client Software Menu Command Definitions (cont’d)
Field Name |
Values |
Description |
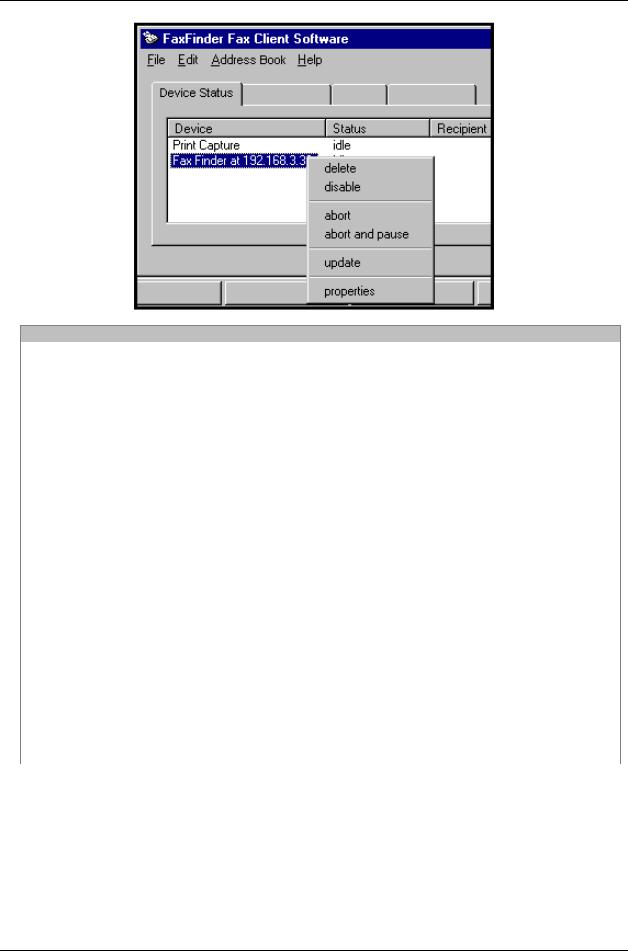
Device Status tab |
|
|
Device (column) |
alphanumeric |
Shows status of FaxFinder or HylaFAX server |
|
|
units with which the client is associated. Also |
|
|
shows status of the “Print Capture” function and |
|
|
the “Outlook Synchronizer” function. |
Status (column) |
idle, negotiating, |
Shows the status of the FaxFinder or HylaFAX |
|
preparing to |
fax server unit pertaining to its fax sending and |
|
capture, capturing |
receiving capabilities and to its print/image |
|
page n, sending |
capturing capabilities. |
|
fax page n, |
|
|
receiving fax page |
|
|
n, success, |
|
|
unsuccessfuluser |
|
|
aborted, |
|
|
unsuccessful-no |
|
|
carrier, |
|
|
unsuccessfulno |
|
|
dial tone, |
|
|
unsuccessful-error |
|
|
<descriptor> |
|
Recipient (column) |
alphanumeric |
Shows the name and fax number of recipient to |
|
|
whom fax is currently being sent. |
Print Capture (row) |
idle, |
Indicates status of the FaxFinder’s Print |
|
preparing to |
Capturing software module. |
|
capture, |
|
|
capturing page n |
|
Multi-Tech Systems, Inc. |
FaxFinder Client User Guide |
23 |
Chapter 2: FaxFinder Client Software Configuration
FaxFinder Fax Client Software Menu Command Definitions (cont’d)
Command Name Description
|
Device Status tab (cont’d) |
Commands accessed by Right-Clicking on a selected FaxFinder |
|
delete |
Dis-associates the client from the selected FaxFinder or HylaFAX unit so that |
|
the client can no longer send faxes through that FaxFinder unit. (The |
|
FaxFinder Server’s IP address is removed from the Device Status list of the |
|
FaxFinder Client Software.) |
disable |
Temporarily dis-associates the client from the selected FaxFinder or HylaFAX |
|
unit so that the client can no longer send faxes through that unit. |
|
To restore the connection to the FaxFinder/HylaFAX unit, select Disable. |
|
(Because the FaxFinder Server’s IP address remains in Device Status list of |
|
the FaxFinder Client Software, service can be restored by toggling the Disable |
|
command, thus enabling the association once again.) |
abort |
Discontinues a fax transmission in progress. |
abort and Pause |
Discontinues a fax transmission in progress and puts all pending faxes on |
|
hold. After this command has been invoked, no more faxes will be sent from |
|
this client until |
|
(a) the client PC is turned off and on again, or |
|
(b) the command has been turned off by selecting Pause Scheduler in the |
|
File menu of the FaxFinder Fax Client Software. |
properties |
Brings up the FaxFinder <IP address><domain name> screen. This screen |
|
simply shows the IP address or domain name of the selected FaxFinder unit. |
FaxFinder Fax Client Software Menu Command Definitions (cont’d)
Field/Command Name |
Values |
Description |
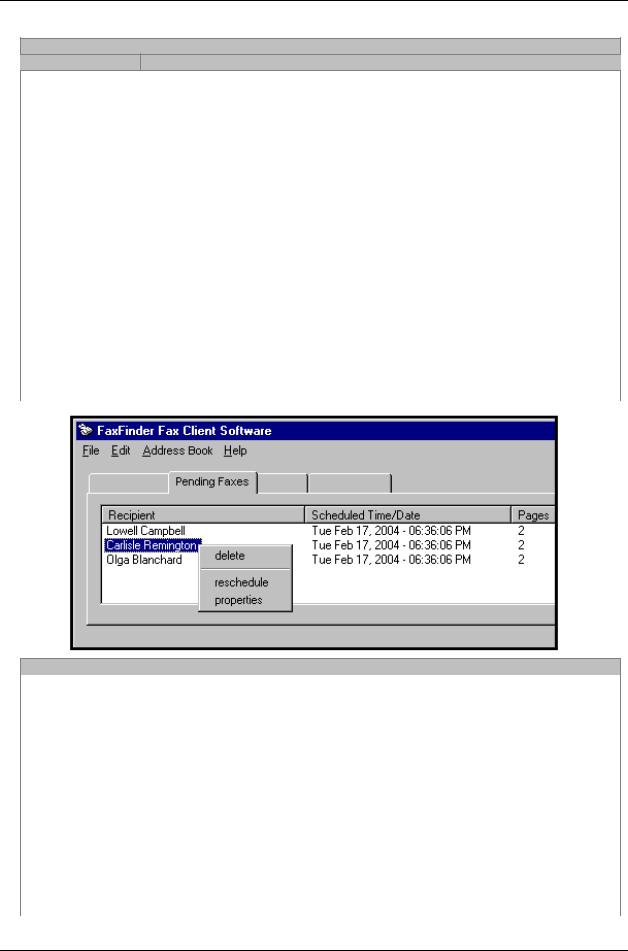
Pending Faxes tab |
|
|
Recipient (column) |
-- |
Identifies recipient of each fax for which transmission is |
|
|
incomplete. |
Scheduled Time/Date |
-- |
Identifies time at which a pending fax is set to be |
|
|
transmitted. |
Pages (column) |
-- |
Shows the number of pages of each fax. |
Commands accessed by right-clicking on a selected pending fax message |
||
delete |
Cancels the transmission of the selected pending fax message. |
|
reschedule |
Brings up the Fax Scheduling screen so that transmission of a pending |
|
|
fax can be scheduled for a different time. |
|
properties |
Brings up the Fax Details screen for the selected pending fax . The |
|
|
Fax Details screen presents information about the recipient, |
|
|
transmission status, cover page, and original source file of the |
|
|
selected pending fax. |
|
Multi-Tech Systems, Inc. |
FaxFinder Client User Guide |
24 |
Chapter 2: FaxFinder Client Software Configuration
FaxFinder Fax Client Software Menu Command Definitions (cont’d)
Field Name |
Values |
Description |
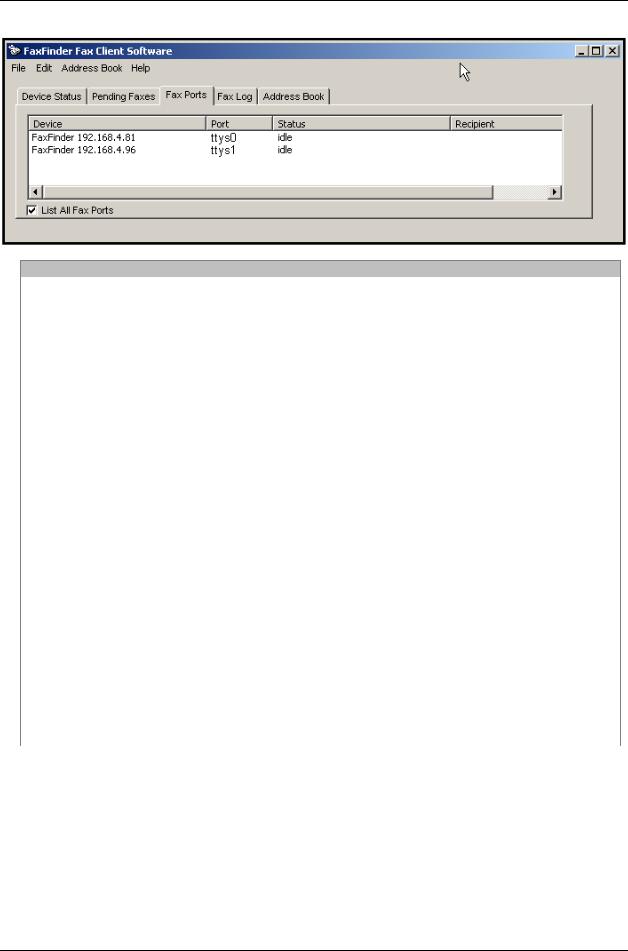
Fax Ports tab |
|
|
Device (column) |
alphanumeric |
Shows FaxFinder units with which the client is |
|
|
associated. |
Port (column) |
ttys0 for FF120, |
The fax modem (within) the FaxFinder server |
|
ttys0, ttys1 |
unit, the status of which is being tracked. |
|
for FF220 |
ttys0 denotes POTS Modem 1 of the listed |
|
ttys_0-3 for FF420 |
faxfinder unit; |
|
ttys1 denotes POTS Modem 2 of the listed |
|
|
ttys_0-7 for FF820 |
faxfinder unit, etc., for all modems in the FF- |
|
420/820 unit. |
|
Status (column) |
idle, negotiating, |
Shows the status of the FaxFinder fax server unit |
|
preparing to |
pertaining to its fax sending and receiving |
|
capture, capturing |
capabilities and to its print/image capturing |
|
page n, sending |
capabilities. |
|
fax page n, |
|
|
receiving fax page |
|
|
n, success, |
|
|
unsuccessfuluser |
|
|
aborted, |
|
|
unsuccessful-no |
|
|
carrier, |
|
|
unsuccessfulno |
|
|
dial tone, |
|
|
unsuccessful-error |
|
|
<descriptor> |
|
Recipient (column) |
alphanumeric |
Shows the name and fax number of recipient to |
|
|
whom fax is currently being sent. |
List All Fax Ports |
Y/N |
When selected, all fax ports are listed; when not |
|
|
selected, only the current active fax port is listed. |
Multi-Tech Systems, Inc. |
FaxFinder Client User Guide |
25 |
Chapter 2: FaxFinder Client Software Configuration
FaxFinder Fax Client Software Menu Command Definitions (cont’d)
Field/Command Name |
Values |
Description |
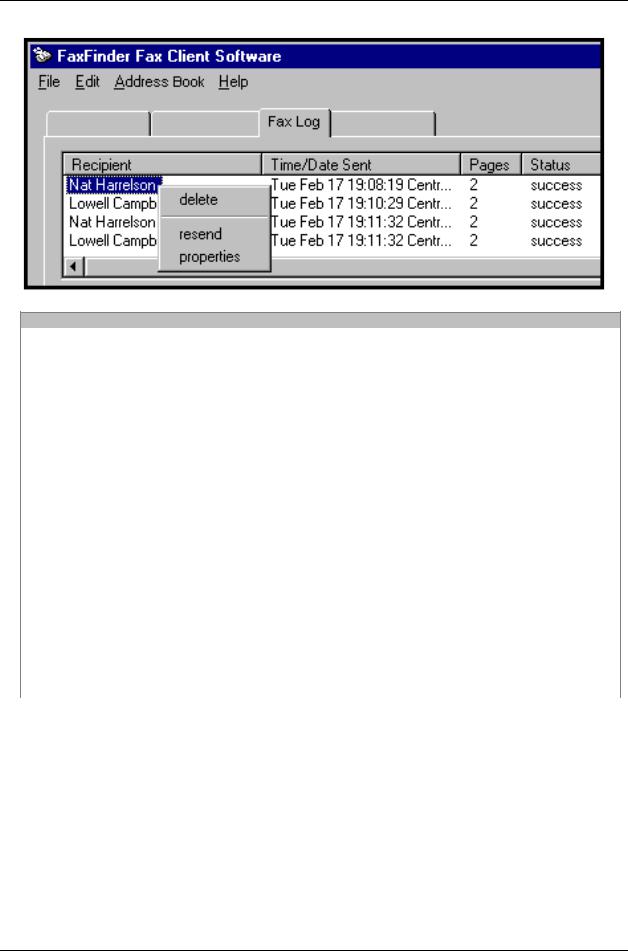
Fax Log |
tab |
|
Recipient (column) |
|
Identifies recipient of each outgoing fax. |
Time/Date Sent (column) |
day, date, time, zone |
Indicates when each outgoing fax was sent. |
|
in the form |
|
|
ddd mmm nn |
|
|
hh:mm:ss zzzzzz |
|
Pages (column) |
integer |
Shows the number of pages in each fax. |
Status (column) |
success, |
Indicates whether each fax was sent successfully |
|
unsuccessfuluser |
or not and, if not, indicates reason for failure. |
|
aborted, |
|
|
unsuccessful-no |
|
|
carrier, |
|
|
unsuccessfulno |
|
|
dial tone, |
|
|
unsuccessful-error |
|
|
<descriptor> |
|
Commands accessed by |
right-clicking on a |
selected fax log entry |
delete |
Cancels the selected fax log entry. |
|
resend |
Resends the selected fax. The Fax Scheduling screen will appear to |
|
|
set a time for the resending to occur. |
|
properties |
Brings up the Fax Details screen for the selected fax. The Fax Details |
|
|
screen presents information about the recipient, transmission status, |
|
|
cover page, and original source file of the selected pending fax. |
|
Multi-Tech Systems, Inc. |
FaxFinder Client User Guide |
26 |
Chapter 2: FaxFinder Client Software Configuration
FaxFinder Fax Client Software Menu Command Definitions (cont’d)
Field/Command Name |
Values |
Description |
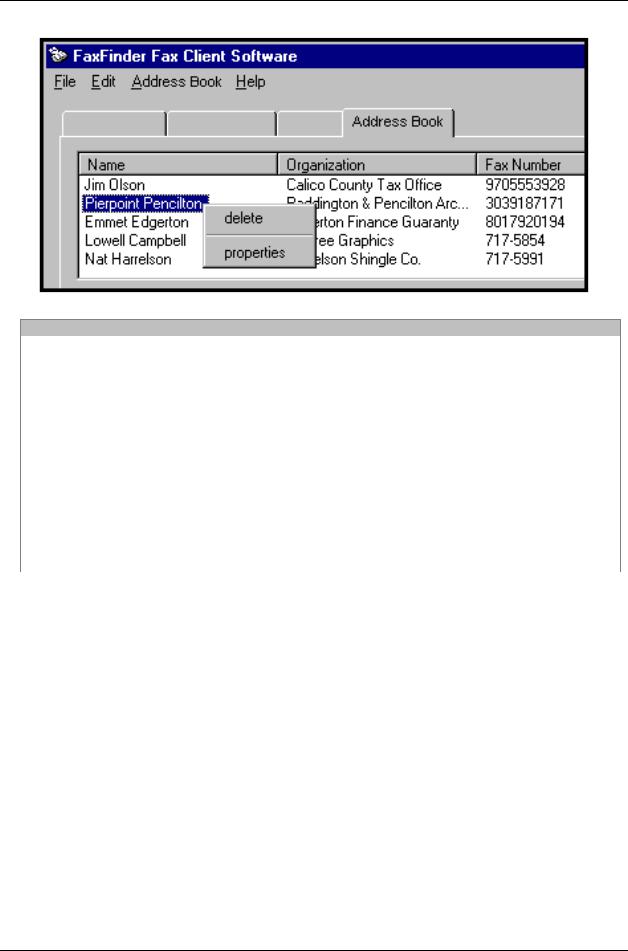
Address Book tab |
|
|
Name (column) |
alphanumeric |
Shows the name of the the selected Address |
|
|
Book entry. |
Organization (column) |
alphanumeric |
Shows the organizational affiliation of the the |
|
|
selected Address Book entry. |
Fax Number (column) |
integers |
Shows the fax number of the selected Address |
|
|
Book entry. |
Commands accessed by |
right-clicking on a |
selected address book entry |
delete |
Removes the selected entry from the Address Book. A confirmation |
|
|
screen appears before the deletion is executed. |
|
properties |
Brings up the Contact <name> screen screen for the selected |
|
|
address book entry. The Contact screen shows user contact details |
|
|
(name, company name, fax number, phone numbers, and street |
|
|
address info). |
|
Multi-Tech Systems, Inc. |
FaxFinder Client User Guide |
27 |

Chapter 2: FaxFinder Client Software Configuration
FaxFinder Fax Client Software Menu Command Definitions
Command Name |
Values |
Description |
Address Book menu commands |
|
|
Add Contact |
-- |
Brings up the New Contact screen for adding entries |
|
|
to client-user’s personal address book. These entries |
|
|
|
|
|
are for parties to whom the client-user may want to |
|
|
send faxes. The contact info includes the party’s |
|
|
name, their organizational affiliation, phone numbers, |
|
|
fax numbers, and land address information. |
|
|
The contact information goes into these specific fields: |
|
|
Name, Organization, Home Number, Work Number, |
|
|
Fax Number, Address, City, State/Province, and |
|
|
Postal Code. |
|
|
The New Contact screen allows for manual entry of |
|
|
contacts into the Address Book. It can also be |
|
|
accessed from the FaxFinder Send Fax screen and |
|
|
from Edit | Add Contact. |
|
|
|
Import |
-- |
Brings up the Address Book Import screen. The |
|
|
Import command allows you to import entries into your |
|
|
|
|
|
address book from a delimited file (e.g., a MS Outlook |
|
|
address book exported as a delimited file; the |
|
|
delimiter could be a comma, semicolon, colon, or a |
|
|
tab). In most cases, a template file is required to map |
|
|
the information from the import file into the appropriate |
|
|
fields of the FaxFinder Address Book (i.e., into the |
|
|
fields of the New Contact screen). |
|
|
The FaxFinder Client software includes a template that |
|
|
allows entries from one FaxFinder client-user’s |
|
|
Address Book to be imported into the Address Book of |
|
|
another client user. |
|
|
Template files are accessible by clicking on the |
|
|
“Browse” button in the “CSV import field mapping |
|
|
template” area of the Address Book Import screen. |
Export |
|
Allows you to create a delimited file from the |
|
|
FaxFinder Address Book for use in applications |
|
|
that can import delimited files. The delimiters |
|
|
could be comma, semicolon, colon, or tab. The |
|
|
primary use of the Export command is to allow |
|
|
an established FaxFinder Address Book to be |
|
|
shared with other client users. Export files have |
|
|
a .csv extension. |
Multi-Tech Systems, Inc. |
FaxFinder Client User Guide |
28 |

Chapter 3: FaxFinder Client Software
Operation
Introduction
This chapter describes the things that a client user can do with the FaxFinder system. Three software programs are involved: the FaxFinder Client Software, the Multi-Tech Tiff Viewer (or designated PDF viewer), and the Multi-Tech Cover Page Generator. The programs work together with the FaxFinder Client Software acting as the hub of activity. The FaxFinder Client Software interfaces with the FaxFinder Server, has a user interface, and calls upon the Cover Page Generator and viewer program for their special functions. When sending faxes, the FaxFinder Client Software calls up the Multi-Tech Cover Page generator if cover pages are requested. When previewing outgoing faxes, the PC’s operating system calls up the designated TIFF viewer to display the outgoing fax. When viewing received faxes, the PC’s operating system calls up the appropriate viewer (PDF or TIFF). The choice of file types (PDF or TIFF) is made in the FaxFinder Server software. Note that client users can choose to display either on the Multi-Tech TIFF viewer or on a different (non-Multi-Tech) TIFF viewing program (see Step 7 of “Installing FaxFinder Client Software” in Chapter 5). Likewise, if the FaxFinder system distributes incoming faxes as PDF files, the client can designate which PDF viewer to use.
Multi-Tech Systems, Inc. |
FaxFinder Client User Guide |
29 |
Loading...