


Safety • Operation • Maintenance • Storage • Troubleshooting
OPERATOR’S MANUAL
179cc and 208cc Horizontal Shaft OHV Snow Engines
IMPORTANT:
READ SAFETY RULES AND INSTRUCTIONS CAREFULLY BEFORE OPERATION
PRINTED IN U.S.A. |
MTD Products Ltd., P. O. Box 1386, KITCHENER, ONTARIO N2G 4J1 |
769-03333 |
9/11/2007 |
This Operator’s Manual is an important part of your new engine. It will help you prepare and maintain the unit for best performance. Please read and understand what it says.
Table of Contents |
|
Safe Operation Practices......................................... |
3 |
Operating the Engine............................................... |
5 |
Maintaining the Engine............................................. |
9 |
Troubleshooting ...................................................... |
12 |
This Operator’s Manual may cover a range of engine models. Characteristics and features discussed and/or illustrated in this manual may not be applicable to all engine models. MTD LLC reserves the right to change product specifications, designs, and equipment without notice and without incurring obligation.
This manual covers the operation and maintenance of your engine. All information in this publication is based on the latest product information available at the time of printing.
No part of this publication may be reproduced without written permission.
This manual should be considered a permanent part of the engine and should remain with it if it is resold.
Pay special attention to safety messages and notes printed in this manual and on the engine itself. A safety message alerts you to potential hazards that could hurt you or others.
WARNING: Indicates a strong possibility of severe personal injury or death if instructions are not followed. Each safety message is preceded by a safety symbol.
NOTE: Gives helpful information.
IMPORTANT: Indicates a possibility of equipment or property damage if instructions are not followed.
WARNING: The engine is designed to give safe and dependable service if operated according to instructions. Read and understand the Operator’s Manual before operating the engine. Failure to do so could result in personal injury or equipment damage.
Customer Support
Visit www.mtdcanada.ca or call a Customer Support Representative at 1-800-668-1238.
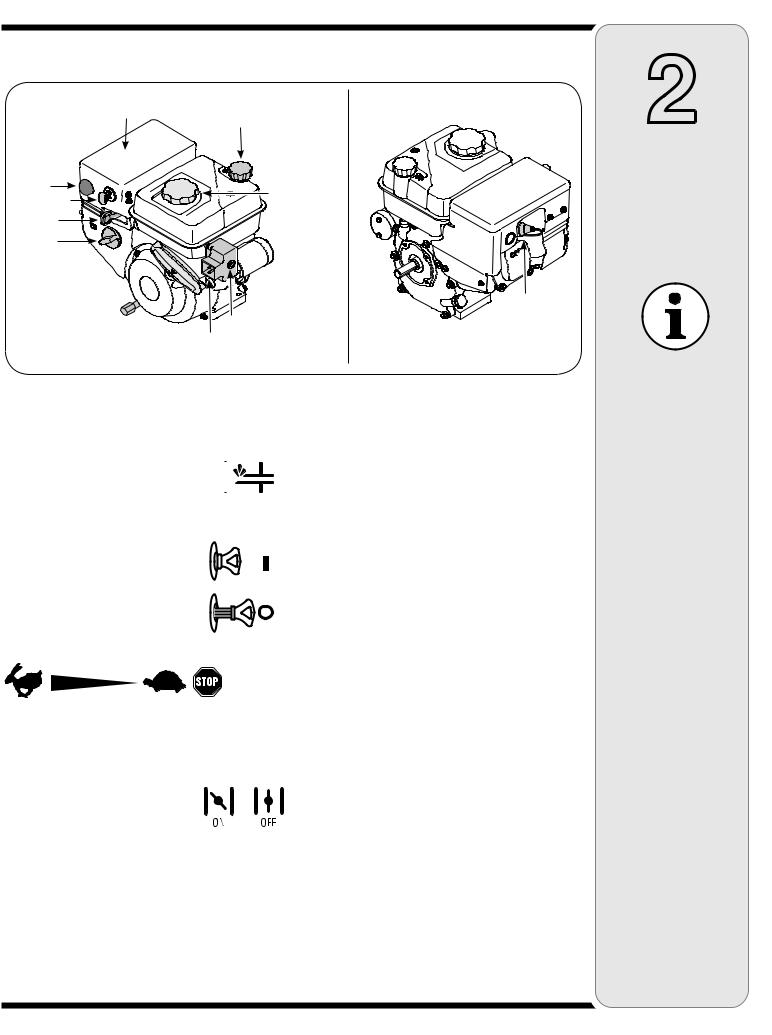
Engine Components
Muffler |
Oil Filler Cap/Dipstick |
|
Primer |
Fuel Fill Cap |
|
Ignition Key |
||
|
Throttle
Choke
Starter Handle 
Oil Drain 
Spark Plug
Electric start button*
Electric Switch Box*
* Optional
Figure 2-1: Front and rear views of the engine.
Read this section before starting the engine. It is important to familiarize yourself with the controls on the engine. Refer to “Starting the Engine” section for detailed operating instructions.
Primer |
|
Oil Drain |
|
|
|||
Depressing primer forces fuel directly into |
|
Removing the oil drain plug will drain the oil from the |
|
engine’s carburetor to aid in cold-weather |
PRIMER |
engine. Refer to the Maintenance section in this manual |
|
starting. |
for instructions on changing the oil. |
||
|
Ignition Key
The ignition key is a safety device. Insert key and snap in place; do not turn ignition key. Pull the key out halfway to stop the engine. Remove key when the unit is not in use.
Throttle
The throttle control regulates the speed of the engine and will shut off the engine when moved into the STOP position.
Choke
Activating the choke closes the choke plate on the carburetor and aids in starting the engine. For information on choke usage, see “Starting The Engine.”
Oil Filler Cap/Dipstick
Remove oil cap to check oil level. Refer to “Pre-Operation Check” section for checking oil and “Maintaining Your Engine” section for adding oil instructions.
Fuel Fill Cap
Remove gas cap to add fuel. Unit runs on automotive unleaded gas.
Electric Start (if equipped)
Electric Switch Box
Requires the use of a three-prong outdoor extension cord and a 120V power source/wall outlet.
Electric Start Button
Pressing the electric starter button engages the engine’s electric starter when plugged into a 120V power source.
Starter Handle
This motor is fitted with a recoil action pull start and a mitten grip handle for easy access while wearing gloves or mittens.
2
Operating
the
Engine
IMPORTANT: This engine is shipped without gasoline or oil in the engine.
Running the engine with insufficient oil can cause serious engine damage and void the engine warranty.
Specifications are subject to change without notification or obligation.
Images my not reflect your exact model and are for reference purposes only.

2
Operating
the
Engine
WARNING
WARNING: Gasoline is extremely flammable and is explosive under certain conditions.
WARNING: Always keep hands and feet clear of equipment moving parts. Do not use a pressurized starting fluid. Vapors are flammable.
Pre-Operation Check
IMPORTANT: This engine is shipped without gasoline or oil in the engine. Running the engine with insufficient oil can cause serious engine damage and void the engine warranty.
Oil Recommendations
Before starting engine, fill with oil, refer to viscosity chart in Figure 2-2. Engine oil capacity is 600 ml. Do not over-fill. Use a 4-stroke, or an equivalent high detergent, premium quality motor oil certified to meet or exceed U.S. automobile manufacturer’s requirements for service classification SG, SF. Motor oils classified SG, SF will show this designation on the container.
IMPORTANT: DO NOT use nondetergent oil or 2-stroke engine oil. It could shorten the engine’s service life.
Synthetic
0W-30
5W-30

 -40º -20º 0º 20º 40º
  -30º -20º -10º 0º
Figure 2-2: Oil Viscosity Chart
Checking Oil Level
IMPORTANT: Be sure to check the engine on a level surface with the engine stopped.
1.Remove the oil filler cap/dipstick and wipe the dipstick clean, Figure 2-3.
2.Insert the cap/dipstick into the oil filler neck, but do not screw it in.
3.Remove the oil filler cap/dipstick. If the level is low, slowly add oil until oil level registers between high
(H) and low (L), Figure 2-3.
4.Replace and tighten cap/dipstick firmly before starting engine.
IMPORTANT: Do not overfill. Overfilling with oil may cause smoking, hard starting, or spark plug fouling.
Fill between high  and low marks
Figure 2-3: Checking the oil level.
Fuel Recommendations
Use automotive gasoline (unleaded or low leaded to minimize combustion chamber deposits) with a minimum of 87 octane. Gasoline with up to 10% ethanol or 15% MTBE (Methyl Tertiary Butyl Ether) can be used. Never use an oil/gasoline mixture or dirty gasoline. Avoid getting dirt, dust, or water in the fuel tank. DO NOT use E85 gasoline.
WARNING: Gasoline is extremely flammable and is explosive under certain conditions.
•Refuel in a well-ventilated area with the engine stopped. Do not smoke or allow flames or sparks in the area where the engine is refueled or where gasoline is stored.
•Do not overfill the fuel tank. After refueling, make sure the tank cap is closed properly and securely.
•Be careful not to spill fuel when refueling. Spilled fuel or fuel vapor may ignite. If any fuel is spilled, make sure the area is dry before starting the engine.
•Avoid repeated or prolonged contact with skin or breathing of vapor.
Fuel Level Indicator
Top View
Figure 2-4: The fuel level indicator
Checking the Fuel Level
IMPORTANT: Before refueling, allow engine to cool two minutes.
1.Clean around fuel fill before removing cap to fuel.
2.A fuel level indicator is located in the fuel tank. Fill tank until fuel reaches the fuel level indictor, Figure 2-4. Be careful not to overfill.
Starting the Engine
WARNING: Always keep hands and feet clear of moving parts. Do not use a pressurized starting fluid. Vapors are flammable.
NOTE: Allow the engine to warm up for a few minutes after starting. The engine will not develop full power until it reaches operating temperatures.
Engines with Electric Starters
WARNING: The electric starter is equipped with a grounded three-wire power cord and plug, and is designed to operate on 120 volt AC household
current. It must be used with a properly grounded three-prong receptacle at all times to avoid the possibility of electric shock. Follow all instructions carefully prior to operating the electric starter.
WARNING: DO NOT use electric starter in rain.
1.Determine that your home’s wiring is a three-wire grounded system. Ask a licensed electrician if you are unsure. If you have a grounded three-prong receptacle, proceed as follows. If you do not have the proper house wiring, DO NOT use the electric starter under any conditions.
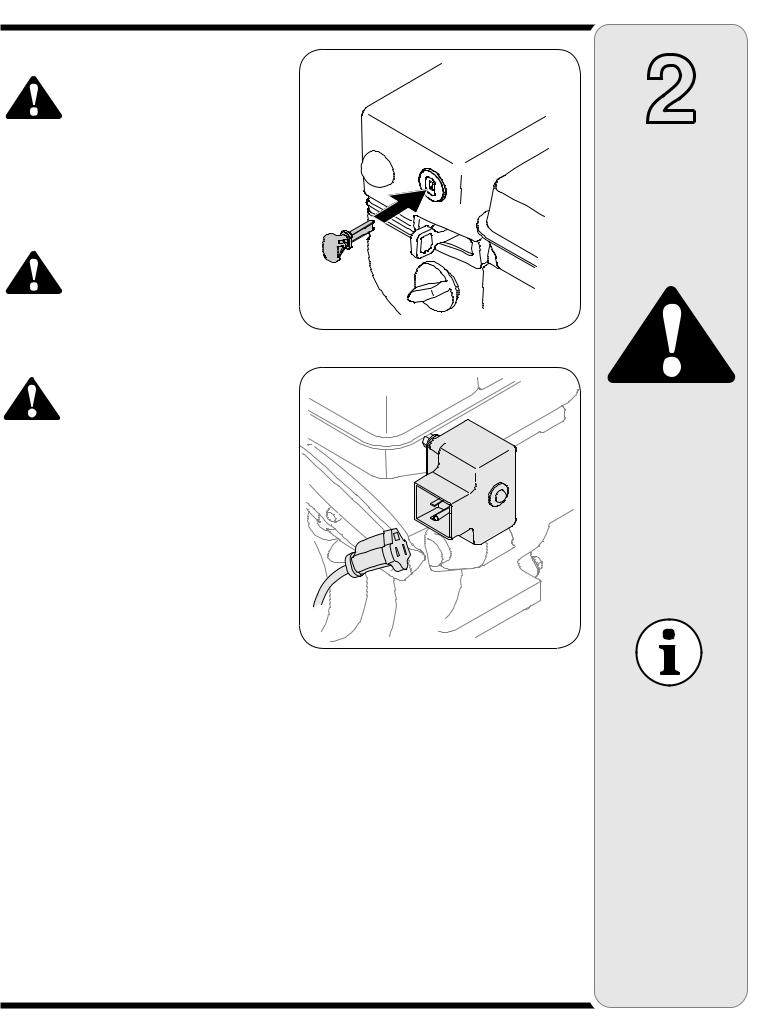
2.Insert ignition key fully into slot, Figure 2-5. Make sure it snaps into place. DO NOT turn ignition key. The engine cannot start unless the key is inserted into ignition switch.
3.Plug the extension cord into the electric switch box located on the engine, Figure 2-6. Plug the other end of extension cord into a three-prong 120-volt, grounded, AC outlet in a well-ventilated area.
4.Move throttle control, Figure 2-1, to FAST (rabbit) position.
5.Move choke to the ON position (cold engine start). If engine is warm, place choke in OFF position, Figure 2-1.
6.Push primer three to five (3-5) times, making sure to cover vent hole when pushing, Figure 2-1. If engine is warm, push primer only once. Always cover vent hole when pushing. Cool weather may require priming to be repeated.
7.Push starter button to start engine, Figure 2-1. Once the engine starts, immediately release starter button. Electric starter is equipped with thermal overload protection; system will temporarily shut-down to allow starter to cool if electric starter becomes overloaded.
2
Operating
the
Engine
Figure 2-5: The ignition key is a safety device.
WARNING
WARNING: The optional electric starter is equipped with a grounded three-wire power cord and plug, and is designed to operate on 120 volt AC household current. It must be used with a properly grounded three-prong receptacle at all times to avoid the possibility of electric shock.
Figure 2-6: Plug cord into electric switch box on engine.
8.As the engine warms, slowly rotate the choke control to OFF position. If the engine falters, restart engine and run with choke at half-choke position for a short period of time, and then slowly rotate the choke into OFF position.
9.After engine is running, disconnect power cord from electric starter. When disconnecting, always unplug the end at the wall outlet before unplugging the opposite end from the engine.
IMPORTANT: This engine is shipped without gasoline or oil in the engine.
Running the engine with insufficient oil can cause serious engine damage and void the engine warranty.
2
Operating
the
Engine
WARNING
WARNING: To avoid unsupervised engine operation, never leave the engine unattended while running. Turn the engine off after use and remove ignition key
IMPORTANT: Do not allow the starter handle to snap back against the engine.
Return it gently to prevent damage to the starter.
Engines with Starter Handle (non-electric start)
IMPORTANT: Do not pull the starter handle with engine running.
1.Insert ignition key fully into slot, Figure 2-4. Make sure it snaps into place. DO NOT turn ignition key. The engine cannot start unless the key is inserted into ignition switch.
2.Move throttle, Figure 2-1, control to FAST (rabbit) position.
3.Move choke, Figure 2-1, to the ON position (cold engine start). If engine is warm, place choke in OFF position.
4.Push primer three to five (3-5) times, making sure to cover vent hole when pushing, Figure 2-1. If engine is warm, push primer only once. Always cover vent hole when pushing. Cool weather may require priming to be repeated.
5.Pull gently on the starter handle until it begins to resist, then pull quickly and forcefully to overcome the compression. Do not release the handle and allow it to snap back. Return rope SLOWLY to original position. If required, repeat this step.
6.As the engine warms, slowly rotate the choke control to OFF position. If the engine falters, restart engine and run with choke at half-choke position for a short period of time, and then slowly rotate the choke into OFF position.
Stopping the Engine
WARNING: To avoid unsupervised engine operation, never leave the engine unattended while running. Turn the
engine off after use and remove ignition key
Run engine for a few minutes before stopping to help dry off any moisture on the engine.
1.Move throttle control to STOP position.
2.Remove the ignition key. Removing the key will reduce the possibility of unauthorized starting of the engine while equipment is not in use. Keep the key in a safe place. The engine cannot start without the ignition key.
3.Wipe any moisture away from the controls on the engine.
WARNING: Shut off the engine before performing any type of maintenance. To prevent accidental start-up, disconnect the spark plug boot.
IMPORTANT: If engine must be tipped to transport equipment or to inspect, keep spark plug side of engine up. Transporting or tipping engine with spark plug down may cause smoking, hard starting, spark plug fouling, or oil saturation of air cleaner.
Periodic inspection and adjustment of the engine is essential if high level performance is to be maintained. Regular maintenance will also ensure a long service life. The required service intervals and the type of maintenance to be performed are described in the table below. Follow the hourly or calendar intervals, whichever occur first. More frequent service is required when operating in adverse conditions.
Maintenance Schedule
Tasks |
First 5 |
Each Use or |
Every Season |
Every Season |
Every Season |
Service Dates |
|
Hrs. |
Every 5 Hrs. |
or 25 Hrs. |
or 50 Hrs. |
or 100 Hrs. |
|
|
|
|
|
|
|
|
Check engine oil |
|
|
|
|
|
|
|
|
|
|
|
|
|
Change engine oil |
|
|
|
|
|
|
|
|
|
|
|
|
|
Check spark plug |
|
|
|
|
|
|
|
|
|
|
|
|
|
Service spark plug |
|
|
|
|
|
|
|
|
|
|
|
|
|
Clean exhaust area |
|
|
|
|
|
|
|
|
|
|
|
|
|
Oil Service
•Check oil level regularly.
•Be sure correct oil level is maintained. Check every five hours or daily before starting engine. See oil checking procedure in the Operation section.
Oil Change
IMPORTANT: Be sure to check engine on a level surface with the engine stopped. Drain the oil while the engine is still warm to assure rapid and complete draining.
1.Drain fuel from tank by running engine until the fuel tank is empty. Be sure fuel fill cap is secure.
2.Place suitable oil collection container under oil drain plug.
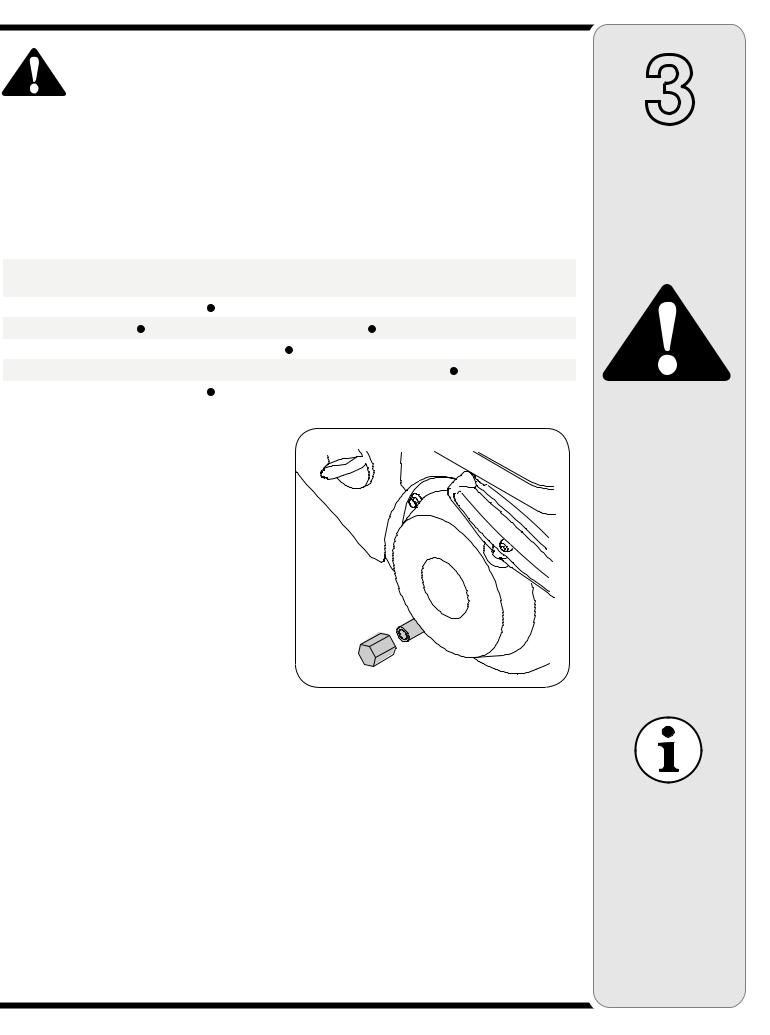
3.Remove oil drain plug, Figure 3-1.
4.Tip engine to drain oil into the container. Used oil must be disposed of at a proper collection center.
5.Reinstall the drain plug and tighten it securely.
6.Refill with the recommended oil and check the oil level, refer to Operation section for instructions.
7.Reinstall the oil filler cap/dipstick securely.
IMPORTANT: Used motor oil may cause skin cancer if repeatedly left in contact with the skin for prolonged periods. Although this is unlikely unless you handle used oil on a daily basis, it is still advisable to thoroughly wash your hands with soap and water as soon as possible after handling used oil.
Oil Drain
Oil
Drain
Plug
Figure 3-1: Remove the oil drain plug to drain oil from engine.
NOTE: Please dispose of used motor oil in a manner that is compatible with the environment. We suggest you take it in a sealed container to your local service station for reclamation. Do not throw it in the trash or pour it on the ground.
3
Maintaining
the
Engine
WARNING
WARNING: Shut off the engine before performing any type of maintenance. To prevent accidental start-up, disconnect the spark plug boot.
Before tipping engine or equipment to drain oil, drain fuel from tank by running engine until fuel tank is empty.
IMPORTANT: Be sure to check engine on a level surface with the engine stopped. Drain the oil while the engine is still warm to assure rapid and complete draining.
3
Maintaining
the
Engine
WARNING
DO NOT check for spark with spark plug removed. DO NOT crank engine with spark plug removed.
If the engine has been running, the muffler will be very hot. Be careful not to touch the muffler.
Spark Plug Service
WARNING: DO NOT check for spark with spark plug removed. DO NOT crank engine with spark plug removed.
WARNING: If the engine has been running, the muffler will be very hot. Be careful not to touch the muffler.
To ensure proper engine operation, the spark plug must be properly gapped and free of deposits.
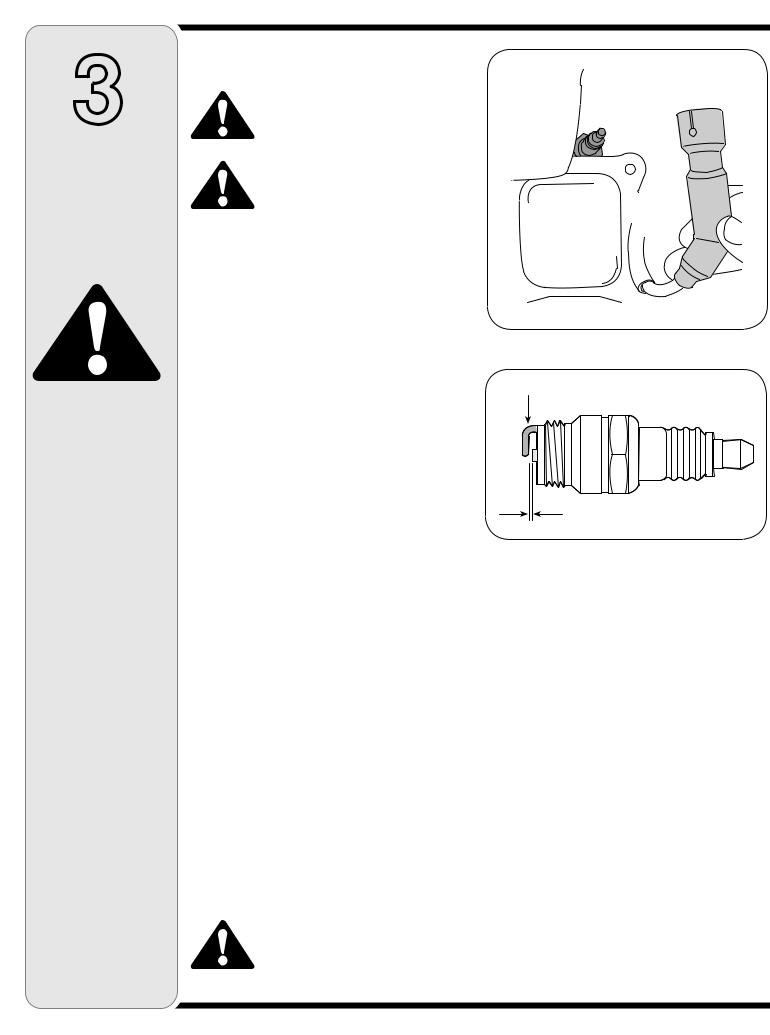
1.Remove the spark plug boot and use a spark plug wrench to remove the plug, Figure 3-2.
2.Visually inspect the spark plug. Discard the spark plug if there is apparent wear, or if the insulator is cracked or chipped. Clean the spark plug with a wire brush if it is to be reused.
3.Measure the plug gap with a feeler gauge. Correct as necessary by bending side electrode, Figure 3-3. The gap should be set to 0.02-0.03 inches (0.60- 0.80 mm).
4.Check that the spark plug washer is in good condition and thread the spark plug in by hand to prevent cross-threading.
5.After the spark plug is seated, tighten with a spark plug wrench to compress the washer.
NOTE: When installing a new spark plug, tighten 1/2 turn after the spark plug seats to compress the washer. When reinstalling a used spark plug, tighten 1/8-1/4 turn after the spark plug seats to compress the washer.
IMPORTANT: The spark plug must be tightened securely. An loose spark plug can become very hot and can damage the engine.
Cleaning the Engine
If the engine has been running, allow it to cool for at least half an hour before cleaning. Periodically remove dirt build-up from engine.
IMPORTANT: Do not spray engine with water to clean because water could contaminate fuel. Using a garden hose or pressure washing equipment can also force water into the muffler opening. Water that passes through the muffler can enter the cylinder, causing damage.
WARNING: Accumulation of debris around muffler could cause a fire. Inspect and clean before every use.
Spark Plug
Spark Plug Boot
Figure 3-2: The spark plug and boot.
Electrode
0.02-0.03 in.
0.60-0.80 mm
Figure 3-3: Use a feeler gauge to measure the plug gap.
 Loading...