


DW_Series_IB.qxd:Layout 1 1/24/08 5:20 PM Page 28
User Manual /
Manual del Usuario
12-Cup Coffeemakers / Cafetera para 12 Tazas DW Series / Serie DW
©2008 Sunbeam Products, Inc. doing business as Jarden Consumer Solutions. All rights reserved.Distributed by Sunbeam Products, Inc. doing business as Jarden Consumer Solutions, Boca Raton, Florida 33431.
One Year Limited Warranty – see inside for details. U.S. 1-800-MR COFFEE (1-800-672-6333)
Canada 1-800-667-8623
Visit us at www.mrcoffee.com. You will find exciting and entertaining tips and ideas, including great recipes!
SPR-01/16/08
©2008 Sunbeam Products, Inc. operando bajo el nombre de Jarden Consumer Solutions. Todos los derechos reservados.Distribuido por Sunbeam Products, Inc. operando bajo
el nombre de Jarden Consumer Solutions, Boca Ratón, Florida 33431 GarantÍa Limitada por un año - por favor consulte los detailes en el interior.
Visítenos en www.mrcoffee.com
Ahí encontrará consejos e ideas excitantes y entretenidos, ¡incluyendo excelentes recetas!
Printed in China/Impreso en China |
P.N. 124922 |
www.mrcoffee.com |
|

DW_Series_IB.qxd:Layout 1 1/24/08 5:20 PM Page 2
IMPORTANT SAFEGUARDS
To reduce the risk of fire, electric shock and/or injury to persons, basic safety precautions should always be followed when using electrical appliances, including the following:
1.READ ALL INSTRUCTIONS BEFORE USING THE COFFEEMAKER.
2.Do not touch the coffeemaker’s hot surfaces. Use handles or knobs and do not open the lid or cover while brewing. Scalding may occur if the lid is removed during brewing cycles.
3.To protect against electric shock, do not immerse the power cord, power plug or coffeemaker in water or in any other liquid.
4.Close adult supervision is necessary when this appliance is used by or near children.
5.Turn the coffeemaker OFF and unplug the power cord from the
power source when the coffeemaker and clock are not in use and before cleaning. Allow the coffeemaker parts to cool before putting
on or taking off parts and before cleaning the appliance.
6.Do not operate any appliance with a damaged power cord or power plug, or operate it after the appliance malfunctions, or has been damaged in any manner. Return this appliance only to the nearest Authorized Service Center for examination, repair or adjustment.
7.The use of accessory attachments other than MR. COFFEE® brand products may cause hazards or injuries.
8.Do not use the coffeemaker outdoors.
9.Do not let the power cord hang over edge of table or counter, or allow it to come into contact with hot surfaces.
10.Do not place this coffeemaker on or near a hot gas stove or electric burner or in a heated oven.
11.To disconnect the coffeemaker, turn it OFF, then remove the power plug from the power supply.
12.Place the appliance on a hard, flat level surface to avoid interruption of airflow underneath the coffeemaker.
13.Avoid contact with any moving parts.
14.This coffeemaker is designed for household use only.
15.Do not use appliance for other than intended use.
16.Scalding may occur if the decanter lid is removed during brewing cycles.
WARNING: To reduce the risk of fire or electric shock, do not remove any service covers. There are no user serviceable parts inside the coffeemaker.
! Only authorized personnel should repair the coffeemaker.
DECANTER USE AND CARE
Follow the instructions below to reduce or eliminate the chance of breaking the glass decanter:
•This decanter is designed for use with your MR. COFFEE® coffeemaker and therefore must never be used on a range top or in any oven, including a microwave oven.
•Do not set a hot decanter on a wet or cold surface.
•Do not use a cracked decanter or a decanter having a loose or weakened handle.
•Do not clean the decanter with abrasive cleaners, steel wool pads or other abrasive materials.
•Discard the decanter immediately if it is ever boiled dry.
•Protect the decanter from sharp blows, scratches or rough handling.
•Do not disassemble the thermal carafe.
•Do not place the thermal carafe in the dishwasher.
SAVE THESE INSTRUCTIONS
Please read ALL of the instructions in this manual carefully before you begin to use this appliance. Proper care and maintenance will ensure a long life and a trouble-free operation for this appliance. Please save these instructions and refer to them for cleaning and care tips.
INTRODUCTION
Welcome and congratulations on the purchase of your new MR. COFFEE® Coffeemaker. Your new coffeemaker will wake up with you in the morning and provide you breaks and treats during your hectic daily activities.How you enjoy your MR. COFFEE® Coffeemaker is up to you!
SPECIAL CORD SET INSTRUCTIONS
1.For your convenience the plug is stored inside the cord storage.
2.A short power supply cord is provided to reduce the hazards resulting from a person or pet becoming entangled in, or tripping over, a longer cord.
3.An extension cord may be purchased and used if care is exercised in its use.
4.If an extension cord is used, the marked electrical rating of the extension cord must be at least 10 amps and 120 volts. The resulting extended cord must be arranged so that it will not drape over a countertop or tabletop where it can be pulled on by children or tripped over accidentally.
5.This appliance has a polarized plug (one blade is wider than the other). To reduce the risk of electric shock, this plug will fit in a polarized outlet only one way. If the plug does not fit fully in the outlet, reverse the plug. If it still does not fit, contact a qualified electrician. Do not modify the plug in any way. You can customize the length of the power cord so that it is the exact length you desire. To increase the length of the power cord: grasp the power cord (not the power plug) and gently lift it out of the slot, then pull it away from the coffeemaker. To decrease the length of the power cord: Grasp the power cord (not the power plug), lift it out of the slot and gently feed it into the coffeemaker. Lock the cord in the slot when finished.
English 2 |
English 3 |
DW_Series_IB.qxd:Layout 1 1/24/08 5:20 PM Page 4
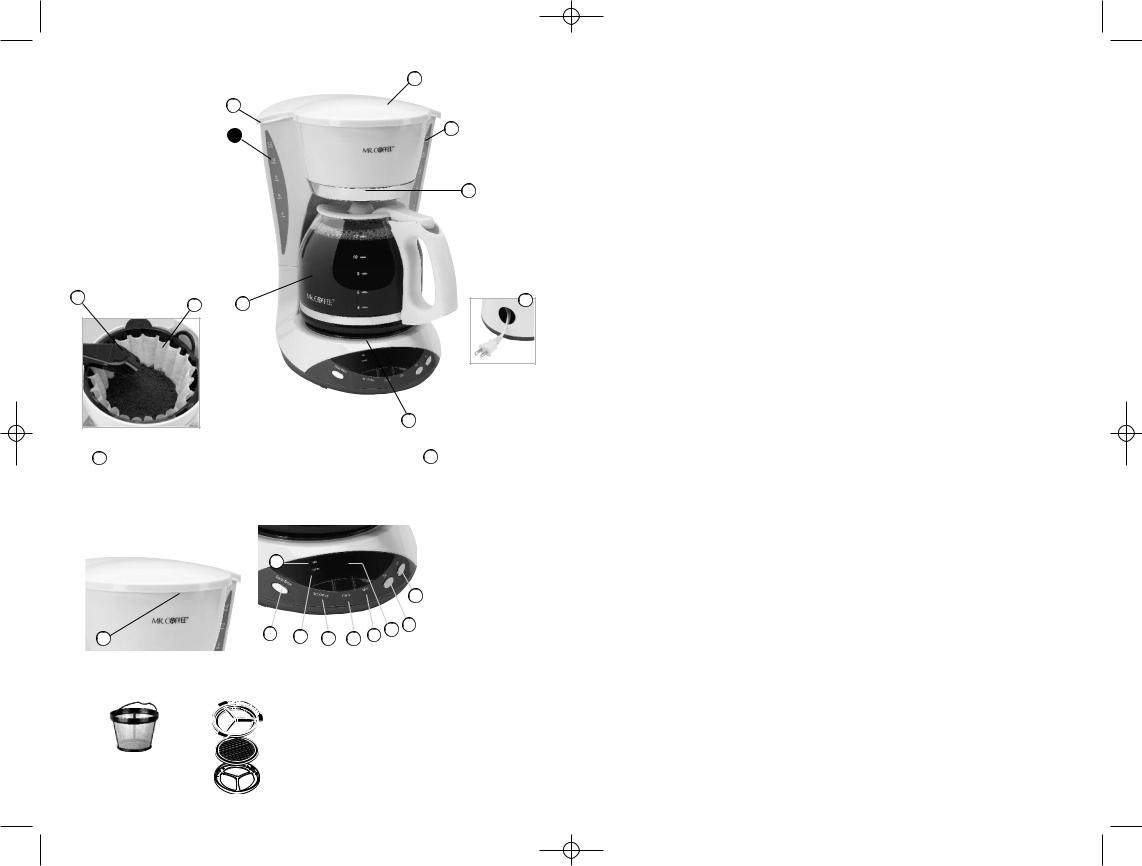
DIAGRAM OF PARTS |
3 |
|||
|
|
|
||
1 |
Dual Water Windows |
2 |
|
|
2 |
Water Reservoir |
|
1 |
|
3 |
Filter Basket Lid |
1 |
||
|
||||
4Pause ’n Serve
5Cord Storage
6 Warming Plate (not on thermal models) |
4 |
7Control Panel (see detail below)
8Glass Decanter or Thermal Carafe
9Removable Filter Basket
10Shower Head
10 |
9 |
8 |
5 |
|
|
|
|
|
|
6 |
|
7 Control Panel, |
|
|
|
|
7 Control Panel, |
Switch Models Only |
|
|
|
Programmable |
|
a On/Off Switch with |
|
|
|
Models Only |
|
|
|
|
a PM Indicator |
||
On Indicator Light |
|
|
|
|
|
|
|
|
|
|
b Delay Brew Button |
|
|
|
|
|
c Delay Indicator |
|
a |
|
|
|
d Set Delay Button |
|
|
|
|
e Hour Button |
|
|
|
|
|
|
|
|
|
|
|
i |
f Minute Button |
|
|
|
|
|
g Clock Display |
a |
b |
c |
d e f |
g h |
h On Button |
|
i Off Button |
||||
Coffeemaker Extras |
(not included with all models) |
|
|
|
|
Mr. Coffee® Brand |
Water Filtration |
|
8-12-Cup Permanent Filter |
||
System |
||
|
COFFEEMAKER FEATURES AND BENEFITS
Your new MR. COFFEE® coffeemaker has the following features:
•Brewing Capacity – 12 cups – Glass decanter series
–8 cups – Thermal carafe series
•Brew Basket with Removable Filter Basket – Lifts out for fast and easy cleaning and filling.
•Pause ‘n Serve – Allows you up to 30 seconds to pour a cup of coffee while the coffeemaker is still brewing. Carefully remove the decanter and the Pause ’n Serve feature will be automatically activated, temporarily stopping the flow of coffee into the decanter.
•Dual Water Windows – Show amount of water in the reservoir for accurate filling.
•Non-Stick Warming Plate (not on thermal models)– Allows you to keep your coffee hot after brewing. The non-stick attribute prevents the decanter from sticking to the surface of the warming plate.
•Cord Storage – Safely stores excess cord to keep your countertop neat.
•On/Off Indicator Light – Lets you know when your coffeemaker is “on.”
•Additional Programmable Control Features (programmable models only)
–Clock – The LED clock serves as a handy kitchen clock and allows you to set the Delay Brew feature.
–Delay Brew – Allows you to preset when you would like the coffeemaker to automatically brew your coffee, up to 24 hours in advance.
–Two-Hour Auto Shut-Off – Keeps your coffee warm for 2 hours after you brew, then automatically turns off (on programmable models).Thermal models shut off immediately after brewing cycle is completed.
NOTE: If you have selected any of the operating functions, the coffeemaker will act upon the last operation selected if the power is restored within 10 seconds after a power outage.
CLEAN YOUR COFFEEMAKER BEFORE USING THE FIRST TIME
Make sure your first cup of coffee is as good as can be by cleaning your MR. COFFEE® Coffeemaker before its first use. Just follow these simple steps:
1.Wash the decanter, decanter lid and the filter basket in a mixture of mild detergent and water. Rinse each thoroughly (please refer to the parts diagram listed above).
2.Replace all the parts and close the lid. Then, run a brew cycle with water only, without adding coffee and coffee filter.
3.When brewing is complete, turn your coffeemaker off, discard the water in the decanter and rinse the decanter, decanter lid, and filter basket.
Your coffeemaker is now ready to use. Enjoy it!
English 4 |
English 5 |
DW_Series_IB.qxd:Layout 1 1/24/08 5:20 PM Page 6
SETTING THE CLOCK AND DELAY BREW TIME
For Programmable Models Only
To Set the Clock:
1.Plug the power cord into a standard electrical outlet. The clock will flash on the control panel to indicate that the time has not been set yet.
2.Press and hold the HOUR and MINUTE buttons until you reach the current time. The PM indicator will light on the left of the display.
NOTE: Pressing any button before setting the clock will cause the clock to start keeping time from 12:00 a.m. You must set the clock if you want to use the Delay Brew feature.
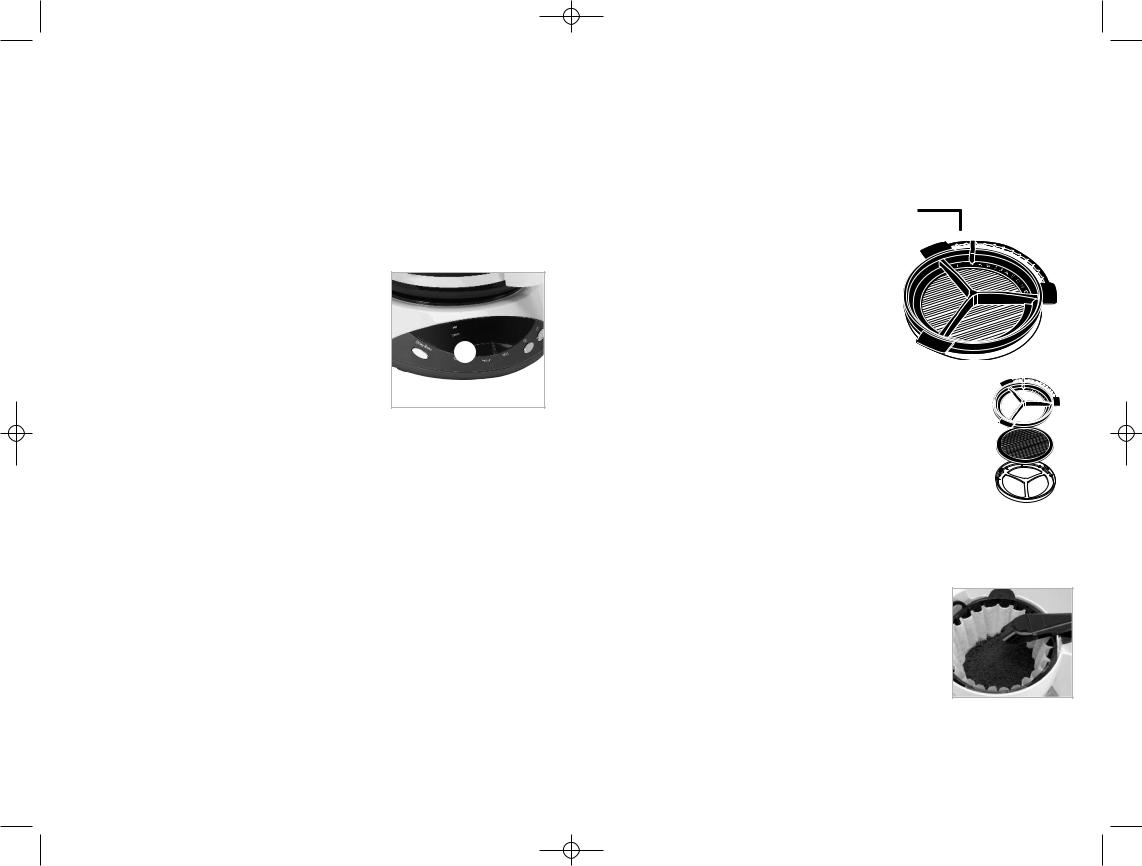
To Set the Delay Brew Time: |
|
|
After setting the clock, simply press and hold the SET DELAY |
|
|
button (Figure 1), and set the brew time by pressing the |
|
|
HOUR and MINUTE buttons. The PM indicator will light up on |
|
|
the clock display. |
|
|
NOTE: To activate the DELAY BREW cycle, see the |
|
|
“Brewing Coffee Later” section. |
|
|
To check the programmed time, push the SET DELAY button. |
|
|
The display will show the time you have programmed the |
(Figure 1 – Set Delay) |
|
coffee to brew. |
||
|
||
P R E P A R I N G F O R U S E |
|
Selecting and Measuring Ground Coffee:
For best results, use a level tablespoon for ground coffee measurement.
Make sure you use medium grind coffee for a perfect brew.
Suggested Coffee Measurement Chart:
To Brew |
Ground Coffee |
|
|
|
1 level tablespoon (tbsp) = 5 gr./0.17 oz. |
12 Cups |
9 tbsp. |
|
10 Cups |
7.5 tbsp. |
1 cup = 5 fl. oz. of brewed coffee |
|
|
Use more or less coffee to suit your taste. |
8 Cups |
6.5 tbsp. |
|
6 Cups |
4.5 tbsp. |
|
4 Cups |
3 tbsp. |
|
Water Filtration System: (Not Included. Available at your favorite retailer or visit the web site www.mrcoffee.com)
Your coffeemaker has been designed to use the MR. COFFEE® water filtration system. This carbon-based water filter improves the taste of your coffee by removing up to 97%
of the chlorine from the water you may use to brew your coffee.
First, look for the MR. COFFEE® Filtration Friendly symbol  on the bottom of your filter basket. If you do not see this symbol, please call 1-800-672-6333.
To use the water filtration system in your MR. COFFEE® Coffeemaker, please follow these steps:
1.Align the red indicator on the frame to the letter that corresponds with the month that you are using the disk for the first time. This serves to remind you to change the disk every month (approx. 30 brewing cycles). (Figure 2)
NOTE: For optimum results, use the water filtration system with a permanent filter.
2.Rinse the water filter in fresh water before first use.
3.Follow “Adding Water and Ground Coffee”
Instructions in the next section.
4.When you are done brewing your coffee, rinse the water filter with fresh water. Do not put your water filter in the dishwasher.
To replace the water filter disks: twist the gray disk cover from your water filtration system. Remove the used disk. Insert the new disk into the frame and twist the cover back into place.
Adding Water and Ground Coffee:
Red
Indicator
Frame
Filter Disk
Disk Cover
Figure 2
1.Lift and open the filter basket lid. For your convenience, you can lift out the removable filter basket.
2.Place a MR. COFFEE® brand 10-12 cup paper basket-style filter or a MR. COFFEE® permanent filter into the removable filter basket. (Figure 3)
NOTE: If using paper filters, it is important that the sides of the filter fit flush against the side of the filter basket. If filter collapse occurs, dampen the filter before placing in the filter basket and adding ground coffee and water.
(Figure 3 – Adding water and ground coffee)
3.Add the desired amount of coffee and gently shake to level the coffee. See the
“Suggested Coffee Measurement Chart”.
English 6 |
English 7 |
DW_Series_IB.qxd:Layout 1 1/24/08 5:20 PM Page 8
4.If using the MR. COFFEE® Water Filtration System, after following instructions in the Water Filtration System section, place the MR. COFFEE® water filter in the basket, making sure that the side marked “this side up” faces you and that the water filter is level.
5.Be sure the filter basket is properly centered and all the way down in the filter basket.
6.Fill the decanter with cold, fresh water to the desired capacity (1 cup equals 5 ounces). For easy and accurate filling, the water markings on the glass decanter and on the dual water windows show the amount of water needed to make the corresponding desired number of cups. Do not fill past the “MAX line” or water will flow out of the overfill hole in the back of the water reservoir.
The amount of coffee brewed will always be slightly less than the amount of water poured in the water reservoir. This is due to the minimum absorption of water by the coffee grounds.
7.Pour the water into the water reservoir. Close the lid and place the empty decanter onto the warming plate.
NOTE: Make sure the decanter is fully placed on the warming plate or the water and the grounds will overflow from the filter basket. An overflow may cause personal injury or damage to property.
CAUTION! To reduce the risk of damaging the decanter and/or the risk of
!personal injury, do not add cold water to the decanter if the decanter is already hot. Allow the decanter to cool before using.
BREWING COFFEE NOW
1.After completing the steps in the “Adding Water and Ground Coffee” section and with the decanter and the filter basket securely in place, turn the coffeemaker on.
For Programmable models: Press the ON Button to begin the brewing cycle. The green indicator light will turn on to signal that the coffeemaker is brewing. When the brewing cycle is complete the coffeemaker switches over to the warming mode.
Your coffeemaker will keep your coffee hot for 2 hours, then automatically shut off. Thermal units will shut off immediatly after the brewing cycle is complete. While the coffee is brewing, the Pause n’ Serve feture allows you to sneak a cup of coffee from the decanter. REPLACE THE DECANTER ON THE WARMING PLATE WITHIN 30 SECONDS TO PREVENT OVERFLOW AND POSSIBLE INJURY.
To turn the coffeemaker off, push the OFF button.
For Switch models: Press the ON/OFF Switch on the control panel so the green indicator light illuminates. The light indicates that the coffeemaker is on and that the brew cycle will begin.
While the coffee is brewing, the Pause ’n Serve feature allows you to sneak a cup of coffee from the decanter. REPLACE THE DECANTER ON THE WARMING PLATE WITHIN 30 SECONDS TO PREVENT OVERFLOW AND POSSIBLE INJURY.
To turn off the coffeemaker, push the switch so the light is no longer illuminated.
If the brew basket overflows or fails to empty into the decanter,
!do not open the brew basket. Turn off the coffeemaker. Unplug the coffeemaker and wait for the contents to cool before handling.
2.After the used coffee grounds have cooled, carefully discard them.
3.Make sure the decanter is empty before starting to brew coffee.
4.Be sure to turn your coffeemaker off when no longer using it.
B R E W I N G C O F F E E L A T E R
For Programmable Models Only (Delay Brew)
1.You must first set the time when you would like the coffeemaker to begin brewing your coffee as described in “Setting the Clock and the Delay Brew Timer” section.
2.Prepare your coffeemaker as described in “Adding Water and Ground Coffee” section.
3.To activate DELAY BREW and program your coffeemaker to brew coffee at a later time, press the Delay Brew button. The DELAY indicator light will illuminate. The coffeemaker is now set to automatically brew coffee at the pre-set later time.
4.At the pre-set time the green indicator light will turn on and the DELAY light will turn off, indicating the brewing has started.
5.The coffeemaker warming plate will keep your coffee hot for 2 hours and then will automatically turn off. Thermal units will shut off immediatly after the brewing cycle is complete.
As a safety feature, your coffeemaker will NOT start again automatically the next day. If you want your coffee to brew at the same time the following day, simply add a new filter, coffee and water and set DELAY BREW,
by repeating Steps 2 and 3 above.
To cancel DELAY BREW: Press the OFF button. The DELAY BREW green indicator light will turn off.
C L E A N I N G A N D M A I N T A I N I N G
Y O U R C O F F E E M A K E R
Daily Cleaning:
Always unplug the coffeemaker and allow to cool before cleaning.
Remove the filter basket, permanent filter (not included on all models), decanter and decanter lid and wash them in a solution of hot water and mild liquid soap.
Never use abrasive cleansers, steel wool pads or other abrasive materials. Dishwasher top rack safe parts: glass decanter and lid, filter basket and permanent filter.
The water filter disk and thermal decanter are not dishwasher safe.
Never immerse the coffeemaker itself in water,
!in any other liquid or place in the dishwasher.CAUTION!
Regular Cleaning and Maintenance:
Decalcifying your MR. COFFEE® Coffeemaker
Minerals (calcium) found in water will leave deposits in your coffeemaker and will affect it. It’s recommended that you regularly remove these deposits by using MR. COFFEE® Cleaner or vinegar. MR. COFFEE® Cleaner is available at many retail stores or by calling the
MR. COFFEE® Consumer Service Department at 1-800-MR COFFEE (1-800-672-6333).
English 8 |
English 9 |
 Loading...