


WWW.MOULINEX.COM
E
E1
E2 
D
C
E3
B
A
F

1
3
5
2
4
6
7
9
8

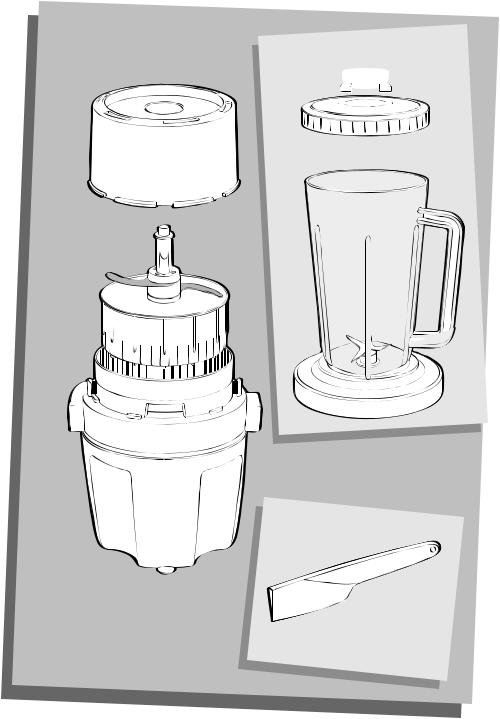
 DESCRIPTION DE L’APPAREIL
A.Bloc moteur
B.Bol hachoir
C.Couteau
D.Couvercle
E.Blender (*pour modèle A327 seulement)
E1. Bouchon
E2. Couvercle
E3. Bol
F.Spatule
 CONSIGNES DE SÉCURITÉ
•Lisez attentivement le mode d’emploi avant la première utilisation de votre appareil et suivez attentivement les instructions d’utilisation. Une utilisation non-conforme au mode d’emploi dégagerait le fabricant de toute responsabilité.
•Cet appareil n'est pas prévu pour être utilisé par des personnes (y compris les enfants) dont les capacités physiques, sensorielles ou mentales sont réduites, ou des personnes dénuées d'expérience ou de connaissance, sauf si elles ont pu bénéficier, par l'intermédiaire d'une personne responsable de leur sécurité, d'une surveillance ou d'instructions préalables concernant l'utilisation de l'appareil.
•Il convient de surveiller les enfants pour s'assurer qu'ils ne jouent pas avec l'appareil.
•Ne faites pas tourner l’appareil
 à vide.
•Cet appareil est conforme aux règles techniques et aux normes en vigueur.
•Il est conçu pour fonctionner uniquement en courant alternatif. Nous vous demandons avant la première utilisation de vérifier que la tension du réseau correspond bien à celle indiquée sur la plaque signalétique de l'appareil.
•Ne pas poser, ni utiliser cet appareil sur une plaque chaude ou à proximité d'une flamme (cuisinière à gaz).
•N'utilisez le produit que sur un plan de travail stable, à l'abri des projections d'eau. Ne le retournez pas.
•Ne jamais retirer le couvercle avant l'arrêt complet du couteau.
•L'appareil doit être débranché :
* s'il y a anomalie pendant le fonctionnement * avant chaque nettoyage ou entretien,
* après chaque utilisation.
•Ne jamais débrancher l'appareil en tirant sur le cordon.
•N'utilisez un prolongateur qu'après avoir vérifié que celui-ci est en parfait état.
•Un appareil électroménager ne doit pas être utilisé :
* s'il est tombé par terre ou après tout autre chute,
* si le couteau est détérioré ou incomplet.
•Si le câble d’alimentation est endommagé, il doit être remplacé par le fabricant, son service après vente ou une personne de qualification similaire afin d’éviter un danger.
• Toujours débrancher l’appareil de l’alimentation si on le laisse sans surveillance et avant montage/démontage ou nettoyage.
•Le produit a été conçu pour un usage domestique, il ne doit en aucun cas être l'objet d'une utilisation professionnelle pour laquelle nous n'engageons ni notre garantie ni notre responsabilité.
•Manipulez les
 lames
lames
 avec précaution car elles sont très
 aiguisées et peuvent vous blesser.
 AVANT LA PREMIERE UTILISATION
•Lavez le bol (B),le couvercle (D),le couteau (C) et l’accessoire blender (E*) à l’eau savonneuse. Rincez puis séchez.
Attention : les
 lames
lames
 sont très
 coupantes, maniez les
 accessoires tranchants
 avec précaution, lorsque
 vous videz le
 bol, lors
 de l’utilisation ou du nettoyage de votre appareil.
1

 UTILISATION DU BOL HACHOIR
•Posez le bloc moteur (A) sur un plan de travail stable.
•Ne branchez pas encore votre appareil.
•Positionnez le bol hachoir (B) sur le bloc moteur
(A)(fig. 1).
•Mettez en place le couteau (C) à l’intérieur du bol. Posez le couteau sur l’axe central en appuyant sur le bouton blanc pour le verrouiller (fig. 2).
•Placez dans le bol hachoir les aliments coupés en morceaux.
•Posez le couvercle (D) sur le bol hachoir (B) (fig.3).Vous pouvez maintenant brancher votre appareil.
•Appuyez sur le couvercle (D) pour la mise en marche (fig. 4).
•Pour stopper,cessez la pression sur le couvercle: l’appareil s’arrête automatiquement.
•N’enlevez jamais le couvercle avant l’arrêt complet du couteau.
•Pour enlever le couteau, appuyez sur le bouton blanc tout en tirant le couteau vers le haut.
 CONSEILS D’UTILISATION
•Travaillez en impulsions pour obtenir un hachis fin et réguler.Si des morceaux d’aliments restent collés sur la paroi du bol (viande, oignons…), décollez les morceaux à l’aide de la spatule (F), répartissez-les dans le bol et effectuez 2 ou 3 impulsions supplémentaires.
•Si en appuyant sur le couvercle l’appareil ne se met pas en marche, vérifiez que des morceaux
d’aliments ne soient pas collés sur le rebord interne du couvercle qui est en contact avec le bol.
•Après un usage prolongé, le couteau s’émousse. Remplacez-le.
•Laissez refroidir l’appareil 2 minutes après chaque utilisation.
INGRÉDIENTS |
QUANTITÉ MAX. |
TEMPS |
|
|
|
Persil |
20 g |
6 s |
Oignons |
150 g |
9 s |
Echalotes |
150 g |
9 s |
Ail |
60 g |
5 s |
Biscottes |
20 g |
5 s |
Amandes |
200 g |
8 s |
Noisettes |
200 g |
12 s |
Noix |
150 g |
10 s |
Gruyère |
150 g |
10 s |
Œuf dur |
200 g |
5 s |
Viande (coupée en morceaux) |
200 g |
6 s |
|
|
|
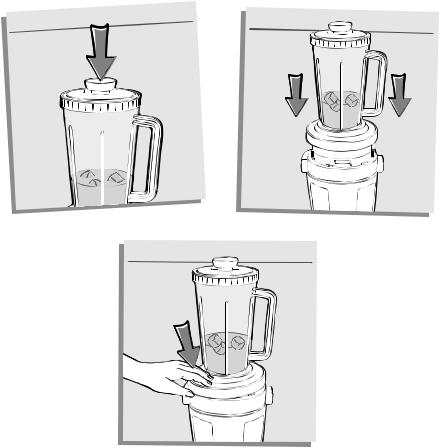
 UTILISATION DU BOL BLENDER (E) (*pour modèle A327 seulement)
•Temps de fonctionnement maximum : 30 secondes
•Posez le bol (E3) sur un plan de travail stable. Toutes les manipulations doivent être effectuées, le bol (E3) posé sur un plan de travail stable, jamais sur le bloc moteur (A).
•Mettez dans le bol (E3) les ingrédients à mixer (fig.5).Versez en premier les liquides sans jamais
dépasser le niveau maximum indiqué (1,25 L).
•Posez le couvercle (E2) sur le bol (E3) (fig. 6).
•Placez le bouchon (E1) dans son logement situé sur le couvercle et tournez-le pour le verrouiller (fig.7).
•Positionnez le bol blender (E*) sur le bloc moteur (A) (fig. 8).
•Branchez l’appareil.
2

•Pour mettre l’appareil en marche : appuyez d'une main sur la couronne coulissante du bol blender (fig. 9).
•Pour arrêter l’appareil, cessez la pression sur la couronne.
•Le couvercle et son bouchon doivent toujours
être en place lors
 du fonctionnement de l’appareil.
•Ne mettez jamais vos doigts ou tout autre objet dans le bol blender pendant le fonctionnement de l’appareil.
ATTENTION :
 ne versez ou ne mélangez jamais de liquides
 ou des ingrédients
 dont la

 température
dépasse 80° C (175° F)
 . Lorsque
 vous mélanger des ingrédients
 chauds, éloignez vos mains du couvercle et du bouchon afin d’éviter tout
 risque de brûlure.
 NETTOYAGE
•Débranchez toujours l’appareil
 avant de nettoyer le
 bloc moteur (A).
•Ne pas immerger le bloc moteur (A), ne pas le passer sous l’eau. Nettoyer le bloc moteur (A) avec un chiffon humide. Séchez-le soigneusement.
•Soyez prudent lorsque
 vous manipulez le
 couteau (C), lorsque
 vous videz le
 bol et lors
 du nettoyage de l’appareil.

•Ne laissez
 pas le
 couteau (C) tremper
 avec de la
 vaisselle au fond de l’évier.

•Afin de faciliter le nettoyage du bol blender (E*) après utilisation, remplissez-le avec un peu d’eau chaude et quelques gouttes de produit vaisselle. Faites fonctionner l’appareil pendant quelques secondes.Videz et puis rincez sous le robinet. Manipulez les lames avec précaution, elles sont très coupantes.
•Le bol hachoir (B), le couteau (C), le couvercle
(D)et le bol blender (E*) peuvent passer au lave-vaisselle dans le panier du haut en utilisant le programme « ECO » ou « PEU SALE ».
 QUE FAIRE SI VOTRE APPAREIL NE FONCTIONNE PAS ?
•Vérifiez tout d’abord le branchement.
•Vous avez suivi parfaitement les
 instructions

du mode d’emploi et votre appareil ne fonctionne toujours pas ?
pas ?
•Dans ce cas adressez-vous à votre revendeur,ou à un centre de service agréé (voir liste dans le livret service).
 PRODUIT ELECTRIQUE OU ELECTRONIQUE EN FIN DE VIE
Participons à la protection de l’environnement !
Votre appareil contient de nombreux matériaux valorisables ou recyclables.
Confiez celui-ci dans un point de collecte ou à défaut dans un centre service agréé pour que son traitement soit effectué.
3

 DESCRIPTION OF THE APPLIANCE
A. |
Motor block |
E. |
Blender (*for A327 model only) |
|
B. |
Chopping bowl |
|
E1. |
Stopper |
C. |
Blade |
|
E2. |
Lid |
D. |
Lid |
|
E3. |
Bowl |
|
|
F. |
Spatula |
|
 SAFETY INSTRUCTIONS
•Read the instructions for use carefully before using your appliance for the first time and follow them carefully. In the event of any use that does not comply with the instructions, the manufacturer shall accept no liability.
•This appliance is not intended for use by persons (including children) with reduced physical, sensory or mental capabilities, or lack of experience and knowledge, unless they have been given supervision or instruction concerning use of the appliance by a person responsible for their safety.
•Children must be supervised to ensure that they do not play with the appliance.
•Do not use the appliance without ingredients
 in the
 bowl.
bowl.
•This appliance conforms to the applicable technical regulations and standards.
•This device is designed to work with alternating current only. We would ask you, before using it for the first time,to check that the voltage of your mains network corresponds to the voltage given on the rating plate on the appliance.
•Do not place or use this appliance on a hotplate or near to a naked flame (gas cooker).
•Only use the appliance on a flat, stable heatresistant work surface away from water splashes. Do not turn it over.
•Do not remove the lid until the blade has completely stopped.
•The appliance must be unplugged:
* if there is a malfunction during operation, * each time it is cleaned or maintained,
* after each use.
•Never unplug the appliance by pulling on the cable.
•Only use an extension lead after checking that it is in perfect working order.
•No domestic appliance should be used if:
*it has been dropped on the floor, or after any other fall,
*if the blade is damaged or incomplete.
•If the power cable is damaged, it must be replaced by the manufacturer, its after-sales service or any person with similar qualifications, in order to avoid all danger.
•Always unplug the appliance if you are to leave it unattended and before you assemble it, take it apart or clean it.
•This product has been designed for domestic use only. Any commercial use, inappropriate use or failure to comply with the instructions, the manufacturer accepts no responsibility and the guarantee will not apply.
•Handle the blades with care because they
 are very sharp and may injure
 you.
you.
•Ensure that any scarves, ties or long hair do not come into contact with the moving parts from this product.
 BEFORE USING FOR THE FIRST TIME
•Wash the bowl (B), the lid (D), the blade (C) and blender accessory (E*) with soapy water. Rinse and dry.
Note: the blades are very sharp, handle cutting accessories with caution when using or emptying the
 bowl and during cleaning.
4

 USING THE CHOPPER BOWL
•Place the motor block (A) on a flat, stable, heatresistant work surface.
•Do not plug your appliance in yet.
•Place the chopper bowl (B) on the motor block
(A)(fig. 1).
•Place the blade (C) inside the bowl. Place the blade on the central axis by pressing the white button to lock it (fig. 2).
•Place the diced food in the chopper bowl.
•Put the lid (D) on the chopper bowl (B) (fig.3). Now you can plug your appliance in.
•Press on the lid (D) to start the appliance up (fig.4).
•To stop the chopper,stop pressing on the lid: the appliance switches off automatically.
•Do not remove the lid until the blade has completely stopped.
•To remove the blade, press the white button while pulling the blade upwards.
 RECOMMENDATIONS FOR USE
•Work in short bursts to obtain a fine, smooth result. If pieces of food stick to the sides of the bowl (meat, onions, etc.), remove them with the spatula (F), spread them around the bowl and press the lid 2 or 3 additional times.
•If pressing the lid does not make the appliance
work, make sure that pieces of food are not stuck on the inside edge of the lid in contact with the bowl.
•After prolonged use, if the blade should become blunt, replace it.
•After use, leave it to cool down for 2 minutes.
INGREDIENTS |
MAX. QUANTITY |
TIME |
|
|
|
Parsley |
20 g |
6 s |
Onions |
150 g |
9 s |
Shallots |
150 g |
9 s |
Garlic |
60 g |
5 s |
Rusks |
20 g |
5 s |
Almonds |
200 g |
8 s |
Hazelnuts |
200 g |
12 s |
Walnuts |
150 g |
10 s |
Gruyere |
150 g |
10 s |
Boiled egg |
200 g |
5 s |
Meat (cut into pieces) |
200 g |
6 s |
|
|
|
 USING THE BLENDER BOWL (E) (*for A327 model only)
•Maximum operating time : 30 seconds.
•Place the bowl (E3) on a flat, stable, heatresistant work surface.All the operations must be carried out with the bowl (E3) placed on a flat, stable, heat-resistant work surface, never on the motor block (A).
•Put the ingredients to be blended in the bowl
•Place the blender bowl (E*) on the motor block
(A)(fig. 8).
•Plug the device in.
•To turn the appliance on: press on the sliding ring on the blender bowl with your hand (fig. 9).
•To stop the appliance, stop pressing the ring.
•The cover and its
 stop must always be in

(E3) (fig.5).Pour the liquids in first.Never exceed |
place properly when the appliance is |
the maximum level indicated (1.25 L). |
operating. |
•Put the lid (E2) on the bowl (E3) (fig.6).
•Put the stopper (E1) in its slot on the lid and turn it to lock it (fig.7).
•Never place your fingers or any other object in the blender bowl while the appliance is working.
5

Attention: never pour or mix liquids
 or ingredients
 with a temperature
 higher than
 80°C (175°F). When you mix hot ingredients,

 take
take your hands away from the
 lid
lid
 and stopper in
 order to
 avoid any risk of burns.
 CLEANING
•Always unplug the appliance before cleaning the
 motor block (A).
•Do not immerse the motor block (A), do not run it under water. Wipe the motor unit (A) down with a damp cloth. Dry it carefully.
•Be careful while handling the blade (C) when you empty the
 jug or clean the
 appliance.
•Do not leave

 the
the blades (C) to
 soak with the
 dishes at the
 bottom of the
 sink.
sink.
•To make cleaning the blender bowl (E*) easier
after use, fill it with a little hot water and a few drops of washing-up liquid. Turn the appliance on for a few seconds. Drain and rinse under the tap. Handle the blades extremely carefully, because they are very sharp.
•The chopper bowl (B), the knife (C), the lid (D) and the blender bowl (E*) can all go in the dishwasher in the basket at the top using the "eco" or "slightly soiled" programme.
 WHAT DO I DO IF MY APPLIANCE DOESN'T WORK?
•Start by checking the power cord and plug.
•You have carefully followed all these instructions, and yet your appliance still does not work?
•In this case,contact your dealer or an approved service centre (see the list in the service booklet).
HELPLINE:
If you have any product problems or queries please contact our Customer Relations Team first for expert help and advice:
0845 602 1454 – UK
(01) 677 4003 – Ireland

or consult our website – www.moulinex.co.uk
 END OF LIFE ELECTRIC OR ELECTRONIC PRODUCT
Environmental protection first!
Your appliance contains valuable materials which can be recovered or recycled.
Leave it at a local civic waste collection point.
6
 DESCRIPCIÓN DEL APARATO
A.Bloque motor
B.Bol picador
C.Cuchilla
D.Tapadera
E.Picadora (*solo para el modelo A327)
E1. Tapón
E2. Tapadera
E3. Bol
F.Espátula
 CONSEJOS DE SEGURIDAD
•Lea atentamente las instrucciones de uso antes de utilizar por primera vez el aparato y sígalas atentamente. Un uso no conforme con las instrucciones de uso eximiría al fabricante de cualquier responsabilidad.
•Este aparato no está diseñado para ser utilizado por personas (incluidos los niños) cuyas capacidades físicas, sensoriales o mentales sean reducidas, o por personas con falta de experiencia o de conocimientos, salvo si éstas están vigiladas por una persona responsable de su seguridad o han recibido instrucciones relativas al uso del aparato.
•Se recomienda vigilar a los niños para asegurarse de que no juegan con el aparato.
•No ponga en marcha el aparato vacío.
•Este aparato cumple las normas técnicas y las reglamentaciones en vigor.
•Este aparato está diseñado para funcionar únicamente con corriente alternativa.Antes de utilizar el aparato por primera vez deberá asegurarse de que la tensión de la red se corresponde con la indicada en la placa indicadora del aparato.
•No coloque ni utilice este aparato sobre una placa caliente o cerca de una llama (cocina de gas).
•Utilice el aparato sólo sobre una superficie de trabajo estable, protegido de las salpicaduras de agua. No le dé la vuelta.
•No retire nunca la tapadera antes de que la
cuchilla se haya detenido completamente.
• El aparato deberá desconectarse:
*si se produce alguna anomalía durante su funcionamiento,
*antes de cada limpieza o mantenimiento,
*después de utilizarlo.
•No desconecte nunca el aparato tirando del cable.
•Utilice un alargador sólo tras haber comprobado que éste se encuentra en perfecto estado.
•Un electrodoméstico no debe utilizarse:
*si ha caído al suelo o tras cualquier otra caída,
*si la cuchilla está estropeada o incompleta.
•En caso de que el cable de alimentación esté dañado, éste deberá ser cambiado por el fabricante, su servicio postventa o por una persona con una cualificación similar con el fin de evitar cualquier peligro.
•Desconecte siempre el aparato de la electricidad si se deja sin vigilancia o antes de montarlo/desmontarlo o limpiarlo.
•El producto está diseñado para un uso doméstico y en ningún caso deberá ser destinado a un uso profesional para el cual nuestra garantía y nuestra responsabilidad quedarán totalmente eximidas.
•Manipule las
 cuchillas con precaución, ya que están muy afiladas y podría dañarse.
 ANTES DEL PRIMER USO
•Lave el bol (B), la tapadera (D), la cuchilla (C) y el accesorio picador (E en función del modelo) con agua jabonosa. Aclárelo y séquelo a continuación.
Atención: las
 hojas son muy cortantes, manejar los
 accesorios de corte con precaución cuando se use o durante el vaciado y limpieza
 del recipiente.
7

 USO DEL BOL PICADOR
•Coloque el bloque motor (A) en una superficie de trabajo estable.
•No conecte aun el aparato.
•Coloque el bol picador (B) en el bloque motor
(A)(fig. 1).
•Coloque la cuchilla (C) en el interior del bol. Coloque la cuchilla en el eje central presionando el botón blanco para bloquearlo (fig. 2).
•Coloque en el bol picador los alimentos cortados en trozos.
•Coloque la tapadera (D) en el bol picador (B) (fig. 3).Ahora puede conectar el aparato.
•Presione la tapadera (D) para ponerlo en marcha (fig. 4).
•Para detenerlo, deje de presionar la tapadera: el aparato se detendrá automáticamente.
•No retire nunca la tapadera antes de que la cuchilla se haya detenido completamente.
•Para retirar la cuchilla,presione el botón blanco tirando de la cuchilla hacia arriba.
 CONSEJOS DE USO
•Trabaje por impulsiones para obtener un picadillo fino y regular.En caso de que los trozos de alimentos se queden pegados a la pared del bol (carne, cebolla...), despegue los trozos con la espátula (F), distribúyalos por el bol y realice de 2 a 3 impulsiones suplementarias.
•En caso de que al presionar la tapadera el aparato no se pusiese en marcha, asegúrese
de que los trozos de alimentos no estén pegados al borde interno de la tapadera que está en contacto con el bol.
•Tras un uso prolongado, la cuchilla se deteriora. Cámbiela.
•Deje enfriar el aparato 2 minutos después de cada uso.
INGREDIENTES |
CANTIDAD MÁX. |
TIEMPO |
|
|
|
Perejil |
20 g |
6 s |
Cebolla |
150 g |
9 s |
Chalote |
150 g |
9 s |
Ajo |
60 g |
5 s |
Biscote |
20 g |
5 s |
Almendras |
200 g |
8 s |
Avellanas |
200 g |
12 s |
Nueces |
150 g |
10 s |
Gruyère |
150 g |
10 s |
Huevo duro |
200 g |
5 s |
Carne (cortada en trozos) |
200 g |
6 s |
|
|
|
 USO DEL BOL PICADOR (E) (*solo para el modelo A327)
•Duración máxima de funcionamiento: 30 segundos.
•Coloque el bol (E3) en una superficie de trabajo estable. Todas las manipulaciones deberán realizarse con el bol (E3) colocado en una superficie de trabajo estable, nunca sobre el bloque motor (A).
•Ponga en el bol (E3) los ingredientes que va a batir (fig.5).Vierta primero los líquidos sin superar nunca el nivel máximo indicado (1,25 l).
•Coloque la tapadera (E2) en el bol (E3) (fig. 6).
•Coloque el tapón (E1) en su alojamiento situado en la tapadera y gírelo para bloquearlo (fig.7).
•Coloque el bol picador (E) en el bloque motor
(A)(fig. 8).
•Conecte el aparato.
•Ponga en marcha el aparato: presione con una mano la corona deslizante del bol picador (fig. 9).
•Para detener el aparato, deje de presionar la corona.
•La tapadera y su tapón
 deberán estar siempre colocados durante el funcionamiento del aparato.
•No introduzca nunca los dedos o cualquier otro objeto en el bol picador mientras que el aparato se encuentre en funcionamiento.
8
 Loading...