


User’s Guide
For S801 / S802 / S803 / S804 / S805
DECT 6.0 Cordless Phones with Answering System
Warning
Use only the power adapters and telephone line cord provided in the box.

Welcome...
to your new Motorola Digital Cordless Phone!
Please retain your original dated sales receipt for your records. For warranty service of your Motorola product, you will need to provide a copy of your dated sales receipt to confirm warranty status. Registration is not required for warranty coverage.
For product related questions, please call:
US and Canada: 1-888-331-3383 On the Web: www.motorola.com
•100 name and number phonebook.
•Answering machine with 15 minutes digital recording time.*
•Caller ID shows you who's calling and you can see details of the last 30 callers in a calls list.**
•Register up to 5 handsets to a single base.
•Make internal calls, transfer external calls, hold 3-way conversation between two internal callers and an external caller (for multi-handset pack only).
*The recording time includes the pre-recorded voice menu and outgoing announcements.
**You must subscribe to your network provider's Caller ID or Call Waiting service for these features to work.
Please note that this equipment is not designed for making emergency telephone calls when the power fails. Alternative arrangements should be made if emergency telephone call is necessary.
This ENERGY STAR® program (www.energystar.gov) recognizes and encourages the use of products that save energy and help protect our environment. We are proud to mark this product with the ENERGY STAR® label indicating it meets the latest energy efficiency guidelines.

This User’s Guide provides you with all the information you need to get the most from your phone.
Before you make your first call you will need to set up your phone. Follow the simple instructions in 'Getting Started', on the next few pages.
IMPORTANT
Only use the telephone line cord supplied.
This equipment is not designed for making emergency telephone calls when the power fails. Alternative arrangements should be made for access to emergency services.
Got everything?
•1 x Handset
•1 x Base
•1 x Charger (for multi-handset pack only)
•1 x NiMH rechargeable battery pack
•1 x Battery door
•1 x Power adapter for the base
•1 x Power adapter for the charger (for multi-handset pack only)
•1 x Telephone line cord
•1 x Quick start guide
•1 x User’s guide
In multihandset packs, you will find one or more additional handsets, chargers with power adapter units, additional rechargeable battery packs and battery doors.

1. |
Getting started ................................................ |
6 |
4.2 |
Add an Entry....................................................... |
20 |
||
2. |
Getting to know your phone |
9 |
4.3 |
Edit an Entry....................................................... |
21 |
||
4.4 |
Delete an Entry................................................... |
21 |
|||||
3. |
Using the phone |
17 |
4.5 |
Delete all Entries ................................................ |
21 |
||
4.6 |
View Phonebook Capacity ................................. |
21 |
|||||
|
3.1 |
Calls |
...................................................................Make a call |
17 |
4.7 |
Store a Phonebook Entry as a One Touch |
21 |
|
|
3.1.1 ............................................ |
17 |
4.8 |
Number............................................................... |
||
|
|
3.1.2 ................................................... |
Predial |
17 |
Change the Phonebook Entry in a One Touch |
22 |
|
|
|
3.1.3 ..............Dial one touch numbers 1 to 9 |
17 |
4.9 |
Number............................................................... |
||
|
|
3.1.4 .......................Call from the phonebook |
17 |
Delete a One Touch Number ............................. |
22 |
||
|
|
3.1.5 ............................ |
Call from the calls list |
17 |
4.10Copy Phonebook Entry to Another Handset ...... |
22 |
|
|
|
3.1.6 .......................... |
Call from the redial list |
17 |
5. Caller ID |
23 |
|
|
|
3.1.7 ......................................... |
Answer a call |
18 |
|||
|
|
3.1.8 ....................................... |
Adjust volume |
18 |
5.1 |
Calls List............................................................. |
23 |
|
|
3.1.9 ...................................................... |
Mute |
18 |
|
5.1.1 View the calls list ................................... |
23 |
|
3.2 |
3.1.10 ..............................................End a call |
18 |
|
5.1.2 Save a number from the calls list to the |
24 |
|
|
Intercom............................................................. |
18 |
|
phonebook ............................................. |
|||
|
|
3.2.1 ............................. |
Call another handset |
18 |
|
5.1.3 Delete a calls list entry ........................... |
24 |
|
|
3.2.2 Transfer an external call to another |
19 |
5.2 |
5.1.4 Delete entire calls list ............................. |
24 |
|
|
|
3.2.3 ................................................. |
handset |
Redial ................................................................. |
24 |
||
|
3.3 |
Three - party conference call |
19 |
|
5.2.1 View the redial list .................................. |
24 |
|
|
Voicemail ........................................................... |
19 |
|
5.2.2 Copy a redial number to the phonebook .. |
25 |
||
|
|
3.3.1 ....................Clear voice mail indication |
19 |
|
5.2.3 Delete a redial list entry ......................... |
25 |
|
4. |
Phonebook |
20 |
|
5.2.4 Delete entire redial list ........................... |
25 |
||
|
|
|
|||||
|
4.1 |
View an ....................................................Entry |
20 |
|
|
|
|
4

6. Personal Settings ......................................... |
25 |
|
6.1 |
Set Date & Time ................................................. |
25 |
6.2 |
Handset Tones ................................................... |
26 |
|
6.2.1 Set the ringer tone ................................. |
26 |
|
6.2.2 Set the ringer volume ............................ |
26 |
|
6.2.3 Key tone on/off ...................................... |
26 |
|
6.2.4 Battery low tone on/off ........................... |
26 |
6.3 |
6.2.5 No coverage tone on/off ........................ |
26 |
Handset Name ................................................... |
27 |
|
6.4 |
Set the Display Language .................................. |
27 |
6.5 |
Set the LCD Contrast ......................................... |
27 |
6.6 |
Auto Talk On/Off................................................. |
27 |
6.7 |
Registration ........................................................ |
27 |
7. Advanced Base Settings ............................. |
28 |
|
7.1 |
Set the Dial Mode............................................... |
28 |
7.2 |
Set the Flash Time ............................................. |
28 |
7.3 |
Set the Area Code.............................................. |
29 |
7.4 |
Reset All Settings ............................................... |
29 |
8. Using your Answering Machine.................. |
29 |
||
8.1 |
Play Messages ................................................... |
29 |
|
8.2 |
Delete All Messages........................................... |
31 |
|
8.3 |
Announcement ................................................... |
31 |
|
|
8.3.1 |
Record the announcement .................... |
31 |
|
8.3.2 |
Play the announcement ......................... |
31 |
8.4 Answering Machine Settings.............................. |
32 |
|
8.4.1 Set the answer mode ............................. |
32 |
|
8.4.2 |
Message alert on/off .............................. |
32 |
8.4.3 Set the number of rings ......................... |
32 |
|
8.4.4 |
Record a memo ..................................... |
32 |
8.4.5 |
Call screening on/off .............................. |
33 |
8.4.6 |
Remote access ...................................... |
33 |
8.4.7 Set the remote code .............................. |
34 |
|
9. Default Settings ......................................................... |
35 |
|
10. Help ............................................................... |
|
35 |
11. General Information..................................... |
37 |
|
5

1. Getting started
WARNING
Do not place your phone in the bathroom or other humid areas.
Location
When choosing a location for your new phone, here are some important guidelines you should consider:
•Avoid sources of noise and heat, such as motors, fluorescent lighting, microwave ovens, heating appliances and direct sunlight.
•Avoid areas of excessive dust, moisture and low temperature.
•Avoid other cordless telephones or personal computers.
•Never install telephone wiring during a lightning storm.
•Never install telephone jacks in wet locations unless the jack is specifically designed for wet locations.
•Never touch non-insulated telephone wires or terminals unless the telephone line has been disconnected at the network interface.
•Use caution when installing or modifying telephone lines.
HANDSET RANGE
Optimal range is reached when there are no other electrical appliances working within the range area. Any obstruction between the base and handset will also reduce the range significantly.
SIGNAL STRENGTH
When out of range of the base, the screen shows Searching.... If you are on a call, the line will hang up. Move back within in range. The handset will automatically re-connect to the base.
Setting up
IMPORTANT
The base must be plugged into the electrical outlet at all times. Do not connect the telephone line cord into the wall jack until the handset is fully charged. Only use the power adapter and telephone line cord supplied with the product.
WHICH POWER ADAPTER
The power adapter with the smaller round pin plug is for the base unit and the power adapter with the bigger round pin plug is for the charger unit.
6 |
Getting started |
|
|

Connecting the base |
Install and charge the handset battery pack |
1.Plug the power adapter with smaller pin plug & telephone line cord into the base. Power adapter with bigger pin plug is for charger (for multi-handset pack only).
2.Plug the other end of the power adapter & telephone line cord into the wall jack.
3.Always use the telephone line cord provided in the box.
4.Use only the provided power adapter.
Getting started
1.Slide out the battery compartment cover.
2.Place the supplied rechargeable battery pack in the battery compartment, with the battery connector plugged in, as shown.
3.Slide the battery compartment cover back.
4.Put the handset on the base to charge for at least 24
hours. When the handset is fully charged the  will indicate that it is fully charged.
5.Use only the rechargeable battery pack provided.
7

BATTERY LOW WARNING
If the  flashes in the display, you will need to recharge the handset before you can use it again. During charging, the
  will scroll in the display.
BATTERY PERFORMANCE
In ideal conditions, a fully charged battery pack should give up to 10 hours talk time or up to 160 hours standby time on a single charge.
Note that new battery packs do not reach full capacity until they have been in normal use for several days.
To keep your battery packs in the best condition, leave the handset off the base for a few hours at a time.
Running the battery packs all the way down at least once a week will help them last as long as possible.
The charge capacity of rechargeable battery packs will reduce with time as they wear out, giving the handset less talk/standby time. Eventually they will need to be replaced.
After charging your handset for the first time, subsequent charging time is about 6-8 hours a day. The battery pack and handset may become warm during charging. This is normal.
8
Getting started

2. Getting to know your phone
Overview of your handset
Getting to know your phone
1Scroll up/ Volume up
In menu mode: press to scroll up.
In editing mode: press to move cursor to the left. During a call, press to increase volume.
Calls list/phonebook/redial list entry: press to scroll up the list. In answering machine mode: press to increase volume.
2Right soft key (Menu/Select)
In idle mode: press to access menu list.
In menu/editing mode: press to confirm and save the settings. During a call: press to hold a call.
In phonebook/calls list entry: press to access the sub-menu list.
3Right/ Calls list
In idle mode/during a call: press to access calls list. In editing mode: press to move the cursor to the right.
4Scroll down/ Volume down/ Redial list
In idle/pre-dial mode: press to access redial list. In menu mode: press to scroll down.
In editing mode: press to move cursor to the right. During a call, press to decrease volume.
Calls list/phonebook/redial list entry: press to scroll down the list. In answering machine mode: press to decrease volume.
5Talk off/ Back
In menu/editing mode/phonebook entry: press to exit to previous level.
9

In pre-dial mode/calls list/redial list entry/answering machine mode: press to exit to idle.
During a call: press to end a call.
6Alphanumeric keypad
In idle/pre-dial/editing mode/during a call: press to enter characters/numbers. Long press to activate speed dial.
7#/ Pause/ ABC/ Format
In idle/pre-dial/number editing mode/during a call: Press to insert a "#", press and hold to insert a pause.
In name editing mode: press to toggle ABC/Abc/abc.
In calls list entry: press to toggle Caller ID display format between 7, 8, 10 and 11 digits.
8Intercom
In idle mode/during a call: press to initiate an intercom call.
9Microphone
10Speaker
In idle/menu/pre-dial mode/during a call: press to turn on/off the speakerphone.
Calls List/phonebook/redial list entry: press to make a call with speakerphone.
In answering machine mode: press to toggle the message playback via earpiece/speakerphone.
11*/ Tone
In idle/pre-dial/editing mode: press to insert a "*". During a call: press to switch from pulse to tone dialing
10
temporarily if pulse mode was selected before. After the call is ended, the dial mode will change back to pulse.
12Talk on/ Flash
In idle/menu/pre-dial mode: press to make a call.
Calls List/phonebook/redial list entry: press to make a call to the selected entry.
During a call: press to make a flash. During ringing: press to answer a call.
13Left/ Phonebook
In idle mode/during a call: press to access the phonebook. In editing mode: press to move the cursor to the left.
14Left soft key (Answering machine/Mute/Clear)
In idle mode: press to play the voice prompt of answering machine main menu.
In menu mode: press to exit to previous level.
In pre-dial/editing mode: press to delete one character/digit. Long press to delete all characters/digits.
During a call: press to mute/unmute the call. In calls list entry: press to delete the entry.
In phonebook entry: press view entry or add new entry when phonebook is empty.
In answering machine mode: press to delete the current message playback.
15Earpiece
Getting to know your phone
Handset LCD display
Display icons
On when speakerphone is turned on.
On when ringer volume is turned off.
On when answering machine is turned on. Flashes when new answering machine message is received.
On when there is new voice mail not yet listened to. Off when new voice mail has been listened to.
Muted On when a call is muted.
Indicates when new call is received.
Off when new call has been viewed.
Flashes when low battery level is detected, needs charging.
1/3 battery power level.
2/3 battery power level.
Full battery power level.
Animation in cycle. Battery is charging.
Getting to know your phone |
11 |
|
|
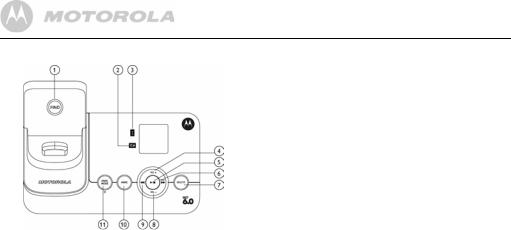
Overview of the base
1FIND
Press to find/page all registered handsets.
2Charging LED - Green
Steadily ON: When the handset is put into base cradle for charging.
3In Use LED - Red
Steadily ON: During a call or when an extension phone (another registered handset) or the built-in answering machine is off hook.
Flashing at a rate similar to the incoming ring pattern: During an incoming call.
Flash at a rate of 0.5s on and 0.5s off for 2 minutes: During paging / Registration.
4VOLUME +
Increase the loudspeaker volume by one level (0 to 8) in idle, during message playback or during call screening.
5PLAY/ STOP
In message playback mode: Press to playback or stop playing messages.
6SKIP FORWARD/ MEMO
Press to skip to play the next message.
In Idle: Press and hold to hear a voice prompt for recording a memo and then start to record a memo. Release key to stop recording memo.
7DELETE
During message playback: Delete the current message. In Idle: Press and hold to erase all read messages (applicable only when messages in answering machine are all read, new message(s) will not be deleted.)
12 |
Getting to know your phone |
|
|

8VOLUME -
Decrease the loudspeaker volume by one level (0 to 8) in idle, during message playback or during call screening.
9SKIP BACKWARD
Press twice or press once within 4 seconds, counting from the beginning of date/time stamp, to playback the previous message.
Press once after 4 seconds, counting from the beginning of date/time stamp, to replay current message from the beginning.
10ANNOUNCE
In Idle: Short press to play the current announcement.
In Idle: Press and hold to hear a voice prompt of how to record the personalized announcement of the current answer mode, release key to stop recording.
11ANSWER ON/OFF/ ANSWER MODE
Press to toggle answering machine mode between Answer Off, Announce Only and Annc & Record mode.
2-digit 7-seg Behavior Base display
--Answering machine is OFF.
00Steadily ON: No voice messages in answering machine.
09Flash in idle: Indicates the number of answering machine messages and that there is an unread message. (e.g. there are 9 answering machine messages in total. Total number of messages is from 1 to 59.)
Flash during message playing: The selected answering machine message is being played.
Steadily On: All the new messages have been read and there are 9 answering machine messages in total.
FFlashing: Answering machine memory is full.
CL Flashing - -: Time is not set and there are old voice messages kept in the answering machine memory only (no new voice messages).
Getting to know your phone |
13 |
|
|

-- |
Blinking between -- |
|
: Personalized |
-- |
--/ |
09 |
|
--/09 |
-- |
|
|
|
announcement or memo is being recorded. The |
||
|
numbers (e.g.09) indicate the total number of |
||
|
messages in answering machine when playing |
||
|
announcement. |
|
|
In |
Flashing: Indicates an incoming call / recording |
||
|
of an incoming call. |
|
|
An |
Steadily ON: Represents Announce Only mode. |
||
LA |
Flashing: Line Remote access is in progress. |
||
LA/09 |
Blinking between LA/09: Remote access is in |
||
|
progress and the numbers (e.g.09) indicate the |
||
|
total number of messages. |
||
L3 |
Steadily ON: Indicates the base speaker volume |
||
|
level is 3. Nine volume levels from L0 to L8 are |
||
provided (L0 means ringer off). L3 disappears after 3 seconds.
Paging is a useful way of finding lost handsets.
1.Press von the base.
- All handsets ring.
2.To stop the paging call, press vagain, or place the handset on the cradle or press any key on the handset.
Navigating the menus
1.Press P.
2.Press ,to scroll through the menu.
3.Press Pto open a sub-menu or validate an option.
Press >to go back to previous menu level or cancel an action.
If you do not press any button on the handset for 30 seconds the display will automatically return to standby. It will also return to standby when the handset is placed on the base or charger.
14 |
Getting to know your phone |
|
|

Menu map
Main Menu |
|
Date & Time |
|
Phonebook |
|
Setup Handset |
|
Setup Base |
|
Answer Machine |
|
Reset Settings |
Sub menu |
|
Set Time |
|
Add |
|
Ringer Tone |
|
Dial Mode |
|
Answer Mode |
|
Clear Voice Mail |
|
|
Set Date |
|
Edit |
|
Ringer Volume |
|
Flash Time |
|
Announcement |
|
All Settings |
|
|
|
|
Delete |
|
Key Tone |
|
Area Code |
|
Record Memo |
|
|
|
|
|
|
Delete All |
|
Battery Low Tone |
|
|
|
Message Alert |
|
|
|
|
|
|
PB Capacity |
|
No Coverage Tone |
|
|
|
Number of Rings |
|
|
|
|
|
|
Speed Dial |
|
Handset Name |
|
|
|
Call Screening |
|
|
|
|
|
|
Copy Phonebook |
|
Language |
|
|
|
Remote Access |
|
|
|
|
|
|
|
|
LCD Contrast |
|
|
|
Remote Code |
|
|
|
|
|
|
|
|
Auto Talk |
|
|
|
|
|
|
|
|
|
|
|
|
Registration |
|
|
|
|
|
|
Getting to know your phone |
15 |
|
|

Character map
Uppercase |
Lowercase |
Key |
|
Character versus key press number |
|
|||||
1 |
space |
1 |
# |
‘ |
, |
- |
. |
& |
2 |
A |
B |
C |
2 |
|
|
|
|
3 |
D |
E |
F |
3 |
|
|
|
|
4 |
G |
H |
I |
4 |
|
|
|
|
5 |
J |
K |
L |
5 |
|
|
|
|
6 |
M |
N |
O |
6 |
|
|
|
|
7 |
P |
Q |
R |
S |
7 |
|
|
|
8 |
T |
U |
V |
8 |
|
|
|
|
9 |
W |
X |
Y |
Z |
9 |
|
|
|
0 |
0 |
|
|
|
|
|
|
|
* |
* |
? |
! |
/ |
( |
) |
@ |
|
#Toggle the letter case - ABC / Abc / abc
Key |
|
Character versus key press number |
|
|||||
1 |
space |
1 |
# |
‘ |
, |
- |
. |
& |
2 |
a |
b |
c |
2 |
|
|
|
|
3 |
d |
e |
f |
3 |
|
|
|
|
4 |
g |
h |
i |
4 |
|
|
|
|
5 |
j |
k |
l |
5 |
|
|
|
|
6 |
m |
n |
o |
6 |
|
|
|
|
7 |
p |
q |
r |
s |
7 |
|
|
|
8 |
t |
u |
v |
8 |
|
|
|
|
9 |
w |
x |
y |
z |
9 |
|
|
|
0 |
0 |
|
|
|
|
|
|
|
* |
* |
? |
! |
/ |
( |
) |
@ |
|
#Toggle the letter case - ABC / Abc / abc
16 |
Getting to know your phone |
|
|
 Loading...