


 Loading...
.......
r370/r470
Handheld Portable
0 |
r370/r470 GETTING STARTED |

Table of Contents |
|
INTRODUCTION |
|
Your r370/r470 Handheld Portable ......................................... |
1 |
Feature Locator ....................................................................... |
2 |
Battery ...................................................................................... |
4 |
Charging Your Battery ........................................................ |
4 |
Attaching Your Battery ....................................................... |
4 |
Detaching Your Battery ..................................................... |
4 |
Installing Your Antenna ..................................................... |
4 |
Display Icons ........................................................................... |
5 |
Powering On ............................................................................ |
6 |
Powering Off ............................................................................ |
6 |
Mode ........................................................................................ |
7 |
Menu ........................................................................................ |
8 |
Menu Options........................................................................... |
8 |
Selecting............................................................................... |
8 |
Scrolling................................................................................ |
8 |
GROUP CALL |
|
Making a Group Call ............................................................... |
9 |
Changing Talkgroups .............................................................. |
9 |
Receiving a Group Call ........................................................... |
10 |
Area Selection .......................................................................... |
10 |
Group/Private Speaker ............................................................ |
10 |
PRIVATE CALL |
|
Making a Private Call .............................................................. |
11 |
Direct Entry Method .......................................................... |
11 |
Scroll Method ...................................................................... |
11 |
Alpha Method...................................................................... |
11 |
Receiving a Private Call .......................................................... |
12 |
Call Alert™ .............................................................................. |
12 |
Sending a Call Alert ........................................................... |
12 |
Receiving a Call Alert ........................................................ |
12 |
Private Call (Radio ID) List Programming ........................... |
13 |

 r
r

 370/
370/

 r
r

 470
470


 GETTING STARTED

Table of Contents |
|
PHONE |
|
Making a Phone Call ............................................................... |
15 |
Direct Dial Method ............................................................. |
15 |
Scroll Method....................................................................... |
15 |
Speed Dial Method ............................................................. |
16 |
Alpha Method ...................................................................... |
16 |
Automatic Redial ..................................................................... |
16 |
Last Number Redial ................................................................ |
16 |
Receiving a Phone Call ........................................................... |
16 |
Call Forwarding ........................................................................ |
17 |
Selecting a Call Forward Number...................................... |
17 |
Unconditional Call Forwarding .......................................... |
17 |
Conditional Call Forwarding............................................... |
18 |
Call Waiting .............................................................................. |
18 |
Call Hold .................................................................................. |
19 |
Recall/Edit Your Own Phone # ............................................... |
19 |
Phone List Programming ......................................................... |
20 |
Additional Phone Information ................................................. |
21 |
Burst DTMF Dial and Overdial ....................................... |
21 |
Call Forward Recall (Rcl#) ................................................ |
21 |
Microphone Muting/Unmuting ........................................ |
22 |
One-Minute Beep .............................................................. |
22 |
MESSAGING SERVICES |
|
Message Mail™......................................................................... |
23 |
Receiving New Message Mail ........................................... |
23 |
Retrieving Stored/Unread Mail .......................................... |
23 |
Saving/Erasing Mail ............................................................ |
24 |
Auto Call Back .......................................................................... |
24 |
Message Full ............................................................................. |
24 |
VOICE MAIL |
|
Retrieving Voice Mail............................................................... |
25 |
Viewing Voice Mail Status ...................................................... |
25 |
PROGRAMMING |
|
Programming Menu.................................................................. |
27 |


 r
r

 370/
370/

 r
r

 470
470


 GETTING STARTED

Table of Contents |
|
ADVANCED FEATURES (r470) |
|
Multi-Simultaneous Talk Group Scan .................................. |
33 |
Powering On ...................................................................... |
33 |
Initiating a Group Call ...................................................... |
34 |
Responding to a Secondary Talkgroup ............................ |
35 |
Turning Scan On and Off .................................................. |
36 |
Talkgroup Mode Selection by Direct Entry ................... |
36 |
Talkgroup Mode Selection by Memory Scroll ................ |
37 |
Emergency Group Call ............................................................ |
38 |
Placing an Emergency Group Call ................................... |
38 |
Cancelling an Emergency Group Call ............................. |
38 |
Receiving an Emergency Group Call .............................. |
38 |
Receiver Operations During an Emergency Call ........... |
39 |
Status Message ........................................................................ |
40 |
Entering the Status Message Function ........................... |
40 |
Selecting a Status Message with Direct Entry ................. |
40 |
Selecting a Status Message Using Memory Scroll .......... |
41 |
Selecting a Target by Direct Entry .................................. |
41 |
Selecting a Target by Memory Scroll .............................. |
41 |
Selecting a Target by Alpha Search ................................. |
42 |
Sending a Status Message ................................................. |
42 |
Exiting the Status Message Function .............................. |
43 |
Receiving a Status Message .............................................. |
43 |
ID List Programming ........................................................ |
43 |
Isolated Site Operation .......................................................... |
44 |
Entering ISO ...................................................................... |
44 |
Initiating a Group Call ...................................................... |
45 |
Exiting ISO ........................................................................ |
45 |
Other Operations ............................................................... |
46 |
TROUBLESHOOTING |
|
Error Messages.......................................................................... |
47 |
SAFETY AND GENERAL INFORMATION |
|
Safety and General Information ............................................. |
49 |
Cleaning Instructions ............................................................... |
53 |
For Further Information .......................................................... |
53 |
, Motorola, iDEN, and Call Alert are all trademarks of Motorola, Inc. |
|
Message Mail is a service mark of Motorola, Inc. |
|
r370/r470 GETTING STARTED |
|

 Introduction
YOUR r370/r470 HANDHELD PORTABLE
Your r370/r470 handheld portable has features to keep you in contact with anyone at anytime. Its features make it the most versatile communication device on the market today. The main features are:
▲ GROUP CALL
▲ PRIVATE CALL
▲ PHONE
▲ MESSAGE MAIL
▲ VOICE MAIL
▲ FAX/DATA (r470 ONLY)
▲ ADVANCED FEATURES (r470 ONLY)
This guide explains the features most people use every day on the r370/r470. The advanced features that are provided in the r470 are described in the Advanced Features (r470) section. We describe these features as they were set up by Motorola. Additionally, your service provider may offer 9.6/4.8 kbs Fax and data support. For information on the data functionality of your r470, please refer to the Circuit Data User’s Guide (publication number 68P81084C18).
Your service provider and your organization may have customized your portable to optimize its use for your individual needs. Check with your service provider or organization to find out the differences from this guide.
Introduction
Additional information for your r370 and r470 Handheld Portable can be found on the iDEN web site: http://www.mot.com/LMPS/iDEN
r370/r470 GETTING STARTED |
1 |

Introduction
Introduction
FEATURE LOCATOR
16a. (r370) Group/Private |
|
Speaker Key |
1. Antenna |
16b. (r470) Orange |
|
Emergency Button |
|
2. Earpiece
15.Volume Control Keys
14.Push-To-Talk (PTT) Button
13.MENU Key
12.LED
|
MENU |
Pwr |
Mode SEND |
END |
3.Alphanumeric Display
4.Option Keys
5.Scroll Keys
6.SEND Key
11. |
Power/END |
1 |
2ABC |
3 DEF |
|
|
|
Key |
4 GHI |
5 JKL |
6MNO |
7. Mode Key |
|
10. Alphanumeric |
||||||
7 PQRS |
8 TUV |
9WXYZ |
|
|||
|
Keypad |
|
||||
|
|
|
0 |
|
|
|
9. |
Speaker |
|
|
|
8. Microphone |
|
|
|
|
|
|
||
2 |
r370/r470 GETTING STARTED |

 Introduction
1.Antenna - Install before using your unit.
2.Earpiece - Used to listen during phone calls and Group/Private low-audio communication.
3.Alphanumeric Display - A four-line display, providing up to 12 characters per line.
4. Option Keys 
 - Lets you select the option that appears directly above the key on the fourth line of the display.
5. Scroll Keys |
- Lets you scroll through options and lists |
that appear in the top three lines of the display, such as Phone, |
|
Group, or Private Call lists. |
|
6. SEND Key |
SEND - Initiates outgoing phone calls. Also used to |
answer an incoming phone call.
7.Mode Key Mode - Used to change between Phone, Group, and Private modes.
8.Microphone - Speak into during communications.
9.Speaker - Used to listen to high-audio Group and Private conversations.
10.Alphanumeric Keypad - Used to enter telephone numbers, Private Call IDs, and alpha-numeric characters.
11. Power/END Key Pwr - Used to turn the portable on and off
END
and to end phone calls.
12.LED - Indicates the service state. See page 6 for description of states.
13.MENU Key MENU - Lets you scroll through the menu options available on the last line of the display within each mode.
14.Push-To-Talk (PTT) Button - Lets you transmit a Group or Private call, or Call Alert. Press and hold the PTT to talk, release to listen.
15.Volume Control Keys - Lets you adjust volume levels.
16a. Group/Private Speaker Key  - Lets you choose to hear audio through earpiece or speaker during Group and Private calls.
16b. Orange Emergency Key - Used for emergency group calls.
r370/r470 GETTING STARTED |
3 |
Introduction

Introduction
Introduction
BATTERY
Charging Your Battery
You should charge your portable battery for at least 16 hours before initial use. This allows your battery to achieve its maximum capacity and life.
Place the battery in the charger as illustrated. You can also place the portable in the charger with the battery attached.
Attaching Your Battery |
Engraved Arrows |
|
Attach the charged battery to |
||
|
||
your portable by aligning the |
|
|
battery with the engraved |
|
|
arrows on the portable. Slide |
|
|
the battery upward until you |
|
|
hear an audible click. |
|
Detaching Your Battery
To detach the battery, pull back on the release button near the top of the battery and slide battery downward.
ANTENNA
Installing Your Antenna
Turn your unit off before installing or removing the antenna.
Insert the bottom of the antenna into the screw-in base on the top of the unit. Turn clockwise by hand until snug. Do not force.
4 |
r370/r470 GETTING STARTED |
Introduction
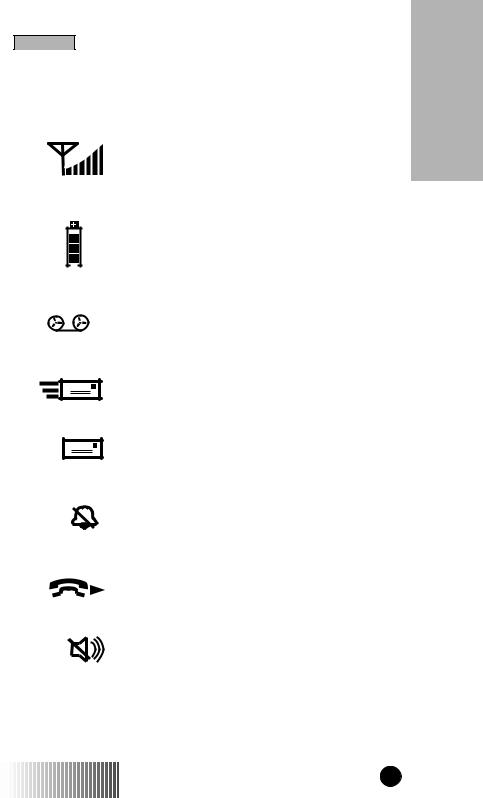
DISPLAY ICONS
Display icons appear along the top of your display and show the following:
Signal Strength Indicator
Shows the signal strength. Calls and messages may not be sent or received in weak signal areas. Six bars indicates the strongest signal.
Battery Strength Indicator
Shows the remaining charge in your battery. Three bars show full charge. The indicator will flash when you have less than five minutes of talk time.
Voice Mail
Indicates that unplayed messages are waiting in your voice mail box.
New Message Mail
Indicates that you have new text messages in your mail box.
Unread Message Mail
Indicates that you have unread Message
Mail.
Silent Ringer
Indicates that the phone ringer volume is off.
Call Forward
Shows that incoming phone calls are being fowarded.
Group/Private Speaker
Indicates that the Group/Private Speaker is off and audio will be heard through the earpiece.
r370/r470 GETTING STARTED |
5 |
Introduction

Introduction
Introduction
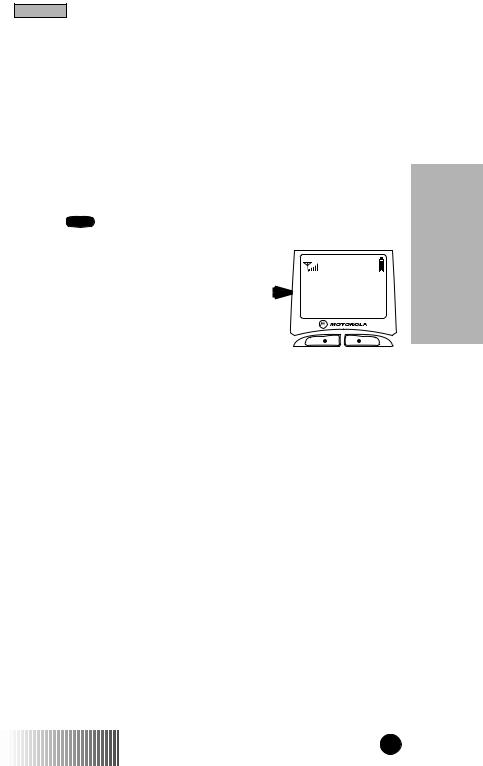
POWERING ON
Press Pwr until a set of icons and squares appears on your
END
display (for a description of the icons, see page 5).
“Please Wait” is displayed while the unit is registering on the system.
Please Wait
The LED indicator located next to the in-service states of your portable:
END |
button shows the |
Pwr |
|
▲ ▲ ▲ ▲
FLASHING RED............. |
REGISTERING |
SOLID RED................... |
NO SERVICE |
flASHING GREEN......... |
IN SERVICE |
SOLID GREEN............... |
IN USE |
If registration is successful, the LED indicator will flash green and the “Phone Ready” message will be displayed.
Phone Ready
Spd# Mail
You can now place and receive Phone, Group, and Private calls.
If the unit cannot register on the system, the LED indicator will flash red. The unit will continue to attempt registration approximately every two minutes as long as you keep the unit on.
POWERING OFF
Press and hold Pwr until you hear an audible beep and the mes-
END
sage “Powering Off” is displayed.
6 |
r370/r470 GETTING STARTED |
Introduction
MODE
Press Mode to switch between Phone, Group, and Private Call modes.
Your display will appear similar to the following default screens for the Phone, Group, and Private Call modes when your portable is In Service. If the word Ready does not appear after the mode name in the display, your unit is Out of Service.
Phone Mode
Introduction
Phone Ready
Spd# Mail
|
Group Call Mode |
Group Ready |
Group Ready |
Plumbers |
1:Plumbers |
Area Mail |
S Off Sts |
r370 |
r470 |
Private Call Mode
Prvt Ready
JUDY
Alert Mail
r370/r470 GETTING STARTED |
7 |

Introduction
Introduction
MENU
Each mode has several menu options, e.g. Speed Dialing in Phone Mode, Area selection in Group Mode, and Call Alert in Private Mode.
These menu options appear in the last line of your display. 
Phone Ready
Spd# Mail
MENU OPTIONS
Selecting
Press the Option Key 
 located under the displayed menu option that you wish to select.
Scrolling
Use the MENU key to scroll through the features in each mode. The menu options appear in pairs with the exception of “Wait” in Phone Mode.
Group Mode Menu Options
Area |
S Off |
Sts |
|
Alert |
Prgm |
Area |
|
|
|
Alert |
Prgm |
|
r370 |
|
r470 |
Private Mode Menu Options |
|
|
|
Alert |
Alert |
||
Alpha |
Prgm |
Alpha |
Prgm |
|
|
Sts |
|
|
r370 |
|
r470 |
Phone Mode Menu Options |
|
|
|
|
Spd# |
|
|
|
Forwd |
Alpha |
|
|
Memo |
Prgm |
|
|
Wait |
|
|
8 |
r370/r470 |
GETTING STARTED |
|
Group Call
GROUP CALL (r370)
A Group Call is an instant communication between you and others in a selected talkgroup.
A talkgroup is a pre-defined set of individuals who share a common communication need. Talkgroups appear on your display as names or numbers, e.g. Sales, Service, Electricians, Talkgrp10.
MAKING A GROUP CALL
1. Press Mode until “Group Ready” is displayed. This is the Group Call mode default display.
Your active talkgroup is displayed, such as Plumbers in this example. 
2.To initiate the call to this talkgroup, press and hold the PTT (Push to Talk) button. Wait for the chirp sound and then speak into the microphone.
3.Release the PTT to listen.
CHANGING TALKGROUPS
Group Ready
Plumbers
Area Mail
You may change talkgroups to reach talkgroups other than the one that is active. Your portable can store up to 30 pre-defined talkgroups.
1.From the Group Call mode, press  or
or  to select the talkgroup. You can also select the talkgroup by the direct entry method.
2.Press  under “Ok”.
3.Press the PTT to initiate the call.
Call Group
r370/r470 GETTING STARTED |
9 |

Group Call
Group Call
RECEIVING A GROUP CALL
No action is necessary to receive a Group Call as long as your unit is idle (not engaged in an active Phone or Private Call).
Any communication activity within the talkgroup you’ve selected will cause your unit to automatically switch into Group Mode and receive the transmission as long as your portable is powered on.
AREA SELECTION
When in Group mode, you may select to send your communication to only those talkgroup members in a specific location. This is useful when you know where the individuals (that you wish to reach) are located within the service area. Your unit can be programmed with up to 50 targeted areas. Targeted areas can be aliased (named) for easy identification.
1.Press Mode until you see “Group Ready” on your display. Additionally, for the r470, press MENU until you see “Area”.
2.Press  under “Area”.
3.Press  or
or  to scroll through the targeted areas specified by your local service provider.You can also select the talkgroup by the direct entry method.
4.Press  under “Ok” to select the targeted area. The area selected will appear on the last line of your display.
Your unit will remain in the area setting that you choose until you change modes from Group Call to Private Call or Phone.
GROUP/PRIVATE SPEAKER
Your portable lets you choose to hear the audio through the earpiece or the speaker in Group and Private modes. If the Group/Private Speaker is set on, incoming audio will be heard through the speaker. This is helpful in monitoring talkgroups.
If the Group/Private Speaker is set off, a brief alert tone will notify you of activity within the talkgroup or Private Call. Incoming audio will be heard through the earpiece.
Press  (located on top of your unit) to turn the Group/Private Speaker on or off.
10 |
r370/r470 GETTING STARTED |

Private Call
PRIVATE CALL
A Private Call is a one-to-one communication between two individuals instead of a talkgroup. Each unit is identified by a name or number up to 5 digits in length.
MAKING A PRIVATE CALL
Direct Entry Method
1. Press Mode until you see “Prvt Ready” on your display. This is the Private Call default display. 
2.Enter the Private Call ID of the person you want to reach using the alphanumeric keys.
3.Press and hold the PTT (Push-To-Talk) button, wait for the chirp and then speak into the microphone.
Scroll Method
Prvt Ready
Alert Mail
1.Press  or
or  to select the person with whom you want to have a Private Call.
2.Press and hold the PTT (Push-To-Talk) button and speak into the microphone.
Alpha Method
1.Press the MENU key until you see the “Alpha” menu option on the last line of your display.
2.Press the  key under “Alpha”.
3.Press the numeric key with the first letter of the name.
4.Press  or
or  to scroll through the list.
5.Press and hold the PTT (Push-To-Talk) button.
Call Private
r370/r470 GETTING STARTED |
11 |

Private Call
Private Call
RECEIVING A PRIVATE CALL
You will hear a brief alert tone when you have an incoming Private Call.
Your unit will automatically switch to Private Call mode and the Private Call ID or name of the caller will be displayed.
Wait for the caller to finish speaking, then press and hold the PTT. Begin speaking after you hear the chirp.
CALL ALERT
You can access Call Alert from the Group and Private modes. Call Alert lets you privately page an individual by sending an audible page.
Sending a Call Alert
1. Press MENU until you see “Alert” on your display.
2.Press  under ”Alert”.
3.Press  or
or  to scroll to the person to whom you want to send the Call Alert. You may also select the person by using Alpha Search or by entering the numeric ID.
4.Press the PTT to send the Call Alert.
Receiving a Call Alert
When you receive a Call Alert, you will hear a recurring tone, and see a message on your display.
1.Press the PTT to return the Call Alert.
2.Press  under “Clear” to clear the Call Alert, or press any key other than the PTT to silence the recurring tone, but keep the alert on the display.
NOTE: Until the Call Alert is cleared or returned or the Mode key pressed, you will be blocked from receiving any additional Phone, Group, or Private Calls. Pressing any key other than the Mode key will only silence the tones.
12 |
r370/r470 GETTING STARTED |

Private Call
PRIVATE CALL (RADIO ID) PROGRAMMING
You can add radio IDs to your Private Call list and store them with names or aliases.
1. Press |
, |
, 2ABC , 1 |
and then press “Ok”. |
2. Select the type of edit you want to perform:
ADD • To add a new entry press  under “Ok”.
EDIT • To edit an existing number, press  once and then press
  under “Ok”.
ERASE • To erase an existing number, press  twice and then press
  under “Ok”.
3.Enter the radio ID (up to 5 digits) and press  under “Store”.
4. Enter the name or alias you want associated with this radio ID and press  under “Store”.
▲PRESS THE NUMBER KEY ONCE FOR THE fiRST LETTER ASSOCIATED WITH THE KEY (2=A).
▲FOR THE SECOND LETTER OF THE KEY, PRESS THE KEY TWICE (2=B).
▲FOR THE THIRD LETTER OF THE KEY, PRESS THE NUMBER KEY THREE TIMES (2=C).
▲FOR THE NUMBER OF THE KEY, PRESS THE NUMBER KEY FOUR TIMES (2=2). FOR KEYS WITH FOUR LETTERS, PRESS THE KEY fiVE TIMES.
▲PRESS THE SCROLL KEYS TO MOVE TO THE NEXT OR PREVIOUS LETTER.
5. When you have entered all the new radio IDs that you want, press  under “Exit”.
6. Press  under “Exit”.
Call Private
r370/r470 GETTING STARTED |
13 |

14 |
r370/r470 GETTING STARTED |
Loading...