


 Loading...
D C P 5 0 0 S e r i e s
D C P 5 0 1
H o m e T h e a t e r S y s t e m
U s e r G u i d e
CAUTION
RISK OF ELECTRIC SHOCK
CAUTION: TO REDUCE THE RISK OF ELECTRIC SHOCK,
DO NOT REMOVE COVER (OR BACK).
NO USER-SERVICEABLE PARTS INSIDE.
REFER SERVICING TO QUALIFIED SERVICE PERSONNEL.
Graphical symbols and supplemental warning marking locations on bottom of terminal.
WARNING
TO PREVENT FIRE OR SHOCK HAZARD, DO NOT EXPOSE THIS APPLIANCE TO RAIN OR MOISTURE.
CAUTION
TO PREVENT ELECTRICAL SHOCK, DO NOT USE THIS (POLARIZED) PLUG WITH AN EXTENSION CORD, RECEPTACLE, OR OTHER OUTLET UNLESS THE BLADES CAN BE FULLY INSERTED TO PREVENT BLADE EXPOSURE.
The lightning flash with arrowhead symbol, within an equilateral triangle, is intended to alert the user to the presence of uninsulated “dangerous voltage” within the product’s enclosure that may be of sufficient magnitude to constitute a risk of electric shock to persons.
The exclamation point, within an equilateral triangle, is intended to alert the user to the presence of important operating and maintenance (servicing) instructions in the literature accompanying the appliance.
This installation should be made by a qualified service person and should conform to all local codes.
REPAIRS
If you find the unit in need of repair, contact your cable system operator for repair or replacement.
NOTE TO CATV SYSTEM INSTALLER
This reminder is provided to call the CATV system installer’s attention to Article 820-40 of the NEC that provides guidelines for proper grounding and, in particular, specifies that the cable ground shall be connected to the grounding system of the building, as close as possible to the point of cable entry as practical.
EXAMPLE OF ANTENNA GROUNDING
Electric serv Ground  equipment clamp

Antenna lead in wire
Antenna 

 discharge unit (NEC Section 810-20)
Grounding |
Grounding conductors |
clamps |
(NEC Section 810-21) |
Power service grounding electrode system
(NEC Article 250, Part H) NEC=NATIONAL ELECTRICAL CODE
Important Safeguards
1Read instructions
All the safety and operating instructions should be read before the appliance is operated.
2Retain instructions
The safety and operating instructions should be retained for future reference.
3Heed warnings
All warnings on the appliance and in the operating instructions should be adhered to.
4Follow instructions
All operating and use instructions should be followed.
5Cleaning
Unplug this product from the wall outlet before cleaning. Do not use liquid cleaners or aerosol cleaners. Use a damp cloth for cleaning.
6Attachments
Do not use attachments not recommended by the product manufacturer as they may cause hazards.
7Water and moisture
Do not use this equipment near water; for example, near a bath tub, wash bowl, kitchen sink, or laundry tub, in a wet basement, or near a swimming pool, and the like.
8Accessories
Do not place this product on an unstable cart, stand, tripod, bracket, or table. The product may fall causing serious injury and serious damage to the appliance. Use only with a cart, stand, tripod, bracket, or table recommended by the manufacturer, or sold with the equipment. Any mounting of the appliance should follow the manufacturer’s instructions, and should use a mounting accessory recommended by the manufacturer.
9Ventilation
Slots and openings in the cabinet are provided for ventilation and to ensure reliable operation of the equipment and to protect it from overheating. The openings should never be blocked by placing the product on a bed, sofa, rug, or similar surface. Equipment should never be placed near or over a radiator or heat register, or in a built-in installation such as a bookcase or rack unless proper ventilation is provided.
10Power sources
This product should be operated only from the type of power sources indicated on the marking label. If you are not sure of the type of power supplied to your home, consult your local power company. For equipment intended to operate from battery power, or other sources, refer to the operating instructions.
11Ground or polarization
This equipment may be equipped with a polarized alternating-current line plug (a plug having one blade wider than the other). This plug will fit into the power outlet only one way. This is a safety feature. If you are unable to insert the plug fully into the outlet, try reversing the plug. If the plug should still fail to fit, contact your electrician to replace your obsolete outlet. Do not defeat the safety purpose of the polarized plug.
12Alternate warnings
This equipment may be equipped with a 3-wire grounding-type plug, a plug having a third (grounding) pin. This pin will only fit into a grounding-type power outlet. This is a safety feature. If you are unable to insert the plug into the outlet, contact your electrician to replace your obsolete outlet. Do not defeat the safety purpose of the grounding-type plug.
13Power cord protection
Power supply cords should be routed so that they are not likely to be walked on or pinched by items placed upon or against them, paying particular attention to cords at plugs, convenience receptacles, and the point where they exit from the appliance.
14Outdoor Antenna Grounding
If an outside antenna or cable system is connected to the equipment, be sure the antenna or cable system is grounded as to provide some protection against voltage surges and built-up static charges. Article 810 of the National Electrical Code, ANSI/NFPA 70, provides information with regard to proper grounding of the mast and supporting structure, grounding of the lead-in wire to an antenna discharge unit, size of grounding conductors, location of antenna-discharge unit, connection to grounding electrodes, and requirements for grounding electrode.
15Lightning
For added protection for this equipment during a lightning storm, or when it is left unattended and unused for long periods of time, unplug it from the wall outlet and disconnect the antenna or cable system. This will prevent damage to the video product due to lightning and power line surges.
16Power lines
An outside antenna system should not be located in the vicinity of overhead power lines or where it can fall into such power lines or circuits. When installing an outside antenna system, extreme care should be taken to keep from touching such power lines or circuits, as contact with them may be fatal.
17Overloading
Do not overload wall outlets and extension cords as this can result in a risk of fire or electrical shock.
Important Safeguards (continued)
18Object and liquid entry
Never push objects of any kind into this equipment through openings as they may touch dangerous voltage points or short-out parts that could result in a fire or electrical shock. Never spill liquid of any kind on the product.
19Servicing
Do not attempt to service this equipment yourself as opening or removing covers may expose you to dangerous voltage or other hazards, refer all servicing to qualified service personnel.
20Damage requiring service
Unplug this equipment from the wall outlet and refer servicing to qualified service personnel under the following conditions: a When the power supply cord or plug is damaged.
b If the equipment has been exposed to rain or water.
c If liquid has been spilled, or objects have fallen into the equipment.
d If the equipment does not operate normally by following the operating instructions. Adjust only those controls that are covered by the operating instructions as an improper adjustment of other controls may result in damage and will often require extensive work by a qualified technician to restore the equipment to its normal operation.
e If the equipment has been dropped or cabinet has been damaged.
f When the equipment exhibits a distinct change in performance, indicating a need for service.
21Replacement parts
When replacement parts are required, be sure the service technician has used replacement parts specified by the manufacturer or have the same characteristics as the original part. Unauthorized substitutions may result in fire, electric shock, or other hazards.
22Safety check
Upon completion of any service or repairs to this video product, ask the service technician to perform safety checks to determine that the product is in proper operational condition.
23Heat
The product should be situated away from heat sources such as radiators, heat registers, stoves, or other products (including amplifiers) that produce heat.
24Telephone equipment
Observe the following precautions when installing telephone modem equipment: a Never install telephone wiring during a lightning storm.
b Never install telephone jacks in a wet location unless the jack is specifically designed for wet locations.
c Never touch uninsulated telephone wires or terminals unless the telephone lines have been disconnected at the network interface.
d Use caution when installing or modifying telephone lines.
25Battery usage
Notwithstanding any information provided by Motorola in this manual regarding the use of batteries, the end user assumes all responsibility and liability to use and dispose of batteries in accordance with all applicable laws, rules and regulations. Motorola will not be liable to anyone for the end user's failure to use and/or dispose of batteries in the proper manner and in accordance with such laws, rules and regulations, or for any defect contained in batteries that may cause injury damage to persons or property.
Regulatory Information
Federal Communications Commission Radio and Television Interface Statement for a Class ‘B’ Device
This equipment has been tested and found to comply with the limits for a Class B digital device, pursuant to part 15 of the FCC Rules. These limits are designed to provide reasonable protection against harmful interference in the residential installation. This equipment generates, uses and can radiate radio frequency energy and, if not installed and used in accordance with the instructions, may cause harmful interference to radio communications. However, there is no guarantee that interference will not occur in a particular installation.
If the equipment does cause harmful interference to radio or television reception, which can be determined by turning the equipment off and on, the user is encouraged to try to correct the interference by one of the following measures:
§Re-orient or relocate the receiving antenna.
§Increase the separation between the equipment and receiver.
§Connect the equipment into an outlet on a circuit different from that to which the receiver is connected.
§Consult the dealer or an experienced radio/TV technician for help.
You may find the following booklet, prepared by the Federal Communication Commission, helpful: How to Identify and Resolve Radio-TV Interference Problems, Stock No. 004-000-0342-4, U.S. Government Printing Office, Washington, DC 20402.
Changes or modification not expressly approved by the party responsible for compliance could void the user’s authority to operate the equipment.

Declaration of Conformity
According to 47 CFR, Parts 2 and 15 for Class B Personal Computers and Peripherals; and/or CPU Boards and Power Supplies used with Class B Personal Computers, Motorola, Inc., 6450 Sequence Drive, San Diego, CA 92121, 1-800-225-9446, declares under sole responsibility that the product identifies with 47 CFR Part 2 and 15 of the FCC Rules as a Class B digital device. Each product marketed is identical to the representative unit tested and founded to be compliant with the standards. Records maintained continue to reflect the equipment being produced can be expected to be within the variation accepted, due to quantity production and testing on a statistical basis as required by 47 CFR 2.909. Operation is subject to the following condition: This device must accept any interference received, including interference that may cause undesired operation. The above named party is responsible for ensuring that the equipment complies with the standards of 47 CFR, Paragraphs 15.107 to 15.109.
Canadian Compliance
This Class B digital apparatus meets all requirements of the Canadian Interference-Causing Equipment Regulations. Cet appareil numérique de la classe B respects toutes les exigences du Règlement sur le matériel brouilleur du Canada.
This product was FCC certified under test conditions that included the use of the supplied cable between system components. NOTE To be in compliance with FCC regulation, the user must use this cable and install it properly.
FCC Part 68 Statement
This equipment complies with part 68 of the FCC rules. On the rear panel of this equipment is a label that contains, among other information, the FCC registration number and ringer equivalence number (REN) for the equipment. If requested, this information must be provided to the telephone company.
The REN is used to determine the quantity of devices that may be connected to the telephone line. Excessive RENs on the telephone line may result in the devices not ringing in response to an incoming call. In most, but not all areas, the sum of the RENs should not exceed five (5.0). To be certain of the number of devices that may be connected to the line, as determined by the total RENs, contact the telephone company to determine the maximum REN for the calling area.
This equipment uses the following USOC jack: RJC. An FCC-compliant telephone cord and modular plug is provided with this equipment. This equipment is designed to be connected to the telephone network or premises wiring using a compatible modular jack that is Part 68 compliant. This equipment cannot be used on telephone company-provided coin services. Connection to Party Line Service is subject to state tariffs.
If this equipment causes harm to the telephone network, the telephone company will notify you in advance that the temporary discontinuance of services may be required. If advance notice isn’t practical, the telephone company will notify the customer as soon as possible. Also, you will be advised of your right to file a complaint with the FCC if you believe it is necessary.
The telephone company may make changes in its facilities, equipment, operations, or procedures that could affect the operation of the equipment. If this happens, the telephone company will provide advance notice in order to maintain uninterrupted service.
If the trouble is causing harm to the telephone system, the telephone company may request that you remove the equipment from the network until the problem is resolved.
It is recommended that the customer install an AC surge arrestor in the AC outlet to which this device is connected. This is to avoid damaging the equipment by local lightning strikes and other electrical surges.
Industry Canada CS-03 Statement
The Industry Canada label identifies certified equipment. This certification means that the equipment meets certain telecommunications network protective, operational and safety requirements as prescribed in the appropriate Terminal Equipment Technical Requirements document(s). The department does not guarantee that the equipment will operate to the user’s satisfaction.
Before installing this equipment, users should ensure that it is permissible to be connected to the facilities of the local telecommunications company. The equipment must also be installed using an acceptable method of connection. The customer should be aware that compliance with the above conditions might not prevent degradation of service in some situations. Only a representative designated by the supplier should coordinate repairs to certified equipment. Repairs or alterations made by the user to this equipment, or equipment malfunctions may give the telecommunication company cause to request the user to disconnect the equipment.
Users should ensure for their own protection that the electrical ground connections of the power utility, telephone lines and internal metallic water pipe system, if present, are connected together. This precaution may be particularly important in rural areas. Users should not attempt to make such connections themselves, but should contact the appropriate electric inspection authority, or electrician, as appropriate.
The Ringer Equivalence Number (REN) of this device is displayed on the product. The REN assigned to each terminal device provides an indication of the maximum number of terminals allowed to be connected to a telephone interface. The termination on an interface may consist of any combination of devices subject only to the requirement that the sum of the Ringer Equivalence Numbers of all devices does not exceed 5. The telephone connection arrangement is a CA11A.

Notes on Copyright
Dolby Digital is manufactured under license from Dolby Laboratories. “Dolby” and the double-D symbol are trademarks of Dolby Laboratories. Copyright © 2002 Dolby Laboratories. All rights reserved.
“DTS” and “DTS Digital” are trademarks of Digital Theater Systems, Inc.
It is forbidden by law to copy, broadcast, show broadcast on cable, play in public, and rent copyrighted material without permission. DVD video discs are copy protected, and any copy made from these discs will be distorted.
This product incorporates copyright protection technology that is protected by certain U.S. patents and other intellectual property rights owned by Macrovision Corporation and other rights owners. Use of this copyright protection technology is authorized by Macrovision Corporation, and is intended for home and other limited viewing uses only unless otherwise authorized by Macrovision Corporation. Reverse engineering or disassembly is prohibited.
Contact Us
For technical support of your DCP Home Theatre System, call Motorola support 1-866-668-2271 or 1-866-MOT-BCS1.
For questions about your cable TV service, call your local cable service provider.
For Motorola consumer cable products, education, and support:
http://www.motorola.com/broadband
Copyright © 2002 by Motorola, Inc.
All rights reserved. No part of the contents of this book may be reproduced or transmitted in any form or by any means without written permission of the publisher.
Motorola reserves the right to revise this publication and to make changes in content from time to time without obligation on the part of Motorola to provide notification of such revision or change. Motorola provides this guide without warranty of any kind, either implied or expressed, including, but not limited, to the implied warranties of merchantability and fitness for a particular purpose. Motorola may make improvements or changes in the product(s) described in this manual at any time.
Motorola and the stylized M logo are registered trademarks of Motorola, Inc. All other product or service marks are the property of their respective owners.

Contents
Introduction .................................................................................................................. |
1 |
Before Operating This Unit................................................................................................................................................................. |
1 |
Before You Begin ................................................................................................................................................................................ |
2 |
Document Conventions ...................................................................................................................................................................... |
2 |
Overview ....................................................................................................................... |
3 |
Features................................................................................................................................................................................................ |
3 |
Supplied Accessories ......................................................................................................................................................................... |
5 |
Disc Information .................................................................................................................................................................................. |
5 |
Types of Discs You Can Use ..................................................................................................................................................... |
5 |
Handling Discs............................................................................................................................................................................ |
6 |
Cleaning Discs ............................................................................................................................................................................ |
6 |
Storing Discs............................................................................................................................................................................... |
6 |
Region Numbers ......................................................................................................................................................................... |
6 |
Front Panel........................................................................................................................................................................................... |
7 |
DCP501 Display ................................................................................................................................................................................... |
9 |
Rear Panel .......................................................................................................................................................................................... |
12 |
Operating the Remote Control ......................................................................................................................................................... |
15 |
Selecting TV and VCR Setup Codes ....................................................................................................................................... |
19 |
Verifying a Setup Code Using Blink Back.......................................................................................................................... |
20 |
Finding a Setup Code ........................................................................................................................................................ |
21 |
Installing Batteries in Remote Control ................................................................................................................................... |
22 |
Installation .................................................................................................................. |
23 |
Before You Begin .............................................................................................................................................................................. |
24 |
Installing the DCP501........................................................................................................................................................................ |
24 |
Recording Your Connections........................................................................................................................................................... |
25 |
Connecting Your TV .......................................................................................................................................................................... |
26 |
S-Video....................................................................................................................................................................................... |
26 |
Video .......................................................................................................................................................................................... |
27 |
Connecting to Cable TV .................................................................................................................................................................... |
28 |
Connecting Your Speakers and Subwoofer ................................................................................................................................... |
29 |
Speaker Placement................................................................................................................................................................... |
29 |
Speaker and Subwoofer Connections.................................................................................................................................... |
30 |
Connecting Speaker Cords................................................................................................................................................ |
30 |
Connecting Your Front Speakers and Active Subwoofer .................................................................................................. |
31 |
Connecting Your Front Speakers and Passive Subwoofer ............................................................................................... |
32 |
Connecting Your Surround and Center Speakers ............................................................................................................. |
33 |
DCP501 User Guide
ii |
Contents |
Connecting Your VCR....................................................................................................................................................................... |
34 |
Video Connections for Your VCR ........................................................................................................................................... |
34 |
S-Video.............................................................................................................................................................................. |
35 |
Video ................................................................................................................................................................................. |
36 |
Audio Connections for Your VCR........................................................................................................................................... |
37 |
Stereo VCR ....................................................................................................................................................................... |
37 |
Mono VCR ......................................................................................................................................................................... |
38 |
Connecting Other Audio/Video Sources................................................................................................................................ |
39 |
Digital Audio Connections ............................................................................................................................................................... |
40 |
Connecting a Tape Deck or CD Player............................................................................................................................................ |
41 |
Connecting the AM and FM Antennas ............................................................................................................................................ |
42 |
Connecting for Power....................................................................................................................................................................... |
43 |
Connecting to the Front Panel......................................................................................................................................................... |
43 |
Operation.................................................................................................................... |
45 |
Before You Begin .............................................................................................................................................................................. |
45 |
Setting Up Audio ............................................................................................................................................................................... |
46 |
Input Setup................................................................................................................................................................................ |
46 |
Subwoofer and Speakers ........................................................................................................................................................ |
49 |
Test Tone Adjust ...................................................................................................................................................................... |
62 |
Advanced Audio Setup............................................................................................................................................................ |
67 |
Using DCP501 Cable TV Functions................................................................................................................................................. |
74 |
Using Cable TV Record............................................................................................................................................................ |
74 |
Using CATV Channel Scan...................................................................................................................................................... |
77 |
Using the DCP501 Tuner .................................................................................................................................................................. |
80 |
Tuning Radio Stations ............................................................................................................................................................. |
80 |
Presetting Radio Stations........................................................................................................................................................ |
80 |
Selecting Preset Radio Stations ............................................................................................................................................. |
81 |
Sound Effects .................................................................................................................................................................................... |
81 |
Using the DCP501 Digital Audio/Video Receiver ........................................................................................................................... |
82 |
Changing the DCP501 Tone Setting....................................................................................................................................... |
82 |
Changing Balance and Fade on the DCP501......................................................................................................................... |
83 |
Using the DCP501 DVD/CD Player .................................................................................................................................................. |
83 |
Resume Play ............................................................................................................................................................................. |
84 |
Fast Motion Playback (Picture Search).................................................................................................................................. |
85 |
Using the DVD Banner Display ............................................................................................................................................... |
85 |
Selecting a DVD Title ........................................................................................................................................................ |
85 |
Selecting a DVD Chapter .................................................................................................................................................. |
86 |
Changing the Audio Language on a DVD ......................................................................................................................... |
86 |
Changing the Subtitle Language on a DVD ...................................................................................................................... |
87 |
Changing the Camera Angle on a DVD ............................................................................................................................ |
87 |
Using Bookmarks on a DVD.............................................................................................................................................. |
88 |
Recalling a Bookmarked Scene on a DVD........................................................................................................................ |
88 |
DCP501 User Guide
Contents |
iii |
Clearing a Bookmark on a DVD......................................................................................................................................... |
88 |
Program Edit on a DVD ..................................................................................................................................................... |
89 |
Insert Chapter on a DVD.................................................................................................................................................... |
90 |
Delete Program on a DVD ................................................................................................................................................. |
90 |
Exiting Program Play on a DVD......................................................................................................................................... |
90 |
Using the Repeat Feature.................................................................................................................................................. |
91 |
Repeat Play ....................................................................................................................................................................... |
91 |
A-B Repeat Play ................................................................................................................................................................ |
91 |
Using the CD Banner Display .................................................................................................................................................. |
92 |
Selecting a CD Track ......................................................................................................................................................... |
92 |
Using IntroScan on a CD ................................................................................................................................................... |
92 |
Using Bookmarks on a CD................................................................................................................................................. |
93 |
Recalling a Bookmarked Selection on a CD...................................................................................................................... |
93 |
Clearing a Bookmark on a CD ........................................................................................................................................... |
93 |
Program Edit on a CD............................................................................................................................................................... |
94 |
Program a Playlist with the TV Turned On ........................................................................................................................ |
94 |
Insert Track on a CD.......................................................................................................................................................... |
95 |
Delete Program on a CD.................................................................................................................................................... |
95 |
Program a Playlist with the TV Turned Off ........................................................................................................................ |
96 |
Exiting Program Play on a CD ........................................................................................................................................... |
96 |
Using the Repeat Feature ........................................................................................................................................................ |
96 |
Repeat Play ....................................................................................................................................................................... |
96 |
A-B Repeat Play ................................................................................................................................................................ |
97 |
Random Play ............................................................................................................................................................................. |
97 |
Playing an MP3 Audio CD on the DCP501 ............................................................................................................................. |
98 |
On-Screen Display when Playing an MP3 CD........................................................................................................................ |
99 |
Playing your MP3 Files ...................................................................................................................................................... |
99 |
Programming Selections from an MP3 CD........................................................................................................................ |
99 |
Deleting Selections from an MP3 CD .............................................................................................................................. |
100 |
Selecting Specific Folder and Files for Playback............................................................................................................. |
100 |
DVD Setup ............................................................................................................................................................................... |
101 |
Resetting Your Password ...................................................................................................................................................... |
108 |
Other On-Screen Text Messages .......................................................................................................................................... |
109 |
Mute ................................................................................................................................................................................ |
109 |
Volume Up/Down ............................................................................................................................................................. |
109 |
DVD/CD Playback Control ............................................................................................................................................... |
109 |
Source Change ................................................................................................................................................................ |
110 |
DCP501 User Guide
iv |
Contents |
Troubleshooting ...................................................................................................... |
111 |
Specifications .......................................................................................................... |
117 |
Digital Cable Receiver .................................................................................................................................................................... |
117 |
A/V Receiver and Amplifier ............................................................................................................................................................ |
117 |
DVD/CD Player................................................................................................................................................................................. |
118 |
Input/Output..................................................................................................................................................................................... |
118 |
Front Panel Inputs.................................................................................................................................................................. |
118 |
Front Panel Outputs............................................................................................................................................................... |
118 |
Rear Panel Inputs ................................................................................................................................................................... |
118 |
Rear Panel Outputs ................................................................................................................................................................ |
119 |
General............................................................................................................................................................................................. |
119 |
TV and VCR Setup Codes ....................................................................................... |
121 |
TV Setup Codes...................................................................................................................................................................... |
121 |
VCR Setup Codes................................................................................................................................................................... |
125 |
Language Codes...................................................................................................... |
129 |
Abbreviations and Acronyms ................................................................................. |
131 |
DCP501 User Guide
Introduction
Congratulations on your purchase of Motorola’s new state-of-the-art Digital Convergence Platform — DCP500 Series Home Theater System. In the past, you may have connected your VCR or stereo through your TV. Now with the DCP501, you connect your TV, VCR, speakers, and other electronic devices through the DCP501 for easier control of your electronics. The DCP501 provides one platform for all your home entertainment needs. Contained within a convenient space-saving design, the Motorola DCP501 combines digital audio/video tuning and processing with a single-disc DVD/CD player, digital cable receiver, and audio/video receiver. The DCP501 is shown in Figure 1:
Figure 1 |
|
|
|
|
|
|
DCP501 |
|
|
|
|
|
|
|
|
|
|
|
|
POWER |
CURSOR |
SET UP |
AUDIO MODE |
VOLUME |
|
|
|
|
MENU |
TONE/LEVEL |
|
|
|
|
|
GUIDE |
AM/FM |
|
|
|
|
|
INFO |
FM MODE |
|
|
|
|
CH/PRESETS |
TUNE |
|
|
|
|
|
SELECT/STORE |
|
|
SOURCE |
|
|
|
PLAY•PAUSE |
STOP |
OPEN•CLOSE |
REPEAT |
|
|
|
PHONES |
|
|
|
VIDEO 2 |
|
|
|
|
|
|
|
|
|
D I G I T A L |
|
|
|
|
|
|
SKIP•SEARCH |
PROGRAM |
SHUFFLE |
|
|
|
|
S U R R O U N D |
|
|
|
|
|
|
|
|
|
DIGITAL |
VIDEO |
L |
R |
|
|
|
AUDIO IN |
IN |
AUDIO IN |
|
Before Operating This Unit
Refer to the instruction manuals for your TV, VCR or other consumer electronics.
Before connecting the DCP501 to any of your other consumer electronics, be sure to turn off the power and unplug all equipment from the wall outlets.
Read this manual carefully before operating this unit.
DCP501 User Guide

2 |
Introduction |
Before You Begin
You program and select options on your DCP501 with cursor buttons on the front of the DCP501 or with your remote control. The following navigational tools enable you to navigate the menus displayed on your television with on-screen display (OSD) or with DCP501 options displayed on the DCP501 front panel display.
Button
SETUP
SELECT
OK
Flashing option
Cursor left < and cursor right >
Cursor up and
cursor down
Function
On the DCP501 front panel or the DCP501 remote control, press SETUP to display the DCP501 MAIN SETUP menu on your TV or display A U D I O S E T on the DCP501 display. Press SETUP to exit the DCP501 setup menus at any time.
On the DCP501 front panel, press SELECT to choose a menu option or save a change to a DCP501 setting. Same as OK on the DCP501 remote control.
On the DCP501 remote control, press OK to choose a menu option or save a change to a DCP501 setting. Same as SELECT on the DCP501 front panel.
Indicates that the option is selected and can be adjusted.
Step through available values for the selected option.
Move up and down through DCP menu settings.
The invalid symbol is displayed on the TV when you press a button that is invalid or unavailable at the time. This symbol only appears when the DCP is in DVD/CD mode.
Document Conventions
The following conventions are used in this manual:
EMPHASIZED TEXT WITH ALL-CAPITAL LETTERS
W i d e T e x t
Emphasized text with all capital letters indicates a button you press on the DCP front panel or the remote control, what is displayed on the TV or DCP501 front panel display, or a connection port on the DCP501.
Examples: SETUP, VIDEO2, VCR1, TONE/LEVEL
Text with wider than normal spacing between characters indicates text that is displayed on your television or the DCP501 display.
Examples: A U D I O S E T , D D I G I T A L , S u b t i t l e s O n / O f f
DCP501 User Guide

O v e r v i e w
This section provides information about:
Features of the DCP501
Accessories included with the DCP501
DVD and CD information
It also includes descriptions of the following:
Front panel
DCP501 display
Rear panel
Remote control unit
Before you begin to install the DCP501, familiarize yourself with the various controls and displays. Information on installing the DCP501 is provided in the “Installation” section.
NOTE !
When not in use, turn off the DCP501.
F e at u r es
The DCP501 includes:
DVD/CD player—single-disc tray
Audio/Video Receiver (AM-FM tuner/audio amplifier)
DCT2000 Digital Cable receiver (analog/digital hybrid)
Audio output — 5 x 100 watts per channel
Tripath Class T- solid state amplifiers
Dolby ® Digital, Dolby ® Pro Logic II, Dolby Pro Logic, and DTS ® audio decoders Multiple connections for several A/V components
Toslink and coaxial digital audio inputs
DCP501 User Guide
4 |
O v e r v i e w |
The DCP501 allows you to listen to your favorite digital and analog music in surround sound from selectable multiple audio sources, including:
Digital audio on the CD player
Digital or analog audio on TV channels tuned with the digital cable TV receiver feature* Digital audio on the digital audio tuner provided on your cable system*
Local analog AM and FM stations with the DCP501 AM/FM tuner
External analog audio cassettes
External MiniDisc digital audio
External digital audio tape (DAT)
Video game audio
* Digital Cable TV and interactive services are subscription services offered by most cable service providers.
DCP501 Video/TV features include:
Tuning and watching either digital or analog cable TV channels on your cable system Viewing digital programs and movies played on your DCP501 DVD player
Viewing analog programs and movies played on your analog VCR or analog video camera Viewing digital movies played on your digital VCR or digital video camera
Viewing movies and programs recorded with a personal video recorder (PVR) Viewing and playing video games
After connecting a VCR, video recording capabilities include:
Using the DCP501 to record DVD movies to video tape (unless the DVD has Macrovision anti-taping control)
With a second VCR, transferring movies or home video played on one VCR to a second VCR With a personal video recorder (PVR), transferring movies from your PVR to a VCR
Audio and video inputs and outputs provide both S-video and phono connections.
DCP501 User Guide

O v e r v i e w |
5 |
S u p p l i ed Ac c e s so ri e s
The following items are shipped with your DCP501:
DCP501-R Universal Remote Control
DCP501 Home Theater System User Guide
DCP501 Home Theater System Quick Setup Guide
Baseband video cable 6 ft. coaxial cable S-video cable
AM antenna
FM antenna
Warranty/Registration Card
D i sc I n f o r m at i o n
This section includes information on the types of discs you can use with the DCP501 and how to handle, clean and store them.
Types of Discs You Can Use
The DCP501 can play back the following discs:
Type |
Disc Logo Mark |
Contents |
Disc Size |
Maximum Playback Time |
DVD |
|
Audio and Video |
12 cm |
Approx. 4 hours for a |
|
|
|
|
single-sided disc or 8 hours for |
|
|
|
|
a double-sided disc |
|
™ |
|
8 cm |
Approx. 80 minutes for a |
|
|
|
||
|
|
|
|
single-sided disc or |
|
|
|
|
160 minutes for a double-sided |
|
|
|
|
disc |
Audio CD |
|
Audio |
12 cm |
Approx. 75 minutes |
|
|
|
8 cm |
Approx. 20 minutes |
The DCP501 cannot play the following disc formats:
DVD-ROM
DVD+R/DVD-RAM (The DCP501 can play DVD-R format).
CD-ROM
CD-EXTRA
Photo CD
Video CD
SACD (SuperAudio CD)
DCP501 User Guide
6 |
O v e r v i e w |
Do not use discs that are:
Cracked
Warped
Contain adhesive tape or a disc label (as on rental discs)
Handling Discs
When handling your discs:
Do not touch the playback side (the blank side) of the disc
Do not attach paper or tape to either side of the disc
Cleaning Discs
Your picture and sound quality may deteriorate due to fingerprints or dust on the disc. To clean the disc, wipe the disc with a soft cloth from the center of the disc outwards. Be sure to always keep your discs clean.
Do not use solvents such as record cleaning sprays to clean a disc. Solvents can damage the disc.
Storing Discs
When storing your discs, follow these guidelines:
Store discs vertically in their cases.
Do not stack or place objects on unprotected discs. This can cause warping or scratches.
Do not store discs in direct sunlight or near a heat source.
Do not store discs in places subject to moisture or dust.
Region Numbers
The region number of the DCP501 is 1 (North America). This number refers to the coding format of the discs that can be played back. This number only applies to DVDs. If the region number of the DVD disc you are trying to play back is not 1 or ALL, the DCP501 cannot play it back and a warning message appears on the DCP501 display.
DCP501 User Guide
O v e r v i e w |
7 |
F ro n t P an el
The DCP501 contains selection buttons, tuning buttons, a volume control knob, video 2 connection ports, and a single disc CD/DVD tray. For information on operating the DCP501, refer to the “Operation” section. Figure 2 illustrates the front panel of the DCP501:
Figure 2
DCP501 fron t pan el
1 |
2 |
3 |
4 |
5 |
6 |
7 |
|
|
8 |
|
|
|
|
|
|
|
|
|
POWER |
CURSOR |
|
SET UP |
|
AUDIO MODE |
VOLUME |
|
|
|
|
|
|
MENU |
|
TONE/LEVEL |
|
|
|
|
|
|
|
GUIDE |
|
AM/FM |
|
|
|
|
|
|
|
INFO |
|
FM MODE |
|
|
|
|
|
|
CH/PRESETS |
|
TUNE |
|
|
|
|
|
|
SELECT/STORE |
|
|
|
|
SOURCE |
|
|
|
|
PLAY•PAUSE |
STOP |
|
OPEN•CLOSE |
REPEAT |
|
|
|
|
|
PHONES |
|
|
|
|
|
|
VIDEO 2 |
|
|
|
|
|
|
|
|
|
|
|
|
D I G I T A L |
|
|
|
|
|
|
|
|
|
S U R R O U N D |
SKIP•SEARCH |
|
PROGRAM |
SHUFFLE |
|
|
|
|
|
|
|
|
|
|
|
|
|
|
|
|
|
|
|
|
|
DIGITAL |
VIDEO |
L |
R |
|
|
|
|
|
|
AUDIO IN |
IN |
AUDIO IN |
|
9 |
10 |
11 |
12 |
|
13 |
|
|
||
Item |
Control |
Description |
1 |
CURSOR |
Moves cursor up/down/left/right in DCP501 display/on-screen display and CATV |
|
|
application control. |
2 |
SELECT/STORE |
Selects current DCP501 display/on-screen display item or CATV application |
|
|
controlled item. |
3 |
SET UP |
Press once to view DCP501 A/V configuration menus. |
|
MENU |
Cable TV source: CATV application controlled. |
|
|
DVD/CD source: Displays DVD menu. |
|
GUIDE |
CATV application controlled. |
|
INFO |
CATV application controlled. |
|
|
DVD/CD source: Displays DVD/CD control summary. |
|
CH/PRESETS |
Cable TV source: Advances to next S or previous Tchannel. CATV application |
|
ST |
controlled. |
|
|
Tuner source: Advances to next S or previous Tstored preset station #. |
4 |
Display |
Refer to DCP501 Display in this section for information on the DCP501 display. |
DCP501 User Guide
8 |
O v e r v i e w |
Item |
Control |
Description |
5AUDIO MODE Selects surround sound mode (toggle through all available modes). TONE/LEVEL Press once to enter Bass Level Change mode.
Press twice to enter Treble Level Change mode.
|
|
Press three times to enter Balance Level Change mode. |
|
|
Press four times to enter Fader Level Change mode. |
|
AM/FM |
If Tuner not source: Selects Tuner. |
|
|
Tuner source: Changes radio band (AM FM, FM AM). |
|
FM MODE |
Press once to force FM station to mono. |
|
|
Press again to return to normal. |
|
TUNE ST |
Press to increase Sor decrease T radio tuner frequency. |
|
|
Hold to scan to next Sor previous Tstrongest signal (station). |
6 |
SOURCE |
Selects viewing source in the following sequence: |
|
|
CATV DVD/CD TUNER |
|
|
VCR1 VCR2 VIDEO1 |
|
|
VIDEO2 TAPE% |
7 |
VOLUME |
Increases (clockwise) or decreases (counter-clockwise) pre-amp and speaker |
|
|
level. |
8POWER Places DCP501 in standby mode.
9PHONES Jack for headphones connection.
10 |
PLAY·PAUSE |
In Playback: Pauses playback of DVD/CD. |
|
|
|
Not in Playback: Begins playback of DVD/CD. |
|
|
STOP |
Stops playback of DVD/CD. |
|
|
|
Press once: place DVD/CD player in resume state. |
|
|
|
Press twice: stop DVD/CD player. |
|
|
SKIP·SEARCH |
In playback: Press to select previous chapter (track) or press to select next |
|
|
|
chapter (track). |
|
|
|
Hold |
to rewind and play DVD/CD x2. |
|
|
Hold |
to fast forward and play DVD/CD x2. |
11 |
Loader |
Loader for disc. |
|
12 |
OPEN·CLOSE |
DVD/CD Loader Closed: Opens tray. |
|
|
|
DVD/CD Loader Open: Closes tray. |
|
|
REPEAT |
Press once to repeat playback of current chapter/disc. |
|
|
|
Press twice to repeat playback of current title/track. |
|
|
|
Press three times to repeat playback of current chapter (DVD only). |
|
|
|
Press again to clear the repeat function. |
|
|
PROGRAM |
Press Once: program DVD/CD playback list (On screen). |
|
|
|
Press Twice: program CD playlist on DCP501 display. |
|
|
SHUFFLE |
Press Once: shuffle current CD tracks. |
|
|
|
Press Again: clear shuffle. |
|
|
|
SHUFFLE does not work with DVDs. |
|
13 |
VIDEO 2 |
Ports for connecting devices such as digital video cameras, mini disc players, and |
|
|
|
DAT tape players. |
|
DCP501 User Guide
O v e r v i e w |
9 |
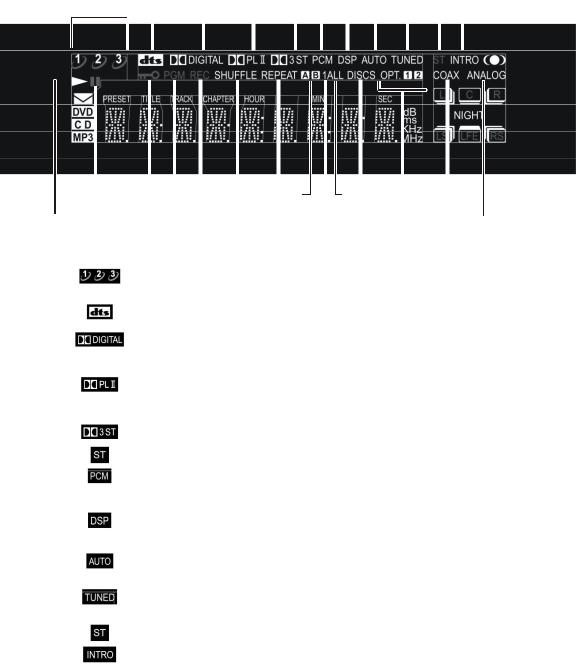
D C P 5 0 1 Di sp l a y
For information on the controls and functions shown in the DCP501 display, see the “Operations” section. The icons on your DCP501 display are described in the table below:
Figure 3
DCP501 display
1 |
|
2 |
|
3 |
4 |
5 |
6 |
|
7 |
8 |
9 |
10 |
11 |
|||||||||||||
|
|
|
|
|
|
|
|
|
|
|
|
|
|
|
|
|
|
|
|
|
|
|
|
|
|
|
|
|
|
|
|
|
|
|
|
|
|
|
|
|
|
|
|
|
|
|
|
|
|
|
|
|
|
|
|
|
|
|
|
|
|
|
|
|
|
|
|
|
|
|
|
|
|
|
|
|
|
|
|
|
|
|
|
|
|
|
|
|
|
|
|
|
|
|
|
|
|
|
|
|
|
|
|
|
|
|
|
|
|
|
|
|
|
|
|
|
|
|
|
|
|
|
|
|
|
|
|
|
|
|
|
|
|
|
|
|
|
|
|
|
|
|
|
|
|
|
|
|
|
|
|
|
|
|
|
|
|
|
|
|
|
|
12 |
13 |
14 |
15 |
16 |
17 |
18 |
19 |
20 21 22 |
23 |
24 |
25 |
Item |
Indicator/Icon |
Description |
|
|
|
|
|
|
||||
1
2
3
4
5
6
7
8
9
10
11
Not used on the DCP501.
On indicates DTS Surround is the currently selected audio mode.
On indicates Dolby Digital Surround is the currently selected audio mode.
P L I I turns on to indicate Dolby Pro Logic II Surround is the currently selected audio mode.
P L turns on to indicate Dolby Pro Logic Surround is the currently selected audio mode.
On indicates Dolby 3 Channel Stereo is the currently selected audio mode.
On indicates standard 2 Channel Stereo is the currently selected audio mode.
Turns on when a DVD/CD or external digital audio input is not Dolby or DTS audio.
On indicates DSP sound mode is selected. When DSP is selected, the specific sound mode is displayed: STADIUM, CONCERT, THEATER, ARENA, CLUB or CHURCH.
Turns on when tuner is in use to indicate DCP501 is scanning to next radio station.
Tuner: On indicates the tuned signal received is strong.
Flashing indicates a weak FM signal.
Tuner: On indicates the tuned FM signal received is transmitting in stereo.
CD: On indicates the DCP501 is in Preview mode (The CD player plays the first ten seconds of each track.)
DCP501 User Guide

1 0 |
O v e r v i e w |
Item |
Indicator/Icon Description |
12 |
On indicates playback of DVD/CD. |
13 |
On indicates DVD/CD has paused playing. |
14 |
DVD: On indicates DVD Parental Control Level has been set. |
15 |
DVD/CD: turns on to indicate you are playing the DVD/CD in programmed |
|
mode. |
16 |
On indicates that the record output sources have been overridden for Cable TV |
|
Record. |
17 |
CD: On indicates Shuffle mode (CD player is randomly selecting tracks for |
|
playback.) |
18 |
DVD: REPEAT turns on to indicate Disc Repeat, and flashes TITLE or |
|
CHAPTER to indicate Title or Chapter Repeat. |
|
CD: REPEAT turns on to indicate Disc Repeat, and flashes TRACK to indicate |
|
Track Repeat. |
19 |
DVD/CD: turns on when a sequence for continuous play is being selected. |
|
When a DVD or CD is in playback, the A-B button on the remote control can be |
|
used to select a sequence for continuous repeated play. The A icon turns on to |
|
indicate the start of the sequence has been selected. The B icon turns on to |
|
indicate the selected sequence is in playback. See the “Operations” section for |
|
more information on this feature. |
20 |
Not used on the DCP501. |
21 |
Not used on the DCP501. |
22 |
Not used on the DCP501. |
23 |
O P T 1 or O P T 2 turns on to indicate which optical input is in use. |
24 |
On indicates coaxial audio input is in use. |
25 |
On indicates analog audio input is in use. |
DCP501 User Guide
O v e r v i e w |
1 1 |
Figure 4
DCP501 display
26 27 28 29 30 31 32 33 34 35 36 37
Item |
Indicator/Icon Description |
26 |
On indicates that you have received incoming messages from the cable |
|
operator. Use the program guide displayed on the TV to retrieve messages. |
27 |
D V D, C D or M P 3 turns on to indicate which item is in use. M P 3 indicates a |
|
disc containing MP3 audio files is in use. |
28 |
Tuner: displays two-digit preset number, if any, of currently selected radio |
|
station. |
|
Flashes to indicate when you are pre-setting radio stations. Stops flashing when |
|
a preset number is selected. |
29 |
After selecting DVD/CD as the source and pressing DVD/CD button on the |
|
remote control, the following is displayed: |
|
DVD: Displays the current title of the DVD. |
30 |
After selecting DVD/CD as the source and pressing DVD/CD button on the |
|
remote control, the following is displayed: |
|
CD: Displays the current track (two-digit number). |
31 |
After selecting DVD/CD as the source and pressing DVD/CD button on the |
|
remote control, the following is displayed: |
|
DVD: displays the current chapter of the DVD (two-digit number). |
32 |
After selecting DVD/CD as the source and pressing DVD/CD button on the |
|
remote control, the following is displayed: |
|
DVD: Displays the duration of the current title. |
|
CD: Displays the time remaining on the current track. |
|
When tuner is selected as the source, displays the radio frequency in use. |
33 |
On indicates volume, bass, treble, and speaker level setting, in decibels. |
34 |
On indicates FM station is in use. |
35 |
On indicates AM station is in use. |
DCP501 User Guide

1 2 |
O v e r v i e w |
Item |
Indicator/Icon Description |
36 |
L, C, and R indicated left, center and right front speakers, respectively. LS and |
|
RS indicate left and right surround speakers, respectively. LFE (Low Frequency |
|
Effect) indicates the subwoofer. |
These icons turn on as follows:
Each icon turns on to indicate a valid input channel. The LFE icon turns on to indicate a LFE component is present.
A box around an icon indicates that the output channel for that speaker has been set.
The three-dimensional box behind the boxed icon indicates whether the speaker has been set up as LARGE (the three-dimensional box is turned on, as shown in the example above) or SMALL (the three-dimensional box is not turned on).
|
For more information on speaker settings, see Initial Set-up Operations in the |
|
“Operations” section. |
37 |
On indicates Night mode enabled. In Night mode, you can set the DCP501 to |
|
dim the display illumination and compresses the audio level to lower volume |
|
peaks. |
R e a r P an el
Figure 5 illustrates the rear panel of the DCP501:
Figure 5
DCP501 r ear pan el
1 |
2 |
3 |
4 |
5 |
6 |
7 |
8 |
|
9 |
|
10 |
|
|
|
11 |
|||||||||||
|
|
|
|
|
|
|
|
|
|
|
|
|
|
|
|
|
|
|
|
|
|
|
|
|
|
|
|
|
|
|
|
|
|
|
|
|
|
|
|
|
|
|
|
|
|
|
|
|
|
|
|
|
|
|
|
|
|
|
|
|
|
|
|
|
|
|
|
|
|
|
|
|
|
|
|
|
|
|
|
|
|
|
|
|
|
|
|
|
|
|
|
|
|
|
|
|
|
|
|
|
|
|
|
|
|
|
|
|
|
|
|
|
|
|
|
|
|
|
|
|
|
|
|
|
|
|
|
|
|
|
|
|
|
|
|
|
|
|
|
|
|
|
|
|
|
|
|
|
|
|
|
|
|
|
|
|
|
|
|
|
|
|
|
|
|
|
|
|
|
|
|
|
|
|
|
|
|
|
|
|
|
|
|
|
|
|
|
|
|
|
|
|
MODEL NO.: DCP 501 |
|
|
|
|
À LA PLUIE NI À L’HUM IDITE”. |
12 |
13 |
14 |
15 |
16 |
Refer to the “Installation” section for instructions on installing and cabling the DCP501.
DCP501 User Guide
O v e r v i e w |
1 3 |
The following table describes the rear-panel features:
Item Description
1 Speakers
FRONT SPEAKERS — connectors used to connect speaker cables to left and right front speakers.
SURR SPEAKERS — connectors used to connect speaker cables to left and right surround speakers.
CENTER SPEAKER — connectors used to connect speaker cables to center speaker.
2RF IN — F-type connector used for DCP501 input from the TO RF IN connector.
3CABLE IN — F-type connector used for the coaxial cable input from the your cable outlet.
4TO RF IN — F-type connector used to connect the TO RF IN port to the RF IN port.
5Cover — covers slot used for Telco return.
6IR — mini-phone jack for connecting an optional IR Blaster.
7TV PASS CARD — for upgradeable security.
8DATA — data connector to interface serial data and access the high-speed serial interface for high definition decoding.
9DIGITAL IN
COAXIAL — digital audio input from digital audio output device with coaxial cable connector.
OPTICAL 1 — digital audio input from digital audio output device with optical connector. 10 Antenna
FM 75 Ω — F-connector used for FM antenna.
AM — terminal tabs used for connecting AM antenna.
11Power Outlet — AC power outlet.
12AUDIO: IN
VCR 1 — left and right RCA jacks used for VCR audio output.
VCR 2 — left and right RCA jacks used for audio output of VCR or PVR.
VIDEO 1 — left and right RCA jacks used for audio output of auxiliary equipment, such as a Laser Disc player.
TAPE — left and right RCA jacks used for audio output of alternate audio equipment, such as a stereo or CD jukebox.
13 AUDIO: REC OUT
VCR 1 and VCR 2 — left and right RCA jacks for audio input of VCR(s).
TAPE—left and right RCA jacks for audio input of tape deck. 14 PRE OUT: Connectors for external amplifiers.
L and R — left and right RCA jacks used for audio output to an external power amplifier for the front speakers.
LS and RS — left and right RCA jacks used for audio output to an external power amplifier for surround sound speakers.
CTR — RCA jack used for audio output to an external power amplifier for the center speaker.
SUB — RCA jack used for audio output of subwoofer. May require a Y-splitter.
DCP501 User Guide
1 4 |
O v e r v i e w |
Item Description
15VIDEO: IN. The RCA jacks in the row labeled VIDEO are used for composite video. The connectors in the row labeled S-VIDEO are used for S-video.
VCR 1 and VCR 2 — connectors used for video output of VCR 1 and VCR 2 or PVR.
VIDEO 1 — connectors used for video output of external video source, such as a camcorder.
16VIDEO: OUT. The RCA jacks in the row labeled VIDEO are used for composite video. The connectors in the row labeled S-VIDEO are used for S-video.
TV — connectors used for video input of TV.
VCR 1 and VCR 2 — connectors used for video input of VCR(s). Note that VCR 1 and VCR 2 are both input and output ports.
DCP501 User Guide
O v e r v i e w |
1 5 |
O p e ra t i n g t h e R em o t e Co n t ro l
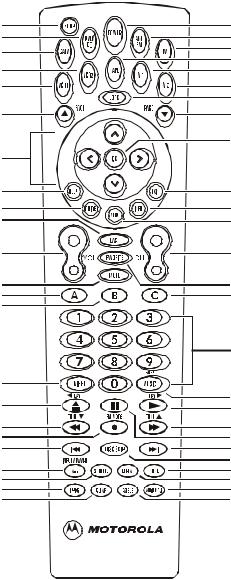
The DCP501 uses the DCP501-R Universal Remote Control. Figure 6 illustrates the DCP501-R Universal Remote Control:
Figure 6
Remo te contro l
1 |
24 |
|
2 |
25 |
|
3 |
26 |
|
4 |
27 |
|
28 |
||
5 |
29 |
|
|
30 |
|
6 |
31 |
|
|
32 |
|
7 |
|
|
8 |
33 |
|
9 |
34 |
|
10 |
35 |
|
11 |
36 |
|
12 |
37 |
|
13 |
38 |
|
14 |
|
|
|
39 |
|
15 |
40 |
|
16 |
||
41 |
||
17 |
42 |
|
18 |
43 |
|
19 |
44 |
|
20 |
45 |
|
46 |
||
21 |
47 |
|
22 |
48 |
|
23 |
49 |
DCP501 User Guide

1 6 |
O v e r v i e w |
Descriptions of the remote control functions are shown in the following table.
When you press a button on the remote control, a mode button (CATV, DVD/CD,VCR1, VCR2, Tape, AM/FM, TV, V1 or V2) will turn on to indicate the current mode.
Button |
Item |
Description |
1SETUP Press Once: DCP501 A/V configuration menus.
2DVD/CD Select DVD/CD as source. (Remote control remains in tuner mode.)
3 |
CATV |
Select Cable TV as source. |
4 |
VCR2 |
Select VCR 2 as source. Select VCR 2 remote control button codes. |
5 |
VCR1 |
Select VCR 1 as source. Select VCR 1 remote control button codes. |
6PAGE S CATV application controlled.
7Cursor keys Any DCP501 source: DCP501 display/on-screen display and CATV application
control.
|
|
|
|
TV source: Move cursor up/down/left/right. |
|
|
|
|
VCR 1 or VCR 2 source: Move cursor up/down/left/right. |
8 |
HELP |
Press once: CATV application controlled. (The CATV button does not turn on.) |
||
9 |
GUIDE |
CATV application controlled. |
||
10 |
LAST |
CATV application controlled. |
||
11 |
VOL |
Raise or lower speaker level. |
||
12 |
MUTE |
Any DCP501 source: mute speaker and pre-amplifier outputs. |
||
|
|
|
|
TV source: mute speaker output . |
13 |
A |
CATV application controlled. |
||
14 |
B |
CATV application controlled. |
||
15 |
NIGHT |
Press once: DIM mode |
||
|
|
|
|
DCP501 display dims and audio plays at maximum dynamic range. |
|
|
|
|
Press twice: DIM+SOFT mode |
|
|
|
|
DCP501 display dims and audio plays at minimum dynamic range. |
|
|
|
|
Press three times: DIM+LOUD mode |
|
|
|
|
DCP501 display dims and audio plays at standard dynamic range. |
|
|
|
|
Press four times: NORMAL mode |
|
|
|
|
DCP501 display is not dimmed and audio plays at maximum dynamic |
|
|
|
|
range. |
16 |
|
|
|
Cable TV source: CATV application controlled. |
|
|
|
|
DVD/CD source: |
|
|
|
|
|
|
|
|
|
Press once (in playback): stop playback (resume possible). |
Press twice (in playback): stop playback.
Press once (not in playback): open DVD/CD tray.
Press once (tray open): close DVD/CD tray.
VCR 1 or VCR 2 source:
Press once (in playback): stop playback.
Press once (not in playback): eject VHS cassette.
DCP501 User Guide
O v e r v i e w |
1 7 |
Button |
Item |
Description |
17 |
TUNE T |
Cable TV source: CATV application controlled. |
|
|
DVD/CD source: |
Press once: rewind and play (rewind 1).
Press twice: rewind and play (rewind 2).
Press three times: rewind and play (rewind 3).
Press four times: rewind and play (rewind 4 for DVD only).
Press again: rewind and play (rewind 1).
|
|
Tuner source: |
|
|
Press to decrease radio tuner frequency |
|
|
Momentarily hold to scan to previous strongest signal (station). Press again |
|
|
to stop scanning. |
|
|
VCR 1 or VCR 2 source: Rewind and play cassette (in playback) or rewind |
|
|
cassette (not in playback). |
18 |
FM MODE |
Cable TV source: CATV application controlled. |
|
|
Tuner source: |
|
|
Press once: force FM station to mono |
|
|
Press twice: return to normal |
|
|
VCR 1 or VCR 2 source: one touch record, start VCR record. |
19 |
|
In playback: Press to select previous chapter (track) |
20 |
INPUT/TV/VCR |
DVD/CD playback: |
|
A-B |
Press once: Select start of sequence for repeat play. |
|
|
Press twice: Mark end of sequence and begin sequence playback. |
21 |
SHUFFLE |
CD source: |
|
|
Press once: shuffle current CD tracks |
22 |
PROG |
Press Once: program DVD/CD playback list (on-screen display) |
|
|
Press Twice: program CD playlist on DCP501 display |
23 |
CLEAR |
In playback: clear A-B, Shuffle, Repeat, or Program playback modes and |
|
|
resume normal mode. |
|
|
Not in playback: clear A-B, Shuffle, Repeat, or Program playback modes. |
24 |
POWER |
Place DCP501 in standby mode. |
|
|
Turns power off/on on TV, VCR 1, VCR 2, Video 1 and Video 2 units. |
25 |
AM/FM |
If Tuner not source: selects Tuner as source |
|
|
Tuner source: change radio band (AM FM, FM AM) |
26 |
TV |
Select TV remote control button codes. Remote control will be in TV mode. |
|
|
Note that pressing the TV button will not affect the current mode of the DCP501. |
27 |
TAPE |
Select Tape as source. |
28 |
V1 |
Select Video 1 as source. Select Video 1 remote control button codes. |
29 |
V2 |
Select Video 2 as source. Select Video 2 remote control button codes. |
30 |
LOCK |
CATV application controlled. |
31 |
PAGE |
CATV application controlled. |
DCP501 User Guide
1 8 |
O v e r v i e w |
Button |
Item |
Description |
32 |
OK |
Any DCP501 source: select current item on DCP501 display/on-screen display |
|
|
or select CATV application controlled item. |
|
|
TV source: Functions as ENTER key. |
|
|
VCR 1 or VCR 2 source: Functions as ENTER key. |
33 |
EXIT |
Cable TV source: exit a menu screen or program guide. |
|
|
TV source: exit menu. |
|
|
VCR 1 or VCR 2 source: exit menu. |
34 |
INFO |
CATV source: CATV Application controlled. |
|
|
DVD/CD source: Display DVD/CD information banners. |
35 |
MENU |
Cable TV source: CATV application controlled. |
|
|
DVD/CD source: DVD menu. |
|
|
TV Source: TV menu. |
|
|
VCR 1 or VCR 2 source: VCR menu. |
36 |
CH |
Cable TV source: CATV application controlled. |
|
Tuner source: Go to next + or previous – stored preset station. |
|
|
|
|
|
|
TV source: Go to next + or previous – channel. |
|
|
VCR 1 or VCR 2 source: Go to next + or previous – channel. |
37 |
FAVORITE |
CATV application controlled. |
38 |
C |
CATV application controlled. |
39 |
Number keys |
Number entry. |
40 |
ENTER/ |
CATV application controlled. |
|
MUSIC |
Any non-DCP501 source: Functions as ENTER key. |
41 |
DAY |
Cable TV source: CATV application enabled. |
|
|
DVD/CD source: Begin/resume playback (if DVD/CD tray closed). Close tray |
|
|
and begin playback (if DVD/CD tray open). |
|
|
VCR 1 or VCR 2 source: Begin playback. |
42 |
TUNE |
Cable TV source: CATV application enabled. |
|
|
DVD/CD source: |
|
|
Press once: fast forward and play (fast forward 1). |
|
|
Press twice: fast forward and play (fast forward 2). |
|
|
Press three times: fast forward and play (fast forward 3). |
|
|
Press four times: fast forward and play (fast forward 4 for DVD only). |
|
|
Press again: fast forward and play (fast forward 1). |
|
|
Tuner source: |
|
|
Press to increase radio tuner frequency |
|
|
Momentarily hold to scan to next strongest signal (station). Press again to |
|
|
stop scanning. |
|
|
VCR 1 or VCR 2 source: Fast forward and play cassette (in playback). Fast |
|
|
forward cassette (not in playback). |
43 |
|
Cable TV source: CATV application controlled. |
|
|
DVD/CD source: |
|
|
Press once: pause playback. |
|
|
Press twice: frame advance (DVD only). |
44 |
|
In playback: Select next chapter (track). |
DCP501 User Guide
O v e r v i e w |
1 9 |
Button |
Item |
Description |
45 |
DISC SKIP |
Not used on the DCP501. |
46 |
TONE |
Press once: enter Bass Level Change mode. |
|
|
Press twice: enter Treble Level Change mode. |
Press three times: enter Balance Level Change mode. Press four times: enter Fader Level Change mode.
REPEAT DVD/CD playback:
47 Press Once: repeat playback of current disc. Press Twice: repeat playback of current title/track.
Press Three Times: repeat playback of current chapter (DVD only). Press Again: clear the repeat function.
48AUDIO MODE Select surround sound mode (toggle through all available modes).
49ANGLE DVD/CD source: Change DVD camera angle (if supported by disc).
Selecting TV and VCR Setup Codes
You can set up your remote control for your TV and VCR by consulting the tables in “TV and VCR Setup Codes”. You only need to set up your remote control for your TV, VCR 1 and VCR 2 (if applicable).
To set up your remote control for your TV or VCR(s):
1Press the mode button for the device you are setting up (either TV, VCR 1 or VCR 2) for six seconds.
The mode buttons will turn on and turn off one at a time. This sequence will repeat two times and then the selected mode button will remain on. This indicates the remote is ready to accept the four-digit setup code.
2Enter the four-digit setup code for your TV or VCR. The setup code can be found in “TV and VCR Setup Codes”.
When the setup code is accepted, the selected mode button will blink three times.
If the setup code is not accepted or more than ten seconds have elapsed between button presses, the selected mode button turns off. The TV or VCR then exits the programming mode and the most recent pre-programmed setup code is restored.
You can only set up your remote control while in TV, VCR 1 or VCR 2 mode.
You can exit the setup mode at any time by pressing any button on the remote other than the number buttons.
DCP501 User Guide
2 0 |
O v e r v i e w |
Verifying a Setup Code Using Blink Back
You can use the remote control’s blink back function to verify a previously entered setup code. The blink back function verifies a setup code by indicating the setup code number through a certain number of blinks on the 1, 2, 3, and 4 buttons on your remote control.
To verify a setup code using blink back:
1Press the mode button for the device you are verifying (either TV, VCR 1 or VCR 2) for six seconds.
The mode buttons will turn on and turn off one at a time. This sequence will repeat two times and then the selected mode button will remain on. This indicates the remote is ready to accept the blink back code.
2Press 9 9 0 on your remote control.
The selected mode button will blink three times and turn off.
3Press 1 on your remote control. The 1 button will blink for a certain number of times.
The number of blinks that occur after pressing the number buttons represent the four-digit setup code for the selected mode. The 1 button represents the first digit in the setup code, the 2 button represents the second digit in the setup code, and so on for all four digits in the setup code.
For example, to verify the TV setup code is 0047, after you press the mode button and 9 9 0, pressing the 1 button will cause it to remain off, pressing the 2 button will cause it to remain off, pressing the 3 button will cause it to blink four times, and pressing the 4 button will cause it to blink seven times.
4Press 2 on your remote control and count the number of blinks.
5Press 3 on your remote control and count the number of blinks.
6Press 4 on your remote control and count the number of blinks.
You can only set up your remote control while in TV, VCR 1 or VCR 2 mode.
After pressing the mode button and 9 9 0 sequence, you can exit the blink back mode at any time by pressing any button on the remote other than the 1 button.
DCP501 User Guide
Loading...