


48780 rev2 29/4/08 14:32 Page 1
TM Food Steamer
Please read and keep these instructions
Getting the best from your new appliance...
Intellisteam brings the whole meal together at precisely the same time to make steaming as easy as 1, 2, 3.
Ú Û Ü
PREPARE |
SET & RELAX |
ENJOY |
Easy set-up guide
T started quickly, see pages 3 and 4.
Recipes
see the weekly meal plan on page 14.
F |
parts, help with using your Morphy Richards product, |
FS48780 MUK Rev 2 |
problems and lots more, contact us by phone or through our website. |
|
|
UK Helpline: 0844 871 0951
Replacement Parts: 0844 873 0717
Ireland Helpline: 1800 409 119

48780 rev2 29/4/08 14:32 Page 2
CONTENTS
EASY SET-UP GUIDE |
3-4 |
FEATURES |
5 |
BEFORE USE |
6 |
USING |
6 |
CONFIGURATIONS |
6-7 |
DIGITAL INTERFACE |
7-8 |
HINTS AND TIPS |
9 |
COOKING GUIDE |
10-13 |
CARE AND CLEANING |
13 |
RECIPES |
14-21 |
IMPORTANT SAFETY INSTRUCTIONS |
22 |
ELECTRICAL REQUIREMENTS |
23 |
HELPLINE |
23 |
GUARANTEE |
24 |
2 |
UK Helpline 0844 871 0951 Replacement Parts 0844 873 0717 Ireland Helpline 1800 409 119 |
48780 rev2 29/4/08 14:32 Page 3
Cut and keep
|
TM |
Please also refer to the main instruction |
|
|
|
|
booklet, which cont ains impor t ant |
Easy set-up guide |
safety information and more detail on |
||
how to use Intellisteam. |
|||
1 |
Max |
|
|
|
|
Fill the water reservoir with cold water |
|
|
|
to the maximum level. This will |
|
|
|
||
|
|
produce enough steam to cook for |
|
|
|
approximately 60 minutes. |
|
2 |
|
|
|
|
|
|
|
|
|
Assemble the appliance, fitting the |
|
|
|
|
|
|
|
|
|
|
|
|
|
|
|
|
|
|
|
|
|
drip tray and then the containers. |
3 |
|
|
|
|
|
|
|
|
|
Place food directly into the containers |
|
|
|
|
|
|
|
|
|
||
|
|
|
|
|
||||||
|
|
|
|
|
|
|
||||
|
|
|
|
|
|
|
|
|
before setting the timer. Use the |
|
|
|
|
|
|
|
|
|
|
divider wall for the front container if |
|
|
|
|
|
|
|
|
||||
|
|
|
|
|
|
|
|
|
cooking two different types of food. |
|
|
|
|
|
|
|
|
||||
|
|
|
|
|
|
|
|
|||
|
|
|
|
|
|
|
|
|
Use the accessories if required, see |
|
|
|
|
|
|
|
|||||
|
|
|
|
|
|
|
|
|
|
suggestions. |
|
|
|
|
|
|
|
|
|||
|
|
|
|
|
|
|
|
|
|
|
|
|
|
|
|
|
|
|
|
|
|
4 |
Back |
Front left |
|
Front dual |
Front right 


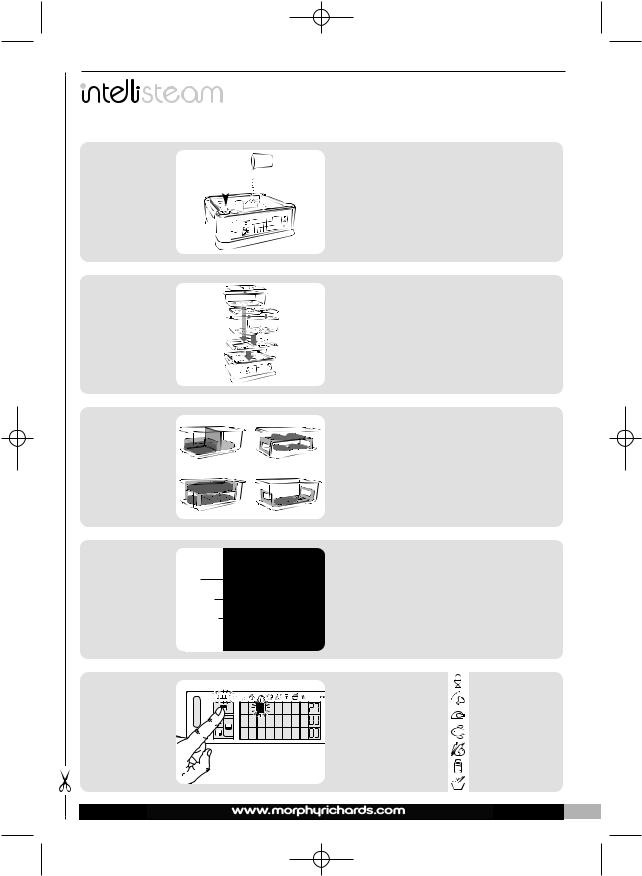
Plug into the electrical socket. Set the time for each container, using the corresponding heater buttons.
5 |
Press the heater |
button until the |
|
rectangle appears |
|
under the food type |
|
you are cooking. |
|
The pre-set cook |
|
|
time will appear in |
|
the timer column. |
Soft boiled eggs, 16 mins
Leaf/pod veg, 15 mins
Chicken, 27 mins
Fish, 20 mins
Root veg, 35 mins
Sauce, 30 mins
Rice, 42 mins
3
48780 rev2 29/4/08 14:32 Page 4
6 7
7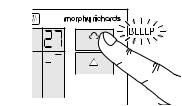 8
8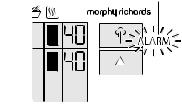 9
9 10
10
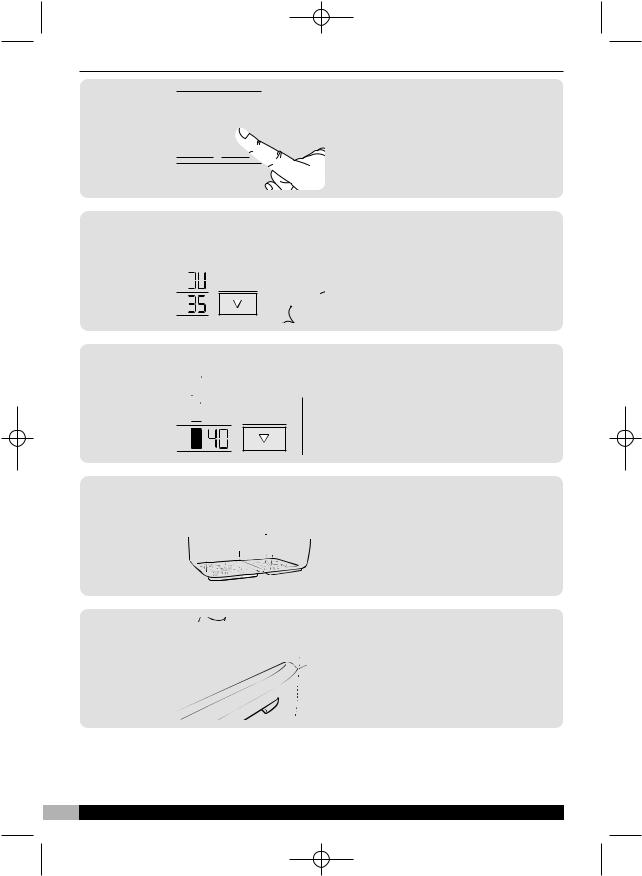
The pre-set cook time is based on cooking four portions (see ‘Cooking guide’ for portion and specific food type adjustments). To adjust the time, press the upwards and downwards arrows.
To begin cooking, press the steam button once. One bleep will sound.
To save adjusted times for future use, hold the steam button down for two seconds, until a second bleep is heard.
The container with the longest cook time will begin steaming first. The timer counts down so all food finishes together. After cooking has finished, the alarm will sound and the keep warm function will start automatically for 40 minutes. To stop the keep warm function, press the steam button.
WARNING: Use oven gloves to remove the lids and containers, ensuring the lids are tilted to direct the steam away from you. Do not remove the drip tray until it is completely cooled.
Pour away excess water from the main base unit, using the pouring lip at the back.
The containers, lids, accessories and drip tray may be washed in a dishwasher.
4

48780 rev2 29/4/08 14:32 Page 5
Features
Ú Back lid
Û Back container
Ü Front left lid
Ý Front right lid
Þ Front container removable divider wall
ß Front container
à External water top-up
á Drip tray
â Main base unit / water reservoir
ã Maximum water level indicator
ä Heaters
å Pouring lip
æ Water level gauge
ç Back heater button
è Front left heater button
é Front right heater button
ê Front dual heater button
ë Display screen (see page 7)
ì Steam button
í Increase steam time button
îDecrease steam time button
ï
!
ñ
Accessories
ï Food plinth
! 2 x sauce trays
ñ Rice tray
Ü
Þ
âã ä
æ 
ç è é ê
Ú
Û
Ý
ß
à
á
å


 ë
ë
ì
í
 î
î
5
48780 rev2 29/4/08 14:32 Page 6
BEFORE USE
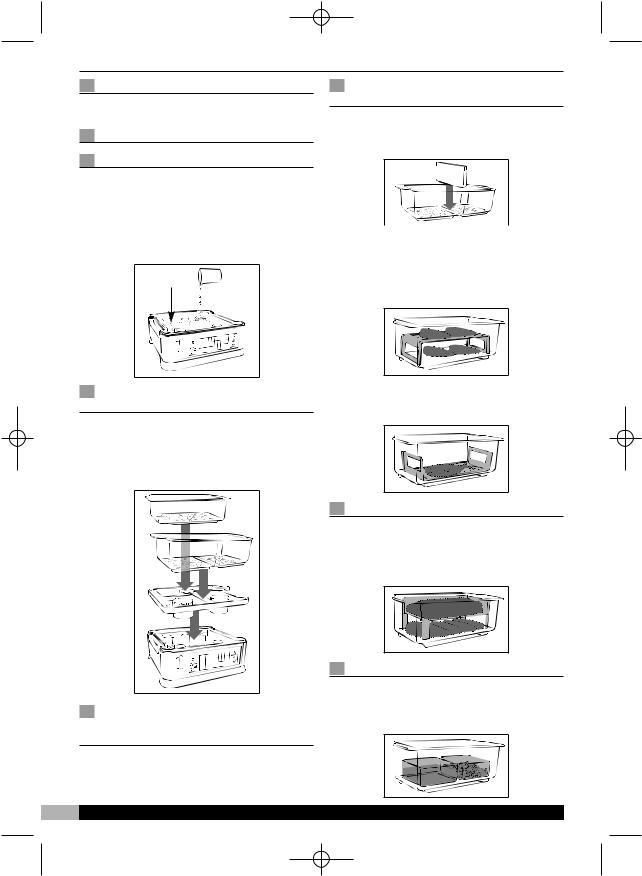
Before using Intellisteam for the first time, wash all parts except the main base unit â.
USING
Filling the water reservoir A
•Fill the water reservoir â with cold water to the maximum level indicated ã. This will produce enough steam to cook for approximately 60 minutes.
Front container removable divider wall
•Use the divider wall Þ if cooking foods with different cook times. Alternatively, use the front container as one large container C.
C
• The system is designed for cold water only. |
|
|
|
|
|
Food plinth |
|||
Do not add any other liquids or add anything |
|
|||
to the water. |
|
|
|
|
A |
• Use in the front or back container. |
|
|
||
Max |
• Use the plinth ï in raised position to place |
|
|
food on and below D. |
|
|
D |
|
Fitting the drip tray and |
• Alternatively, use the plinth upside down to |
|
containers B |
place food on, using the legs as handles for |
|
1 Fit the drip tray á to the main base, |
easy removal E. |
|
E |
||
aligning the steam vents with the heaters ä. |
||
2 Fit the front ß and back Û containers to |
|
|
the drip tray, aligning them above the steam |
|
|
vents in the drip tray. |
|
|
B |
Rice Tray |
|
|
||
|
• Use in the front or back container. |
|
|
• Use for cooking rice or pasta. Other foods |
|
|
may be cooked in the space below the rice |
|
|
tray F. |
F |
Sauce Trays
|
|
• Use in the front or back container. |
|
|
USING THE ACCESSORIES |
• Use for cooking sauce, peas or small |
|
|
TO ARRANGE YOUR FOOD |
portions of rice G. |
|
|
BEFORE COOKING |
G |
|
|
• Place food directly into the containers or use |
|
|
|
accessories as required. The accessories are |
|
|
|
very versatile and can be used in a number |
|
|
|
of ways (see C, D, E, F, G). |
|
|
6 |
UK Helpline 0844 871 0951 Replacement Parts 0844 873 0717 |
Ireland Helpline 1800 409 119 |
|

48780 rev2 29/4/08 14:32 Page 7
• IMPORTANT: If steaming meat, fish or |
H |
poultry together with vegetables, always |
|
place the meat, fish or poultry separately |
|
so that the juices from raw or partially |
|
cooked meat cannot drip onto other |
|
foods. |
|
• Once food is arranged, place all lids ÚÜÝ |
|
back on the containers H. |
|
|
ó |
ô |
|
æ |
ò |
|
|
|
|
|
|
ç |
|
õ |
ì |
|
|
|
|
è |
|
|
í |
|
|
|
|
é |
|
|
î |
ê |
|
|
|
ë |
|
|
|
|
|
|
Display screen features
æ Water level gauge
ç Back heater button
è Front left heater button
é Front right heater button
ê Front dual heater button
ë Display screen
ì Steam button
í Increase steam time button
î Decrease steam time button
ò Digital rectangle icons
ó Food symbols
ô Keep warm symbol
õ Timer column (minutes)
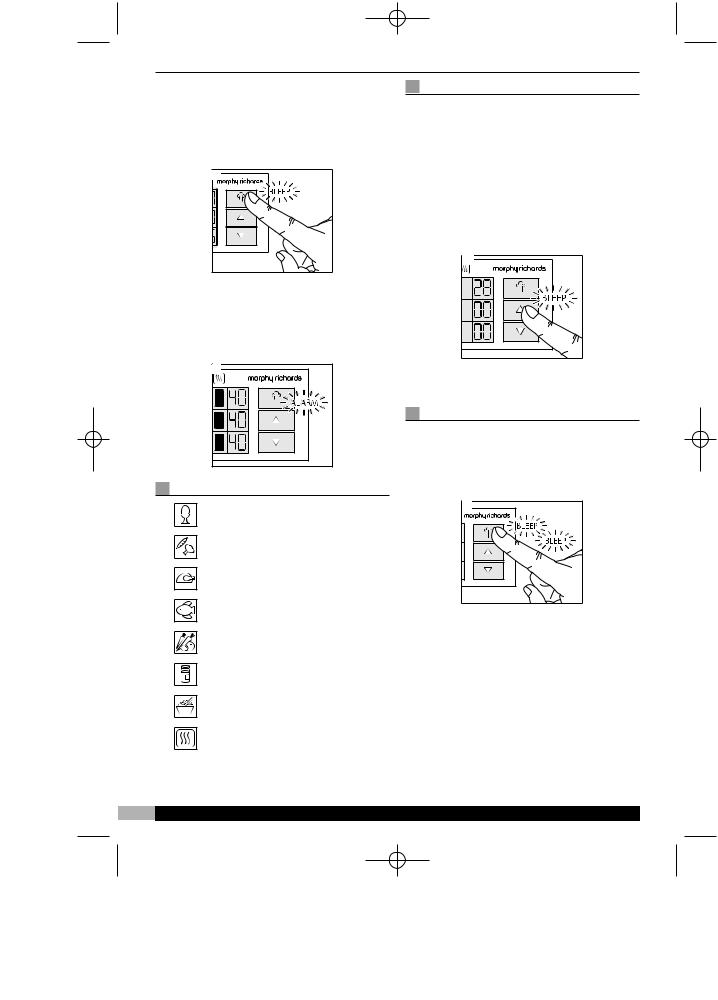
Setting timer using pre-set cook times
1Plug into the electrical socket.
2Set the time for each container using the corresponding heater buttons. If using the front container with the divider wall, use the separate right and left heater buttons.
If using as one large container, use the dual heater button I.
I |
Back |
Front left |
Front dual |
Front right |
3Press the heater button to move the rectangle ò until it appears under the required food symbol (refer to food symbols guide ó). A bleep will sound each time the heater button is pressed. The cook time for each food symbol will appear in the timer column. Repeat this process for each container, the rectangle will flash to indicate your last setting J.
J |
•If using the back container for foods with different cook times, set the timer to the longest cook time. Alternatively, stop the appliance during cooking and add the food with the shortest cook time.
7
48780 rev2 29/4/08 14:32 Page 8
4Press the steam button ì once to begin cooking. A bleep will sound and the display screen and steam button will illuminate brightly until cooking and keep warm finishes. The timer will count down from the longest cook time so everything finishes together K.
K |
•When cooking has finished, the alarm will sound and the keep warm function will start automatically for 40 minutes. To stop, press the steam button once. After 40 minutes, the keep warm function will automatically turn off L. Always check there is water in the water reservoir when using the keep warm function.
L |
Food symbols guide ó
Soft boiled eggs, pre-set time: 16 minutes
Leaf & Pod vegetables, pre-set time: 15 minutes
Chicken,
pre-set time: 27 minutes
Fish,
pre-set time: 20 minutes
Root vegetables, pre-set time: 35 minutes
Sauce,
pre-set time: 30 minutes
Rice,
pre-set time: 42 minutes
Keep warm ô,
pre-set time: 40 minutes
Pre-set times are a guide and based on approximately 4 portions. Refer to ‘Cooking guide’ for portion and specific food type adjustments.
Adjusting the timer
The timer can be adjusted for portion sizes and specific food types (see cooking guide) or to suit your personal preferences.
1Press the heater button until the rectangle appears under the food symbol you want to adjust.
2Press the upwards arrow button to increase the cook time or the downwards arrow button to decrease the cook time. Each time the arrow button is pressed, a bleep will sound and the time will increase/decrease by one minute M.
M |
3Repeat the process for each container as required.
Saving time adjustments
To save your personal time adjustments for future use, hold down the steam button for two seconds. One bleep will sound, indicating steaming has begun, the second bleep indicates your time adjustments have been saved N.
N |
•If you do not want to save your personal time settings for future use, press the steam button once to start cooking.
8 |
UK Helpline 0844 871 0951 Replacement Parts 0844 873 0717 Ireland Helpline 1800 409 119 |
 Loading...