


Owner’s Guide
Mitsubishi Plasma Display PD-5050 & PD-6150

IMPORTANT SAFETY INSTRUCTIONS (PD-5050/PD-6150) Read before operating equipment
1.Read these instructions.
2.Keep these instructions.
3.Heed all warnings.
4.Follow all instructions.
5.Do not use this plasma display near water.
6.Clean only with a dry cloth.
7.Do not block any of the ventilation openings. Install in accordance with the manufacturers instructions.
8.Do not install near any heat sources such as radiators, heat registers, stoves, or other apparatus (including amplifiers) that produce heat.
9.Do not defeat the safety purpose of the polarized or grounding-type plug. A polarized plug has two blades with one wider than the other. A grounding type plug has two blades and third grounding prong. The wide blade or third prong are provided for your safety. When the provided plug does not fit into your outlet, consult an electrician for replacement of the obsolete outlet.
10.Protect the power cord from being walked on or pinched particularly at plugs, convenience receptacles, and the point where they exit from the apparatus.
11.Only use attachments/accessories specified by the manufacturer.
12.Use only with a cart, stand, tripod, bracket,
or table specified by the manufacturer, or sold with the plasma display. When a cart is used, use caution when moving the cart/plasma
display combination to avoid injury from tip-over.
13.Unplug this plasma display during lightning storms or when unused for long periods of time.
14.Refer all servicing to qualified service personnel. Servicing is required when the plasma display has been damaged in any way, such as power-supply cord or plug is damaged, liquid has been spilled or objects have fallen into apparatus, the apparatus has been exposed to rain or moisture, does not operate normally, or has been dropped.
15.This product may contain lead or mercury. Disposal of these materials may be regulated due to environmental considerations.
For disposal or recycling information, please contact your local authorities or the Electronic Industries Alliance: www.eiae.org.
16.Damage Requiring Service - The plasma display should be serviced by qualified service personnel when:
A. The power supply cord or the plug has been damaged; or
B. Objects have fallen, or liquid has been spilled into the plasma display; or
C. The plasma display has been exposed to rain; or
D. The plasma display does not appear to operate normally or exhibits a marked change in performance; or
E. The plasma display has been dropped, or the enclosure damaged.
17.Tilt/Stability - All televisions must comply with recommended international global safety standards for tilt and stability properties of its cabinets design.
•Do not compromise these design standards by applying excessive pull force to the front, or top, of the cabinet which could ultimately overturn the product.
•Also, do not endanger yourself, or children, by placing electronic equipment/toys on the top of the cabinet. Such items could unsuspectingly fall from the top of the set and cause product damage and/or personal injury.
18.Wall Mounting - The plasma display should be mounted to a wall only as recommended by the manufacturer.
19.Power Lines - An outdoor antenna should be located away from power lines.
20.Outdoor Antenna Grounding - If an outside antenna is connected to the receiver, be sure the antenna system is grounded so as to provide some protection against voltage surges and built up static charges.
Section 810 of the National Electric Code, ANSI/NFPA No. 701984, provides information with respect to proper grounding of the mats and supporting structure grounding of the lead-in wire to an antenna-discharge unit, size of grounding connectors, location of antennadischarge unit, connection to grounding electrodes and requirements for the grounding electrode.
21.Objects and Liquid Entry - Care should be taken so that objects do not fall and liquids are not spilled into the enclosure through openings.
The plasma display shall not be exposed to dripping or splashing and that no objects filled with liquids, such as vases, shall be placed on apparatus.
WARNING
To reduce the risk of fire or electric shock, do not expose this plasma display to rain or moisture.
Caution
This device needs to be attached to a stand or other mounting hardware.
Use the following optional accessories. Use with other optional accessories is capable of resulting in instability causing possible injury.
Do Not use the bottom carton as a temporary or permanent stand.
Manufacturer’s name: MITSUBISHI DIGITAL ELECTRONICS AMERICA, INC
Stand: MB-5010/MB-5030 for PD-5050 MB-6130 for PD-6150
Tilt Wall Mount: PMOUNT-5061T
Please contact MITSUBISHI DIGITAL ELECTRONICS AMERICA, INC for approved optional accessories.
Important Information
Precautions
Please read this manual carefully before using your Mitsubishi plasma display and keep the manual handy for future reference.
CAUTION
RISK OF ELECTRIC SHOCK
DO NOT OPEN
CAUTION:TO REDUCE THE RISK OF ELECTRIC SHOCK, DO NOT REMOVE COVER. NO USER-SERVICEABLE PARTS INSIDE. REFER SERVICING TO QUALIFIED SERVICE PERSONNEL.
This symbol warns the user that uninsulated voltage within the unit may have sufficient magnitude to cause electric shock. Therefore, it is dangerous to make any kind of contact with any part inside of this unit.
This symbol alerts the user that important literature concerning the operation and maintenance of this unit has been included.
Therefore, it should be read carefully in order to avoid any problems.
WARNING
TO PREVENT FIRE OR SHOCK HAZARDS, DO NOT EXPOSE THIS UNIT TO RAIN OR MOISTURE. ALSO DO NOT USE THIS UNIT’S POLARIZED PLUGWITH AN EXTENSION CORD RECEPTACLE OR OTHER OUTLETS, UNLESS THE PRONGS CAN BE FULLY INSERTED. REFRAIN FROM OPENING THE CABINET AS THERE ARE HIGH-VOLTAGE COMPONENTS INSIDE. REFER SERVICING TO QUALIFIED SERVICE PERSONNEL.
Warning
Not for use in a computer room as defined in the Standard for the Protection of Electronic Computer/ Data Processing Equipment ANSI/NFPA 75.
This equipment has been tested and found to comply with the limits for a Class B digital device, pursuant to Part 15 of the FCC Rules. These limits are designed to provide reasonable protection against harmful interference in a residential installation. This equipment generates, uses, and can radiate radio frequency energy and, if not installed and used in accordance with the instructions, may cause harmful interference to radio communications. However, there is no guarantee that interference will not occur in a particular installation. If this equipment does cause harmful interference to radio or television reception, which can be determined by turning the equipment off and on, the user is encouraged to try to correct the interference by one or more of the following measures:
•Reorient or relocate the receiving antenna.
•Increase the separation between the equipment and receiver.
•Connect the equipment into an outlet on a circuit different from that to which the receiver is connected.
•Consult the dealer or an experienced radio / TV technician for help.
Warnings and Safety Precautions
The Mitsubishi plasma display is designed and manufactured to provide long, trouble-free service. No maintenance other than cleaning is required. Use a soft dry cloth to clean the panel. Never use solvents such as alcohol or thinner to clean the panel surface.
The plasma display panel consists of fine picture elements (cells). Although Mitsubishi plasma display’s utilize panels with more than 99.99 percent active cells, there may be some cells that do not produce light or remain lit.
For operating safety and to avoid damage to the unit, please read and observe the following instructions. To avoid shock and fire hazards:
1.Provide adequate space for ventilation to avoid internal heat build-up. Do not cover rear vents or install the unit in a closed cabinet or shelves.
The unit is equipped with cooling fans. If you install the unit in an enclosure, make sure there is adequate space at the top of the unit to allow hot air to rise and escape. If the display becomes too hot, the overheat protector will be activated and the display will be turned off. If this happens, turn off the power to the display and unplug the power cord. If the room where the monitor is installed is particularly hot, move the display to a cooler location, and wait for the display to cool for 60 minutes. If the problem persists, contact your Mitsubishi dealer for service.
2.Do not use the power cord polarized plug with extension cords or outlets unless the prongs can be completely inserted.
3.Do not expose the unit to water or moisture.
4.Avoid damage to the power cord, and do not attempt to modify the power cord.
5.Unplug the unit during electrical storms or if the unit will not be used over a long period.
6.Do not open the cabinet which has potentially dangerous high voltage components inside. If the unit is damaged in this way the warranty will be void. Moreover, there is a serious risk of electric shock.
7.Do not attempt to service or repair the unit. Mitsubishi is not liable for any bodily harm or damage caused if unqualified persons attempt service or open the back cover. Refer all service to authorized Mitsubishi Service Centers.
NOTE:
When you connect a computer to this monitor, use an RGB cable including the ferrite cores on both ends of the cable. If you do not do this, this display will not conform to mandatory FCC standards.
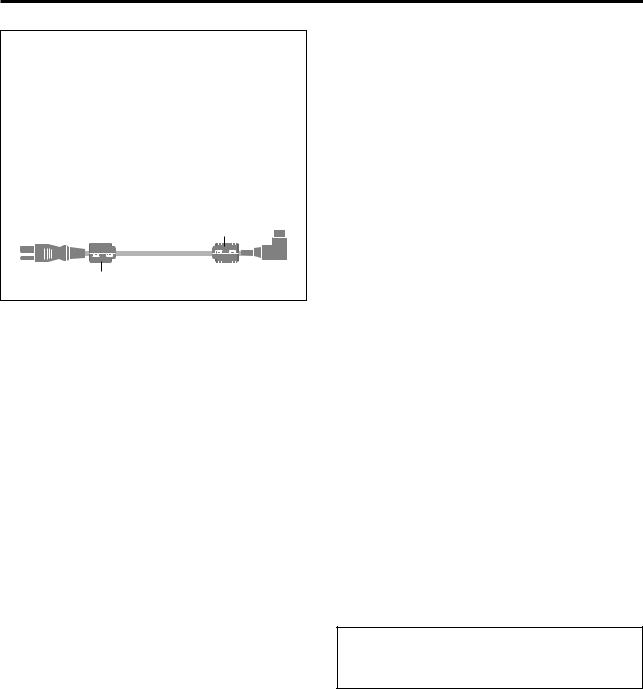
Attaching the ferrite cores:
Attach the ferrite cores on both ends of the power cable (supplied).
Close the lid tightly until the clamps click. *HDMI cable doesn’t need ferrite cores.
Power cable (supplied)
core (large)
core (large)
To avoid damage and prolong operating life:
1.Use only with 100V-240V 50/60Hz AC power supply. Continued operation at line voltages greater than 100240 Volts AC will shorten the life of the unit, and might even cause a fire hazard.
2.Handle the unit carefully when installing it and do not drop.
3.Set the unit away from heat, excessive dust, and direct sunlight.
4.Protect the inside of the unit from liquids and small metal objects. In case of an accident, unplug the unit and have it serviced by an authorized Mitsubishi Service Center.
5.Do not hit or scratch the panel surface as this causes flaws on the surface of the screen.
6.For correct installation and mounting it is strongly recommended to use a trained, authorized Mitsubishi dealer.
7.Only use tabletop stands or wall-mount brackets that are designed specifically for this product.
8.As is the case with any phosphor-based display (like a CRT monitor, for example) light output will gradually decrease over the life of a Plasma Display Panel.
Recommendations to avoid or minimize uneven phosphor aging:
Like all phosphor-based display devices and all other gas plasma displays, plasma displays can be susceptible to uneven phosphor aging under certain circumstances. Certain operating conditions, such as the continuous display of a static image over a prolonged period of time, can result in uneven phosphor aging if proper precautions are not taken. To protect your investment in this Mitsubishi plasma display, please adhere to the following guidelines and recommendations for minimizing this type of damage:
1.Do not turn off ORBITER.*
2.Always enable and use your computer’s video game or DVD player screen saver during use with these sources.
3.Display a moving image whenever possible.
4.Change the position of the menu display from time to time.
5.Always power down the display when you are finished using it.
If the plasma display is in long term use or continuous operation, take the following measures to reduce the likelihood of uneven phosphor aging:
1.Do not turn off ORBITER.*
2.Lower the Brightness and Contrast levels as much as possible without impairing image readability.
3.Display an image with many colors and color gradations (i.e. photographic or photo-realistic images).
4.Create image content with minimal contrast between light and dark areas. Use complementary or pastel colors whenever possible.
5.Avoid displaying images with few colors and distinct, sharply defined borders between colors.
NOTE:
Uneven phosphor aging/burn-in is not covered by the warranty.
Contact Mitsubishi at 1-800-332-2119 for other recommended procedures that will best suit your particular application needs.
*ORBITER - Uneven phosphor aging/burn-in reduction feature. To minimize the risk of uneven phosphor aging/burn-in when displaying still images, the Mitsubishi PD-5050 and PD-6150 offers a built-in feature known as ORBITER. The ORBITER feature intermittently shifts the screen image horizontally and vertically in small increments. This intermittent screen movement is usually not evident in full motion video. In some instances the ORBITER shift might be evident while displaying static guides or menus. The default setting for ORBITER is On (AUTO1). Mitsubishi chose this setting to help reduce uneven phosphor aging. Please do not shut the ORBITER off. For more information regarding ORBITER, see page 27.

WARNING: Do not leave stationary or letterbox images on-screen for extended periods of time. Mix types of pictures shown. Uneven phosphor aging is NOT covered by your warranty.
The normal use of a TV should include a mixture of TV picture types. The most frequently used picture types should fill the screen with constantly moving images rather than stationary images or patterns. Displaying the same stationary patterns over extended periods of time, or displaying the same stationary pattern frequently can leave a subtle but permanent ghost image. To avoid this, mix your viewing pattern. Do not show the same stationary image for more than 15% of your total TV viewing in any one week. Display constantly moving and changing images that fill the screen whenever possible.
This plasma display is a phosphor-based display. As is the case with any phosphor-based display (like a CRT TV/ monitor, for example) light output will gradually decrease over the life of a plasma display panel. Normal TV pictures fill the screen with constantly changing images. Under these conditions, phosphor-based displays age at an even rate across the entire screen. This maintains a TV picture that is evenly bright over the whole screen. Stationary images or images that only partially fill the screen (leaving black or colored bars to fill the screen), when used over extended periods of time or when viewed repeatedly, can cause uneven aging of the phosphors used in plasma displays and can leave subtle ghosts of the stationary images in the picture.
When using a computer or similar device through a VGA input, be sure to turn on the Screen Saver feature and set the activation time to 5 minutes or less. If your computer program allows, you should also set your toolbars to the hidden mode.
Still or stationary images may be received from broadcasters, cable channels, satellite channels, DVD discs, video tapes, laser discs, on-line services, web/internet searching devices, video games, and digital TV tuner/converter boxes. Examples of these types of images include, but are not limited to the following:
•Letterbox top/bottom black bars: shown at the top and bottom of the TV screen when you watch a widescreen (16:9) movie on a standard (4:3) TV.
•Side bar images: solid bars shown on each side of an image when watching a standard (4:3) program on a widescreen (16:9) TV.
•Stock-market report bars: ticker running at the bottom of the TV screen.
•Shopping channel logos & pricing displays: bright graphics that are shown constantly or repeatedly in the same location.
•Video game patterns and scoreboards
•Bright station logos: moving or low-contrast graphics are less likely to cause uneven aging of the picture tubes.
•On-line (Internet) web sites: or any other stationary or repetitive computer style images.
•Closed Caption Backgrounds: If Close Caption will be used frequently Mitsubishi suggests the use of the gray background.

Cleaning Safeguards
Plasma Display Screen & Cabinet
Please follow the cleaning safeguards listed below to prevent damage to your Plasma Display and retain this document for future reference.
IMPORTANT: No Abrasives!
DO NOT use any kind of abrasive cloth or cleaner or ammonia on the Plasma Display’s screen or cabinet.
Cleaning Your Plasma Display
Normally, light dusting with a dry, non-abrasive cloth will clean your Plasma Display. If cleaning beyond this is needed, please follow these guidelines:
First, turn off the Plasma Display and unplug the power cord from the wall outlet before cleaning.
Cleaning the cabinet of your Plasma Display
•Gently wipe down the Plasma Display with a soft, nonabrasive cloth such as cotton flannel or a clean cloth diaper, lightly moistened with water.
•Dry with a second dry, soft, non-abrasive cloth.
General Cleaning Warnings:
•DO NOT apply pressure to the Plasma Display’s screen.
•DO NOT allow liquid to enter the Plasma Display through the ventilation slots or any crevice.
•DO NOT use any strong or abrasive cleaners because they can scratch the screen and the cabinet.
•DO NOT use any cleaners that contain ammonia, bleach, alcohol, benzene, or thinners because they can damage and dull the surfaces.
•DO NOT scrub or rub the screen or cabinet. Wipe it gently.
IMPORTANT
For further assistance in operating your Plasma Display or if you are in need of service, please contact us at www.mitsubishi-tv.com or call Consumer Relations at
800-332-2119

Introduction
Introduction to the PD-5050/ PD-6150 Plasma Displays
Mitsubishi’s PD-5050/PD-6150 plasma displays are a seamless blend of cutting-edge visual technology and sophisticated design. The displays sleek techno-art lines blend in well with most environments. The displays crisp, vivid image quality will transform data from any graphic medium from PCs to DVD players into art. Mitsubishi has made sure that a host of multimedia resources can be easily connected and displayed as brilliantly as intended.
The features you’ll enjoy include:
•16:9 aspect ratio
•Capsulated Color Filter (CCF) and black matrix
•The enhanced display uses a two-stage filtering system for deeper, more accurate colors.
•High-resolution screen: 1365 x 768 pixels
•160-degrees of off-axis viewing, horizontally and vertically.
•Flicker - and warp - free display provides excellent image geometry even in screen corners
•Not affected by magnetic fields, no color drift or edge distortion.
•VGA, SVGA, XGA, SXGA, UXGA computer signal compatibility
•NTSC, PAL, SECAM, composite and S-Video signal compatibility
•480P, 1080I, 720P and HDTV signal compatibility
•PCs, VCRs, Laser Disc and DVD player source compatibility
•Sophisticated formatting circuitry automatically converts VGA, SVGA, XGA, SXGA and UXGA signals to the panel’s native resolution
•Precision algorithms are used to convert interlaced signals to progressive scan.
•User selectable on-screen color temperature settings
•Component video input terminal for DVD, 15.75kHz (Y, CB, CR )
•Digital broadcasting source compatibility
•Menu-driven on-screen control system that makes image adjustments a snap
•Eight languages (English, German, French, Italian, Spanish, Swedish, Chinese and Russian.)
Contents of the Package
Plasma display
Power cord
Remote control with two AAA Batteries
Owner’s guide
Registration Card
Safety metal fittings*
Screws for safety metal fittings*
Ferrite cores (large x 2)
Cable clamps
BNC-RCA Adapters
*These fittings are for fastening the unit to a wall to prevent tipping when used with an optional tabletop stand. Fasten the safety fittings to the holes in the back of the display using the mount screws.
Options
•Tabletop stand
•Tilt Wall Mount

Battery installation and replacement ............................ |
|
Operating range ........................................................... |
|
Handling the remote control......................................... |
|
To turn the unit ON and OFF: ................................... |
|
|
|
To adjust the sound volume:..................................... |
|
|
|
To cancel the sound:................................................. |
|
|
|
To check the settings: ................................................ |
|
|
|
|
|
To set the off timer: .................................................. |
|
To check the remaining time: .................................... |
|
To cancel the off timer: ............................................. |
|
When viewing videos or digital video discs ............. |
|
|
|
Storing picture settings.............................................. |
|
Adjusting the picture................................................. |
|
Reducing noise in the picture .................................... |
|
Setting the color temperature .................................... |
|
Adjusting the color to the desired level ..................... |
|
Changing the Gamma Curve ..................................... |
|
Making the Low Tone adjustments............................ |
|
Adjusting the pedestal level ...................................... |
|
ColorView ............................................................. |
|
Film Mode ................................................................ |
|
Setting the picture mode according to the |
|
brightness of the room............................................. |
Adjusting the treble, bass and left/right balance |
|
and audio input select.............................................. |
|
Selecting the input of the audio connectors ............... |
|
Adjusting the Position, Size, Fine Picture, PictureAdj......
Setting the language for the menus............................ |
|
Setting the BNC connectors ...................................... |
|
Setting high definition images to the suitable |
|
screen size............................................................... |
|
Setting a computer image to the correct RGB |
|
select screen ............................................................ |
|
Setting the black level for HDMI signal |
|
Setting the video signal format.................................. |
|
Setting the background color when no signal is |
|
being input .............................................................. |
|
Setting the gray level for the sides of the screen ........ |
|
Setting the screen size for S1/S2 video input............. |
|
Turning the display menu on/off ............................... |
|
Setting the position of the menu ................................ |
|
Resetting to the default values................................... |
|
Setting the power management for computer images ......... |
|
POWER/STANDBY indicator .................................. |
|
Setting the Input Skip................................................ |
|
Reducing the burn-in of the screen ............................ |
|
Checking the frequencies, polarities of input |
|
signals, and resolution ............................................. |
CAUTION
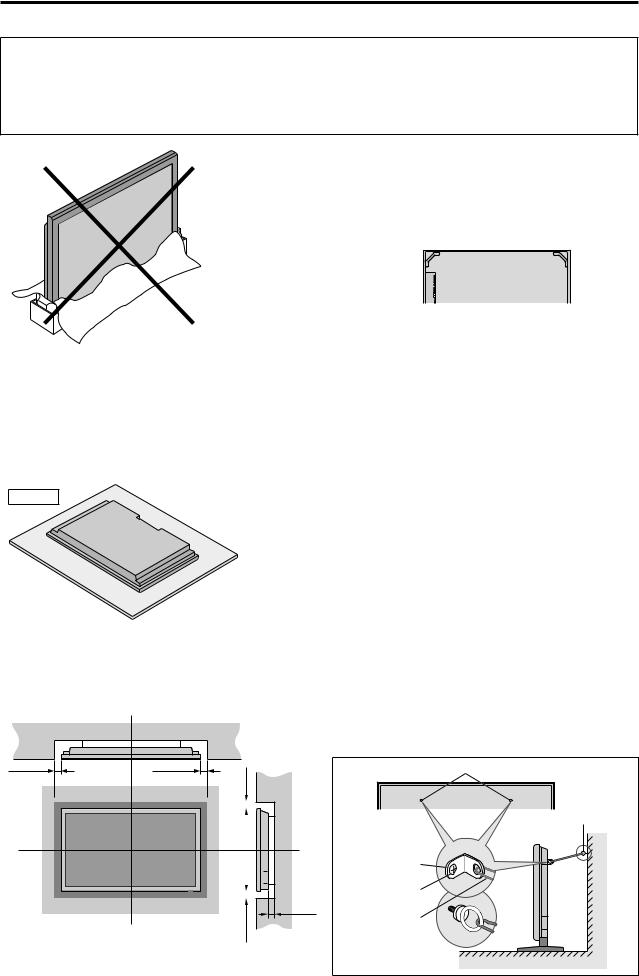
This device needs to be attached to a stand or other mounting hardware. Be sure to use a stand or other mounting hardware that is designed specifically for this product.
DO NOT USETHE BOTTOM CARTON AS ATEMPORARY OR PERMANENT STAND. (See Drawing A)
|
|
|
|
When installing or carrying, use the |
||
|
|
Drawing B |
|
|||
|
|
|
handles attached to the upper back |
|||
|
|
|
|
|||
Drawing A |
|
|
|
of the display. |
||
|
|
|
|
|
|
|
|
|
|
|
|
|
|
|
|
|
|
|
|
|
You can attach your optional mount or stand to the plasma display in the following way:
1.Before performing work make sure to disconnect theAC cord from the plasma display.
2.Before performing work spread the protective sheet, which was wrapped around the display, on a flat, even surface.This will prevent the display from being damaged.
3.Use the handles (Drawing B) to gently lay the plasma display face down on the protective sheet. (See Drawing C).
4.Do not touch or hold the screen face while carrying the display.
5.To complete the installation follow the instructions included with the stand or other mounting hardware.
Drawing C
To allow heat to disperse, leave space between surrounding objects as shown on the diagram below when installing.
|
Wall |
|
50mm (2") |
50mm (2") |
(2") |
|
|
|
|
|
|
|
50mm |
|
|
Wall |
||
|
|
|
|
|
|
|
|
|
|
|
|
|
|
|
|
|
|
|
|
|
|
|
|
|
|
|
|
|
|
|
|
|
|
|
|
|
|
|
|
|
|
|
|
|
|
|
|
|
|
|
|
|
|
|
|
|
|
|
|
|
|
|
|
|
|
|
|
|
|
|
|
|
|
|
|
|
|
|
|
|
|
|
|
|
|
|
|
|
|
|
|
|
|
|
|
|
|
|
|
|
|
|
|
|
|
|
|
|
|
50mm (2") (2")mm 50
These are fittings for fastening the unit to a wall to prevent tipping due to external shock when using the stand (optional). Fasten the safety fittings to the holes in the back of the monitor using the safety fitting mount screws. * Safety metal fittings will differ according to the model.
Screw hole
Screw or Hook etc. (Not supplied)
Safety metal fittings
Screw for Safety metal fittings
Metal chain (Not supplied)
Wall |
Table Top
1
|
|
|
|
|
|
|
|
|
|
|
|
|
|
|
|
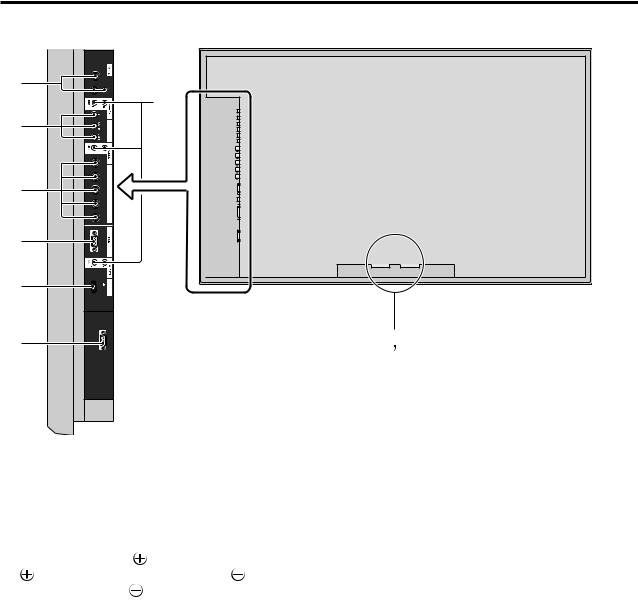
POWER
Push this button to turn the display s main power on or off.
REMOTE SENSOR WINDOW
Receives the signals from the remote control.
POWER/STANDBY Indicator
When the power is on ............................. Lights green. When the power is in the standby mode ... Lights red.
INPUT / EXIT BUTTON
Switches the input.
The available inputs depend on the setting of BNC INPUT , RGB SELECT and HDMI SET UP . Functions as the EXIT buttons in the On-Screen Menu mode.
LEFT/ and RIGHT/+
Functions as the ADJUST ( / ) buttons in the OnScreen Menu mode.
VOLUME  and
and
Adjusts the volume. Functions as theADJUST ( / ) buttons in the On-Screen Menu mode.
MENU/ENTER BUTTON
Display the main menu or select a menu item.
ThePoweron/offbuttondoesnotdisconnecttheplasma display completely from the main power supply.
2
|
|
|
||
C |
3 INPUT |
1 INPUT |
2 INPUT |
|
|
|
|
D |
|
E |
|
|
1 COMPONENT |
|
|
|
R/Cr/Pr |
|
|
F |
|
G/Y |
|
|
|
H B/Cb/Pb |
RGB2/COMPONENT2 |
|
|
|
|
|
||
|
|
V |
|
|
G |
|
|
|
|
H |
|
|
MONITORLINK |
|
I |
|
MONITORLINK CONTROL |
A |
B |
AAC IN
Connect the included power cord here.
BEXT SPEAKER L and R
Connect speakers (optional) here.Maintain the correct
polarity. Connect the |
(positive) speaker wire to the |
EXT SPEAKER terminal and the (negative) |
|
speaker wire to the |
EXT SPEAKER terminal on |
both LEFT and RIGHT channels.
Please refer to your speaker s owner s manual.
CINPUT1, 2, 3 (BNC, RCA, S-Video)
Connect VCR s, DVD s or Video Cameras, etc. here.
DAUDIO1, AUDIO2, AUDIO3
These are audio input terminals.
The input is selectable. Select which video input to assign them to from the audio menu screen.
ECOMPONENT1
Connect DVD s, Cable Boxes or High Definition sources, etc. here.
FRGB2 / COMPONENT2
COMP2: You can connect DVDs, High Definition sources, Cable Boxes, etc. here.
This input can be set for use with an
RGB or component source. (see page 22, Setting the BNC connectors.)
RGB2: YoucanconnectananalogRGBsignal and the syncronization signal.
GRGB1 (D-Sub)
Connect an analog RGB signal from a computer, etc. here.
HMONITORLINK/HDMI
Connect a digital signal from a source with a HDMI output.
IMONITORLINK CONTROL (RS-232C)
This terminal is used when operating and controlling the display externally (by external control).
3
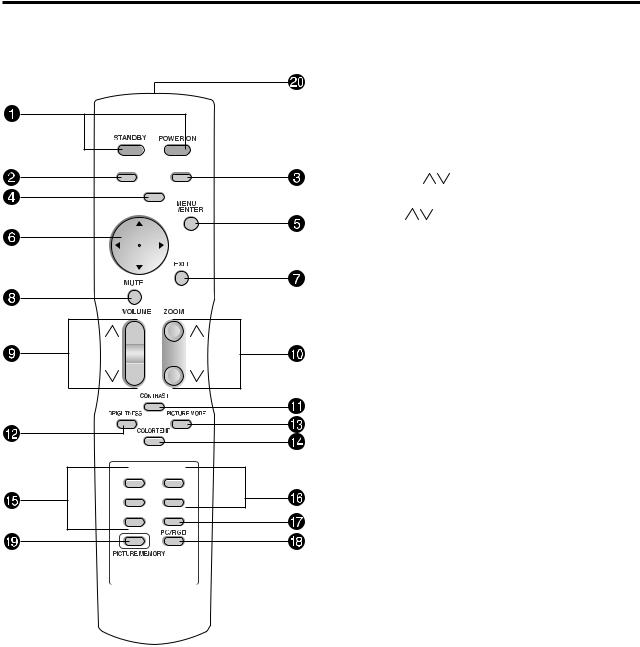
POWER ON/STANDBY
Switches the power to ON or STANDBY mode. (These buttons do not operate when POWER/ STANDBY indicator of the main unit is off.)
SLEEP
Press this button to activate the off timer.
INFO
Displays the source settings on the screen.
FORMAT
Automatically detects the signal and sets the aspect ratio. FORMAT button is not active for all signals.
MENU/ENTER
Press this button to access the Menu.
Press this button during the display of the main menu to go to the sub menu.
ADJUST ( / / / )
Use these buttons to select items or settings and to adjust settings or switch the display patterns.
EXIT
Press this button to exit the MAIN MENU. Press this button during the display of the sub menu to return to the previous menu.
MUTE
Press this button to mute the audio.
VOLUME ( )
Press this button to adjust audio volume.
ZOOM ( )
Press this button to enlarge or reduce the image.
CONTRAST
Press this button to adjust contrast directly.
BRIGHTNESS
Press this button to adjust brightness directly.
PICTURE MODE
Press this button to adjust picture mode directly.
COLOR TEMP
Press this button to adjust color tone directly.
INPUT1, 2, 3
Press one of these buttons to select INPUT1 or INPUT2 or INPUT3 as the source.
INPUT 1-3 can also be selected using the INPUT/EXIT button on the front panel of the display.
COMP1, 2
Press one of these buttons to select COMP1 or COMP2 as the source.
COMP 1-2 can also be selected using the INPUT/EXIT button on the front panel of the display.
MONLINK
Press this button to select MONLINK/HDMI as the source.
PC/RGB
Press this button to select PC/RGB as the source. PC/ RGB can also be selected using the INPUT SELECT button on the display.
PICTURE MEMORY
Switches sequentially between picture memory settings 1 to 6
Remote control signal transmitter
Transmits the remote control signal
4
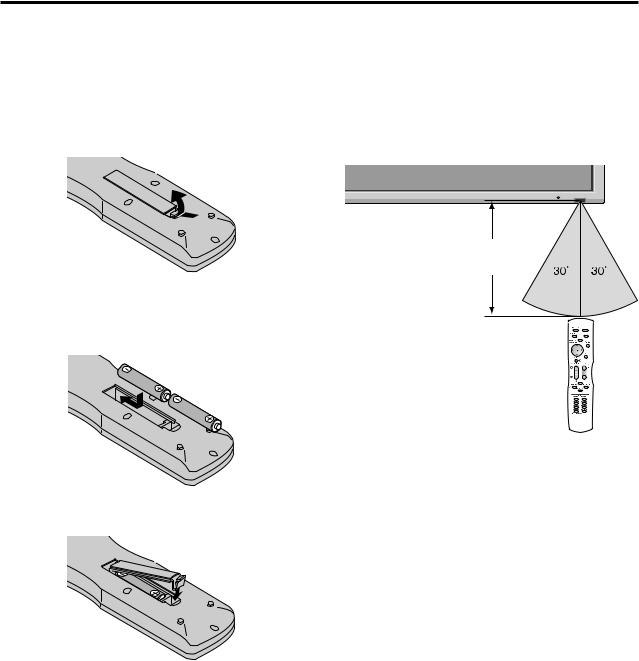
Battery Installation and Replacement
Insertthe2 AAA batteries,makingsureinsertthemwith the proper polarity.
1.Remove the remote control s back cover by gently pressing the rigid tab in the direction of the arrow.
2.Installthebatteriesaccordingtothe(+)and( )indication inside the case. For ease of installation, install the negative ( ) side first.
3.Replace the cover.
Operating Range
*Use the remote control within a distance of about 7 m/ 23ft. from the front of the display s remote control sensor andathorizontalandverticalanglesofuptoapproximately 30°.
*The remote control operation may not function if the display s remote control sensor is exposed to direct sunlight or strong artificial light, or if there is an obstacle between the sensor and the remote control.
Handling the remote control
Do not drop or mishandle the remote control.
Do not get the remote control wet. If the remote control gets wet, wipe it dry immediately.
Avoid heat and humidity.
When not using the remote control for a long period, remove the batteries.
Donotusenewandoldbatteriestogether,orusedifferent types together.
Do not take apart the batteries, heat them, or throw them into a fire.
5
 Loading...