


MINOLTA X-700INSTRUCTION MANUAL
Before using your camera for the first time, study this manual carefully all the way through — or at least all the sections covering your photographic needs. As you read, attach a lens, load batteries, turn the main switch on, and handle your X-700 to acquaint yourself with its parts and features. Then load it with film and proceed to actual picture taking. In this way you can take good photos and begin to realize the broad potential of your X-700 right from the start.
To obtain many years of service from your X-700, be sure to read and follow the precautions given on page 8 and elsewhere. Keep this manual for reference later as necessary.
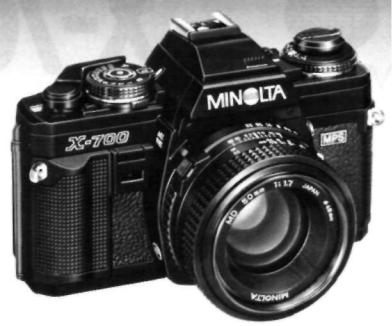
Your Minolta X-700, the state-of-the-art SLR camera at the center of the Minolta
Program System, offers you the focus-and-shoot simplicity of programmed auto-exposure |
|
(AE) control: Both aperture and shutter speed are automatically set over a wide range by |
|
the camera, with continuous viewfinder LED readout of speeds being set. The program is |
|
designed to maintain fastest practicable speeds as light dims, then give audible beeps, if |
|
desired, to guard against blur from subject/camera-movement, making the X-700 ideal if |
|
you're starting out in photography or if you want full |
program automation for ease of use |
or fast-breaking action. |
|
The X-700's aperture-priority AE mode lets you |
control the depth of field but still |
maintain AE control of stepless shutter speeds fine-tuned for proper exposure with light |
|
metered up to the instant of exposure. This mode is |
excellent for AE photography with |
the wide range of Minolta SLR system lenses and accessories available, including mirror lenses and close-up bellows — not possible with shutter-priority AE systems. For full creative flexibility, aperture and shutter can be set independently in any combination in the X-700's metered/full-manual mode.
Other handy features of your X-700 include: touch-switch metering that keeps the
LEDs on for 15 seconds |
after you first touch the operating button; AE lock for holding |
|
adjusted-framing meter readings;+/— 2EV stops' exposure adjustment with LED indicator |
||
in finder; self-timer with triple-rate visual/audible indications; flash-ready and Flash |
||
Distance Checker |
(FDC) |
indications in finder; split-image microprism spot and Acute |
Matte focusing screen; integral front and back grips for surer holding; Safe Load Signal; |
||
and a new easy-load take-up spool. |
||
A programmed |
autoflash, multi-function back, and quartz data back (see pages 53 to |
|
55) complete the |
Minolta |
Program System; also available are a new wireless controller, a |
|
|
1 |
motor drive and auto winder, and a broad range of other SLR system accessories.
CONTENTS
NAMES OF PARTS/MAIN FEATURES . .. |
4 |
TAKING CARE OF YOUR X-700 |
8 |
Strap and case |
9 |
PREPARING TO TAKE PICTURES |
10 |
MOUNTING AND CARE OF LENSES |
10 |
Body and lens caps |
10 |
Attaching and removing lenses |
11 |
Care of glass surfaces |
11 |
BATTERIES AND POWER |
12 |
Batteries |
12 |
Main switch |
13 |
Operating button |
14 |
Automatic battery check and shutter lock . . . . 14 |
|
Battery holder |
15 |
Cold-weather operation |
15 |
FILM AND FILM SPEED |
16 |
LOADING AND ADVANCING FILM |
17 |
Loading film |
17 |
Film-advance lever |
20 |
Safe Load Signal/Frame counter |
20 |
REWINDING AND UNLOADING FILM |
21 |
TAKING PICTURES WITH YOUR |
|
X-700 |
23 |
Pre shooting check |
23 |
EXPOSURE CONTROL WITH THE X-700 ...... 24 |
|
Summary of modes |
24 |
Mode/shutter-speed selector and |
|
P/A-lock release |
25 |
Minimum-aperture lock |
25 |
Eyepiece cap |
25 |
PROGRAMMED AUTO-EXPOSURE |
|
MODE (P mode) |
26 |
FUNDAMENTALS OF EXPOSURE |
28 |
COUPLED RANGES AND PROGRAM |
|
GRAPH |
30 |
LENS AND MODE COMBINATIONS |
31 |
APERTURE-PRIORITY AUTO- |
|
EXPOSURE MODE (A mode) |
32 |
METERING WITH THE X-700 |
34 |
AE LOCK |
34 |
EXPOSURE-ADJUSTMENT CONTROL |
35 |
WHEN TO USE AE LOCK AND |
|
EXPOSURE-ADJUSTMENT CONTROL |
. . . 36 |
2

METERED/FULL-MANUAL EXPOSURE MODE (M mode)
Long exposures ("B" setting)
FOCUSING
Focusing aid
Distance scale
Film-plane index
Infrared index
•DEPTH OF FIELD Preview button Depth-of-field scale
•BLUR FROM CAMERA/SUBJECT
MOVEMENT
SUPPORTING THE CAMERA AND RELEASING THE SHUTTER
Slow-shutter-speed warning Mounting camera on tripod Self-timer
Other ways of releasing shutter
38
39
40
40
41
41
41
42
43
43
44
45
4G
46
47
47
• CREATIVE CONTROL OF APERTURE |
|
AND SHUTTER SPEED |
48 |
FLASH PHOTOGRAPHY |
50 |
ACCESSORIES (Minolta Program |
|
System) |
53 |
TECHNICAL DETAILS |
58 |
STORAGE |
61 |
• : Supplemental information on fundamentals of photography given in boxes
3
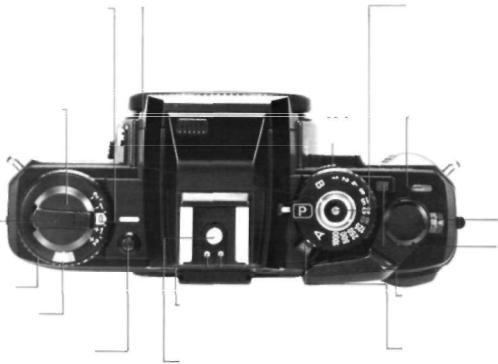
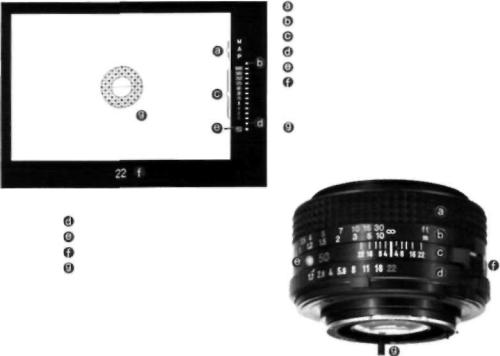
NAMES OF PARTS/MAIN
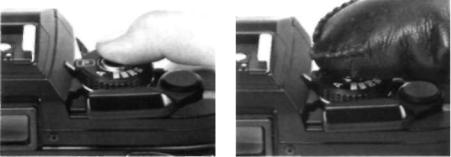
Exposure-adjustment control
2 EV stops continuous adjustment over or under normal exposure, with LED indicator in viewfinder
Back-cover release k n o b -
Rewind crank
Film-speed ring-
Film-speed window
Exposure-adjustment control release
4
FEATURES
Mode/shutter-speed selector P: Programmed AE
A: Aperture-priority AE
1 -1000: Stepped shutter speeds for metered/full manual
B: Long ("bulb") exposures
Main switch
Flash/camera-control contacts For dedicated programmed autoflash and X-series autoflashes
Sync contact
Operating button
"Soft touch" electromagnetic release; locks when battery power too low
"Touch switch" metering with 15-sec. hold of LED display
Safe Load Signal
Monitors correct film advance
Frame counter
P/A-lock release
Film-advance lever
Smooth 130" advance stroke after 30' unengaged movement
Main-switch position indicator OFF, ON, ON  (audible slow- shutter-speed warning and self-
timer beeps)
AE lock/self-timer switch
•AE lock for holding close-up or adjusted-viewing meter readings
•Electronic self-timer with triple-rate blinking LED and optional audible beeps
Front grip
Integral front and back grips giving camera surer hold
Sync terminal
Bayonet lens mount
New integrally lubricated stainlesssteel mount offers greater durability and smoother lens changing; accepts virtually all Minolta SLR interchangeable lenses and accessories
MD coupler
MC coupler
Not visible:
• Silicon photocell atop pentaprism for full-aperture metering for viewfinder LED display, and for "final check" stop-down metering
Lens-mounting index
Lens-release button
Mirror
Specially coated to make viewfinder 11 % brighter
Strap eyelet
Shutter-release socket
Diaphragm-control lever
Preview button Easy-to-use spring-loaded button for previewing depth of field
• Second silicon photocell in mirror compartment for Direct Autoflash Metering with PX-
series Auto Electroflashes
5
 Mode indicators
M: Metered manual
A: Aperture-priority AE P: Programmed AE
(blinks if lens not set at minimum aperture or non-MD lens in use
 Over-range LED
 Shutter-speed scale/LEDs
• LED indicates stepless speed set by camera in P and A modes
• LED indicates stepped speed recommended in M mode
• " 6 0 " LED blinks at 2Hz as flash-ready indicator with
PXand X-series Auto Electroflashes
• " 6 0 " LED blinks at 8Hz as flash-distance checker (FDC)
6
with PX-series Auto Electroflashes
Focusing grip
Distance scale
Depth-of-field scale
Aperture ring/scale
Mounting index
Minimum-aperture lock
Prevents accidental movement of
aperture ring in P mode
Diaphragm-control pin
Under range LED Exposure-adjustment LED Aperture setting
Focusing screen
Split-image spot, microprism band, and Acute Matte field; exchangeable with eight other screens at authorized Minolta service facilities
Lens shown: 50mm f/1.7 MD
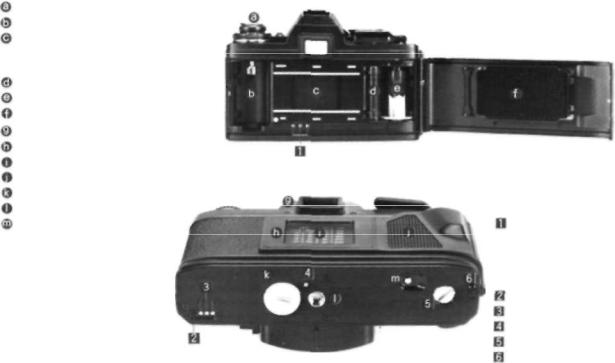
Back-cover release knob Film-cartridge chamber Shutter curtain
Horizontal-traverse focal-plane type
Sprocket Take-up spool Pressure plate
Eyepiece frame/eyepiece Memo holder
ISO (DIN-ASA) table Back grip
Battery-chamber cover
Tripod socket
Rewind release
Accessory connections:
Contact terminals for camera control by Multi-Function Back and data-imprint control with Multi-Function Back or Quartz Data Back 1
Motor-drive guide socket Motor-drive contacts Winder contact Winder/motordrive coupler Winder/motordrive guide
socket
7
TAKING CARE OF YOUR X-700
Your Minolta X-700 is a high-precision instrument designed to give many years of trouble-free picture taking if used and cared for properly. The precautions you should follow for keeping the camera in good operating condition are given below and at various places throughout the text.
• Always keep your camera in its case with the lens |
|
capped when not in use, or with a body cap on when a |
|
lens is not attached. |
|
• |
No part of the X-700 should be forced at any time. |
If |
operation is not as you think it should be, carefully |
restudy the |
applicable |
instructions |
or |
consult |
an |
|
authorized Minolta service facility. |
|
|
|
|||
• Never subject your camera to shock, |
high |
heat |
||||
and/or humidity, water, |
or |
harmful |
chemicals. |
Be |
||
particularly |
careful not |
to |
leave it |
in |
the glove |
|
compartment or other places in motor vehicles where it may be subject to high temperatures.
• Never lubricate any part of the body or lens.
• Never touch the shutter curtains or the front inside part of the body with fingers or other objects or blow against them, as doing so might damage the alignment and movement of either the curtains or mirror.
•External camera and lens barrel — but not glass — surfaces should be wiped with a soft, silicone-treated cloth now and then, especially after using the camera near salt water.
•It is recommended to have your camera cleaned once per year at an authorized Minolta service facility.
Lens-care instructions are given on pages 10 and 11. If you will not be using your camera for an extended period, see the storage instructions at the back of the manual.
If you have questions concerning operation of your
camera or about photography, feel free |
to contact |
|
your local |
Minolta agent or distributor by writing one |
|
of the offices listed inside the back cover. |
|
|
CAUTION |
|
|
• Before |
using lenses, flashes, or other |
accessories |
made by companies other than Minolta, attach them to the camera to make sure they function properly and take test photographs if necessary.
8

Strap and case
The strap (provided with camera) and case (sold separately) should be attached as shown to keep your camera handy for use and to protect it from being dropped or bumped.
NOTE
• The protective plastic film on the camera's base can be removed if desired.
Eyepiece cap
Battery
holder
Shoulder pad
9
PREPARING TO TAKE PICTURES
The next four sections cover things you must do to prepare your camera for taking pictures:
•Attach lens (at right).
•Insert batteries and turn main switch on (pp. 12 and 13).
•Set film speed (p. 16).
• Load camera with film (pp. 17 to 20).
You must always install batteries properly and turn on the main
switch before |
loading film; |
the |
order of other steps may vary. |
|
|
Instructions |
for rewinding |
and |
unloading film |
are also given in this |
|
part. We recommend reading them before starting to use your camera, so that you will be sure what to do when you come to the end of the film.
MOUNTING AND CARE OF LENSES
Body and lens caps
Remove body and lens caps as shown above.
CAUTIONS
• Always cap the rear end of the lens and the lens mount of the camera when the lens is not attached, and the front of the lens when the camera is not in use.
•To prevent damage to the control pins, never set a lens with its rear end down unless a rear lens cap is on.
•If it is necessary to set an un-
capped lens with its front end down, do so on a smooth surface. Fisheye lenses should always be capped before being placed front end down.
• Keep lenses, properly capped front and rear, in their cases when not in use.
10

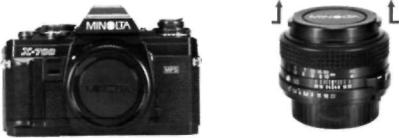
To attach lenses
After removing the body cap and rear lens cap, align the red mounting index on the lens barrel with the red index on the camera's lens mount, insert the lens bayonet into the socket, then turn the lens clockwise until it locks into place with a click.
To remove lenses
While pushing the lens-release button, turn the lens counterclockwise as far as it will go, then lift it out of the mount.
CAUTION
• Be careful not to touch anything inside the camera when attaching or removing lenses.
Care of glass surfaces
• Never touch lens or eyepiece surfaces with fingers or other objects. If necessary, remove loose matter with a blower brush. Use special photographic lens tissue or a soft, clean cloth to remove smudges or fingerprints with a gentle circular motion. Only if absolutely necessary, the tissue may be moistened very slightly with not more than one drop of a satisfactory quickevaporating fluid cleaner specially compounded for photographic lenses. Such fluids must never be dropped directly on the glass surface.
• Never lift the mirror or touch its surface, as doing so might damage the alignment. Small smudges or fingerprints on the mirror will not affect the meter reading or image quality; if they are very annoying, have the camera cleaned at an authorized Minolta service facility.
11

BATTERIES AND POWER
Batteries
For operation of the X-700's
circuitry |
and shutter, use one of |
the following types of batteries: |
|
• T w o |
1.55v silver-oxide (SR44: |
Eveready S-76, EPX-76, or equiv.) |
|
• T w o |
1.5v alkaline-manganese |
(LR44: Eveready A-76 or equiv.)
•One 3v lithium (CR-1/3N)-See note on p. 15.
CAUTIONS
•Never use 1.35v mercury batteries (MR44: Eveready EPX-675 or equiv.), which have a similar shape and size.
•To avoid battery leakage or bursting, do not mix batteries of different types, brands, or ages.
•Used batteries should not be disposed of in fire.
WARNING: Keep batteries away from young children.
1. Unscrew counterclockwise and remove the battery-chamber cover on the camera bottom.
2. After wiping the terminals with a clean, dry cloth, hold the batteries by their edges and insert them plus
(+) side out into the sleeve on the inside of the cover.
12
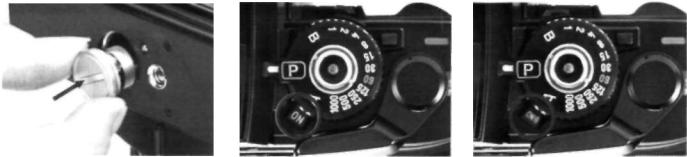
Main switch
For the camera's circuitry and shutter to operate, the main switch must be set at either " O N " or "ON ". The latter position should be used when you want audible beeps during self-timer operation or an audible warning whenever the shutter speed set or recommended by the camera is 1/30 sec. or slower. (For the slow-shutter-speed warning to function, the operating button must be touched or slightly pressed.)
To prevent accidental exposures and battery drain, move the main switch to " O F F " when you are done taking pictures. (When the switch is left on, however, battery drain occurs only if the operating button is touched, so you may want to leave it on to avoid missing unexpected shots.)
13
Operating button
Touching the operating button in the center of the mode/shutterspeed selector activates the camera's meter, viewfinder LED display, and exposure-control system. If proper contact is not possible (e.g., in cold weather, when fingers are excessively dry, or when wearing gloves), press the button slightly. The shutter is released when the operating button is pressed all the way down.
For easier operation of other controls while viewing through the finder, the circuits will remain on for 15 sec. after you first touch the button.
NOTE
• If the operating button becomes dirty or greasy, turn off the main switch and wipe the button with a clean, dry cloth.
Automatic battery check and shutter lock
If any LED in the viewfinder lights up when the main switch is on and the operating button is touched or slightly pressed, the batteries are inserted correctly and have sufficient power for operation of the camera.
When battery power decreases to a point almost insufficient for camera operation, the LED display will no longer light up, serving as a warning to insert fresh batteries as soon as possible. When battery capacity is no longer sufficient, the shutter will not operate.
14

Battery holder
Fresh spare batteries can be stored in the battery holder threaded on the camera strap (p. 9). To insert batteries, form a loop as shown above then drop them in. Slide the holder off the strap to remove batteries.
NOTE
• If the camera is not to be used for more than two weeks, it is advisable to remove the batteries (especially old ones).
Cold-weather operation
Since batteries tend to lose power as they become colder, always use fresh batteries and keep a spare set with you when using your camera in cold weather. For prolonged cold-weather use (approx. O°C or lower), silver-oxide batteries are recommended. Battery capacity will be restored as temperatures rise.
NOTE
• If a lithium battery is used below 0°C, the camera may not operate.
• Never transfer the camera directly from low to high temperatures as condensation may form inside and prevent normal operation.
15

FILM AND FILM SPEED
The X-700 uses standard 35mm cartridge film. If you are not already familiar with the many types available, you may want to experiment to find one or more that give pleasing results for subjects you like to photograph or for special situations.
The ISO film speed (incorporating ASA and DIN numbers) indicates the film's sensitivity to light. The first part of the ISO number (equivalent to ASA number) is marked on the X-700's film-speed ring. Each time this number doubles (e.g., from 25 to 50, 50 to 100), the required exposure is halved. Such a change is called one "stop".
Though selecting a high-speed film will allow you to take pictures when there is less light, such films in general may produce a grainier image.
Setting film speed
Lift up on the film-speed ring and turn it until the proper ASA number appears centered in the film-speed window and locks in that position when the ring is released. Marks between numbered graduations indicate speeds shown in the table at right.
ASA |
DIN |
ASA |
DIN |
|
25 |
15 |
250 |
25 |
|
32 |
16 |
320 |
26 |
|
40 |
17 |
400 |
27 |
|
50 |
18 |
500 |
28 |
|
64 |
19 |
640 |
29 |
|
80 |
20 |
800 |
30 |
|
100 |
21 |
1000 |
31 |
|
125 |
1250 |
|||
22 |
32 |
|||
160 |
23 |
1600 |
33 |
|
200 |
24 |
|
|
|
|
|
|
CAUTION
• Film should be stored in a cool, dry, dark place before use and exposed before the expiration date printed on the box.
16
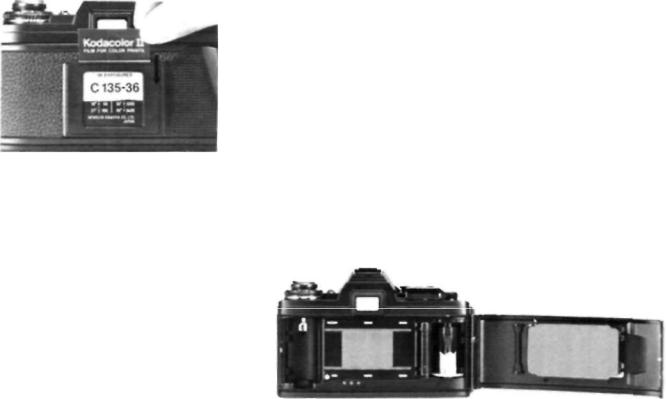
A handy ISO (DIN-ASA) table, with a surrounding memo holder for keeping the film-box end as a reminder of the film type and number of exposures, is located on the camera back.
LOADING AND |
|
ADVANCING |
FILM |
|
|||||
Loading film |
|
|
|
|
|
Prior to loading film, set the film |
|||
Before opening the camera back, |
speed |
(see previous page) and turn |
|||||||
confirm that there is no film inside |
the main switch on (p. 13). |
||||||||
that could be damaged by light if |
|
|
|
||||||
the back is opened, by checking |
CAUTIONS |
||||||||
that: |
|
|
|
|
|
|
• |
Film should be handled and load- |
|
• No |
red is visible |
in |
the Safe Load |
ed |
in |
subdued light - at least |
|||
Signal (see p. 20). |
|
|
|
|
shaded from direct sunlight by your |
||||
• Rewind |
crank |
can |
be |
freely |
body. |
|
|||
rotated |
clockwise |
many |
times |
• Do not touch any parts or areas |
|||||
without pushing rewind button. |
shown in blue below. |
||||||||
Since the frame counter advances |
|
|
|
||||||
each |
time |
the shutter |
is |
cocked |
|
|
|
||
even if no film is inside, the camera may be empty even when the index does not point to " S " .
17
 Loading...