


Operating instructions |
Washer |
W 1213 |
To prevent accidents and |
UV |
machine damage, |
|
read these instructions |
|
before installation or use. |
M.-Nr. 05 875 000 |

Contents
IMPORTANT SAFETY INSTRUCTIONS . . . . . . . . . . . . . . . . . . . . . . . . . . . . . . . . . 4
Guide to the washer. . . . . . . . . . . . . . . . . . . . . . . . . . . . . . . . . . . . . . . . . . . . . . . . 5 Control panel . . . . . . . . . . . . . . . . . . . . . . . . . . . . . . . . . . . . . . . . . . . . . . . . . . . . . . 5
Before using for the first time. . . . . . . . . . . . . . . . . . . . . . . . . . . . . . . . . . . . . . . . 6
Using the washer . . . . . . . . . . . . . . . . . . . . . . . . . . . . . . . . . . . . . . . . . . . . . . . . . . 7 1. Prepare and sort the laundry . . . . . . . . . . . . . . . . . . . . . . . . . . . . . . . . . . . . . . . . 7 2. Load the laundry . . . . . . . . . . . . . . . . . . . . . . . . . . . . . . . . . . . . . . . . . . . . . . . . . 8 3. Select a program . . . . . . . . . . . . . . . . . . . . . . . . . . . . . . . . . . . . . . . . . . . . . . . . . 8 Program guide . . . . . . . . . . . . . . . . . . . . . . . . . . . . . . . . . . . . . . . . . . . . . . . . . . . . . 9 4. Select wash options (if needed) . . . . . . . . . . . . . . . . . . . . . . . . . . . . . . . . . . . . 11 5. Select the temperature and spin speed . . . . . . . . . . . . . . . . . . . . . . . . . . . . . . 12 6. Add detergent . . . . . . . . . . . . . . . . . . . . . . . . . . . . . . . . . . . . . . . . . . . . . . . . . . 14
Detergent . . . . . . . . . . . . . . . . . . . . . . . . . . . . . . . . . . . . . . . . . . . . . . . . . . . . . . . 15 Water softener . . . . . . . . . . . . . . . . . . . . . . . . . . . . . . . . . . . . . . . . . . . . . . . . . . . . 16 Fabric softener. . . . . . . . . . . . . . . . . . . . . . . . . . . . . . . . . . . . . . . . . . . . . . . . . . . . 17 Starch. . . . . . . . . . . . . . . . . . . . . . . . . . . . . . . . . . . . . . . . . . . . . . . . . . . . . . . . . . . 18 Fabric dye . . . . . . . . . . . . . . . . . . . . . . . . . . . . . . . . . . . . . . . . . . . . . . . . . . . . . . . 18
Using the washer . . . . . . . . . . . . . . . . . . . . . . . . . . . . . . . . . . . . . . . . . . . . . . . . . 19 7. Select Delay Start (if needed) . . . . . . . . . . . . . . . . . . . . . . . . . . . . . . . . . . . . . . 19 8. Start the program. . . . . . . . . . . . . . . . . . . . . . . . . . . . . . . . . . . . . . . . . . . . . . . . 19 9. Activate the program lock (if necessary). . . . . . . . . . . . . . . . . . . . . . . . . . . . . . 19 10. Remove the laundry. . . . . . . . . . . . . . . . . . . . . . . . . . . . . . . . . . . . . . . . . . . . . 20 Cancelling a program . . . . . . . . . . . . . . . . . . . . . . . . . . . . . . . . . . . . . . . . . . . . . . 21 Interrupting a program. . . . . . . . . . . . . . . . . . . . . . . . . . . . . . . . . . . . . . . . . . . . . . 21 Making changes to the program . . . . . . . . . . . . . . . . . . . . . . . . . . . . . . . . . . . . . . 21 Adding/removing laundry during a wash program . . . . . . . . . . . . . . . . . . . . . . . . 22
Locking the washer . . . . . . . . . . . . . . . . . . . . . . . . . . . . . . . . . . . . . . . . . . . . . . . 23 Electronic program lock. . . . . . . . . . . . . . . . . . . . . . . . . . . . . . . . . . . . . . . . . . . . . 23 Child Safety Lock. . . . . . . . . . . . . . . . . . . . . . . . . . . . . . . . . . . . . . . . . . . . . . . . . . 23
Washer care . . . . . . . . . . . . . . . . . . . . . . . . . . . . . . . . . . . . . . . . . . . . . . . . . . . . . 24 Cleaning the washer . . . . . . . . . . . . . . . . . . . . . . . . . . . . . . . . . . . . . . . . . . . . . . . 24 Cleaning the detergent drawer . . . . . . . . . . . . . . . . . . . . . . . . . . . . . . . . . . . . . . . 24 Cleaning the drain pump . . . . . . . . . . . . . . . . . . . . . . . . . . . . . . . . . . . . . . . . . . . . 25
Quick Guide . . . . . . . . . . . . . . . . . . . . . . . . . . . . . . . . . . . . . . . . . . . . Center pages
2

Contents
Washer care . . . . . . . . . . . . . . . . . . . . . . . . . . . . . . . . . . . . . . . . . . . . . . . . . . . . . 27 Cleaning the water inlet filters . . . . . . . . . . . . . . . . . . . . . . . . . . . . . . . . . . . . . . . . 27 Cleaning the inlet hose filter . . . . . . . . . . . . . . . . . . . . . . . . . . . . . . . . . . . . . . . . . 27 Cleaning the filter in the inlet valve . . . . . . . . . . . . . . . . . . . . . . . . . . . . . . . . . . . . 27
Frequently asked questions . . . . . . . . . . . . . . . . . . . . . . . . . . . . . . . . . . . . . . . . 28 A wash program cannot be started . . . . . . . . . . . . . . . . . . . . . . . . . . . . . . . . . . . . 28 The program was interrupted and a fault message appears. . . . . . . . . . . . . . . . . 29 General issues with the washer . . . . . . . . . . . . . . . . . . . . . . . . . . . . . . . . . . . . . . . 30 Poor wash results. . . . . . . . . . . . . . . . . . . . . . . . . . . . . . . . . . . . . . . . . . . . . . . . . . 31 The door will not open when the "Door" button is pressed. . . . . . . . . . . . . . . . . . . 32 Opening the drum door during a power failure . . . . . . . . . . . . . . . . . . . . . . . . . . 33
Technical Service. . . . . . . . . . . . . . . . . . . . . . . . . . . . . . . . . . . . . . . . . . . . . . . . . 34 Repairs . . . . . . . . . . . . . . . . . . . . . . . . . . . . . . . . . . . . . . . . . . . . . . . . . . . . . . . 34 PC Update . . . . . . . . . . . . . . . . . . . . . . . . . . . . . . . . . . . . . . . . . . . . . . . . . . . . 34 Warranty terms . . . . . . . . . . . . . . . . . . . . . . . . . . . . . . . . . . . . . . . . . . . . . . . . . 34 Optional accessories . . . . . . . . . . . . . . . . . . . . . . . . . . . . . . . . . . . . . . . . . . . . 34
Help protect our environment . . . . . . . . . . . . . . . . . . . . . . . . . . . . . . . . . . . . . . . 36
Installation . . . . . . . . . . . . . . . . . . . . . . . . . . . . . . . . . . . . . . . . . . . . . . . . . . . . . . 37 Front view. . . . . . . . . . . . . . . . . . . . . . . . . . . . . . . . . . . . . . . . . . . . . . . . . . . . . . . . 37 Back view. . . . . . . . . . . . . . . . . . . . . . . . . . . . . . . . . . . . . . . . . . . . . . . . . . . . . . . . 38 Installation site . . . . . . . . . . . . . . . . . . . . . . . . . . . . . . . . . . . . . . . . . . . . . . . . . . . . 39 Installation . . . . . . . . . . . . . . . . . . . . . . . . . . . . . . . . . . . . . . . . . . . . . . . . . . . . . . . 40 Remove the shipping struts . . . . . . . . . . . . . . . . . . . . . . . . . . . . . . . . . . . . . . . . . . 40 Installing the shipping struts . . . . . . . . . . . . . . . . . . . . . . . . . . . . . . . . . . . . . . . . . 42 Level the washer . . . . . . . . . . . . . . . . . . . . . . . . . . . . . . . . . . . . . . . . . . . . . . . . . . 43 Installation beneath a counter . . . . . . . . . . . . . . . . . . . . . . . . . . . . . . . . . . . . . . . . 44 Washer stand with drawer . . . . . . . . . . . . . . . . . . . . . . . . . . . . . . . . . . . . . . . . . . . 44 Washer/ Dryer Stack . . . . . . . . . . . . . . . . . . . . . . . . . . . . . . . . . . . . . . . . . . . . . . . 44
Plumbing. . . . . . . . . . . . . . . . . . . . . . . . . . . . . . . . . . . . . . . . . . . . . . . . . . . . . . . . 45 Water connection . . . . . . . . . . . . . . . . . . . . . . . . . . . . . . . . . . . . . . . . . . . . . . . . . . 46 Drainage . . . . . . . . . . . . . . . . . . . . . . . . . . . . . . . . . . . . . . . . . . . . . . . . . . . . . . . . 47
Electrical connection. . . . . . . . . . . . . . . . . . . . . . . . . . . . . . . . . . . . . . . . . . . . . . 48
3

IMPORTANT SAFETY INSTRUCTIONS
,WARNING - To reduce the risk of fire, electric shock or injury to persons while using your appliance, follow basic safety precautions, including the following:
Read all instructions before using the appliance.
GROUNDING INSTRUCTIONS This appliance must be grounded.
In the event of malfunction or breakdown, grounding will reduce the risk of electric shock by providing a path of least resistance for electric current. This appliance is equipped with a cord having an equipment-grounding conductor and a grounding plug. The plug must be plugged into an appropriate outlet that is properly installed and grounded in accordance with all local codes and ordinances.
WARNING - Improper connection of the equipment-grounding
conductor can result in a risk of electric shock. Check with a qualified electrician or serviceman if you are in doubt as to whether the appliance is properly grounded.
Do not modify the plug provided with the appliance - if it will not fit
the outlet, have a proper outlet installed by a qualified electrician.
Do not wash articles that have been previously cleaned in,
washed in, soaked in or spotted with gasoline, dry-cleaning solvents or other flammable or explosive substances.
These articles give off vapors that could ignite or explode. Do not add these items to the washload.
Under certain conditions, hydrogen gas may be produced in a hot
water system that has not been used for 2 weeks or more. HYDROGEN GAS IS EXPLOSIVE. If the hot water system has not been used for such a period, turn on all hot water faucets and let the water flow from each for several minutes before using the washing machine. This will release any built up hydrogen gas. Do not smoke or use an open flame during this time, as the gas is flammable .
Do not allow children to play on or in the appliance. Close supervision
is necessary when the appliance is used near children.
Before the appliance is removed from service or discarded, remove
the door.
Do not reach into the appliance if the drum is moving.
Do not install or store this appliance where it will be exposed
to the weather.
Do not tamper with the controls.
Do not repair or replace any part of the appliance or attempt any
servicing unless specifically recommended in these operating instructions.
SAVE THESE INSTRUCTIONS
4
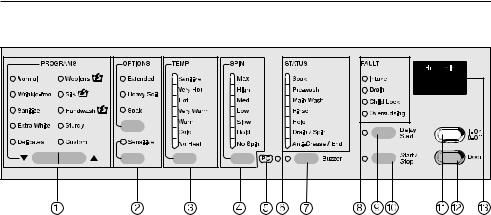
Guide to the washer
Control panel
aProgram selection buttons e-
For selecting a program.
bWash options
Special features to enhance a wash program.
cTemperature button
For selecting the desired wash temperature.
dSpin speed button
For selecting the desired spin speed.
ePC Indicator
Allows a service technician to check and update the wash programs.
fProgram sequence display
Shows the currect cycle of the wash program.
g"Buzzer" button hFAULT-indicators
i"Delay Start" button
For delaying the start of a program.
j"Start/Stop" button T
Begins the wash program or interrupts a program.
k"On/Off" button
Turns the machine on and off.
l"Door" button
Opens the drum door.
mDisplay (h min)
Shows the delayed start time and the countdown to the end of the program.
5

Before using for the first time
The appliance must be correctly installed and connected before the first use. Please see the "Installation instructions".
For safety reasons, it is not possible to run a spin cycle before the first use. A program must be run without laundry and without detergent to flush out any residual water from the factory testing process, as well as to activate the spin cycle. Using detergent can cause sudsing and ball valve activation, resulting in the future maximum use of detergent.
^Turn on the water valve.
^Press the "On/Off" button.
^Select the "Extra White" program with the program buttons.
^Press the "Start/Stop" button T.
Once the program ends, the washer can be used for laundry.
6
Using the washer
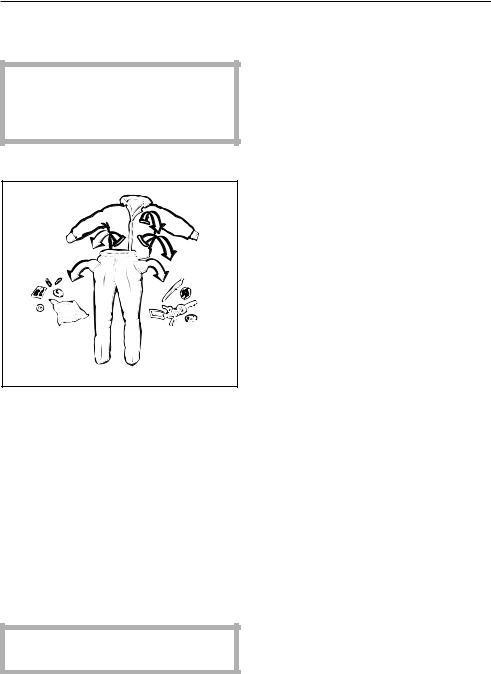
1. Prepare and sort the laundry
^ Empty all pockets.
,Foreign objects left in pockets (e.g. nails, coins, paper clips, etc.) can cause damage to clothes and the machine.
^ Sort the laundry.
Only wash items in the machine that are labeled machine washable by the manufacturer. Most garments have a fabric care label in the collar or side seam. Sort the laundry by care label and color.
^ Pretreat stains.
Tough stains (e.g. blood, egg, coffee, tea, etc.) or badly soiled areas (e.g. collars and cuffs) should be penetrated with a stain remover or a paste made from powdered detergent and warm water.
,Do not use chemical solvents in the machine.
General tips
–Dark fabrics often bleed the first few times they are washed. They should be washed seperately several times before being included in a mixed load.
–Remove any lead weights or strips from curtains before washing.
–Loose undergarment underwires should be removed or sewn in place before washing.
–Woolens and knitted garments should be turned inside out.
–Close zippers, hooks and eyelets before washing.
–Comforter covers and pillowcases should be fastened in order to prevent small items from rolling inside of them.
Do not machine wash items if it is not recommended on the fabric care label.
7
Using the washer
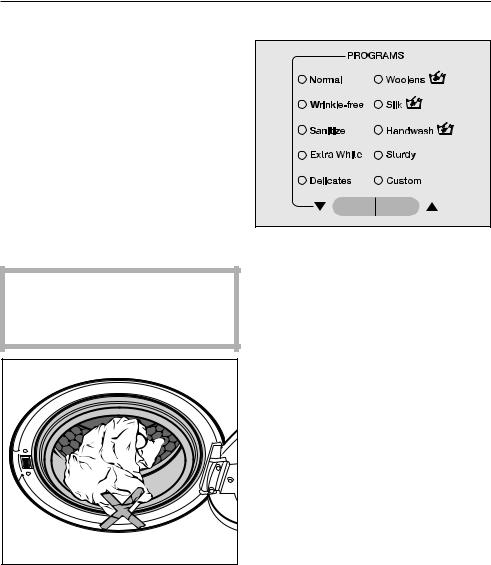
2. Load the laundry
^Turn on the washer using the "On/Off" button.
^Open the drum door using the "Door" button.
^Load the laundry into the drum. For best results, wash mixed loads of small and large items. This will improve washing effectiveness and help distribute the load evenly.
Note: Overloading the washer will cause poor wash results and wrinkling.
^ Close the drum door.
To prevent damage to the door seal and clothing, make sure that there are no clothes caught between the drum door and the seal.
3. Select a program
^Press the "PROGRAMS" button e or - until the desired program indicator lights.
8
|
|
|
|
Using the washer |
|
|
|
|
|||
Program guide |
|
|
|||
|
|
|
|
|
|
Temperatures |
Fabric |
Spin |
Laundry |
||
|
care |
speed |
|
||
|
symbol |
|
|
||
Normal |
Options: Extended, Heavy Soil, Soak, Sensitive |
||||
Hot |
8 |
|
Max |
For a rapid wash of colorfast items and |
|
Very Warm |
E |
C |
High |
mixed loads made from cottons and |
|
linen, e.g. jeans, t-shirts, underwear, |
|||||
Warm |
7 |
B |
|
||
|
socks. |
||||
Cold |
6 |
A |
|
||
|
|
||||
No Heat |
e |
|
|
|
|
Wrinkle-free |
Options: Extended, Heavy Soil, Soak, Sensitive |
||||
Hot |
8 |
|
Med |
For cotton blends, polyester blends |
|
Very Warm |
E |
C |
|
and synthetics (e.g. acrylic, nylon, |
|
|
ramie). Fabric softener can be |
||||
Warm |
7 |
B |
|
||
|
dispensed in the final rinse of these |
||||
|
|
|
|
||
Cold |
6 |
A |
|
programs to reduce static cling. |
|
No Heat |
e |
|
|
|
|
Sanitize |
Options: Extended, Heavy Soil, Soak, Sensitive |
||||
Sanitize |
9 |
|
Max |
For white items with special hygienic |
|
Very Hot |
ö |
|
High |
demands, e.g. baby clothing, |
|
|
underwear, towels. |
||||
|
|
|
|
||
Extra White |
Options: Extended, Heavy Soil, Soak |
||||
Sanitize |
9 |
|
Max |
For white items without special |
|
Very Hot |
ö |
|
High |
hygienic demands. |
|
|
|
||||
Hot |
8 |
|
|
|
|
Delicates |
Options: Extended, Heavy Soil, Soak |
||||
Warm |
7 |
B |
Low |
For delicate machine washable |
|
Cold |
6 |
A |
|
clothing, e.g. satin, hosiery, lingerie, |
|
|
lace or crocheted (non-wool) items. |
||||
No Heat |
e |
|
|
||
|
|
|
|||
|
|
|
|
|
|
9

Using the washer
Temperatures |
Fabric |
Spin |
Laundry |
|
|
care |
speed |
|
|
|
symbol |
|
|
|
Woolens / |
Options: Sensitive |
|
||
Warm |
7 |
B |
High |
For hand washable and machine |
Cold |
6 |
A |
Med |
washable wool and wool blends. |
|
||||
No Heat |
e |
|
|
|
Silk |
Options: Sensitive |
|
||
Cold |
6 |
A |
Slow |
For hand washable and machine |
No Heat |
e |
|
|
washable silks and other non-wool |
|
|
handwashable garments. |
||
|
|
|
|
|
Handwash / |
Options: Extended, Heavy soil, Sensitive |
|||
Warm |
7 |
B |
Med |
For handwashable items with no wool |
Cold |
6 |
A |
|
or silk content. |
|
|
|||
No Heat |
e |
|
|
|
Sturdy |
Options: None |
|
||
Warm |
7 |
B |
Med |
For a mixed load of colorfast or perma |
Cold |
6 |
A |
Low |
press items, or for cotton blends. |
|
||||
No Heat |
e |
|
|
|
Custom |
Options: Extended, Heavy Soil, Soak, Sensitive |
|||
Sanitize |
9 |
|
Max |
All options can be selected individually |
Very Hot |
ö |
|
High |
for colorfast or white items. |
|
|
|||
Hot |
8 |
|
Med |
|
Very Warm |
E |
C |
Low |
|
Warm |
7 |
B |
Slow |
|
Cold |
6 |
A |
Hold |
|
No Heat |
e |
|
No Spin |
|
|
|
|
|
|
10
Using the washer
4. Select wash options (if needed)
The upper button selects the following "OPTIONS":
–Extended
–Extended and Heavy Soil
–Extended and Soak
–Heavy Soil
–Soak
–no selection
The lower button selects the "Sensitive" options.
^Select the desired "OPTIONS". Press the upper button until the indicator of the desired wash option lights.
See the Program Guide to determine which options can be selected in each program.
If a wash option is chosen and it is not compatible with the program, the indicator light will go out when the button is released.
Extended
For laundry with normal to heavy soiling or stains.
The main wash cycle time for the wash program will be extended.
Heavy Soil
For heavily soiled laundry where a pretreatment is necessary to remove surface soiling.
Soak
For heavy soiling and stubborn stains (e.g. blood, grease, chocolate) that require soaking before the main wash.
The preset soak time is 2 hours.
Sensitive
An additional final rinse that will wash away detergent residue and scents.
Buzzer
A buzzer signals the end of the wash program, or after "No spin".
The buzzer will sound until the washer is turned off. Once activated, the buzzer is active in all programs unless turned off.
The warning sound (indicating a fault has occured) will activate independent of whether the buzzer is turned on or off.
11
Using the washer
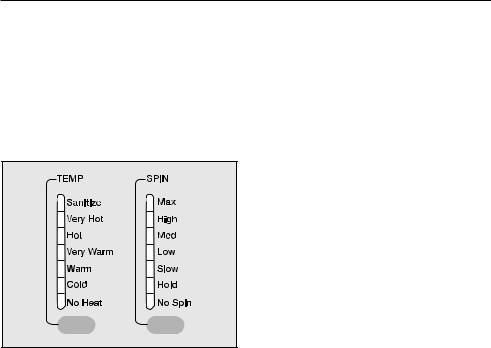
5. Select the temperature and spin speed
The default temperature and spin speed will automatically be selected for each program. However, you can adjust the temperature and spin speed within the parameters of the selected wash program.
^Press the "TEMP" and "SPIN" buttons until the indicator of the desired setting lights.
Program |
Spin speed |
Normal |
High |
Wrinkle Free |
Med |
Sanitize |
High |
Extra White |
High |
|
|
Delicates |
Low |
Woolens / |
High |
|
|
Silk / |
Slow |
Handwash / |
Med |
|
|
Sturdy |
Med |
Custom |
Med-no Spin |
|
|
The laundry is spun after the main wash and between the rinse cycles. Reducing the final spin speed will also reduce the rinse spin speeds. If in the programs "Sturdy" and "Custom" a spin speed lower that "Med" is selected, an extra rinse cycle is added to remove any detergent left in the laundry.
12

Using the washer
Special spin options
Hold
^ Select "Hold".
The laundry is not spun and remains soaking in water. This will prevent wrinkles if the laundry is not removed immediately at the end of the wash program.
–To start the final spin:
The washer is set to default to the maximum spin speed of the wash program. You can select a lower spin speed. Start the final spin with the "Start/Stop" Tbutton.
–To finish the program:
Press the "Door" button. The water will be drained away.
–Use the "Door" button to open the door.
No spin
^ Select "No spin".
The laundry is not spun after the final rinse, but the water is drained away. After the drain cycle, the washer goes immediately into the anti-crease cycle. Spinning between these rinses is also omitted in this setting. If "No spin" is selected in the programs "Sturdy" and "Custom", an extra rinse cycle is added.
13
Using the washer
6. Add detergent
For optimum wash results, it is important to use the correct amount of detergent.
Too little detergent may cause
–Ineffective cleaning of laundry; fabrics may become gray and stiff over time.
–Grease stains on the laundry.
–Hard water deposits on the heating element.
Too much detergent may cause
–Oversudsing with minimal drum movement; poor wash, rinse and spin results.
–Higher water consumption through an automatic, additional rinse cycle.
–Higher environmental burden.
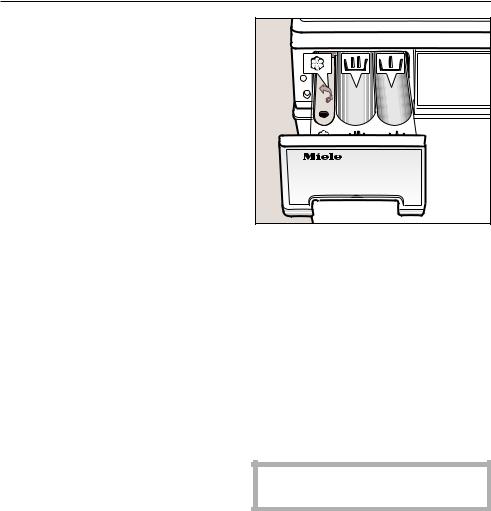
^Pull out the detergent dispenser drawer and add detergent to the compartments.
j = Detergent for the main wash
i= Only add detergent (1/4 of the total recommended amount of detergent) to this compartment if the "Heavy Soil" wash option is selected.
§= Fabric softener or liquid starch.
^Close the detergent dispenser drawer.
,Do not use detergents containing chemical solvents.
14

Detergent
Use only high-efficiency, low sudsing laundry detergent formulated for front loading washing machines.
For wool and wool blend fabrics, use a detergent specially formulated for woolens.
Follow instructions on the detergent packaging for the correct use and amount of detergent. Adjust the amount of detergent if the load is smaller or more or less soiled than normal.
Add detergent to the main wash compartment jat the beginning of each wash program.
Only add detergent (1/4 total recommended amount) to compartment iif the "Heavy Soil" option was selected.
^If you are using liquid detergent and select the "Heavy Soil" option, use the liquid detergent insert in the main wash compartment j. This will prevent the detergent for the main wash from being used during the prewash.
,Do not use chlorine bleach!
The amount of detergent used depends on the level of soiling:
Light soiling
No soiling or stains are visible.
Normal soiling
Some visible soiling or a few light stains.
Heavy soiling
Very visible soiling or stains.
The size of the load and the water hardness level in your area have an impact on the amount of detergent necessary to obtain optimum wash results. If you do not know the water level hardness in your area, contact your local water authority.
15

Detergent
Water hardness
Hardness |
Water |
Water |
German |
|
level |
quality |
hardness |
hardness |
|
|
|
in mmol/l |
°d |
|
I |
soft |
0 |
- 1.3 |
0 - 7 |
II |
moderate |
1.3 |
- 2.5 |
7 - 14 |
III |
hard to |
over 2.5 |
over 14 |
|
|
very hard |
|
|
|
Water softener
If the water hardness level is between II and III, you can soften the water to reduce detergent consumption.
The detergent packaging should indicate the correct amount to use in your machine. Add the detergent, then add the water softener. You can then use the recommended amount of detergent for water hardness level I.
16

Detergent
Fabric softener
Fabric softener added to the wash program will make fabrics feel softer and will reduce static cling in the dryer.
^Open the lid of the fabric softener compartment §.
^Pour the amount of liquid fabric softener into the compartment according to the manufacturer’s instructions. Do not exceed the maximum fill level marked inside the compartment, as the excess will prematurely activate the siphon and be wasted.
^Close the compartment lid and push in the dispenser drawer.
The fabric softener will automatically be dispensed during the final rinse cycle. A small amount of water will remain in the compartment at the end of the program.
Never mix fabric softener and starch together in the fabric softener compartment §. This will clog the dispenser.
17
 Loading...