


Operating instructions Washing machine
W 1612
To avoid the risk of personal injury or damage to the appliance, it is essential that you read these operating instructions before installation and use. This maschine is not approved for use in the United States.
en - CA
M.-Nr. 07 264 960
Caring for the environment
Disposal of packing materials
The packing materials protect the washer from damage during shipping. They have been selected with an eye to environmental compatibility and efficient disposal, and should be recycled.
Returning packaging to the materials cycle helps conserve raw materials and reduces waste. The packing materials can be returned to your dealer.
Disposing of your old appliance
Old electric and electronic equipment often contains valuable materials. However, they may also contain harmful substances that were necessary for safe use. Improperly disposing of these items in your household waste can be detrimental to health and the environment. This is why it is important NEVER to dispose of your old appliance with the regular household garbage.
Instead, please contact your local community waste collection point to return and recycle electric and electronic appliances. Your dealer should be able to provide you with details.
If the appliance is being stored for disposal, please make sure it has been child-proofed.
2

Contents
Caring for the environment . . . . . . . . . . . . . . . . . . . . . . . . . . . . . . . . . . . . . . . . . . 2
Important safety instructions . . . . . . . . . . . . . . . . . . . . . . . . . . . . . . . . . . . . . . . . 6
Operating the washing machine. . . . . . . . . . . . . . . . . . . . . . . . . . . . . . . . . . . . . 10 Control panel . . . . . . . . . . . . . . . . . . . . . . . . . . . . . . . . . . . . . . . . . . . . . . . . . . . . . 10
Before using for the first time. . . . . . . . . . . . . . . . . . . . . . . . . . . . . . . . . . . . . . . 12
Environmentally friendly use . . . . . . . . . . . . . . . . . . . . . . . . . . . . . . . . . . . . . . . 13 Energy and water consumption . . . . . . . . . . . . . . . . . . . . . . . . . . . . . . . . . . . . 13 Detergent consumption . . . . . . . . . . . . . . . . . . . . . . . . . . . . . . . . . . . . . . . . . . 13
How to wash correctly . . . . . . . . . . . . . . . . . . . . . . . . . . . . . . . . . . . . . . . . . . . . . 14 Brief instructions . . . . . . . . . . . . . . . . . . . . . . . . . . . . . . . . . . . . . . . . . . . . . . . . . . 14
Spin cycles . . . . . . . . . . . . . . . . . . . . . . . . . . . . . . . . . . . . . . . . . . . . . . . . . . . . . . 19 Final spin cycle speed . . . . . . . . . . . . . . . . . . . . . . . . . . . . . . . . . . . . . . . . . . . . . . 19 Rinse cycle spins . . . . . . . . . . . . . . . . . . . . . . . . . . . . . . . . . . . . . . . . . . . . . . . 19 De-select final spin (Rinse hold). . . . . . . . . . . . . . . . . . . . . . . . . . . . . . . . . . . . 19 De-select the rinse spin(s) and final spin (none ) . . . . . . . . . . . . . . . . . . . . . 19
Program overview . . . . . . . . . . . . . . . . . . . . . . . . . . . . . . . . . . . . . . . . . . . . . . . . 20
Extra options . . . . . . . . . . . . . . . . . . . . . . . . . . . . . . . . . . . . . . . . . . . . . . . . . . . . 22
Garment care label symbols . . . . . . . . . . . . . . . . . . . . . . . . . . . . . . . . . . . . . . . . 23
Program sequence. . . . . . . . . . . . . . . . . . . . . . . . . . . . . . . . . . . . . . . . . . . . . . . . 24
Changing a program sequence . . . . . . . . . . . . . . . . . . . . . . . . . . . . . . . . . . . . . 26 Canceling a program . . . . . . . . . . . . . . . . . . . . . . . . . . . . . . . . . . . . . . . . . . . . . . . 26 Interrupting a program. . . . . . . . . . . . . . . . . . . . . . . . . . . . . . . . . . . . . . . . . . . . . . 26 Changing a program . . . . . . . . . . . . . . . . . . . . . . . . . . . . . . . . . . . . . . . . . . . . . . . 26 Loading or removing laundry. . . . . . . . . . . . . . . . . . . . . . . . . . . . . . . . . . . . . . . . . 27 Childproof lock. . . . . . . . . . . . . . . . . . . . . . . . . . . . . . . . . . . . . . . . . . . . . . . . . . . . 27
3

Contents
Detergent . . . . . . . . . . . . . . . . . . . . . . . . . . . . . . . . . . . . . . . . . . . . . . . . . . . . . . . 28 Selecting the right detergent . . . . . . . . . . . . . . . . . . . . . . . . . . . . . . . . . . . . . . . . . 28 Water softener . . . . . . . . . . . . . . . . . . . . . . . . . . . . . . . . . . . . . . . . . . . . . . . . . . . . 29 Washing with several components . . . . . . . . . . . . . . . . . . . . . . . . . . . . . . . . . . . . 29 Fabric softener, fabric shaper, and liquid starch . . . . . . . . . . . . . . . . . . . . . . . . . 30
Automatic dispensing of fabric softener, fabric shaper, or liquid starch . . . . . 30 Dyes and dye removers. . . . . . . . . . . . . . . . . . . . . . . . . . . . . . . . . . . . . . . . . . . . . 30
Cleaning and care . . . . . . . . . . . . . . . . . . . . . . . . . . . . . . . . . . . . . . . . . . . . . . . . 31 Cleaning the drum . . . . . . . . . . . . . . . . . . . . . . . . . . . . . . . . . . . . . . . . . . . . . . . . . 31 Cleaning the housing and control panel . . . . . . . . . . . . . . . . . . . . . . . . . . . . . . . . 31 Cleaning the dispenser drawer . . . . . . . . . . . . . . . . . . . . . . . . . . . . . . . . . . . . . . . 31 Cleaning the water inlet filters . . . . . . . . . . . . . . . . . . . . . . . . . . . . . . . . . . . . . . . . 33
Troubleshooting. . . . . . . . . . . . . . . . . . . . . . . . . . . . . . . . . . . . . . . . . . . . . . . . . . 34 What to do if . . .. . . . . . . . . . . . . . . . . . . . . . . . . . . . . . . . . . . . . . . . . . . . . . . . . . . 34 No wash program will start . . . . . . . . . . . . . . . . . . . . . . . . . . . . . . . . . . . . . . . . . . 34 Fault messages in the display . . . . . . . . . . . . . . . . . . . . . . . . . . . . . . . . . . . . . . . . 35 General problems . . . . . . . . . . . . . . . . . . . . . . . . . . . . . . . . . . . . . . . . . . . . . . . . . 36 Unsatisfactory wash results . . . . . . . . . . . . . . . . . . . . . . . . . . . . . . . . . . . . . . . . . . 37 The loading door cannot be opened with the Door button . . . . . . . . . . . . . . . . . . 38 Opening the loading door (blocked drain outlet and/or power outage) . . . . . . . . 39
Customer service. . . . . . . . . . . . . . . . . . . . . . . . . . . . . . . . . . . . . . . . . . . . . . . . . 41 Repairs . . . . . . . . . . . . . . . . . . . . . . . . . . . . . . . . . . . . . . . . . . . . . . . . . . . . . . . 41 Program updates (PC) . . . . . . . . . . . . . . . . . . . . . . . . . . . . . . . . . . . . . . . . . . . 41 Warranty conditions and warranty period. . . . . . . . . . . . . . . . . . . . . . . . . . . . . 41 Additional accessories . . . . . . . . . . . . . . . . . . . . . . . . . . . . . . . . . . . . . . . . . . . 41
Installation and connection . . . . . . . . . . . . . . . . . . . . . . . . . . . . . . . . . . . . . . . . 42 Front view. . . . . . . . . . . . . . . . . . . . . . . . . . . . . . . . . . . . . . . . . . . . . . . . . . . . . . . . 42 Rear view . . . . . . . . . . . . . . . . . . . . . . . . . . . . . . . . . . . . . . . . . . . . . . . . . . . . . . . . 43 Installation surface. . . . . . . . . . . . . . . . . . . . . . . . . . . . . . . . . . . . . . . . . . . . . . . . . 44 Transporting the washer to the installation site . . . . . . . . . . . . . . . . . . . . . . . . 44 Removing the transport fittings . . . . . . . . . . . . . . . . . . . . . . . . . . . . . . . . . . . . . . . 44 Re-fitting the shipping rods . . . . . . . . . . . . . . . . . . . . . . . . . . . . . . . . . . . . . . . . . . 46
4

Contents
Levelling the machine . . . . . . . . . . . . . . . . . . . . . . . . . . . . . . . . . . . . . . . . . . . . . . 47 Screw out and adjust the feet . . . . . . . . . . . . . . . . . . . . . . . . . . . . . . . . . . . . . . 47 Installing under a countertop . . . . . . . . . . . . . . . . . . . . . . . . . . . . . . . . . . . . . . 48 Washer-dryer stack. . . . . . . . . . . . . . . . . . . . . . . . . . . . . . . . . . . . . . . . . . . . . . 48 The Miele water protection system . . . . . . . . . . . . . . . . . . . . . . . . . . . . . . . . . . . . 49 Connecting to the water supply . . . . . . . . . . . . . . . . . . . . . . . . . . . . . . . . . . . . . . . 49 Tap water line (cold water) . . . . . . . . . . . . . . . . . . . . . . . . . . . . . . . . . . . . . . . . 50 Hot water connection . . . . . . . . . . . . . . . . . . . . . . . . . . . . . . . . . . . . . . . . . . . . 50 Drainage system . . . . . . . . . . . . . . . . . . . . . . . . . . . . . . . . . . . . . . . . . . . . . . . . . . 51 Electrical connection . . . . . . . . . . . . . . . . . . . . . . . . . . . . . . . . . . . . . . . . . . . . . . . 52 ELECTRICAL INSTRUCTIONS. . . . . . . . . . . . . . . . . . . . . . . . . . . . . . . . . . . . . . . . 52 Electrical connection . . . . . . . . . . . . . . . . . . . . . . . . . . . . . . . . . . . . . . . . . . . . . . . 52
Technical data . . . . . . . . . . . . . . . . . . . . . . . . . . . . . . . . . . . . . . . . . . . . . . . . . . . 53
Programmable functions. . . . . . . . . . . . . . . . . . . . . . . . . . . . . . . . . . . . . . . . . . . 55 To access programmable functions . . . . . . . . . . . . . . . . . . . . . . . . . . . . . . . . . 55 To select a programmable function . . . . . . . . . . . . . . . . . . . . . . . . . . . . . . . . . 55 To change a programmable function . . . . . . . . . . . . . . . . . . . . . . . . . . . . . . . . 55 To exit a programmable function . . . . . . . . . . . . . . . . . . . . . . . . . . . . . . . . . . . 55
Language . . . . . . . . . . . . . . . . . . . . . . . . . . . . . . . . . . . . . . . . . . . . . . . . . . . . . . 55 Water plus . . . . . . . . . . . . . . . . . . . . . . . . . . . . . . . . . . . . . . . . . . . . . . . . . . . . . . . 56 Gentle wash . . . . . . . . . . . . . . . . . . . . . . . . . . . . . . . . . . . . . . . . . . . . . . . . . . . . . . 56 Suds cooldown . . . . . . . . . . . . . . . . . . . . . . . . . . . . . . . . . . . . . . . . . . . . . . . . . . . 56 Pin code. . . . . . . . . . . . . . . . . . . . . . . . . . . . . . . . . . . . . . . . . . . . . . . . . . . . . . . . . 57 Temperature unit . . . . . . . . . . . . . . . . . . . . . . . . . . . . . . . . . . . . . . . . . . . . . . . . . . 58 Buzzer . . . . . . . . . . . . . . . . . . . . . . . . . . . . . . . . . . . . . . . . . . . . . . . . . . . . . . . . . . 58 Keypad tone . . . . . . . . . . . . . . . . . . . . . . . . . . . . . . . . . . . . . . . . . . . . . . . . . . . . . 58 Brightness . . . . . . . . . . . . . . . . . . . . . . . . . . . . . . . . . . . . . . . . . . . . . . . . . . . . . . . 58 Contrast . . . . . . . . . . . . . . . . . . . . . . . . . . . . . . . . . . . . . . . . . . . . . . . . . . . . . . . . . 58 Standby display . . . . . . . . . . . . . . . . . . . . . . . . . . . . . . . . . . . . . . . . . . . . . . . . . . . 59 Memory . . . . . . . . . . . . . . . . . . . . . . . . . . . . . . . . . . . . . . . . . . . . . . . . . . . . . . . . . 59 Anti-crease. . . . . . . . . . . . . . . . . . . . . . . . . . . . . . . . . . . . . . . . . . . . . . . . . . . . . . . 59
5

Important safety instructions
This washer complies with all applicable safety laws and regulations. Inappropriate use can, however, lead to personal injury and property damage.
Please thoroughly read these instructions before first using the appliance. They contain important information on the safe installation, operation, and care of your appliance. They are intended to help prevent personal injury and damage to the appliance.
Keep these operating instructions in a safe place and pass them on to any future owner.
The W 1612 meets all CSA requirements. This machine is not approved for use in the United States.
Proper use
The washing machine is designed for household use only and only for washing textiles whose fabric care label states that they can be washed. Other uses may be dangerous. Miele will not be held liable for damage caused by improper use or incorrect operation.
Individuals who are incapable of using the appliance safely because of reduced physical, sensory or mental capabilities, or because of a lack of experience or knowledge, must not use this appliance without supervision or instruction by a responsible person.
Children around the appliance
Supervise any children in the vicinity of the appliance. Never allow children to play with the appliance.
Children must not use the washer unsupervised unless they have received sufficient instruction to operate it safely. They must be able to recognize the potential hazards of improper operation.
Remember that high wash temperatures will make the porthole glass hot.
Teach children not to touch the glass while the washer is in operation.
6

Important safety instructions
Technical safety
Check the washer for externally visible damage before installation. Do not install or operate a damaged washer.
Before plugging in the appliance, you must make sure that the electrical rating (fuse amperage, voltage and connected load in watts, indicated on the data plate) matches the household electrical supply. If in any doubt, consult a qualified electrician.
The washer can only be considered safe if it has been connected to a properly installed grounding system, as per code.
It is crucial to have this essential safety requirement tested, and to have the household wiring checked by a professional if there is any doubt. Miele will not be held liable for any damage or harm caused by a missing or incomplete grounding system.
For safety reasons, do not use extension cords (danger of fire from overheating).
Use only genuine Miele replacement parts to replace defective components. Only these parts are guaranteed to meet applicable safety requirements.
Unauthorized repairs may create unforeseeable risks for the user, for which Miele assumes no liability.
Repairs should be carried out only by authorized Miele technicians - otherwise, associated damage will not be covered by the warranty.
If the power cord is damaged it must be replaced by an authorized Miele technician to prevent danger to the user.
In the event of a fault, or for care and cleaning, the washer is only considered disconnected from the power supply, when
–the plug is completed removed from the socket, or
–the circuit breaker for the house wiring system is completely shut off, or
–the screw-out fuse in the house wiring system is unscrewed and removed.
Use only a new hose kit to attach the washer to the household water supply. Old hosing should not be re-used.
7

Important safety instructions
The appliance is not designed for use in non-stationary locations (for example, on ships). However, this use may be possible if a qualified specialist determines that the appliance can be used safely in the location in question.
Make no modifications to the washer that are not expressly authorized by Miele.
Proper use
Do not place the washer in a room where there is a risk of frost occurring. Frozen hoses can split or burst, and the reliability of the electronics can be reduced below the freezing point.
Before using the washer for the first time, remove the shipping rods on the back of the appliance (see "Installation and connection" under "Removing the transport fittings"). Failure to remove the shipping rods can damage the washer and any surrounding furniture or devices during spinning.
For extended absences (e.g., a vacation), close the taps, especially if there is no gully near the washer.
Danger of flooding!
Before hanging the drain hose in the washbasin, make sure the water will drain away quickly enough.
Secure the hose from slipping. The force of the water exiting the hose can cause an unsecured hose to pop out of the basin.
Ensure that no foreign bodies (e.g., nails, needles, coins, paper clips) are in the wash. Foreign bodies can damage the appliance components (e.g., suds container, washer drum). Damaged components, in turn, can damage laundry items.
Proper dosing of the detergent will eliminate the need to remove lime deposits. However, if heavy limescale nonetheless forms on your washer, be sure to select a special descaling agent with corrosion protection. This special product can be obtained from your Miele dealer or from Miele Customer Service. Closely follow the instructions on the product package.
8

Important safety instructions
Textiles that have been pre-treated with solvent-based cleaners must be rinsed thoroughly in water before you wash them.
NEVER use solvent-based cleaners (e.g., benzine) in the washing machine. The use of such products can damage the appliance and generate noxious fumes. Fire hazard and danger of explosion!
NEVER use solvent-based cleaners (e.g., benzine) on or around the washing machine. Splatters can damage the plastic surfaces of the appliance.
Do not use dyes unless they are recommended for use in washing machines. Dyes are to be used in reasonable (household) quantities only. Closely follow the manufacturer's instructions.
Colour removers contain sulphur compounds, which can lead to corrosion. Therefore, do not use colour removers in the washer.
If liquid detergent comes into contact with the eyes, immediately flush with copious amounts of lukewarm water. If accidentally swallowed, immediately seek medical attention. Persons with sensitive or damaged skin should avoid contact with liquid detergents.
Accessories
Only use accessories that are expressly authorized by Miele.
If other parts are used, the appliance warranty and any associated performance and/or product liability claims become null and void.
The manufacturer will not be held liable for damage caused by failure to comply with the safety instructions and warnings.
9
Operating the washing machine
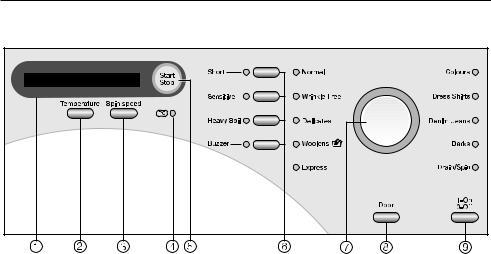
Control panel
Display
See the following page for more information.
Temperature button
For selecting a temperature.
Spin speed button
For selecting the final spin speed or Rinse hold orNo (de-select spin).
PC / Optical interface
Used by Customer Service for diagnostic checks and programming updates.
Start/Stop button
Starts the selected wash program or stops a started program.
Extra option buttons
Various extras can be added to the wash programs.
Program selector
For selecting a program. The indicator light next to the selected program comes on. The program dial can be turned right or left.
Door button
Opens the drum door.
I-On/0-Off button
For switching the machine on or off.
10
Operating the washing machine
The following functions are selected from the display:
–wash temperature
–spin speed
–programmable functions
–program cancel
–childproof (safety) lock The display also shows:
–program duration
–program sequence
program duration
Once a program starts, the estimated program duration (in hours and minutes) is displayed.
During the first 8 minutes of the program, the washer calculates the quantity and absorbency of the laundry. This can cause an increase or decrease in program times.
Programmable functions
The programmable functions can be used to adapt the washer to your personal requirements. In programming mode, the display will show the function selected.
11

Before using for the first time
Before the washer is used for the first time, it needs to be properly installed and connected. See "Installation and connection".
Because the washer was put through a complete operational test in the factory, there will be some water left in the drum.
For safety reasons, the washer will not spin until it has been prepared for use. To activate the spinning function, you will need to run a wash programwithout laundry and without detergent.
If you use detergent, it will cause excessive sudsing.
This preparation step also activates the ball valve in the drain. Once activated, the ball valve helps prevent detergent escaping from the suds container into the drain during a wash program, thus ensuring maximum use of the detergent.
Press the I-On/0-Off button in.
If the washer is being switched on for the first time, the welcome screen will appear.
The welcome screen will appear in the display every time the washer is switched on, until a program lasting longer than 1 hour has been completed.
Setting the language
You will be prompted to select the desired display language. You can change the language at any time through the programmable functions.
deutsch
Turn the program selector to select the desired display language. Use the Start/Stop button to confirm your selection.
Reminder to remove the shipping rods
The shipping rods must be removed before the washer is used for the first time, to help prevent damage to the appliance.
After removing the shipping rods, press the Start/Stopbutton.
Running the washer for the first time
Run aCotton 60°C with no laundry and no detergent. (This program is automatically selected.)
Open the faucets.
Press the Start/Stopbutton.
Once the program is finished, switch the washer off.
The washer is now ready for regular use.
12

Environmentally friendly use
Energy and water consumption
–To make the most out of each wash load, load the maximum dry weight for the program you have selected.
–Use the Colours and Express programs for small loads.
–When smaller amounts of laundry are washed using the Normal program, the automatic load recognition system will automatically reduce the water, energy, and time for that load. This may cause a correction in the remaining time displayed for the wash.
–Using the Normal 60°C program instead of the Normal 95°C program will result in energy savings of 35% to 45%. This setting is quite sufficient for most levels of soiling.
–To save energy, all wash programs with a temperature setting of 40°C or above will draw from the hot water supply. The only exception is the Wool program, which protects garments by avoiding the use of hot water.
Detergent consumption
–Do not exceed the maximum detergent dose listed on the package.
–Adjust the detergent dose to suit how soiled the laundry is.
–For smaller loads, reduce the amount (approx. 1/3 less detergent for a half load).
Choosing the right extra options (Short and Pre-wash)
Select:
–a wash program together with the Short option for lightly soiled items with no obvious staining
–a wash program with NO extra options for moderate to heavy soiling with visible staining.
–The Heavy Soil extra option for laundry with large amounts of dirt (e.g., dust, sand).
When drying with a tumble dryer
To help save energy when using a dryer, select the highest possible spin speed for the wash program in question.
13
How to wash correctly
Brief instructions
The bold headings numbered( , ,, ...) show the overall sequence of steps, and may be used as short-cut instructions.
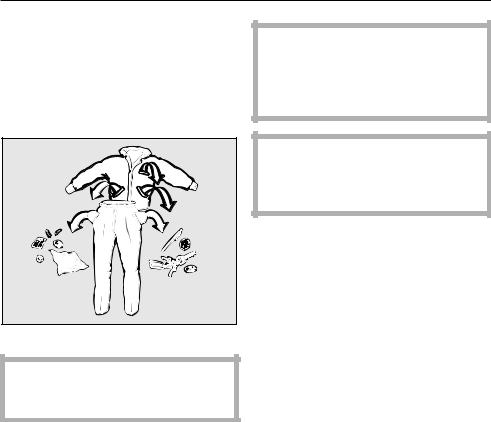
Prepare the laundry
Empty all pockets.
Foreign objects (e.g., nails, coins, paper clips) can damage garments and the washer itself.
Pre-treat stains
Before washing, treat fabrics to loosen stains; it is best to do so while the stains are still fresh. Blot stains with a colourfast cloth to remove. Do not rub.
Common stains (blood, egg, coffee, tea, etc.) can typically be addressed with the help of the Miele laundry care guide. For a copy, contact Miele directly, or visit the Miele Website.
When pre-treating fabrics with solvent-based products (gasoline, for example), make sure that the product does NOT come into contact with any plastic parts.
NEVER use solvent-based cleaners (e.g., gasoline, cleaner's solvent) on or around the washing machine.
Sort the laundry
Sort garments by colour and care requirements (see collar or side seam for garment tags).
Dark items may bleed colour for the first few washes. To avoid staining, take care to wash light and dark items separately.
General information:
–Curtains: Remove any curtain hardware or weights, or tie the curtains in a laundry bag.
–Stitch down or remove any loose underwires in bras.
–Close any zippers, hooks and eyes before washing.
–Close duvet covers and pillowcases to prevent small items from getting inside.
Do not wash items that are labelled Do not wash (Care symbol ).
14

How to wash correctly
Switch the washer on
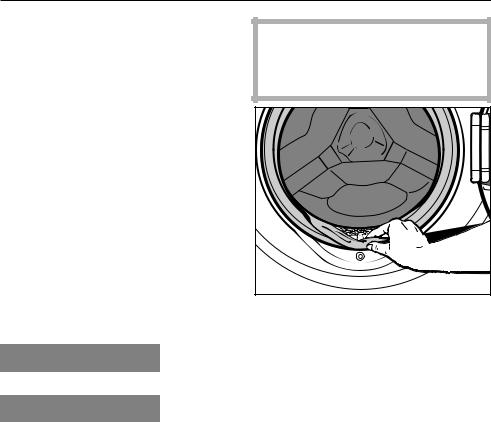
Load the washer
Press theDoor button to open the drum door.
Unfold the laundry and load it loosely into the drum. Mixing both large and small items in a load gives better wash results and helps distribute the load evenly during the spin cycle(s).
Loading to the maximum listed amount helps keep energy and water consumption as low as possible, proportionate to other load sizes. However, overloading diminishes wash performance and leads to creasing.
Check that no items are trapped between the drum door and the door seal.
Gently swing the loading door shut. |
Select program
Turn the program selector right or left to select the desired program. A program is selected when the indicator light next to the program name is on.
Select a temperature / spin speed
You can modify the suggested temperature and/or spin speed.
1:49 |
60° |
1200 |
|
|
|
Press the Temperature button to change the temperature, and press the Spin button to alter the spin speed.
15

How to wash correctly
Select extra options
Use the corresponding button to select any desired extras. When an extra is selected, the matching indicator light comes on.
Not all extras can be selected in every wash program.
If an extra cannot be selected, it is not compatible with the program you wish to run.
Short
For lightly soiled textiles without visible stains.
The main wash is shortened.
Sensitive
The water level for washing and rinsing is increased.
You can also select other settings like Water plus, as described in the section on "Programmable functions".
Heavy Soil
For more heavily soiled items (dust, sand, etc.).
Buzzer
You will hear a buzzer sound at the end of a program and when Rinse hold is reached. The buzzer continues to ring until the washer is turned off. You can adjust the volume of the buzzer as described in the section on "Programmable functions".
16
How to wash correctly
Add detergent
It is important to use the right amount, because . . .
. . . too little detergent results in:
–the laundry not getting clean, and turning grey and stiff over time
–greasy deposits on the laundry
–limescale deposits on the heating element
. . . too much detergent results in:
–excessive sudsing, which interferes with proper agitation and leads to poor wash, rinse, and spin results
–increased water consumption because of an automatic additional rinse cycle
–a burden to the environment
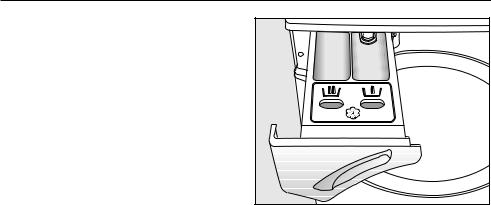
Pull out the detergent drawer and fill with product, as follows:
Detergent for the pre-wash (we recommend dividing the total detergent amount as follows: 1/3 in compartment and 2/3 in compartment )
Detergent for the main wash
Fabric softener or liquid starch
Close the detergent drawer.
Additional information regarding laundry products and doses can be found in the "Detergent" section.
17
How to wash correctly
How to start a program
Press the flashing Start/Stopbutton.
The estimated program duration will appear in the display as soon as the program has started. During the first 8 minutes of the program, the washer calculates how much water is needed, based on the absorbency of the laundry. This can result is shorter or longer program times.
The program sequence will also appear in the display. The washer will show which program step is currently running.
Remove the laundry when the program is finished
In crease-free mode, the display alternates between:
0:00 Anti-crease
and
0:00 Finish
Press theDoor button to open the drum door.
Remove the laundry.
Check that all items have been removed from the drum. Items left behind could shrink or bleed colour during the next load.
Check the folds in the door seal for foreign objects.
Use the I-On/0-Off button to switch the washer off.
Close the door. If it is left open, objects may inadvertently be placed in the drum. They could be washed in the next load and damage the laundry.
18
 Loading...