


Operating Instructions
for condenser tumble dryer T 7644 C
To avoid the risk of personal injury or |
|
damage to the appliance, it is |
en - CA |
essential that you read these |
|
operating instructions before |
|
installation and use. This maschine |
|
is not approved for use in the |
|
United States. |
M.-Nr. 07 323 260 |
Caring for the environment
Disposal of packing material
The packing materials protect the dryer from damage during transport. They have been selected for environmental compatibility and efficient disposal and can therefore be recycled.
To prevent suffocation, ensure that any plastic wrappings, bags, etc. are disposed of safely and kept out of the reach of children.
Disposing of your old appliance
Old appliances may contain materials that can be recycled. Please contact your local recycling authority about the possibility of recycling these materials.
Ensure that a discarded dryer presents no danger to children. When being stored for disposal remove the door to the drying compartment.
Saving energy
To avoid unnecessarily long drying times and increased energy use:
–Let the wash spin in the washer at maximum spin speed.
You can save about 30% in energy and time if you spin at 1600 instead of 800 rpm.
–Use the maximum load for each drying program. This gives the optimum energy consumption in relation to the total amount of laundry.
–Ensure that the room where the dryer is located is sufficiently ventilated.
–Clean the lint screen after every use.
–Check the condenser unit from time to time and clean it when necessary.
2

Contents
Caring for the environment . . . . . . . . . . . . . . . . . . . . . . . . . . . . . . . . . . . . . . . . . . 2
IMPORTANT SAFETY INSTRUCTIONS. . . . . . . . . . . . . . . . . . . . . . . . . . . . . . . . . 5
Description . . . . . . . . . . . . . . . . . . . . . . . . . . . . . . . . . . . . . . . . . . . . . . . . . . . . . . . 8 Operating the dryer . . . . . . . . . . . . . . . . . . . . . . . . . . . . . . . . . . . . . . . . . . . . . . . . . 8 Function of Miele condenser dryer . . . . . . . . . . . . . . . . . . . . . . . . . . . . . . . . . . . . . 8 Operation of Miele condenser dryer . . . . . . . . . . . . . . . . . . . . . . . . . . . . . . . . . . . . 8 Main Features . . . . . . . . . . . . . . . . . . . . . . . . . . . . . . . . . . . . . . . . . . . . . . . . . . . . . 8
Operating the dryer . . . . . . . . . . . . . . . . . . . . . . . . . . . . . . . . . . . . . . . . . . . . . . . 10 Control panel . . . . . . . . . . . . . . . . . . . . . . . . . . . . . . . . . . . . . . . . . . . . . . . . . . . . . 10
Laundry care . . . . . . . . . . . . . . . . . . . . . . . . . . . . . . . . . . . . . . . . . . . . . . . . . . . . 12 Care symbols . . . . . . . . . . . . . . . . . . . . . . . . . . . . . . . . . . . . . . . . . . . . . . . . . . . . . 12 Drying tips . . . . . . . . . . . . . . . . . . . . . . . . . . . . . . . . . . . . . . . . . . . . . . . . . . . . . . . 12
Proper drying . . . . . . . . . . . . . . . . . . . . . . . . . . . . . . . . . . . . . . . . . . . . . . . . . . . . 14 Brief instructions . . . . . . . . . . . . . . . . . . . . . . . . . . . . . . . . . . . . . . . . . . . . . . . . . . 14
Options/Delay. . . . . . . . . . . . . . . . . . . . . . . . . . . . . . . . . . . . . . . . . . . . . . . . . . . . 17
Gentle . . . . . . . . . . . . . . . . . . . . . . . . . . . . . . . . . . . . . . . . . . . . . . . . . . . . . . . . . . 17
Buzzer . . . . . . . . . . . . . . . . . . . . . . . . . . . . . . . . . . . . . . . . . . . . . . . . . . . . . . . . . . 17
Delay . . . . . . . . . . . . . . . . . . . . . . . . . . . . . . . . . . . . . . . . . . . . . . . . . . . . . . . . . . . 17
Program Overview . . . . . . . . . . . . . . . . . . . . . . . . . . . . . . . . . . . . . . . . . . . . . . . . 18
Changing the program sequence . . . . . . . . . . . . . . . . . . . . . . . . . . . . . . . . . . . . 21 Switching over from a running program . . . . . . . . . . . . . . . . . . . . . . . . . . . . . . . . 21 - Canceling and selecting a new program . . . . . . . . . . . . . . . . . . . . . . . . . . . . 21 - Interrupting a program and removing laundry . . . . . . . . . . . . . . . . . . . . . . . . 21
Loading or removing laundry. . . . . . . . . . . . . . . . . . . . . . . . . . . . . . . . . . . . . . . . . 21 Time remaining . . . . . . . . . . . . . . . . . . . . . . . . . . . . . . . . . . . . . . . . . . . . . . . . . . . 21
Electronic lock . . . . . . . . . . . . . . . . . . . . . . . . . . . . . . . . . . . . . . . . . . . . . . . . . . . 22
Cleaning and care . . . . . . . . . . . . . . . . . . . . . . . . . . . . . . . . . . . . . . . . . . . . . . . . 23 Emptying the condensed water container . . . . . . . . . . . . . . . . . . . . . . . . . . . . . . . 23 Cleaning the lint filtration components . . . . . . . . . . . . . . . . . . . . . . . . . . . . . . . . . 24 Cleaning without water . . . . . . . . . . . . . . . . . . . . . . . . . . . . . . . . . . . . . . . . . . . 24 Cleaning with water . . . . . . . . . . . . . . . . . . . . . . . . . . . . . . . . . . . . . . . . . . . . . 25 Cleaning the dryer . . . . . . . . . . . . . . . . . . . . . . . . . . . . . . . . . . . . . . . . . . . . . . . . . 25 Cleaning the condenser (heat exchanger) unit . . . . . . . . . . . . . . . . . . . . . . . . . . . 26 Removing the condenser unit. . . . . . . . . . . . . . . . . . . . . . . . . . . . . . . . . . . . . . 26 Checking the condenser unit . . . . . . . . . . . . . . . . . . . . . . . . . . . . . . . . . . . . . . 27 Cleaning the condenser unit. . . . . . . . . . . . . . . . . . . . . . . . . . . . . . . . . . . . . . . 27 Replacing the condenser unit. . . . . . . . . . . . . . . . . . . . . . . . . . . . . . . . . . . . . . 28
3

Contents
Trouble shooting . . . . . . . . . . . . . . . . . . . . . . . . . . . . . . . . . . . . . . . . . . . . . . . . . 29 What to do, if . . . ? . . . . . . . . . . . . . . . . . . . . . . . . . . . . . . . . . . . . . . . . . . . . . . . . . 29 Test and fault messages.. . . . . . . . . . . . . . . . . . . . . . . . . . . . . . . . . . . . . . . . . . . . 29 Other problems . . . . . . . . . . . . . . . . . . . . . . . . . . . . . . . . . . . . . . . . . . . . . . . . . . . 31 Replacing the light bulb. . . . . . . . . . . . . . . . . . . . . . . . . . . . . . . . . . . . . . . . . . . . . 34
Customer service. . . . . . . . . . . . . . . . . . . . . . . . . . . . . . . . . . . . . . . . . . . . . . . . . 35 Repairs. . . . . . . . . . . . . . . . . . . . . . . . . . . . . . . . . . . . . . . . . . . . . . . . . . . . . . . . . . 35 Program updates . . . . . . . . . . . . . . . . . . . . . . . . . . . . . . . . . . . . . . . . . . . . . . . . . . 35 Warranty conditions and warranty period . . . . . . . . . . . . . . . . . . . . . . . . . . . . . . . 35 Optional accessories . . . . . . . . . . . . . . . . . . . . . . . . . . . . . . . . . . . . . . . . . . . . . . . 35
Installation and connection . . . . . . . . . . . . . . . . . . . . . . . . . . . . . . . . . . . . . . . . 36 Front view. . . . . . . . . . . . . . . . . . . . . . . . . . . . . . . . . . . . . . . . . . . . . . . . . . . . . . . . 36 Rear view . . . . . . . . . . . . . . . . . . . . . . . . . . . . . . . . . . . . . . . . . . . . . . . . . . . . . . . . 37 Installation site . . . . . . . . . . . . . . . . . . . . . . . . . . . . . . . . . . . . . . . . . . . . . . . . . . . . 37 Carrying the dryer to the installation site . . . . . . . . . . . . . . . . . . . . . . . . . . . . . 37 Washer-dryer stack. . . . . . . . . . . . . . . . . . . . . . . . . . . . . . . . . . . . . . . . . . . . . . 37 Leveling the dryer . . . . . . . . . . . . . . . . . . . . . . . . . . . . . . . . . . . . . . . . . . . . . . . 38 Ventilating the installation area . . . . . . . . . . . . . . . . . . . . . . . . . . . . . . . . . . . . . 39 Before transport at a later date. . . . . . . . . . . . . . . . . . . . . . . . . . . . . . . . . . . . . 39 Draining condensed water externally . . . . . . . . . . . . . . . . . . . . . . . . . . . . . . . . . . 40 Arranging the drain hose . . . . . . . . . . . . . . . . . . . . . . . . . . . . . . . . . . . . . . . . . 40 Hooking up the drain hose (in sink or floor drain) . . . . . . . . . . . . . . . . . . . . . . 41 Special installation conditions requiring a non-return valve . . . . . . . . . . . . . . . 41 Electrical connections . . . . . . . . . . . . . . . . . . . . . . . . . . . . . . . . . . . . . . . . . . . . . . 43
Technical data . . . . . . . . . . . . . . . . . . . . . . . . . . . . . . . . . . . . . . . . . . . . . . . . . . . 44
Programmable functions. . . . . . . . . . . . . . . . . . . . . . . . . . . . . . . . . . . . . . . . . . . 46 Extending the range of drying levels . . . . . . . . . . . . . . . . . . . . . . . . . . . . . . . . . . . 46 Adjusting buzzer volume . . . . . . . . . . . . . . . . . . . . . . . . . . . . . . . . . . . . . . . . . . . . 47 Set memory function . . . . . . . . . . . . . . . . . . . . . . . . . . . . . . . . . . . . . . . . . . . . . . . 48 Extending cooldown time . . . . . . . . . . . . . . . . . . . . . . . . . . . . . . . . . . . . . . . . . . . 49 Change function of Filter/Vent indication . . . . . . . . . . . . . . . . . . . . . . . . . . . . . . . . 50 Adjust keypad tone . . . . . . . . . . . . . . . . . . . . . . . . . . . . . . . . . . . . . . . . . . . . . . . . 51 Changing water conductivity setting . . . . . . . . . . . . . . . . . . . . . . . . . . . . . . . . . . . 52
4
IMPORTANT SAFETY INSTRUCTIONS
This machine T 7644 C meets all CSA requirements. This machine is not approved for use in the United States.
WARNING - To reduce the risk of fire, electric shock, or injury to persons when using your appliance, follow basic precautions, including the following:
It is essential to read all instructions before using the appliance.
The dryer is designed for household use only and only for drying textiles that have been washed in water and whose fabric care label states that they can be tumble dried. Other uses may be dangerous. Miele will not be held liable for damage caused by improper use or incorrect operation.
Do not allow children to play on or in the appliance. Close supervision is necessary when the appliance is used near children. Always close the door after use to prevent child hazards.
This appliance is not intended for use by persons (including children) with reduced physical, sensory or mental capabilities, or lack of experience or knowledge, unless they are supervised whilst using it or have been shown how to use it by a person responsible for their safety.
Before this appliance is removed for service or discarded, remove the door to the drying compartment.
Do not reach into the dryer if the drum is moving.
Do not install or store this appliance where it will be exposed to the weather.
Do not tamper with the controls.
Do not repair or replace any part of the appliance or attempt any servicing unless specifically recommended in these operating instructions. Repairs to electrical appliances should only be performed by qualified personnel. Incorrectly repaired machines may pose a considerable risk to the user.
Do not use fabric softener sheets to eliminate static in this dryer. Best results are achieved when a liquid softener is used in the washer. Follow the manufacturers instructions.
To prevent the risk of fire, the following textiles must not be dried in this dryer:
–items which have not been washed.
–items, such as work-wear, exposed to grease, oils, or other deposits (such as lotions or cosmetics) in your dryer. If these items have not been thoroughly cleaned there is a danger that they may contribute to a chemical reaction that could cause the laundry to ignite when heated even after being removed from the dryer.
5

IMPORTANT SAFETY INSTRUCTIONS
–items that have been previously cleaned, washed, soaked or spotted with gasoline, dry-cleaning solvents or other flammable or explosive substances. They may give off vapors that could ignite or explode.
–items treated with flammable cleaning agents or items containing acetone, alcohol, petrol, stain remover, wax or chemicals from buffing, etc.
–items which have been splashed with hair spray, nail polish remover, etc.
When washing heavily soiled items ensure that sufficient detergent is used with a high temperature. If in doubt wash the item several times.
–items containing foam rubber or similarly textured rubber-like materials.
–items with padding or filling (e.g. pillows or jackets) which have been damaged. Loose filling could catch fire.
WARNING – Never stop a tumble dryer before the end of the drying cycle unless all items are quickly removed and spread out so that the heat is dissipated.
Allow the dryer to complete each stage of the program selected, including the cooling down phase. This will ensure that the items being removed are not too hot to handle
Clean the lint filter and lint screens before or after each load.
Keep the area around the air intake (toe kick) and adjacent surrounding areas free from lint, dust and dirt.
The interior of the machine should be cleaned periodically by qualified personnel.
This dryer is intended for residential use only!
GROUNDING INSTRUCTIONS This appliance must be grounded. In
the event of malfunction or breakdown, grounding will reduce the risk of electric shock by providing a path of least resistance for electric current. This appliance is equipped with a cord having an equipment grounding conductor and a grounding plug. The plug must be plugged into an appropriate outlet that is properly installed and grounded in accordance with all local codes and ordinances.
WARNING – Improper connection of the equipment-grounding conductor can result in a risk of electric shock. Contact a qualified electrician if you are in doubt as to whether the appliance is properly grounded.
Do not modify the plug provided with the appliance: if it will not fit the outlet, have a proper outlet installed by a qualified electrician.
A faulty power cord must be replaced by a genuine Miele power cord.
Do not use the dryer without lint screens or with damaged lint screens.
Lint screens must be cleaned regularly!
6
IMPORTANT SAFETY INSTRUCTIONS
The dryer should not be operated without its condenser unit.
Lint screens and door lint filter must be dried after wet cleaning. Wet screens may cause faulty dryer operation!
Do not place the dryer in a room where there is a risk of frost occurring. Temperatures around the freezing point affect dryer performance.
Condensed water freezing in the pump and the drain hose can lead to damage.
Permissible room temperature musts be between +2°C and +35°C.
If the condensed water is drained externally, you must secure the drain hose against slipping off, if for example it is hanging from a sink.
If the hose slips off, the condensed water released can cause damage.
Condensed water is not potable.
It can endanger the health of people and pets.
Keep the room in which the dryer is installed free of dust and fluff.
Dirt particles in the incoming cooling air impair performance.
Do not sit or lean on the door. The dryer might tip over.
Close the door after every drying cycle. In this way you can prevent
–children from trying to climb into the dryer or leaving objects inside it.
–Pets or small animals from getting into the dryer.
Do not hose down the dryer.
Accessories
Accessory parts may only be attached or installed when they have been expressly approved by Miele. If other parts are added or installed,
guarantee, performance and/or product liability claims are invalidated.
The manufacturer will not be held liable for damage caused by failure to comply with the safety instructions and warnings.
SAVE THESE INSTRUCTIONS
7

Description
Operating the dryer
Dear Customer,
Thank you for choosing Miele condenser (heat-exchanger) dryer!
Function of Miele condenser dryer
The condenser dryer evaporates water from damp clothes.
The water vapor is then condensed and collected in a special container.
Operation of Miele condenser dryer
The condenser dryer circulates air (trapped with wet laundry inside a reversibly rotating drum) via lint filters, heat exchanger and heaters, back into the drum in a closed loop.
The vapor condenses inside the heat exchanger and is collected in a condensed water container.
The heat exchanger (condenser) needs cooling, so the dryer circulates ambient air, through separate channels across heat exchanger, in an open loop. (the two air flows do not mix).
Returning ambient air warms up the room with dry heat.
Practically all energy, taken from the electrical wall outlet, remains in the room as dry heat.
Main Features
1.No outside venting is required:
The dryer operates on heat-exchange principle.
Ideal for condominiums – needs only a regular Canadian dryer wall outlet and room air for cooling.
Saves space (normally taken by a vent).
2.No depressurization,
3.No burden on dwelling’s existing venting system,
4.High energy efficiency:
Axial air flow.
Automatic moisture sensing and drying stage termination.
No venting to outside = the electrical energy is not blown outside, but stays in the room in form of dry heat (as opposed to a vented dryer).
This dry heat helps to keep a house warm in cold months.
By helping to heat the house in winter, condenser dryer lowers overall energy needs of a house, thus becoming effectively more energy efficient than a vented dryer.
8

Description
5.Laundry care – anti-crease action and roll-up prevention:
To limit wrinkling the dryer performs the following actions:
5.1.Tumble drying with drum reversal (prevents roll-ups of laundry, creasing and uneven drying),
5.2.Constantly measures the temperature of air coming into and leaving the drum,
5.3.Cycles two heater sections for 0, half and full power, to control drum’s temperature,
5.4.Automatic drying stage termination, after the desired Dryness level of laundry is reached,
5.5.Cooling down with tumbling and drum reversal,
5.6.Anti-crease with drum reversal:
–axial air flow in the drum: for uniform drying.
–smooth stainless steel drum: for air cushioning of tumbling laundry and reliable residual moisture sensing.
To do all this, the dryer is equipped with systems:
i.water conductivity metering,
ii.sensing of laundry’s residual moisture,
iii.software,
iv.reversing drum drive.
9
Operating the dryer
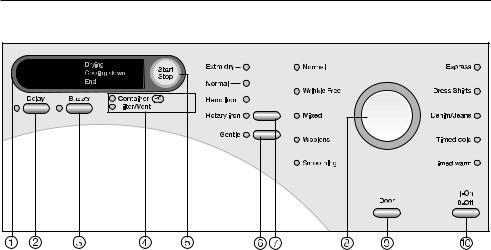
Control panel
Display
Delay button
This button has a dual function:
-Selecting the duration of the
Timed cold and Timed warm programs.
-Pre-selection of start time.
Buzzer button
The end of the program is signaled audibly.
Fault indicator / Optical interface
Description: See "Problem solving / Customer service" section.
Start/Stop button
Starts and stops a program. Interrupts a program when pressed. Flashes during program selection and lights once the program starts.
Gentle button
Delicate fabrics are dried at a lower temperature.
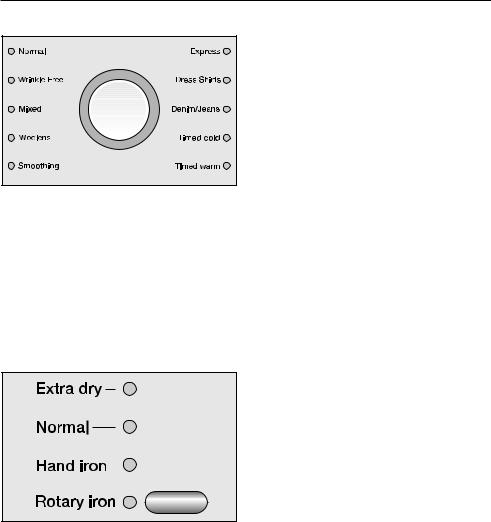
Dryness button
Indicator lights identify the drying level selected.
Program selector
Indicator lights identify the program selected.
Door button
This button opens the door independently of the power supply.
I-On/0-Off button
For switching the dryer on and off.
10
Operating the dryer
Display
The following functions are selected from the display:
–Delay
–Selecting duration of timed programs.
–Programmable functions. The display also shows:
–Program duration.
–Program stage:
Drying Cooling down End.
–Test and fault messages.
Program duration/ Estimated time remaining
When a program is selected, the estimated time remaining will be displayed. This is to be considered an estimate only.
The following factors can lead to variations in the time remaining estimate: Residual moisture after spinning; type of fabric; size of load; ambient temperature, or fluctuations in the power supply.
The adaptive electronics constantly adjusts to the individual wash load to ensure a more accurate estimate of time remaining. This estimate is permanently monitored during drying, which in some cases can lead to a change in the estimate.
In this way, the delicate and smoothing programs can end earlier, when a certain temperature is reached. This can happen with particularly fine fabrics, very small loads, or if items have previously been dried.
Delay
The delay time selected will be displayed.
The delay time countdown begins after pressing the Start button.
Once the time delay expired, the estimated program duration will appear in the display and the drying begins.
Programmable functions
The programmable functions can be used to adapt the dryer to your personal requirements. In programming mode, the display will show the function selected.
11

Laundry care
Care symbols
Drying
Normal/higher temperature
reduced temperature: select
Gentle
(for delicate fabrics)
Not suitable for dryer
Ironing and rotary ironing
very hot
hot
not very hot
Do not iron/rotary iron
Drying tips
–Always check the weight recommendation for maximum loads as listed in the "Program Overview" section.
Overloading will cause wear and tear on the laundry, give a poor drying result and cause more creasing.
–Do not dry fabrics that are still soaking wet! After washing, spin fabrics for at least 30 seconds.
–Dry mixed loads of cottons, colors and easy-care fabrics in the in the Express program.
–Open jackets so that they dry evenly.
–Woolens and wool blends tend to mat and shrink. Only handle these fabrics in the Woolens program.
–The linings of down-filled garments, depending on quality, tend to shrink. Handle these fabrics only in the
Smoothing program.
–Pure linens are dried only when indicated on the care label. Otherwise the fabric may become rough. Handle these fabrics only in the Smoothing program.
–Cottons (such as T-shirts and underwear) depending on quality, often shrink at the first wash. Therefore: to avoid further shrinkage, do not over-dry these textiles.
–Starched laundry may be dried. To achieve the usual finish, however, use a double amount of starch.
–Wash new colored fabrics separately before the first drying. Do not dry them together with light-colored fabrics since their colors may run and discolor other garments or even plastic dryer components.
12

Laundry care
–Wrinkling increases with larger loads. This especially occurs with very fine fabrics as used in shirts and blouses.
To limit wrinkling the dryer performs the following actions:
1.Tumble drying with drum reversal (prevents roll-ups of laundry, creasing and uneven drying),
2.Constantly measures the temperature of air coming into and leaving the drum,
3.Cycles two heater sections for 0, half and full power,
4.Automatic drying stage termination, after the desired Dryness level of laundry is reached. To do this, the dryer is equipped with systems:
-water conductivity metering,
-sensing of laundry’s residual moisture,
-software.
5.Cooling down with tumbling and drum reversal,
6.Anti-crease with drum reversal.
In cases of doubt, reduce the load by dividing it.
Use the Dress shirts program.
13
Proper drying
Brief instructions
The operating steps identified with numbers( , , , ...) may be used as short-cut instructions.
Preparing the laundry
Loosen the washed garments and sort them by: . .
. . . desired drying level,
. . . type of fabric and finish,
. . . size,
. . . same residual moisture content after spinning.
This will produce very even drying.
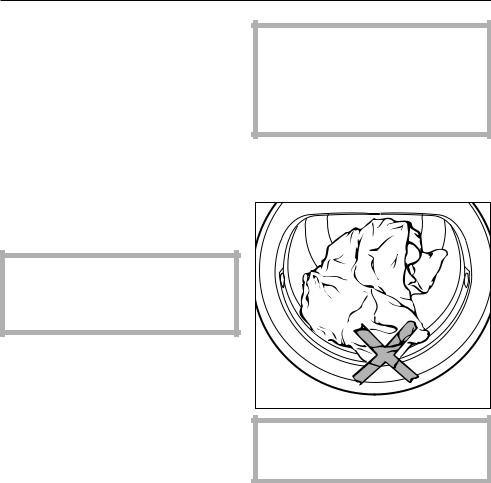
Remove foreign objects like detergent dispensing devices from the laundry. They can melt and damage the dryer and the wash.
–Check hems and seams to ensure that linings don't come out.
–Close duvet covers and pillowcases to prevent small items from getting inside.
–Fasten hooks and close buttons.
–Tie fabric belts together.
Turn on the dryer
You may also switch the dryer on after loading it, as the drum will not be illuminated, to save energy.
To turn it on, press the I-On/0-Off button.
Loading the dryer
Press the Door button to open.
Place the laundry loosely in the drum.
Do not exceed maximum loads specified in the "Program Overview" Section.
Overloading may cause wear and tear on the laundry and adversely affects drying.
Before closing the door, check that the lint filter is properly inserted in the door casing.
Ensure that no small items are jammed in the door, because they might otherwise be damaged.
14
Proper drying
Select program
Select the desired program.
The indicator light for the program selected lights up.
Other indicator lights for drying levels or extras may be lit, and drying times displayed.
Dryness level selection in programs:
–Normal, Wrinkle-free, Express, Dress shirts, denim/jeans
Press the button repeatedly until the desired indicator light is lit.
For Normal any dryness level can be selected, but selection is limited in other programs.
Note: The estimate of time remaining shown in the display varies with each new program selection.
Woolens and Smoothing programs:
– cannot be altered.
Timed program
The Delay button flashes when Timed cold or Timed warm programs are selected.
Repeatedly press the Delay button until the required duration appears in the display.
Drying time can be selected in 10-minute increments from 20 minutes up to 2 hours.
Extra options/Select Delay
Press button to select the following options:
Gentle, Buzzer, Delay options (see "Options/Delay").
Anti-Crease action always activates at program's end (see next page).
Please note: Delay is not possible in combination with the Timed warm and Timed cold programs.
15

Proper drying
Starting the program
The Start/Stop button flashes during program selection. This means that a program can be started.
Press the Start/Stop button.
The Start/Stop button lights.
Drying appears in the display and the time remaining is counted down.
Before the end of a program
After the drying phase finished a cooldown phase follows.
The following programs have no cooldown phase: Woolens, Smoothing.
End of program - Remove laundry
0 and End appear in the display to indicate the program end. The buzzer sounds at intervals (when selected).
After the program end the drum rotates reversible in intervals if clothes are not removed (Anti-crease action). This helps to prevent creasing for up to 2 hours.
Press the Door button.
Open the door.
Remove the laundry.
Check that the drum is empty. Laundry left behind may be damaged if dried again.
To save energy, the drum light turns off after a few minutes when the dryer is not operating and the door is open.
To shut it off, press the On/Off button.
Clean the lint filter and lint screens.
Close the door.
Empty the condensed water container (if the condensed water is not drained off externally).
The condenser should be checked at intervals and cleaned as necessary (See the section on "Dryer Care").
16

Options/Delay
Gentle
Delicate fabrics (with the symbol on the care label, such as acrylics) must be dried at lower temperatures for longer durations.
On some programs Gentle is permanently set and cannot be deselected.
Buzzer
At the end of the program a buzzer sounds at intervals, for a maximum of 1 hour.
A continuous warning tone for fault messages sounds whether the buzzer is on or off.
Delay
With the Delay option, you can select a later program start time. Program start can be delayed by 30 minutes up to a maximum of 24 hours. This enables you, for instance, to take advantage of night electricity rates.
After program selection:
Repeatedly press the Delay button until the required duration appears in the display.
–The Delay indicator light flashes.
–Times of
up to I0^ are selected in 30-minute steps,
more than I0^ in one-hour steps.
–If you keep the Delay button pressed in, the time will continue to increase up to 24^.
Starting
Press the Start/Stop button.
– The Delay indicator light comes on.
The Delay counts down to program start as follows:
–More than I0^, in whole hours.
–Less than I0^, in minutes.
The drum will turn briefly every hour to prevent creasing.
Canceling / altering Delay
Press the Start/Stop button. The Delay is cancelled.
Repeatedly press the Delay button until the required duration appears in the display.
Press the Start/Stop button.
The Delay resumes from the beginning.
Adding laundry
You can add laundry while the Delay is still counting down:
Switch off the dryer.
Open the door and add the laundry.
Close the door and switch on the dryer.
17
 Loading...