


Operating and Installation
Instructions
Fridge-Freezer Combination KFN 9753 iD
To prevent accidents and machine damage read these instructions before
en - CA, US
installation or use. |
M.-Nr. 07 270 540 |

Contents
IMPORTANT SAFETY INSTRUCTIONS. . . . . . . . . . . . . . . . . . . . . . . . . . . . . . . . . 4
Description of the appliance . . . . . . . . . . . . . . . . . . . . . . . . . . . . . . . . . . . . . . . . . 7
Before use . . . . . . . . . . . . . . . . . . . . . . . . . . . . . . . . . . . . . . . . . . . . . . . . . . . . . . . 9 Turning the appliance on/Off . . . . . . . . . . . . . . . . . . . . . . . . . . . . . . . . . . . . . . . . . 10 Safety lock . . . . . . . . . . . . . . . . . . . . . . . . . . . . . . . . . . . . . . . . . . . . . . . . . . . . . . . 10 Turning off for longer periods of time . . . . . . . . . . . . . . . . . . . . . . . . . . . . . . . . . . 11
Setting the temperature. . . . . . . . . . . . . . . . . . . . . . . . . . . . . . . . . . . . . . . . . . . . 12 Setting the temperature in the refrigerator and freezer sections . . . . . . . . . . . . . . 12 Temperature displays . . . . . . . . . . . . . . . . . . . . . . . . . . . . . . . . . . . . . . . . . . . . . . 13
Alarm . . . . . . . . . . . . . . . . . . . . . . . . . . . . . . . . . . . . . . . . . . . . . . . . . . . . . . . . . . . 15 Door alarm . . . . . . . . . . . . . . . . . . . . . . . . . . . . . . . . . . . . . . . . . . . . . . . . . . . . . . . 15 Turning the alarm off . . . . . . . . . . . . . . . . . . . . . . . . . . . . . . . . . . . . . . . . . . . . . . . 15
Using the Super and DynaCool functions . . . . . . . . . . . . . . . . . . . . . . . . . . . . . 16 Super function . . . . . . . . . . . . . . . . . . . . . . . . . . . . . . . . . . . . . . . . . . . . . . . . . . . . 16 DynaCool m . . . . . . . . . . . . . . . . . . . . . . . . . . . . . . . . . . . . . . . . . . . . . . . . . . . . . 17
Using the refrigerator efficiently . . . . . . . . . . . . . . . . . . . . . . . . . . . . . . . . . . . . 18 Different storage zones . . . . . . . . . . . . . . . . . . . . . . . . . . . . . . . . . . . . . . . . . . . . . 18
Using the freezer efficiently . . . . . . . . . . . . . . . . . . . . . . . . . . . . . . . . . . . . . . . . 19 Freezing food . . . . . . . . . . . . . . . . . . . . . . . . . . . . . . . . . . . . . . . . . . . . . . . . . . . . . 19 Freezer calendar . . . . . . . . . . . . . . . . . . . . . . . . . . . . . . . . . . . . . . . . . . . . . . . . . . 20 Defrosting . . . . . . . . . . . . . . . . . . . . . . . . . . . . . . . . . . . . . . . . . . . . . . . . . . . . . . . 20 Freezer tray . . . . . . . . . . . . . . . . . . . . . . . . . . . . . . . . . . . . . . . . . . . . . . . . . . . . . . 21 Cool pack. . . . . . . . . . . . . . . . . . . . . . . . . . . . . . . . . . . . . . . . . . . . . . . . . . . . . . . . 21
Automatic defrosting . . . . . . . . . . . . . . . . . . . . . . . . . . . . . . . . . . . . . . . . . . . . . . 22
Adjusting the interior fittings . . . . . . . . . . . . . . . . . . . . . . . . . . . . . . . . . . . . . . . 23 Moving the shelves . . . . . . . . . . . . . . . . . . . . . . . . . . . . . . . . . . . . . . . . . . . . . . . . 23 Split shelf . . . . . . . . . . . . . . . . . . . . . . . . . . . . . . . . . . . . . . . . . . . . . . . . . . . . . . . . 23 Fruit and vegetable drawers on rollers . . . . . . . . . . . . . . . . . . . . . . . . . . . . . . . . . 23 Moving the adjustable door shelves . . . . . . . . . . . . . . . . . . . . . . . . . . . . . . . . . . . 24 Universal container . . . . . . . . . . . . . . . . . . . . . . . . . . . . . . . . . . . . . . . . . . . . . . . . 24 Moving the divider . . . . . . . . . . . . . . . . . . . . . . . . . . . . . . . . . . . . . . . . . . . . . . . . . 24
Cleaning and Care . . . . . . . . . . . . . . . . . . . . . . . . . . . . . . . . . . . . . . . . . . . . . . . . 25 Cleaning the interior and accessories . . . . . . . . . . . . . . . . . . . . . . . . . . . . . . . . . . 25 Ventilation slits . . . . . . . . . . . . . . . . . . . . . . . . . . . . . . . . . . . . . . . . . . . . . . . . . . . . 26 Door seal . . . . . . . . . . . . . . . . . . . . . . . . . . . . . . . . . . . . . . . . . . . . . . . . . . . . . . . . 26

Contents
Frequently asked questions . . . . . . . . . . . . . . . . . . . . . . . . . . . . . . . . . . . . . . . . 27
Noises . . . . . . . . . . . . . . . . . . . . . . . . . . . . . . . . . . . . . . . . . . . . . . . . . . . . . . . . . . 30
After sales service . . . . . . . . . . . . . . . . . . . . . . . . . . . . . . . . . . . . . . . . . . . . . . . . 31
Caring for the environment . . . . . . . . . . . . . . . . . . . . . . . . . . . . . . . . . . . . . . . . . 34
Electrical information . . . . . . . . . . . . . . . . . . . . . . . . . . . . . . . . . . . . . . . . . . . . . 35
Installation . . . . . . . . . . . . . . . . . . . . . . . . . . . . . . . . . . . . . . . . . . . . . . . . . . . . . . 36 Installation site . . . . . . . . . . . . . . . . . . . . . . . . . . . . . . . . . . . . . . . . . . . . . . . . . . . . 36 Ventilation . . . . . . . . . . . . . . . . . . . . . . . . . . . . . . . . . . . . . . . . . . . . . . . . . . . . . . . 37 Before installation . . . . . . . . . . . . . . . . . . . . . . . . . . . . . . . . . . . . . . . . . . . . . . . . . 37
Installation Dimensions. . . . . . . . . . . . . . . . . . . . . . . . . . . . . . . . . . . . . . . . . . . . 38
Adjusting the door hinges . . . . . . . . . . . . . . . . . . . . . . . . . . . . . . . . . . . . . . . . . 39
Adjusting the door hinges . . . . . . . . . . . . . . . . . . . . . . . . . . . . . . . . . . . . . . . . . 40
Installing the appliance . . . . . . . . . . . . . . . . . . . . . . . . . . . . . . . . . . . . . . . . . . . . 43 Custom door panels . . . . . . . . . . . . . . . . . . . . . . . . . . . . . . . . . . . . . . . . . . . . . . . 43 Installing the appliance as a room divider. . . . . . . . . . . . . . . . . . . . . . . . . . . . . . . 43 Mounting the custom door panels . . . . . . . . . . . . . . . . . . . . . . . . . . . . . . . . . . . . . 47
IMPORTANT SAFETY INSTRUCTIONS
When using the appliance, follow basic safety precautions, including the following:
Read all instructions before installation and use to prevent accidents and machine damage.
This appliance is intended for residential use only. Use only as described in this Operating manual.
Only use this appliance for its intended purpose. The manufacturer cannot be held responsible for damages caused by improper use of this appliance.
This appliance complies with current safety requirements. Improper use of the appliance can lead to personal injury and material damage.
Keep these operating instructions in a safe place and pass them on to any future user.
Electrical safety
~Before installation, make sure that the voltage and frequency listed on the data plate correspond with the household electrical supply. This data must correspond to prevent injury and machine damage. Consult a qualified electrician if in doubt.
~Before installation or use check the machine for any visible damage. A damaged machine is dangerous. Contact the Miele Service Department.
~Do not use an extension cord to connect this appliance to electricity. Extension cords do not guarantee the required safety of the appliance (e.g., danger of overheating).
~Be certain your appliance is properly installed and grounded by a qualified technician. To guarantee the electrical safety of this appliance, continuity must exist between the appliance and an effective grounding system. It is imperative that this basic safety requirement be met. If there is any doubt, have the electrical system of the house checked by a qualified electrician. The manufacturer cannot be held responsible for damages caused by the lack, or inadequacy, of an effective grounding system.
~Only connect power to the appliance when all installation work is complete.
4
IMPORTANT SAFETY INSTRUCTIONS
Installation
This appliance is top-heavy and must be secured to prevent it from tipping forward.
~Before installation or service, disconnect the power supply to the work area by unplugging the unit, "tripping" the circuit breaker or removing the fuse.
~This appliance must be installed and connected in compliance with the installation instructions.
~Installation and repair work should be performed by a Miele authorized service technician. Work by unqualified persons could be dangerous and may void the warranty.
~Installation must comply with local regulations and state laws.
~Do not operate any appliance with a damaged cord or plug, or if the appliance has been damaged in any manner. Contact Miele’s Technical Service Department.
~This equipment is not designed for maritime use or for use in mobile installations such as recreational vehicles or aircraft.
~Do not install the fridge/freezer in a room with too low an ambient temperature, e.g., a garage, as this may lead to the appliance switching off for longer periods so that it cannot maintain the required temperature.
~ Defective parts must only be exchanged with original Miele spare parts. Only then can the safety of the unit be guaranteed.
Use
~Persons who lack physical, sensory or mental abilities, or experience with the machine should not use it without supervision or instruction by a responsible person.
~To reduce the risk of injury, do not allow children to play in, on or near the appliance.
~After your appliance is in operation do not touch the cold surfaces in the machine, ice cubes or frozen food, particularly when hands are damp or wet. Skin may adhere to extremely cold surfaces.
~Do not refreeze frozen foods which have thawed partially or completely.
~Do not handle frozen food or ice with wet hands. Danger of injury.
~Do not store or use gasoline or other flammable vapors and liquids in the vicinity of this or any other appliance.
~Do not use sharp-edged objects to remove frost and ice, or separate frozen foods and remove ice trays. They will damage the evaporator, causing irreversible damage to the appliance.
5
IMPORTANT SAFETY INSTRUCTIONS
~Do not use defrosting sprays or de-icers, as they might contain substances which could damage the plastic parts or which could cause a build-up of gases and pose a danger to health.
~Do not use any oils or grease on the door seal, as these will cause the seal to deteriorate and become porous with time.
~Do not block the ventilation gaps in the plinth or the top of the appliance housing unit, as this can impair the efficiency of the appliance, increase the electricity consumption and cause damage to the appliance.
~Never use a steam cleaner to clean the appliance. Pressurized steam could damage electrical components and cause a short circuit.
Disposal of your old appliance
~Before disposing of an old appliance, first make the door latch or lock unusable.
~Take off the doors.
~Leave the shelves and drawers in place so that children may not easily climb inside.
~Be careful not to damage any part of the pipework while awaiting disposal by:
- puncturing the refrigerant channels in the evaporator.
- bending any pipework.
- scratching the surface coating. Splashes of refrigerant can damage the eyes.
~ Your old refrigerator may have a cooling system that used CFC's (chlorofluorocarbons). CFC's are believed to harm stratospheric ozone. If you intentionally release this CFC refrigerant, you can be subject to fines and imprisonment under provisions of
environmental legislation. Make sure the CFC refrigerant is removed and disposed of by a qualified technician.
The manufacturer cannot be held liable for damage caused by non-compliance with these Important Safety instructions.
SAVE THESE
INSTRUCTIONS
6
Description of the appliance
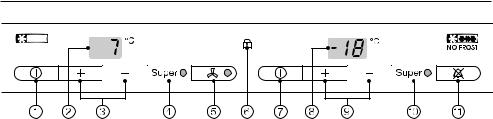
aOn/Off button for independently switching the refrigerator section on and off
bRefrigerator section temperature display
cTemperature selector buttons for the refrigerator section
(+ for warmer; - for colder)
dSuperCool button and indicator light
eDynaCool button (dynamic cooling) and indicator light
fSafety lock indicator light
gMaster switch for switching the whole appliance on and off
hFreezer section temperature display
iTemperature selector buttons for the freezer section
(+ for warmer; - for colder)
jSuperFreeze button and indicator light
kAudio alarm off button
7
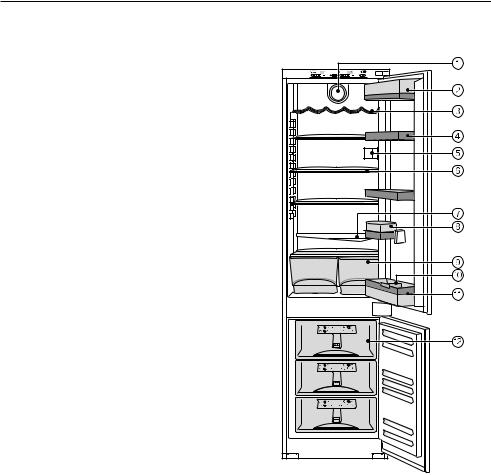
Description of the appliance
aDynaCool fan (dynamic cooling)
bHinged door shelf
cBottle rack
dAdjustable door shelves
eInterior lighting
fAdjustable interior shelves
gCondensate channel and drain hole
hUniversal container
iFruit and vegetable drawer
jDivider*
kBottle shelf
lFreezer drawers with calendar
* may vary by model
8
Before use
Before using for the first time
The stainless steel frames of the shelves have a protective plastic coating to prevent scratching during transportation.
^Do not remove the plastic until the appliance has been installed.
^After removing the plastic, treat the stainless steel with a stainless steel cleaner.
This will help protect the stainless steel and prevent resoiling.
^Clean the inside of the appliance and the accessories with a mild solution of warm water and liquid dish soap.
To ensure proper functioning of the appliance, let it stand for approx. 30 mins to an hour before it is connected to the electrical supply.
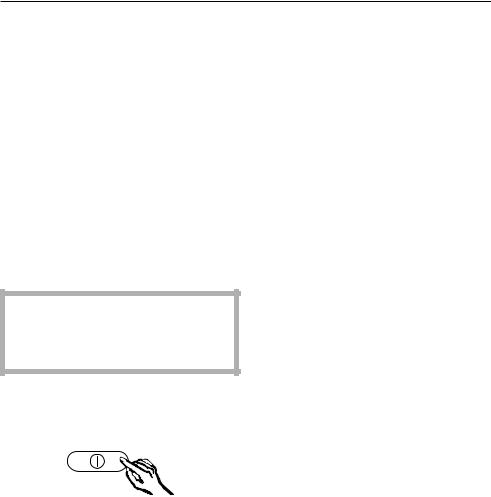
Turning the appliance on
With the main switch you can turn the appliance on.
^Press the main switch on the right side of the control panel.
The temperature display for the refrigerator section lights up, and the interior lighting comes on when the door is opened.
Bars light up in the freezer section display until the selected temperature is reached.
The appliance begins cooling.
Allow the appliance to run for a few hours before placing food in it. This will enable it to sufficiently cool.
Cool pack
Place the cool pack in the top freezer drawer. The cool pack will be at maximum performance after it has been in the freezer for approx. 24 hours.
Turning the appliance off
^Press the main switch on the right side of the appliance until both temperature displays go out.
If the cooling system does not turn off the safety lock has been activated.
9
Before use
Turning the appliance on/Off
Turning the refrigerator section off
The refrigerator section can be turned off separately while the freezer section remains on, e.g. during vacation.
^Press the On/Off button on the left side of the control panel until the temperature display for the refrigerator section goes out.
Turning the refrigerator section on
^Press the On/Off switch on the left side of the control panel until temperature display for the refrigerator section turns on.
The refrigerator section will begin to cool and the interior lighting will turn on when the door is opened.
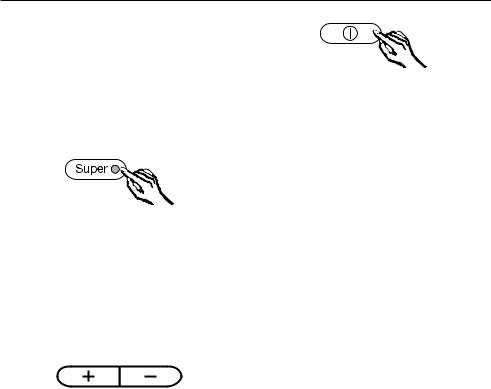
Safety lock
The safety lock can be activated to prevent the appliance from being turned off accidently.
Activating/Deactivating the safety lock
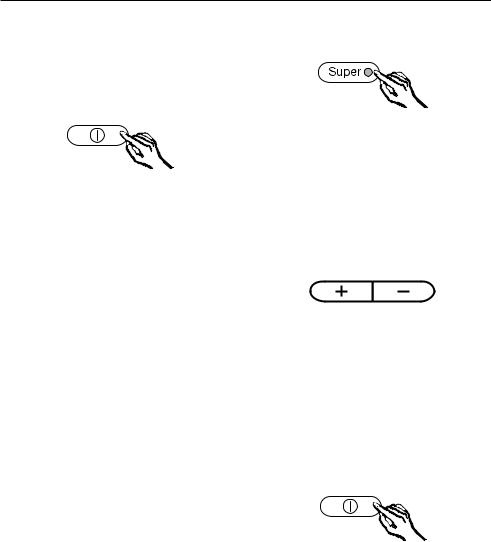
^Press the Super button for the freezer for approx. 5 seconds.
The Super indicator light flashes, and ; flashes in the temperature display.
^Press the Super button for the freezer again.
; will appear in the display.
^Using the temperature selector
buttons you can now choose between ; 0 and ; 1 :
0: safety lock deactivated,
1: safety lock activated.
^Press the Super button for the freezer to save the setting.
The safety lock indicator lights up in the display X when it is activated.
^Press the main switch on the right side on the control panel to exit the settings mode.
If a button is not pressed within 2 minutes the electronics will return to normal operation.
10
Before use
Turning off for longer periods of time
If the appliance is not going to be used for an extended time (for example, during a vacation) some precautions should be taken.
^Take all food out of the appliance
^Turn the appliance off at the main switch
^Unplug the appliance
^Discard any ice cubes
^Clean the interior
^Leave the doors open to prevent odors
11
Setting the temperature
Temperature range
The temperature can be selected within the following ranges:
–Refrigerator:
39°F (4° C) to 48°F (9° C).
A temperature of 39°F (4° C) is recommended in the refrigerator section.
–Freezer:
3°F (-16° C) to -15 (-26° C).
To freeze fresh food and store frozen food for an extended period of time, a temperature of 0°F (-18°C) is suggested.
Partially or completely thawed food must never be refrozen.
The room temperature and the installation location can affect the time it takes for the appliance to get to the desired temperature. If the room temperature is too high, it may not be possible for the appliance to reach the lowest temperature.
Setting the temperature in the refrigerator and freezer sections
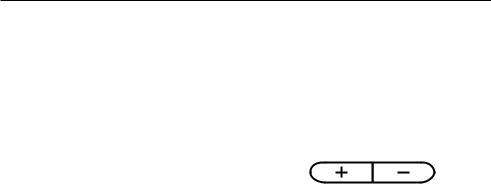
The temperatures for the refrigerator and freezer sections can be set independently using the temperature selection buttons.
+ button: |
increases the temperature |
- button: |
decreases the temperature |
The temperature being set will flash in the display.
When pressing the buttons the following information appears in the display:
–When first pressed: The last selected temperature flashes.
–Each subsequent press of the button adjusts the temperature in increments of 1 °F (1°C).
–Holding down the button will move through the temperature range quickly.
Approx. 5 seconds after releasing the button the current, average temperature in the refrigerator or freezer section is automatically shown.
If the temperature is adjusted, wait approx. 6 hours (or 24 hours for a fully loaded appliance) for the temperature display to show an accurate reading. If after this time the temperature is still too high or low, try adjusting it again.
12

Setting the temperature
Temperature displays
During normal operation, the temperature display shows the temperature in the middle of the refrigerator section and the temperature in the warmest part of the freezer section.
If the temperatures in the appliance are not in the possible temperature display range, dashes will flash in the temperature displays.
The temperature displays flash if:
–a different temperature is being set,
–the temperature in the appliance has risen by several degrees, indicating that the appliance is warming up too much.
This short-term loss of cooling is not a cause for concern in the following cases:
–when the door has been left open for a longer period, for example to take out or put in a large amount of food,
–when fresh food is being frozen.
However, if the temperature remains above 0°F (-18° C) for a longer period of time, you will need to check to make sure that any frozen food has not started to thaw. Any food that has started to thaw should be used as soon as possible.
13
Setting the temperature
Temperature display brightness
The brightness of the temperature display is factory-set to the lowest setting.
However when the door is opened, a setting is changed or an alarm is triggered, the temperature display will appear very bright.
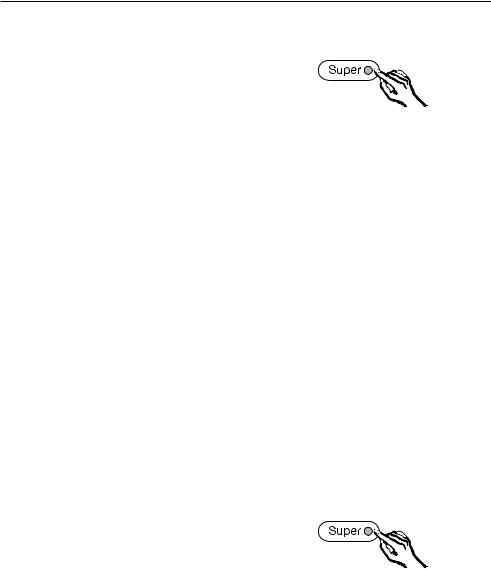
^Hold down the Super button for the freezer for approx. 5 seconds.
The Super indicator flashes and ; flashes in the temperature display.
^Press either of the temperature selection buttons until ^ appears in the display.
^Press the Super button for the freezer again.
^appears in the display.
^Using the temperature selector buttons, you can now choose a brightness level from 1 to 5:
1 dimmest setting
5 brightest setting.
^To save the setting, press the Super button for the freezer.
^Press the main switch on the right side on the control panel to exit the settings mode.
If a button is not pressed within 2 minutes the electronics will return to normal operation.
14
Alarm
The appliance is equipped with an alarm system, to ensure that the temperature does not rise unnoticed.
The alarm system is always operational, it does not need to be turned on.
If the temperature becomes too warm, the alarm sounds and the temperature display for the freezer section flashes. The temperature set will determine when the alarm is triggered.
The alarm will sound and the display will flash if:
–too much warm air flows into the appliance, for example when food is being loaded, re-arranged, or taken out.
–large amounts of food are being frozen at once.
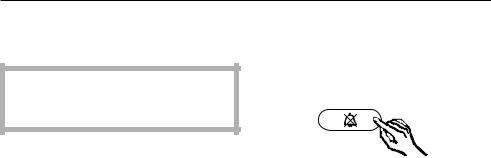
Door alarm
If one of the appliance doors is left open for more than 60 seconds, the alarm signal will sound.
Turning the alarm off
Once the set temperature is reached in the freezer, the alarm signal turns off and the temperature display stops flashing.
^To turn the alarm off early, press the alarm off button.
^The alarm signal turns off. The temperature display will continue to flash until the set temperature has been reached. The display then stops flashing and lights steadily. The alarm system is automatically reactivated.
15
Using the Super and DynaCool functions
Super function
The Super function is used to rapidly reduce the temperature in the refrigerator and freezer sections to their lowest settings (depending on the room temperature).
When used with the refrigerator the Super function is ideal for the rapid cooling of drinks and refrigerating large quantities of food.
When used with the freezer the Super function is ideal for freezing large quantities of unfrozen food. The function should be switched on approx. 6 hours before the fresh food is placed in the freezer. If the max. freezing capacity is used allow 24 hours.
This helps food to freeze quickly and retain its nutrients, vitamins, flavor and appearance.
It is not necessary to use the Super function in the freezer if you are loading frozen food or if you are loading less than 4.4 lbs (2 kg) of food.
Turning on the Super function for the refrigerator/freezer
^Press the Super button for the refrigerator or freezer as desired, the indicator light will turn on.
The appliance will now work at full power to lower the temperature in the refrigerator/freezer section.
Turning off the Super function for the refrigerator/freezer
The Super function automatically turns off after:
Refrigerator: approx. 6 hours Freezer: approx. 30 - 60 hours (depending on the amount of food frozen).
The indicator light will go out, and the appliance will run at normal power.
The Super function can be turned off early, once a constant temperature of 0°F (-18° C) or colder has been
reached in the freezer section, or once the food and/or drinks are sufficiently chilled in the refrigerator.
^To turn the function off early, press the Super button for the refrigerator or freezer as desired, the indicator light will go out.
The appliance will now run at normal power.
16
 Loading...