


Operating instructions
for Combi-ovens, Models H 267 B, H 277 B
To prevent accidents and reduce the risk of damaging the machine, read the Operating Manual before installing or using
the machine.
ö]
M.-Nr. 04 919 480

Caring for the environment
Disposal of the packing material
The transport and protective packing is made from materials that are environmentally friendly and can be recycled.
Rather than throwing these materials away, please ensure that they are offered for recycling.
Disposal of your old machine
Old machines contain materials which can be recycled. Please contact your local recycling center or scrap merchant about recycling programs.
To ensure that the machine presents no danger to children while being stored for disposal, see the appropriate section in the Warning and Safety instructions.

Contents
Guide to the appliance. . . . . . . . . . . . . . . . . . . . . . . . . . . . . . . . . . . . . . . . . . . . . . 4
Warning and Safety instructions . . . . . . . . . . . . . . . . . . . . . . . . . . . . . . . . . . . . . 7
Child Safety Feature . . . . . . . . . . . . . . . . . . . . . . . . . . . . . . . . . . . . . . . . . . . . . . 11
Before using for the first time. . . . . . . . . . . . . . . . . . . . . . . . . . . . . . . . . . . . . . . 12
Oven Operation
– Description of the cooking modes . . . . . . . . . . . . . . . . . . . . . . . . . . . . . . . . . . . 13
– Controls . . . . . . . . . . . . . . . . . . . . . . . . . . . . . . . . . . . . . . . . . . . . . . . . . . . . . . . 15
– Selecting an cooking mode . . . . . . . . . . . . . . . . . . . . . . . . . . . . . . . . . . . . . . . . 17
– Selecting a temperature. . . . . . . . . . . . . . . . . . . . . . . . . . . . . . . . . . . . . . . . . . . 18
– Changing the temperature. . . . . . . . . . . . . . . . . . . . . . . . . . . . . . . . . . . . . . . . . 19
– Canceling a mode or turning off the oven . . . . . . . . . . . . . . . . . . . . . . . . . . . . . 19
– Pre-heating the oven . . . . . . . . . . . . . . . . . . . . . . . . . . . . . . . . . . . . . . . . . . . . . 20
– Energy Conservation Feature . . . . . . . . . . . . . . . . . . . . . . . . . . . . . . . . . . . . . . 20
– Baking tray, oven tray and rack . . . . . . . . . . . . . . . . . . . . . . . . . . . . . . . . . . . . . 21
– Minute Minder . . . . . . . . . . . . . . . . . . . . . . . . . . . . . . . . . . . . . . . . . . . . . . . . . . 22
Timer Operation . . . . . . . . . . . . . . . . . . . . . . . . . . . . . . . . . . . . . . . . . . . . . . . . . . 23
Programming the Oven . . . . . . . . . . . . . . . . . . . . . . . . . . . . . . . . . . . . . . . . . . . . 29
Applications
– Baking recommendations . . . . . . . . . . . . . . . . . . . . . . . . . . . . . . . . . . . . . . . . . 30
– Roasting recommendations and roasting with the roast probe . . . . . . . . . . . . . 34
– Defrosting in the oven . . . . . . . . . . . . . . . . . . . . . . . . . . . . . . . . . . . . . . . . . . . . 41
– Casseroles . . . . . . . . . . . . . . . . . . . . . . . . . . . . . . . . . . . . . . . . . . . . . . . . . . . . . 42
– Broiling . . . . . . . . . . . . . . . . . . . . . . . . . . . . . . . . . . . . . . . . . . . . . . . . . . . . . . . . 43
Maintenance
Cleaning and care
– Oven door and control panel . . . . . . . . . . . . . . . . . . . . . . . . . . . . . . . . . . . . . . . 47
– Accessories . . . . . . . . . . . . . . . . . . . . . . . . . . . . . . . . . . . . . . . . . . . . . . . . . . . . 47
– Oven interior. . . . . . . . . . . . . . . . . . . . . . . . . . . . . . . . . . . . . . . . . . . . . . . . . . . . 48
Correcting minor problems . . . . . . . . . . . . . . . . . . . . . . . . . . . . . . . . . . . . . . . . . . 52
After sales service . . . . . . . . . . . . . . . . . . . . . . . . . . . . . . . . . . . . . . . . . . . . . . . . . 56
Optional accessories . . . . . . . . . . . . . . . . . . . . . . . . . . . . . . . . . . . . . . . . . . . . . . . 57
Installation / Electrical connection
Electrical connection . . . . . . . . . . . . . . . . . . . . . . . . . . . . . . . . . . . . . . . . . . . . . . . 58
Installation . . . . . . . . . . . . . . . . . . . . . . . . . . . . . . . . . . . . . . . . . . . . . . . . . . . . . . . 59
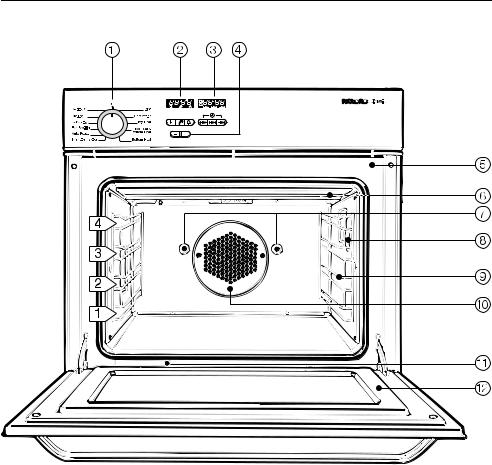
Guide to the appliance
H 277 B for ]
Control panel
b Oven Mode Selector
c Oven display and pushbuttons d Timer display and pushbuttons e – /+ button with indicator lamp
Oven interior
f Door safety switch g Top heating element
h Connection for rotisserie
i Connection socket for roast probe j Non-tip, four level racks
k Convection fan l Data plate
m Oven door
4

Guide to the appliance
H 267 B for ö
Control panel
b Oven Mode Selector
c Oven display and pushbuttons d Timer display and pushbuttons e – /+ button with indicator lamp
Oven interior
f Door safety switch g Top heating element
h Rotisserie connections
i Connection socket for roast probe j Non-tip, four level racks
k Convection fan l Data plate
m Oven door
5
Guide to the appliance
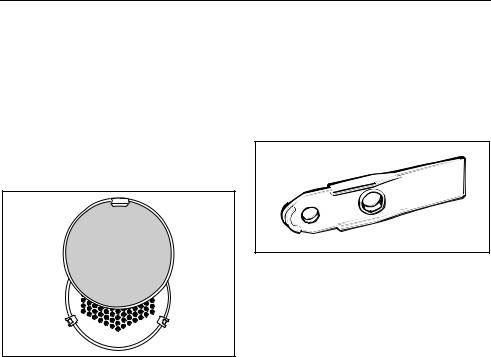
Accessories
–2 baking trays
–dual purpose broiling pan / oven tray
–non-tip rack for baking, roasting or grilling
–grease filter
to be placed in front of the air intake when Convection roasting.
Droplets of grease suspended in the circulating air are deposited on the grease filter to help keep the oven clean.
–Roast probe for temperature controlled roasting and broiling
–Dual rotisserie
for broiling on the spits
–Lever (pictured below)
to remove the oven lamp cover
6

Warning and Safety instructions
This appliance complies with all legal safety requirements. Improper use can cause both personal injury and material damage.
Before installation and before using the oven for the first time, read the operating instructions carefully. They contain important information on safety, and on the operation and care of the appliance.
Do not let children in, on or around the appliance or its controls.
Keep these instructions in a safe place and pass them to any future users.
Proper Use
This appliance is intended for residential use only. Use for any
other purpose is at the owner’s risk and could be dangerous. The manufacturer cannot be held responsible for damage caused by improper use of this appliance.
Installation and Servicing
Before connecting the appliance to the power supply, make sure that
the available voltage and frequency correspond to the ratings on the data plate. Consult a licensed electrician if in doubt.
The electrical safety of this appliance can only be guaranteed
when continuity is complete between the appliance and a grounding system which complies with local and national ordinances. It is extremely important that this safety requirement be verified by a qualified electrician. The manufacturer cannot be held responsible for problems arising due to an inadequate or missing ground.
This appliance must only be operated after it has been installed in
appropriate cabinetry, as outlined in the Installation instructions.
Installation and repairs should only be performed by qualified and
trained personnel. Repairs or other work performed by unqualified personnel could be dangerous.
The appliance is completely isolated from the electrical supply
only when:
–the main circuit breaker is tripped, or
–the fuse is removed (in countries where this is applicable)
7

Warning and Safety instructions
Oven operation
High temperatures can be produced by the oven.
Care should be taken to ensure that small children do not touch the appliance when it is in use. External parts of the oven such as the door glass, vents, and control panel can become hot.
Use of heat-resistant oven gloves is recommended:
–when placing food in, turning, or removing items from the oven. The top heating element and oven racks can become very hot and the risk of burns exists.
 Always open the door carefully.
–Let hot air or steam escape before removing or replacing food.
Wait until the upper element is cool before lowering it for cleaning, in
order to avoid the risk of burns.
Do not use force to pull down the top heating element as this can
break it.
Always place the oven racks in their desired location while the
oven is cool. If a rack must be moved while the oven is hot, do not let the pot holder contact the hot heating elements.
Caution: Heating elements may be hot even though they are not glowing. Interior surfaces of an oven become hot enough to cause burns. During and after use, do not let clothing or other flammable materials con-
tact the heating elements or interior surfaces of the oven until they have had sufficient time to cool.
Do not let aluminum foil or the
meat probe contact hot heating elements.
Do not push pots and pans on the oven floor as this could scratch the
surface.
Do not lean, sit, or place heavy items on the open oven door. The
door can support a maximum weight of 22 lbs (10 kg).
Cover any food left in the oven. This will prevent the food from
drying out and steam from condensing inside the oven. If condensation is excessive, damage to the oven may occur.
Use only the Miele roast probe supplied with the oven. If a replace-
ment is necessary, it can be obtained from the Miele Parts Dept. or a Miele dealer.
8

Warning and Safety instructions
When not in use, do not leave the roast probe in the oven. High broil-
ing temperatures could damage it.
Do not heat unopened containers of food in the oven, as pressure
may build up and cause them to explode.
To keep food warm after cooking, take advantage of the residual
heat or select the lowest temperature available.
Put any frozen products, such as pizza, on aluminum foil or on the rack. Do not place them on the baking
tray or broiling pan, as this could cause the metal to distort to such an extent that it may be difficult to remove the tray/pan from the oven.
Never use aluminum foil to line the oven floor or place pots and pans or baking sheets directly on the oven floor when using “Top & Bottom Heat”, “Bottom Heat” or the “Intensive Bake” modes, as this could cause the enamel on the oven floor to crack.
Flammable materials should never be stored in an oven or near sur-
face cooking units.
General notes
Never use a steam cleaner to clean the oven. Pressurized steam
could cause a short circuit, or cause permanent damage to the oven surface and/or components. The manufacturer cannot accept responsibility for damage caused by steam cleaning.
Children should not be left alone or unattended in an area where an
oven is in use. They should never be allowed to sit or stand on any part of the oven.
Caution: Do not store items of interest to children in cabinets above an oven. Children climbing on the oven to reach these items could be seriously injured.
Do not leave the oven unattended when cooking with oils or fats as
these can be a fire hazard if allowed to overheat.
Do not use water on grease fires. Smother the fire or flame or use a dry chemical or foam fire extinguisher.
Wear proper apparel. Loose-fitting or hanging garments should never
be worn while using the oven.
Do not use the oven to heat the room. Due to the high temperatures radiated, objects left near the
oven could ignite.
9

Warning and Safety instructions
When using kitchen appliances connected to outlets near the
oven, make certain that their cables do not contact with any cooking zones or get trapped in the oven door.
Use only dry potholders. Moist or damp potholders on hot surfaces may result in burns from steam. Do not
let potholders touch hot heating elements.
Always ensure that food is sufficiently cooked. Many factors will af-
fect the overall cooking time, including the size or amount of food, the selected temperature, changes to the recipe and the shape and size of the cooking container. Some foods may contain microorganisms which are only destroyed by thorough cooking. If in doubt, select a longer cooking time.
It is important that the heat is allowed to spread evenly throug-
hout the food being cooked. This can be achieved by stirring or turning the food, or by observing a sufficiently long set time at the end of the cooking cycle.
Disposal of your old machine
Before discarding an old machine, cut off the cable and remove the
door in order prevent accidental injury to any children or animals who may attempt to play inside of it.
The manufacturer is not liable for damage caused by non-com- pliance with safety instructions.
10
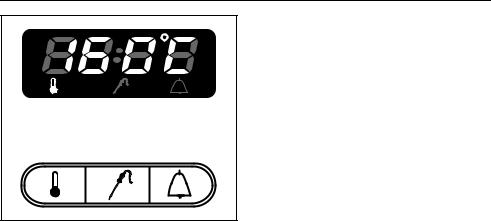
Child Safety Feature
The Child Safety Feature can be activated to prevent the oven being turned on unintentionally by children.
It is activated as follows:
The Oven Mode Selector must be in the "0" (OFF) position.
Press the "p" (Temperature) button until the key symbol appears in the display.
Once this symbol appears, the oven can no longer be turned on.
To cancel the Child Safety Feature:
Select an oven mode.
Press the "p" (Temperature) button until the key symbol in the display disappears.
11
Before using for the first time
Timer
After the appliance has been turned on,
Either;
– "12:00" and the "f" (Start) and ")" (End) symbols will flash in the display.
or
–the timer will remain dark.
To save energy the time display has been turned off (factory setting)
If the "f" and ")" buttons are pressed simultaneously, "12.00" should appear in the display.
Setting the time of day
Press the "f" (Start) and ")" (End) buttons simultaneously.
"12:00" and the control lamp in the center of the “– /+” button will now stay on without flashing.
Use the “– /+” button to enter the time in hours and minutes.
When the control lamp for the “– /+” button goes out, the time has been set. The colon will flash and the display will change in one minute intervals.
To turn off the time display while still allowing the clock to run unseen, see page 24.
Oven
Use a cloth to wipe out the oven interior with warm water and a non-ab- rasive detergent solution. Dry it with a soft cloth.
Do not close the oven door until the oven interior is dry.
Rinse the accessories.
New ovens may have a slight odor during their first use. Running the oven for at least an hour at 450°F / 230°C or higher will make it dissipate more quickly.
Turn the Oven Mode Selector to "Convection".
Select the highest temperature using the "– /+" button.
The timer can be used to set the finish time to one hour.
Make sure the room is well ventilated during this process.
12

Oven Operation
Description of the cooking modes
Convection
This mode cooks by circulating the heated air over and around the food.
The convection fan/heater combination located on the rear wall of the oven blows heated air through openings in the rear panel of the oven. Because of this, the oven usually does not need preheating as the heated air will reach the food immediately.
Exception: Pre-heat the oven when roasting meat.
Use of the convection mode allows you to bake and roast on different levels at the same time.
Due to the uniform cooking that occurs when using the “Convection” setting, a lower temperature can be selected when using this mode.
Auto Roast
This setting offers convection cooking with an Auto Roast feature. The oven will initially heat up to a high temperature in order to sear the meat and lock in the juices, thereby allowing it to remain moist and tasty. Once this high temperature has been reached, the oven automatically returns to your selected temperature and continues cooking as in the “Convection” mode. Consequently the oven should not be pre-heated when using the auto roast function.
Top Heat
Heat from the top element can be used to brown dishes or to finish dishes with a cheese topping.
Top & Bottom Heat
With this method of cooking, radiant heat is directed onto food from above and below.
Pre-heating the oven is only necessary when:
–baking biscuits or cakes with a short baking time.
–baking certain types of doughs.
–roasting meat.
Bottom Heat
Select “Bottom Heat” at the end of a baking cycle for cakes which require extra browning on the bottom.
13

Oven Operation
Description of the cooking modes
Defrosting
Defrosting can be done without heat or at a temperature of up to 120°F (50°C). When Defrosting without heat, the circulated air will be at room temperature.
Intensive baking
This method combines "Convection" with "Bottom Heat" and is recommended for dishes that have a moist topping and crisp base such as pizza or quiche lorraine.
Fan Broiling
Hot air from the broiling element is blown over the food by the convection fan on the rear wall of the oven. This allows broiling at lower temperatures than in the “Broiling 1” or “Broiling 2” mode.
Broiling 1
The inner part of the upper heating element is used in this mode. It will glow red a few minutes after being turned on, and is then ready for use. Use this mode for small quantities or thin pieces of food.
Broiling 2
The entire upper heating element is used for broiling.
In this mode, the inner part of the heating element will glow red a few minutes after being turned on. The outer part of the element will remain noticeably darker, but will still produce the heat necessary for broiling.
This mode is especially useful for broiling thicker cuts or large quantities of food distributed over the entire rack.
14

Oven operation
Controls
The oven controls consist of the Oven Mode Selector and push buttons.
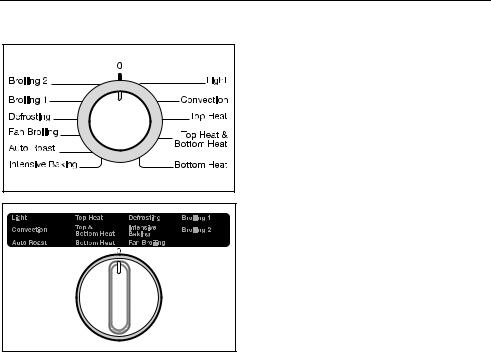
Oven Mode Selector
Use this control to select the desired cooking mode.
The selector can be turned clockwise or counter-clockwise.
Mode selector on USA models:
The mode selected will illuminate.
Pushbuttons
With the pushbuttons you can:
–change the oven temperature.
–change the core temperature when using the roast probe.
–activate the Minute Minder.
Each pushbutton has a matching symbol in the display.
15

Oven operation
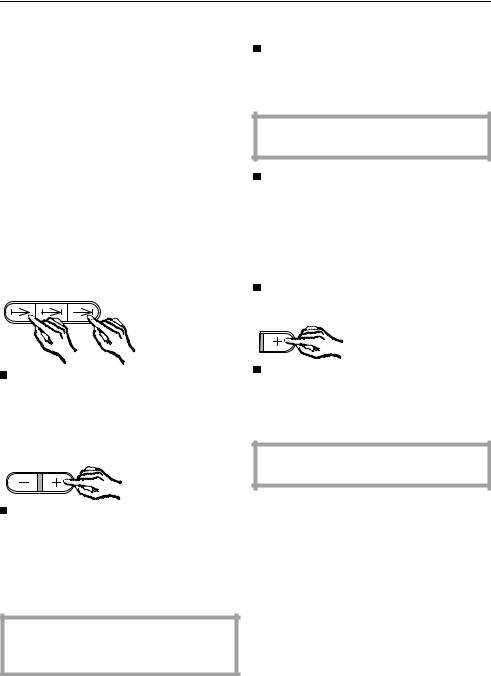
The “– /+” button is used to input all entries or alterations to the oven.
Temperature or time can be altered in increments, by pressing the “– /+” button briefly, or more rapidly by holding the button in.
“–” button:
To select a lower temperature, earlier time or shorter period.
“+” button:
To select a higher temperature, later time or longer period.
The increase / decrease is changed
–for the oven temperature in 10°F (5°C) steps,
–for the core temperature in 2°F (1°C) steps,
–for the Minute Minder in 1 min. steps.
Temperature or time can be entered as follows:
Press the required button.
Enter the time or temperature immediately using the “– /+” button.
As long as the indicator lamp in the center of the “– /+” button is lit, a time or temperature can be entered or altered.
The indicator lamp in the “– /+” button lights up:
–when a cooking mode has been selected (except for "Light"),
–if the "p" button is pressed during the cooking process,
–if the "e" button is pressed when cooking with the roast probe,
–if the "l" button is pressed.
Each time the “– /+” button or one of the other buttons is pressed, this gives more time for data input.
When the indicator lamp goes out, the entry has been stored.
Symbols and figures which appear in the oven display:
–"e“, whenever the roast probe is connected.
–"e" and the core temperature you set always takes precedence whenever the roast probe is connected.
–The oven temperature and "p" when the probe is not being used.
–"l" always appears when a time has been entered into the Minute Minder. If a time has been entered while the oven is in use, it will appear along with the oven temperature. If only the Minute Minder is being used, it will appear with a time countdown.
16
Oven operation
Selecting a cooking mode
With the Oven Mode Selector, the following cooking modes can be chosen:
–Light
Turns on the oven light.
(factory setting: to save energy, the light will go out one minute after the last button was pressed).
–Convection
For baking or roasting on several levels at the same time.
–Auto Roast
An initial high temperature is used to sear the meat. Cooking then continues using the “Convection” mode at the selected temperature.
This mode should not be used for baking, except when baking freshly prepared wholemeal or rye doughs, (not packaged mixes).
–Top Heat
For browning dishes or finishing dishes with a cheese topping.
–Top & Bottom Heat
For baking or roasting traditional recipes or soufflés.
–Bottom Heat
Use this setting towards the end of baking, to brown the base of a cake.
–Defrosting
For gentle defrosting of deep frozen foods.
–Intensive Baking
For recipes which require a moist topping, and a crisp base, such as pizza, quiche lorraine, open fruit cake or cheesecake.
This mode should not be used for roasting or shallow baking as the base will be overcooked.
–Fan Broiling
Ideal for grilling thicker items such as stuffed meat, kebobs and pieces of poultry. Broiling can be done with the oven door closed.
–Broiling 1
For broiling flat items or small quantities of food, or for browning small dishes. Broiling can be done with the oven door closed.
–Broiling 2
For broiling flat items or large quantities of food, and for browning larger dishes. Broiling can be done with the oven door closed.
17
Oven operation
A recommended temperature, listed below, will appear for each cooking mode when it is selected.
Convection . . . . . . . . . . . . 160°C/320°F Auto Roast* . . . . . . . . . . . 160°C/320°F Top Heat. . . . . . . . . . . . . . 190°C/370°F Top & Bottom Heat . . . . . . 190°C/370°F Bottom Heat . . . . . . . . . . . 190°C/370°F Defrosting. . . . . . no temperature given Intensive Baking. . . . . . . . 170°C/340°F Fan Broiling . . . . . . . . . . . 200°C/390°F Broiling 1 . . . . . . . . . . . . . 240°C/460°F Broiling 2 . . . . . . . . . . . . . 240°C/460°F
* Cooking temperature. The initial searing temperature is about 230°C/446°F
Once a cooking mode is selected, the heating elements will turn on.
Selecting a temperature
If you wish to use the suggested temperature, it will be set automatically when the “– /+” button indicator lamp goes out.
Once the lamp goes out, the actual oven temperature will be displayed.
The oven temperature rise will be shown in 2°F (1°C) increments until the selected temperature is reached. From this point onward, the oven temperature will be displayed.
If the oven door is opened, or a lower temperature is selected, the decrease in oven temperature will also be shown in 2°F (1°C) increments.
18
 Loading...