


Operating instructions for
Double Oven H 213 B2
It is essential to read these operrating instructions before installing or using the machine, to avoid the risk of accident, or damage to the machine
Q\@ä}
M.-Nr. 04 696 970

Caring for the environment
Disposal of the packing material
The transport and protective packing has been selected from materials which are environmentally friendly for disposal and can normally be recycled.
Rather than just throwing these materials away, please ensure they are offered for recycling.
Disposal of your old machine
Old machines contain materials which can be reclaimed or recycled. Please contact your dealer, your local waste collection centre or scrap merchant about potential recycling schemes, before disposing of the appliance.
Ensure that the machine presents no danger to children.

Contents
Description of the appliance . . . . . . . . . . . . . . . . . . . . . . . . . . . . . . . . . . . . . . . . . 4
Warning and Safety instructions . . . . . . . . . . . . . . . . . . . . . . . . . . . . . . . . . . . . . 6
Safety feature (operating lock) . . . . . . . . . . . . . . . . . . . . . . . . . . . . . . . . . . . . . . . 9
Before using for the first time. . . . . . . . . . . . . . . . . . . . . . . . . . . . . . . . . . . . . . . 10
Use
Oven
– Systems . . . . . . . . . . . . . . . . . . . . . . . . . . . . . . . . . . . . . . . . . . . . . . . . . . . . . . . 11
– Controls . . . . . . . . . . . . . . . . . . . . . . . . . . . . . . . . . . . . . . . . . . . . . . . . . . . . . . . 12
– Pre-heating the oven . . . . . . . . . . . . . . . . . . . . . . . . . . . . . . . . . . . . . . . . . . . . . 14
– Rack with non-tip feature . . . . . . . . . . . . . . . . . . . . . . . . . . . . . . . . . . . . . . . . . . 15
Timer . . . . . . . . . . . . . . . . . . . . . . . . . . . . . . . . . . . . . . . . . . . . . . . . . . . . . . . . . . . 16
Applications
Baking and chart . . . . . . . . . . . . . . . . . . . . . . . . . . . . . . . . . . . . . . . . . . . . . . . . . . 22
Roasting and chart. . . . . . . . . . . . . . . . . . . . . . . . . . . . . . . . . . . . . . . . . . . . . . . . . 26
Defrosting. . . . . . . . . . . . . . . . . . . . . . . . . . . . . . . . . . . . . . . . . . . . . . . . . . . . . . . . 29
Casseroles . . . . . . . . . . . . . . . . . . . . . . . . . . . . . . . . . . . . . . . . . . . . . . . . . . . . . . . 30
Grilling and chart . . . . . . . . . . . . . . . . . . . . . . . . . . . . . . . . . . . . . . . . . . . . . . . . . . 31
Maintenance
Cleaning and care
– Appliance front, controls . . . . . . . . . . . . . . . . . . . . . . . . . . . . . . . . . . . . . . . . . . 34
– Accessories . . . . . . . . . . . . . . . . . . . . . . . . . . . . . . . . . . . . . . . . . . . . . . . . . . . . 34
– Oven interior . . . . . . . . . . . . . . . . . . . . . . . . . . . . . . . . . . . . . . . . . . . . . . . . . . . 35
Correcting minor faults. . . . . . . . . . . . . . . . . . . . . . . . . . . . . . . . . . . . . . . . . . . . . . 43
After sales service . . . . . . . . . . . . . . . . . . . . . . . . . . . . . . . . . . . . . . . . . . . . . . . . . 45
Extra accessories. . . . . . . . . . . . . . . . . . . . . . . . . . . . . . . . . . . . . . . . . . . . . . . . . . 46
Installation / Electrical connection
Electrical connection . . . . . . . . . . . . . . . . . . . . . . . . . . . . . . . . . . . . . . . . . . . . . . . 47
Installation . . . . . . . . . . . . . . . . . . . . . . . . . . . . . . . . . . . . . . . . . . . . . . . . . . . . . . . 50
3

Description of the appliance
H 213 B2
4
Description of the appliance
Control panel
bUpper oven -:
Oven function selector, Oven heating indicator light, Temperature control
c Clock and timer for the lower oven e
dLower oven e:
Oven function selector, Oven heating indicator light, Temperature control
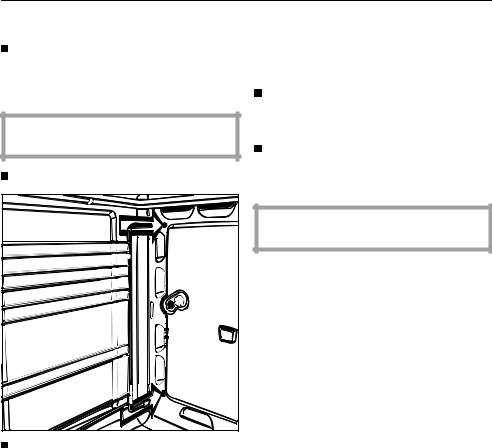
Oven interior
eHeating element for top heat and grilling with guard plate
f Side rails g Oven door
h Air inlet for fan
i Door contact switch
Accessories
–2 baking trays
–dual purpose grill pan / oven tray
–Non-tip rack for baking, roasting or grilling
–Roasting filter
to be attached in front of the fan aperture before fan oven roasting and fan grilling
The droplets of fat caught up in the circulating air are deposited on the roasting filter. This helps to keep the oven and especially behind the interior back wall cleaner.
5

Warning and Safety instructions
This appliance complies with all relevant legal safety requirements. Improper use of the appliance can, however, present a risk of both personal injury and material damage.
Before installation and before using the appliance for the first time, read the operating instructions carefully. They contain important notes on safety, on the operation and care of the appliance. This way you will avoid the risk of accidents and damage to the appliance.
Do not let children access the appliance or its controls. Supervise its use by the elderly or infirm.
Keep these instructions in a safe place and pass them on to any future user.
Correct usage
The appliance is intended for domestic use to cook food, and in
particular to bake, roast, defrost, cook, dry fruit etc, and to grill. Any other usage is at the owner’s risk and could be dangerous. The manufacturer cannot be held responsible for damage caused by improper use of the appliance.
Technical safety
Before connecting the appliance to the mains supply make sure that
the voltage and frequency correspond to the rating on the data plate. Consult a competent person if in doubt.
The electrical safety of this appliance can only be guaranteed
when continuity is complete between the appliance and an effective earthing system, which complies with local and national regulations. It is most important that this basic safety requirement is tested by a qualified electrician. The manufacturer cannot be held responsible for the consequences of an inadequate earthing system.
This appliance must only be operated as a built-in appliance. This is
necessary to ensure that all electrical components are shielded.
Never open the casing of the appliance.
Tampering with electrical connections or components and mechanical parts is highly dangerous to the user and can cause operational faults.
Installation work and repairs may only be carried out by suitably
qualified and competent persons to ensure safety. Repairs and other work by unqualified persons could be dangerous.
The appliance is only completely isolated from the electricity supply
when:
–it is switched off at the wall socket
–or the mains fuse is withdrawn
–or the screw-out fuse is removed (in countries where this is applicable)
Do not connect the appliance to the mains electricity supply by an
extension lead.
Extension leads do not guarantee the required safety of the appliance.
6

Warning and Safety instructions
Use
Caution, danger of burning.
High temperatures are produced by the oven.
Great care should be taken to ensure that small children do not
touch the appliance when it is being used. The hob and also external parts of the oven such as the door glass, vents and control panel can become quite hot.
Use of heat-resistant oven gloves is recommended:
–when placing food in the oven, turning or removing it.
When working with “Conventional” heating or when grilling, the element in the roof of the oven and the guard plate become very hot, and there is a danger of being burnt.
Wait until the grill element has cooled down before lowering it for
cleaning, to avoid the danger of burning.
Do not use force to pull it down as this can cause the element to
break.
Do not heat up unopened tins or jars of food in the oven, as pressure will build up and they will explode.
Do not push pots and pans around on the oven floor as this could
damage the surface.
Do not lean or sit on the open oven door, or place heavy items on it.
This could damage the appliance. Take care in the region of the hinges. The oven door can support a maximum load of 10 kg.
Cover any food which is left in the oven to be kept hot. This avoids
the food drying out. It also prevents steam condensing and possibly leading to moisture damage in the oven.
If food is left in the oven after cooking, e.g. to take advantage of the
residual heat, select the lowest temperature available. Leave the function selector switch at the position set.
Do not switch the appliance off until the food has been removed. Otherwise there may be a build-up of condensation which could adversely affect the oven interior, and externally the control panel, the worktop surface or surrounding kitchen furniture.
Put any deep frozen products such as pizza on baking paper on the
rack. Do not place them on the baking tray or grill pan. This could cause the metal to distort to such an extent that it might be difficult to remove the tray/pan from the oven. The distortion would increase with subsequent use.
7
Warning and Safety instructions
General notes
Under no circumstances use a steam cleaner to clean this appliance. Pressurised steam could give rise to a short circuit, or cause perma-
nent damage to the surface and to components, for which the manufacturer of the oven cannot accept any responsibility.
Do not leave the appliance unattended when cooking with oils and
fats as these can be a fire hazard if allowed to overheat.
Do not use the oven to heat up the room. Due to the high tempera-
tures radiated, objects left near the oven or hob could catch fire.
When using kitchen appliances connected to sockets near the oven, ensure that the cable cannot come in contact with the hot cooking
zones or get trapped in a hot oven door, which could melt the cable insulation and be dangerous.
Always ensure that food is sufficiently cooked or reheated. Many
factors will affect the overall cooking time, including the size and amount of food, its temperature, changes to the recipe and the shape and size of cooking container. Some foods may contain micro organisms which are only destroyed by thorough cooking, therefore when cooking or reheating foods, e.g. poultry, it is particularly important that food is fully cooked through. If in doubt select a longer cooking or reheating time.
It is important that the heat is allowed to spread evenly throug-
hout the food being cooked.
This can be achieved by stirring and/or turning the food, and by observing a sufficiently long standing time, which should be added to the time needed for cooking, reheating or defrosting.
In countries which may be subject to infestation by cockroaches or
other vermin, pay particular attention to keeping the appliance and its surroundings in a clean condition at all times.
Any damage which might be caused by cockroaches or other vermin will not be covered by the appliance guarantee.
Disposal of your old machine
Before discarding an old machine switch off and disconnect it from
the power supply. Cut off and render any plug useless.
Cut off the cable directly behind the machine to prevent misuse.
The manufacturer cannot be held liable for damage caused by noncompliance with safety instructions.
8
Safety feature
Operating lock for the lower oven.
The operating lock prevents the lower oven being switched on unintentionally.
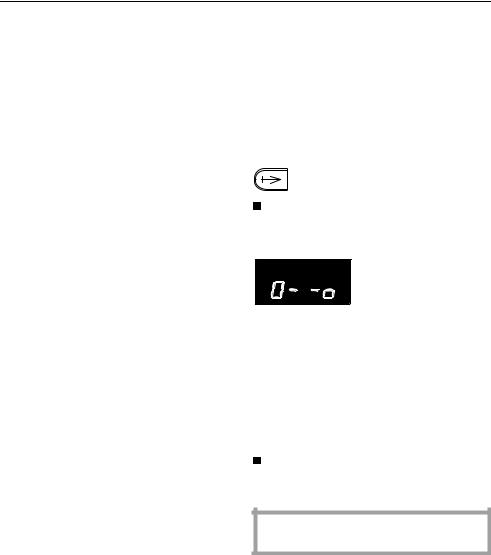
The operating lock is activated as follows:
Press the “f” button until the key symbol appears in the display field.
Now the lower oven can not be switched on.
After a short time the time of day reappears in the display field; but as soon as a button is pressed, the key symbol appears.
To cancel the operating lock:
Press the “f” button until the key symbol disappears from the display field.
After a power cut the operating lock has to be reset.
9
Before using for the first time
Oven
Use a cloth to wipe out the oven interior with a warm water and detergent solution. Polish dry with a dry cloth.
Do not close the oven door until the oven interior is dry.
Rinse the accessories.
Fit the side rails.
New appliances have a slight smell on first use. Running the ovens for at least an hour at a high temperature makes it dissipate more quickly.
Turn the oven function selectors to “Fan Heat D” or “Conventional heating A”.
Select the highest temperature.
The timer can be used to set the finish time.
Ensure the room is well ventilated during this process.
10
Oven - use
Description of the systems
Fan Heat D
This system works by the circulation of heated air.
A fan situated on the back wall of the oven sucks in the air, heats it over a ring element and blows the heated air through the carefully spaced openings in the rear panel of the oven.
The oven does not usually need to be pre-heated as the heated air reaches the food straight away.
Exception: Pre-heat the oven when roasting meat or baking bread made with dark flour.
Using the fan heating system you can bake and roast on different levels at the same time.
The heated air used by this system is of a lower temperature than that used with the Conventional heating system.
Auto Roast E
This setting offers the fan heat with Auto Roast. The oven heats initially to a high temperature which seals the meat to keep it succulent and tasty.
As soon as the high temperature has been reached, the oven temperature is automatically returned to the pre-se- lected setting.
Conventional heating A
With this conventional method of heating, radiant heat is directed on the food from above and below.
Pre-heating the oven is only necessary when
–baking biscuits or cakes with a short cooking time (up to approx. 30 minutes).
–baking some types of doughs.
–baking bread made with dark flour.
–roasting a joint of meat.
Defrost G
No heating is used.
At this setting air at room temperature is circulated by the fan, for gentle defrosting.
Grill ,
The inner part of the upper heating element acts as the grill. This will glow red a few minutes after switching it on and is then ready for use.
Pre-heat the grill for 5 minutes with the oven door closed, before placing the food on the rack.
11
Oven - use
The double oven has a choice of two ovens with differing heating systems.
The upper oven - uses a top and bottom heating system.
It is suitable for preparing thinner items of food (e.g. tray baking, “flat” cakes, grilling slices of fish)
The lower oven e has both Fan Heat and Top and Bottom heating systems, and offers a wide range of options.
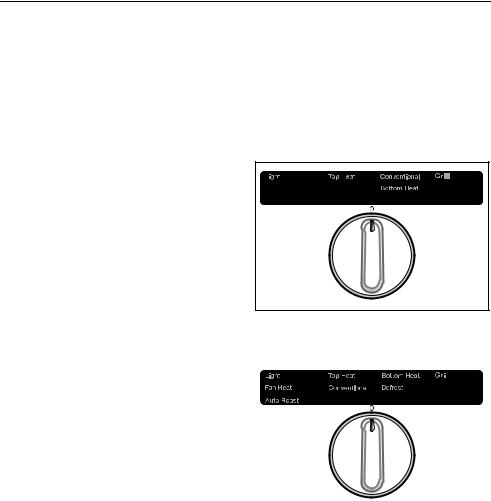
Function selector
(depending on the model)
With this control you select the oven function required.
The function selector can be turned clockwise or anti-clockwise.
– Upper oven -
Controls
Each oven is controlled by its own selector switch and a temperature selector.
The version of the controls depends on the model.
The following symbols identify the con- |
– Lower oven e |
|||
trols for each oven: |
|
|
|
|
- Upper oven |
|
|
|
|
|
|
|
|
|
|
|
|
|
|
|
|
|
|
|
e Lower oven |
|
|
|
|
|
|
|
|
|
12

Oven - use
The following functions are available for either one or both ovens:
–Light H
Turns on the oven light independently.
–Fan heat D
For baking or roasting on several levels at the same time.
–Auto Roast E
Initial high temperature to seal meat followed by normal roasting temperature.
Not suitable for baking, except for baking freshly prepared wholemeal or rye doughs, (not packet mixes).
–Conventional A
Top and bottom heat for baking / roasting traditional recipes, for soufflés.
–Top heat C
For browning dishes, finishing dishes with a cheese topping.
–Bottom heat B
Use this setting towards the end of baking, to brown the base of a cake.
–Defrost G
For gentle defrosting of deep frozen foods.
–Grill ,
For grilling fish and cuts such as chops, steaks, poultry pieces, and kebabs .
13
Oven - use
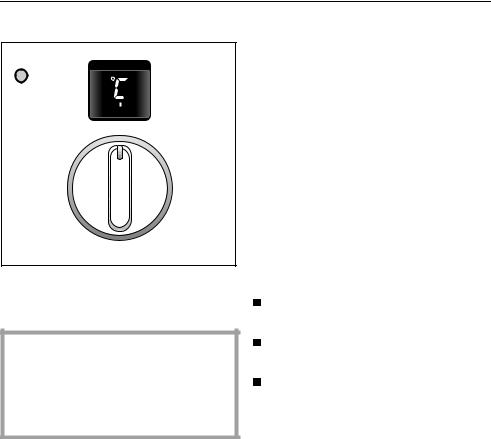
Temperature selector -e
Each oven has its own temperature selector. Select the appropriate temperature for the food to be cooked.
Turn the temperature selector only in a clockwise direction, and back, otherwise the control could be damaged.
Defrost G: Do not set a temperature when selecting “Defrosting”.
The temperature can be freely selected within the given range.
When the temperature selector is switched to the chosen temperature, the indicator light above this switch comes on.
When the temperature is reached, the heating element switches itself off. When the temperature falls below that selected, the heating switches on again automatically.
Pre-heating the oven
This is only necessary in a few cases.
With Fan Heat D
–for baking bread made with dark flour,
–for roast beef and beef fillet.
With “Conventional” A
–for baking biscuits and cakes with a short cooking time.
–for baking some doughs.
–for baking bread made with dark flour,
–for roasting sirloin.
Pre-heating
Turn the oven selector to the required function.
Set the temperature selector to the required temperature.
When the indicator light above the temperature goes out for the first time, put the food to be roasted or baked into the oven.
14
Oven - use
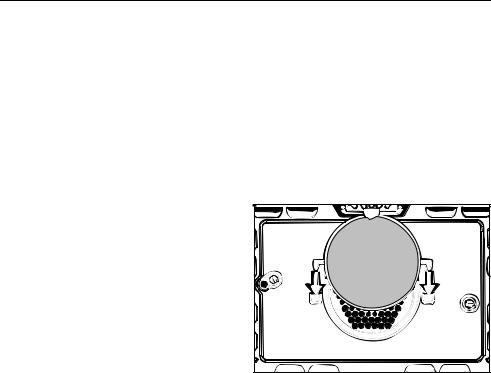
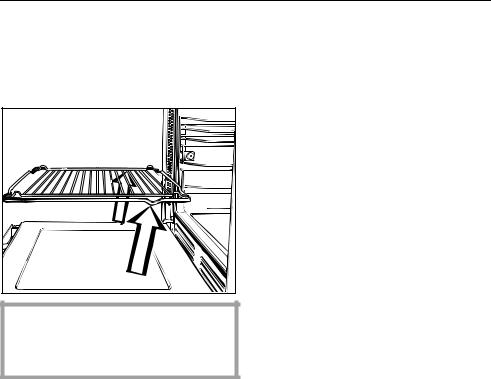
Rack with safety feature
The non-tip safety feature prevents the rack from being pulled right out when it only needs to be partially pulled out.
When using the rack push it into the oven so that the safety notches (illustrated) go to the rear of the oven, to meet the notches on the runners.
The rack can then only be taken right out of the oven by raising it upwards and then pulling it out.
15
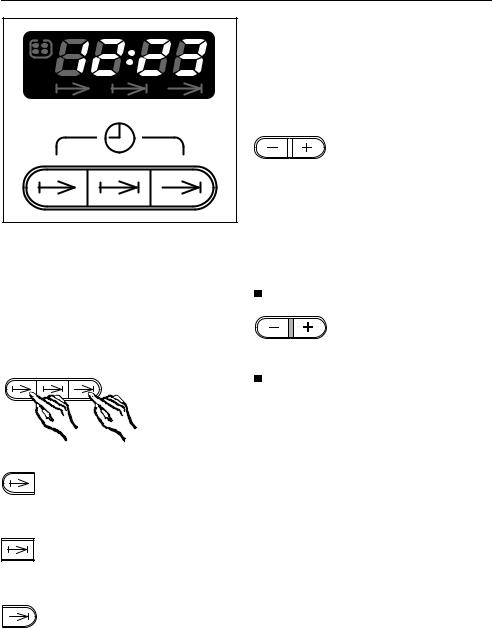
Timer - use
The timer can:
–show the time of day,
–switch the lower ovene off, or on and off automatically.
A corresponding symbol for each push button appears in the display when appropriate.
The symbol lights up when an oven function has been selected and the relevant button pressed in.
All data input or alteration is done with the – /+ button.
Changes to the start, duration or end of cooking time, or time of day are effected in 1 minute steps.
To enter time:
Press the required button.
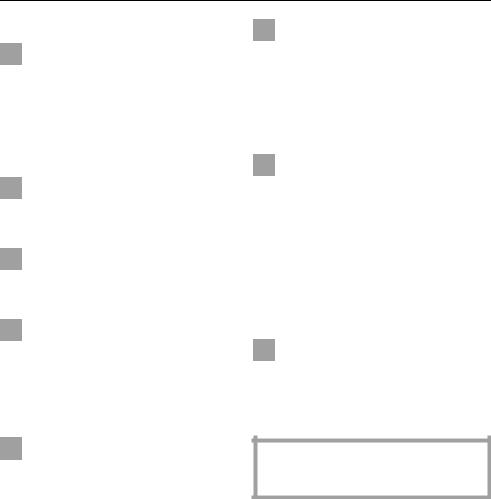
Push buttons
With the pushbuttons you can
–set the time of day.
–enter the start of a cooking process.
–enter the duration of a cooking process.
–enter end of a cooking process.
The – /+ button indicator light comes.
Enter the time immediately with the
– /+ button
While the indicator light at the centre of the – /+ button is lit up, a time can be entered or altered.
Each time the – /+ or another button is pressed, additional time is allowed for data input.
When the indicator light goes out the data input or alteration has been registered.
16
 Loading...