


Operating instructions
Steam oven
DG 155
DG 155-1
DG 155-2
DG 155-3
To prevent accidents and machine damage,
read these instructions before
UV
installation or use. |
M.-Nr. 05 229 041 |

Contents
IMPORTANT SAFETY INSTRUCTIONS
Guide to the steam oven
Control panel . . . . . . . . . . . . . . . . . . . . . . . . . . . . . . . . . . . . . . . . . . . . . . . . . . . . . . 9
Accessories
Before using for the first time
Setting the water hardness level . . . . . . . . . . . . . . . . . . . . . . . . . . . . . . . . . . . . . . 13 Setting the altitude . . . . . . . . . . . . . . . . . . . . . . . . . . . . . . . . . . . . . . . . . . . . . . . . . 14 Changing the temperature display . . . . . . . . . . . . . . . . . . . . . . . . . . . . . . . . . . . . 16
Operation
Before each use. . . . . . . . . . . . . . . . . . . . . . . . . . . . . . . . . . . . . . . . . . . . . . . . . . . 18 Turning the oven on . . . . . . . . . . . . . . . . . . . . . . . . . . . . . . . . . . . . . . . . . . . . . . . . 19 Selecting a program . . . . . . . . . . . . . . . . . . . . . . . . . . . . . . . . . . . . . . . . . . . . . . . 19 Program table . . . . . . . . . . . . . . . . . . . . . . . . . . . . . . . . . . . . . . . . . . . . . . . . . . . . 20 Adjusting the temperature . . . . . . . . . . . . . . . . . . . . . . . . . . . . . . . . . . . . . . . . . . . 21 Changing the preset temperature permanently . . . . . . . . . . . . . . . . . . . . . . . . . . 22 Setting the cooking time . . . . . . . . . . . . . . . . . . . . . . . . . . . . . . . . . . . . . . . . . . . . 23 Starting the cooking process . . . . . . . . . . . . . . . . . . . . . . . . . . . . . . . . . . . . . . . . 24 Changing a program . . . . . . . . . . . . . . . . . . . . . . . . . . . . . . . . . . . . . . . . . . . . . . . 26 At the end of cooking. . . . . . . . . . . . . . . . . . . . . . . . . . . . . . . . . . . . . . . . . . . . . . . 27 Insufficient water / water container not in place . . . . . . . . . . . . . . . . . . . . . . . . . . 28 Overheating protection . . . . . . . . . . . . . . . . . . . . . . . . . . . . . . . . . . . . . . . . . . . . . 29 Safety lock . . . . . . . . . . . . . . . . . . . . . . . . . . . . . . . . . . . . . . . . . . . . . . . . . . . . . . 30
Cooking tips
Suitable containers . . . . . . . . . . . . . . . . . . . . . . . . . . . . . . . . . . . . . . . . . . . . . . . . 31 Steaming . . . . . . . . . . . . . . . . . . . . . . . . . . . . . . . . . . . . . . . . . . . . . . . . . . . . . . . . 32 Defrosting. . . . . . . . . . . . . . . . . . . . . . . . . . . . . . . . . . . . . . . . . . . . . . . . . . . . . . . . 36
Meal planning
Preparing a whole meal . . . . . . . . . . . . . . . . . . . . . . . . . . . . . . . . . . . . . . . . . . . . . 38
2

Contents
Special uses
Canning . . . . . . . . . . . . . . . . . . . . . . . . . . . . . . . . . . . . . . . . . . . . . . . . . . . . . . . . . 40 Reheating. . . . . . . . . . . . . . . . . . . . . . . . . . . . . . . . . . . . . . . . . . . . . . . . . . . . . . . . 41 Blanching. . . . . . . . . . . . . . . . . . . . . . . . . . . . . . . . . . . . . . . . . . . . . . . . . . . . . . . . 41 Disinfecting baby bottles . . . . . . . . . . . . . . . . . . . . . . . . . . . . . . . . . . . . . . . . . . . . 42
Cleaning and care
Appliance front. . . . . . . . . . . . . . . . . . . . . . . . . . . . . . . . . . . . . . . . . . . . . . . . . . . . 43 Drip tray, rack and cooking containers . . . . . . . . . . . . . . . . . . . . . . . . . . . . . . . . . 43 Removable door and drip plate. . . . . . . . . . . . . . . . . . . . . . . . . . . . . . . . . . . . . . . 44 Cooking compartment . . . . . . . . . . . . . . . . . . . . . . . . . . . . . . . . . . . . . . . . . . . . . . 45 Runners . . . . . . . . . . . . . . . . . . . . . . . . . . . . . . . . . . . . . . . . . . . . . . . . . . . . . . . . . 45 Connector . . . . . . . . . . . . . . . . . . . . . . . . . . . . . . . . . . . . . . . . . . . . . . . . . . . . . . . 46
O-Ring. . . . . . . . . . . . . . . . . . . . . . . . . . . . . . . . . . . . . . . . . . . . . . . . . . . . . . . . 47 Descaling lock . . . . . . . . . . . . . . . . . . . . . . . . . . . . . . . . . . . . . . . . . . . . . . . . . . . . 48 Descaling. . . . . . . . . . . . . . . . . . . . . . . . . . . . . . . . . . . . . . . . . . . . . . . . . . . . . . . . 49
Frequently asked questions
Electrical connection
After sales service
Data Plate . . . . . . . . . . . . . . . . . . . . . . . . . . . . . . . . . . . . . . . . . . . . . . . . . . . . . . . 54
Help protect our environment |
|
Disposal of packing materials . . . . . . . . . . . . . . . . . . . . . . . . . . . . . . . . . . . . . . . |
55 |
Disposal of an old appliance . . . . . . . . . . . . . . . . . . . . . . . . . . . . . . . . . . . . . . . . |
55 |
3

IMPORTANT SAFETY INSTRUCTIONS
WARNINGWhen using your steam oven, follow basic precautions, including the following:
Read all instructions before installation or use of the steam oven to prevent injury and machine damage.
Use the steam oven only for its intended purpose. This appliance is intended for residential cooking only.
This appliance conforms to all uniform safety codes and regulations. The manufacturer cannot be held responsible for damage or injury caused by improper use of this appliance.
Keep these operating instructions in a safe place and pass them on to any future user.
SAVE THESE INSTRUCTIONS
Electrical Safety
Before installation make sure that the voltage and frequency listed on
the data plate correspond with the household electrical supply. This data must correspond to prevent injury and machine damage. Consult a qualified electrician if in doubt.
Installation, repair and maintenance work should be by a
Miele authorized service technician. Work by unqualified persons could be dangerous and may void the warranty.
Before installation or service, disconnect the power supply to the
work area by removing the fuse, "tripping" the circuit breaker, or switching off the power main. Ensure that the power is not restored to the appliance during maintenance or repair work.
Be certain your appliance is properly installed and grounded by
a qualified technician. To guarantee the electrical safety of this appliance, continuity must exist between the appliance and an effective grounding system. It is imperative that this basic safety requirement be met. If there is any doubt, have the electrical system of the house checked by a qualified electrician. The manufacturer cannot be held responsible for damage caused by the lack, or inadequacy of, an effective grounding system.
Do not use an extension cord to connect this appliance to
electricity. Extension cords do not guarantee the required safety of the appliance, e.g. danger of overheating.
Do not operate any appliance with a damaged cord or plug, or if the
appliance has been damaged in any manner. Return the appliance to the nearest authorized service facility for examination, repair or adjustment.
4

IMPORTANT SAFETY INSTRUCTIONS
Use
Inspect the steam oven for shipping damage. Do not install or
operate a damaged unit. Contact your Miele Dealer.
The steam oven should be installed at a safe height for users to safely
access all cooking levels and containers. Otherwise spills could cause burns or scalding and children might be put at risk by the hot appliance door.
This equipment is not designed for maritime use or for use in mobile
installations such as recreational vehicles or aircraft. However, under certain conditions it may be possible for an installation in these applications. Please contact the nearest Miele dealer or the Miele Technical Service Department with specific requirements.
This appliance is intended for domestic use only. It should not be
used for commercial purposes.
This appliance must only be operated after it has been correctly
installed in cabinetry. This is necessary to ensure that all electrical components are shielded.
Only use the appliance for its intended purpose. Any other use is
at the owner’s risk and could be dangerous.
Scalding and Burning hazards
When in use, the oven, particularly the inside of the door as well as the
outer side by the vent, may become very hot and remain so for a while after the oven has been turned off. Keep children away.
Allow the steam oven to cool before putting in or taking out
racks.
Use pot holders when working with a hot appliance.
Avoid hot steam, serious burns and scalds could result.
Do not touch hot surfaces, use the handles.
When handling cooking containers take care not to let the contents
spill.
Extreme caution must be used when moving hot liquids.
Do not use plastic containers. They may melt at high temperatures in
the oven.
5

IMPORTANT SAFETY INSTRUCTIONS
Children
To reduce the risk of injury, do not allow children to play in, on, or
near the steam oven.
Do not store items of interest to children in cabinets near the oven.
Children climbing on the oven to reach items could be seriously injured.
Use the safety lock so that children cannot turn the steam oven on or
change the settings.
The door hinges of the appliance could be hazardous. Ensure that
children are kept at a safe distance.
Ensure that any plastic wrap, is disposed of safely and kept out of
the reach of children. Danger of suffocation!
Before discarding an old appliance, disconnect it from the
electrical supply, cut off the power cord, and remove any doors to prevent hazards.
Appliance damage
Do not heat unopened containers of food in the oven. Pressure will
build up causing an explosion that will damage the cooking compartment.
To prevent condensation which could corrode the appliance; do
not leave cooked foods in the oven for an extended period of time.
Do not use items in the steam oven which might rust. This can lead to
corrosion of the appliance.
Do not lean, sit or place heavy items on the open door of the appliance. The door can support a maximum weight of 17 lbs. (8 kg).
6

IMPORTANT SAFETY INSTRUCTIONS
Appliance maintenance
When descaling the oven, only use descaling agents with a citric acid base or the descaling tablets available from Miele. Do not use vinegar. Vinegar
will damage the appliance. Follow the manufacturer’s safety instructions on the packaging.
Wipe out the appliance after each use and leave the door open until
the moisture in the cooking compartment has evaporated.
If the steam oven is not used for a lengthy period, e.g. vacationing,
clean it to avoid odors.
See "Before using for the first time - Setting the altitude" and leave the door open until the cooking compartment is dry.
Do not use a steam cleaner to clean this appliance. The steam
from the cleaning appliance could penetrate live components and permanently damage the oven or cause injury.
Further safety notes
In the event of damage or a defect, turn off the appliance immediately.
After it has been turned off, isolate it from the main power supply and contact the Miele Technical Service Department. Ensure that the power is not restored to the appliance during maintenance or repair work.
While the appliance is under warranty repairs should only be
performed by a Miele authorized service technician. Otherwise the warranty will be void.
Do not tamper with electrical connections, components or mechanical parts. Never open the outer
casing of the appliance.
Be sure that cords of other electrical appliances do not come
in contact with the steam oven door. The insulation of the cords could become damaged creating a hazard.
To protect against electric shock, keep the appliance cord clear of
liquids.
Do not let the cord hang over the edge of tables or counters, or
come in contact with hot surfaces.
The use of accessories not recommended by Miele may cause
injury.
7

Guide to the steam oven
|
|
|
|
|
|
|
|
|
|
|
|
|
|
|
|
|
|
|
|
|
|
|
|
|
|
|
|
|
|
|
|
|
|
|
|
|
|
|
|
|
|
|
|
|
|
|
|
|
|
|
|
|
|
|
|
|
|
|
|
|
|
|
|
|
|
|
|
|
|
|
|
|
|
|
|
|
|
|
|
|
|
|
|
|
|
|
|
|
|
|
|
|
|
|
|
|
|
|
|
|
|
|
|
|
|
|
|
|
|
|
|
|
|
|
|
|
|
|
|
|
|
|
|
|
|
|
|
|
|
|
|
|
|
|
|
|
|
|
|
|
|
|
|
|
|
|
|
|
|
|
|
|
|
|
|
|
|
|
|
|
|
|
|
|
|
|
|
|
|
|
|
|
|
|
|
|
|
|
|
|
|
|
|
|
|
|
|
|
|
|
|
|
|
|
|
|
|
|
|
|
|
|
|
|
|
|
|
|
|
|
|
|
|
|
|
|
|
|
|
|
|
|
|
aControl panel |
gSteam inlet |
||||||||||||||
bDoor seal |
hWater container contact |
||||||||||||||
cSide runners with 4 levels |
iFeed tube for water return |
||||||||||||||
dTemperature sensor |
jWater container connector |
||||||||||||||
eAir Outlet |
kWater Valve |
||||||||||||||
fVent |
lDrip channel |
||||||||||||||
8
Guide to the steam oven
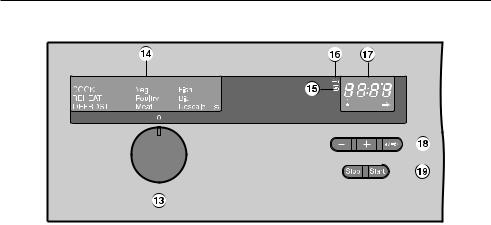
Control panel
|
|
|
|
|
|
|
|
|
|
|
|
|
|
|
|
|
|
|
|
|
|
|
|
|
|
|
|
|
|
|
|
|
|
|
|
|
|
|
|
|
|
|
|
|
|
|
|
|
|
|
|
|
|
|
|
|
|
|
|
|
|
|
|
|
|
|
|
|
|
|
|
|
|
|
|
|
|
|
|
|
|
|
|
|
|
|
|
|
|
|
|
|
|
|
|
|
|
|
|
|
|
|
|
|
|
|
|
|
|
|
|
mProgram selector |
|
|
Buttons with light bars: |
||||||||||
|
|
||||||||||||
nProgram display |
|
|
r- Decrease |
||||||||||
oDescale k |
|
|
+ Increase |
||||||||||
|
|
z / x Temperature/Cooking time |
|||||||||||
|
|
|
|
||||||||||
pInsufficient water p |
|
|
sStop and Start |
||||||||||
|
|
|
|
||||||||||
qTemperature z and |
|
|
|
|
|
|
|
|
|
|
|
|
|
Timer x display |
|
|
|
|
|
|
|
|
|
|
|
|
|
9

Accessories
Included
All the accessories can also be reordered if necessary.
Drip tray (3.5 pints, 1.7 l) |
Side runners |
|||
|
|
|
|
|
|
|
|
|
|
|
|
|
|
|
|
|
|
|
|
|
|
|
|
|
|
|
|
|
|
For catching excess liquids |
Cookbook |
Rack
Water container
To place cooking containers on
2 cooking containers, perforated (3.2 pints, 1.5 l)
For steaming
10
Accessories
Silicone grease |
Connecting valve |
For lubricating the O-Rings on the connecting valve of the water container. See, "Cleaning and care-O-Ring" for more details.
with:
Valve insert, t, white
creates a bridge between the water container, j, and the appliance, k.
O-Ring, u, black
These two parts along with the tool, see "Accessories-optional" can be ordered individually or together as a repair kit.
11

Accessories
Optional
The following stainless steel cooking containers for steaming can be ordered as optional accessories:
Container |
Capacity |
Height in inches (cm) |
|
in pt (l) |
|
DGG 2 |
4 (2.0) |
2 3/8" (6) |
solid |
|
|
|
|
|
DGG 3 |
6.5 (3.1) |
2 3/8" (6) |
solid |
|
|
|
|
|
DGGL 4 |
6.5 (3.1) |
2 3/8" (6) |
perforated |
|
|
|
|
|
Tool |
|
|
For removing and inserting the valve insert.
This part can be ordered individually or together with the connecting valve parts, see "Accessories-connecting valve," as a repair kit.
12

Before using for the first time
Setting the water hardness level
For the steam oven to function properly, the water hardness level must be programmed into the unit.
You can use the supplied test strip to check your water hardness level or your local water company can tell you the water hardness of your area.
The steam oven is preset to water hardness level IV (4). If your water is softer than 21 gr/gal the setting should be adjusted.
Please check that the program selector is at "0".
^Press and hold the – button while turning the program selector to DESCALE k.
4 1 will appear in the display.
The 1 represents the program number. The 4 represents the water hardness level.
^Press – or + to select the level III (3), II (2) or I (1) corresponding to your water hardness.
The selected water hardness level will be stored in memory as soon as the program selector is turned to another position.
The water hardness is shown as settings I to IV, equivalent to the following values:
Setting |
Display |
gr/gal |
ppm |
I |
1 |
1-7 |
<20-130 |
|
|
|
|
II |
2 |
8-14 |
140-250 |
|
|
|
|
III |
3 |
15-21 |
270-380 |
|
|
|
|
IV |
4 |
>21 |
>380 |
|
|
|
|
13
Before using for the first time
Setting the altitude
The steam oven must be run through the DESCALE k program before the first use to set the unit for the altitude in your area.
If this is not done, too much steam will be released from the appliance during use.
^Fill the water container with a quart (1 l) of water (do not add descaling agent), place in the appliance and close the door.
^Select DESCALE k using the program selector.
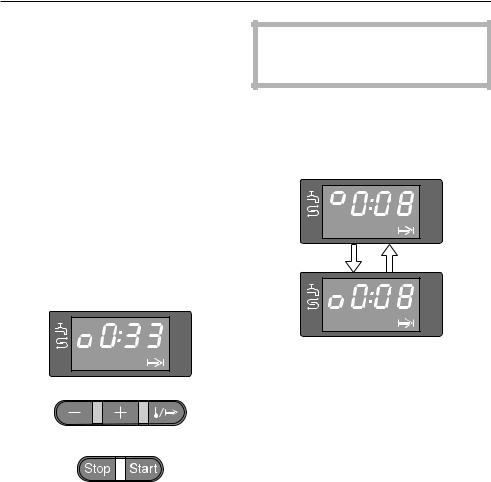
The following will be displayed:
Do not turn the program selector during this period or the descaling program will have to be restarted.
A tone will sound when there are
8 minutes remaining and the following will alternate in the display:
^Empty the water container, refill it with another quart (1 l) of fresh water, and close the door.
^Press Start.
The above procedure must be repeated two more times when the tone sounds.
Do not be alarmed at the amount of steam emitted.
^ Press Start.
The time will count down from
33 minutes as shown in the display.
14

Before using for the first time
When the time has elapsed you will see the following display:
^Turn the program selector to "0".
^Wait until the oven has pumped the residual water back into the water container, then open the door.
,Hot steam will escape when the door is opened.
^Remove, empty and thoroughly dry the water container.
^Wipe out the oven interior with an absorbent cloth. Remember to wipe down the vent and the drip channel.
^Leave the door open until the moisture in the cooking compartment has evaporated.
15

Before using for the first time
Changing the temperature display
The display is set to show the temperatures in °F but it can be programmed to show °C.
Please check that the program selector is set to "0".
^Press and hold the - button while turning the program selector to DESCALE k.
^Release the - button.
4 1 will appear in the display.
^Press the z/grepeatedly until F9 appears in the display.
^Press the - button.
C9 will appear in the display.
^ Turn the program selector to "0".
The conversion is now stored.
If you wish to revert back to °F follow the previous instructions until C9 appears in the display.
^ Press the + button.
p k
F9 will appear in the display.
^ Turn the program selector to "0".
16

Before using for the first time
Selecting a temperature
In the cookbook, temperatures are specified in °C, but are shown on the appliance display in °F. Use the following conversion table for setting the temperature on your steam oven.
The temperature on the display can only be shown in 10 °F increments. Therefore, the temperature shown in °F does not always correspond exactly with the temperature specified in °C, i.e. the actual measurable temperature. This discrepancy in temperature is nominal and will not cause a significant difference in cooking time or results.
Temperature |
Corresponding |
in °C |
Temperature in °F |
100 |
boil |
|
|
95 |
205 |
|
|
90 |
195 |
|
|
85 |
185 |
|
|
80 |
175 |
|
|
75 |
165 |
|
|
70 |
155 |
|
|
65 |
145 |
|
|
60 |
135 |
|
|
55 |
125 |
|
|
50 |
115 |
|
|
17
 Loading...