


Operating and Installation
Instructions
Coffee System
CVA 4070
To prevent accidents and machine damage read these instructions before
en - US, CA
installation or use. |
M.-Nr. 07 194 170 |

Contents
IMPORTANT SAFETY INSTRUCTIONS. . . . . . . . . . . . . . . . . . . . . . . . . . . . . . . . . 4
Guide to the machine . . . . . . . . . . . . . . . . . . . . . . . . . . . . . . . . . . . . . . . . . . . . . . 7
First steps to use . . . . . . . . . . . . . . . . . . . . . . . . . . . . . . . . . . . . . . . . . . . . . . . . . . 9
Filling water, beans or ground coffee . . . . . . . . . . . . . . . . . . . . . . . . . . . . . . . . 10
Filling the water tank . . . . . . . . . . . . . . . . . . . . . . . . . . . . . . . . . . . . . . . . . . . . . . . 10 Filling the beans container. . . . . . . . . . . . . . . . . . . . . . . . . . . . . . . . . . . . . . . . . . . 11 Filling ground coffee . . . . . . . . . . . . . . . . . . . . . . . . . . . . . . . . . . . . . . . . . . . . . . . 11
Making coffee . . . . . . . . . . . . . . . . . . . . . . . . . . . . . . . . . . . . . . . . . . . . . . . . . . . . 12
Turning on . . . . . . . . . . . . . . . . . . . . . . . . . . . . . . . . . . . . . . . . . . . . . . . . . . . . . . . 12 Prewarming cups . . . . . . . . . . . . . . . . . . . . . . . . . . . . . . . . . . . . . . . . . . . . . . . . . . 13 Adjust the dispenser height . . . . . . . . . . . . . . . . . . . . . . . . . . . . . . . . . . . . . . . . . . 13 Espresso and coffee made from coffee beans . . . . . . . . . . . . . . . . . . . . . . . . . . . 14 Espresso and coffee made from ground coffee . . . . . . . . . . . . . . . . . . . . . . . . . . 15 Cappuccino and milk froth . . . . . . . . . . . . . . . . . . . . . . . . . . . . . . . . . . . . . . . . . . 16
Adjusting the coffee grinder . . . . . . . . . . . . . . . . . . . . . . . . . . . . . . . . . . . . . . . . 18
Settings . . . . . . . . . . . . . . . . . . . . . . . . . . . . . . . . . . . . . . . . . . . . . . . . . . . . . . . . . 19
Language. . . . . . . . . . . . . . . . . . . . . . . . . . . . . . . . . . . . . . . . . . . . . . . . . . . . . . . . 19 Clock . . . . . . . . . . . . . . . . . . . . . . . . . . . . . . . . . . . . . . . . . . . . . . . . . . . . . . . . . . . 20 Timer . . . . . . . . . . . . . . . . . . . . . . . . . . . . . . . . . . . . . . . . . . . . . . . . . . . . . . . . . . . 21 Grind amount . . . . . . . . . . . . . . . . . . . . . . . . . . . . . . . . . . . . . . . . . . . . . . . . . . . . . 24 Pre-brewing . . . . . . . . . . . . . . . . . . . . . . . . . . . . . . . . . . . . . . . . . . . . . . . . . . . . . . 24 Temperature . . . . . . . . . . . . . . . . . . . . . . . . . . . . . . . . . . . . . . . . . . . . . . . . . . . . . 25 Rinse automatic . . . . . . . . . . . . . . . . . . . . . . . . . . . . . . . . . . . . . . . . . . . . . . . . . . . 25 Steam system . . . . . . . . . . . . . . . . . . . . . . . . . . . . . . . . . . . . . . . . . . . . . . . . . . . . 26 Lighting . . . . . . . . . . . . . . . . . . . . . . . . . . . . . . . . . . . . . . . . . . . . . . . . . . . . . . . . . 26 Total no. coffees . . . . . . . . . . . . . . . . . . . . . . . . . . . . . . . . . . . . . . . . . . . . . . . . . . 27 System Lock . . . . . . . . . . . . . . . . . . . . . . . . . . . . . . . . . . . . . . . . . . . . . . . . . . . . . 27 Water hardness . . . . . . . . . . . . . . . . . . . . . . . . . . . . . . . . . . . . . . . . . . . . . . . . . . . 28 User profiles. . . . . . . . . . . . . . . . . . . . . . . . . . . . . . . . . . . . . . . . . . . . . . . . . . . . . . 29 Display . . . . . . . . . . . . . . . . . . . . . . . . . . . . . . . . . . . . . . . . . . . . . . . . . . . . . . . . . . 31 Tone options . . . . . . . . . . . . . . . . . . . . . . . . . . . . . . . . . . . . . . . . . . . . . . . . . . . . . 31 Reset . . . . . . . . . . . . . . . . . . . . . . . . . . . . . . . . . . . . . . . . . . . . . . . . . . . . . . . . . . . 32
Setting the serving sizes . . . . . . . . . . . . . . . . . . . . . . . . . . . . . . . . . . . . . . . . . . . 33
2

Contents
Cleaning and Care . . . . . . . . . . . . . . . . . . . . . . . . . . . . . . . . . . . . . . . . . . . . . . . . 34
Descaling the appliance . . . . . . . . . . . . . . . . . . . . . . . . . . . . . . . . . . . . . . . . . . . 44
Frequently asked questions . . . . . . . . . . . . . . . . . . . . . . . . . . . . . . . . . . . . . . . . 46
After sales service . . . . . . . . . . . . . . . . . . . . . . . . . . . . . . . . . . . . . . . . . . . . . . . . 53
Installation instructions . . . . . . . . . . . . . . . . . . . . . . . . . . . . . . . . . . . . . . . . . . . 55
Caring for the environment . . . . . . . . . . . . . . . . . . . . . . . . . . . . . . . . . . . . . . . . . 56
Electrical connection . . . . . . . . . . . . . . . . . . . . . . . . . . . . . . . . . . . . . . . . . . . . . . 57
Installation . . . . . . . . . . . . . . . . . . . . . . . . . . . . . . . . . . . . . . . . . . . . . . . . . . . . . . 58
Adjusting the door hinges . . . . . . . . . . . . . . . . . . . . . . . . . . . . . . . . . . . . . . . . . . . 60
3
IMPORTANT SAFETY INSTRUCTIONS
When using electrical appliances basic safety precautions should always be followed, including the following:
Read all instructions before installation or use of the coffee system.
Please read these instructions carefully to prevent accidents and machine damage.
This appliance complies with current safety requirements. Improper use of the appliance can cause personal injury and material damage.
This appliance is for household use only, to prepare espresso, cappuccino and coffee.
Do not use this appliance other than for its intended use. Any other use could be dangerous.
The manufacturer cannot be held responsible for damage caused by improper use of the appliance.
Electrical safety
Before connecting the appliance to the electrical supply make sure that the voltage and frequency listed on the data plate correspond with the household electrical supply. If in doubt, consult a qualified technician.
Be certain your appliance is properly installed and grounded by a qualified technician. To guarantee the electrical safety of this appliance, continuity must exist between the appliance and an effective grounding system. It is imperative that this basic safety requirement be met. If there is any doubt, have the electrical system of the house checked by a qualified electrician. The manufacturer cannot be held responsible for damages caused by the lack, or inadequacy, of an effective grounding system.
Do not use an extension cord to connect the appliance to electricity. Extension cords do not guarantee the required safety of the appliance (danger of overheating).
Before service or maintenance disconnect the power supply by either removing the fuse, "tripping" the circuit breaker or unplugging the unit.
Install or locate this appliance only in accordance with the provided installation instructions.
The appliance must be properly installed before operation to ensure that no electrical components are accessible. Ensure that power is not supplied to the appliance while installation work, repairs or maintenance is performed.
4
IMPORTANT SAFETY INSTRUCTIONS
Installation work and repairs must only be performed by a trained technician in accordance with national and local safety regulations. Repairs and other work by unauthorized persons could be dangerous and may void the warranty.
Only use Miele original spare parts. Only then can the manufacturer guarantee the safety of this machine.
Never open the outer casing of the appliance. Tampering with electrical connections or components and mechanical parts is dangerous and may cause machine damage.
If the machine is installed in combination with other appliances, a protective base should be installed between the appliance and the unit.
Do not install or use outdoors even if installed in the display cabinet.
To protect against fire, electric shock and injury to persons do not submerge the cord or plugs in water or other liquids.
Do not let the cord hang over the edge of a table or counter, or touch hot surfaces.
Do not operate any appliance with a damaged cord or plug, or after the appliance malfunctions or has been damaged in any manner. Contact Miele.
Always attach the cord to the appliance first, then plug it into the wall outlet. To disconnect, turn the machine off, then remove the plug from the wall outlet.
Use
The coffee system must be maintained daily to prevent the growth of harmful bacteria and mold. Please read the "Cleaning and care" section of this booklet. All parts are dishwasher safe except the brew unit and bean container.
Caution! Do not look directly or with an optical instrument into the lighting - laser radiation.
Caution! Risk of burns when dispensing hot beverages, they are extremely hot.
Persons which lack physical, sensory or mental abilities or experience with the machine should not use it without supervision or instruction by a responsible person.
Close supervision is necessary when any appliance is used by or near children.
Do not touch hot surfaces. Use handles or knobs.
Rinse the lines and the froth dispenser, and clean the unit before the first use.
To avoid injuries allow the coffee system to cool before cleaning or putting on and taking off parts. Turn the machine off at the main switch when not in use and before cleaning.
5

IMPORTANT SAFETY INSTRUCTIONS
Only fill the water tank with cold, fresh tap water. Warm or hot water, or any other liquids may damage the machine. The water should be changed daily to prevent bacteria or mold growth.
Do not use mineral water. Mineral water leads to heavy calcium buildup in the machine that can damage the unit.
Do not put anything but coffee beans into the beans container. Do not put ground coffee in the beans container, it will damage the grinding unit.
Do not use the machine when the froth dispenser is removed. Danger of scalding with hot steam!
Never use a steam cleaner to clean the appliance. Pressurized steam could damage electrical components and cause a short circuit.
The appliance must be descaled regularly with the supplied descaling tablets. In areas with very hard water the machine may need to be descaled more often. The manufacturer cannot be held responsible for damages resulting from insufficient descaling.
Do not fill anything but ground coffee or a cleaning tablet (for the brew unit) in the funnel for ground coffee, otherwise it will get damaged.
Sugar can damage the appliance! Caramelized or otherwise pre-treated coffee beans or other sugar containing beverages must not be put in the machine.
Never place a cup with an
alcohol-coffee mixture underneath the coffee dispenser. Plastic parts of the unit could catch fire!
The hot water and steam dispensed could cause scalding. These functions must be used carefully. Never hold any parts of the body under the steam nozzle or the hot water dispenser. The machine must never be used to clean objects.
Only use the descaling tablets provided by Miele. Take care to use the correct mixture of water and descaler, otherwise it may cause damage.
Depending on the fat content of the coffee, the brew unit may clog. Clean the brew unit every 200 cups with a cleaning tablet. The display shows a respective request.
Dispose of the coffee waste in a trash can, not in the sink. The sink could get clogged.
Do not hang, lean, sit or place heavy items on the door. The machine could be damaged.
The use of accessory attachments not recommended by the appliance manufacturer may result in fire, electric shock or injury to persons.
SAVE THESE
INSTRUCTIONS
6
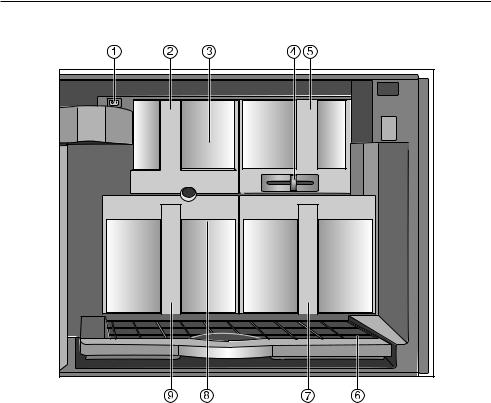
Guide to the machine
Front view
|
|
|
|
|
|
|
|
|
|
|
|
|
|
|
|
|
|
|
|
|
|
|
|
|
|
|
|
|
|
|
|
|
|
|
|
|
|
|
|
|
|
|
|
|
|
|
|
|
|
|
|
|
|
|
|
|
|
|
|
|
|
|
|
|
|
|
|
|
|
|
|
|
|
|
|
|
|
|
|
|
|
|
|
|
|
|
|
|
|
|
|
|
|
|
|
|
|
|
|
|
|
|
|
|
|
|
|
|
|
|
|
|
|
|
|
|
|
|
|
|
|
|
|
|
|
|
|
|
|
|
|
|
|
|
|
|
|
|
|
|
|
|
|
|
|
|
|
|
|
|
|
|
|
|
|
|
|
|
|
|
|
|
|
|
|
|
|
|
|
|
|
|
|
|
|
|
|
|
|
|
|
|
|
|
|
|
|
|
|
|
|
|
|
|
|
|
|
|
|
|
|
|
|
|
|
|
|
|
|
|
|
|
|
|
|
|
|
|
|
|
|
|
|
|
|
|
|
|
|
|
|
|
|
|
|
|
|
|
|
|
|
|
|
|
|
|
|
|
|
|
|
|
|
|
|
|
|
|
|
|
|
|
|
|
|
|
|
|
|
|
|
|
|
|
|
|
|
|
|
|
|
|
|
|
|
|
|
|
|
|
|
|
|
|
|
|
|
|
|
|
|
|
|
|
|
|
|
|
|
|
|
|
|
|
|
|
|
|
|
|
|
|
|
|
|
|
|
|
|
|
|
|
|
|
|
|
|
|
|
|
|
|
|
|
|
|
|
|
|
|
|
|
|
|
|
|
|
|
|
|
|
|
|
|
|
|
|
|
|
|
|
|
|
|
|
|
|
|
|
|
|
|
|
|
|
|
|
|
|
|
|
|
|
|
|
|
|
|
|
|
|
|
|
|
|
|
|
|
|
|
|
|
|
|
|
|
|
|
|
|
|
|
|
|
|
|
|
|
|
|
|
|
|
|
|
|
|
|
|
|
|
|
|
|
|
|
|
|
|
|
|
|
|
|
|
|
|
|
|
|
|
|
|
|
|
|
|
|
|
|
|
|
|
|
|
|
|
|
|
|
|
|
|
|
|
|
|
|
|
|
|
|
|
|
|
|
|
|
|
|
|
|
|
|
|
|
|
|
|
|
|
|
|
|
|
|
|
|
|
|
|
|
|
|
|
|
|
|
|
|
|
|
|
|
|
|
|
|
|
|
|
|
|
|
|
|
|
|
|
|
|
|
|
|
|
|
|
|
|
|
|
|
|
|
|
|
|
|
|
|
|
|
|
|
|
|
|
|
|
|
|
|
|
|
|
|
|
|
|
|
|
|
|
|
|
|
|
|
|
|
|
|
|
|
|
|
|
|
|
|
|
|
|
|
|
|
|
|
|
|
|
|
|
|
|
|
|
|
|
|
|
|
|
|
|
|
|
|
|
|
|
|
|
|
|
|
|
|
|
|
|
|
|
|
|
|
|
|
|
|
|
|
|
|
|
|
|
|
|
|
|
|
|
|
|
|
|
|
|
|
|
|
|
|
|
|
|
|
|
|
|
|
|
|
|
|
|
|
|
|
|
|
|
|
|
|
|
|
|
|
|
|
|
|
|
|
|
|
|
|
|
|
|
|
|
|
|
|
|
|
|
|
|
|
|
|
|
|
|
|
|
|
|
|
|
|
|
|
|
|
|
|
|
|
|
|
|
|
|
|
|
|
|
|
|
|
|
|
|
|
|
|
|
|
|
|
|
|
|
|
|
|
|
|
|
|
|
|
|
|
|
|
|
|
|
|
|
|
|
|
|
|
|
|
|
|
|
|
|
|
|
|
|
|
|
|
|
|
|
|
|
|
|
|
|
|
|
|
|
|
|
|
|
|
|
|
|
|
|
|
|
|
|
|
|
|
|
|
|
|
|
|
|
|
|
|
|
|
|
|
|
|
|
|
|
|
|
|
|
|
|
|
|
|
|
|
|
|
|
|
|
|
|
|
|
|
|
|
|
|
|
|
|
|
|
|
|
|
|
|
|
|
|
|
|
|
|
|
|
|
|
|
|
|
|
|
|
|
|
|
|
|
|
|
|
|
|
|
|
|
|
|
|
|
|
|
|
|
|
|
|
|
|
|
|
|
|
|
|
|
|
|
|
|
|
|
|
|
|
|
|
|
|
|
|
|
|
|
|
|
|
|
|
|
|
|
|
|
|
|
|
|
|
|
|
|
|
|
|
|
|
|
|
|
|
|
|
|
|
Touch controls |
Bottom lighting |
||||||||||||||||||||||||||||||||||||||
|
(lowest control "On/Off" button) |
||||||||||||||||||||||||||||||||||||||
|
|
|
|
|
|
|
|
|
|
|
|
|
|
|
|
|
|
|
|||||||||||||||||||||
Display |
Plastic drip tray |
||||||||||||||||||||||||||||||||||||||
|
|
|
|
|
|
|
|
|
|
|
|
|
|
|
|
|
|
||||||||||||||||||||||
Touch controls |
Metal drip tray |
||||||||||||||||||||||||||||||||||||||
|
|
|
|
|
|
|
|
|
|
|
|
|
|
|
|
|
|
||||||||||||||||||||||
|
(lowest control "Clear" button) |
Coffee dispenser |
|||||||||||||||||||||||||||||||||||||
Top lighting |
|
(height adjustable) |
|||||||||||||||||||||||||||||||||||||
|
|
|
|
|
|
|
|
|
|
|
|
|
|
|
|
|
|
||||||||||||||||||||||
Door grip |
Froth dispenser |
||||||||||||||||||||||||||||||||||||||
|
(removable for better cleaning) |
||||||||||||||||||||||||||||||||||||||
|
|
|
|
|
|
|
|
|
|
|
|
|
|
|
|
|
|
|
|
|
|
|
|||||||||||||||||
Hot water spout |
Intake hose |
||||||||||||||||||||||||||||||||||||||
|
|
|
|
|
|
|
|
|
|
|
|
|
|
|
|
|
|
|
|
|
|
||||||||||||||||||
|
|
|
|
|
|
|
|
|
|
|
|
|
|
|
|
|
|
|
|
|
|
|
(removable together with dispenser) |
||||||||||||||||
7
Guide to the machine
Interior view
Main switch
Cover for ground coffee funnel
Funnel for ground coffee
Grind control lever
Coffee bean container
Drip tray with no-spill grid for transport
Water tank
Brew unit
Waste unit
8
First steps to use
Touch controls
Select a touch control with your fingertip to use the machine.
Display
To select a menu, select the touch control next to the respective menu point.
If more features can be selected under one menu point, the menu has three dots (e.g. "Settings...").
"more" / "back": If there are more menus which are not immediately shown, select "more" or "back" to see further options.
"Clear": to go back to the previous screen.
"Stop": to cancel coffee preparation.
"OK": to save a setting.
Before the first use
The appliance must be correctly installed and connected before the first use.
Clean the appliance and remove protective foils before the first use.
Turning on
Select "On/Off" to turn the coffee system on.
The display shows the clock. See "Settings - Clock - Setting the time of day" to set the time.
During the very first use, you will be prompted to select a language.
Select the desired language touch control and then "OK".
The symbol indicates the "Language" setting. If you accidentally select an unfamiliar language, simply look for the
symbol. Touch the control next to the flag symbol and select your language of choice.
Customize the coffee system to your desired settings.
Prepare two cups of coffee and dispose of them, this will clean any coffee residues from the brew unit left from the quality control tests at the factory.
Turning off
Select "On/Off".
The display shows the time of day. After 60 seconds the display turns off (depending on the setting). See "Settings - Clock".
If the rinse automatic feature is turned on the machine will begin rinsing if a coffee was prepared that day.
9
Filling water, beans or ground coffee
Before using the coffee system for the first time, clean the appliance. See "Cleaning and Care".
Filling the water tank |
|
|
The beans and the water quality is |
|
|
important for a good espresso or |
Open the appliance door by |
|
coffee. The water tank must be washed |
||
grasping the recess next to the hot |
||
and filled with fresh cold drinking water |
||
water spout and pulling the door |
||
before each day of use. The unit |
||
towards you. |
||
displays a reminder when turned on. |
||
|
Never add hot water or any other liquids except cold water to the water tank.
Do not use mineral water. Mineral |
|
|
|
|
|
|
|
|
|
|
water leads to heavy calcium |
|
|
|
|
|
|
|
|
|
|
|
|
|
|
|
|
|
|
|
|
|
|
|
|
|
|
|
|
|
|
|
|
built-up in the machine that can |
|
|
|
|
|
|
|
|
|
|
|
|
|
|
|
|
|
|
|
|
|
damage the unit. |
Pull the water tank out. |
|||||||||
|
|
|
|
|
|
|
|
|
|
|
|
Fill the container with fresh, cold tap |
|||||||||
|
||||||||||
|
||||||||||
|
water to the "Max." mark. |
|||||||||
|
A valve at the front of the tank prevents |
|||||||||
|
leaks. |
|||||||||
Close the lid and push the water tank into the unit until it clicks into place.
The water tank must be positioned correctly or the valve will leak. If the water tank has not clicked into place, pull the tank out, check and clean the niche.
10
Filling water, beans or ground coffee
Filling the beans container
Only fill espresso or coffee beans in the beans container. Anything else - including ground coffee - will damage the grinding unit. Caramelized or otherwise pre-treated beans or sugar containing beverages must not be filled into the appliance. It will damage the coffee system.
Pull the bean container out.
Push the lid back and fill the container with roasted coffee beans.
Push the lid back into place and put the beans container back into the appliance.
Close the door.
Filling ground coffee
A funnel for ground coffee is provided in case you would like to prepare a different coffee type, e.g. decaffeinated coffee.
Pull the cover for the ground coffee funnel out of the appliance and lift the funnel lid, .
Place one spoonful of ground coffee into the funnel, , (using the supplied spoon) and close the lid.
Push the cover into the appliance and close the door.
See "Making Coffee - Espresso and coffee made from ground coffee".
11

Making coffee
The lines must be rinsed daily before the first use. This will happen automatically if "Rinse automatic" is set to "On" (see "Settings - Rinse Automatic") and the machine is cold. After heating, hot water runs out of the two spouts into the drip tray. If "Rinse automatic" was set to "Off", use "Care" to rinse the lines. See "Cleaning and Care - Rinse".
Turning on
Select the "On/Off" touch control.
A reminder to fill the water tank with fresh water is displayed.
Please fill and reinsert the water tank
Then the upper line in the display shows:
Preheating
DESCALING
USER PROFILE: STANDARD
SETTINGS ...
If "Rinse automatic" is set to "On" (default), the machine rinses after the heating phase and the main menu is displayed.
12
Making coffee
Prewarming cups
All beverages should be made in a warm cup, to develop the aroma. The smaller the amount of coffee or espresso and the thicker the cups, the more important it is to prewarm the cups.
Set the cup under the hot water spout.
|
|
ESPRESSO |
HOT WATER |
COFFEE |
MILK FROTH |
CAPPUCCINO |
more |
|
|
Select "Hot water" from the main menu.
Hot water is dispensed. Select "Stop" to stop the flow.
Let the hot water sit for a moment to prewarm the cup, then empty the cup.
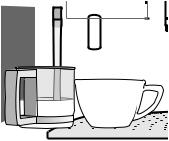
Adjust the dispenser height
Depending on the cup height, the coffee dispensers can be adjusted so that the coffee and espresso have a shorter distance to the cup, do not cool and have a better crema.
Pull the coffee dispenser slowly up or down.
13
Making coffee
Espresso and coffee made |
Preparing two cups at the same time |
||||
from coffee beans |
|
|
|||
|
|
||||
|
|
|
|
|
|
|
|
|
|
|
|
|
|
|
|
|
|
|
|
|
|
|
|
|
|
|
|
|
|
|
|
|
|
|
|
|
|
|
|
|
|
|
|
|
|
|
|
|
|
|
|
|
|
|
|
|
|
|
|
|
|
|
|
|
|
|
|
|
|
|
|
|
|
|
|
|
|
|
|
|
|
|
|
|
|
|
|
|
|
|
|
|
|
|
|
Set a cup under the coffee dispenser.
The drink is dispensed through both dispensers at the same time.
Select "Espresso" or "Coffee".
The machine grinds the beans and pre-brews the coffee (if "On" is selected under "Pre-brewing"). The selected beverage is dispensed.
Do not open the door during brewing. The machine will be damaged.
Canceling
Select "Stop" to cancel the process.
The portion sizes for espresso, coffee and cappuccino can be set individually. See "Setting the serving sizes".
Set a cup under each coffee dispenser.
Select "Espresso" or "Coffee".
Select "2 portions" when displayed.
The coffee system makes two portions of espresso or coffee with a few seconds in between.
Keep the cups under the dispenser until the main menu shows in the display.
14

Making coffee
Espresso and coffee made from ground coffee
After filling the funnel with ground coffee (see "Filling water, beans or ground coffee - Filling ground coffee"), the display shows:
Did you fill ground coffee and do you want to prepare it?
No |
Yes |
Select "Yes".
Select "No" if no ground coffee is filled in the funnel. Otherwise the coffee system assumes that ground coffee is in the machine and dispenses only water next time coffee is made.
Set a cup under the coffee dispenser.
The drink is dispensed through both dispensers at the same time.
Select "Espresso" or "Coffee".
The coffee system brews the espresso or coffee and the drink is dispensed.
Do not open the door during the brewing process. It will damage the machine. The unit will switch automatically back to brewing with beans after preparation.
Canceling
Select "Stop" to cancel the process.
Preparing two cups at the same time
When using ground coffee, only one portion at a time can be prepared. The unit uses the whole portion of ground coffee which was filled in the funnel to prepare one drink.
15

Making coffee
Cappuccino and milk froth
When using for the first time or using after descaling
The lines were completely drained before the unit left the factory. They will also be drained when the machine is descaled. Before preparing cappuccino or froth, the lines must be filled with water.
Set a cup under the cappuccino dispenser.
Select "Milk froth".
The intake hose takes in water from the tank and fills the lines with water. A small amount of water runs from the froth dispenser.
Prompts to clean the froth dispenser appear in the display.
Confirm by selecting "OK".
Once the machine stops, select "Milk froth" again.
The froth dispenser dispenses steam and the lines are filled with water.
Select "Clear" to get back to the main menu.
The coffee system is ready to use.
16
|
|
|
|
|
|
|
|
|
Making coffee |
|
|
|
|
|
|
|
|
|
|
Cappuccino |
|
Milk froth |
|||||||
To prepare a cappuccino you need a |
|
If you need additional milk froth, |
|||||||
large ceramic or porcelain cup and a |
|
prepare cold skim milk in a stainless |
|||||||
small mug (supplied) of milk. |
|
steel mug which narrows towards the |
|||||||
The best milk froth is achieved with |
|
top. |
|||||||
|
|
||||||||
cold milk. |
|
Set the supplied glass mug with milk |
|||||||
|
|
|
|
|
|
|
|
|
under the intake hose and the |
|
|
|
|
|
|
|
|
|
|
|
Only one cup of cappuccino can be |
|
|||||||
|
|
stainless steel mug under the froth |
|||||||
|
prepared at a time because of the |
|
dispenser. |
||||||
|
milk frothing process. |
|
Select "Milk froth". |
||||||
|
|
|
|
|
|
|
|
|
|
|
|
|
|
|
|
|
|
|
The milk is frothed into the stainless |
|
|
|
|
|
|
|
|
|
|
|
|
|
|
|
|
|
|
|
|
|
|
|
|
|
|
|
|
|
steel mug. |
|
|
|
|
|
|
|
|
|
|
|
|
|
|
|
|
|
|
|
Select "Stop" to cancel the milk |
|
|
|
|
|
|
|
|
|
frothing. |
|
|
|
|
|
|
|
|
|
After preparing milk froth and |
|
|
|
|
|
|
|
|
|
|
|
|
|
|
|
|
|
|
|
|
|
|
|
|
|
|
|
|
|
cappuccino |
|
|
|
|
|
|
|
|
|
Clean the froth dispenser and intake |
|
|
|
|
|
|
|
|
|
|
|
|
|
|
|
|
|
|
|
|
|
|
|
|
|
|
|
|
|
|
|
|
|
|
|
|
|
|
|
hose immediately after use. If the milk is |
|
|
|
|
|
|
|
|
|
|
Set the mug of milk under the intake |
|
allowed to dry, the parts may get |
|||||||
|
|
||||||||
|
hose and the cup under the froth |
|
clogged and difficult to clean. See |
||||||
|
|
|
|||||||
|
dispenser. |
|
"Cleaning and Care". |
||||||
|
|
|
|||||||
Select "Cappuccino".
The milk is frothed into the cup. At the same time the beans are ground.
Select "Stop" to cancel the milk frothing.
Once the milk is frothed, set the cappuccino cup under both dispensers and select "OK".
The cappuccino will be prepared.
Select "Stop" when enough espresso has been prepared.
17

Adjusting the coffee grinder
The finer the coffee beans are ground determines the strength of the coffee and the quality of the crema.
To prevent machine damage adjust the coffee grinder one notch at a time and let the beans grind before adjusting another notch. Otherwise the machine will be damaged.
The grinder should be adjusted:
–If the espresso flows too quickly into the cup, the pressure cannot be built up because the beans have been ground too coarsely. The grinder should be adjusted to a finer setting.
–If the espresso only trickles into the cup, the beans have been ground too fine and the coffee will be bitter. The grinder should be adjusted to a coarser setting.
–If the crema is evenly colored but pale, the ground coffee is too coarse.
–If the crema is very dark brown on one side, graduating almost to white on the other, the ground coffee is too fine.
To adjust the grinder setting
Push the slide control to the left for a finer grind or to the right for a coarser grind.
You should be able to feel the notches when moving the slide control.
If the slide control will not move:
Close the machine and dispense a cup of coffee.
Then try to move the slide control again.
18

Settings
The coffee system can be customized to suit individual preferences.
Language
To show the displays in the desired language, select the language before the first use.
Preheating
DESCALING
USER PROFILES: STANDARD
SETTINGS ...
Select "Settings" from the main menu during the pre-heating phase or,
back |
SETTINGS ... |
CARE ...
USER PROFILES
in the main menu.
|
SETTINGS |
|
|
|
LANGUAGE ... |
GRIND AMOUNT ... |
|
|
CLOCK |
PRE-BREWING |
|
|
TIMER ... |
more |
|
|
|
|
|
Select "Language". |
|
||
|
|
|
|
|
LANGUAGE english |
|
|
|
english |
français |
|
|
deutsch |
more |
|
|
español |
OK |
|
|
|
|
|
|
|
|
|
Select the desired language.
To see more language options, select "more".
The language options are:
English, German, Español, Français, Italiano, Polski and Portugués.
Select "OK" to save the selection.
All displays are shown in the selected language.
To go back to the main menu, select "Clear".
19

Settings
Clock
back |
SETTINGS ... |
CARE ...
USER PROFILES
Select "Settings".
SETTINGS
LANGUAGE ... |
GRIND AMOUNT ... |
CLOCK |
PRE-BREWING |
TIMER ... |
more |
|
|
Select "Clock". |
|
Setting the time of day
Select "Enter Time".
Select "+" or "-" with the right touch controls to select the hours.
Set the minutes by selecting "Minutes".
Select "+" or "-" with the right touch controls to select the minutes.
Select "OK".
The time of day is saved.
Clock display size
The size of the clock display can be adjusted. The options are "normal" or "large".
Select "Size".
The selected size is highlighted in the display.
Select "Size" until the desired size is highlighted.
Select "OK" to save the selection.
12 or 24 hour clock
The clock display can be set to the 12 or 24 hour clock.
Select the respective touch control. The selected display is highlighted.
Select "OK" to save the selection.
Clock display on/off
The clock can be displayed or turned off.
If the display is turned on, the time of day is displayed when the machine is turned off.
If the option is set to off, the display turns off after 60 seconds.
Select "Clock display".
The selected display is highlighted.
Select "OK" to save the selection.
20
 Loading...