


Operating instructions
Coffee System
CVA 2650
To prevent accidents and machine damage read these instructions before
UV
installation or use. |
M.-Nr. 06 541 610 |
2

Contents
IMPORTANT SAFETY INSTRUCTIONS . . . . . . . . . . . . . . . . . . . . . . . . . . . . . . . . . 5
Guide to the machine. . . . . . . . . . . . . . . . . . . . . . . . . . . . . . . . . . . . . . . . . . . . . . . 8
Displays . . . . . . . . . . . . . . . . . . . . . . . . . . . . . . . . . . . . . . . . . . . . . . . . . . . . . . . . 10
First steps to use . . . . . . . . . . . . . . . . . . . . . . . . . . . . . . . . . . . . . . . . . . . . . . . . . 11 Turning the machine on and off . . . . . . . . . . . . . . . . . . . . . . . . . . . . . . . . . . . . . . . 11
Filling water and coffee capsules. . . . . . . . . . . . . . . . . . . . . . . . . . . . . . . . . . . . 13 Filling the coffee capsule carousel . . . . . . . . . . . . . . . . . . . . . . . . . . . . . . . . . . . . 14 Changing the coffee capsules. . . . . . . . . . . . . . . . . . . . . . . . . . . . . . . . . . . . . . . . 14
Allocating various coffee types . . . . . . . . . . . . . . . . . . . . . . . . . . . . . . . . . . . . . 15
Making coffee . . . . . . . . . . . . . . . . . . . . . . . . . . . . . . . . . . . . . . . . . . . . . . . . . . . . 17 Espresso and coffee . . . . . . . . . . . . . . . . . . . . . . . . . . . . . . . . . . . . . . . . . . . . . . . 19 Interrupting the brewing. . . . . . . . . . . . . . . . . . . . . . . . . . . . . . . . . . . . . . . . . . . . . 19 Cappuccinatore (milk froth mug) . . . . . . . . . . . . . . . . . . . . . . . . . . . . . . . . . . . . . . . 20
Dispensing hot water. . . . . . . . . . . . . . . . . . . . . . . . . . . . . . . . . . . . . . . . . . . . . . 23
Setting serving sizes . . . . . . . . . . . . . . . . . . . . . . . . . . . . . . . . . . . . . . . . . . . . . . 24 Setting a default serving size. . . . . . . . . . . . . . . . . . . . . . . . . . . . . . . . . . . . . . . . . 24
Setting user profiles . . . . . . . . . . . . . . . . . . . . . . . . . . . . . . . . . . . . . . . . . . . . . . 25 Setting user profiles (serving sizes). . . . . . . . . . . . . . . . . . . . . . . . . . . . . . . . . . . . 26 Making espresso / coffee with user profile . . . . . . . . . . . . . . . . . . . . . . . . . . . . . . 26
Settings. . . . . . . . . . . . . . . . . . . . . . . . . . . . . . . . . . . . . . . . . . . . . . . . . . . . . . . . . 27 Selecting a language. . . . . . . . . . . . . . . . . . . . . . . . . . . . . . . . . . . . . . . . . . . . . . . 27 Setting the time of day . . . . . . . . . . . . . . . . . . . . . . . . . . . . . . . . . . . . . . . . . . . . . . 28 Turning off after Standby time . . . . . . . . . . . . . . . . . . . . . . . . . . . . . . . . . . . . . . . . 29 Turning on at a preset time . . . . . . . . . . . . . . . . . . . . . . . . . . . . . . . . . . . . . . . . . . 30 Turning off at a preset time . . . . . . . . . . . . . . . . . . . . . . . . . . . . . . . . . . . . . . . . . . 31 Deleting the preset times . . . . . . . . . . . . . . . . . . . . . . . . . . . . . . . . . . . . . . . . . . . . 31 Setting lighting, display contrast and brightness . . . . . . . . . . . . . . . . . . . . . . . . . 32 Automatic rinsing . . . . . . . . . . . . . . . . . . . . . . . . . . . . . . . . . . . . . . . . . . . . . . . . . . 33 Total coffee counter (INFO) . . . . . . . . . . . . . . . . . . . . . . . . . . . . . . . . . . . . . . . . . . 35 Factory setting . . . . . . . . . . . . . . . . . . . . . . . . . . . . . . . . . . . . . . . . . . . . . . . . . . . . 35
System lock . . . . . . . . . . . . . . . . . . . . . . . . . . . . . . . . . . . . . . . . . . . . . . . . . . . . . 36
Daily coffee system care . . . . . . . . . . . . . . . . . . . . . . . . . . . . . . . . . . . . . . . . . . . 37
Common coffee system care . . . . . . . . . . . . . . . . . . . . . . . . . . . . . . . . . . . . . . . 38
Descaling the appliance . . . . . . . . . . . . . . . . . . . . . . . . . . . . . . . . . . . . . . . . . . . 43 Descaling prompts. . . . . . . . . . . . . . . . . . . . . . . . . . . . . . . . . . . . . . . . . . . . . . . . . 45
3

Contents
Fault messages . . . . . . . . . . . . . . . . . . . . . . . . . . . . . . . . . . . . . . . . . . . . . . . . . . 46
Frequently asked questions . . . . . . . . . . . . . . . . . . . . . . . . . . . . . . . . . . . . . . . . 47
Removing a jammed capsule . . . . . . . . . . . . . . . . . . . . . . . . . . . . . . . . . . . . . . . 54
After sales service . . . . . . . . . . . . . . . . . . . . . . . . . . . . . . . . . . . . . . . . . . . . . . . . 55
Electrical connection. . . . . . . . . . . . . . . . . . . . . . . . . . . . . . . . . . . . . . . . . . . . . . 56
Installation . . . . . . . . . . . . . . . . . . . . . . . . . . . . . . . . . . . . . . . . . . . . . . . . . . . . . . 57 Installation options . . . . . . . . . . . . . . . . . . . . . . . . . . . . . . . . . . . . . . . . . . . . . . . . . 57 Installation . . . . . . . . . . . . . . . . . . . . . . . . . . . . . . . . . . . . . . . . . . . . . . . . . . . . . . . 61 Programming . . . . . . . . . . . . . . . . . . . . . . . . . . . . . . . . . . . . . . . . . . . . . . . . . . . . . 62 Setting the language. . . . . . . . . . . . . . . . . . . . . . . . . . . . . . . . . . . . . . . . . . . . . 62 Setting the water hardness . . . . . . . . . . . . . . . . . . . . . . . . . . . . . . . . . . . . . . . . 63
Coffee glossary . . . . . . . . . . . . . . . . . . . . . . . . . . . . . . . . . . . . . . . . . . . . . . . . . . 64
The Espresso range. . . . . . . . . . . . . . . . . . . . . . . . . . . . . . . . . . . . . . . . . . . . . . . 65
The Lungo range . . . . . . . . . . . . . . . . . . . . . . . . . . . . . . . . . . . . . . . . . . . . . . . . . 66
Caring for the environment . . . . . . . . . . . . . . . . . . . . . . . . . . . . . . . . . . . . . . . . . 67
4
IMPORTANT SAFETY INSTRUCTIONS
When using electrical appliances, basic safety precautions should always be followed, including the following:
Read all instructions before installation or use of the coffee system.
Please read these instructions carefully to prevent accidents and machine damage.
This appliance is for household use only. Use appliance only for its intended use. Any other use could be dangerous.
This appliance complies with current safety requirements. Improper use of the appliance can cause personal injury and material damage.
The manufacturer cannot be held responsible for damage caused by improper use of the appliance.
Electrical safety
Before connecting the appliance to the electrical supply make sure
that the voltage and frequency details listed on the data plate correspond with the household electrical supply. If in doubt, consult a qualified technician.
The appliance must be properly installed before operation to ensure
that no electrical components are accessible. Ensure that power is not supplied to the appliance while installation, repairs or maintenance work is performed.
Be certain your appliance is properly installed and grounded by
a qualified technician. To guarantee the electrical safety of this appliance, continuity must exist between the appliance and an effective grounding system. It is imperative that this basic safety requirement be met. If there is any doubt, have the electrical system of the house checked by a qualified electrician. The manufacturer cannot be held responsible for damages caused by the lack or inadequacy of an effective grounding system.
Do not use an extension cord to connect the appliance to electricity.
Extension cords do not guarantee the required safety of the appliance (danger of overheating).
This appliance is not designed for maritime use or for use in mobile
installations such as recreational vehicles or aircraft. However, under certain conditions it may be possible for installation in these applications. Please contact the Miele Technical Service Department with specific requirements.
Before service or maintenance work disconnect the power supply
by either removing the fuse, "tripping" the circuit breaker or unplugging the unit.
5
IMPORTANT SAFETY INSTRUCTIONS
Installation work and repairs should only be performed by a trained
technician in accordance with national and local safety regulations. Repairs and other work by unauthorized persons could be dangerous.
Never open the outer casing of the appliance. Tampering with
electrical connections or components and mechanical parts is dangerous and may cause machine damage.
If the machine is installed in combination with other appliances,
it should be installed with a protective base between the appliance and the unit.
To protect against fire, electric shock and injury to persons do not
submerge the cord or plug in water or any other liquid.
Do not let the cord hang over the edge of the table or counter, or
touch hot surfaces.
Do not operate any appliance with a damaged cord or plug, or after
the appliance malfunctions or has been damaged in any manner. Return the appliance to the nearest authorized Miele dealer for examination, repair or adjustment.
Always attach the plug to the appliance first, then plug the cord
into the wall outlet. To disconnect, turn the machine off by pressing the left jog shuttle, then remove the plug from the wall outlet.
Use
Only use Nespresso-coffee capsules with this machine.
The coffee system must be cleaned daily to prevent the growth of harmful bacteria and mold. Please read the "Coffee system care" section of this booklet.
Caution! There is a risk of burns when dispensing hot beverages, they are extremely hot.
Do not touch hot surfaces. Use the jog shuttles or steam lever.
Children should not use the appliance unsupervised.
Danger of scalding!
This appliance must not be installed or operated outdoors.
To avoid injuries allow the coffee system to cool before cleaning or putting on or taking off parts. Turn the
machine off at the main switch when not in use and before cleaning.
Only fill the water tank with cold, fresh tap water. Warm or hot water
or any other liquids may damage the machine. The water should be changed daily to prevent bacteria or mold growth.
6

IMPORTANT SAFETY INSTRUCTIONS
The water lines must be rinsed and the machine cleaned thoroughly
before the first coffee is prepared. See "Daily coffee system care".
The use of accessories not recommended by the appliance
manufacturer may result in fire, electric shock or injury.
Do not reach into the perforator. Injuries may occur.
Do not use damaged, broken or dented capsules! They may jam in
the machine and damage it.
The hot water and steam dispensed could cause scalding!
Use these functions carefully. The machine must never be used to clean objects.
Never use a steam cleaner to clean the appliance. Pressurized steam
could damage electrical components and cause a short circuit.
The coffee system must be descaled regularly with the supplied descaling tablets. In areas with very hard water the machine will need to be descaled more often. The
manufacturer cannot be held responsible for damages resulting from insufficient descaling.
Only use the descaling tablets provided by Miele and be sure to
use the correct mixture of water and descaler. Otherwise appliance damage may occur.
The capsule plate will soil more or less depending on the coffee
capsule used. Clean the capsule plate every 1 to 2 months with a cleaning tablet, available from Miele.
Do not hang, lean, sit or place heavy items on the door. The
machine may be damaged.
Do not place the coffee system on or near a hot gas or electric burner,
or in a heated oven.
SAVE THESE
INSTRUCTIONS
7
Guide to the machine
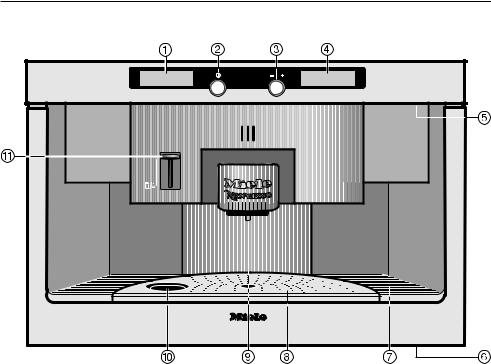
Front view
a Left display
b Left jog shuttle
Press this jog shuttle to turn the machine on and off.
Turning it selects a desired program, option or setting.
c Right jog shuttle
Press this jog shuttle:
–to start and stop the dispensing of coffee or hot water.
–to select an option to alter or customize a program.
–to save a setting into memory when the machine is turned off.
Turning it selects a desired program, option or a setting.
d Right display
e Upper door handle
(for installation at countertop height)
f Lower door handle
(for installation at a higher level, e.g. upper cabinets)
g Plastic drip grill
h Metal drip catch
i Coffee dispenser
j Inset for Cappuccinatore
k Valve / Lever for steam and hot water
8
Guide to the machine
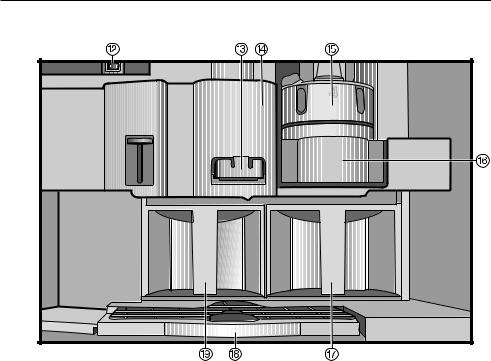
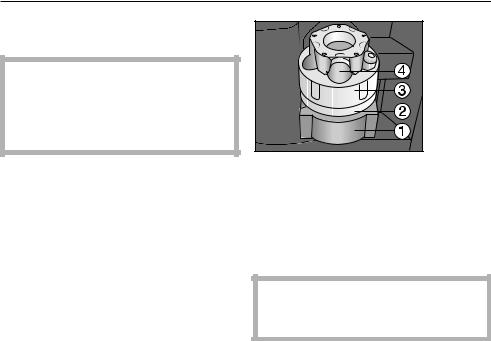
Interior view
l Main switch
m Capsule plate
(replaced with the descaling funnel when descaling is performed)
n Perforator
(not visible, penetrates capsule to assist in the brewing process)
o Capsule carousel
p Carousel tray
q Water tank
r Drip tray with grid
(grid avoids spilling during transport)
s Waste container
9

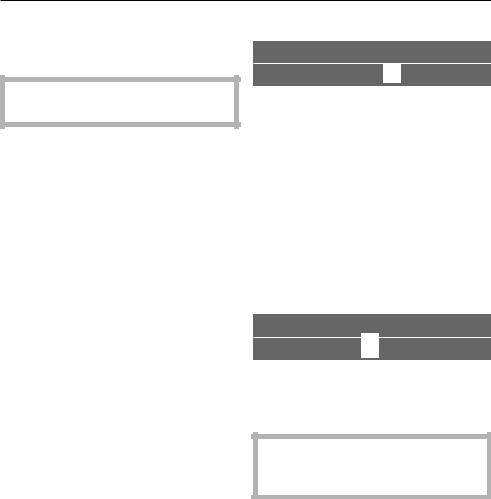
Displays
Left display
COSI
K1 2 3 4 5 L o n G k C
–Drink selection
Up to 5 different coffee types K, as well as, steam L and hot water o
–User profile
Up to 4 different users n
–Important maintenance
Rinsing G, descaling k
–Selection of Settings C
Right display
LANGUAGE
F Y K n I I J Z
–selects coffee or espresso
–shows current actions, e.g. heating
–prompts an action, e.g. close the door
Individual settings and information can be selected in the right hand display.
F Language
m Time
K Allocation of coffee type
n User name
I Programming
ITotal number of cups of coffee dispensed to date
JMaintenance
ZReset to default settings
The selected option will be highlighted in the display.
10
First steps to use
Turning the machine on and off
The appliance must be correctly installed and connected before the first use.
Turning on
^ Press the left jog shuttle.
Míele
Welcome!
When turned on for the first time, a welcome screen along with other messages will appear in the right display. The welcome screen will be displayed each time the machine is turned on until 5 drinks (including steam) have been prepared.
COSI
K1 2 3 4 5 L o n G k C
The displays light.
Turning off
^Press the left jog shuttle until the displays go dark.
If the automatic rinsing function is activated, both displays will go dark when turned off. If coffee was dispensed, the machine will be rinsed and "Machine Rinsing" will appear in the right display. When finished the machine will shut off completely.
11

First steps to use
Before using the coffee system for the first time
1. Clean the parts
^Hand wash the coffee capsule plate with hot water and liquid dish soap.
^The water tank can be washed in the dishwasher.
2. Fill the water tank
^Open the appliance door.
^Lift the water tank and pull it out.
^Fill the container with fresh, cold tap water to the "Max." mark. Push the water tank back into the machine.
3. Fill the system with water
HOT WATER
K1 2 3 4 5 L o n G k C
^Set a cup under the steam valve.
^Turn the left jog shuttle to "Hot water".
^Press the right jog shuttle.
The steam valve dispenses hot water.
^Press the right jog shuttle again to turn the hot water off.
^Turn the left jog shuttle to "Heating with steam".
^Press the steam lever down.
^Push the steam lever up when steam starts to be dispensed.
The lines are filled and the coffee system is ready to use.
4. Rinse the lines
RINSE
K1 2 3 4 5 L o n G k C
^Turn the left jog shuttle to "Rinse".
^Press the right jog shuttle.
Water runs from the coffee dispenser.
^Press the steam lever down. Water runs from the steam valve.
^Push the steam lever up after a few seconds.
12

Filling water and coffee capsules
Filling the water tank
The water tank should be washed and filled with fresh cold tap water before each day of use.
Never put hot water or any other liquid except cold water into the water tank.
^ Open the appliance door. |
^ Lift the water tank and pull it out. |
^Fill the container with fresh, cold tap water to the "Max." mark.
A valve at the tank front prevents leaks.
^Push the water tank back into the machine.
13
Filling water and coffee capsules
Filling the coffee capsule carousel
Only insert Nespresso coffee capsules in the carousel. Damaged, broken or dented capsules should not be used they may jam in the machine.
There are five chambers, each can hold four capsules. The coffee types have to be allocated to their respective chambers to get the desired coffee type. You can also fill each chamber with the same coffee type.
The chambers are factory set for a coffee type. Fill the chambers respectively or program other coffee types according to your preference. See "Allocating various coffee types".
^Pull the carousel tray, a, all the way out.
^Take the carousel, c, out.
^Insert the capsules into the chambers, d, with the flat, silver side down.
Take care that the capsules sit loosely in the chambers so they do not jam.
^Insert the carousel into the carousel tray.
^Push the carousel all the way into the machine.
^Close the door.
The machine aligns the carousel automatically. A sound will be heard.
Changing the coffee capsules
^Pull out the carousel tray and lift out the carousel.
^Push the carousel ring, b, up and take out the capsules.
14

Allocating various coffee types
Twelve different Nespresso coffee types are available for this coffee system. They differentiate in terms of acidity, fruitness, bitterness and roast. Therefore the preparing times will vary.
See "The Espresso / Lungo range" for more information on the coffee types.
Allocating the coffee types
Five different coffee types can be filled in the five chambers of the capsule carousel. The chambers can be either allocated to the desired coffee types or filled with the same coffee type in all chambers.
SETTINGS F
K1 2 3 4 5 L o n G k C
^ Turn the left jog shuttle to "Settings".
ALLOCATE TYPE
F Y K n I I J Z
^Turn the right jog shuttle to the "Coffee bean" symbol. Press to confirm.
TYPE COSI
K1 |
2 3 |
4 |
5 |
A |
The upper line shows the coffee type, the lower line shows the chamber number. If no type is allocated to the chamber, the upper display line shows: empty.
Some coffee types are factory set, which you can either accept or change.
^Take the carousel from the machine to see which coffee type is filled in each chamber.
TYPE ARPEGGIO
K |
1 |
2 3 |
4 |
5 |
A |
^Turn the right jog shuttle to the desired chamber and press to confirm.
15

Allocating various coffee types
Allocating different coffee types
CHAMBER 5
ARPEGGIO |
~ |
^Turn the right jog shuttle to the desired coffee type and press to confirm it to that chamber.
Setting a new coffee type
CHAMBER 5
+ save as |
~ |
^Turn the right jog shuttle to "save as" if no coffee type is allocated yet, to save a new coffee type or to name a coffee type yourself.
^Press the right jog shuttle.
CHAMBER 5 ............
A B C D E F G H I J KL M ~
The alphabet is displayed. Turn the right jog shuttle to the right to display the rest of the alphabet and the numbers 0 through 9.
To enter text
^Turn the right jog shuttle to the first letter or number and press to confirm. The selected letter shows in the upper line.
^Repeat until the desired name is entered.
To delete text
^If you made a mistake, turn the right jog shuttle until "delete" appears in the display.
^Pressing it deletes the last letter entered.
^Turn the right jog shuttle counterclockwise to the alphabet and continue entering the name.
Saving an entry
CHAMBER 5 TEST...
+ OK |
~ |
^When the entry is complete, turn the right jog shuttle until "OK" is displayed.
^Press to confirm.
The main menu is displayed, the last selected chamber is highlighted.
^To leave the menu turn the right jog shuttle to the "back" symbol A and press to confirm.
Not saving an entry
^If you do not want to save an entry turn the right jog shuttle until "back" is displayed. Press and the entry will not be saved.
16

Making coffee
Rinse the water lines before preparing the first drink of the day. If the "Automatic rinsing" option is set to "on" and the machine is still cold this will take place automatically. The heating system will heat and the water lines will be rinsed.
If the "Automatic rinsing" option is set to "off", use the option "Rinse" in the left display to rinse the lines. See "Daily coffee system care".
^Press the left jog shuttle to turn the machine on.
COSI
K1 2 3 4 5 L o n G k C
The left display lights.
The right display shows briefly:
Please fill with fresh water
This is a reminder to fill the water tank with fresh water.
The next message shows:
Heating up -
Please wait
If the "Automatic rinsing" option is set to "on" (default setting) the next message shows:
Rinsing in progress - please wait
Water will run out of the coffee dispenser and a sound will be heard as the carousel aligns.
The right display shows:
ESPRESSO
q r s t
17
Making coffee
Prewarming the cups
Prewarming the cups allows the coffee to fully develop the flavor and aroma.
Use caution. Steam and hot water are very hot.
^Place a cup under the steam / hot water valve.
To prewarm with hot water
HOT WATER
K1 2 3 4 5 L o n G k C
^Turn the left jog shuttle to the "Hot water" option.
^Press the right jog shuttle and half fill the cup with hot water.
^Press the right jog shuttle again to stop the water from dispensing.
^Leave the cup for a few seconds to warm, then pour the water away.
To prewarm with steam
HEATING WITH STEAM
K1 2 3 4 5 L o n G k C
^Turn the left jog shuttle to the "Heating with steam" option.
^Press the steam lever down.
The steam supply is temporary. If the steam stops prematurely push the steam lever up then down again.
^Push the lever up to stop the steam from dispensing.
^Pour away any excess water.
18

Making coffee
Espresso and coffee
The flavor of the coffee depends on the coffee capsule and the quantity of water used. To ensure the machine uses exactly the amount of water to suit your taste and your cup size, there is a choice of four serving sizes for espresso / coffee.
Aside from the serving size, making coffee and espresso are done the same way.
^Place a cup under the coffee dispenser.
COSI
K1 2 3 4 5 L o n G k C
^Turn the left jog shuttle to the desired coffee type.
ESPRESSO
qr s t
^Turn the right jog shuttle to the desired coffee or espresso size.
qEspresso
rCoffee
sDouble espresso
tDouble coffee
When selecting a double coffee or espresso, two capsules will be dispensed one after another. You can set the water amount to your taste. See "Setting the serving sizes".
^Press the right jog shuttle to confirm and the drink will be dispensed.
Interrupting the brewing
^Press the right jog shuttle to interrupt the coffee dispensing immediately.
For coffee / espresso recipes see the "Coffee glossary".
19
Making coffee
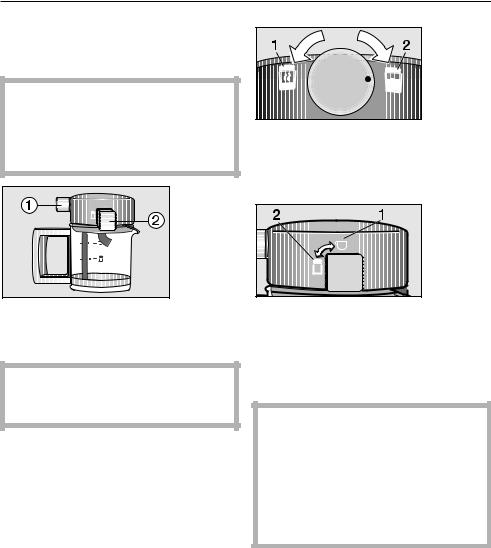
Cappuccinatore (milk froth mug)
A cappuccinatore (milk froth mug) is supplied with the appliance.
Before using the cappuccinatore for the first time, wash it either in the dishwasher or with hot water and liquid dish soap.
See "Common coffee system care".
The cappuccinatore has a valve, a, over the handle and a spout on its side, b.
Cold, whole milk is best for creating froth. The higher the fat content, the better the froth.
The steam is regulated by turning the valve:
1 Hot milk is prepared
2 Froth is prepared
^Turn the spout so that the black dot points to the respective symbol.
Milk is frothed 1 into the cup
2 into the cappuccinatore
When milk is frothed in the cappuccinatore the froth is hotter and has more volume.
When frothing milk into a cup while dispensing a coffee, the steam system must be turned on. See "Settings - Steam system".
20
Making coffee
Frothing milk into the cup
^Prewarm the cup before filling with froth.
^Fill the cappuccinatore to the upper "max" mark with cold milk.
^Turn the spout to the cup symbol.
^Turn the valve over the handle to the froth symbol.
^Place the cappuccinatore under the steam valve.
^Place a cup underneath the spout of the cappuccinatore.
^Press the steam lever, a, down and "connect" the valve with the cappuccinatore, b.
Ensure that the valve engages properly in the lower position.
Milk is frothed by the hot steam and dispensed into the cup.
^Turn the cappuccinatore valve to the right. Once the froth flows steadily, turn it to the left.
^Push the steam lever up when enough froth is prepared.
The steam supply is temporary. If the steam stops and there is not enough froth prepared, push the steam lever up then down again.
21
 Loading...