


Operating instructions
Rotary iron
B 890
It is essential to read these operating instructions before installing or using the machine, to prevent accidents,
and machine damage.
UV
M.-Nr. 05 319 321

Contents
Description of the appliance . . . . . . . . . . . . . . . . . . . . . . . . . . . . . . . . . . . . . . . . 3
IMPORTANT SAFETY INSTRUCTIONS . . . . . . . . . . . . . . . . . . . . . . . . . . . . . . . . . 5
Caring for the environment . . . . . . . . . . . . . . . . . . . . . . . . . . . . . . . . . . . . . . . . . . 7 Transport strut . . . . . . . . . . . . . . . . . . . . . . . . . . . . . . . . . . . . . . . . . . . . . . . . . . . . . 7
Moving the appliance. . . . . . . . . . . . . . . . . . . . . . . . . . . . . . . . . . . . . . . . . . . . . . . 8
Before using for the first time . . . . . . . . . . . . . . . . . . . . . . . . . . . . . . . . . . . . . . . 9 Power cord. . . . . . . . . . . . . . . . . . . . . . . . . . . . . . . . . . . . . . . . . . . . . . . . . . . . . . . . 9 Dust cover . . . . . . . . . . . . . . . . . . . . . . . . . . . . . . . . . . . . . . . . . . . . . . . . . . . . . . . . 9
Before ironing. . . . . . . . . . . . . . . . . . . . . . . . . . . . . . . . . . . . . . . . . . . . . . . . . . . . 10 Preparing the work area. . . . . . . . . . . . . . . . . . . . . . . . . . . . . . . . . . . . . . . . . . . . . 10 Preparing the laundry . . . . . . . . . . . . . . . . . . . . . . . . . . . . . . . . . . . . . . . . . . . . . . 11 Correct dampness . . . . . . . . . . . . . . . . . . . . . . . . . . . . . . . . . . . . . . . . . . . . . . 11 Pulling into shape and smoothing out . . . . . . . . . . . . . . . . . . . . . . . . . . . . . . . 11 Sorting . . . . . . . . . . . . . . . . . . . . . . . . . . . . . . . . . . . . . . . . . . . . . . . . . . . . . . . 11 Testing the finger guard . . . . . . . . . . . . . . . . . . . . . . . . . . . . . . . . . . . . . . . . . . . . . 12
Ironing . . . . . . . . . . . . . . . . . . . . . . . . . . . . . . . . . . . . . . . . . . . . . . . . . . . . . . . . . 13 Turning on and off . . . . . . . . . . . . . . . . . . . . . . . . . . . . . . . . . . . . . . . . . . . . . . . . . 13 Selecting the ironing temperature . . . . . . . . . . . . . . . . . . . . . . . . . . . . . . . . . . . . . 13 Selecting the roller speed . . . . . . . . . . . . . . . . . . . . . . . . . . . . . . . . . . . . . . . . . . . 14 Ironing . . . . . . . . . . . . . . . . . . . . . . . . . . . . . . . . . . . . . . . . . . . . . . . . . . . . . . . . . . 15 Positioning the laundry . . . . . . . . . . . . . . . . . . . . . . . . . . . . . . . . . . . . . . . . . . . . . 16 Removing the feed board . . . . . . . . . . . . . . . . . . . . . . . . . . . . . . . . . . . . . . . . . . . 16 After ironing . . . . . . . . . . . . . . . . . . . . . . . . . . . . . . . . . . . . . . . . . . . . . . . . . . . . . . 17 Power failure . . . . . . . . . . . . . . . . . . . . . . . . . . . . . . . . . . . . . . . . . . . . . . . . . . . . . 17
Tips on ironing . . . . . . . . . . . . . . . . . . . . . . . . . . . . . . . . . . . . . . . . . . . . . . . . . . . 18 Tea towels, hand towels, handkerchiefs etc. . . . . . . . . . . . . . . . . . . . . . . . . . . . . . 18 Sheets and bedspreads . . . . . . . . . . . . . . . . . . . . . . . . . . . . . . . . . . . . . . . . . . . . 18 Pillow cases . . . . . . . . . . . . . . . . . . . . . . . . . . . . . . . . . . . . . . . . . . . . . . . . . . . . . . 18 Table cloths . . . . . . . . . . . . . . . . . . . . . . . . . . . . . . . . . . . . . . . . . . . . . . . . . . . . . . 18 Duvet covers . . . . . . . . . . . . . . . . . . . . . . . . . . . . . . . . . . . . . . . . . . . . . . . . . . . . . 19 Shirts . . . . . . . . . . . . . . . . . . . . . . . . . . . . . . . . . . . . . . . . . . . . . . . . . . . . . . . . . . . 20 To press trousers . . . . . . . . . . . . . . . . . . . . . . . . . . . . . . . . . . . . . . . . . . . . . . . . . . 23 To press skirts . . . . . . . . . . . . . . . . . . . . . . . . . . . . . . . . . . . . . . . . . . . . . . . . . . . . 23
Maintenance and care . . . . . . . . . . . . . . . . . . . . . . . . . . . . . . . . . . . . . . . . . . . . . 24
After sales service . . . . . . . . . . . . . . . . . . . . . . . . . . . . . . . . . . . . . . . . . . . . . . . . 27
Electrical connection. . . . . . . . . . . . . . . . . . . . . . . . . . . . . . . . . . . . . . . . . . . . . . 28
Technical data . . . . . . . . . . . . . . . . . . . . . . . . . . . . . . . . . . . . . . . . . . . . . . . . . . . 29
2
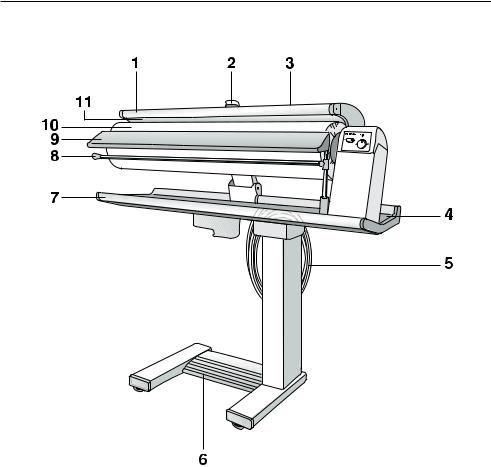
Description of the appliance
1 Finger guard plate |
7 Ironing table |
2 Temperature selector |
8 Bar for hanging ironed laundry |
3 Emergency release |
9 Feed board |
4 Release catch |
10 Roller |
5 Power cord |
11 Heater plate |
6 Foot pedal switch |
|
3
Description of the appliance
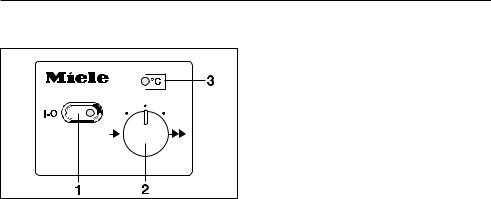
Control panel
1"I - 0" ("on/off") button
for turning the ironer on and off
2 Roller speed selector
3 Indicator light "oC Temperature"
4

IMPORTANT SAFETY INSTRUCTIONS
Read the operating instructions carefully before using this appliance for the first time. They contain important information about the safety, use and maintenance of the appliance. Please read this booklet carefully to prevent accidents and machine damage.
Keep these instructions in a safe place for reference, and pass them on to any future user.
Appropriate use
This rotary ironer is intended for ironing textiles suitable for machine
ironing and which have been washed in water.
Technical and electrical safety
Before setting up the rotary ironer, check for any externally visible
damage.
Do not install or use a damaged appliance.
A damaged appliance is dangerous. Turn off the rotary
ironer, unplug from the wall outlet and call the Miele Technical Service Department.
Before connecting the appliance, ensure that the connection data on
the data plate (fusing, voltage and frequency) match the household electricity supply. If in any doubt, consult an electrician.
The electrical safety of this appliance can only be guaranteed
when continuity exists between the appliance and an effective grounding system which complies with local and national safety regulations.
It is important that this basic safety requirement is tested by a qualified electrician.
The manufacturer can not be held responsible for the consequences of an inadequate grounding system.
This appliance is built in accordance with current safety
requirements. Unauthorized repairs could be hazardous for the user, for which the manufacturer can not accept responsibility. Repairs should only be by a Miele authorized technician. Ensure that power is not restored to the appliance while maintenance or repair work is performed.
Faulty components must only be replaced with Miele original spare
parts. Only when these parts are used can the safety of the appliance be guaranteed.
The appliance is only completely isolated from the electricity supply
when:
–it is turned off at the wall switch and unplugged
–the circuit breaker has been "tripped".
5

IMPORTANT SAFETY INSTRUCTIONS
Do not damage, remove or bypass the safety components or control
elements on the appliance.
Only operate the rotary ironer when all removable outer casings are
fitted so that it is not possible to touch any electrical component or moving part.
This equipment has not been designed for maritime use or for
use in mobile installations such as aircraft or recreational vehicles. However, under certain circumstances it may be possible for an installation in these applications. Please contact the nearest Miele Dealer or the Miele Technical Service Department with specific requirements.
Use
When the ironer is heated there is a danger of burns:
–if the heater plate is touched
–if the foot pedal is pressed down while fingers or hands are positioned between the raised roller and the heater plate to smooth an article.
Never drape items over the heater plate when it is heated.
This is a fire hazard. Hang laundry on the swing out bar.
The swing out bar is only to be used for hanging laundry. Swing it
back immediately after use. Take care not to press down on the bar when it is swung out this could tip the ironer over.
Turn the appliance off before removing the plug from the
electrical outlet.
Pull only on the plug and not on the power cord.
Do not lay the power cord over the heater plate when it is heated. This
could damage the cord - danger of electric shock.
Use the cable holders attached to the appliance to secure the cord.
In areas subject to infestation by cockroaches or other vermin, keep
the appliance and its surroundings clean at all times. Any damage caused by cockroaches or other vermin will not be covered by the appliance warranty.
Never allow children to play on or near the rotary ironer or to operate
it themselves.
Accessories
Accessory parts may only be used when expressly approved by Miele. If other parts are used, warranty, performance and product liability claims may be invalidated.
6
Caring for the environment
Disposal of the packing material
The transport and protective packing materials which are environmentally friendly for disposal and can normally be recycled. Rather than just throwing these materials away, please recycle.
Disposal of your old appliance
Old appliances contain materials which can be recycled. Please contact your local recycling center about potential recycling before disposing of the appliance.
Turn off and unplug the appliance from the outlet. Cut off and render any plug useless. Cut off the power cord directly behind the appliance to prevent misuse. This should be done by a competent person.
Ensure that the appliance presents no danger to children while waiting for disposal.
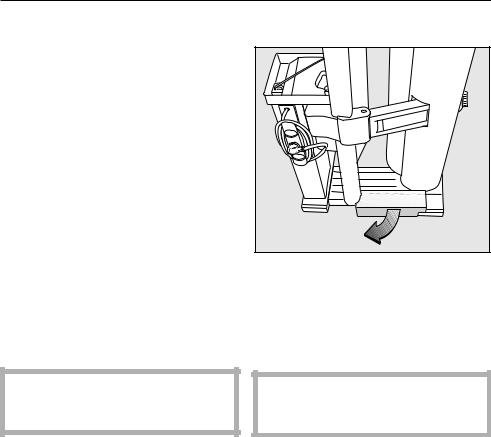
Transport strut
^Pull the transport strut out (see illustration).
Keep the transport strut in a safe place. It must be re-fitted if the appliance ever has to be moved again (e.g. when moving to a new home).
The rotary ironer may only be transported in a folded up position if the transport strut is in place.
7
Moving the appliance
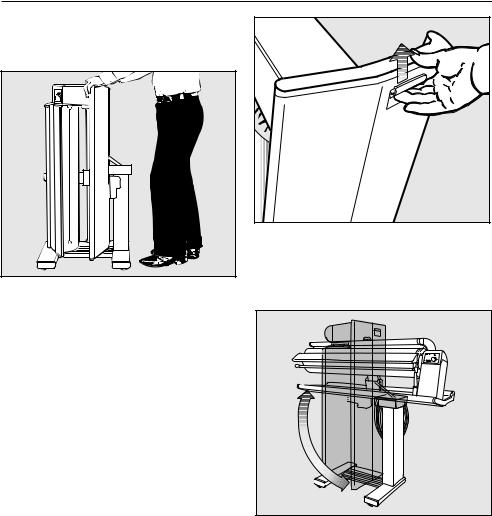
Moving the appliance
The rotary ironer has four rollers.
^Hold the ironer by the ironing table and push or pull to move it.
To overcome obstacles such as carpet edges and doorways but also to steer:
^ Tilt the appliance slightly.
The rotary ironer can be moved either when assembled or folded.
^Hold the ironing table and release the catch situated on the right hand side at the back underneath the ironing table.
^Swing the top section of the rotary ironer to the side until it clicks into position horizontally.
8
Before using for the first time
Power cord |
Dust cover |
|||||||||||
|
|
|
|
|
|
|
|
|
|
|
|
|
|
|
|
|
|
|
|
|
|
|
|
|
|
|
|
|
|
|
|
|
|
|
|
|
|
|
|
|
|
|
|
|
|
|
|
|
|
|
|
|
|
|
|
|
|
|
|
|
|
|
|
|
|
|
|
|
|
|
|
|
|
|
|
|
|
|
|
|
|
|
|
|
|
|
|
|
|
|
|
|
|
|
|
|
|
|
|
|
|
|
|
|
|
|
|
|
|
|
|
|
|
|
|
|
|
|
|
|
|
|
|
|
|
|
|
|
|
|
|
|
|
|
|
|
|
|
|
|
|
|
|
|
|
|
|
|
|
|
|
|
|
|
|
|
|
|
|
|
|
|
|
|
|
|
|
|
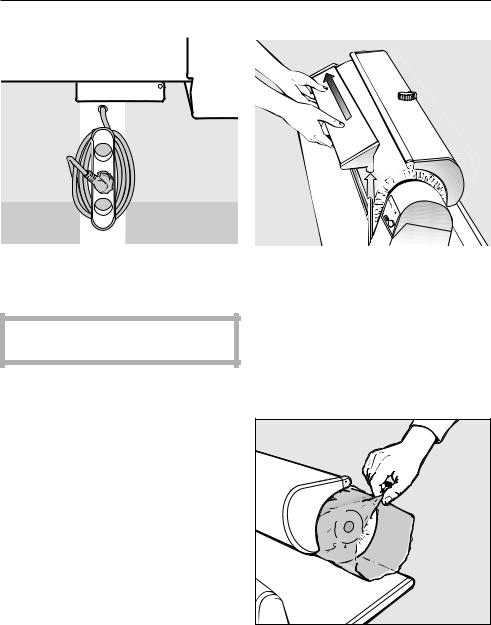
The power cord is wound around a hook underneath the ironing table.
^ Unwind the cord.
Do not insert the plug into the electrical socket yet.
* The plug shown is for illustration only.
The dust cover which protects the roller during transit must be removed.
^First remove the feed board by lifting it out of the right hand holder, then pull it out to the left of the roller.
Then plug the appliance in and turn it on. The heater plate will then rise automatically.
^The protective dust cover can now be pulled out and off.
9
Before ironing
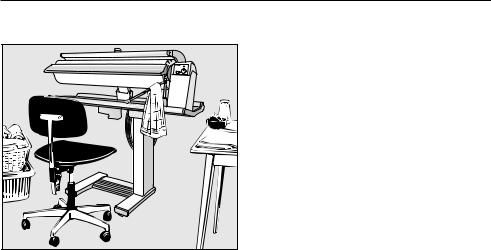
Preparing the work area
A height adjustable chair is useful and also a flat surface, e.g. a table, to lay ironed laundry on.
When positioning the rotary ironer horizontally be sure to secure the appliance so that it does not roll sideways.
Place close at hand:
–a basket with the laundry ready for ironing to the left of the rotary ironer,
–a surface for the ironed laundry to the right of the rotary ironer.
Shirts, overalls and blouses etc., should be hung on hangers immediately after ironing.
Small items can be hung over the swing out bar.
Have some water ready for redamping the laundry if necessary.
10
 Loading...