


INDICE |
|
Introduzione.......................................................................................... |
2 |
Descrizione comandi............................................................................. |
3 |
Installazione.......................................................................................... |
7 |
. Collegamento elettrico........................................................................ |
7 |
. Installazione dell’antenna................................................................... |
7 |
Uso dell’ALAN 48 EXCEL MULTI.......................................................... |
8 |
. Selezione bande di frequenza............................................................ |
8 |
. Tabella bande di frequenza................................................................ |
8 |
Caratteristiche tecniche......................................................................... |
9 |
I T A L I A N O
Informazione importante
Aggiornamenti sulle restrizioni nazionali:
Per poter utilizzare tale apparato in Belgio, Gran Bretagna, Spagna e Svizzera i residenti necessitano di una licenza individuale; coloro che provengono dall’estero invece, godono di libero uso per la FM, mentre per l’ AM devono essere in possesso della licenza del paese d’origine. Per gli stranieri che arrivano in Italia, è necessaria un’autorizzazione Italiana.
L’Austria invece non autorizza l’utilizzo di ricetrasmettitori CB multistandard (programmabili). Si consiglia di rispettare scrupolosamente questa direttiva e di non utilizzare l’apparato in territorio austriaco.
Lungo i confini di alcune zone della Germania, l’utilizzo come stazione base dal canale 41 all’80 non è ammesso. Rivolgersi all’ufficio notifiche locale per ulteriori dettagli. Aggiornamenti sulle restrizioni all’uso in vigore in Germania vengono costantemente pubblicati sul website ALAN-Albrecht www.alan-albrecht.info.
1

ALAN 48 EXCEL MULTI è un ricetrasmettitore veicolare la cui caratteristica principale è la possibilità di selezionare qualsiasi banda CB europea tramite una semplice ed immediata procedura. ALAN 48 EXCEL MULTI è inoltre dotato del dispositivo “ESP2” (soppressore dinamico dei disturbi) che permette di ridurre notevolmente i disturbi audio (fino al 95%) facilitando l’ascolto anche quando il segnale è disturbato.
L’ampio display multifunzionale permette la visualizzazione del numero del canale in uso o della frequenza corrispondente ed è retroilluminato per una comoda visualizzazione notturna. ALAN 48 EXCEL MULTI è dotato inoltre uno strumento S-Meter analogico per una comoda visualizzazione della potenza trasmessa e del segnale ricevuto e – novità assoluta – dispone anche di un riduttore interno di tensione che ne permette l’uso con doppia alimentazione, 13.2V e 24V.
L’apparato viene consegnato secondo la banda “EC“ CEPT 40CH FM 4W.
2

DESCRIZIONE COMANDI
1 |
7 |
3 |
6 |
5 |
4 |
|
|
|
|
|
|
CH |
|
|
|
|
|
|
|
|
|
VOL |
SQ |
|
|
|
|
|
|
|
|
|
|
|
|
|
01 |
|
3 |
5 7 9 |
30 |
|
|
|
|
|
17 |
|
0 |
|
2 |
3 5 10 |
|
|
|
|
|
18 |
|
|
|
POWER |
|
|
|
|
|
|
|||
|
|
|
|
|
|
|
|
|
|||
MIC |
|
|
|
|
F |
EMG |
LOW ESP |
LOCK DW |
SCAN |
MIC |
RF |
CB/PA |
|
|
|
|
|
|
|
|
|
||
|
TX |
RX AM |
FM |
|
|
|
|
|
|
||
|
|
|
|
|
|
|
|
|
|
|
16 |
|
FUNC |
|
|
M1 |
M2 |
M3 |
M4/LCR |
M5 |
N.K. |
|
15 |
|
|
|
EMG |
DW |
SCAN |
AM/FM |
LOCK |
|
|
||
2 |
8 |
|
9 |
10 |
11 |
12 |
13 |
14 |
|
|
|
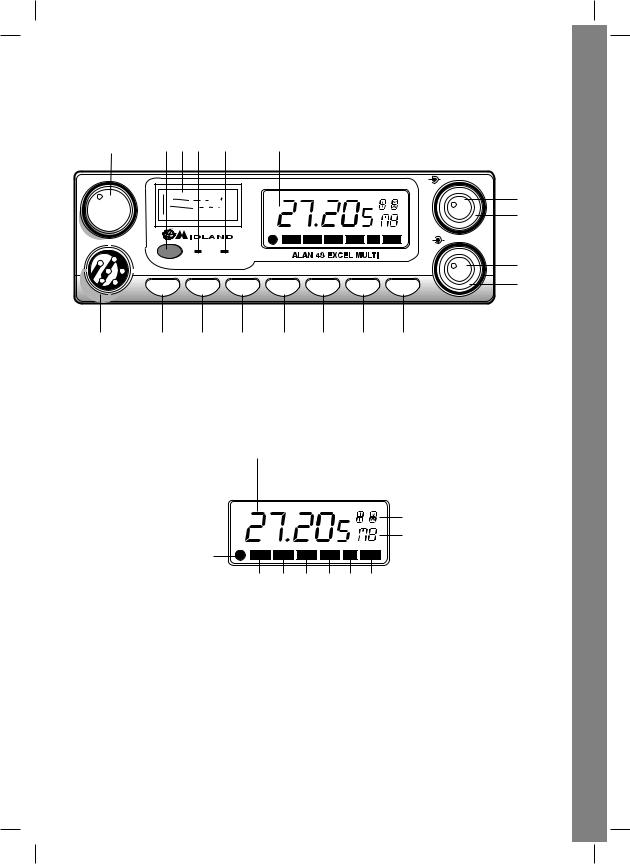
1.Selettore canali: permette la selezione manuale dei canali.
2.Presa microfono: inserire lo spinotto microfonico in questa presa.
3.Indicatore: questo strumento indica l’intensità dei segnali in ricezione e la potenza di uscita RF del trasmettitore.
4.Display retroilluminato multifunzione
a
i h
b |
F |
EMG LOW ESP LOCK DW SCAN |
e j c f d g
a.Numero canali selezionati (da 1 a 40) o frequenza corrispondente.
b.Attivazione tasto FUNC.
c.ESP: attivazione soppressore dinamico dei disturbi.
d.DW: funzione DUAL WATCH attivata
e.EMG: indicatore attivazione canale 9 / 19 o canale in uso
f.LOCK: indicatore funzione blocco tasti e selettori attivata
g.SCAN: indicatore funzione SCAN attivata
h.M1-M2-M3-M4-M5: indicatori memorie canali .
i.Indica la banda di frequenza selezionata.
j.Viene visualizzato quando la radio trasmette in bassa potenza (condizione che si verifica solo per determinate bande di frequenza – vedi tabella bande)
I T A L I A N O
3

5.Indicatore “AM/FM”
Indica il modo operativo. FM: LED rosso; AM: LED verde.
6.Indicatore “RX/TX”
Indicatore di ricezione / trasmissione. Posizione RX: LED verde; posizione TX: LED rosso.
7.Selettore “CB - PA”
Posizione “CB” : in questa posizione, l’apparato é attivo come ricetrasmettitore. Posizione “PA”: questo modo di funzionamento é possibile solo se viene collegato un altoparlante alla presa PA sul retro (scritta “PA” visualizzata sul display). In questo caso, il comando “MIC” viene usato come controllo dell’amplificazione.
8.Tasto FUNC
Questo tasto permette, a scelta dell’utente, di:
•visualizzare il canale o la frequenza operativa premendo “FUNC” per circa 3 secondi.
•attivare le seconde funzioni dei tasti “M” (M1/M5).
M1 / M2 / M3 / M4 / M5:
La radio ha la possibilità di memorizzare e di richiamare all’occorrenza 5 canali a piacimento precedentemente memorizzati. Per memorizzarne uno, procedere come segue:
A)Selezionare il canale che si desidera memorizzare tramite il selettore canali o i tasti “UP/DN” sul microfono;
B)Premere il tasto “FUNC”: il display mostrerà una “F”;
C)Tenere premuto per circa tre secondi il tasto “M1/EMG”: la radio emetterà un “BIP” e il display mostrerà la scritta “M1”.
Per memorizzare altri canali ripetere i punti A e B e selezionare una diversa memoria.
Per richiamare un canale precedentemente memorizzato premere il tasto “FUNC” e di seguito il tasto della memoria desiderata.
I tasti di memorizzazione canali hanno una doppia funzione; qui di seguito sono descritte le 2 modalità di funzionamento.
9.Pulsante “M1 - EMG”
Permette di memorizzare la memoria numero 1 e di richiamare i canali di emergenza. La pressione del tasto “M1/EMG” seleziona ciclicamente il canale 9, 19 ed il canale in uso.
10.Pulsante “M2 - DW”
Permette la memorizzazione della memoria numero 2 e l’attivazione della funzione DUAL WATCH, che consiste nel rimanere sintonizzati contemporaneamente su due canali a scelta dell’utente.
Con tale funzione si monitorizzerà ciclicamente un secondo canale. In presenza di un segnale sul secondo canale, la conversazione sul canale prescelto si interromperà e il ricevitore commuterà automaticamente sul secondo canale. Il monitoraggio riprenderà dopo 5 secondi dal cessare del segnale.
Per attivare questa funzione, operare come segue:
-Selezionare il canale desiderato mediante il selettore canali o i tasti “UP/DN” sul microfono;
-Premere il tasto “DW” per circa 3 secondi: la radio emetterà un “BIP” e sul display lampeggerà la scritta “DW”.
-Selezionare il secondo canale desiderato tramite il selettore canali o i tasti “UP/ DN” sul microfono;
4

-Premere nuovamente il tasto “DW” per 3 secondi circa: la radio emetterà un ‘BIP’, il display mostrerà la scritta “DW” permanente e visualizzerà alternativamente i due canali selezionati.
11.Pulsante “M3 - SCAN”
Tramite questo tasto, si memorizza la memoria numero 3 e si attiva la funzione “SCAN” (ricerca automatica di un canale occupato).
Per attivare questa funzione, operare come segue:
-selezionare un canale libero e ruotare la manopola dello squelch in senso orario in modo che il rumore di fondo scompaia;
-premere il tasto “M3/SCAN”: il display mostrerà la scritta “SCAN” ed il ricetrasmettitore scansionerà automaticamente e ripetutamente tutti i canali fino
a quando non troverà un canale in uso. |
|
|
La funzione “SCAN” può essere annullata in tre modi: premendo il tasto PTT, |
|
|
ruotando il selettore canali o premendo un qualsiasi tasto. |
|
|
12. Pulsante “M4/LCR - AM/FM” |
|
|
Questo tasto, permette la memorizzazione della memoria numero 4 e la selezione |
|
|
del modo operativo (AM/FM). Modo AM: spia 5 di colore verde; Modo FM: spia 5 di |
|
|
colore rosso. Se inoltre si seleziona una banda di frequenza che opera solamente |
|
|
la modalità FM, il tasto “AM/FM” attiva la funzione LCR (richiamo ultimo canale |
|
|
utilizzato). |
|
|
13. Pulsante “M5 - LOCK” |
|
|
Permette di memorizzare la memoria numero 5 e di attivare la funzione “LOCK” |
O |
|
(blocco tastiera, selettore canali e tasti “UP/DOWN” del microfono per evitare |
||
N |
||
accidentali pressioni dei tasti). |
||
A |
||
14. Tasto “N.K.” |
||
L I |
||
Tasto di attivazione del soppressore dinamico dei disturbi (Vedi introduzione). |
||
15. Manopola “MIC” |
T A |
|
L’amplificazione della voce in trasmissione va regolata tramite questa manopola. |
||
Il livello ottimale della modulazione va ricercato chiedendo conferma a chi riceve la |
I |
|
trasmissione. |
|
|
16. Manopola “RF” |
|
|
Controllo della sensibilità in ricezione. Ruotando la manopola in senso orario, si |
|
|
ottiene un aumento della sensibilità; ruotandola in senso antiorario, si ottiene una |
|
|
diminuzione della sensibilità. |
|
|
17. Manopola “VOL” |
|
|
Questa manopola permette l’accensione dell’apparecchio e la regolazione del |
|
|
volume al livello desiderato. |
|
|
18. Manopola “SQ” |
|
|
Permette la regolazione del livello di soglia della ricezione. Per la massima sensibilità |
|
|
del ricevitore, é preferibile che il comando sia regolato solo al preciso livello dove il |
|
|
rumore di fondo del ricevitore viene eliminato. |
|
5
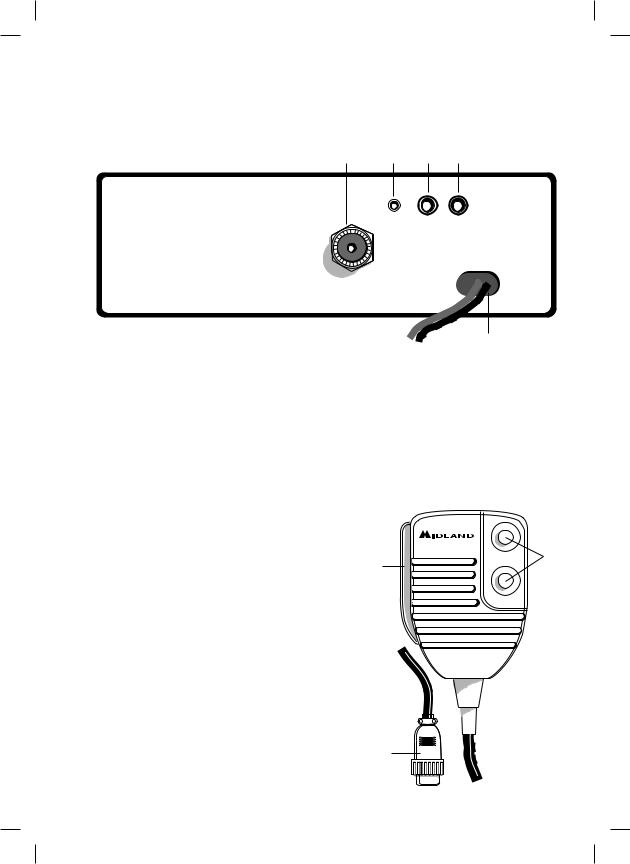
PANNELLO POSTERIORE
19 20 21 22
S-METER PA EXT
ANTENNA
19. Connettore antenna: è previsto il connettore SO 239. |
23 |
|
20.Presa S.METER: permette il collegamento di uno strumento esterno.
21.Presa PA: tramite il collegamento ad un altoparlante esterno, permette di utilizzare l’apparato come amplificatore audio.
22.Presa EXT: presa altoparlante esterno (questo collegamento esclude l’uso dell’alto parlante interno).
23.POWER 13.2 Vcc: presa di alimentazione.
MICROFONO
1. |
Pulsante di trasmissione. |
1 |
|
2. |
Pulsanti UP/DOWN:selezione canali verso |
|
|
|
l’alto (up) e verso il basso (DN). |
|
|
3. |
Connettore microfonico 6 pin. |
|
|
|
|
|
|
|
|
|
|
UP 2
DOWN
3
6

INSTALLAZIONE
Ricercare e localizzare, sul mezzo mobile, la posizione per installare l’apparato, utilizzando la staffa di supporto in dotazione. Tale posizionamento deve essere fatto in modo da non creare intralcio a chi guida, ma deve anche essere facilmente accessibile.
Praticare i fori (diametro di circa 3 mm.) nella carrozzeria per il fissaggio con le viti. Posizionare l’apparato nella staffa di fissaggio. Controllare che le viti siano ben serrate, in considerazione delle notevoli e vibrazioni create dal mezzo mobile.
COLLEGAMENTO ELETTRICO
Prima di procedere in questa operazione, controllare che il ricetrasmettitore sia spento (manopola del volume completamente girata a sinistra, dopo lo scatto).
L’apparato é dotato di un cavetto di alimentazione bicolore con un portafusibile inserito sul cavo rosso (positivo). Nel collegamento, è molto importante rispettare la polarità anche se l’apparato é protetto contro l’inversione accidentale. Di norma si identifica il polo positivo con il colore rosso o con il segno ‘’+’’, e il polo negativo con il colore nero o con il segno “-”.
Gli stessi segni (o colori) identificativi li troveremo sulla batteria (accumulatore od altro) e nella scatola dei fusibili dell’automobile. Si raccomanda di collegare in modo corretto e stabile i terminali del cavetto alla batteria.
ATTENZIONE
Per l’ottimizzazione delle prestazioni si consiglia l’installazione dell’apparecchiatura in luoghi che possano consentire un sufficiente riciclo d’aria.
INSTALLAZIONE DELL’ ANTENNA
Informazioni utili :
1)Installare l’antenna nella parte più alta del veicolo.
2)Maggiore é la lunghezza dell’ antenna, migliore sarà il suo rendimento.
3)Se possibile, installare l’antenna al centro della superficie metallica scelta.
4)Tenere il cavo dell’ antenna lontano da fonti di disturbi elettrici.
5)Assicurarsi di avere una buona massa.
6)Evitare danni ai cavi.
Attenzione: non usare mai la radio CB senza aver installato un’antenna appropriata per non correre il rischio di danneggiare il trasmettitore; per la stessa ragione con trollare periodicamente il ROS.
I T A L I A N O
7

USO DELL’ ALAN 48 EXCEL MULTI
Dopo aver installato il vostro CB e la vostra antenna, seguire attentamente le istruzioni qui sotto riportate per ottenere un funzionamento soddisfacente del vostro apparato.
1)Avvitare la spina nella presa del microfono sul pannello.
2)Assicurarsi che l’antenna sia collegata al connettore dell’ antenna.
3)Assicurarsi che il comando di squelch sia completamente ruotato verso sinistra.
4)Accendere l’apparato e regolare il comando del volume per un buon livello sonoro.
5)Selezionare il canale desiderato, tramite il selettore canali o i tasti “UP / DOWN” del microfono.
6)Per trasmettere, premere il pulsante di trasmissione PTT sul microfono.
7)Per ricevere, rilasciarlo.
SELEZIONE BANDE DI FREQUENZA
La scelta delle bande di frequenza deve essere eseguita a seconda del paese nel quale si intende operare.
Procedimento:
1.Spegnere la radio.
2.Accendere l’apparecchio premendo il tasto “N.K.”.
3.Ruotare la manopola “CHANNEL” e selezionare la banda di frequenza desiderata (vedi tabella bande).
4.Premere il tasto “LOCK” per terminare la selezione.
NOTA: Se si seleziona una banda di frequenza che opera solamente la modalità FM, il tasto “AM/FM” attiva la funzione LCR (richiamo ultimo canale selezionato).
NOTA: Nella banda di frequenza UK, è possibile selezionare direttamente la banda
EC premendo il tasto “LCR-A/F” per 2 secondi circa.
|
TABELLA BANDE DI FREQUENZA |
Sigla sul display |
Paese |
|
|
I |
Italia 40 CH AM/FM 4Watt |
|
|
I2 |
Italia 34 CH AM/FM 4Watt |
|
|
D |
Germania 80 CH FM 4Watt / 12 CH AM 1 Watt |
|
|
D2 |
Germania 40 CH FM 4Watt / 12 CH AM 1 Watt |
D3 |
Germania 80 CH FM 4Watt / 40 CH AM 1 Watt |
EU |
Europa 40 CH FM 4Watt / 40 CH AM 1 Watt |
EC |
CEPT 40 CH FM 4Watt |
|
|
E |
Spagna 40 CH AM/FM 4Watt |
|
|
F |
Francia 40 CH FM 4Watt / 40 CH AM 1 Watt |
|
|
PL |
Polonia 40 CH AM/FM 4W |
|
|
UK |
Inghilterra 40 CH FM 4Watt frequenze inglesi + |
|
+ EC 40 CH FM 4Watt frequenze CEPT |
ATTENZIONE:
Lo standard sicuramente riconosciuto in tutti i paesi europei è 40CH FM 4W (EC)
–Vedi tabella “Restrizioni all’uso”
8

CARATTERISTICHE TECNICHE
Generali
Canali.................................................................................... |
40 FM (vedi tabella bande) |
Gamma di frequenza.................................................................. |
26.565 - 27.99125 MHz |
Controllo di frequenza ............................................................................................ |
a PLL |
Temperatura................................................................................................. |
-10° / +55°C |
Tensione di alimentazione .................................................................. |
13.2/24 Vcc ±15% |
Dimensione........................................................................... |
150(L) x 45(A) x 175(P)mm |
Peso......................................................................................................................... |
1 Kg. |
Ricevitore
Sistema ricevente................................................. |
Supereterodina a doppia conversione |
Frequenza intermedia........................................................................... |
I° IF:10.695 MHz |
................................................................................................................... |
II° IF:455 KHz |
Sensibilità.......................................................................... |
0.5 V per 20dB SINAD in FM |
.......................................................................................... |
0.5 V per 20dB SINAD in AM |
Potenza d‘ uscita audio @10% THD...................................................... |
2.0 W @ 8 Ohm |
Distorsione audio........................................................................ |
Meno dell‘ 8% @ 1KHz |
Reiezione alle immagini.......................................................................................... |
65 dB |
Selettività sul canale............................................................................................... |
65 dB |
Rapporto segnale disturbo...................................................................................... |
45 dB |
Assorbimento all’ attesa ............................................................................ |
13.2V: 450mA |
..................................................................................................................... |
24V: 520 mA |
Trasmettitore
Potenza d’uscita .............................................. |
duty cycle 10% 4W AM/FM @ 13.2 Vcc |
Modulazione....................................................................................... |
AM:da 85% a 95% |
..................................................................................................... |
FM:1,8 KHz ± 0,2 KHz |
Frequenza di risposta.............................................................................. |
400 Hz ÷ 3 KHz |
Impedenza d’ uscita..................................................................... |
RF 50 Ohm sbilanciato |
Rapporto segnale disturbo.............................................................................. |
40 dB MIN |
Corrente assorbita .................................. |
13.2V: 1300mA (potenza senza modulazione) |
................................................................... |
24V: 1600mA (potenza senza modulazione) |
Le specifiche sono soggette a variazione senza preavviso.
I T A L I A N O
9

INDEX |
|
Introduction........................................................................................... |
2 |
Function and location of the controls.................................................... |
3 |
Installation............................................................................................. |
7 |
. Power supply...................................................................................... |
7 |
. Installing an antenna.......................................................................... |
7 |
How to use your ALAN 48 EXCEL MULTI............................................. |
8 |
. Frequency band selection.................................................................. |
8 |
. Frequency band chart........................................................................ |
8 |
Specifications........................................................................................ |
9 |
E N G L I S H
Important Note
Following national regulations have been modified:
Residents of Belgium, Great Britain, Spain and Switzerland need a CB licence in their countries, while visitors may use their CB radios in FM free of licence, for AM they should be able to present their homecountry’s licence document. In Italy, even visitors need a valid Italian authorization.
Austria does not accept any multi-standard or programmable CB radio. Please respect this requirement and do not use Your radio during driving through Austria.
In Germany transmitting as a base station on channels 41-80 is restricted in some areas along the country borders. No restrictions apply for mobile use. More details can be obtained from the local RegTP authority office.
Changes in European or national regulations will be published on the service website of ALAN-Albrecht under www.alan-albrecht.info
1

ALAN 48 EXCEL MULTI is a mobile transceiver whose main feature is the possibility to select any of the European CB bands with an easy and quick operation. ALAN 48 EXCEL MULTI is equipped with the “ESP2” (noise reducer device) that reduces considerably the audio noises up to 95%, allowing a clear communication even when the signal is disturbed.
The wide multifunctional backlit display shows the number of the channel in use or the correspondent frequency even in conditions of deep darkness. ALAN 48 EXCEL MULTI is also equipped with an analogical S-Meter, showing the transmitted power and the signal received, and with the exclusive internal voltage reducer allowing the use with 12V or
24V power supply.
The unit is preset at the factory on the “EC“band , CEPT 40CH FM 4W.
2
FUNCTION AND LOCATION OF THE CONTROLS
FRONT PANEL
1 |
7 |
3 |
6 |
5 |
4 |
|
|
|
|
|
|
CH |
|
|
|
|
|
|
|
|
|
VOL |
SQ |
|
|
|
|
|
|
|
|
|
|
|
|
|
01 |
|
3 |
5 7 9 |
30 |
|
|
|
|
|
17 |
|
0 |
|
2 |
3 5 10 |
|
|
|
|
|
18 |
|
|
|
POWER |
|
|
|
|
|
|
|||
|
|
|
|
|
|
|
|
|
|||
MIC |
|
|
|
|
F |
EMG |
LOW ESP |
LOCK DW |
SCAN |
MIC |
RF |
CB/PA |
|
|
|
|
|
|
|
|
|
||
|
TX |
RX AM |
FM |
|
|
|
|
|
|
||
|
|
|
|
|
|
|
|
|
|
|
16 |
|
FUNC |
|
|
M1 |
M2 |
M3 |
M4/LCR |
M5 |
N.K. |
|
15 |
|
|
|
EMG |
DW |
SCAN |
AM/FM |
LOCK |
|
|
||
2 |
8 |
|
9 |
10 |
11 |
12 |
13 |
14 |
|
|
|
1.Channel selector: it permits the manual channel selection.
2.Microphone jack: insert the mic connector into this jack.
3.Indicator: this meter indicates the receiving signal strength and the transmitter RF output power.
4.Multifunction backlighted display.
a
i h
b |
F |
EMG LOW ESP LOCK DW SCAN |
|
e j c f d g
It shows:
a.channel selected number (from 1 up 40) or operative frequency
b.FUNC button activated
c.ESP: reducing noise device activated
d.DW: Dual Watch function activated
e.EMG: indicates channel being used or when the emergency channels are activated
f.LOCK: keyboard lock function activated
g.SCAN function activated
h.M1-M2-M3-M4-M5: memory channel indicator
i.Indicates the frequency band selected.
j.It appears when the radio transmits in low power (this condition happens only in certain frequency bands – see the chart at the end of this manual).
E N G L I S H
3

5. “AM/FM” Indicator
It indicates the operative mode. FM: red LED; AM: green LED. 6. “RX/TX” Indicator
LED indicating receiving or trasmitting mode. RX: green LED; TX: red LED. 7. “CB/PA” Selector
In the “CB” position, the unit operates as a transceiver. You can use the PA (public address) function only if you connect a speaker to the PA jack (“PA” visualized on the display). In this case the “MIC” knob controls the amplification level.
8.FUNC button
With the SCAN button, you can:
•visualize the operative frequency (if you keep pressing the button for 3 seconds approx.), or the channel in use;
•activate the second functions of the “M” (M1/M5) buttons.
M1 / M2 / M3 / M4 / M5:
ALAN 48 EXCEL has the possibility to store and to recall, when necessary, 5 channels previously memorized.
To memorize one channel, follow the procedure herebelow:
A)Select the channel with the appropriate selector or the “UP/DN” buttons on the microphone;
B)Push the “FUNC” button: the display will show “F”;
C)Keep pressing the “M1/EMG” button for 3 seconds: you will hear a “BIP” and the display will show “M1”.
To memorize the other preset, repeat these steps and select another memory different from 1.
To recall a channel previously stored, push the “FUNC” switch and the button of the desired memory.
These buttons have two functions; herebelow you will find their descriptions:
9.“M1 - EMG” switch
This switch allows the storing of the first memory and the recalling of the 2 emergency channels. “M1 - EMG” selects sequentially channels 9 / 19 (emergency) and the one in use.
10.“M2 - DW” button
“M2 - DW” stores the chosen channel in the M2 memory and activates the DUAL WATCH. This function allows the synthonization on two different channels at the same time:
when a signal on the second channel is received, the conversation on the first one is automatically interrupted and the receiver switches on the second channel. The monitoring starts again 5 seconds after the signal end.
To activate this function, operate as follows:
-Select the desired channel through the channel selector or the “UP/DOWN” buttons on the microphone;
-Keep the “DW” button pressed for about 3 seconds: you will hear a “BIP” and “DW” will flash on the display.
-Select the second channel with the same procedure;
-Press the button “DW” again for roughly 3 seconds: you will hear another “BIP”; the display will permanently show “DW” and will alternatively visualize the two selected channels.
11.“M3 - SCAN” switch
The two functions of this button are: memorization of the third channel in the M3
4

|
memory and “SCAN” function activation. In this case, you can automatically seek |
|
|
for a busy channel: |
|
|
• turn the squelch clockwise until the background noise is no longer heard; |
|
|
• press the “M3 - SCAN” button: “SCAN” will be shown on the display and the |
|
|
transceiver will automatically scan all the channels until a carrier is being |
|
|
received. |
|
|
This function can be deactivated in three ways: pressing the PTT button, turning the |
|
|
channel selector or simply pushing any other button on the unit. |
|
12. |
“M4/LCR - AM/FM” button |
|
|
Stores the memory number 4 and selects the operative mode (AM/FM). AM: green |
|
|
LED; FM: red LED. If you select a frequency band operating in FM modulation only, |
|
|
this button activates the LCR function (Last Channel Recall). |
|
13. |
“M5 - LOCK” switch |
|
|
Pressing this button, you memorize the fifth (last) memory and activate the “LOCK” |
|
|
function (it allows the locking of the keyboard, channel selector and “UP/DN” buttons |
|
|
on the microphone, thus avoiding accidental use of the keys). |
|
14. N.K. button |
|
|
|
Pressing this switch, you activate the reducing noise device (see introduction). |
|
15. |
“MIC” knob |
|
|
The amplification of the voice in TX must be adjusted with this knob. The optimum |
|
|
level of the modulation must be found with the help of your receiving partner. |
|
16. “RF” knob |
H |
|
|
It controls the reception sensitivity. |
|
|
I S |
|
|
To increase sensitivity, simply turn it clockwise. Sensitivity decreases turning it |
|
|
counterclockwise. |
L |
17. |
“VOL” knob |
G |
|
It allows the switching on of the unit and sets the volume to a comfortable audio |
N |
|
level. |
E |
18. |
“Squelch” knob |
|
For the maximum receiver sensitivity, the control must be regulated exactly where the receiver background noise disappears.
5
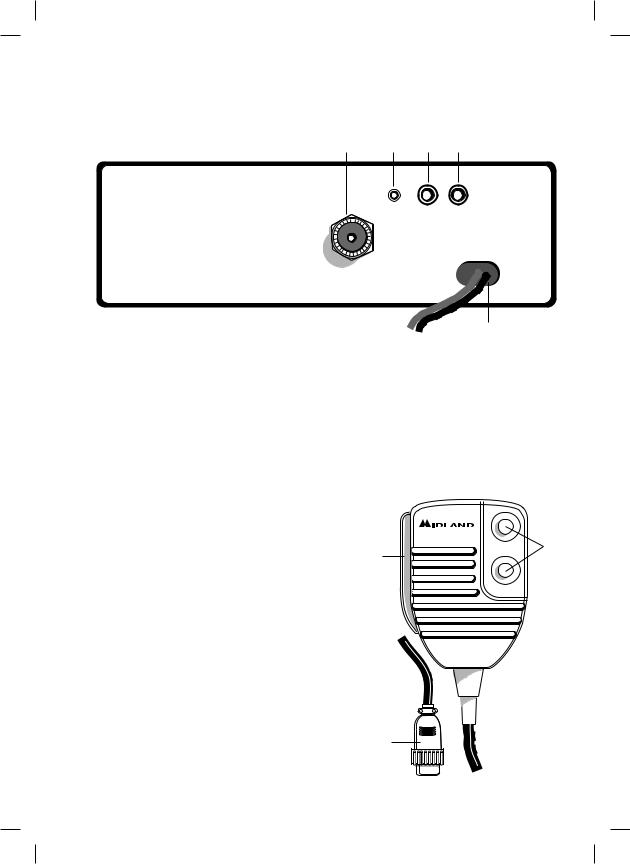
REAR PANEL
19 20 21 22
S-METER PA EXT
ANTENNA
19. Antenna connector (SO239 connector type). |
23 |
|
20.S.Meter jack: it allows an external “s meter” connection.
21.“PA” jack: by connecting with an external loudspeaker, you can use the unit as an audio-amplifier.
22.”EXT” jack: external loudspeaker jack (the internal loudspeaker is excluded).
23.Power 13.2 Vdc: power supply cable.
MICROPHONE |
1 |
|
1.PTT: transmission button
2.UP/DOWN buttons: manual channels selector.
3.6 pin microphone connector.
UP 2
DOWN
3
6

INSTALLATION
Safety and convenience are the primary consideration for mounting any piece of mobile equipment. All controls must be readily available to the operator without interfering with the movements necessary for safe operation of the vehicle. Set the proper position in the car to install the transceiver using the supplied supporting bracket or eventually the slide bracket. Tighten the retaining screws. The fixing bracket must be close to metallic parts.
POWER SUPPLY
Be sure the transceiver is off. In the direct-voltage power supply, to observe the polarity is very important, even if the unit is protected against the accidental inversion:
Red = positive pole (+) Black = negative pole (-)
The same colors are present on the battery and in the fuse box of the car. Connect correctly the cable terminal to the battery.
ATTENTION
To obtain best performances we recommend to install the radio in a place with enough air circulation.
INSTALLING AN ANTENNA
1.Place the antenna as high as possible.
2.The longer is the antenna, the better will be the performance.
3.If possible, mount the antenna in the center of whatever surface you choose.
4.Keep the antenna cable away from noise sources, such as the ignition switch, gauges,etc.
5.Make sure you have a solid metal-to-metal ground connection.
6.Prevent cable damage during antenna installation.
WARNING. to avoid damage, never operate your CB radio without connecting a proper antenna. A periodical control of the SWR is recommended.
E N G L I S H
7

HOW TO OPERATE WITH YOUR
ALAN 48 EXCEL MULTI
1.Screw the microphone plug into the microphone jack.
2.Make sure your antenna is securely connected to the antenna connector.
3.Make sure the SQUELCH control is turned fully conterclockwise.
4.Turn on the unit and adjust the volume control.
5.Select your desired channel through the “UP/DN” buttons on the microphone.
6.To transmit, press the PTT button and speak with a normal tone of voice.
7.To receive, release the PTT button.
FREQUENCY BAND SELECTION
The frequency bands must be chosen according to the country you are in. Procedure:
1.Switch off the unit.
2.Turn it on while pushing the “N.K.” button.
3.Rotate the “CHANNEL” knob and select the desired frequency band (see the chart here below).
4.To fix your selection, press the “LOCK” button.
NOTE: If you select a frequency band which operates in FM mode only, the “AM/ FM” control activates the LCR function (Last Channel Recall).
NOTE: In the UK frequency band, you can select directly the EC band by pushing the “LCR-A/F” control for about 2 seconds.
FREQUENCY BAND CHART
Displayed digits |
Country |
I |
Italy 40 CH AM/FM 4Watt |
|
|
I2 |
Italy 34 CH AM/FM 4Watt |
|
|
D |
Germany 80 CH FM 4Watt / 12 CH AM 1 Watt |
|
|
D2 |
Germany 40 CH FM 4Watt / 12 CH AM 1 Watt |
|
|
D3 |
Germany 80 CH FM 4Watt / 40 CH AM 1 Watt |
EU |
Europe 40 CH FM 4Watt / 40 CH AM 1 Watt |
EC |
CEPT 40 CH FM 4Watt |
E |
Spain 40 CH AM/FM 4Watt |
F |
France 40 CH FM 4Watt / 40 CH AM 1 Watt |
|
|
PL |
Poland 40 CH AM/FM 4Watt |
|
|
UK |
England 40 CH FM 4Watt English frequencies + |
|
+ EC 40 CH FM 4Watt CEPT frequencies |
ATTENTION!
The frequency band allowed all over Europe is 40CH FM 4W (EC) – See the “Restrictions on the use” table.
8

SPECIFICATIONS
GENERAL
Channels .......................................................... |
40 FM (see the Frequency band chart) |
Frequency Range ...................................................................... |
26.565 - 27.99125 MHz |
Frequency Control .................................................................................................... |
PLL |
Operating Temperature Range...................................................................... |
-10°/+55° C |
DC input voltage ................................................................................ |
13.2/24 Vdc ±15% |
Size...................................................................................... |
150(L) x 45(H) x 175(D)mm |
Weight........................................................................................................................ |
1Kg |
RECEIVER
Receiving system....................................................... |
Dual conversion superheterodyne |
Intermediate frequency ................................................. |
I°IF:10.695 MHz II°IF:455 KHz |
Sensitivity.................................................................... |
0.5µV for 20dB SINAD in AM/FM |
Audio output power @10% THD............................................................ |
2.0 W @ 8 Ohm |
Audio distortion............................................................................ |
Less than 8% @ 1KHz |
Image rejection........................................................................................................ |
65dB |
Adjacent channel rejection...................................................................................... |
65dB |
Signal/Noise ratio.................................................................................................... |
45dB |
Current drain at stand/by.......................................................................... |
13.2V: 450mA |
..................................................................................................................... |
24V: 520mA |
TRANSMITTER
Output power . ................................................... |
duty cycle 10% 4W AM/FM @ 13.2 Vdc |
Modulation . ..................................................................................... |
FM:1.8KHz ± 0.2khz |
.............................................................................................................. |
AM: 85% to 95% |
Frequency response ............................................................................... |
400 Hz ÷ 3 KHz |
Output impedance . ................................................................... |
RF 50 Ohm unbalanced |
Signal/Noise Ratio .......................................................................................... |
40 dB MIN |
Current drain ......................................................... |
13.2V: 1300 mA (without modulation) |
.................................................................................. |
24V: 1600mA (without modulation) |
All specifications are subject to change without notice.
E N G L I S H
9

Inhaltsverzeichnis |
|
Einleitung.............................................................................................. |
2 |
Beschreibung der Bedienelemente....................................................... |
3 |
Einbau im Kraftfahrzeug........................................................................ |
7 |
. Anschluss an die Spannungsversorgung........................................... |
7 |
. Montage der Antenne......................................................................... |
7 |
Bedienung des ALAN 48 EXCEL MULTI............................................... |
8 |
Auswahl der Frequenzbänder............................................................... |
8 |
Frequenzbandtabelle............................................................................ |
8 |
Technische Daten.................................................................................. |
9 |
D E U T S C H
Wichtige Hinweise zur Bedienungsanleitung
Bitte beachten Sie folgende Änderung bei den nationalen Besonderheiten: Bewohner von Belgien, Großbritannien, Spanien und der Schweiz benötigen für den CB-Funk eine anmeldeund gebührenpflichtige Genehmigung (Lizenz), während Besucher aus anderen Ländern auf Reisen ihre CB Geräte in diesen Ländern jedoch in FM frei benutzen dürfen, fürAM sollte die Heimatgenehmigung (falls im Heimatland noch erforderlich) mitgenommen werden.
In Italien brauchen auch Besucher eine gültige italienische Genehmigung!
In Österreich ist die Benutzung von Multi-Standard CB-Funkgeräten (umschaltbare CB-Geräte) leider nicht gestattet. Wir empfehlen Ihnen dringend, das Funkgerät bei der Fahrt durch Österreich ausgeschaltet zu lassen.
In Deutschland ist der Sendebetrieb auf den Kanälen 41 bis 80 in bestimmten
Regionen entlang der meisten Grenzen zu den Nachbarländern bei ortsfestem Betrieb nicht oder nur mit Sondergenehmigung erlaubt. Nähere Informationen erhalten Sie bei den Anmeldestellen der Regulierungsbehörde RegTP.
Über Änderungen bei den europäischen oder nationalen CB-Bestimmungen informierten wir Sie im Bedarfsfalle auf unserer Service-Webseite unter www.alan-albrecht.info
1

Das ALAN 48 EXCEL MULTI ist ein vielseitiges CB-Mobilfunkgerät, das sich insbesondere durch die Frequenzbandwahl und das integrierte aktive Rauschunterdrückungssystem ESP II hervorhebt. Durch eine einfache Tastenkombination kann das Gerät bei einer Auslandsreise auf die entsprechende Landesnorm umgeschaltet werden. Die Funktion des ESP II beruht auf einen optimierten Sprachfrequenzfilter, der sich automatisch in Abhängigkeit des empfangenden Sprachsignals einbzw. ausschaltet. Im eingeschalteten Zustand werden die stark störenden Rauschanteile eliminiert und speziell die Sprachfrequenzen bevorzugt. Das große Multifunktions-LC-Display mit Hintergrundbeleuchtung ist zu jeder Tagesund Nachtzeit gut ablesbar und gibt Auskunft über alle Betriebsparameter, wie z.B. Kanaloder Frequenzanzeige. Das integrierte analoge S-Meter zeigt die Intensität der eingehenden Signale und die Sendeleistung an. Eine absolute Neuheit ist der integrierte, automatischen Spannungsregler, der den Anschluss an 1224 V Stromversorgung ohne weiteres Zubehör erlaubt.
Ab Werk wird das Gerät auf dem Frequenzband „EC“ CEPT 40 Kanäle FM, 4 W eingestellt.
2

Beschreibung der Bedienelemente
1 |
7 |
3 |
6 |
5 |
4 |
|
|
|
|
|
|
CH |
|
|
|
|
|
|
|
|
|
VOL |
SQ |
|
|
|
|
|
|
|
|
|
|
|
|
|
01 |
|
3 |
5 7 9 |
30 |
|
|
|
|
|
17 |
|
0 |
|
2 |
3 5 10 |
|
|
|
|
|
18 |
|
|
|
POWER |
|
|
|
|
|
|
|||
|
|
|
|
|
|
|
|
|
|||
MIC |
|
|
|
|
F |
EMG |
LOW ESP |
LOCK DW |
SCAN |
MIC |
RF |
CB/PA |
|
|
|
|
|
|
|
|
|
||
|
TX |
RX AM |
FM |
|
|
|
|
|
|
||
|
|
|
|
|
|
|
|
|
|
|
16 |
|
FUNC |
|
|
M1 |
M2 |
M3 |
M4/LCR |
M5 |
N.K. |
|
15 |
|
|
|
EMG |
DW |
SCAN |
AM/FM |
LOCK |
|
|
||
2 |
8 |
|
9 |
10 |
11 |
12 |
13 |
14 |
|
|
|
1.Kanalwahlschalter: mit diesem Schalter lassen sich alle Kanäle einstellen.
2.Mikrofonbuchse: hier wird das Mikrofon angeschlossen.
3.S-Meter-Anzeige: zeigt die Intensität der eingehenden Signale sowie die Sendeleistung an.
4.Multifunktions-Display mit Hintergrundbeleuchtung
a
i h
b |
F |
EMG LOW ESP LOCK DW SCAN |
|
e j c f d g
a.Kanal- (von 1 bis 40) oder Frequenzanzeige.
b.F:Funktionstaste aktiviert.
c.ESP: Rauschunterdrückung aktiviert.
d.DW: Zweikanalüberwachung (DUAL WATCH) aktiviert
e.EMG: Direktschaltung auf Kanal 9 / 19 oder dem aktuell eingestellten Kanal
f.LOCK: Mikrofon-Tastaturverriegelung (UP/DOWN) aktiviert.
g.SCAN: Kanalsuchlauf aktiviert
h.M1-M2-M3-M4-M5: Kanalspeicheranzeige .
i.Anzeige des gewählten Frequenzbandes.
l.erscheint, wenn das Funkgerät auf niedrige Sendeleistung schaltet (betrifft nur bestimmte Frequenzbänder – siehe Frequenzbandtabelle im Anhang)
5.“AM/FM”-Anzeige
Zeigt die eingestellte Betriebsart an. FM: rote LED ; AM: grüne LED.
D E U T S C H
3
 Loading...