


ÿRicetrasmettitore CB ÿ CB Transceiver ÿ CB Funkgerät ÿ Transceptor CB
ÿEmetteur-récepteur CB ÿ Radio CB ÿ Radiotelefon CB ÿ Statie Radio CB
Alan 42 Multi
”G U I DA A L L‘ U S O
”I N ST R U C T I O N G U I D E
”B E D I E N U N G S A N L E I T U N G
”M A N UA L D E I N ST R U CC I O N E S
”G U I D E D ' U T I L I S AT I O N
”M A N UA L D E I N ST R U ÇÕ E S
”I N ST R U KC J A O B S L U G I
”M A N UA L D E U T I L I Z A R E

Italia - Restrizioni all’uso - In conformità al Piano Nazionale di ripartizione delle Frequenze, pubblicato sulla G.U. n. 169 -Supplemento Ordinario 146 - del 20 luglio 2002 - nota 49G -, per lo standard  in AM occorre utilizzare un sistema radiante che abbia il guadagno complessivo non superiore a -6 dB (es.: con antenna PC8 con cavo originale).
Italy - Restrictions on the use - According to the Italian Frequency Allocation Table, issued on the G.U. No. 169 - Supplement 146 - of 20th July 2002 - note 49G, the standard  in AM modulation needs a radiating system with a gain not higher than -6dB, such as, for example, with the antenna “PC8” with original cable.
Italie - Restrictions à l’usage - Conformément au Tableau National de répartition des bandes de fréquences publié sur la G.U. n. 169, Supplément 146 - du 20 Juillet 2002 – note 49G -, pour le standard  in modulation AM il faut utiliser un système radiante avec un gain pas supérieur à –6dB (par exemple, avec l’antenne PC8 avec câble original).
Italien - Nutzungshinweis - Entsprechend der Italienischen Frequenzverteilungstabelle, herausgegeben in G.U,. No. 169, Anhang 146 vom 20. Juli 2002, Note 49 G, darf bei Standard  in AM Modulation nur ein Antennensystem von nicht mehr als -6dB Gewinn benutzt werden, wie z.B. der Antennentyp “ PG 8 “ mit Originalkabel
Italia - Restricciones al uso - De acuerdo con el Piano Nazionale di Ripartizione delle Frequenze, publicado en la G.U. n° 169 - Supplemento Ordinario 146 - del 20 de julio de 2002 - nota 49G - , por el estándar  en la modalidad AM se deberá utilizar un sistema radiante que tenga una ganancia conjunta no superior a -6dB (es.: con antena “PC8” con cable original)

INDICE
INTRODUZIONE
DESCRIZIONE COMANDI
FISSAGGIO/RIMOZIONE DEL PACCO BATTERIA RICARICA DELLE BATTERIE
USO DELL’APPARATO
SELEZIONE BANDE DI FREQUENZA TABELLA BANDE DI FREQUENZA
GARANZIA
CARATTERISTICHE TECNICHE
3
4
6
6
7
7
7
8
8
INTRODUZIONE
I
ALAN 42 MULTI è un ricetrasmettitore di piccole dimensioni che garantisce ottime prestazioni nelle più svariate condizioni di utilizzo. È un apparato innovativo in quanto è l’unico CB portatile che offre all’utente la possibilità di selezionare qualsiasi banda CB europea tramite una semplice ed immediata procedura. ALAN 42 MULTI è controllato da un sintetizzatore di frequenza (PLL) e da un dispositivo automatico di risparmio delle batterie.
Dispone di un ampio display, che può essere illuminato con l’apposito tasto, per consentire la sua visualizzazione anche in condizioni di scarsa luminosità. La presa esterna per un microfono parla/ascolta permette il collegamento con microfoni accessori.
Informazione importante
Aggiornamenti sulle restrizioni nazionali:
Per poter utilizzare tale apparato in Spagna e Svizzera i residenti necessitano di una licenza individuale; coloro che provengono dall’estero invece, godono di libero uso per la FM, mentre per l’ AM devono essere in possesso della licenza del paese d’origine.
Per gli stranieri che arrivano in Italia, è necessaria un’autorizzazione Italiana. L’Austria invece non autorizza l’utilizzo di ricetrasmettitori CB multi-standard (programmabili). Si consiglia di rispettare scrupolosamente questa direttiva e di non utilizzare l’apparato in territorio austriaco.
Lungo i confini di alcune zone della Germania, l’utilizzo come stazione base dal canale 41 all’80 non è ammesso. Rivolgersi all’ufficio notifiche locale per ulteriori dettagli. Aggiornamenti sulle restrizioni all’uso in vigore in Germania vengono costantemente pubblicati sul website ALAN-Albrecht www.alan-albrecht.info.
3
CONTENUTO |
DESCRIZIONE COMANDI |
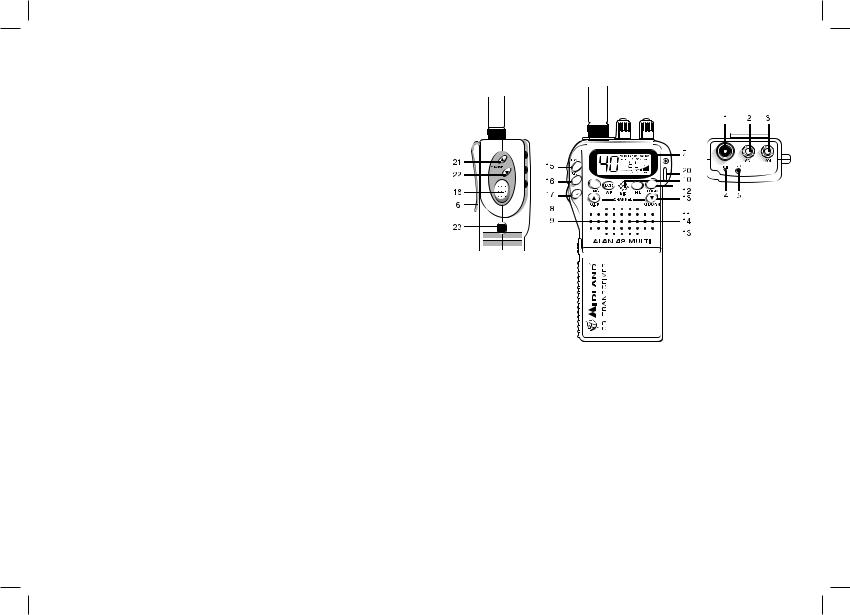
››1 ricetrasmettitore CB portatile
››caricatore da muro per pacco batterie da 8 stili
››pacco vuoto per batterie alcaline da 6 stili tipo AA
›› pacco batterie vuoto da 8 stili tipo AA per batterie ricaricabili con presa di ricarica
›› adattatore per uso in auto con presa per antenna esterna ›› custodia antigraffio
›› antenna
›› attacco a cintura ›› cinghia da polso
1. Connettore antenna: A questa presa va inserita l’antenna in dotazione con l’innesto a baionetta. Per estendere il raggio di copertura, si possono utilizzare antenne esterne veicolari o più efficienti.
2. Manopola Squelch: Questo controllo serve per eliminare il rumore di fondo del ricevitore. Girando la manopola verso destra viene attivata la funzione, girandola verso sinistra la funzione viene disattivata.
Per la massima sensibilità del ricevitore è preferibile che il comando sia regolato solo al preciso livello in cui viene eliminato il rumore di fondo del ricevitore.
3. Manopola Off-Volume
Posizione OFF: Apparato spento
Posizione Volume: Ruotando la manopola, regolare il volume al livello desiderato.
Ruotando la manopola verso destra, il volume viene alzato, ruotando la stessa manopola verso sinistra, il volume viene abbassato.
4

4.Presa microfono esterno: Collegare inserendo nell’ apposito spinotto il microfono altoparlante (o vox) accessorio.
5.Presa altoparlante esterno: Collegare inserendo all’apposito spinotto il microfono altoparlante (o vox) accessorio.
6.Attacco cintura
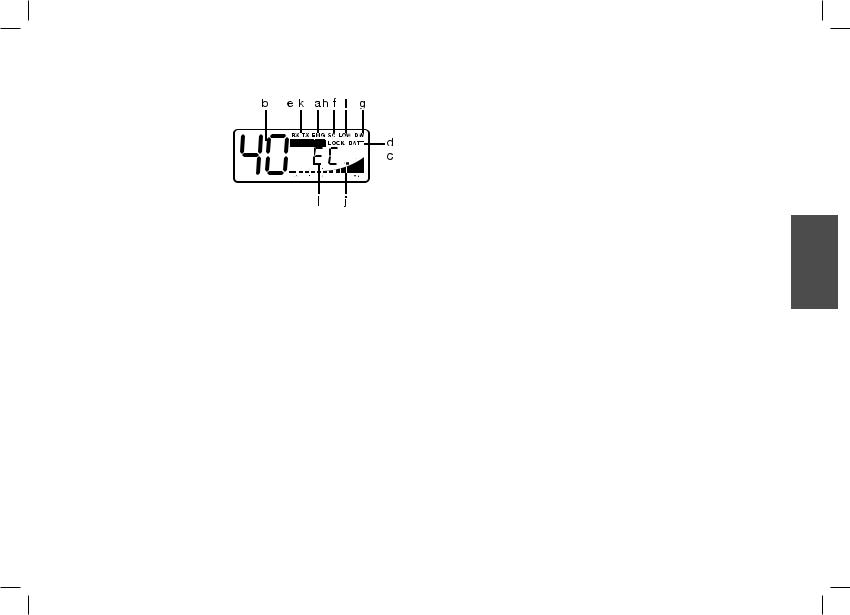
7.Display retroilluminato multifunzione
Il display a cristalli liquidi è stato espressamente progettato per indicare la modalità operativa.
a.EMG: indicatore lampeggiante canale d’emergenza attivato
b.Numero canali selezionati (da 1 a 40)
c.LOCK: indicatore funzione blocco tastiera attivata
d.BATT: indicatore batterie scariche
e.AM/FM: indicatore del modo di emissione
f.SC: indicatore funzione SCAN attivata
g.DW: Dual Watch
h.P. S.: indicatore funzione SAVE attivata
i.LOW: indicatore di bassa potenza
j.Indicatore di intensità del segnale ricevuto e di potenza di segnale trasmesso.
k.RX/TX: indicatore ricezione (RX) e trasmissione (TX)
l.Banda di frequenza selezionata
8.Pulsante EMG: canale d’emergenza. Premendo questo tasto l’apparato si posizionerà automaticamente sul canale 9 canale d’emergenza. Sul display lampeggerà EMG e non sarà possibile cambiare accidentalmente il canale. Per disinserire questa funzione, premere di nuovo il tasto.
9.Pulsante A/F-LCR:per selezionare il modo di emissione (AM/FM). La relativa scelta sarà visualizzata sul display. Se inoltre si seleziona una banda di frequenza che opera solamente la modalità FM, il tasto “A/F-LCR” attiva la funzione LCR (richiamo ultimo canale utilizzato).
10.Microfono: durante la trasmissione, avvicinare l’apparato alla bocca (4 cm
circa) e parlare con un tono di voce normale verso il microfono
11.Pulsante H/L: Selezione livello di potenza in trasmissione. All’accensione l’apparato trasmette sempre con il livello più alto (“HIGH”) di potenza. Premendo questo tasto l’apparato trasmetterà con potenza ridotta, visualizzando nel contempo sul display la scritta “LOW”. Premere nuovamente questo tasto per tornare in alta potenza. In alta potenza l’apparato eroga 4W, in bassa potenza 1W
12.Pulsante LOCK: tramite questo tasto è possibile bloccare la tastiera evitando accidentali pressioni dei tasti.
13.Pulsanti QUICK UP/DOWN: per spostarsi di dieci canali verso l’alto (UP) o verso il basso (DOWN).
14.Altoparlante
15.Dual Watch: con questo tasto si ha la possibilità di rimanere sintonizzati contemporaneamente su due canali a scelta dell’utente.
Con tale funzione si monitorizzerà ciclicamente un secondo canale. In presenza di un segnale sul secondo canale, la conversazione sul canale prescelto si interromperà e il ricevitore commuterà automaticamente sul secondo canale. Il monitoraggio riprenderà dopo 4 secondi dal cessare del segnale.
Per attivare questa funzione, operare come segue:
-Selezionare il canale desiderato mediante il selettore canali
-Premere il tasto DW
-Selezionare il secondo canale
-Ripremere il tasto DW
-Per annullare la funzione premere il tasto DW o il PTT.
16.Pulsante SCAN
Tramite questo comando si potrà ricercare automaticamente un canale sul quale ci sono comunicazioni (occupato). Operare come segue:
-Ruotare lo squelch in senso orario fino a quando non sparisce il rumore di fondo in un canale libero.
-Premere il pulsante SCAN. Il ricetrasmettitore scansionerà automaticamente e ripetutamente tutti i canali fino a quando non troverà un canale in uso.
-Quando trova il canale in uso si ferma e riparte alcuni secondi dopo la fine della comunicazione sul canale.
-Mandando in trasmissione la radio, la funzione SCAN si disattiva.
17.Pulsante : Tasto illuminazione display (temporizzata) che consente di poter operare anche in condizioni di oscurità. Questo tasto permette l’illuminazione del display per 5 secondi.
18.Interruttore PTT: tasto di commutazione RX/TX. Premendolo si attiva il trasmettitore, rilasciandolo viene attivato il ricevitore.
I
5
19.Vano batterie: l’apparato funziona con 6 batterie alcaline o 8 batterie Ni-Mh ricaricabili.
20.Foro per cinghia da polso
21.Pulsante Channel UP: Permette di sintonizzarsi al canale successivo. Mantenendo premuto questo tasto si ottiene la funzione di autorepeat.
22.Pulsante Channel DOWN: Permette di sintonizzarsi al canale precedente. Mantenendo premuto questo tasto, si ha la funzione di autorepeat.
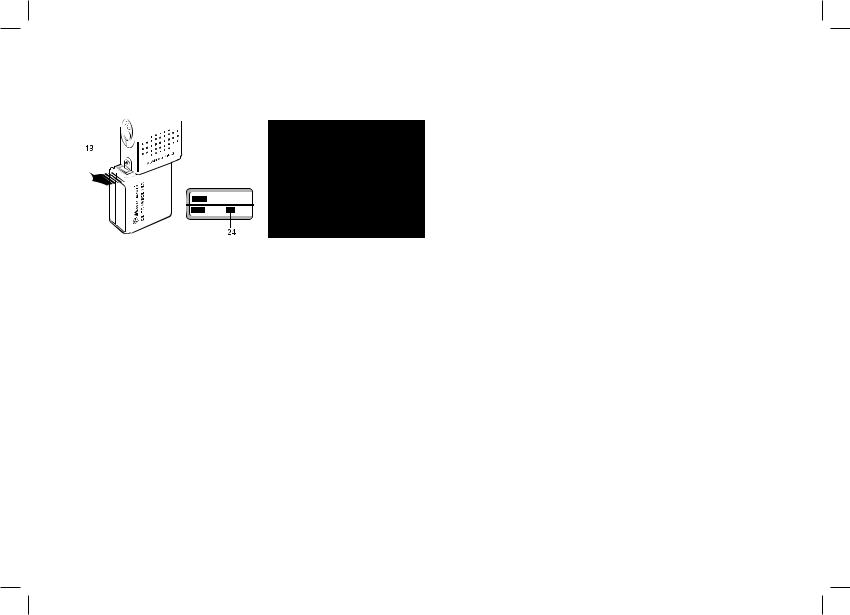
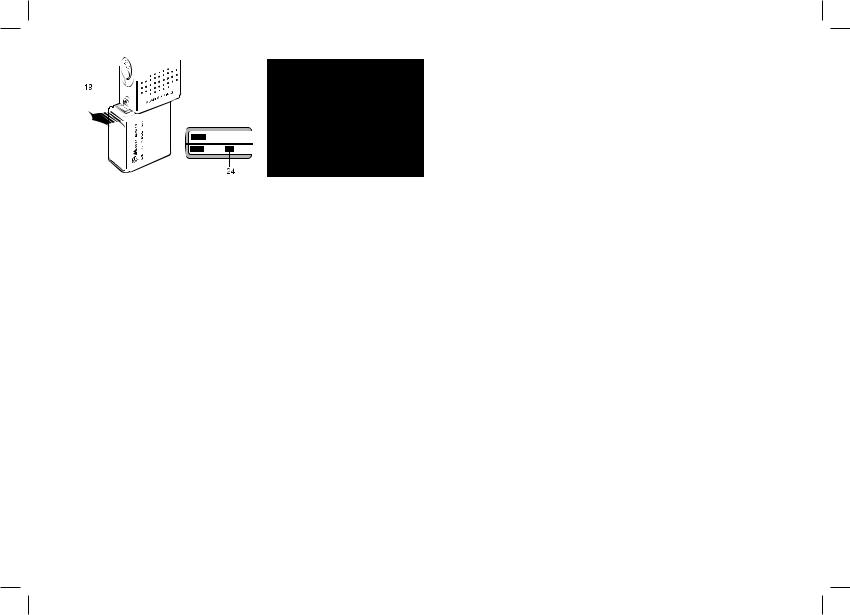
23.Aggancio pacco batterie: sollevare il pulsante e sfilare le batterie (vedi disegno).
24.Contatto antenna ausiliare: per il collegamento all’adattatore veicolare.
FISSAGGIO/RIMOZIONE DEL PACCO BATTERIA
Alan 42 Multi funziona sia con batterie alcaline che con batterie ricaricabili NI-Mh.
Per questo motivo vengono forniti due tipi di pacco batterie: pacco batterie vuoto con presa di ricarica per la carica di 8 stili ricaricabili tipo AA e pacco batterie per l’uso di 6 stili AA alcaline.
Per rimuovere il pacco batteria vuoto occorre prima di tutto sollevare la leva laterale; dopo di che sfilate il pacco batteria. Inserire le batterie.
Per fissare nuovamente il pacco batterie posizionatelo nell’apposita scanalatura posta nella parte inferiore del ricetrasmettitore e fatelo scorrere finché non udirete scattare un click.
RICARICA DELLE BATTERIE
La ricarica delle batterie può avvenire solo utilizzando il pacco batterie per stili ricaricabili.
Non cercate di ricaricare batterie alcaline o non ricaricabili; accertatevi che nel pacco batterie dell’apparecchio, con il caricabatterie collegato, vi siano esclusivamente batterie ricaricabili del tipo consigliato.
Inserite la spina del cavo di ricarica in una presa di alimentazione di rete CA e l’altra estremità nella presa della radio.
Al termine della carica, scollegate la spina del cavo di ricarica dalla presa da alimentazione di rete CA.
Per ottenere la capacità massima ricordiamo che normalmente è necessario, al primo utilizzo della radio, ripetere due/tre volte il ciclo completo di scarica/carica delle batterie.
ATTENZIONE:
!L’adattatore da muro in dotazione utilizza il metodo di ricarica standard. La corrente di ricarica utilizzata è quindi circa il 10% della capacità. Quando le batterie sono completamente cariche, il processo di carica non si blocca automaticamente.
!E’ consigliato non tenere l’apparecchio perennemente connesso al caricatore; se non necessario, staccare il ricetrasmettitore dal caricabatteria non appena é trascorso il tempo necessario di ricarica.
!Il caricatore è stato progettato per caricare esclusivamente batterie ricaricabili NiMh e non può essere utilizzato per caricare batterie Alcaline o altre batterie non ricaricabili. Batterie non idonee potrebbero perdere liquido, esplodere, bruciare e causare danni o lesioni personali!
!Per la ricarica, utilizzate il caricatore in dotazione. L’utilizzo di un caricabatterie non originale può causare danni al vostro apparecchio o causare esplosioni e lesioni personali.
!Smaltite le batterie esclusivamente seguendo le normative locali.
!La presa di rete deve rimanere prontamente utilizzabile.
6

USO DELL’APPARATO
1.Collegare l’antenna al ricetrasmettitore
2.Inserire le batterie nell’apposito vano, facendo attenzione alla giusta polarità.
3.Ruotare la manopola di accensione in senso orario, quindi regolare il volume per un livello normale di ascolto.
4.Regolare lo squelch come descritto al punto 2.
5.Selezionare il canale desiderato mediante i tasti UP/DOWN (oppure QUICK UP /QUICK DOWN)
Nota: se il canale non cambia, controllare che non sia stato premuto il tasto EMG o LOCK. In tal caso premere di nuovo il tasto EMG o LOCK per disattivare la funzione d’emergenza.
Per le altre funzioni fare riferimento alle istruzioni precedentemente descritte.
Per trasmettere: premere e mantenere premuto il tasto PTT situato sul lato sinistro dell’apparato. Avvicinare l’apparato alla bocca e parlare verso il microfono con normale tono di voce .
Per ricevere: rilasciare semplicemente il tasto PTT.
ATTENZIONE: NON ESPORRE IL DISPLAY A TEMPERATURE TROPPO ALTE O TROPPO BASSE.
SELEZIONE BANDE DI FREQUENZA
La scelta delle bande di frequenza deve essere eseguita a seconda del paese nel quale si intende operare.
Procedimento:
1.Spegnere la radio.
2.Accendere l’apparecchio premendo contemporaneamente i tasti A/F-LCR e
SC.
3.Tramite i tasti ▲ e ▼, selezionare la banda di frequenza desiderata (vedi tabella bande).
4.Premere il tasto A/F-LCR per terminare la selezione.
NOTA1: Se si seleziona una banda di frequenza che opera solamente in modalità FM, il tasto A/F-LCR attiva la funzione LCR (richiamo ultimo canale selezionato).
NOTA2: nella banda di frequenza UK è possibile selezionare direttamente la banda EC premendo il tasto “AM/FM” per 2 secondi circa.
TABELLA BANDE DI FREQUENZA
|
|
I |
Sigla sul display |
Paese |
|
I |
Italia 40 CH AM/FM 4Watt |
|
I2 |
Italia 34 CH AM/FM 4Watt |
|
D |
Germania 80 CH FM 4Watt / 12 CH AM 1 Watt |
|
D2 |
Germania 40 CH FM 4Watt / 12 CH AM 1 Watt |
|
D3 |
Germania 80 CH FM 4Watt / 40 CH AM 1 Watt |
|
D4 |
Germania 80 CH FM 4Watt / 40 CH AM 4 Watt |
|
EU |
Europa 40 CH FM 4Watt / 40 CH AM 1 Watt |
|
EC |
CEPT 40 CH FM 4Watt |
|
E |
Spagna 40 CH AM/FM 4Watt |
|
F |
Francia 40 CH FM 4Watt / 40 CH AM 1 Watt |
|
PL |
Polonia 40 CH AM/FM 4W |
|
UK |
Inghilterra 40 CH FM 4Watt frequenze inglesi + |
|
|
EC 40 CH FM 4Watt frequenze CEPT |
|
ATTENZIONE:
Lo standard sicuramente riconosciuto in tutti i paesi europei è 40CH FM 4W (EC) - Vedi tabella “Restrizioni all’uso”
7

CARATTERISTICHE TECNICHE
Canali................................................................................................. |
|
40 FM (vedi tabella bande) |
Gamma di frequenza*......................................................................... |
|
26.565 - 27.99125 MHz |
Modulazione................................................................................................... |
|
F3E (FM), A3E (AM) |
Impedenza antenna........................................................................................................... |
|
50 ohm |
Altoparlante.................................................................................................................. |
|
8 ohm 0.5W |
Microfono.............................................................................................................. |
|
a condensatore |
Alimentazione.......................................................... |
|
min 7.2Vcc;max 13,8Vcc; nom 12,6Vcc |
Dimensioni............................................................................................................. |
|
30x70x140 mm |
Peso............................................................................................................ |
|
220 gr. (senza batterie) |
RICEVITORE |
|
|
Sensibilità 10dB S/N........................................................................... |
|
0.5µV (AM), 0.25µV (FM) |
Selettività.......................................................................................................... |
|
maggiore di 60 dB |
Gamma squelch......................................................................................................... |
|
0.25V-500µV |
Potenza d’uscita audio.......................................................... |
|
0.5W 8 ohm (10% distorsione) |
Distorsione con un’ingresso di 1000µV |
................................................................................ 3% |
|
Risposta in frequenza.............................................................................................. |
|
400-2400 Hz |
Frequenze intermedie........................................................................................... |
|
I° 10.695 MHz |
............................................................................................................................................. |
|
II° 455 KHz |
Reiezione alle risposte spurie.................................................................... |
|
maggiore di 60 dB |
Corrente assorbita in standby............. |
100 mA quando é disinserita la funzione save |
|
................................................................................ |
|
45 mA quando é inserita la funzione save |
TRASMETTITORE |
|
|
Potenza d’uscita ........................................................................... |
|
duty cycle 10% 4W AM/FM |
Tolleranza di frequenza...................................................................................................... |
|
0.005% |
Soppressione emissioni armoniche........................................................ |
|
maggiore di 70 dB |
Corrente assorbita.............................................................................................................. |
|
900 mA |
Modulazione.......................................................................................................... |
|
AM 90% (± 5%) |
.................................................................................................................................... |
|
FM dev. 2.0KHz |
* (considerando tutte le bande di frequenza europee approvate) Le specifiche sono soggette a variazione senza preavviso.
ATTENZIONE
L’adattatore di alimentazione è il dispositivo di disconnessione dell’apparato; la base di carica della corrente deve restare vicino all’apparato e facilmente accessibile.
Noi, CTE International dichiariamo che il prodotto è conforme ai requisiti essenziali e alle disposizioni della Direttiva del Consiglio 1999/5/CE.
8

INDEX
INTRODUCTION
FUNCTION AND LOCATION OF THE CONTROLS INSTALLING/REMOVING THE BATTERY CASE RECHARGE OF THE BATTERIES
HOW TO OPERATE WITH YOUR ALAN 42 MULTI FREQUENCY BAND SELECTION
FREQUENCY BAND CHART
WARRANTY
TECHNICAL SPECIFICATIONS
|
INTRODUCTION |
|
|
ALAN 42 MULTI is a small-size portable transceiver which guarantees the best perfor- |
|
9 |
mance during the years even under heavy conditions. What is unique to this innova- |
|
tive transceiver is the capability to select any of the European CB bands with an easy |
||
|
||
10 |
and fast procedure. |
|
|
ALAN 42 MULTI has a built-in Channel Phase Loop synthesizer (PLL) circuit and an au- |
12 |
tomatic battery economy circuit. |
|
12The wide display can be illuminated and allows the night use. Optional microphones can be connected to the equipment thanks to the external mike plug situated on the
13upper side of the radio.
13
13 |
Important Note |
|
|
14 |
Following national regulations have been modified: |
14Residents of Spain and Switzerland need a CB licence in their countries, while visitors may use their CB radios in FM free of licence, for AM they should be able to present their home-country’s licence document or the “Circulation card”. In Italy, even visitors need a valid Italian authorization.
Austria does not accept any multi-standard or programmable CB radio. Please respect this requirement and do not use Your radio during driving through Austria. In Germany transmitting as a base station on channels 41-80 is restricted in some areas along the country borders. No restrictions apply for mobile use. More details can be obtained from the local BNetzA authority office.
Changes in European or national regulations will be published on the service website of ALAN-Albrecht under www.alan-albrecht.info
UK
9

CONTENT |
FUNCTION AND LOCATION OF THE CONTROLS |
››1 portable CB transceiver
››wall charger for 8 penlight battery pack
››empty pack for 6 penlight AA type alkaline batteries
›› empty pack for 8 penlight AA type rechargeable batteries with charge jack ›› car adapter with SO 239 external antenna jack
›› scratch proof case ›› antenna
›› belt clip
›› wrist band
1. Antenna connector: insert into this plug the antenna supplied with the radio. It is possible to use external vehicular antennas to obtain a better performance.
2. Squelch Control: this control cancels the background noise of the receiver. By turning the knob to the right the function is activated, by turning the knob to the left the function is deactivated. The knob should be regulated exactly at the point where the receiver background noise disappears.
3. On/Off Volume Control.
In ‘’off’’ position your transceiver is off. Turn this control clockwise to switch on the unit. Turn the knob clockwise a little more to set the audio level, until you get a comfortable reception.
4. MIC jack: connect by inserting the loudspeaker mike to the plug.
5. External loudspeaker jack: connect by inserting the loudspeaker mike to the plug.
6. Belt clip
10
7 Multifunction backlighted display.
This liquid crystal display has been projected to show the operative modality:
a.EMG function activated
b.Channel selected number( from 1 up to 40)
c.Lock: keyboard lock function activated
d.BATT: Run-down batteries indicator
e.AM/FM mode
f.SC: SCAN function activated
g.DW: DUAL WATCH function
h.P. S.: Save function activated
i.LOW function activated
j.The received signal strength and the power of the transmitting signal
k.RX/TX: TX=transmit mode; RX=receive mode
l.Frequency band selected
8.EMG button: emergency channel. By pressing this button, the unit automatically skips to Channel 9 (emergency channel). The display will shows EMG. It will not be possibile to change accidentally the channel. To cancel this function, press the button again.
9.A/F–LCR button: to select AM mode or FM mode; the modulation you choose will appear on the display. If you select a frequency band operating in FM mode only, the A/F–LCR button will activate the LCR function (Last Channel Recall).
10.Microphone: during transmission, keep your mouth 4 cm far from the unit, and speak with a normal tone of voice to the microphone.
11.H/L button: it selects the output power level during trasmission.When the unit is turned on, it always transmits with high power (4W). By pressing this button, the unit will transmit with low power (1W). The display will show “LOW”. Press again the H/L button to return to “HIGH” power level.
12.LOCK button: it allows you to lock the keyboard, thus avoiding accidental use
of the keys.
13.Q.UP - Q.DOWN buttons: to skip 10 channels up (Q.UP) or 10 channels down (Q.DOWN).
14.Loudspeaker
15.Dual Watch: this function allows the synthonization on two different channels at the same time. Thanks to this function, you can monitor a second channel. When a signal on the second channel is received, the conversation on the first channel is automatically interrupted and the receiver switches on the second channel. The monitoring starts again 4 seconds after the signal end.
To activate this function, operate as follows:
-Select the desired channel through the channel selector
-Press the DW button
-Select the second channel
-Press the button DW again
-To cancel the function press again the DW button or the PTT button.
16.SCAN button: with this control, you can automatically seek for a busy channel.
-Turn the Squelch clockwise until the background noise is no longer heard.
-Press the ‘’SCAN’’ button: the transceiver will scan automatically all the channels until a carrier is being received.
-When it finds the carrier, it stops and starts again some seconds after the end of the communication on the channel.
-When the radio is transmitting, the scan function is deactivated.
17. button: display lighting (temporized).This function allows to operate in darkness conditions. By pressing this button, the display is lighted for 5
seconds.
18. Push to talk button (PTT): Its pressure activates the transmission. When it is released, the receiver is activated.
UK
11
19.Battery compartment: insert 6 alkaline batteries or 8 rechargeable Ni-Mh batteries.
20.Hole for wrist belt
21.Channel UP: to skip to the next channel. Keeping this button pressed, the “autorepeat” function is obtained.
22.Channel DOWN: to skip to the previous channel. Keeping this button pressed, the “autorepeat” function is obtained.
23.Battery pack contact: lift the button and take the batteries out (see drawing).
24.Auxiliary antenna contact: for the connection to the vehicular adaptor.
INSTALLING/REMOVING THE BATTERY CASE
Alan 42 Multi works with both Alkaline and with Ni-Mh rechargeable batteries. For this reason, 2 kinds of battery case are supplied: empty battery case for 8 penlight AA type rechargeable batteries with charge jack and an empty battery case for 6 penlight AA type alkaline batteries.
To remove the battery case, lift the side trigger and slide the battery case off. Put the batteries in.
To replace the battery case, slide it again onto the dual track system of the back side of the transceiver.
RECHARGE OF THE BATTERIES
The battery recharge can be possible only by using the NiMH rechargeable battery case.
Do not try to charge alkaline batteries or non rechargeable batteries. Make sure that when you charge the radio, only rechargeable NI-MH batteries should be contained in the battery compartment!
Use a socket ready accessible for ac/dc adaptor; Connect the socket of the wall adaptor to a mains power socket and insert the jack of the wall adaptor into the charge jack of the battery case.
When charging is complete detach the socket of the wall adaptor from the mains. To obtain the maximum performance and capacity, at the first use of the radio, it is highly recommended to completely discharge/recharge the batteries 2 or 3 times.
WARNINGS
!The supplied wall charger is using “standard charging” method. This is a method, where the charging current is about 10 % of the capacity. Using this method, chargers do not automatically disconnect charging when batteries are fully charged.
!You should avoid to keep the radio permanently connected to the wall charger, when you do not need it.
!The charger is only designed for NiMH rechargeable batteries and cannot be used for standard Alkaline or other not chargeable batteries. Trying to charge such kind of batteries can be a risk. Such batteries may leak, explode or even burn and cause damage or personal injuries!
!Please use only the supplied wall charger type and no other charger.
!Dispose of the batteries according to the procedures set out by local regulations.
!Mains plug used shall remain readily operable.
12

HOW TO OPERATE WITH YOUR ALAN 42 MULTI
1.Insert the antenna in the antenna connector.
2.Insert the batteries into the battery compartment, noting polarity.
3.Rotate the ON/OFF volume control clockwise to turn the unit on. Adjust the volume for a normal listening level.
4.Adjust the SQUELCH control
5.Select the desired channel by the UP/DOWN or QUICK UP/QUICK/DOWN buttons
Note: if the channel does not change,control that the EMG or LOCK button has not been pressed. In this case, press the EMG or LOCK button to deactivate this function.
As far as the other functions are concerned, refer to previous instructions. To transmit: press and hold the PTT button, then talk to the microphone. To receive: simply release the PTT button.
CAUTION: DON’T EXPOSE THE DISPLAY TO EXTREME TEMPERATURES.
FREQUENCY BAND SELECTION
The frequency bands must be chosen according to the country you are in.
Procedure:
1.Switch off the unit.
2.Turn it on while pushing the “A/F-LCR” and “SC” buttons.
3.By pushing the ▲ and ▼ buttons, select the desired frequency band (see the chart here below).
4.To fix your selection, press the “A/F-LCR” button.
NOTE1: If you select a frequency band which operates in FM mode only, the “A/F- LCR” control activates the LCR function (Last Channel Recall).
NOTE2: In the UK frequency band, you can select directly the EC band by pushing the “AM/FM” button for 2 seconds.
FREQUENCY BAND CHART
Displayed digits |
Country |
|
|
I |
Italy 40 CH AM/FM 4Watt |
|
|
I2 |
Italy 34 CH AM/FM 4Watt |
|
|
D |
Germany 80 CH FM 4Watt / 12 CH AM 1 Watt |
|
|
D2 |
Germany 40 CH FM 4Watt / 12 CH AM 1 Watt |
|
|
D3 |
Germany 80 CH FM 4Watt / 40 CH AM 1 Watt |
|
UK |
D4 |
Germany 80 CH FM 4Watt / 40 CH AM 4 Watt |
|
|
|
|
||
EU |
Europe 40 CH FM 4Watt / 40 CH AM 1 Watt |
|
|
EC |
CEPT 40 CH FM 4Watt |
|
|
E |
Spain 40 CH AM/FM 4Watt |
|
|
F |
France 40 CH FM 4Watt / 40 CH AM 1 Watt |
|
|
PL |
Poland 40 CH AM/FM 4Watt |
|
|
UK |
England 40 CH FM 4Watt English frequencies |
|
|
|
+ EC 40 CH FM 4Watt CEPT frequencies |
|
|
ATTENTION!
The frequency band allowed all over Europe is 40CH FM 4W (EC) – See the “Restrictions on the use” table.
13

TECHNICAL SPECIFICATIONS
Channels .................................................................. |
40 FM (see the Frequency band chart) |
Frequency Range* ............................................................................... |
26.565 - 27.99125 MHz |
Operating mode........................................................................................... |
F3E (FM), A3E (AM). |
Antenna impedance ........................................................................................................ |
50 Ohm. |
Loudspeaker............................................................................................................... |
8 Ohm 0.5W. |
Microphone........................................................................................................... |
condenser type |
Power supply........................................................... |
min 7.2Vdc;max 13,8Vdc; nom 12,6Vdc |
Dimensions........................................................................................................... |
30x70x140 mm. |
Weight................................................................................................ |
220 gr. (without batteries). |
RECEIVER |
|
Sensitivity at 10dB S/N...................................................................... |
0.5µV (AM), 0.25µV (FM) |
Selectivity............................................................................................................. |
more than 60dB |
Squelch range............................................................................................................ |
0.25V-500µV |
Audio output power............................................................... |
0.5W 8 ohm (10% distortion) |
Distortion at 1000 µV................................................................................................................. |
3% |
Audio frequency response.................................................................................... |
400-2400 Hz |
Intermediate frequency........................................................................................ |
I° 10.695 MHz |
............................................................................................................................................. |
II° 455 KHz |
Spurious response............................................................................................ |
more than 60 dB |
Current drain at stanby................................................ |
100 mA when the save mode is off |
............................................................................................... |
45 mA when the save mode is on |
TRANSMITTER |
|
RF Output Power........................................................................... |
duty cycle 10% 4W AM/FM |
Frequency Tolerance........................................................................................................... |
0.005% |
Harmonic Suppression.................................................................................... |
more than 70 dB |
Current Drain........................................................................................................................ |
900 mA |
Modulation............................................................................................................. |
AM 90% (± 5%) |
.................................................................................................................................... |
FM dev. 2.0KHz |
* (covering all approved EU frequency bands)
All specifications are subject to change without notice.
WARNING
Direct plug-in ac/dc power supply must be used for disconnecting the transceiver from the mains; the desktop charger must be positioned close to the unit and easily accessible.
Hereby, CTE International declares that this product is in compliance with the essential requirements and other relevant provisions of Directive 1999/5/EC.
14

INHALTSVERZEICHNIS
EINLEITUNG
BESCHREIBUNG DER BEDIENELEMENTE
INSTALLATION/ABRINGEN UND ENTFERNEN DES BATTERIEKASTENS
AUFLADEN DER AKKUS BEDIENUNG DES FUNKGERÄTES AUSWAHL DER FREQUENZBÄNDER
FREQUENZBANDTABELLE
GEWÄHRLEISTUNG
TECHNISCHE DATEN
EINFÜHRUNG
Ihr ALAN 42 MULTI ist ein besonders vielfältiges und leistungsfähiges CB-
15Handfunkgerät. Es verkörpert den aktuellen Stand der Entwicklung auf dem Gebiet der Funkgerätetechnik und ist mit vielen Funktionen ausgestattet, die Ihnen vielseitige
16Anwendungsmöglichkeiten erlauben. Das ALAN 42 MULTI ist z.Zt. das wohl einzige CB-Handfunkgerät, das durch eine Tastenkombination auf die jeweilige Landesnorm
18 umschalten kann. Über Tastendruck kann die Hintergrundbeleuchtung für das große Display aktiviert werden, die eine Anpassung an schlechte Sichtverhältnisse erlaubt.
18 |
Durch externe Anschlussmöglichkeiten ist eine vielfache Erweiterung durch beliebiges |
|
|
19 |
Zubehör (z.B. Vox, Lautsprechermikrofon, etc.) möglich. |
|
|
19 |
|
19Wichtige Hinweise zur Bedienungsanleitung
20Bitte beachten Sie folgende Änderung bei den nationalen Besonderheiten: Bewohner von Spanien und der Schweiz benötigen für den CB-Funk eine anmel-
21deund gebührenpflichtige Genehmigung (Lizenz), während Besucher aus anderen Ländern auf Reisen ihre CB Geräte in diesen Ländern jedoch in FM frei benutzen dürfen, für AM sollte die Heimatgenehmigung (falls im Heimatland noch erforderlich) oder eine “Circulation Card” mitgenommen werden.
In Italien brauchen auch Besucher eine gültige italienische Genehmigung!
In Österreich ist die Benutzung von Multi-Standard CB-Funkgeräten (umschaltbare CB-Geräte) leider nicht gestattet. Wir empfehlen Ihnen dringend, das Funkgerät bei der Fahrt durch Österreich ausgeschaltet zu lassen.
In Deutschland ist für den Betrieb in den deutschen Programmiereinstellungen d1....d4 (ab Freigabe) als Mobilfunkgerät keine Anmeldung mehr erforderlich. Einschränkungen gelten für die Kanäle 41 -80 bei Feststationen in Grenznähe.
D
15

LIEFERUMFANG |
BESCHREIBUNG DER BEDIENELEMENTE |
››1 CB Handfunkgerät
››Stecker-Ladegerät für 8 Mignonzellen
››Batterie/Akkuleerpack für 6 Alkalibatterien vom Typ AA
›› Batterie-/Akkuleerpack für 8 aufladbare Mignonzellen vom Typ AA mit Netzanschluss
›› Bordspannungsadapter mit Antennenanschluss SO 239 für den Mobilbetrieb ›› Schutzhülle
›› Antenne ›› Gürtelclip
›› Trageschlaufe
1. Antennenanschluss BNC
Zum Anschluss der mitgelieferten Flexantenne oder einer anderen geeigneten CB-Funk Antenne an das ALAN 42 MULTI.
2. Squelchregler
Mit dem Squelchregler stellen Sie die Empfangs-Signalstärke ein, ab der Sie Stationen (oder Rauschen) im Lautsprecher hören.
Um die höchstmögliche Empfangsempfindlichkeit zu nutzen, muß der Regler so eingestellt werden, daß das Hintergrundrauschen gerade unterdrückt wird.
3. Ein-/Ausschalter, Lautstärkeregler OFF-VOL
Über diesen Drehregler wird das Gerät einund ausgeschaltet sowie die Lautstärke eingestellt. Drehen im Uhrzeigersinn erhöht die Lautstärke.
4. Mikrofonbuchse: Hier können Sie ein externes Mikrofon mit Sendetaste (PTT) oder VOX-Funktion anschließen.
5. Externer Lautsprecheranschluss: An diese Buchse kann ein externer Wiedergabelautsprecher angeschlossen werden.
16
6.Gürteltrageclip
7.Multifunktions-Display mit Hintergrundbeleuchtung
In dem Display werden die folgenden Informationen angezeigt:
a)EMG: Direktschaltung auf den Notrufkanal
b)Kanalanzeige (von 1 bis 40)
c)LOCK: Tastatursperre ist eingeschaltet
d)BATT: Batteriezustandsanzeige
e)AM/FM: Anzeige der gewählten Betriebsart
f)SC: Kanalsuchlauf aktiviert
g)DW: Zweikanalüberwachung (Dual Watch)
h)P. S.: Energiesparmodus aktiviert
i)LOW: erscheint, wenn das Funkgerät auf niedrige Sendeleistung schaltet
j)Anzeige für relative Empfangsund Sendeleistung
k)RX-/TX-Anzeige, TX=Sendebetrieb, RX=Empfangsbetrieb
l)Anzeige des gewählten Frequenzbandes.
8.Taste EMG: Auf Knopfdruck läßt sich der Notrufkanal 9 direkt einschalten. In der Anzeige erscheint der Schriftzug EMG. Die manuelle Kanalumschaltung ist gesperrt, solange die EMG-Funktion aktiv ist. Zum deaktivieren dieser Funktion, drücken Sie erneut die Taste„EMG“.
9.Taste A/F–LCR: Auswahl der gewünschten Betriebsart (AM/FM). Die eingestellte Betriebsart wird entsprechend im Display angezeigt. Wird ein Frequenzband gewählt, das nur in der Betriebsart FM arbeitet, übernimmt die Taste “A/F-LCR” statt der Betriebsartwahl die LCR-Funktion (Last Channel Recall – Aufruf des zuletzt genutzten Kanals).
10.Mikrofon: Sprechen Sie beim Senden aus etwa vier Zentimetern Entfernung mit normaler Lautstärke in das Mikrofon.
11.Taste H/L: Mit diesem Schalter läßt sich die HF-Sendeleistung umschalten. Im Display wird die aktuell eingestellte Sendeleistungsstufe angezeigt: High
(hohe Leistung, 4 W) oder Low (niedrige Leistung, 1 W).
12.Taste LOCK: Drücken dieser Taste sperrt alle Funktionstasten. Dadurch ist eine versehentliche Betätigung von Tasten ausgeschlossen. Erneutes Drücken der LOCK-Taste entriegelt die Tastatur.
13.Tasten QUICK UP/DOWN’: Die Taste QUICK UP schaltet 10 Kanäle höher, während die Taste Quick DOWN 10 Kanäle tiefer schaltet.
14.Lautsprecher
15.Taste Dual Watch: Taste zum Aktivieren der Zweikanalüberwachung (DUAL WATCH), die eine zeitgleiche Überwachung von zwei beliebigen Kanälen Ihrer Wahl erlaubt.
Sobald auf einem dieser Kanäle ein Empfangssignal anliegt, das die eingestellte Schwelle der Rauschsperre überschreitet, stoppt das Funkgerät auf diesem Kanal und Sie hören das empfangende Signal. Fällt das Signal für längere Zeit aus, schaltet das Funkgerät nach ca. 4 Sekunden wieder zwischen den beiden eingestellten Kanälen hin und her. Einstellen der Zweikanalüberwachung:
-Schalten Sie das Funkgerät ein.
-Stellen Sie den Squelch Regler auf die gewünschte Ansprechschwelle.
-Mit dem Kanalwahltasten den ersten gewünschten Kanal einstellen.
-Taste„DW“ drücken.
-Mit dem Kanalwahltasten den zweiten Kanal einstellen
-Taste„DW“ erneut betätigen.
-Zum Ausschalten der Zweikanalüberwachung drücken Sie erneut die Taste„DW“ oder betätigen Sie die Sendetaste (PTT).
16.Taste SC
Taste zum Aktivieren der Kanalsuchlauffunktion “SCAN”. Durch Einschalten des Suchlaufbetriebs lassen sich belegte Kanäle automatisch finden.
-stellen Sie die Rauschsperre so ein, daß das Hintergrundrauschen gerade unterdrückt wird.
-Drücken Sie die Taste “SC”. Das CB-Funkgerät startet den Suchlauf.
-Der Suchlauf stoppt, sobald ein belegter Kanal gefunden ist.
-Im Sendemodus ist die Funktion„SCAN“ deaktiviert.
17.Taste : Einmaliges Drücken dieserTaste schaltet die Hintergrundbeleuchtung des Displays für ca. 5 Sekunden ein.
18.Sendetaste PTT: Durch Drücken der PTT-Taste wird der Sender des ALAN 42 Multi aktiviert.
19.Batterie-/Akkufach: Batterie-/Akkufach für 6 Alkali oder 8 Ni-Mh Akku.
20.Aufnahme für die Trageschlaufe
21.Taste Channel UP: Durch Drücken der Kanalwahltaste„CHANNEL UP“ schalten Sie einen Kanal höher. Längeres Drücken aktiviert den Schnelldurchlauf.
D
17
 Loading...