


Nokia 1112 User Guide
Nota: La traducción en español de este manual inicia en la Página 41.
1

DECLARATION OF CONFORMITY
Hereby, NOKIA CORPORATION, declares that this RH-92 product is in compliance with the essential requirements and other relevant provisions of Directive 1999/5/EC.
A copy of the Declaration of Conformity can be found from
http://www.nokia.com/phones/declaration_of_conformity/.

 0434
0434
The crossed-out wheeled bin means that within the European Union the product must be taken to separate collection at the product end-of-life. This applies to your device but also to any enhancements marked with this symbol. Do not dispose of these products as unsorted municipal waste.
Copyright© 2006 Nokia. All rights reserved.
Reproduction, transfer, distribution or storage of part or all of the contents in this document in any form without the prior written permission of Nokia is prohibited.
US Patent No 5818437 and other pending patents. T9 text input software Copyright © 1997-2006. Tegic Communications, Inc. All rights reserved.
Nokia, Nokia Connecting People, Xpress-on are trademarks or registered trademarks of Nokia Corporation. Other product and company names mentioned herein may be trademarks or tradenames of their respective owners.
Nokia tune is a sound mark of Nokia Corporation.
The information contained in this user guide was written for the Nokia 1112 product. Nokia operates a policy of ongoing development. Nokia reserves the right to make changes to any of the products described in this document without prior notice.
UNDER NO CIRCUMSTANCES SHALL NOKIA BE RESPONSIBLE FOR ANY LOSS OF DATA OR INCOME OR ANY SPECIAL, INCIDENTAL, AND CONSEQUENTIAL OR INDIRECT DAMAGES HOWSOEVER CAUSED.
2
THE CONTENTS OF THIS DOCUMENT ARE PROVIDED "AS IS." EXCEPT AS REQUIRED BY APPLICABLE LAW, NO WARRANTIES OF ANY KIND, EITHER EXPRESS OR IMPLIED, INCLUDING, BUT NOT LIMITED TO, THE IMPLIED WARRANTIES OF MERCHANTABILITY AND FITNESS FOR A PARTICULAR PURPOSE, ARE MADE IN RELATION TO THE ACCURACY AND RELIABILITY OR CONTENTS OF THIS DOCUMENT. NOKIA RESERVES THE RIGHT TO REVISE THIS DOCUMENT OR WITHDRAW IT AT ANY TIME WITHOUT PRIOR NOTICE.
EXPORT CONTROLS
This device may contain commodities, technology, or software subject to export laws and regulations from the U.S. and other countries. Diversion contrary to law is prohibited.
FCC/INDUSTRY CANADA NOTICE
Your device may cause TV or radio interference (for example, when using a telephone in close proximity to receiving equipment). The FCC or Industry Canada can require you to stop using your telephone if such interference cannot be eliminated. If you require assistance, contact your local service facility. This device complies with part 15 of the FCC rules. Operation is subject to the following two conditions: (1) This device may not cause harmful interference, and (2) this device must accept any interference received, including interference that may cause undesired operation. Any changes or modifications not expressly approved by Nokia could void the user's authority to operate this equipment.
9248263/Issue 1
3

T a b l e o f c o n t e n t s
Table of contents
For your safety........................... |
5 |
General information .................. |
9 |
Access codes.............................................. |
9 |
Shared memory......................................... |
9 |
1. Get started .......................... |
10 |
Keys and parts......................................... |
10 |
Insert a SIM card and battery ............ |
10 |
Charge the battery ................................ |
11 |
Switch on or off ..................................... |
12 |
Demo mode.............................................. |
12 |
Shortcuts in the standby mode.......... |
13 |
Lock the keypad...................................... |
13 |
4. Menu functions .................. |
16 |
Messages .................................................. |
16 |
Contacts.................................................... |
18 |
Call log ...................................................... |
19 |
Settings..................................................... |
19 |
Clock .......................................................... |
22 |
Reminders................................................. |
23 |
Extras......................................................... |
23 |
SIM services............................................. |
24 |
5. Battery information............ |
25 |
Charging and discharging.................... |
25 |
Nokia battery |
|
authentication guidelines.................... |
26 |
2. |
Call functions...................... |
14 |
Make and answer a call ....................... |
14 |
|
Loudspeaker............................................. |
14 |
|
3. |
Write text............................ |
15 |
6. Enhancements..................... |
29 |
Care and maintenance............. |
30 |
Additional safety information |
32 |
Index .......................................... |
38 |
4
F o r y o u r s a f e t y
For your safety
Read these simple guidelines. Not following them may be dangerous or illegal. Read the complete user guide for further information.
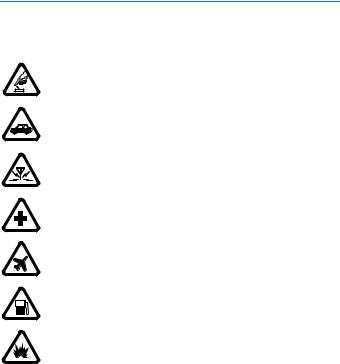
SWITCH ON SAFELY
Do not switch the phone on when wireless phone use is prohibited or when it may cause interference or danger.
ROAD SAFETY COMES FIRST
Obey all local laws. Always keep your hands free to operate the vehicle while driving. Your first consideration while driving should be road safety.
INTERFERENCE
All wireless phones may be susceptible to interference, which could affect performance.
SWITCH OFF IN HOSPITALS
Follow any restrictions. Switch the phone off near medical equipment.
SWITCH OFF IN AIRCRAFT
Follow any restrictions. Wireless devices can cause interference in aircraft.
SWITCH OFF WHEN REFUELING
Do not use the phone at a refueling point. Do not use near fuel or chemicals.
SWITCH OFF NEAR BLASTING
Follow any restrictions. Do not use the phone where blasting is in progress.
5

F o r y o u r s a f e t y
USE SENSIBLY
Use only in the normal position as explained in the product documentation. Do not touch the antenna unnecessarily.
QUALIFIED SERVICE
Only qualified personnel may install or repair this product.
ENHANCEMENTS AND BATTERIES
Use only approved enhancements and batteries. Do not connect incompatible products.
WATER-RESISTANCE
Your phone is not water-resistant. Keep it dry.
BACK-UP COPIES
Remember to make back-up copies or keep a written record of all important information stored in your phone.
CONNECTING TO OTHER DEVICES
When connecting to any other device, read its user guide for detailed safety instructions. Do not connect incompatible products.
EMERGENCY CALLS
Ensure the phone is switched on and in service. Press the end key as many times as needed to clear the display and return to the start screen. Enter the emergency number, then press the call key. Give your location. Do not end the call until given permission to do so.
6

F o r y o u r s a f e t y
■ About your device
The wireless device described in this guide is approved for use on the GSM 850 and GSM 1900 networks. Contact your service provider for more information about networks.
When using the features in this device, obey all laws and respect privacy and legitimate rights of others.
Warning: To use any features in this device, other than the alarm clock, the device must be switched on. Do not switch the device on when wireless device use may cause interference or danger.
■ Network services
To use the phone you must have service from a wireless service provider. Many of the features in this device depend on features in the wireless network to function. These network services may not be available on all networks or you may have to make specific arrangements with your service provider before you can utilize network services. Your service provider may need to give you additional instructions for their use and explain what charges will apply. Some networks may have limitations that affect how you can use network services. For instance, some networks may not support all language-dependent characters and services.
Your service provider may have requested that certain features be disabled or not activated in your device. If so, they will not appear on your device menu. Your device may also have been specially configured. This configuration may include changes in menu names, menu order and icons. Contact your service provider for more information.
7

F o r y o u r s a f e t y
■ Chargers and enhancements
Always switch the device off and disconnect the charger before removing the battery.
Check the model number of any charger before use with this device. This device is intended for use when supplied with power from the ACP-7 and ACP-12 chargers.
Warning: Use only batteries, chargers, and enhancements approved by Nokia for use with this particular model. The use of any other types may invalidate any approval or warranty, and may be dangerous.
For availability of approved enhancements, please check with your dealer.
8

G e n e r a l i n f o r m a t i o n
General information
■ Access codes
•The security code, supplied with the phone, helps to protect your phone against unauthorized use. The preset code is 12345.
•The PIN code, supplied with the SIM card, helps to protect the card against unauthorized use.
•The PIN2 code, supplied with some SIM cards, is required to access certain services.
•PUK and PUK2 codes may be supplied with the SIM card. If you enter the PIN or PIN2 code incorrectly three times in succession, you will be asked for the PUK or PUK2 code. If you do not have them, contact your local service provider.
Select Menu > Settings > Security settings to set how your phone uses the access codes and security settings.
■ Shared memory
The following features in this device may share memory: Messages, Contacts, and Composer. Use of one or more of these features may reduce the memory available for the remaining features sharing memory. For example, saving many text messages may use all of the available memory. Your device may display a message that the memory is full when you try to use a shared memory feature. In this case, delete some of the information or entries stored in the shared memory features before continuing. Some of the features, such as Contacts may have a certain amount of memory specially allotted to them in addition to the memory shared with other features.
9
G e t s t a r t e d
1. Get started
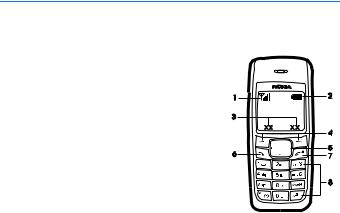
■ Keys and parts
When the phone is ready for use and no characters have been keyed in, the phone is in the standby mode.
• Network intensity (1)
• Battery charge level (2)
• Selection key functions (3)
• Selection keys (4)
• Scroll keys (5)
• Call key (6)
• End key and power key (7)
• Keypad (8)
■ Insert a SIM card and battery
Keep all SIM cards out of the reach of small children.
For availability and information on using SIM card services, contact your SIM card vendor. This may be the service provider, network operator, or other vendor.
This phone is intended for use with a BL-5CA battery.
10

G e t s t a r t e d
1. Press the back cover release button (1), open the back cover,
and remove it (2, 3). Lift the battery from the finger grip, and remove it (4).
2.Carefully lift the SIM card holder from the finger grip of the phone (5). Insert the SIM card, ensuring that the bevelled corner is on the upper right side and that the gold-colored contact is facing downward (6). Close the SIM card holder (7), and press it to lock it into place. Insert the battery (8, 9).
3. Replace the back cover.
■ Charge the battery
1. Connect the charger to an ac wall outlet.
2. Connect the plug from the charger to the jack on the bottom of the phone. The battery indicator bar starts scrolling.
If Not charging is displayed, wait for a while, disconnect the charger, plug it in again, and retry. If charging still fails, contact your dealer.
11
G e t s t a r t e d
3.When the battery is fully charged, the bar stops scrolling. Disconnect the charger from the phone and the ac outlet.
The battery provides up to 5 hours and 30 minutes of talk time, and up to 14 days of standby time. Operation times are estimates and may vary depending on network conditions, charging, and device use.
■ Switch on or off
Press and hold the end key for a few seconds.
Use the phone only in its normal operating position.
Your device has an internal antenna.
Note: As with any other radio transmitting device, do not touch the antenna unnecessarily when the device is switched on. Contact with the antenna affects call quality and may cause the device to operate at a higher power level than otherwise needed. Avoiding contact with the antenna area when operating the device optimizes the antenna performance and the battery life.
Note: Avoid touching this connector as it is sensitive to electrostatic discharge.
■ Demo mode
You may view how to use certain features of your phone. If the SIM card is not installed, select Demo > Basics, More or Games.
If the SIM card is installed, select Menu > Extras > Demo > Basics or More.
12

G e t s t a r t e d
■ Shortcuts in the standby mode
Scroll up to access Call log.
Scroll down to access the names and numbers saved in Contacts.
Scroll left to write a message.
Scroll right to access the demo mode.
Press and hold * to activate the speaking clock.
Press the call key once to access the list of dialed numbers. Scroll to the name or number that you want, and to call the number, press the call key.
■ Lock the keypad
The keypad lock helps to prevent keys from being pressed accidentally.
To lock the keypad, in the standby mode, select Menu, and press * quickly; to unlock, select Unlock, and press * quickly.
When the keypad lock is on, calls may be possible to the official emergency number programmed into your device.
Enter the emergency number, and press the call key. The emergency number you have entered may not be displayed on the screen.
13

C a l l f u n c t i o n s
2. Call functions
■ Make and answer a call
To make a call, do the following:
1.Enter the phone number, including the area code and country code, if necessary.
2.Press the call key to call the number. Scroll right to increase or left to decrease the volume of the earpiece or headset during the phone call.
To answer an incoming call, press the call key. To reject the call without answering, press the end key.
■ Loudspeaker
If available, you may select Loudsp. or Hands. to use the loudspeaker or the earpiece of the phone during a call.
Warning: Do not hold the device near your ear when the loudspeaker is in use, because the volume may be extremely loud.
14

W r i t e t e x t
3. Write text
You can enter text in two different ways: traditional text input, indicated by  , or predictive text input, indicated by
  .
.
To use traditional text input, repeatedly press the key marked with the letter that you want until the letter appears.
To turn on predictive text input when writing text, select Options > Predictive text and the desired language; to turn it off, select Options > Prediction off.
To use predictive text input, do the following:
1.To enter the word you want, press each key once for a single letter.
2.If the displayed word is the one you want, press 0, and start writing the next word. To change the word, press * repeatedly until the word you want appears.
If ? is displayed after the word, the word is not in the dictionary. To add the word to the dictionary, select Spell, enter the word (using traditional text input), and select OK.
Following are tips for writing text with traditional and predictive text input.
•To add a space, press 0.
•To quickly change the text input method when writing text, press # repeatedly and check the indicator at the top of the display.
•To add a number, press and hold the desired number key.
•To get a list of special characters when using traditional text input, press *; when using predictive text input, press and hold *.
15

M e n u f u n c t i o n s
4. Menu functions
In the standby mode, select Menu and the desired menu and submenu. Select Exit or Back to exit the current level of menu. Press the end key to return to the standby mode directly.
Not all menu functions or option items are described here.
■ Messages
Message settings
To edit your message settings, select Menu > Messages > Message settings.
Select Sending profile > Message center number to save the phone number needed for sending text and picture messages. You obtain this number from your service provider.
Select Character support (network service) to set whether the Full or Reduced coding is used when sending a text message.
Select No. screening to view or edit the list of filtered numbers.
Create message
Your device supports the sending of text messages beyond the character limit for a single message. Longer messages will be sent as a series of two or more messages. Your service provider may charge accordingly. Characters that use accents or other marks, and characters from some language options like Chinese, take up more space limiting the number of characters that can be sent in a single message.
The number of available characters and the current part number of a multipart message are shown on the top right of the display, for example, 447/1.
16

M e n u f u n c t i o n s
To create a message, do the following:
1.In the standby mode, select Menu > Messages > Create message.
2.Write the message.
3.To send the message, select Options > Send, enter the recipient’s phone number, and select OK.
Note: When sending messages, your device may display Message Sent. This is an indication that the message has been sent by your device to the message center number programmed into your device. This is not an indication that the message has been received at the intended destination. For more details about messaging services, check with your service provider.
Read a text message
When you receive text messages, the number of new messages and the  icon are shown on the display in the standby mode.
Select Show to view the messages immediately, or Exit to view it later in Menu >
Messages > Inbox.
Drafts and sent items
In the Drafts menu, you can view the messages that you saved with the Save message menu. In the Sent items menu, you can view the copies of the messages that you sent.
Picture messages (network service)
You can receive and send messages that contain pictures. Received picture messages are saved in the Inbox. Each picture message comprises several text messages. Therefore, sending one picture message may cost more than one text message.
17

M e n u f u n c t i o n s
Note: The picture message function can be used only if it is supported by your network operator or service provider. Only compatible devices that offer picture message features can receive and display picture messages.
The appearance of a message may vary depending on the receiving device.
Delete messages
To delete all read messages or all the messages in a folder, select Menu > Messages >
Delete messages > All read or the desired folder.
■ Contacts
You can save names and phone numbers in the phone memory and in the SIM card memory. The internal contact list can store up to 200 names.
Find a name and phone number
Scroll down in the standby mode, and enter the first letters of the name. Scroll to the name that you want.
You can also use the following options in the Contacts menu:
Add name—To save names and phone numbers in the contact list
Delete—To delete names and phone numbers from the contact list individually or all at once
Copy—To copy names and phone numbers all at once or one by one from the internal contact list to the SIM contact list, or vice versa
Settings for contacts
Select Menu > Contacts > Settings and from the available options:
18

M e n u f u n c t i o n s
Memory in use—To select whether the names and phone numbers are saved in Phone or SIM card. When you change the SIM card, SIM card memory is automatically selected.
Contacts view—To select how the names and phone numbers are shown. When you view the Details of a contact with Contacts view set to Name list or Name only, the name or phone number saved in the SIM card memory is indicated by  and the name or phone number saved in the phone memory is indicated by
  .
.
Memory status—To check how many names and phone numbers are already saved and how many can still be saved in each contact list
■ Call log
The phone logs the phone numbers of missed, received, and dialed calls; the approximate length of your calls; and the number of sent and received messages.
The phone logs missed and received calls if it is switched on, within the network service area, and the network supports these functions.
Call timers
Select Menu > Call log >Call timers to view the approximate duration of the last call, all received calls, all dialed calls, or the approximate duration of all calls.
To reset the timers, select Clear timers, enter the security code, and select OK.
Note: The actual invoice for calls and services from your service provider may vary, depending upon network features, rounding off for billing, taxes and so forth.
■ Settings
In this menu, you can adjust various phone settings. To reset some menu settings to their default values, select Restore factory set.
19
M e n u f u n c t i o n s
Tone settings
Select Menu > Settings > Tone settings and from the available options:
Ringing tone—To set the tone for incoming calls
Ringing volume—To set the volume level for the ringing and message alert tones. If you set Ringing volume to be level 2 or above, your phone rings with the ringing volume ascending from level 1 to the level you have set when there is an incoming call.
Vibrating alert—To set the phone to vibrate when you receive a call or a text message
Message alert tone—To set the tone to sound when you receive a text message
Warning tones—To set the phone to sound tones, for example, when the battery is running out of power
Display settings
Select Menu > Settings > Display settings.
Select Power saver clock to set the phone to show the digital or classic clock and all the main display icons as a screen saver.
Profiles
You can customize the profiles to use certain features, such as ringing tones and screen saver.
Select Menu > Settings > Profiles, the profile that you want to modify, and Customize.
Time settings
Select Menu > Settings > Time settings.
Select Clock to hide or show the clock, to set the time, or to edit the time format.
If the battery was removed from the phone, you may need to set the time and date again.
20
M e n u f u n c t i o n s
Call settings
Select Menu > Settings > Call settings, and the following options:
Select Call forwarding (network service) to forward your incoming calls to your voice mailbox or to some other phone number. Scroll to the forward option you want and select Activate to set the selected forward option on and Cancel to set it off. To check whether the selected option is active, select Check status; to specify a delay for certain forwards, select Set delay time (not available for all forward options). Several forward options may be active at the same time. When Forward all voice calls is activated,  is shown on the display in the standby mode. To deactivate all call forwards, select Cancel all call forwarding.
Select Send my caller ID (network service) to determine if your phone number is displayed to or hidden from the person you are calling.
Select Automatic redial to set your phone to make up to 10 attempts to connect the call after an unsuccessful call attempt.
Call waiting (network service) to let the network notify you of a new incoming call while you have a call in progress.
Phone settings
Select Menu > Settings > Phone settings.
Select Language to select the language for the display texts.
Cost settings
Note: The actual invoice for calls and services from your service provider may vary, depending on network features, rounding off for billing, taxes, and so forth.
Select Menu > Settings > Cost settings and from the following options:
Prepaid tracker (network service)—To view information about prepaid credit
21

M e n u f u n c t i o n s
Note: When no more charging units or currency units are left, calls may only be possible to the official emergency number programmed into the device.
In-call timer—To turn the call time display on or off
Call summary—To turn the approximate call time report on or off
Call costs (network service)—To view the approximate cost of your last call or all calls in terms of units specified within the Show costs in function
Enhancement settings
Select Menu > Settings > Enhancement settings > Headset or Loopset.
Select Automatic answer to set the phone to automatically answer an incoming call after 5 seconds.
The accessory settings menu item becomes visible only after one of the accessories has been connected to the phone.
Right selection key setting
In the standby mode, you may select Go to to access a list of shortcuts. To define or organize the shortcuts, select Menu > Settings > R. navigation key settings. Scroll to Select options to select the functions that you want as shortcuts; scroll to Organize to organize the order of the functions in the shortcut list.
■ Clock
In the standby mode, select Menu > Clock > Alarm time to set the time for the alarm. Scroll to Alarm tone to select the tone for the alarm, Repeat alarm to set the alarm to sound only once or repeatedly on certain days of the week and Speaking clock to let the phone speak the time. When the alarm sounds, select Stop to stop the alarm or Snooze to stop the alarm and set it to ring again in 10 minutes.
22

M e n u f u n c t i o n s
If the alarm time is reached while the device is switched off, the device switches itself on and starts sounding the alarm tone. If you select Stop, the device asks whether you want to activate the device for calls. Select No to switch off the device or Yes to make and receive calls. Do not select Yes when wireless phone use may cause interference or danger.
■ Reminders
To save a short text note with an alarm, select Menu > Reminders > Add new. When the reminder time is reached, select Quit to stop the alarm or Postp. to let the phone alarm again in 10 minutes.
■ Extras
Calculator
Note: This calculator has limited accuracy and is designed for simple calculations.
Select Menu > Extras > Calculator.
1.Press keys 0 to 9 to insert digits and # to insert a decimal point. To change the sign of the entered number, press *.
2.Scroll up or down to highlight +, -, x, or /.
3.Repeat steps 1 and 2 if necessary.
4.To get the result, select Equals.
Converter
You can convert different measurement units.
23
M e n u f u n c t i o n s
In the standby mode, select Menu > Extras > Converter. To access your last five conversions, select Last 5 conv. You can also select from the six predefined unit categories.
You can add your own conversions with My conversions.
When doing a conversion, you may scroll up or down to swap the positions of the units in the conversion.
Composer
Select Menu > Extras > Composer and a tone. To create your own ringing tones, enter the notes. For example, press 4 for note f. Press 8 to shorten (-) and 9 to lengthen (+) the duration of the note or rest. Press 0 to insert a rest, * set the octave, and # to make the note sharp (not available for notes e and b).
After you complete the ringing tone, select Options > Play,
Save, Tempo, Send, Clear screen or Exit.
Leaving applications running in the background increases the demand on battery power and reduces the battery life.
■ SIM services
Your SIM card may provide additional services that you can access. This menu is shown only if it is supported by your SIM card. The name and contents of the menu depend on the SIM card.
For information, contact your service provider.
24

B a t t e r y i n f o r m a t i o n
5. Battery information
■ Charging and discharging
Your device is powered by a rechargeable battery. The full performance of a new battery is achieved only after two or three complete charge and discharge cycles. The battery can be charged and discharged hundreds of times, but it will eventually wear out. When the talk and standby times are noticeably shorter than normal, replace the battery. Use only Nokia approved batteries, and recharge your battery only with Nokia approved chargers designated for this device.
If a replacement battery is being used for the first time or if the battery has not been used for a prolonged period, it may be necessary to connect the charger and then disconnect and reconnect it to start the charging.
Unplug the charger from the electrical plug and the device when not in use. Do not leave fully charged battery connected to a charger, since overcharging may shorten its lifetime. If left unused, a fully charged battery will lose its charge over time.
If the battery is completely discharged, it may take a few minutes before the charging indicator appears on the display or before any calls can be made.
Use the battery only for its intended purpose. Never use any charger or battery that is damaged.
Do not short-circuit the battery. Accidental short-circuiting can occur when a metallic object such as a coin, clip, or pen causes direct connection of the positive (+) and negative (-) terminals of the battery. (These look like metal strips on the battery.) This might happen, for example, when you carry a spare battery in your pocket or purse. Short-circuiting the terminals may damage the battery or the connecting object.
25
B a t t e r y i n f o r m a t i o n
Leaving the battery in hot or cold places, such as in a closed car in summer or winter conditions, will reduce the capacity and lifetime of the battery. Always try to keep the battery between 15°C and 25°C (59°F and 77°F). A device with a hot or cold battery may not work temporarily, even when the battery is fully charged. Battery performance is particularly limited in temperatures well below freezing.
Do not dispose of batteries in a fire as they may explode. Batteries may also explode if damaged. Dispose of batteries according to local regulations. Please recycle when possible. Do not dispose as household waste.
■ Nokia battery authentication guidelines
Always use original Nokia batteries for your safety. To check that you are getting an original Nokia battery, purchase it from an authorized Nokia dealer, look for the Nokia Original Enhancements logo on the packaging, and inspect the hologram label using the following steps:
Successful completion of the four steps is not a total assurance of the authenticity of the battery. If you have any reason to believe that your battery is not an authentic original Nokia battery, you should refrain from using it and take it to the nearest authorized Nokia service point or dealer for assistance. Your authorized Nokia service point or dealer will inspect the battery for authenticity. If authenticity cannot be verified, return the battery to the place of purchase.
26

B a t t e r y i n f o r m a t i o n
Authenticate hologram
1.When looking at the hologram on the label, youshould see the Nokia connecting hands symbol from one angle and the Nokia Original Enhancements logo when looking from another angle.
2.When you angle the hologram left, right, down, and up, you should see 1, 2, 3, and 4 dots on each side respectively.
3.Scratch the side of the label to reveal a 20-digit code, for example, 12345678919876543210. Turn the battery so that the numbers are facing upwards. The 20-digit code reads starting from the number at the top row followed by the bottom row.
4.Confirm that the 20-digit code is valid by following the instructions at www.nokia.com/batterycheck.
27
 Loading...