


Metabo DKG 90/25, DKG 90/40, DKG 114/65, DKNG 40/50, DPN 25 Manual
...DKG 80/16
DKG 90/25
DKG 90/40
DKG 114/65
DKNG 40/50
DPN 25
DSN 50
de |
Originalbetriebsanleitung 6 |
nopl |
Oryginalna instrukcja obsługi 37 |
en |
Original instructions 11 |
plno |
Originalbruksanvisning 42 |
fr |
Notice d'utilisation originale 16 |
hu |
Eredeti üzemeltetési útmutató 47 |
nl |
Oorspronkelijke gebruiksaanwijzing 22 |
ru |
52 |
es |
Manual original 27 |
cs |
|
fi |
Alkuperäinen käyttöohje 32 |
Originální návod k použití 58 |
www.metabo.com
DKG 80/16
16 |
9 |
10 |
6 11 |
12 |

 13
13
2 |
15 |
14 |
DPN 25
16 9 10 6 11 12
4 |
13 |
|
|
5 |
|
|
|
|
|
1 |
|
|
|
|
|
2 |
|
15 |
14 |
|
DKG 90/25 |
6 |
9 |
10 |
11 |
12 |
|
|
|
|
|
 13
13
4 


5  3
3
2 |
15 |
14 |
2

DKG 90/40 |
6 |
7 |
9 |
10 |
11 |
12 |
4 |
|
|
|
5 |
3 |
|
|
|
|
|
|
|
2 |
14 |
15 |
DSN 50 |
6 |
7 |
9 |
10 |
11 |
12 |
|
|
|
|
|
|
13 |
4 |
|
|
|
|
|
|
5 |
3 |
|
|
|
|
|
|
|
|
|
|
|
|
|
|
2 |
|
15 |
|
14 |
DKG 114/65 |
6 |
7 |
8 9 |
10 |
11 |
12 |
|
|
|
|
|
|
4 |
|
|
5 |
|
|
3 |
|
|
2 |
14 |
15 |
3
DKNG 40/50
6 |
7 |
9 |
10 |
11 12 |
 13
13
4
5
3
2
15 14
4

|
|
DKG |
DKG |
DKG |
DKG |
DKNG |
DPN |
DSN |
|
|
11. |
80/16 |
90/25 |
90/40 |
114/65 |
40/50 |
25 |
50 |
|
|
|
|
|
|
|
|
|
||
|
|
|
|
|
|
|
|
||
*1) Serial Number |
015645.. |
015655.. |
015665.. |
015675.. |
015625.. |
015635.. |
015685.. |
||
|
|
|
|
|
|
|
|
|
|
V |
l |
0,66 |
0,52 |
0,962 |
1,5 |
0,66 |
0,34 |
0,6 |
|
|
|
|
|
|
|
|
|
|
|
p |
bar |
5,0 - 7,0 |
5,0 - 7,0 |
5,0 - 7,0 |
5,0 - 8,0 |
5,0 - 7,0 |
4,5 - 7,0 |
5,0 - 8,0 |
|
|
|
|
|
|
|
|
|
|
|
pmax. |
bar |
7,0 |
7,0 |
7,0 |
8,0 |
7,0 |
7,0 |
8,0 |
|
LC |
l/min |
>=50 |
>=50 |
>=50 |
>=100 |
>=50 |
>=50 |
>=50 |
|
|
|
|
|
|
|
|
|
|
|
AS |
- |
C |
S1 |
S1 |
C |
C |
S2/C |
C |
|
NTyp |
- |
SKN |
- |
- |
- |
SKN |
PN |
SKN |
|
NL |
mm (in) |
15-50 |
- |
- |
- |
15-50 |
15-25 |
15-50 |
|
NT |
mm (in) |
1,25 x |
- |
- |
- |
1,25 x |
0,64 |
1,25 x |
|
1,00 |
1,00 |
1,00 |
|||||||
|
|
|
|
|
|
||||
|
|
|
|
|
|
|
|
|
|
KTyp |
- |
Type 90 |
Type 90 |
Type 90 |
Type 114 |
Type 90 |
- |
- |
|
Type ES |
Type ES |
Type ES |
|||||||
|
|
|
|
|
|
||||
|
|
|
|
|
|
|
|
|
|
KB |
mm (in) |
5,8 |
5,8 |
5,8 |
11,1 |
5,8 |
- |
- |
|
|
|
|
|
|
|
|
|
|
|
KL |
mm (in) |
15-40 |
13,5-25 |
13-40 |
32-65 |
15x40 |
- |
- |
|
|
|
|
|
|
|
|
|
|
|
KT |
mm |
1,25 x |
1,25 x |
1,25 x |
1,70 x |
1,25 x |
|
|
|
1,00 |
1,00 |
1,00 |
1,90 |
1,00 |
- |
- |
|||
|
|
|
|
||||||
|
|
|
|
|
|
|
|
|
|
|
|
295 |
256 |
272 |
369 |
295 |
226 |
252 |
|
A |
mm |
x |
x |
x |
x |
x |
x |
x |
|
60 |
59,4 |
59,4 |
98 |
60 |
42 |
59 |
|||
|
|
x |
x |
x |
x |
x |
x |
x |
|
|
|
235 |
202 |
245 |
338 |
235 |
160 |
249 |
|
|
|
|
|
|
|
|
|
|
|
m |
kg (lbs) |
1,1 (2.4) |
0,72 (1.6) |
0,92 (2.1) |
2,53 (5.6) |
1,2 (2.6) |
0,96 (2.1) |
0,92 (2.0) |
|
|
|
|
|
|
|
|
|
|
|
ah/Kh |
m/s2 |
2,7 / 1,35 |
2,1 / 1,05 |
2,33 / |
3,17 / |
2,7 / 1,35 |
2,1 / 1,05 |
3,45 / |
|
1,17 |
1,58 |
1,72 |
|||||||
|
|
|
|
|
|
||||
|
|
|
|
|
|
|
|
|
|
LpA/KpA |
dB(A) |
85 / 4 |
85,6 / 4 |
87,2 / 4 |
87 / 4 |
85 / 4 |
77,6 / 4 |
85 / 4 |
|
LWA/KWA |
dB(A) |
98 / 4 |
98,6 / 4 |
100,2/ 4 |
93,6 / 4 |
98 / 4 |
90,6 / 4 |
98 / 4 |
|
*2) 2006/42/EC
*3) EN ISO 12100:2010, EN 792-13:2000+A1:2008
2016-01-20, Volker Siegle
Direktor Produktentstehung & Qualität (Vice President Product Engineering & Quality) *4) Metabowerke GmbH - Metabo-Allee 1 - 72622 Nuertingen, Germany
5

de DEUTSCH
Originalbetriebsanleitung
1. Konformitätserklärung
Wir erklären in alleiniger Verantwortlichkeit: Diese Druckluft-Tacker, identifiziert durch Type und Seriennummer *1), entsprechen allen einschlägigen Bestimmungen der Richtlinien *2) und Normen *3). Technische Unterlagen bei *4) - siehe Seite 3.
2.Bestimmungsgemäße Verwendung
DKG 80/16, DKG 90/25, DKG 90/40, DKG 114/65 ist bestimmt zum Eintreiben von Klammern im professionellen Bereich.
DKNG 40/50 ist bestimmt zum Eintreiben von Klammern und Stauchkopfnägeln im professionellen Bereich.
DPN 25, DSN 50 ist bestimmt zum Eintreiben von Stauchkopfnägeln im professionellen Bereich.
Eintreibgerät und Eintreibgegenstände sind als ein sicherheitstechnisches System anzusehen. Nur die in dieser Betriebsanleitung, für das jeweilige Gerät genannten Eintreibgegenstände verwenden (siehe Kap. 11.Technische Daten).
Dieses Werkzeug darf nur mit einer Druckluftversorgung angetrieben werden. Nicht mit explosiven, brennbaren oder gesundheitsgefährdenden Gasen oder mit Sauerstoff betreiben. Der auf dem Druckluftwerkzeug angegebene maximal zulässige Arbeitsdruck darf nicht überschritten werden. Nicht verwenden als Hebel, Brechoder Schlagwerkzeug.
Jede andere Verwendung ist bestimmungswidrig. Durch bestimmungswidrige Verwendung, Veränderungen am Druckluftwerkzeug oder durch den Gebrauch von Teilen, die nicht vom Hersteller geprüft und freigegeben sind, können unvorhersehbare Schäden entstehen!
Für Schäden durch nicht bestimmungsgemäßen Gebrauch haftet allein der Benutzer.
Allgemein anerkannte Unfallverhütungsvorschriften und beigelegte Sicherheitshinweise müssen beachtet werden.
3.Allgemeine Sicherheitshinweise
Beachten Sie die mit diesem Symbol gekennzeichneten Textstellen zu Ihrem eigenen Schutz und zum Schutz Ihres Druckluftwerkzeugs!
WARNUNG – Zur Verringerung eines Verletzungsrisikos Betriebsanleitung lesen.
WARNUNG Lesen Sie alle Sicherheitshinweise und Anweisungen. Versäumnisse
bei der Einhaltung der Sicherheitshinweise und
6
Anweisungen können elektrischen Schlag, Brand und/oder schwere Verletzungen verursachen.
Bewahren Sie alle Sicherheitshinweise und Anweisungen für die Zukunft auf.
Geben Sie Ihr Druckluftwerkzeug nur zusammen mit diesen Dokumenten weiter.
-Der Benutzer oder der Arbeitgeber des Benutzers muss die spezifischen Risiken bewerten, die aufgrund jeder Verwendung auftreten können.
-Die Sicherheitshinweise sind vor dem Einrichten, dem Betrieb, der Reparatur, der Wartung und dem Austausch von Eintreibgegenständen sowie vor der Arbeit in der Nähe des Druckluftwerkzeugs zu lesen und müssen verstanden werden. Ist dies nicht der Fall, so kann dies zu schweren körperlichen Verletzungen führen.
-Das Druckluftwerkzeug sollte ausschließlich von qualifizierten und geschulten Bedienern eingerichtet, eingestellt oder verwendet werden.
-Das Druckluftwerkzeug darf nicht verändert werden. Veränderungen können die Wirksamkeit der Sicherheitsmaßnahmen verringern und die Risiken für den Bediener erhöhen.
-Benutzen Sie niemals beschädigte Druckluftwerkzeuge. Pflegen Sie Druckluftwerkzeuge mit Sorgfalt. Kontrollieren Sie regelmäßig, ob bewegliche Teile einwandfrei funktionieren und nicht klemmen, ob Teile gebrochen oder so beschädigt sind, dass die Funktion des Druckluftwerkzeugs beeinträchtigt ist. Prüfen sie Schilder und Aufschriften auf Vollständigkeit und Lesbarkeit. Lassen Sie beschädigte Teile vor dem Einsatz des Gerätes reparieren oder erneuern. Viele Unfälle haben ihre Ursache in schlecht gewarteten Druckluftwerkzeugen.
4.Spezielle Sicherheitshinweise
4.1Gefährdungen durch herausgeschleuderte Teile
-Bei einem Bruch des Werkstücks, von Eintreibgegenständen oder des Druckluftwerkzeugs, können Teile mit hoher Geschwindigkeit herausgeschleudert werden.
-Beim Betrieb, beim Austausch von Zubehörteilen oder Eintreibgegenständen sowie bei Reparaturoder Wartungsarbeiten am Druckluftwerkzeug ist immer ein schlagfester Augenschutz zu tragen.
Der Grad des erforderlichen Schutzes sollte für jeden einzelnen Einsatz gesondert bewertet werden.
-Stellen Sie sicher, dass das Werkstück sicher befestigt ist.
-Trennen Sie das Druckluftwerkzeug von der Druckluftversorgung, bevor Sie das Einsatzwerkzeug oder Zubehörteile austauschen oder eine Einstellung oder Wartung oder Reinigung vorgenommen wird.
-Stellen sie sicher, dass auch für andere Personen keine Gefahren entstehen.
4.2Gefährdungen im Betrieb
-Der Bediener und das Wartungspersonal müssen physisch in der Lage sein, die Größe, das Gewicht und die Leistung des Druckluftwerkzeugs zu beherrschen.
-Halten Sie das Druckluftwerkzeug richtig: Seien Sie bereit, den üblichen oder plötzlichen Bewegungen entgegenzuwirken – halten Sie beide Hände bereit.
-Sorgen Sie für einen sicheren Stand und halten Sie jederzeit das Gleichgewicht.
-Vermeiden Sie eine unbeabsichtigte Inbetriebnahme. Bei einer Unterbrechung der Luftversorgung, den Auslöser (9) nicht betätigen.
-Verwenden Sie nur die vom Hersteller empfohlenen Schmiermittel.
-Tragen Sie persönliche Schutzausrüstung und immer eine Schutzbrille und einen Gehörschutz. Das Tragen persönlicher Schutzausrüstung, wie rutschfeste Sicherheitsschuhe, verringert das Risiko von Verletzungen.
-Richten Sie ein betriebsbereites Eintreibgerät niemals direkt gegen sich selbst oder auf andere Personen.
-Halten Sie das Eintreibgerät beim Arbeiten so, dass Kopf und Körper bei einem möglichen Rückstoß nicht verletzt werden können.
-Lösen Sie das Eintreibgerät niemals in den freien Raum aus.
-Tragen Sie das Eintreibgerät in betriebsbereitem Zustand nur am Handgriff (10) und nie mit betätigtem Auslöser (9).
-Achten Sie auf die Arbeitsplatzverhältnisse. Eintreibgegenstände können eventuell dünne Werkstücke durchschlagen oder beim Arbeiten an Ecken und Kanten von Werkstücken abgleiten und dabei Personen gefährden.
4.3Gefährdungen durch Zubehörteile/ Eintreibgegenstände
-Trennen Sie das Druckluftwerkzeug von der Luftversorgung, bevor sie die Schutzkappe (1) aufstecken oder abnehmen.
-Verwenden Sie nur Eintreibgegenstände, die für dieses Gerät bestimmt sind und die in dieser Betriebsanleitung angegebenen Anforderungen und Kenndaten erfüllen.
4.4Gefährdungen am Arbeitsplatz
-Ausrutschen, Stolpern und Stürzen sind Hauptgründe für Verletzungen am Arbeitsplatz. Achten Sie auf Oberflächen, die durch den Gebrauch des Druckluftwerkzeugs rutschig geworden sein können, und auf durch den Luftschlauch bedingte Gefährdungen durch Stolpern.
-Gehen Sie in unbekannten Umgebungen mit Vorsicht vor. Es können versteckte Gefährdungen durch Stromkabel oder sonstige Versorgungsleitungen gegeben sein.
-Das Druckluftwerkzeug ist nicht zum Einsatz in explosionsgefährdeten Atmosphären bestimmt und nicht gegen den Kontakt mit elektrischen Stromquellen isoliert.
-Überzeugen Sie sich, dass sich an der Stelle, die bearbeitet werden soll, keine Strom-, Wasser-
DEUTSCH de
oder Gasleitungen befinden (z.B. mit Hilfe eines Metallsuchgerätes).
4.5Gefährdungen durch Lärm
-Die Einwirkung hoher Lärmpegel kann bei ungenügendem Gehörschutz zu dauerhaften Gehörschäden, Gehörverlust und anderen Problemen, wie z. B. Tinnitus (Klingeln, Sausen, Pfeifen oder Summen im Ohr), führen.
-Es ist unerlässlich, eine Risikobewertung in Bezug auf diese Gefährdungen durchzuführen und geeignete Regelungsmechanismen umzusetzen.
-Durch entsprechende Arbeitsplatzgestaltung, z.B. Auflegen von Werkstücken auf schalldämpfende Unterlagen, lassen sich Geräuschpegel auch mindern.
-Verwenden Sie Gehörschutzausrüstungen nach den Anweisungen Ihres Arbeitgebers und wie nach den Arbeitsund Gesundheitsschutzvorschriften gefordert.
-Das Druckluftwerkzeug ist nach den in dieser Anleitung enthaltenen Empfehlungen zu betreiben und zu warten, um eine unnötige Erhöhung der Lärmpegel zu vermeiden.
-Die Verbrauchsmaterialien und das Einsatzwerkzeug sind den Empfehlungen dieser Anleitung entsprechend auszuwählen, zu warten und zu ersetzen, um eine unnötige Erhöhung des Lärmpegels zu vermeiden.
-Der integrierte Schalldämpfer darf nicht entfernt werden und muss sich in einem guten Arbeitszustand befinden.
4.6Zusätzliche Sicherheitsanweisungen
-Druckluft kann ernsthafte Verletzungen verursachen.
-Wenn das Druckluftwerkzeug nicht in Gebrauch ist, vor dem Austausch von Zubehörteilen oder bei der Ausführung von Reparaturarbeiten ist stets die Luftzufuhr abzusperren, der Luftschlauch drucklos zu machen und das Druckluftwerkzeug von der Druckluftzufuhr zu trennen.
-Richten Sie den Luftstrom niemals auf sich selbst oder gegen andere Personen.
-Umherschlagende Schläuche können ernsthafte Verletzungen verursachen. Überprüfen Sie daher immer, ob die Schläuche und ihre Befestigungsmittel unbeschädigt sind und sich nicht gelöst haben.
-Falls Universal-Drehkupplungen (Klauenkupplungen) verwendet werden, müssen Arretierstifte eingesetzt werden und verwenden Sie Whipcheck-Schlauchsicherungen, um Schutz für den Fall eines Versagens der Verbindung des Schlauchs mit dem Druckluftwerkzeug oder von Schläuchen untereinander zu bieten.
-Sorgen Sie dafür, dass der auf dem Druckluftwerkzeug angegebene Höchstdruck nicht überschritten wird.
-Tragen Sie Druckluftwerkzeuge niemals am Schlauch.
4.7Weitere Sicherheitshinweise
-Beachten Sie gegebenenfalls spezielle Arbeitsschutzoder Unfallverhütungs-
7

de DEUTSCH
Vorschriften für den Umgang mit Kompressoren und Druckluftwerkzeugen.
-Stellen Sie sicher, dass der in den Technischen Daten angegebene maximal zulässige Arbeitsdruck nicht überschritten wird.
-Überlasten Sie dieses Werkzeug nicht – benutzen Sie dieses Werkzeug nur im Leistungsbereich, der in den Technischen Daten angegeben ist.
-Verwenden Sie unbedenkliche Schmierstoffe. Sorgen sie für ausreichende Belüftung des Arbeitsplatzes. Bei erhöhtem Austrag: Druckluftwerkzeug prüfen und ggf. reparieren lassen.
-Benutzen Sie dieses Werkzeug nicht, wenn Sie unkonzentriert sind. Seien Sie aufmerksam, achten Sie darauf, was Sie tun, und gehen Sie mit Vernunft an die Arbeit mit einem Druckluftwerkzeug. Benutzen Sie kein Werkzeug, wenn Sie müde sind oder unter dem Einfluss von Drogen, Alkohol oder Medikamenten stehen. Ein Moment der Unachtsamkeit beim Gebrauch des Werkzeuges kann zu ernsthaften Verletzungen führen.
-Halten Sie Ihren Arbeitsbereich sauber und gut beleuchtet. Unordnung oder unbeleuchtete Arbeitsbereiche können zu Unfällen führen.
-Druckluftwerkzeuge vor Kindern sichern.
-Werkzeug nicht ungeschützt im Freien oder in feuchter Umgebung aufbewahren.
-Schützen Sie das Druckluftwerkzeug, insbesondere den Druckluftanschluss und die Bedienelemente vor Staub und Schmutz.
-Eintreibgeräte mit Kontaktauslösung (siehe technische Daten) sind mit dem Bildzeichen "Nicht von Gerüsten oder Leitern benutzen" gekennzeichnet und dürfen für bestimmte Anwendungen nicht benutzt werden, z. B.: - Wenn das Wechseln von einer Eintreibstelle zur anderen über Gerüste, Treppen, Leitern oder leiterähnliche Konstruktionen, wie z. B. Dachlattungen, erfolgt. -Das Schließen von Kisten oder Verschlägen. - Beim Anbringen von Transportsicherungen, z. B. auf Fahrzeugen und Waggons.
Die Informationen in dieser Betriebsanleitung sind wie folgt gekennzeichnet:
Gefahr! Warnung vor Personenschäden oder Umweltschäden.
Achtung. Warnung vor Sachschäden.
4.8Symbole auf dem Druckluftwerkzeug
Vor der Inbetriebnahme die
Bedienungsanleitung lesen.
Augenschutz tragen
Gehörschutz tragen
Nicht von Gerüsten oder Leitern benutzen
Gerät ist mit einer Auslösesicherung ausgestattet.
-Prüfen Sie vor jedem Arbeitsbeginn die einwandfreie Funktion der Sicherheitsund Auslöseeinrichtungen und achten Sie auf den festen Sitz von Schrauben und Muttern.
-Am Gerät dürfen keine Manipulationen, Notreparaturen oder Zweckentfremdungen vorgenommen werden.
-Demontieren oder blockieren Sie niemals Teile wie z. B. die Auslöseeinrichtung des Eintreibgerätes.
-Vermeiden Sie jegliche Schwächungen oder Beschädigungen des Gerätes.
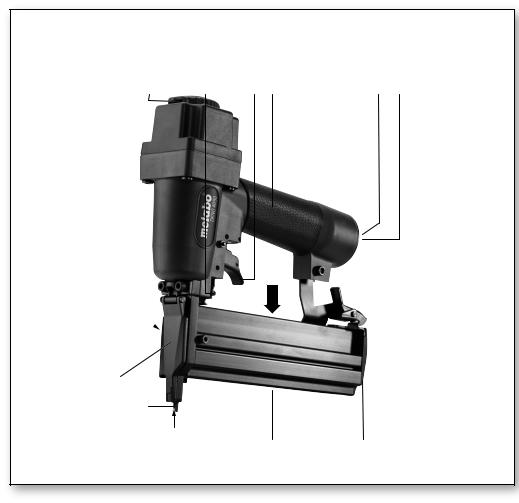
5. Überblick
Siehe Seite 2.
1 Schutzkappe *
2 Mündung
3 Auslösesicherung *
4Hebel / Schrauben (zum Öffnen der Wartungsklappe)
5 Wartungsklappe
6 Luftaustritt / Abluftblende *
7 Eintreibtiefenregulierung *
8DKG 114/65: Schalter (Betriebsart Einzelauslösung mit Sicherungsfolge oder Kontaktauslösung vorwählen) *
9 Auslöser
10Handgriff
11Druckluftanschluss mit Filter
12Stecknippel 1/4"
13Sperrhebel *
14Magazinschieber
15Magazin
16Entriegelungshebel (bei Geräten ohne Auslösesicherung) *
* ausstattungsabhängig
6.Betrieb
6.1Vor dem ersten Betrieb
Stecknippel (12) einschrauben.
6.2An Druckluftleitung anschließen
Entleeren Sie das Magazin (15) um zu verhindern, dass beim Anschließen ein Eintreibgegenstand ausgestoßen wird. (Falls sich infolge von Reparaturund Wartungsarbeiten oder Transport innere Teile des Eintreibgerätes nicht in
Ausgangsstellung befinden).
Nur an Druckluftleitungen anschließen, bei denen sichergestellt ist, dass ein
Überschreiten des zulässigen Betriebsdruckes von mehr als 10% verhindert ist (z.B. über Druckminderer).
Nur Schnellkupplungen verwenden. So anschließen, dass der unverschließbare Stecknippel am Gerät angebracht ist, so dass nach
8

dem Trennen keine Druckluft mehr im Gerät vorhanden ist.
Um die volle Leistung Ihres Druckluftwerkzeuges zu erzielen, verwenden Sie bitte stets Druckluftschläuche mit einem Innendurchmesser von mindestens 9 mm. Ein zu geringer Innendurchmesser kann die Leistung deutlich mindern.
Achtung. Die Druckluftleitung darf kein Kondenswasser enthalten.
Achtung. Damit dieses Werkzeug lange einsatzbereit bleibt, muss es ausreichend mit
Pneumatiköl versorgt werden. Dies kann wie folgt geschehen:
–Geölte Druckluft verwenden durch Anbau eines Nebelölers.
–Ohne Nebelöler: Täglich von Hand über den Druckluftanschluss ölen. Ca. 3-5 Tropfen Pneumatiköl je 15 Betriebsminuten bei Dauereinsatz.
War das Werkzeug mehrere Tage außer Betrieb, etwa 5 Tropfen Pneumatiköl von Hand in den Druckluftanschluss geben.
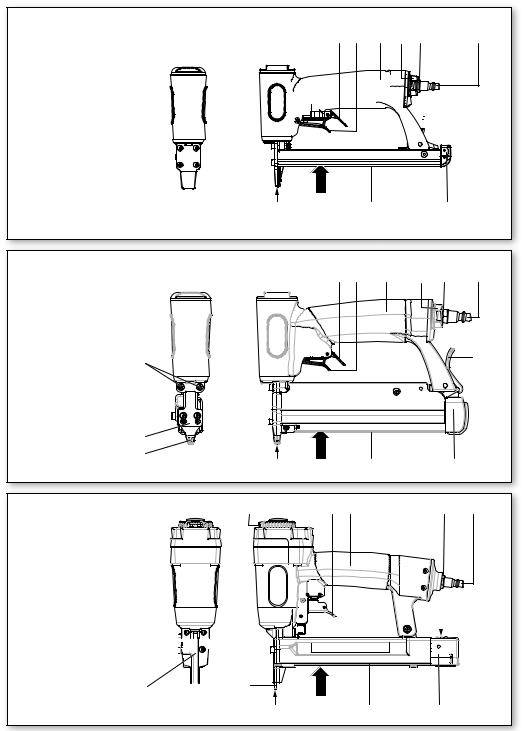
6.3Magazin befüllen
Zum Füllen des Magazins (15) das Gerät so halten, dass die Mündung (2) weder auf den
eigenen Körper noch auf andere Personen gerichtet ist.
Zum Füllen des Magazins (15) das Gerät so halten, dass die Mündung (2) weder auf den
eigenen Körper noch auf andere Personen gerichtet ist.
Siehe Abbildung am Anfang der Betriebsanleitung.
-Sperrhebel (13) (ausstattungsabhängig) betätigen und dann...
-Magazinschieber (14) zurückziehen.
-Die für das Gerät geeigneten Eintreibgegenstände (siehe Kap. 8. und 11.) in das Magazin einlegen.
-Den Magazinschieber (14) einschieben (bis dieser am Sperrhebel (13) (ausstattungsabhängig) einrastet).
6.4Druckluftwerkzeug einstellen / benutzen
Achtung. Leerschläge vermeiden - nicht bei leerem Magazin auslösen.
1.Die Abluftblende (6) (ausstattungsabhängig) in die gewünschte Stellung drehen.
2.DKG 114/65: Betriebsart Einzelauslösung oder Kontaktauslösung vorwählen. Dazu Schalter (8) von der rechten Seite eindrücken und auf der Linken Seite verdrehen. (Erläuterung siehe Kapitel 11.)
3.Bei empfindlichen Werkstück-Oberflächen die Schutzkappe (1) aufstecken.
4.Druckluftwerkzeug an die Druckluftversorgung anschließen (siehe Kapitel 6.2).
5.Magazin (15) befüllen (siehe Kapitel 6.3).
DEUTSCH de
6.Stellen Sie den Luftdruck zunächst auf den kleinsten Wert des empfohlenen Arbeitsdruckes ein.
7.Das Eintreibgerät mit der Mündung (2) auf das Werkstück drücken und den Auslöser (9) betätigen (siehe Kapitel 6.5).
8.Erhöhen oder senken Sie den Arbeitsdruck in Schritten von 0,5 bar, bis das gewünschte Eintreibergebnis erzielt wird.
Das Eintreibgerät sollte mit dem geringstmöglichen Arbeitsdruck betrieben
werden. (Das spart Energie, verringert den Geräuschpegel und reduziert den Verschleiß)
Achten Sie darauf, dass der maximale Arbeitsdruck nicht überschritten wird.
9.Zur Feinjustierung kann die Eintreibtiefe an der Eintreibtiefenregulierung (7) (austattungsabhängig) eingestellt werden.
10.Bei verklemmten Eintreibgegenständen, das Gerät von der Druckluftquelle trennen, den Hebel (4) zum Öffnen der Wartungsklappe (9) betätigen und den defekten Eintreibgegenstand entfernen.
11.Bei längeren Pausen oder bei Arbeitsende das Gerät von der Druckluftquelle trennen und das Magazin entleeren.
6.5Druckluftwerkzeug auslösen
Achtung: DKG 80/16, DPN 25 arbeitet ohne Auslösesicherung. Mit dem Mittelfinger das Gerät am Entriegelungshebel (16) entriegeln, erst
dann kann mit dem Zeigefinger der Schlag am Auslöser (9) ausgelöst werden.
Die anderen Eintreibgeräte (alle außer DKG 80/16, DPN 25) sind mit einer
Auslösesicherung (3) ausgestattet und mit einem auf der Spitze stehenenden gleichseitigen Dreieck gekennzeichnet. Die Auslösesicherung ermöglicht ein Arbeiten nur, wenn die Auslösesicherung (3) auf die Eintreibstelle gedrückt und der Auslöser (9) betätigt wird. Diese Geräte dürfen nur mit funktionierender Auslösesicherung verwendet werden.
Ein defektes oder nicht einwandfrei arbeitendes Gerät sofort von der
Druckluftquelle trennen und einem Sachkundigen zur Überprüfung übergeben.
.
7. Wartung und Pflege
Gefahr! Vor allen Arbeiten am Werkzeug Druckluftanschluss trennen und Magazin
entleeren.
Gefahr! Weitergehende Wartungsoder Reparaturarbeiten, als die in diesem Kapitel
beschriebenen, dürfen nur Fachkräfte durchführen.
-Druckluftanschlüsse von Eintreibgerät und Schlauchleitung vor Verschmutzung schützen.
-Stellen Sie durch regelmäßige Wartung die Sicherheit des Druckluftwerkzeugs sicher.
-Verschraubungen auf festen Sitz prüfen, ggf.
festziehen. |
9 |

de DEUTSCH
-Filter im Druckluftanschluss mindestens wöchentlich reinigen.
-Es wird empfohlen, dem Druckluftwerkzeug einen Druckminderer mit Wasserabscheider und einen Öler vorzuschalten.
-Bei erhöhtem Öloder Luftaustritt das Druckluftwerkzeug prüfen und ggf. instand setzen lassen. (Siehe Kapitel 9.)
f
8. Zubehör
Verwenden Sie nur original Metabo Zubehör.
Verwenden Sie nur Zubehör, das für dieses Druckluftwerkzeug bestimmt ist und die in dieser Betriebsanleitung angegebenen Anforderungen und Kenndaten erfüllt.
Zubehör-Komplettprogramm siehe www.metabo.com oder Katalog.
9. Reparatur
Gefahr! Reparaturen an Druckluftwerkzeugen dürfen nur Sachkundige mit
original Metabo-Ersatzteilen unter Beachtung der in der Betriebsanleitung enthaltenen Angaben ausführen!
(Als Sachkundige gelten Personen, die aufgrund ihrer fachlichen Ausbildung und Erfahrung ausreichende Kenntnisse auf dem Gebiet der Eintreibgeräte haben und mit den einschlägigen staatlichen Arbeitsschutzvorschriften, Unfallverhütungsvorschriften, Richtlinien und allgemein anerkannten Regeln der Technik soweit vertraut sind, dass sie den arbeitssicheren Zustand von Eintreibgeräten beurteilen können.)
Mit reparaturbedürftigen Metabo Druckluftwerkzeugen wenden Sie sich bitte an Ihre Metabo-Vertretung. Adressen siehe www.metabo.com.
Ersatzteillisten können Sie unter www.metabo.com herunterladen.
10. Umweltschutz
Befolgen Sie nationale Vorschriften zu umweltgerechter Entsorgung und zum Recycling ausgedienter Druckluftwerkzeuge, Verpackungen und Zubehör. Es dürfen keine Gefährdungen für Personen und Umwelt entstehen.
11. Technische Daten
Erläuterungen zu den Angaben auf Seite 3.
Änderungen im Sinne des technischen Fortschritts vorbehalten.
V= Luftverbrauch pro Eintreibvorgang
p= empfohlener Arbeitsdruck
pmax. |
= |
maximal zulässiger Arbeitsdruck |
|
LC |
= |
Füllleistung geeigneter Kompressoren |
|
AS |
= |
Auslöseart: |
|
|
|
S1 |
= Einzelauslösung |
|
|
S2 |
= Einzelauslösung mit |
10 |
|
Sicherungsfolge |
|
C = Kontaktauslösung
Erläuterung:
Einzelauslösung: Für jeden Eintreibvorgang muss der Auslöser (9) betätigt werden. Für jeden weiteren Eintreibvorgang muss der Auslöser vorher in die Ausgangslage gebracht werden.
Einzelauslösung mit Sicherungsfolge: Für jeden Eintreibvorgang müssen Auslöser (9) und Auslösesicherung (3) betätigt werden, sodass ein einzelner Eintreibvorgang über den Auslöser bewirkt wird, nachdem die Mündung des Gerätes auf der Eintreibstelle aufgesetzt ist. Weitere Eintreibvorgänge können nur dann ausgelöst werden, wenn der Auslöser und die Auslösesicherung in der Ausgangslage gewesen sind.
Kontaktauslösung: Für jeden Eintreibvorgang müssen Auslöser (9) und Auslösesicherung (3) betätigt werden, wobei die Reihenfolge der Betätigung nicht vorgegeben ist. Für anschließende Eintreibvorgänge reicht es aus, wenn entweder der Auslöser betätigt bleibt und die Auslösesicherung betätigt wird, oder umgekehrt.
verwendbare Stauchkopfnägel:
NTyp = Type
NL = Länge
NT = Drahtstärke
verwendbare Klammern:
KTyp |
= |
Type |
KB |
= |
Rückenbreite |
KL |
= |
Länge |
KT |
= |
Drahtstärke |
A |
= |
Abmessungen: |
|
|
Länge x Breite x Höhe |
m= Gewicht (ohne Eintreibgegenstände)
Die angegebenen technischen Daten sind toleranzbehaftet (entsprechend den jeweils gültigen Standards).
Emissionswerte
Diese Werte ermöglichen die Abschätzung der Emissionen des Werkzeugs und den Vergleich verschiedener Werkzeuge. Je nach Einsatzbedingung, Zustand des Werkzeuges oder der Einsatzwerkzeuge kann die tatsächliche Belastung höher oder geringer ausfallen. Berücksichtigen Sie zur Abschätzung Arbeitspausen und Phasen geringerer Belastung. Legen Sie aufgrund entsprechend angepasster Schätzwerte Schutzmaßnahmen für den Anwender fest, z.B. organisatorische Maßnahmen.
Vibration (gewichteter Effektivwert der Beschleunigung; EN 28662-1, ISO 8662-11) :
ah |
=Schwingungsemissionswert |
Kh |
=Messunsicherheit (Schwingung) |
Schallpegel (EN 12549): |
|
LpA |
=Schalldruckpegel |
LWA |
=Schallleistungspegel |
KpA, KWA= Messunsicherheit
 Gehörschutz tragen!
ENGLISH en
Original instructions
1. Declaration of Conformity
Under our sole responsibility, we hereby declare that these compressed air stapler guns, identified by type and serial number *1), meet all relevant requirements of directives *2) and standards *3). Technical documents for *4) - see Page 3.
2. Specified Use
DKG 80/16, DKG 90/25, DKG 90/40, DKG 114/65 are designed for driving in staples in the professional sector.
DKNG 40/50 is designed for driving in staples and finishing nails in the professional sector.
DPN 25, DSN 50 is designed for driving in finishing nails in the professional sector.
The stapler and fasteners should be regarded as a technical safety system. Only use the fasteners named in these operating instructions for the respective tool (see Section 11. Technical Specifications).
This air tool must only be operated with a compressed air supply. Do not operate with explosive, combustible or harmful gases, or with oxygen. The maximum supply pressure specified on the air tool must never be exceeded. It must not be used as a lever, crushing tool or striking tool.
Any other use does not comply with the intended purpose. Unspecified use, modification of the air tool or use of parts that have not been tested and approved by the manufacturer can cause unforeseeable damage.
The user bears sole responsibility for any damage caused by improper use.
Generally accepted accident prevention regulations and the enclosed safety information must be observed.
3. General Safety Instructions
For your own protection and for the protection of your air tool, carefully observe all parts of the text that are marked with this symbol!
WARNING – Reading the operating instructions will reduce the risk of injury.
WARNING Read all safety warnings and instructions. Failure to follow all safety warn-
ings and instructions may result in electric shock, fire and/or serious injury.
Keep all safety instructions and information for future reference.
Pass on your air tool only together with these documents.
-The user or user's employer must evaluate the specific risks associated with each application of the tool.
-You must read and understand the safety instructions before installing, operating, repairing or maintaining the tool, and also before replacing any fasteners or carrying out any work in the vicinity of the air tool. Failure to read and follow the instructions may lead to serious injury.
-Only qualified, trained operators are authorised to install, adjust or use the air tool.
-The air tool must not be modified. Any modifications implemented may reduce the efficiency of the safety measures and increase risks for the operator.
-Never use air tools that have been damaged. Look after your air tools carefully. Regularly check that all moving parts are functioning correctly without jamming. Also regularly ensure that no parts are broken or damaged to an extent that they affect the operation of the air tool. Check that all signs and labels are legible and intelligible. Have damaged parts repaired or replaced before using the tool. Many accidents are caused by poorly maintained air tools.
4.Special Safety Instructions
4.1Risks associated with ejected parts
-If either the workpiece, fasteners or the air tool breaks, parts may be ejected at high speed.
-During operation, when replacing accessories or fasteners or during repair and maintenance work on the air tool, you must always wear impactresistant safety goggles. The degree of protection required for each individual task must be evaluated separately in each case.
-Ensure that the workpiece is securely attached.
-Disconnect the air tool from the compressed air supply before replacing the mounted tool or accessories, and also before carrying out maintenance, settings or cleaning.
-Also ensure that no other people are placed at risk.
4.2Risks during operation
-The operator and maintenance staff must be physically capable of handling the size, weight and power output of the air tool.
-Make sure you hold the air tool correctly: be prepared to counter both routine and unexpected movements, so keep both hands ready.
-Ensure you stand in a safe position and keep your balance at all times.
-Avoid accidental operation. If the air supply is interrupted, do not actuate the trigger (9).
-Only use lubricants that have been recommended by the manufacturer.
-Wear personal protective equipment and always wear safety glasses and ear protection. Wearing personal protective equipment, such as non-slip safety shoes, reduces the risk of injury.
-Never point a stapler gun at yourself or other persons when it is ready for operation.
-When working, hold the stapler gun such that your
head and body cannot be injured in case of a |
|
possible kickback. |
11 |

en ENGLISH
-Never trigger the stapler gun into an open area.
-When the stapler gun is ready for operation, always carry it by the handle (10) and never with the trigger actuated (9).
-Closely observe the conditions at the workplace. Fasteners can possibly pierce thin workpieces or, when working on corners and edges, slip off workpieces and cause injury.
4.3Risks associated with accessories/fasteners
-Disconnect the air tool from the air supply before fitting or removing the protective cap (1).
-Only use fasteners that are designed for this tool and that fulfil the requirements and the specifications listed in these operating instructions.
4.4Risks in the workplace
-Slipping, tripping and falling are the main reasons for accidents in the workplace. Pay attention to surfaces that may have become slippery as a result of using the air tool, and also be careful that the air hose does not cause someone to trip.
-Proceed carefully when working in unfamiliar environments. Power cables and other supply lines may represent a hidden risk.
-The air tool is not designed for use in explosive environments and is not insulated against contact with sources of electric power.
-Ensure that the area where you wish to work is free of power cables, gas lines or water pipes (e.g. by using a metal detector).
4.5Risks associated with noise
-Failure to use adequate ear protectors when the noise level is high can result in lasting damage to hearing, hearing loss and other problems, such as tinnitus (ringing, whistling or buzzing in the ear).
-It is vital to carry out a risk assessment in relation to these risks and to implement appropriate control measures that take the risks into account.
-Noise levels can also be reduced through suitable arrangement of the workplace, e.g. placing workpieces on noise-insulating supports.
-Use ear protection in accordance with your employer instructions or in accordance with health and safety regulations.
-The air tool must be operated in accordance with the recommendations provided in these instructions and must be maintained in order to avoid unnecessarily raising the noise level.
-To avoid increasing the noise level unnecessarily, the consumables and the mounted tool must be selected, maintained and replaced in accordance with these instructions.
-The integrated sound absorber must not be removed. You must ensure the sound absorber is in good working order.
4.6Additional safety instructions
-Compressed air can cause serious injury.
-Whenever the air tool is not in use, and before replacing accessory parts or when carrying out repairs, you must ensure that air supply is shut off, that the air hose is depressurised and that the air
tool is disconnected from the compressed air supply.
-Never direct the air jet at yourself or other people.
-Whiplashing hoses can cause serious injury. Therefore always check that the hoses and their fixtures are in good condition and that they have not become loose.
-If universal swivel couplings (claw couplings) are being used, locking pins are also required. You should also use whip check hose restraints in case there is a problem with the connection between the hose and air tool or between the hoses themselves.
-Ensure that the maximum pressure specified on the air tool is not exceeded.
-Never carry air tools by the hose.
4.7Additional safety instructions
-If applicable, observe any special health and safety or accident prevention regulations governing the use of compressors and compressed air tools.
-Ensure that the maximum supply pressure specified in the Technical Specifications is not exceeded.
-Do not overload the tool – use it only within the performance range for which it was designed (see “Technical Specifications”).
-Use non-hazardous lubricants. Ensure the workplace is adequately ventilated. If there is a large amount of discharge: check the air tool and have it repaired if necessary.
-Do not operate the tool unless you are completely focused. You must be alert, pay attention to what you are doing and proceed cautiously when working with an air tool. Never use a tool when you are tired or under the influence of drugs, alcohol or medication. Just one moment's carelessness when using the tool can cause serious injury.
-Make sure your workplace is clean and well lit. Untidy or poorly lit workplaces can cause accidents.
-Keep air tools away from children.
-Do not store the tool outdoors or in damp conditions without protection.
-Protect the air tool, especially the compressed air connection and the control elements from dust and dirt.
-Staple guns with contact actuation (see Technical Specifications) are identified by the symbol "Do not use on scaffolding or ladders" and must not be used for certain applications, e.g.: - When changing from one fastening point to another involves the use of scaffolding, steps, ladders or similar structures, such as roofing battens. -The sealing of boxes or crates. -When fitting transport locks, e.g. on vehicles or carriages.
Information in these operating instructions is categorised as shown below:
Danger! Risk of personal injury or environmental damage.
Caution. Risk of material damage
12
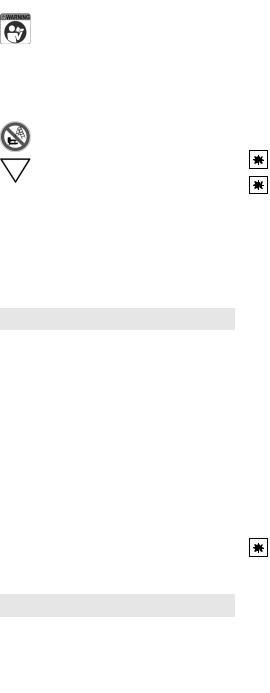
4.8Symbols on the air tool
Read the Operating Instructions before starting to use the machine.
Wear safety goggles.
Wear ear protectors.
Do not use on scaffolds or ladders
The air tool is equipped with a trigger safety lock.
-Before starting work, always check the safety and trigger devices for perfect operation and ensure that screws and nuts are firmly seated.
-The tool must not be manipulated, subject to emergency repair or used in a non-specified manner.
-Never disassemble or block parts such as the trigger device of the stapler gun.
-Avoid all kinds of weakening or damage to the tool.
5. Overview
See Page 2.
1 Protective cap *
2 Opening
3 Trigger safety lock *
4 Lever (for opening the service port)
5 Service port
6 Air outlet / exhaust air aperture *
7 Insertion depth control *
8DKG 114/65: Switch (select operating mode sequential actuation with safety sequence or contact actuation) *
9 Trigger
10Handle
11Compressed air connection with filter
12Plug-in nipple 1/4"
13Locking lever *
14Magazine slider
15Magazine
16Unlocking lever (for tools without trigger safety lock) *
* depending on model
6.Operation
6.1Before using the tool for the first time
Insert plug-in nipple (12).
6.2Connect to compressed air line
Empty the magazine (15) to prevent fasteners from being ejected when connecting. (If, as a result of repair, maintenance work or transport, interior parts of the stapler gun are not in initial position).
ENGLISH en
Only connect to compressed air lines after you have ensured that it is not possible to exceed
the permissible operating pressure by more than 10% (e.g. using pressure reducers).
Only use quick-action couplings. Make the connection such that the unlockable plug-in nipple is fitted on the tool so that there is no more
compressed air in the tool after disconnection.
To benefit from the air tool's full performance, always use compressed air hoses with an inner diameter of at least 9 mm. Tool performance can be significantly impaired if the inner diameter is too small.
Caution. The compressed air line must not contain any water condensation.
Caution. To preserve and extend the service life of this tool, you must ensure that it is regu-
larly maintained with the pneumatic oil lubricator. You can do this as follows:
–Use oiled compressed air by fitting an oil-fog lubricator.
–Without an oil-fog lubricator: manually apply oil every day via the compressed air connection. Use approx. 3-5 drops of pneumatic oil lubricator for each 15 minutes of continuous operation.
If the tool has not been in use for several days, you should manually apply about 5 drops of pneumatic oil lubricator into the compressed air connection.
6.3Filling the magazine
To fill the magazine (15), hold the device so that the opening (2) is not directed at your own
body or other persons.
To fill the magazine (15), hold the device so that the opening (2) is not directed at your own
body or other persons.
See illustration in the operating instructions.
-Actuate the locking lever (13) (depending on features) and then...
-pull back the magazine slider (14).
-Insert fasteners that are suitable for the tool (see Section 8. and 11.) in the magazine.
-Push in magazine slider (14) (until it engages at locking lever (13) (depending on features)).
6.4Setting / using the air tool
Caution. Avoid empty shots - do not actuate with empty magazine.
1.Turn the exhaust air aperture (6) (depending on features) into the desired position.
2.DKG 114/65: select operating mode sequential actuation or contact actuation. To do this, press in switch (8) from the right side and turn on the left side. (For explanation, see Section 11.)
3.For sensitive workpiece surfaces, fit the protective cap (1).
4.Connect the air tool to the compressed air supply (see Section 6.2).
5.Fill magazine (15) (see Section 6.3).
6.Set the air pressure initially to the smallest val-
ue for the recommended operating pressure. |
13 |

en ENGLISH
7.Press the mouth (2) of the stapler onto the workpiece and actuate the trigger (9) (see Section 6.5).
8.Increase or reduce operating pressure in steps of 0.5 bar until the desired fastening result is achieved.
The stapler should be operated with lowest possible operating pressure. (This saves
energy, reduces the noise level and wear)
Ensure that the maximum operating pressure is not exceeded.
9.For fine adjustment, the insertion depth can be adjusted at the insertion depth control (7) (depending on features).
10.If fasteners become jammed, disconnect the tool from the compressed air supply, actuate the lever (4) to open the service port (9) and remove the defective fastener.
11.Before long pauses or at the end of work, disconnect the tool from the compressed air source and empty the magazine.
6.5Actuating the air tool
Important: DKG 80/16, DPN 25 work without a trigger safety lock. Use your middle finger to
unlock the tool at the unlocking lever (16); only then can the shot be triggered with the forefinger on the trigger (9).
The other stapler guns (all except for DKG 80/ 16, DPN 25) are equipped with a trigger safety
lock (3) and identified by an equilateral triangle on its tip. The trigger safety lock only permits work when the lock (3) is pressed on the fastening point and the trigger (9) is actuated. These tools must only be used with a functioning trigger safety catch.
If a tool is defective or not functioning perfectly, disconnect it from the compressed
air source immediately and forward it to a specialist for inspection.
.
7. Care and Maintenance
Danger! Disconnect the compressed air connection and empty the magazine before car-
rying out any work on the tool.
Danger! Repair and maintenance work other than the work described in this section should
only be carried out by qualified specialists.
-Protect the compressed air connections of the stapler and the hose line against contamination.
-Carry out regular maintenance to ensure the safety of the air tool.
-Check that all screw fittings are seated securely, and tighten if necessary.
-Clean the filter in the compressed air connection at least once a week.
-It is recommended that you install a pressure reducer with an air-water separator and lubricator upstream of the air tool.
-If a large amount of air or oil is escaping, check the air tool and have it maintained if necessary. (See Section 9.)
14
f
8. Accessories
Use only genuine Metabo accessories.
Only use accessories that are designed for this air tool and that fulfil the requirements and the specifications listed in these operating instructions.
For a complete range of accessories, see www.metabo.com or the catalogue.
9. Repairs
Danger! Repairs to the air tools must only be carried out specialists using original Metabo
spare parts and who observe the specifications in the operating instructions!
('Specialists' are persons who, on the basis of their technical training and experience, have sufficient knowledge in the area of staplers and who are sufficiently familiar with the relevant statutory occupational safety regulations, accident prevention regulations, directives and generally recognised technological rules that they are able to assess the status of staplers with regard to work safety.)
If you have Metabo air tools that require repairs, please contact your Metabo service centre. For addresses see www.metabo.com.
You can download spare parts lists from www.metabo.com.
10. Environmental Protection
Observe national regulations on environmentally compatible disposal and on the recycling of disused air tools, packaging and accessories. You must not cause risks to people or the environment.
11. Technical Specifications
Explanatory notes on the specifications on Page 3.
Subject to change in line with technological advances.
V= Air consumption per fastening operation
p |
= |
Recommended operating pressure |
|
pmax. |
= Maximum permissible supply pressure |
||
LC |
= Filling capacity of suitable compressors |
||
AS |
= |
Type of actuation: |
|
|
|
S1 |
= Sequential actuation |
|
|
S2 |
= Sequential actuation with safety |
sequence
C = Contact actuation
Explanation:
Sequential actuation: The trigger (9) must be actuated for every fastening operation. For each additional fastening operation, the trigger first has to be moved back to initial position.
Sequential actuation with safety sequence: For each fastening operation, the trigger (9) and trigger safety lock (3) must be actuated so that a single fastening operation is initiated via the trigger after the opening of the tool is placed on the fastening point. Additional fastening operations can only be

ENGLISH en
actuated if the trigger and trigger safety lock are in initial position.
Contact actuation: For every fastening operation, the trigger (9) and trigger safety lock (3) must be actuated, whereby the order of actuation is not defined. For subsequent fastening operations, it is sufficient either if the trigger remains actuated and the trigger safety lock is actuated, or vice versa.
Finishing nails that can be used:
NTyp |
= |
Type |
NL |
= |
Length |
NT |
= |
Wire thickness |
Staples than can be used:
KTyp |
= |
Type |
KB |
= |
Back width |
KL |
= |
Length |
KT |
= |
Wire thickness |
A |
= |
Dimensions: |
|
|
Length x Width x Height |
m= Weight (without fasteners)
The technical specifications quoted are subject to tolerances (in compliance with the relevant valid standards).
Emission values
Using these values, you can estimate the emissions from this tool and compare these with the values emitted by other tools. The actual values may be higher or lower, depending on the particular application and the condition of the tool or mounted tool. In estimating the values, you should also include work breaks and periods of low use. Based on the estimated emission values, specify protective measures for the user - for example, any organisational steps that must be put in place.
Vibration (weighted effective value of acceleration; EN 28662-1, ISO 8662-11) :
ah |
=Vibration emission level |
Kh |
=Measurement uncertainty (vibration) |
Sound level (EN 12549): |
|
LpA |
=Sound pressure level |
LWA |
=Acoustic power level |
KpA, KWA= Measurement uncertainty
 Wear ear protectors!
15

fr FRANÇAIS
Notice d'utilisation originale
1. Déclaration de conformité
Nous déclarons sous notre seule responsabilité : ces agrafeuses pneumatiques, identifiées par le type et le numéro de série *1), sont conformes à toutes les prescriptions applicables des directives *2) et normes *3). Documents techniques pour *4) - voir page 3.
2.Utilisation conforme aux prescriptions
Les agrafeuses DKG 80/16, DKG 90/25, DKG 90/ 40 et DKG 114/65 sont conçues pour l'enfoncement d'agrafes dans le domaine professionnel.
L'agrafeuse DKNG 40/50 est conçue pour l'enfoncement d'agrafes et de clous à tête perdue dans le domaine professionnel.
Les agrafeuses DPN 25 et DSN 50 sont conçues pour l'enfoncement de clous à tête perdue dans le domaine professionnel.
L'appareil d'enfoncement et les objets d'enfoncement constituent un système de sécurité. Utiliser uniquement les objets d'enfoncement indiqués dans cette notice d'utilisation pour l'appareil respectif (voir chap. 11. "Caractéristiques techniques").
Cet outil ne peut fonctionner que s’il est raccordé à une alimentation en air comprimé. Ne pas exploiter avec des gaz explosibles, inflammables ou dangereux pour la santé ou avec de l'oxygène. La pression de service maximale admissible indiquée pour cet outil pneumatique ne doit pas être dépassée. Cet outil ne doit pas servir de levier, d’outil de démolition ou de percussion.
Toute autre utilisation est considérée comme étant contraire aux prescriptions. Une utilisation contraire aux prescriptions, des modifications apportées à l’outil pneumatique ou l’emploi de pièces qui n’ont été ni testées, ni homologuées par le fabricant peuvent entraîner des dommages imprévisibles !
L'utilisateur est entièrement responsable de tous dommages résultant d'une utilisation non conforme aux prescriptions.
Il est impératif de respecter les directives de prévention des accidents reconnues et les consignes de sécurité ci-jointes.
3.Consignes de sécurité générales
Pour votre propre sécurité et afin de protéger l'outil pneumatique, observez les passages de texte repérés par ce symbole !
AVERTISSEMENT – Lire la notice d'utilisation afin d'éviter tout risque de blessures.
AVERTISSEMENT Lire toutes les consignes de sécurité et instructions. Le
non-respect des consignes de sécurité et des instructions peut être à l'origine d'un choc électrique, d'un incendie et/ou de blessures graves.
Conserver toutes les consignes de sécurité et instructions.
En cas de transmission de l’outil pneumatique, remettre également tous les documents qui l’accompagnent.
-L’utilisateur ou son employeur est dans l’obligation d’évaluer les risques spécifiques qui sont susceptibles de se produire en fonction de chaque application.
-Il est indispensable de lire et de bien comprendre les consignes de sécurité avant de régler, d'exploiter, de réparer, d’effectuer la maintenance, de remplacer des objets d'enfoncement, ou même de travailler à proximité de l’outil pneumatique. Dans le cas contraire, il y a risque de blessures corporelles graves.
-Cet outil pneumatique doit être exclusivement préparé, réglé ou utilisé par des personnes qualifiées et formées.
-Il est interdit d’apporter des modifications à cet outil pneumatique. Toute modification risque d’altérer l’efficacité des dispositifs de sécurité et, par conséquent, d’aggraver les risques encourus par l’utilisateur.
-Ne jamais utiliser des outils pneumatiques endommagés. Manipuler les outils pneumatiques avec soin. Contrôler régulièrement si les pièces mobiles fonctionnent sans problèmes et si elles ne coincent pas, si des pièces sont brisées ou endommagées de sorte à affecter le fonctionnement de l’outil pneumatique. Vérifier que les plaques et les inscriptions sont complètes et bien lisibles. Faire réparer ou remplacer les pièces endommagées avant d’utiliser l’appareil. De nombreux accidents proviennent d’un mauvais entretien des outils pneumatiques.
4.Consignes de sécurité spéciales
4.1Risques inhérents à la projection de pièces
-En cas de rupture de la pièce, d’objets d'enfoncement ou de l’outil pneumatique lui-même, des pièces risquent d’être projetées à grande vitesse.
-Porter systématiquement des lunettes de protection anti-chocs lors de l'exploitation de l’outil pneumatique, pour changer les accessoires ou les objets d'enfoncement, ainsi que pour effectuer des opérations de réparation ou de maintenance sur l’outil pneumatique. Le degré de protection nécessaire doit être déterminé au cas par cas.
-Vérifier que le matériau soit fixé correctement.
-Débrancher l’outil pneumatique de l’alimentation en air comprimé avant de changer l’outil rapporté ou les accessoires, d’effectuer un réglage, la maintenance ou un nettoyage.
16
-Veiller à ce que les autres personnes éventuellement présentes ne soient pas exposées à des risques.
4.2Risques en cours de fonctionnement
-L’utilisateur et le personnel de maintenance doivent être physiquement en mesure de maîtriser la taille, le poids et la puissance de l’outil pneumatique.
-Tenir l’outil pneumatique correctement : l’utilisateur doit être en mesure de contenir tout mouvement brusque ou usuel de l’appareil. Il doit donc pouvoir utiliser ses deux mains.
-Veiller à une bonne stabilité et toujours se tenir en équilibre.
-Eviter toute mise en marche involontaire. En cas d'interruption de l'alimentation en air, ne pas actionner le déclencheur (9).
-Utiliser exclusivement le lubrifiant préconisé par le fabricant.
-Porter un équipement de protection individuelle, et toujours des lunettes de protection et une protection acoustique. Le port d'un équipement de protection individuelle, tel que des chaussures de sécurité antidérapantes, minimise le risque de blessures.
-Ne jamais orienter un appareil d'enfoncement opérationnel directement vers soi ou vers d’autres personnes.
-Lors des travaux, maintenir l'appareil d'enfoncement de manière à ce que votre tête et votre corps ne puissent pas être blessés en cas d'un éventuel rebond.
-Ne déclencher en aucun cas l'appareil d'enfoncement dans l'espace libre.
-Porter uniquement l'appareil d'enfoncement à l'état opérationnel par le biais de la poignée (10), et jamais avec le déclencheur (9) actionné.
-Tenir compte des conditions au poste de travail. Les objets d'enfoncement peuvent éventuellement perforer des pièces minces ou peuvent être déviés lors de travaux dans des coins ou près des bords, et par conséquent mettre en danger des personnes.
4.3Danger dû aux accessoires / objets d'enfoncement
-Séparer l'outil pneumatique de l'alimentation en air avant de monter ou de retirer le capuchon de protection (1).
-Utiliser uniquement des objets d'enfoncement conçus pour cet appareil et qui sont conformes aux exigences et aux données caractéristiques indiquées dans la présente notice d’utilisation.
4.4Risques inhérents au poste de travail
-Les glissades, pertes d’équilibre et les chutes constituent les principales causes de blessures sur le lieu de travail. Faire très attention en cas d’évolution sur des surfaces rendues glissantes par l’utilisation de l’outil pneumatique et veiller à ne pas trébucher en se prenant les pieds dans le flexible pneumatique.
-Agir avec prudence dans les environnements qui ne sont pas familiers. Les câbles électriques et autres câbles d’alimentation sont autant de
FRANÇAIS fr
sources de danger qui peuvent passer inaperçues.
-L’outil pneumatique n’a pas été conçu pour être utilisé dans des atmosphères explosibles et il ne bénéficie pas d’une isolation spécifique en cas de contact avec des sources électriques.
-Vérifier que l'endroit prévu pour l'intervention ne comporte aucune conduite électrique, d'eau ou de gaz (p. ex. à l'aide d'un détecteur de métaux).
4.5Risques inhérents au bruit
-En cas de protection auditive insuffisante, l’exposition à un niveau de bruit élevé risque d’endommager durablement l’audition, d’entraîner une perte d’audition et d’autres problèmes, comme les acouphènes (tintement, chuintement, sifflement ou bourdonnement dans les oreilles).
-Il est indispensable de procéder à une analyse des risques eu égard à ces facteurs et de mettre en œuvre des mécanismes de régulation appropriés.
-Le niveau de bruit peut également être minimisé par un aménagement correspondant du poste de travail, p. ex. dépose des pièces sur des supports amortissants.
-Utiliser des équipements de protection acoustique conformes aux consignes de l’employeur et aux directives en matière de santé et de sécurité au travail.
-L’outil pneumatique doit être utilisé et entretenu conformément aux recommandations de la présente notice d'utilisation pour éviter toute augmentation inutile du niveau sonore.
-Les consommables et l'outil rapporté doivent être sélectionnés, entretenus et remplacés conformément aux recommandations de la présente notice d'utilisation, afin d’éviter toute augmentation inutile du niveau sonore.
-Il est interdit de retirer le silencieux intégré. Par ailleurs, ce silencieux doit être en bon état de fonctionnement.
4.6Consignes de sécurité supplémentaires
-L’air comprimé risque de provoquer de graves blessures.
-Lorsque l’outil pneumatique n’est pas utilisé, avant de changer des accessoires ou d’effectuer des réparations, il convient systématiquement de couper l’alimentation pneumatique, de mettre le flexible pneumatique hors pression et de débrancher l’outil pneumatique de l’alimentation en air comprimé.
-Ne jamais orienter le flux d’air vers soi ou vers d’autres personnes.
-Les flexibles qui sont projetés peuvent provoquer de graves blessures. Pour cette raison, s’assurer systématiquement que les flexibles et les dispositifs de fixation ne sont pas endommagés ou desserrés.
-En cas d’utilisation de raccords tournants universels (accouplement à griffes), il est indispensable de mettre en place des goupilles d’arrêt et d’utiliser des câbles de sécurité pour les flexibles, afin de se protéger en cas de défaillance de la liaison entre le flexible et l’outil pneumatique ou entre deux flexibles.
17

fr FRANÇAIS
-Faire en sorte que la pression maximale indiquée pour l’outil pneumatique ne soit pas dépassée.
-Ne jamais utiliser le flexible pour transporter l’outil pneumatique.
4.7Autres consignes de sécurité
-Respecter, le cas échéant, les prescriptions spécifiques en matière de prévention des accidents et de sécurité au travail relatives à la manipulation de compresseurs et d’outils pneumatiques.
-Veiller à ce que la pression de service maximale admissible qui figure dans les caractéristiques techniques soit bien respectée.
-Ne pas surcharger l’outil ; n’utiliser cet outil que dans la plage de puissance indiquée dans les caractéristiques techniques.
-Utiliser des lubrifiants sans risques. Veiller à ce que le poste de travail soit suffisamment ventilé. En cas d’usure prononcée, faire contrôler et réparer le cas échéant l’outil pneumatique.
-Ne pas utiliser cet outil si l’on n’est pas concentré. Soyez vigilant, faites attention à ce que vous faites et prenez toutes les précautions qui s’imposent en travaillant avec un outil pneumatique. Ne pas utiliser d’outil sous l’influence de la fatigue, de drogues, d’alcool ou de médicaments. Il suffit d’un moment d’inattention lors de l’utilisation de cet outil pour encourir de graves blessures.
-Veiller à ce que la zone de travail soit propre et bien éclairée. Les zones de travail encombrées et mal éclairées peuvent provoquer des accidents.
-Conserver les outils pneumatiques hors de portée des enfants.
-Ne pas conserver l’outil à l’extérieur sans protection, ni dans un environnement humide.
-Protéger l’outil pneumatique des poussières et des salissures, et tout spécialement le raccord pneumatique et les éléments de commande.
-Les appareils d'enfoncement avec déclenchement par contact (voir caractéristiques techniques) sont identifiés par le pictogramme "Ne pas utiliser sur des échafaudages ou des échelles" et ne doivent pas être utilisés pour certaines applications, p. ex. : - Si le changement d'un endroit d'enfoncement à l'autre s'effectue via des échafaudages, des escaliers, des échelles ou des constructions similaires à des échelles, comme p. ex. des lattages de toit. - La fermeture de caisses ou de caisses à claire-voie. - Pour la fixation de sécurités de transport, p. ex. sur des véhicules et des wagons.
Les informations qui figurent dans la présente notice d'utilisation sont signalées comme suit :
Danger ! Risques de dommages corporels ou de dégâts causés à l'environnement.
Attention. Risque de dommages matériels.
4.8Symboles sur l’outil pneumatique
Lire la notice d’utilisation avant la mise en service.
Porter des lunettes de protection
18
Porter un casque antibruit
Ne pas utiliser sur des échafaudages ou des échelles
L'appareil est pourvu d'une sécurité de déclenchement.
-Contrôler avant chaque début de travail le fonctionnement irréprochable des dispositifs de sécurité et de déclenchement et veiller à la bonne fixation des vis et écrous.
-Aucune manipulation, réparation de secours ou utilisation détournée ne doit être effectuée sur / avec l'appareil.
-Ne démonter ou ne bloquer en aucun cas des pièces comme p. ex. le dispositif de déclenchement de l'appareil d'enfoncement.
-Eviter toute fragilisation ou tout endommagement de l'appareil.
5. Aperçu
Voir page 2.
1 Capuchon de protection *
2 Ouverture
3 Sécurité de déclenchement *
4Levier (pour l'ouverture du clapet de maintenance)
5 Clapet de maintenance
6 Sortie / évacuation d'air *
7 Régulation de la profondeur d'enfoncement *
8DKG 114/65 : interrupteur (présélectionner le mode déclenchement individuel avec séquence de sécurité ou déclenchement par contact) *
9 Déclencheur
10Poignée
11Raccord pneumatique avec filtre
12Raccord enfichable 1/4"
13Levier d'arrêt *
14Curseur du magasin
15Magasin
16Levier de déverrouillage (pour appareils sans sécurité de déclenchement) *
* suivant équipement
6.Fonctionnement
6.1Avant la première mise en service
Visser le raccord enfichable (12).
6.2Raccordement à la conduite d'air comprimé
Vider le magasin (15) pour éviter l'expulsion d'un objet d'enfoncement lors du raccorde-
ment (si suite à des travaux de réparation et de maintenance ou à un transport, des pièces intérieures de l'appareil d'enfoncement ne se trouvent pas dans leur position initiale).

Raccorder l'appareil uniquement à des conduites d'air comprimé pour lesquelles il est
garanti qu'un dépassement de plus de 10 % de la pression de service admissible est empêché (p. ex. par le biais d'un limiteur de pression).
Utiliser uniquement des accouplements rapides. Effectuer le raccordement de façon à
ce que le raccord enfichable non verrouillable soit fixé sur l'appareil, afin qu'il ne reste plus d'air comprimé dans l'appareil après la coupure de l'air comprimé.
Pour profiter de toute la puissance de cet outil pneumatique, utiliser systématiquement des flexibles pneumatiques avec un diamètre intérieur d’au moins 9 mm. Un diamètre intérieur insuffisant risque d’altérer considérablement la puissance.
Attention. Le tuyau d’air comprimé ne doit pas contenir d'eau de condensation.
Attention. Pour que cet outil reste opérationnel longtemps, il doit être suffisamment lubrifié en utilisant de l’huile pneumatique. La marche à
suivre est la suivante :
–Utiliser de l’air comprimé lubrifié en montant un système de lubrification par brouillard d’huile.
–Sans lubrificateur par brouillard d’huile : lubrifier quotidiennement l’outil par le biais du raccord pneumatique. Verser 3 à 5 gouttes d’huile pneumatique pour 15 minutes de fonctionnement en continu.
Si l’outil n’a pas été utilisé pendant plusieurs jours, verser manuellement environ 5 gouttes d’huile pneumatique dans le raccord d’air comprimé.
6.3Remplissage du magasin
Pour remplir le magasin (15), maintenir l'appareil de façon à ce que l'ouverture (2) ne soit
pas orientée vers votre propre corps ou d'autres personnes.
Pour remplir le magasin (15), maintenir l'appareil de façon à ce que l'ouverture (2) ne soit
pas orientée vers votre propre corps ou d'autres personnes.
Voir illustration au début de la notice d'utilisation.
-Actionner le levier d'arrêt (13) (suivant équipement), puis...
-Tirer le curseur du magasin (14) en arrière.
-Insérer les objets d'enfoncement appropriés pour l'appareil (voir chap. 8. et 11.) dans le magasin.
-Rentrer le curseur du magasin (14) (jusqu'à ce qu'il s'enclenche au niveau du levier d'arrêt (13) (suivant équipement)).
6.4Réglage / utilisation de l'outil pneumatique
Attention. Eviter les coups à vide - ne pas déclencher avec le magasin vide.
1.Tourner la sortie d'air (6) (suivant équipement) dans la position souhaitée.
2.DKG 114/65 : présélectionner le mode déclenchement individuel ou déclenchement par contact. Pour ce faire, enfoncer l'interrupteur
FRANÇAIS fr
(8)par le côté droit et le tourner sur le côté gauche (explication voir chapitre 11.)
3.En cas de surfaces de pièce sensibles, monter le capuchon de protection (1).
4.Raccorder l'outil pneumatique à l'alimentation en air comprimé (voir chapitre 6.2).
5.Remplir le magasin (15) (voir chapitre 6.3).
6.Régler tout d'abord la pression d'air sur la valeur la plus petite correspondant à la pression de service recommandée.
7.Presser l'appareil d'enfoncement avec l'ouverture (2) sur la pièce et actionner le déclencheur
(9)(voir chapitre 6.5).
8.Augmenter ou réduire la pression de service par pas de 0,5 bar, jusqu'à obtenir le résultat d'enfoncement souhaité.
L'appareil d'enfoncement devrait être exploité avec la pression de service la plus faible
possible (cela permet des économies d'énergie, minimise le niveau de bruit et réduit l'usure).
Faire attention de ne pas dépasser la pression de service maximale.
9.La profondeur d'enfoncement peut faire l'objet d'un réglage fin par le biais du dispositif de régulation de la profondeur d'enfoncement (7)
(suivant l'équipement).
10.En cas de coincement d'objets d'enfoncement, séparer l'appareil de la source d'air comprimé, actionner le levier (4) permettant d'ouvrir le clapet de maintenance (9) et retirer l'objet d'enfoncement défectueux.
11.En cas de pauses prolongées ou à la fin du travail, séparer l'appareil de la source d'air comprimé et vider le magasin.
6.5Déclenchement de l'outil pneumatique
Attention : les modèles DKG 80/16, DPN 25 fonctionnent sans sécurité de déclenchement.
Déverrouiller avec le majeur l'appareil au niveau du levier de déverrouillage (16) ; le coup peut seulement être déclenché ensuite avec l'index au niveau du déclencheur (9).
Les autres appareils d'enfoncement (tous les appareils exceptés les modèles DKG 80/16 et DPN 25) sont pourvus d'une sécurité de déclenche-
ment (3) et identifiés par un triangle équilatéral se trouvant sur la pointe. La sécurité de déclenchement permet uniquement un travail lorsque la sécurité de déclenchement (3) est pressée sur l'endroit d'enfoncement et que le déclencheur (9) est actionné. Ces appareils doivent uniquement être utilisés avec la sécurité de déclenchement opérationnelle.
Séparer immédiatement de la source d'air comprimé tout appareil défectueux ou ne
fonctionnant pas correctement, et le remettre à un spécialiste à des fins de contrôle.
19

fr FRANÇAIS
.
7. Maintenance et entretien
Danger ! Avant tous les travaux sur l'outil, séparer le raccordement de l'air comprimé et
vider le magasin.
Danger ! Les travaux de maintenance et de réparation autres que ceux décrits dans ce
chapitre ne doivent être exécutés que par une personne qualifiée et compétente.
-Protéger les raccords d'air comprimé de l'appareil d'enfoncement et le tuyau flexible contre les encrassements.
-Entretenir régulièrement l’outil pneumatique pour garantir sa sécurité de fonctionnement.
-Vérifier que les raccords sont bien fixés et les resserrer si nécessaire.
-Nettoyer le filtre du raccord pneumatique au moins une fois par semaine.
-Il est préconisé de placer un réducteur de pression avec séparateur d’eau et dispositif de lubrification en amont de l’outil pneumatique.
-En cas de fuite d’huile ou d’air importante, vérifier l’outil pneumatique et le faire réparer si nécessaire (voir chapitre 9.).
f
8. Accessoires
Utiliser uniquement des accessoires d'origine Metabo.
Utiliser uniquement des accessoires spécialement conçus pour cet outil pneumatique et qui sont conformes aux exigences et aux données caractéristiques de la présente notice d’utilisation.
Gamme d'accessoires complète, voir www.metabo.com ou catalogue.
9. Réparation
Danger ! Les réparations sur des outils pneumatiques doivent uniquement être effectuées
par des personnes qualifiées avec des pièces de rechange d'origine Metabo, en respectant les indications figurant dans la notice d'utilisation !
(sont considérées comme des personnes qualifiées, des personnes qui, compte tenu de leur formation et de leur expérience professionnelles, ont des connaissances suffisantes dans le domaine des appareils d'enfoncement et sont familiarisées avec les prescriptions nationales en vigueur concernant la protection au travail, les règlements en matière de prévention des accidents, les directives et les réglementations généralement reconnues en matière de technique, afin de pouvoir évaluer l'état de sécurité d'appareils d'enfoncement).
Pour toute réparation d’un outil pneumatique Metabo, contacter l’agence Metabo. Voir les adresses sur www.metabo.com.
Les listes des pièces de rechange peuvent être téléchargées sur le site Internet www.metabo.com.
20
10. Protection de l'environnement
Se conformer aux réglementations nationales concernant la mise au rebut dans le respect de l’environnement et le recyclage des outils pneumatiques, emballages et accessoires. Il est interdit de mettre en danger des personnes ou de nuire à l’environnement.
11. Caractéristiques techniques
Explications concernant les indications de la page 3.
Sous réserve de modifications allant dans le sens du progrès technique.
V= consommation d'air par processus
d'enfoncement
p= pression de service recommandée
pmax. |
= |
pression de service maximale admissible |
|
LC |
= |
capacité de remplissage de compres- |
|
|
|
seurs appropriés |
|
AS |
= |
type de déclenchement : |
|
|
|
S1 |
= déclenchement individuel |
|
|
S2 |
= déclenchement individuel avec |
séquence de sécurité
C = déclenchement par contact
Explications :
Déclenchement individuel : le déclencheur (9) doit être actionné pour chaque processus d'enfoncement. Avant chaque autre processus d'enfoncement, le déclencheur doit auparavant être remis en position initiale.
Déclenchement individuel avec séquence de sécurité : le déclencheur (9) et la sécurité de déclenchement (3) doivent être actionnés pour chaque processus d'enfoncement, si bien que chaque processus d'enfoncement individuel s'opère via le déclencheur après avoir appliqué l'ouverture de l'appareil à l'endroit d'enfoncement. Les processus d'enfoncement suivants peuvent ensuite uniquement être déclenchés après que le déclencheur et la sécurité de déclenchement se trouvent en position initiale.
Déclenchement par contact : le déclencheur (9) et la sécurité de déclenchement (3) doivent être actionnés pour chaque processus d'enfoncement, auquel cas l'ordre d'actionnement n'est pas spécifié. Pour les processus d'enfoncement suivants, il suffit que soit le déclencheur reste actionné et que la sécurité de déclenchement est actionnée, ou inversement.
Clous à tête perdue utilisables :
NTyp |
= |
type |
NL |
= |
longueur |
NT |
= |
épaisseur de fil |
Agrafes utilisables : |
||
KTyp |
= |
type |
KB |
= |
largeur de dos |
KL |
= |
longueur |
KT |
= |
épaisseur de fil |
A |
= |
dimensions : |
|
|
longueur x largeur x hauteur |
m= poids (sans objets d'enfoncement)
 Loading...