

Mercedes-Benz smart crossblade Operating Instructions Manual

smart crossblade operating instructions
(Supplementary operating instructions)
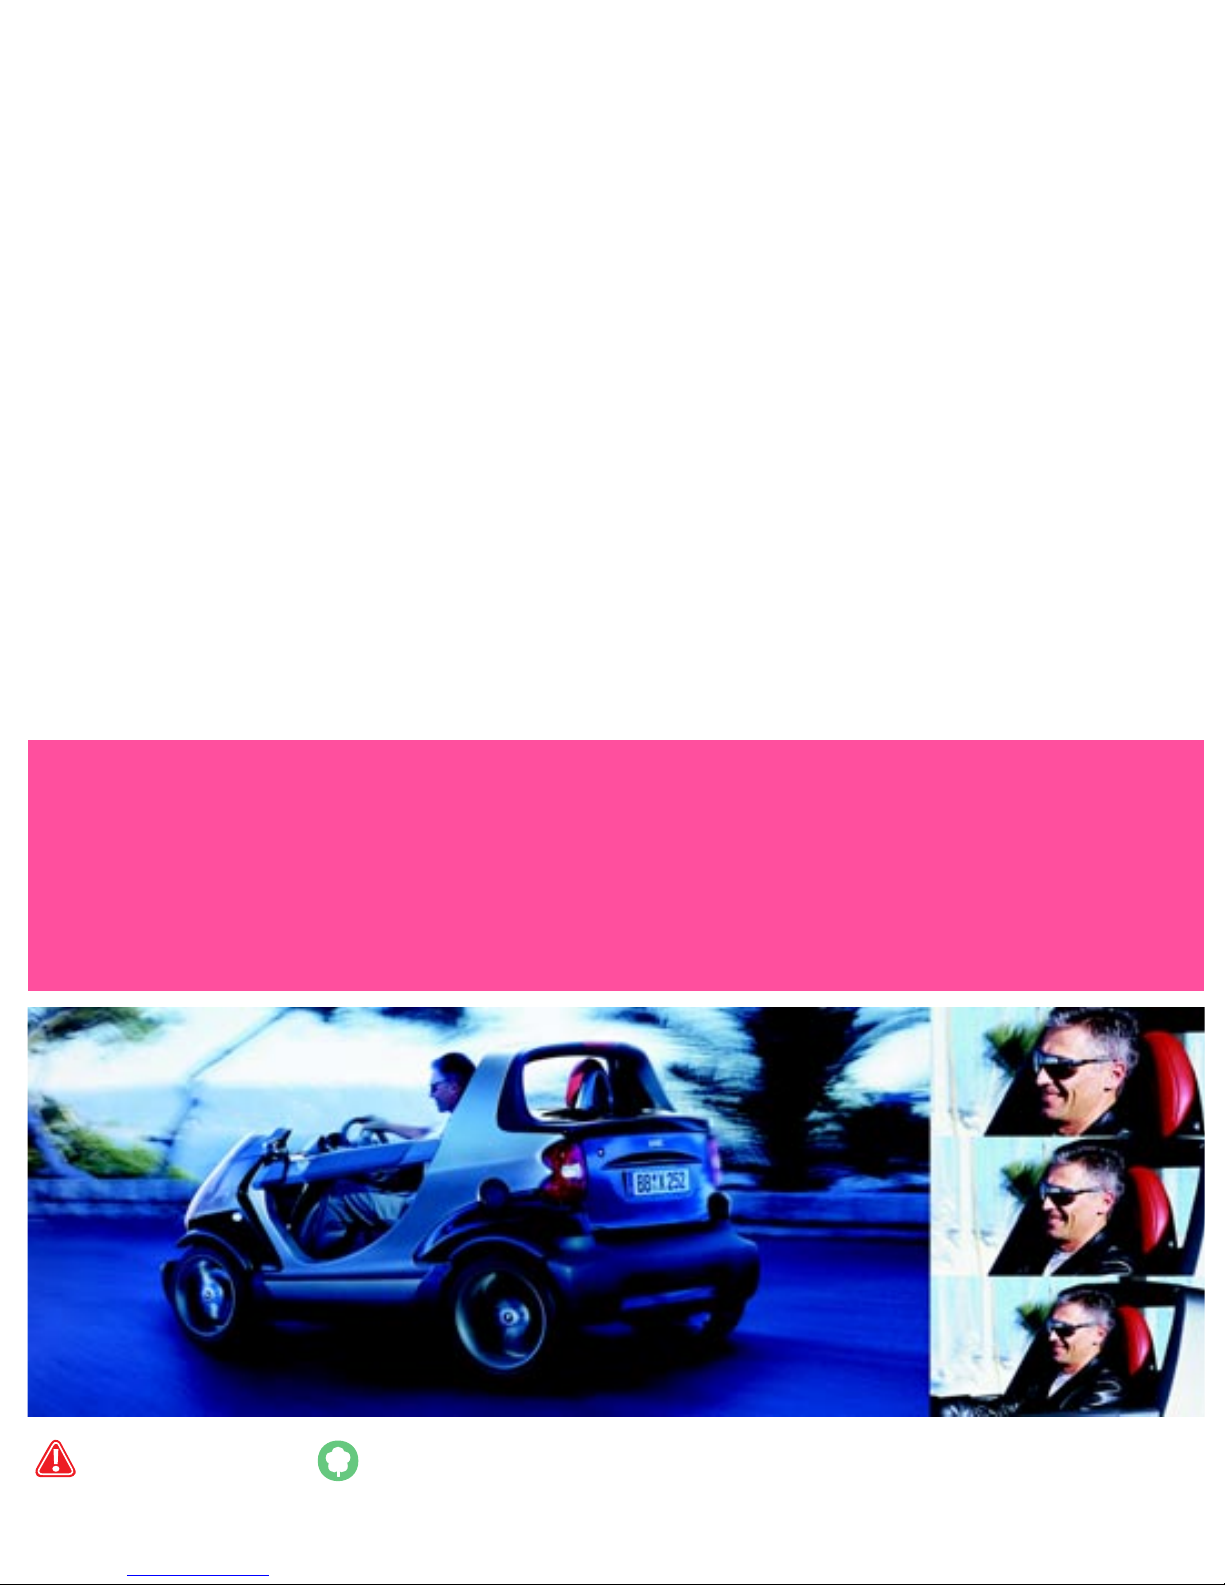
Footloose and fancy free >>
Be it the sun, blue sky or the desire to break out of the daily grind, the most uncompromising smart ever built provides pure open air
enjoyment with no roof, no doors, and no windscreen.
These quick reference operating instructions show you all that the crossblade can do. They contain important tips on how to best
operate the vehicle and show you what you can do to keep potential risks down to an absolute minimum for yourself and others. Keep
in mind that this handy guide in no way acts as a substitute for the main smart operating instructions. This is especially true for warning
signs.
Once you have familiarised yourself with the instructions and the vehicle, a maximum of driving pleasure awaits you!
Danger!
We want to protect you and your
passenger.
For this reason, it is essential to
read the sections marked with
this symbol.
Environment!
We want to safeguard our
environment.
For this reason, it is essential to
read the sections marked with
this symbol.
>Equipment: The installed
equipment specification
description is the valid one for
your crossblade.
Use original smart accessories
and spare parts only.
>Resale: Should you sell your
smart please be sure to pass on
these operating instructions.
>Important!
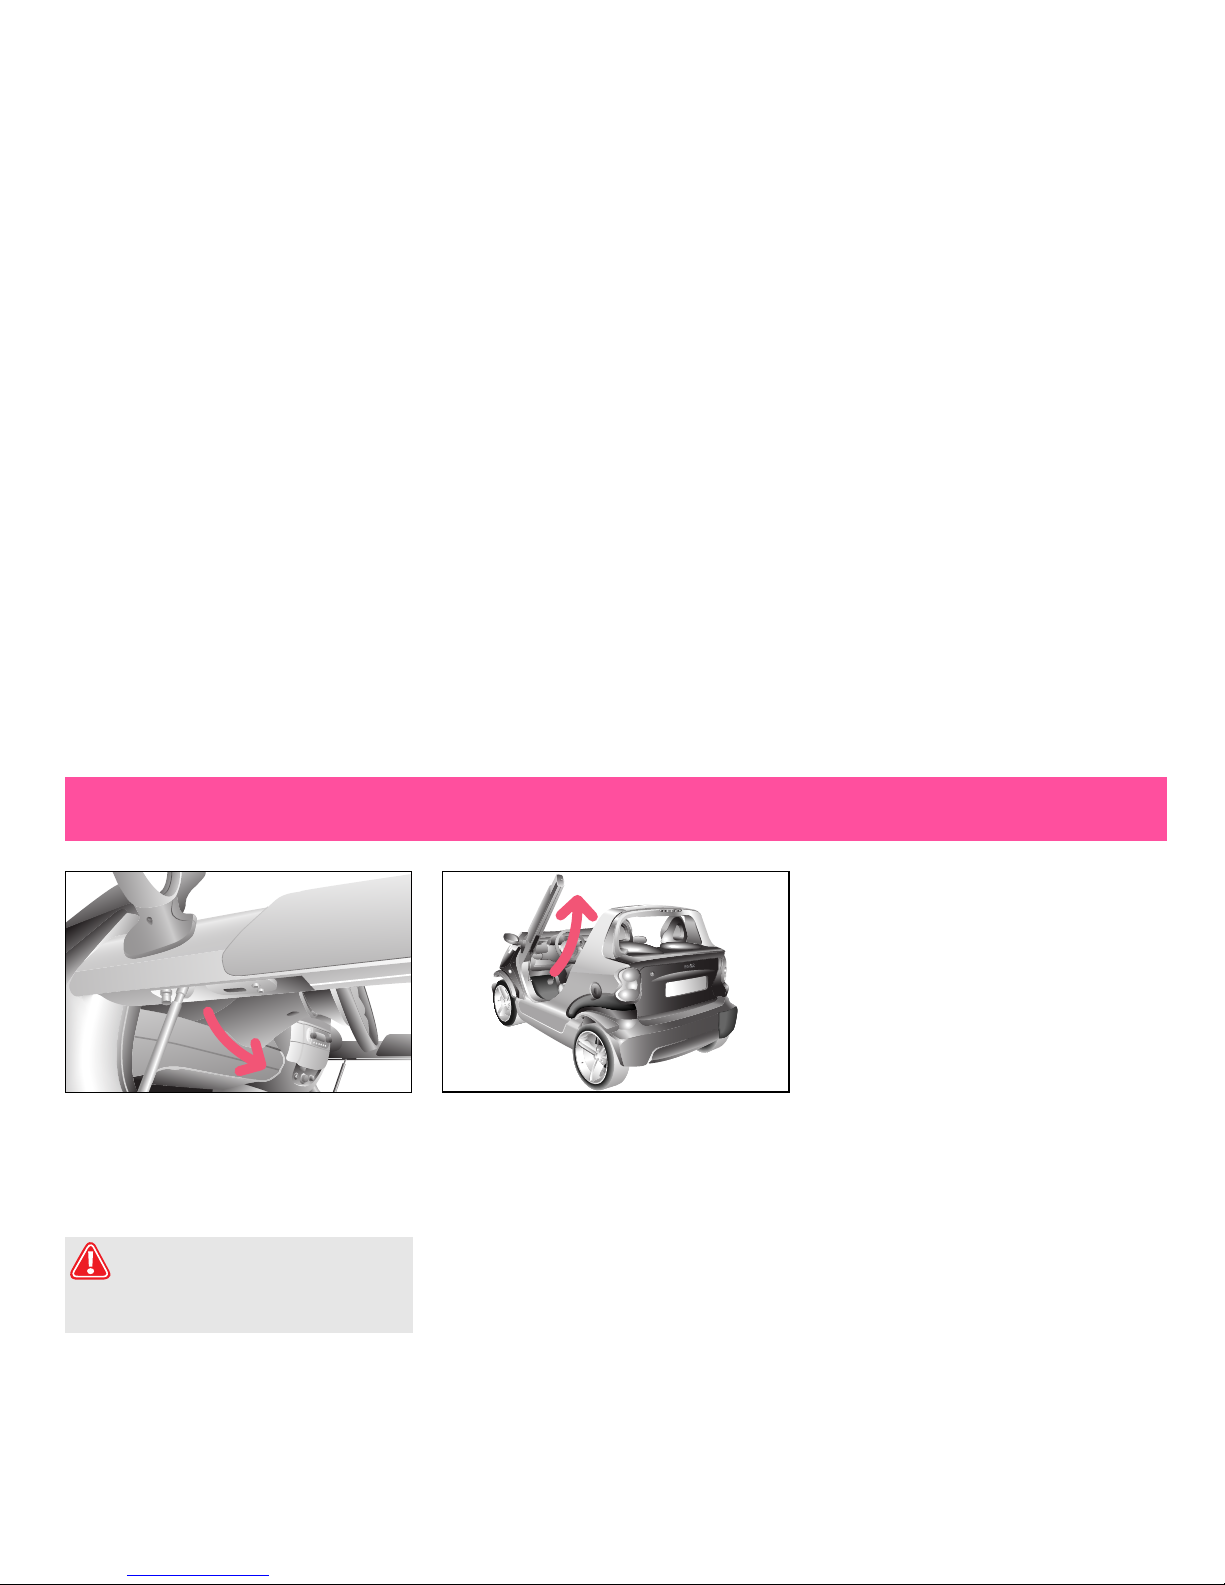
Opening and closing the crossblade
How to open and close the crossblade
The driver and passenger side door bars
are opened and closed manually.
To open the door bar:
쮿 Pull the release lever on the underside
of the door bar.
> The door bar swings upward.
To close the door bar:
쮿 Push the door bar downwards and latch
it into the lock.
> The door bar must audibly latch with a
”double click”.
>Note!
If the door bar is not properly locked, a
warning sound is triggered when you start
off.
Danger of injury!
Do not h old onto the door bars w hen
entering and exiting the vehicle. This
can lead to injuries.
>Important!
- Please grease the door bar locks at
regular intervals to ensure proper
operation.
- Note that the door bar grease can
smudge objects that rub up against it.
2 - >Important!
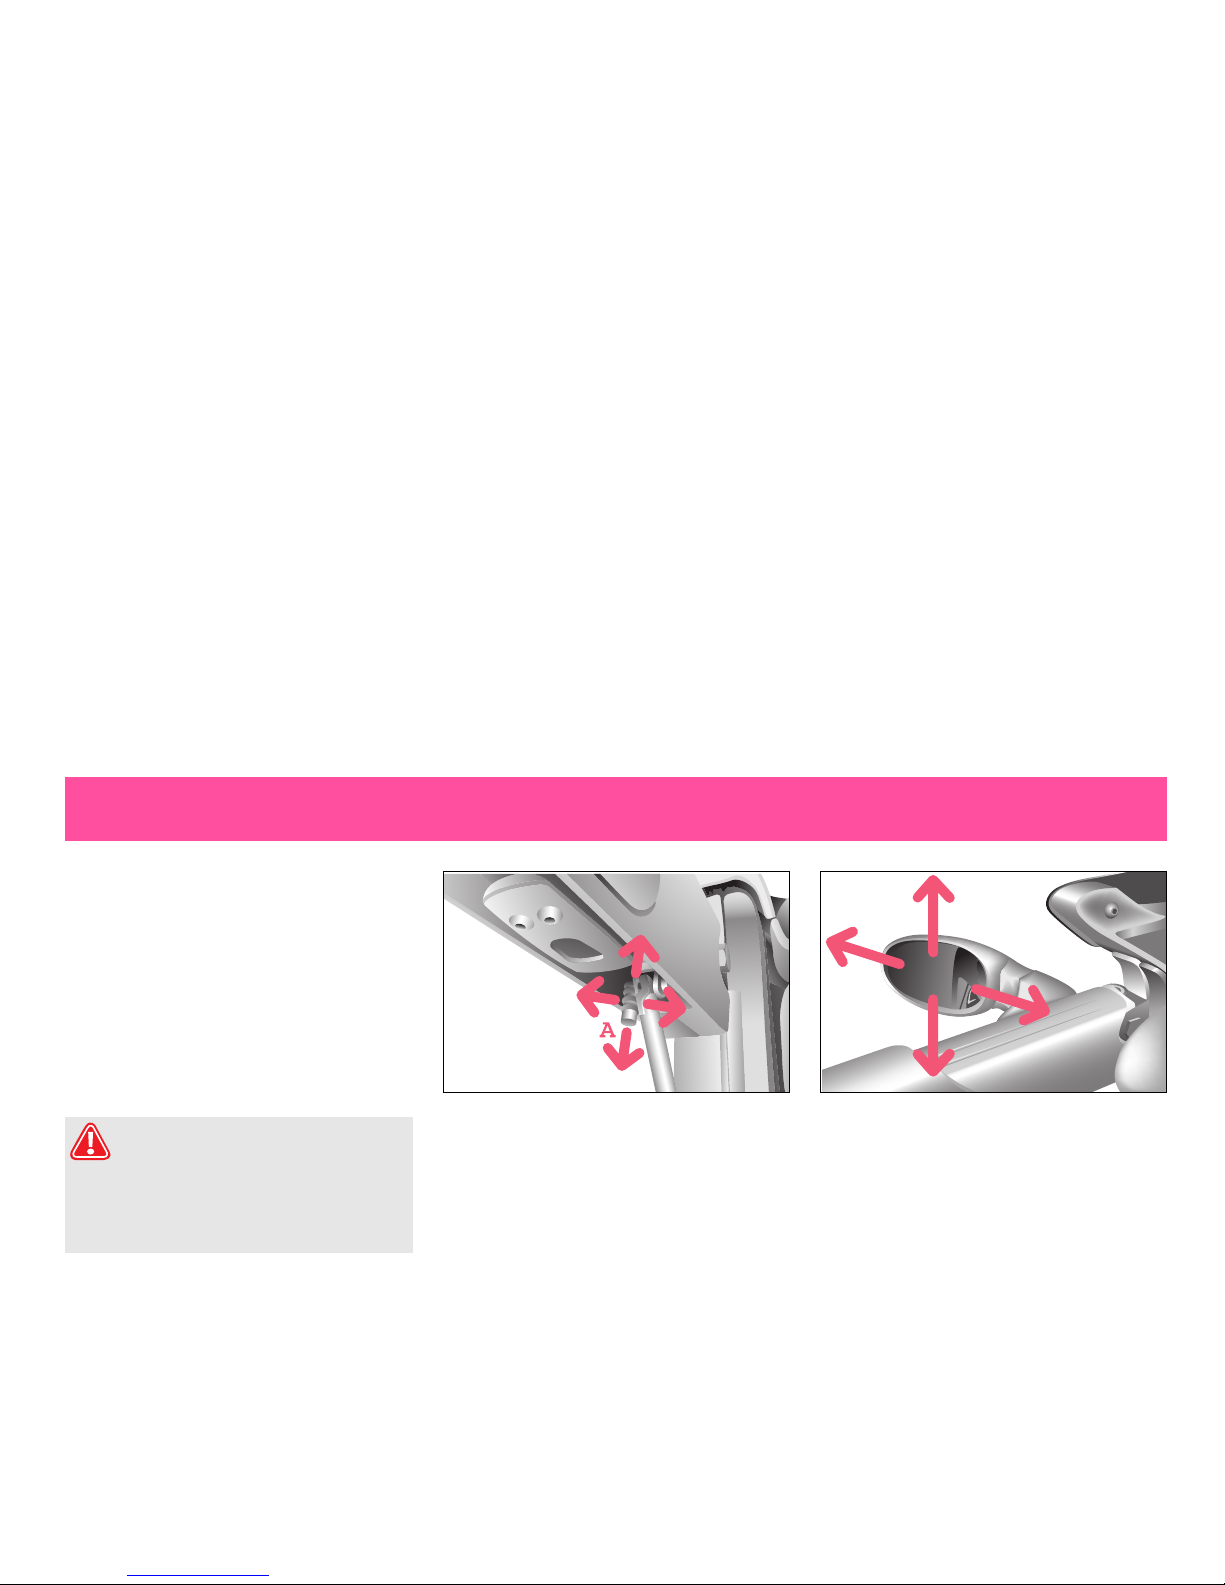
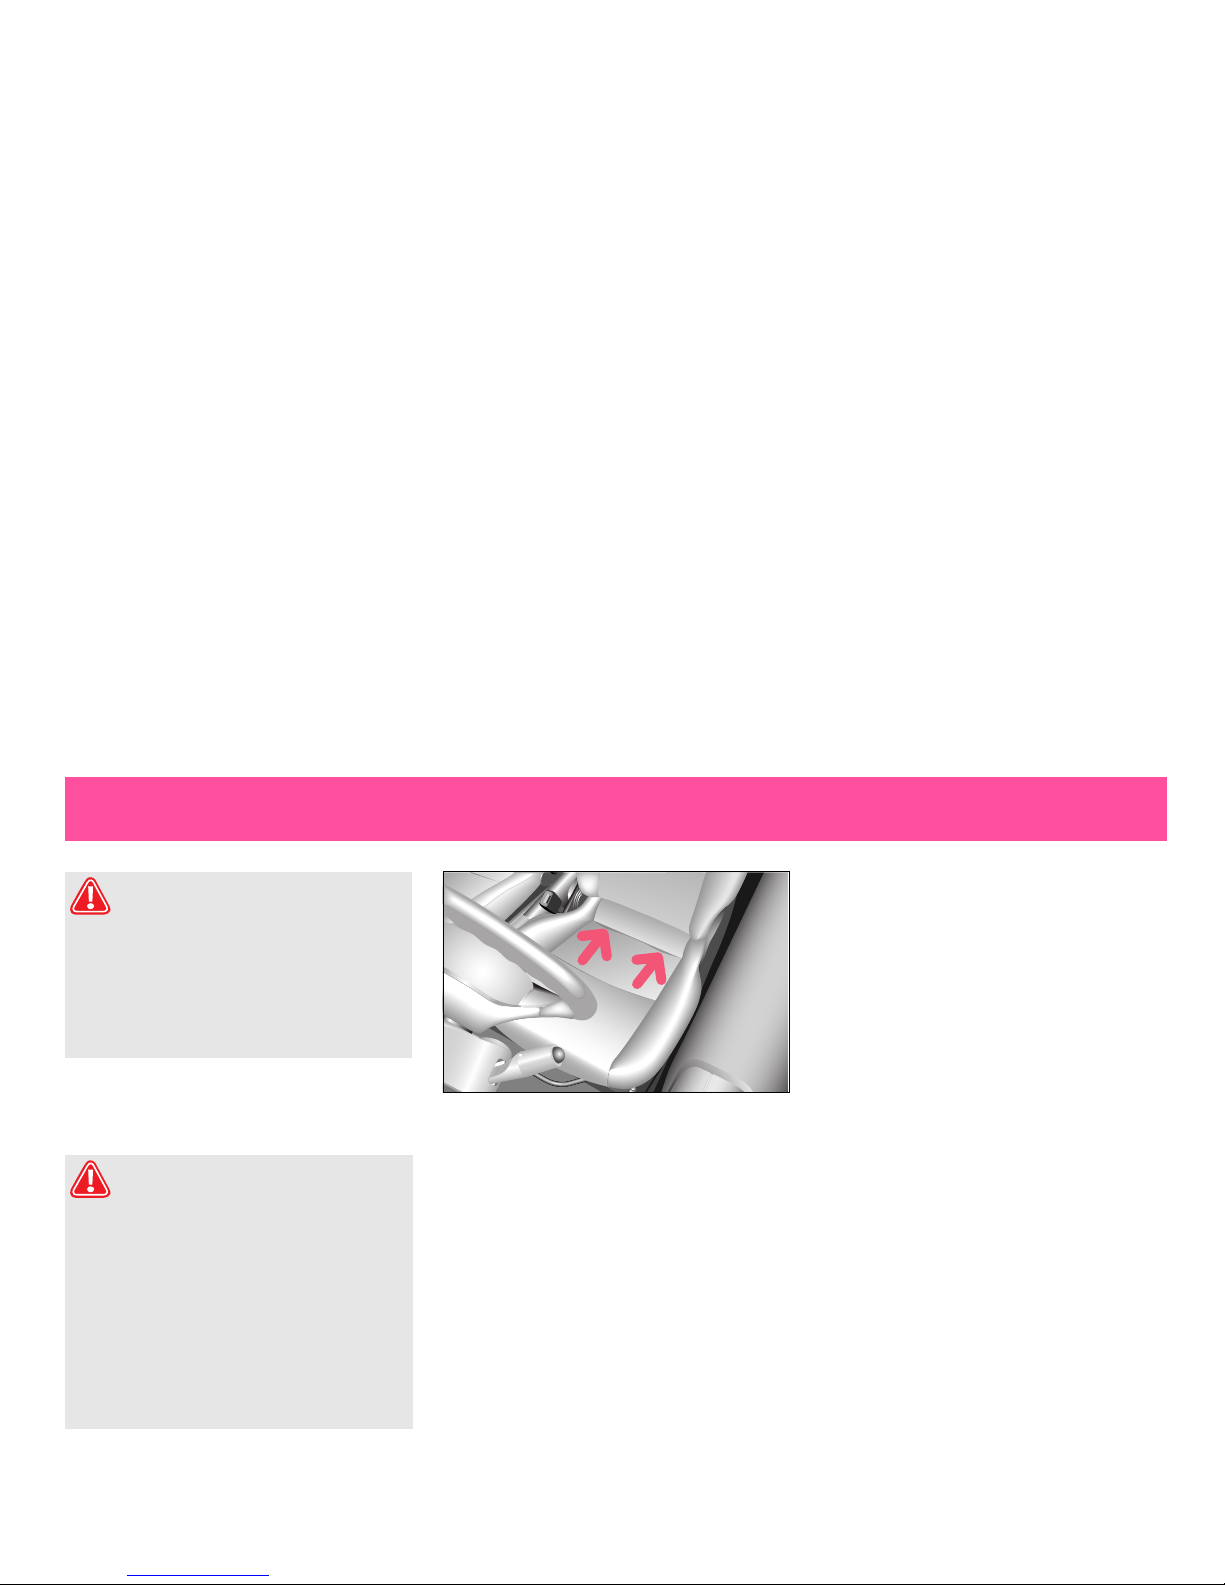
Adjusting the mirrors
Adjusting the mirrors
Ensure that the outside mirrors are
correctly set every time before you start
driving. Only then can the driver be sure
that the view to the rear is unobstructed.
>Note!
The adjustment lever is found on the
underside of the door bar.
How to adjust the outside mirrors
쮿 Adjust the outside mirrors by turning
lever (A).
Danger of accident!
The mirror curvature causes the
field of vision to be distorted. Vehicles in
the rear view mirror may appear to be
smaller and furt her away than they really
are.
>Important!
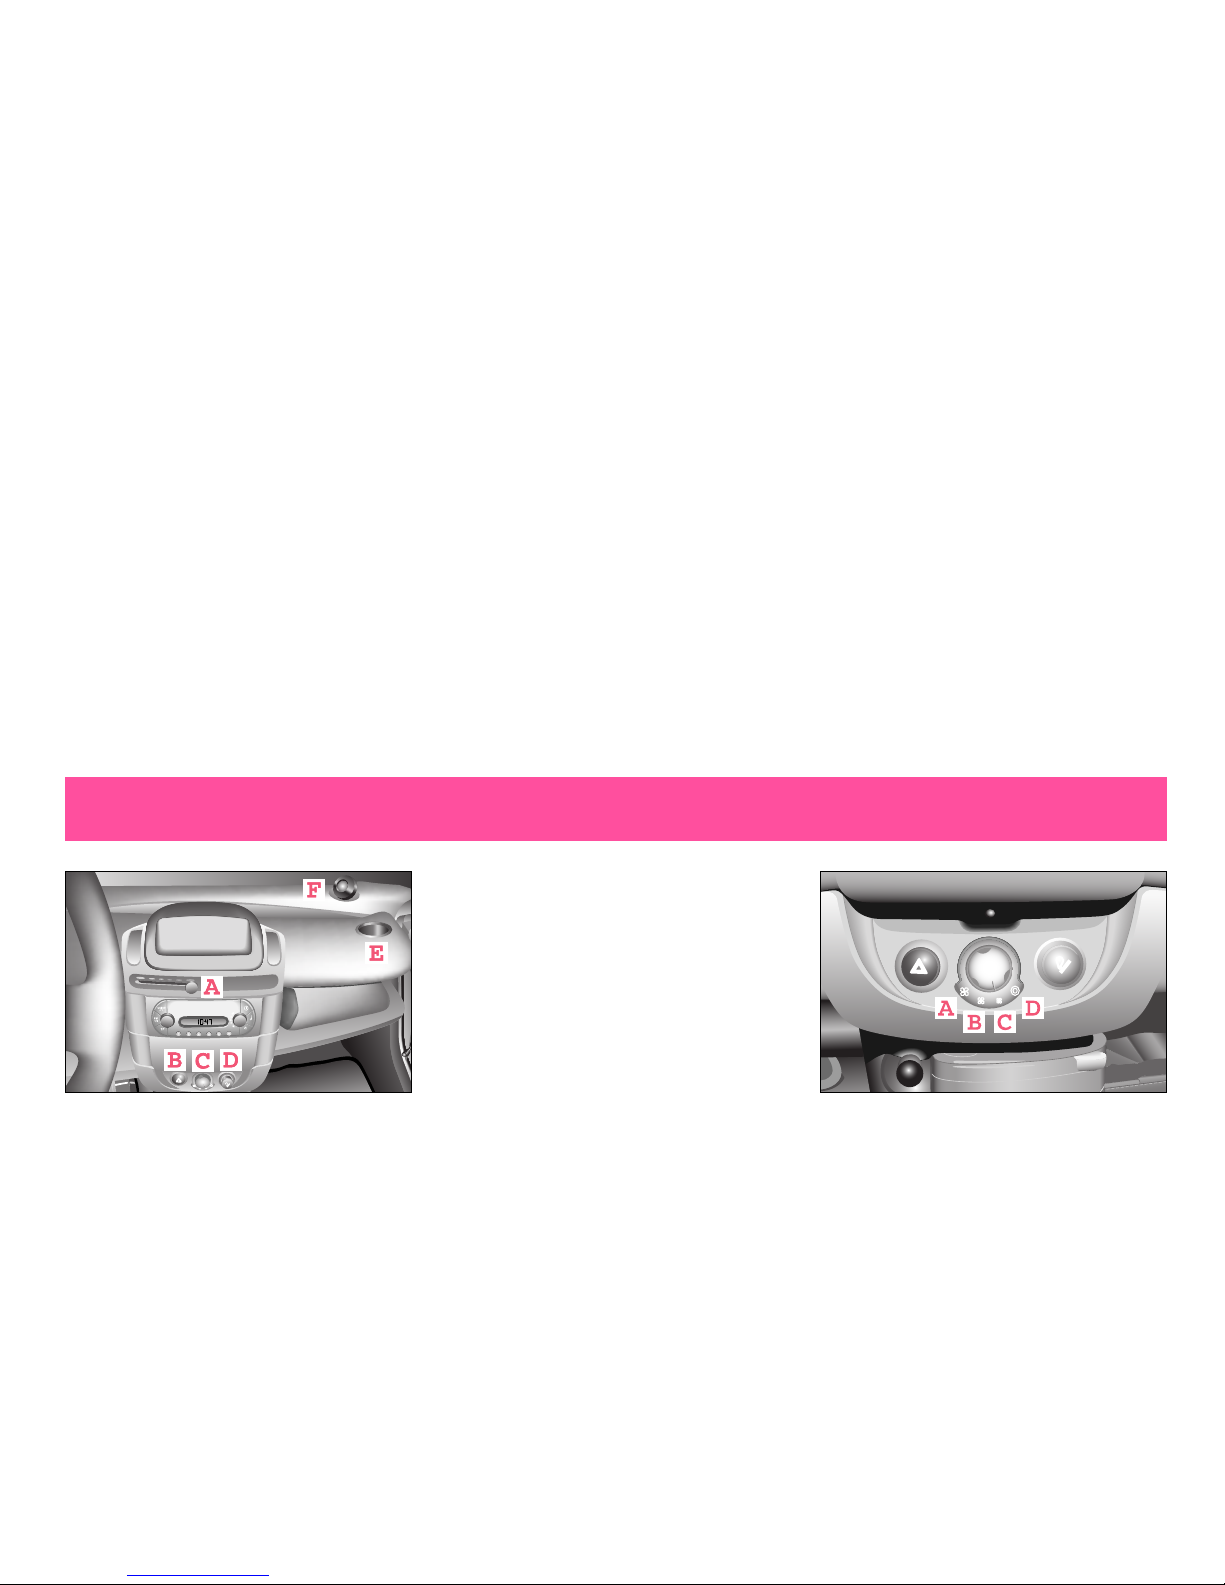
Centre console and cockpit
A Heater
B Hazard warning lights
C Blower
D Cigarette lighter
ECup holder
F Loudspeakers (sound package)
How to use the hazard warning lights
쮿 To switch on the hazard warning lights,
press the red switch (B).
>This causes:
- all six turn signal lights to start
flashing,
- the turn signal indic ator light (whe n
the ignition is switched on)
- the hazard warning light switc h also
to flash.
쮿 To switch the hazard warning lights off
press the red switch again. How to switch the blower on
You can set the blower to four different
levels by turning the control knob.
쮿 Position A
> Maximum setting
쮿 Position B
> Middle setting
쮿 Position C
>Slow setting
쮿 Position D
>Blower off
A
B
C
D
4 - >Important!
Driving
>Important driving notes!
쮿 Drain openings are found in the driver
and passenger seats as well as in the
floor pan so that rain will not collect
on the seat surfaces or in the footwell.
쮿 Ensure that the drain holes are clean
and not covered up. Only then can
rainwater freely flow out of the
vehicle.
쮿 Never drive with the wind deflector
open; see page 7.
쮿 Please put all loose objects away in the
provided stowage compartments prior
to driving. The airstream created in the
cabin when driving can e specially blow
out paper and other lightweight
objects.
쮿 For your safety, wear a suitable pair of
protective glasses when driving. A
helmet with a visor will protect your
head from airborne rocks and similar.
Danger of accident!
The crossblade and its safety
systems are intended for use on
surfaced roads only. Driving the
crossblade over any other type of terrain
introduces an increased accident hazard.
In order to avoid this risk, ensure that you
only drive on surfaced roads.
Danger of accident!
Water and dirt in the driver footwell
can lead to the floor mats sliding
and getting caught in between the
pedals. This could lead to an accident.
Therefore, remove any water and dirt
that may have accumulated (especially on
the seats and in the footwell) each time
before you start driving. Ensure that the
pedals have a free range of motion (i.e.
nothing is blocking them) and that the
floor mats cannot slide.

>Important!
Driving
Driving in the rain
쮿 The crossblade is not designed to be
driven in the rain for extended
periods of time.
쮿 If you happen to be driving when it is
raining, protect the driver-side
airbag in the steering wheel and the
controls in the centre console by
fitting both covers. Also do this when
parking in the rain.
> You will find both covers in the
drawer in the centre console.
After driving in the rain
- Park the crossblade in a dry and wellventilated garage.
- Also be sure to dry off the covers and
the tarpaulin; see page 9.
>Notes on child restraint systems!
- The child restraint systems are only
intended to be used when it is not
raining.
- When using the child restraint system,
pay attention to the airbag indicator
lamp.
Danger of injury!
Always protect the driver-side
airbag with the provided cover when
the vehicle is exposed to the rain. This w ill
ensure that the airbag retains its
functionality.
Danger of injury!
For your own safety, wear a
suitable pair of protective glasses or a
helmet with a visor when driving.
Dust, rocks and other airborne objects
could be thrown into your face,
distracting and injuring you. This could
ultimately lead to a car accident.
6 - >Important!
Loading
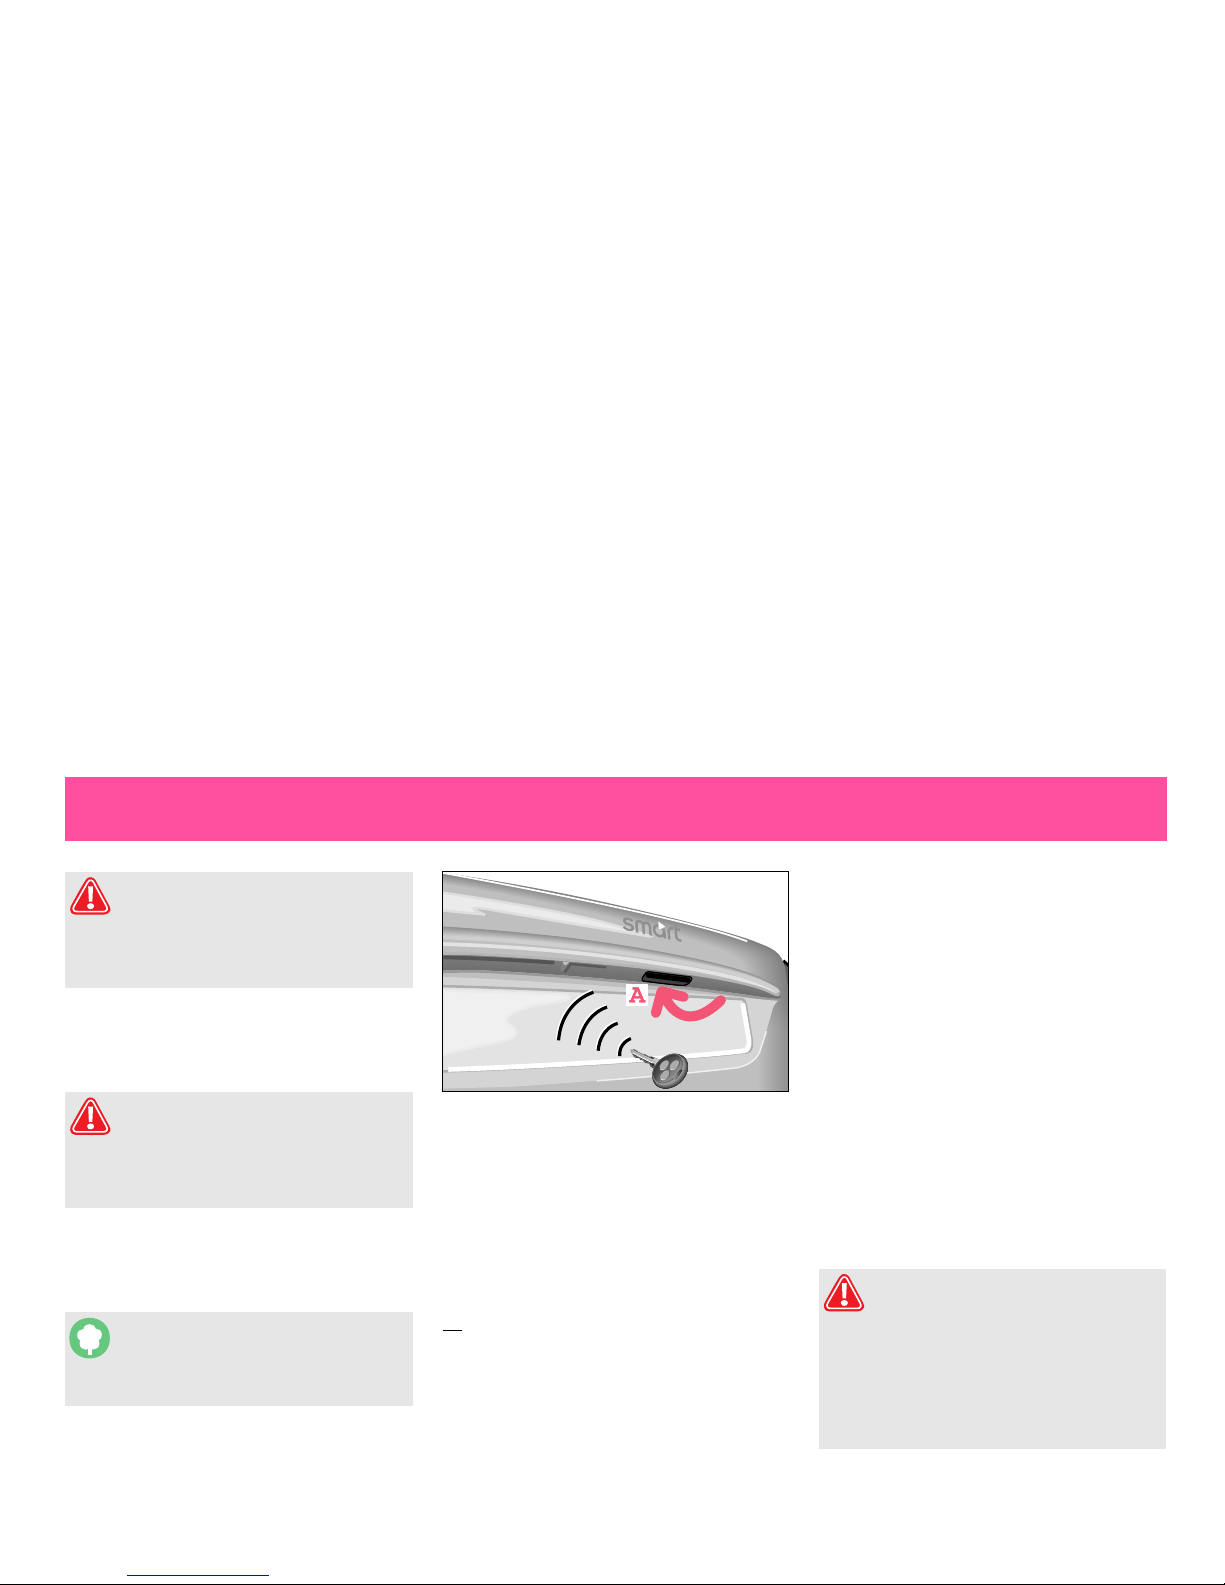
Opening the tailgate
After opening the crossblade with the
radio remote control, you can unlock the
tailgate in the door handle recess (A).
The tailgate can also be opened
mechanically from the outside.
>Important!
Do not place any objects behind the seats
on
the luggage compartment.
What you are permitted to load
쮿 Luggage compartment volume:
>122l
쮿 Gross weight limit:
>250kg
쮿 Luggage compartment load weight:
>max. 50kg
Reducing the load
- Optional extras and accessories
increase the curb weight; this results in
a payload reduction.
> Please study the operating
instructions for each individual
accessory part!
Danger of injury!
Objects on the passenger seat
should always be secured in such a way
that they will not distract the driver
during the journey.
Environment!
Unnecessary ballast increases
gross vehicle weight and increases fuel
consumption.
Danger of injury!
Loaded objects must always be
properly tied down. In the event of a
sudden full application of the brakes or in
an accident they could penetrate into the
passenger compartment.
Danger of accident!
Pulling a trailer with the smart
poses increased danger of an accident
and can reduce the longevity of the
vehicle, which is why the manufacturer
does not approve the smart for towing a
trailer. Never use your smart to tow a
trailer.
 Loading...