

Mercedes-Benz Integrated Morterola TIMEPORT Digital Cellular Telephone, Morterola TIMEPORT Operation Manual

Integrated TDMA Digital Cellular Phone
Operation Guide
Mercedes-Benz

TABLE OF CONTENTS
Safety Information . . . . . . . . . . . . . . . . . . . . . . . . . . . . . . . . . . . . . . . . . . . . . . . . . . . . . . . . . . . . . . . . . . . . . . 3
Getting Started . . . . . . . . . . . . . . . . . . . . . . . . . . . . . . . . . . . . . . . . . . . . . . . . . . . . . . . . . . . . . . . . . . . . . . . . . 7
Using Memory . . . . . . . . . . . . . . . . . . . . . . . . . . . . . . . . . . . . . . . . . . . . . . . . . . . . . . . . . . . . . . . . . . . . . . . . . 35
The Menu System . . . . . . . . . . . . . . . . . . . . . . . . . . . . . . . . . . . . . . . . . . . . . . . . . . . . . . . . . . . . . . . . . . . . . . 43
Managing Recent Calls . . . . . . . . . . . . . . . . . . . . . . . . . . . . . . . . . . . . . . . . . . . . . . . . . . . . . . . . . . . . . . . . . . 45
Phone Book . . . . . . . . . . . . . . . . . . . . . . . . . . . . . . . . . . . . . . . . . . . . . . . . . . . . . . . . . . . . . . . . . . . . . . . . . . . 51
Managing Your Phone Use with Call Timers . . . . . . . . . . . . . . . . . . . . . . . . . . . . . . . . . . . . . . . . . . . . . . . . 61
Adjusting Tone Controls . . . . . . . . . . . . . . . . . . . . . . . . . . . . . . . . . . . . . . . . . . . . . . . . . . . . . . . . . . . . . . . . . 69
Using Lock/Security Features . . . . . . . . . . . . . . . . . . . . . . . . . . . . . . . . . . . . . . . . . . . . . . . . . . . . . . . . . . . . 75
Phone Options . . . . . . . . . . . . . . . . . . . . . . . . . . . . . . . . . . . . . . . . . . . . . . . . . . . . . . . . . . . . . . . . . . . . . . . . . 85
Message Menu . . . . . . . . . . . . . . . . . . . . . . . . . . . . . . . . . . . . . . . . . . . . . . . . . . . . . . . . . . . . . . . . . . . . . . . . . 95
Reference Information . . . . . . . . . . . . . . . . . . . . . . . . . . . . . . . . . . . . . . . . . . . . . . . . . . . . . . . . . . . . . . . . . 105
Index . . . . . . . . . . . . . . . . . . . . . . . . . . . . . . . . . . . . . . . . . . . . . . . . . . . . . . . . . . . . . . . . . . . . . . . . . . . . . . . . . 111
1

Table of Contents
2

SAFETY INFORMATION
Important: Read this information before using your wireless handheld phone.
Important Export Information
Because of federal export regulations applicable to this Motorola phone, it cannot be sold for export from the U.S.A. or
Canada. Please read the following important notice.
Export Law Assurances: This product is controlled under the export regulations of the United States of America and
Canada. This product cannot be exported from the United States or Canada without an export license issued by the U.S.
Department of Commerce. In addition to the U.S. license, if this product is to be exported from Canada, an Export Permit
issued by the Canada Department of Foreign Affairs and International Trade must be obtained before export.
Exposure to Radio Frequency Signals
Your wireless handheld portable telephone is a low power radio transmitter and receiver. When it is on, it receives and also
sends out radio frequency (RF) signals.
In August 1996, The Federal Communications Commission (FCC) adopted RF exposure guidelines with safety levels for
handheld wireless phones. Those guidelines are consistent with safety standards previously set by both U.S. and international
standards bodies:
• American National Standards Institute (ANSI) C95.1 1992
• National Council on Radiation Protection and Measurement (NCRP) Report 86 1986
• International Commission on Non-Ionizing Radiation Protection (ICNIRP) 1996
Those standards were based on comprehensive and periodic evaluations of the relevant scientific literature. For example, over
120 scientists, engineers, and physicians from universities, government health agencies, and industry reviewed the available
body of research to develop the ANSI Standard (C95.1).
The design of your phone complies with the FCC guidelines (and those standards).
Antenna Care and Installation
Important: To meet the FCC’s RF Exposure Guidelines, the antenna should be installed so there is at least 20 cm
of separation between people and the antenna.
Safety Information
3

Safety Information
Use only the supplied or an approved replacement antenna. Unauthorized antennas, modifications, or attachments could
damage the phone and may violate FCC regulations.
Phone Operation
Normal Operation
Hold the phone as you would any other telephone with the antenna pointed up and over your shoulder.
Tips on Efficient Operation
For your phone to operate most efficiently when in Portable Mode:
• Do not touch the antenna unnecessarily when the phone is in use. Contact with the antenna affects call quality and may
cause the phone to operate at a higher power level than otherwise needed.
Batteries
Caution: All batteries can cause property damage, injury, or burns if conductive material, such as jewelry, keys, or beaded
chains, touches exposed terminals. The material may complete an electrical circuit and become quite hot. To protect against
such unwanted current drain, exercise care in handling any charged battery, particularly when it is inside your pocket, purse,
or other container with metal objects. Your batteries are packed with a protective cover. When the battery is detached from the
phone, please use this cover for storing your batteries.
Driving
Check the laws and regulations on the use of wireless telephones in the areas where you drive. Always obey them. Also, if
using your phone while driving, please:
• Give full attention to driving—driving safely is your first responsibility.
• Use hands-free operation whenever possible; this is the recommended mode of operation.
• Pull off the road and park before making or answering a call if driving conditions so require.
Electronic Devices
Most modern electronic equipment is shielded from RF signals. However, certain electronic equipment may not be shielded
against the RF signals from your wireless phone.
4

Pacemakers
The Health Industry Manufacturers Association recommends that a minimum separation of six (6") inches be maintained
between a handheld wireless phone and a pacemaker to avoid potential interference with the pacemaker. These
recommendations are consistent with the independent research by and recommendations of Wireless Technology Research.
Persons with pacemakers:
• Should ALWAYS keep the phone more than six inches from their pacemaker when the phone is on.
• Should not carry the phone in a breast pocket.
• Should use the ear opposite the pacemaker to minimize the potential for interference.
• If you have any reason to suspect that interference is taking place, turn your phone off immediately.
Hearing Aids
Some digital wireless phones may interfere with some hearing aids. In the event of such interference, you may want to consult
your hearing aid manufacturer to discuss alternatives.
Other Medical Devices
If you use any other personal medical device, consult the manufacturer of your device to determine if it is adequately shielded
from external RF energy. Your physician may be able to assist you in obtaining this information.
Turn your phone off in health care facilities when any regulations posted in these areas instruct you to do so. Hospitals or
health care facilities may be using equipment that could be sensitive to external RF energy.
Posted Facilities
Turn your phone off in any facility where posted notices so require.
Aircraft
FCC regulations prohibit phone usage while in the air. Switch off your phone before boarding an aircraft.
Blasting Areas
To avoid interfering with blasting operations, turn your phone off when in a “blasting area” or in areas posted: “Turn off twoway radio.” Obey all signs and instructions.
Safety Information
5

Safety Information
Potentially Explosive Atmospheres
Turn your phone OFF and do not remove your battery when you are in any area with a potentially explosive atmosphere and
obey all signs and instructions. Sparks from your battery in such areas could cause an explosion or fire resulting in bodily
injury or even death.
Areas with a potentially explosive atmosphere are often, but not always, clearly marked. They include, but are not limited to,
fueling areas such as gasoline stations, below deck on boats, fuel or chemical transfer or storage facilities, areas where fuel
odors are present (for example, if a gas/propane leak occurs in a car or home), areas where the air contains chemicals or
particles (such as grain, dust, or metal powders), and any other area where you would normally be advised to turn off your
vehicle engine.
For Vehicles Equipped with an Air Bag
An air bag inflates with great force. DO NOT place objects, including both installed or portable wireless equipment, in the
area over the air bag or in the air bag deployment area. If in-vehicle wireless equipment is improperly installed and the air bag
inflates, serious injury could result.
6
GETTING STARTED
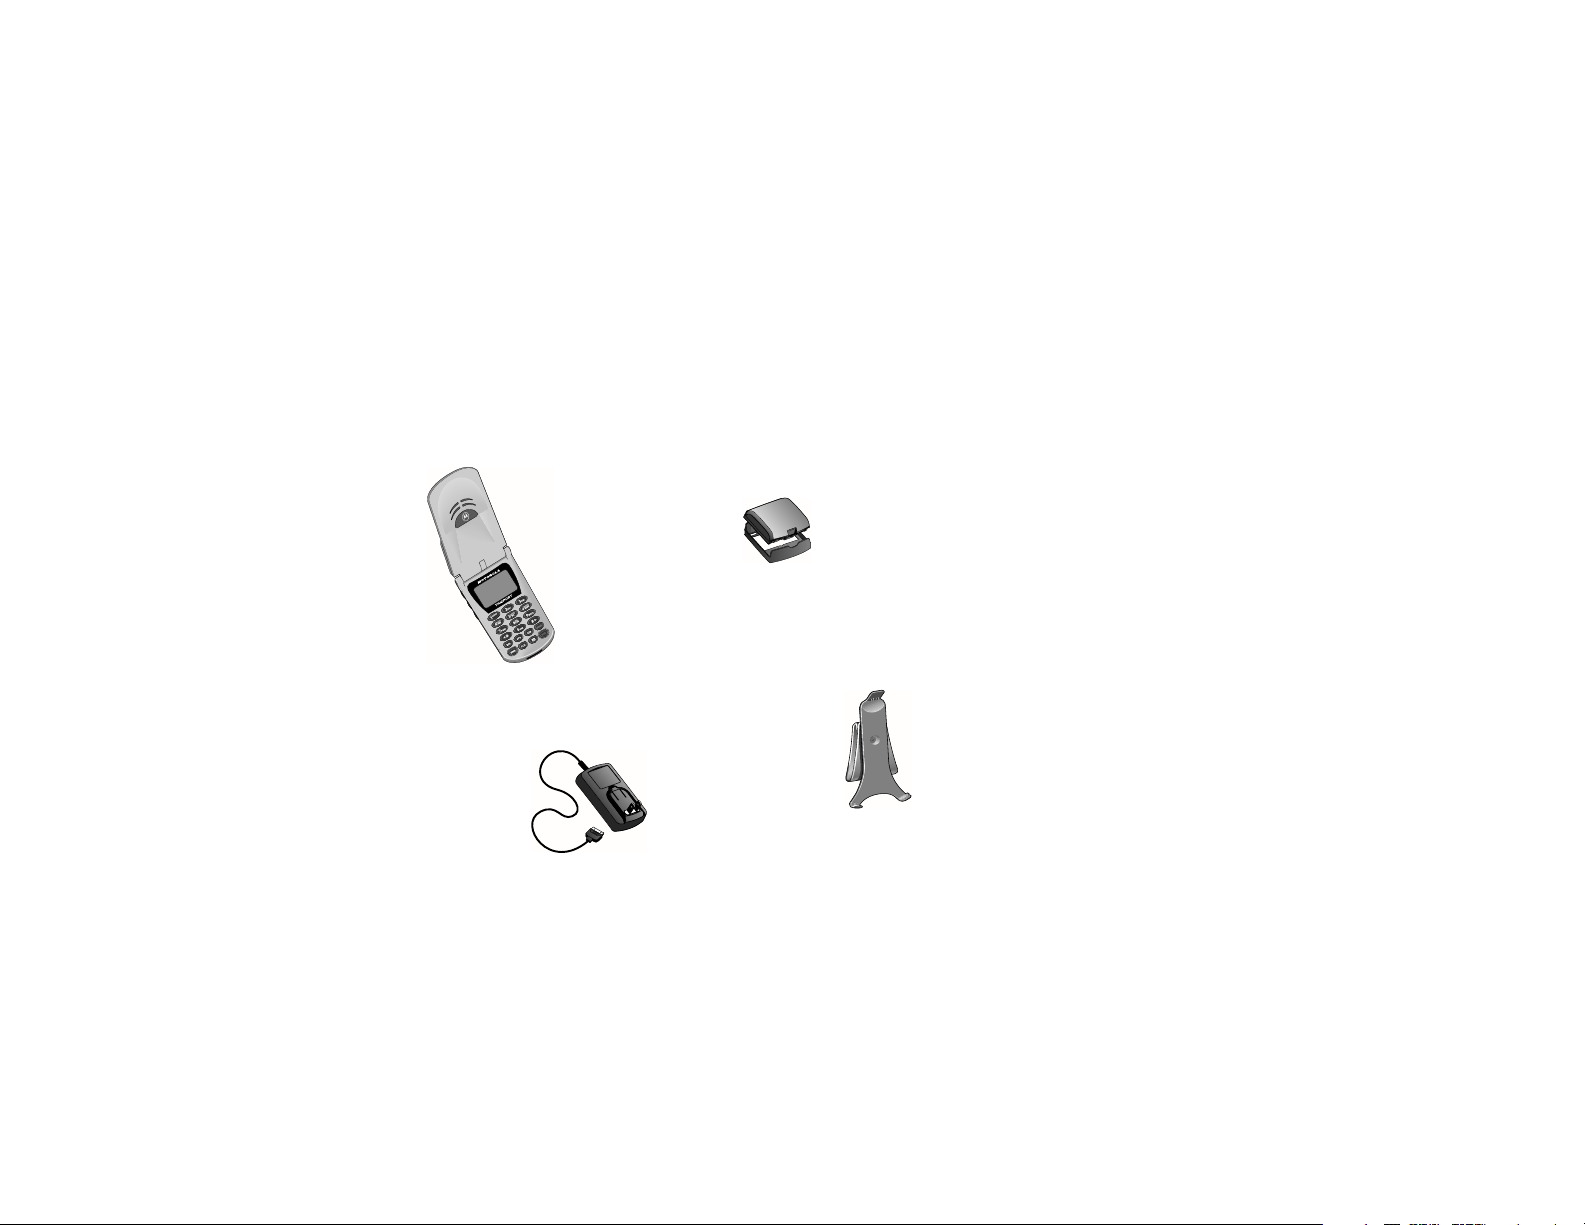
Package Content Options
Your Timeport™ cellular phone is supplied together with a charger, holster, transformer and a battery. Below is
an outline of the included accessories.
Note: Your phone and accessories may not look exactly as pictured.
Standard Main Battery
with Battery Cover
Motorola Timeport™
Phone
Holster
AC Adapter
7

Getting Started
Phone Overview
Fixed Antenna—Active when in portable mode; when connected to the coilcord, the
phone will use the vehicle’s integrated antenna.
Earpiece—Ultra-compact phone speaker.
Accessory Connector Port—Provides the connections for an external power supply and
vehicular accessories.
Headset Jack—Provides the connection for an optional headset.
Microphone—Positioned for convenient conversation.
Function Keys—
¡—Turns the phone On and Off.
ƒ—Acts as a “shift” key to access the secondary functions of other keys.
‰—Recalls phone numbers from memory.
¬—Stores phone numbers into memory.
Ç—Clears characters from the screen.
º—Ends phone calls.
æ—Places or answers calls.
« and »—Can be used to scroll through memory entries and menu features.
Message Button—Allows access to messaging features.
Smart Button—(Located on side of phone) Use the Smart Button to recall
information from memory, place and end calls, select menu features, and toggle features on and off. The symbol
“ ” in your display represents the Smart Button.
Headset Jack
Power/Status
Indicator
Signal Strength
Indicator
Volume Keys
Smart Button
Icon Indicators
Microphone
Earpiece
Battery Level
Indicator
VibraCall®
Alert Indicator
Alphanumeric
Keypad
Function
Keys
Accessory
Connector Port
or
Volume Keys—The upper and lower volume keys can adjust keypad, earpiece, and ringer volume. After
pressing the Smart Button, the volume keys also scroll through memory entries and menu features.
8

Understanding the Guide
Key Presses
Key presses are represented in this guide using symbols so that you may locate and use the required sequence
quickly. A sequence of key presses may be shown as follows:
ƒ ‚ ‡ Ç
This means you should press ƒ followed by ‚, ‡, and then Ç, in sequence, not simultaneously.
Prompts and Messages
Your phone responds to key presses by displaying either a prompt that guides you to the next action or a message
confirming that your action is complete. Prompts and messages are represented in this guide in LCD style, for
example: Reset Timer.
Short Cuts and Tips
In the margins of your guide are short cuts and useful hints and ways to improve your phone’s performance. These
are especially helpful for experienced Mercedes-Benz phone users, who can find many of the same key sequences
used with other Mercedes-Benz phone models.
Getting Started
9

Getting Started
Radio Phone Features
This telephone system is fully integrated with your Mercedes-Benz audio system and steering wheel switches*.
You can scroll through and access your phone’s entire phone number memory, place, receive, and terminate calls,
change volume, and view the most common call status messages. Because the exact phone features are dependent
on the particular audio system installed in your vehicle, detailed operation is covered in your audio system
manual. Please refer to it.
Note: In order for your Mercedes-Benz volume controls to work in conjunction with the Timeport™ phone (to
change ringer volume or adjust call volume), the vehicle must either have the engine running or have the ignition
key turned clockwise to the last position before starting the engine.
Basic Features
Most features of your new Mercedes-Benz telephone are available in both stand-alone PORTABLE MODE and
when attached to the coilcord in the vehicle, referred to as VEHICULAR MODE.
This section of your manual will give you the basic information you need to place and receive calls from your
portable telephone in VEHICULAR MODE. Subsequent sections will detail additional operation in PORTABLE
MODE, use of memory to store your most-used phone numbers, and descriptions of advanced features.
Note: Your cellular carrier may not support some of the features of your new Mercedes-Benz Integrated System;
To find out what features are available, contact your cellular carrier.
*not available on all models
10
About Your Batteries
Your Timeport™ phone uses Lithium Ion (LiIon) batteries. Batteries are available in these sizes: Slim, Standard,
and Extra Capacity.
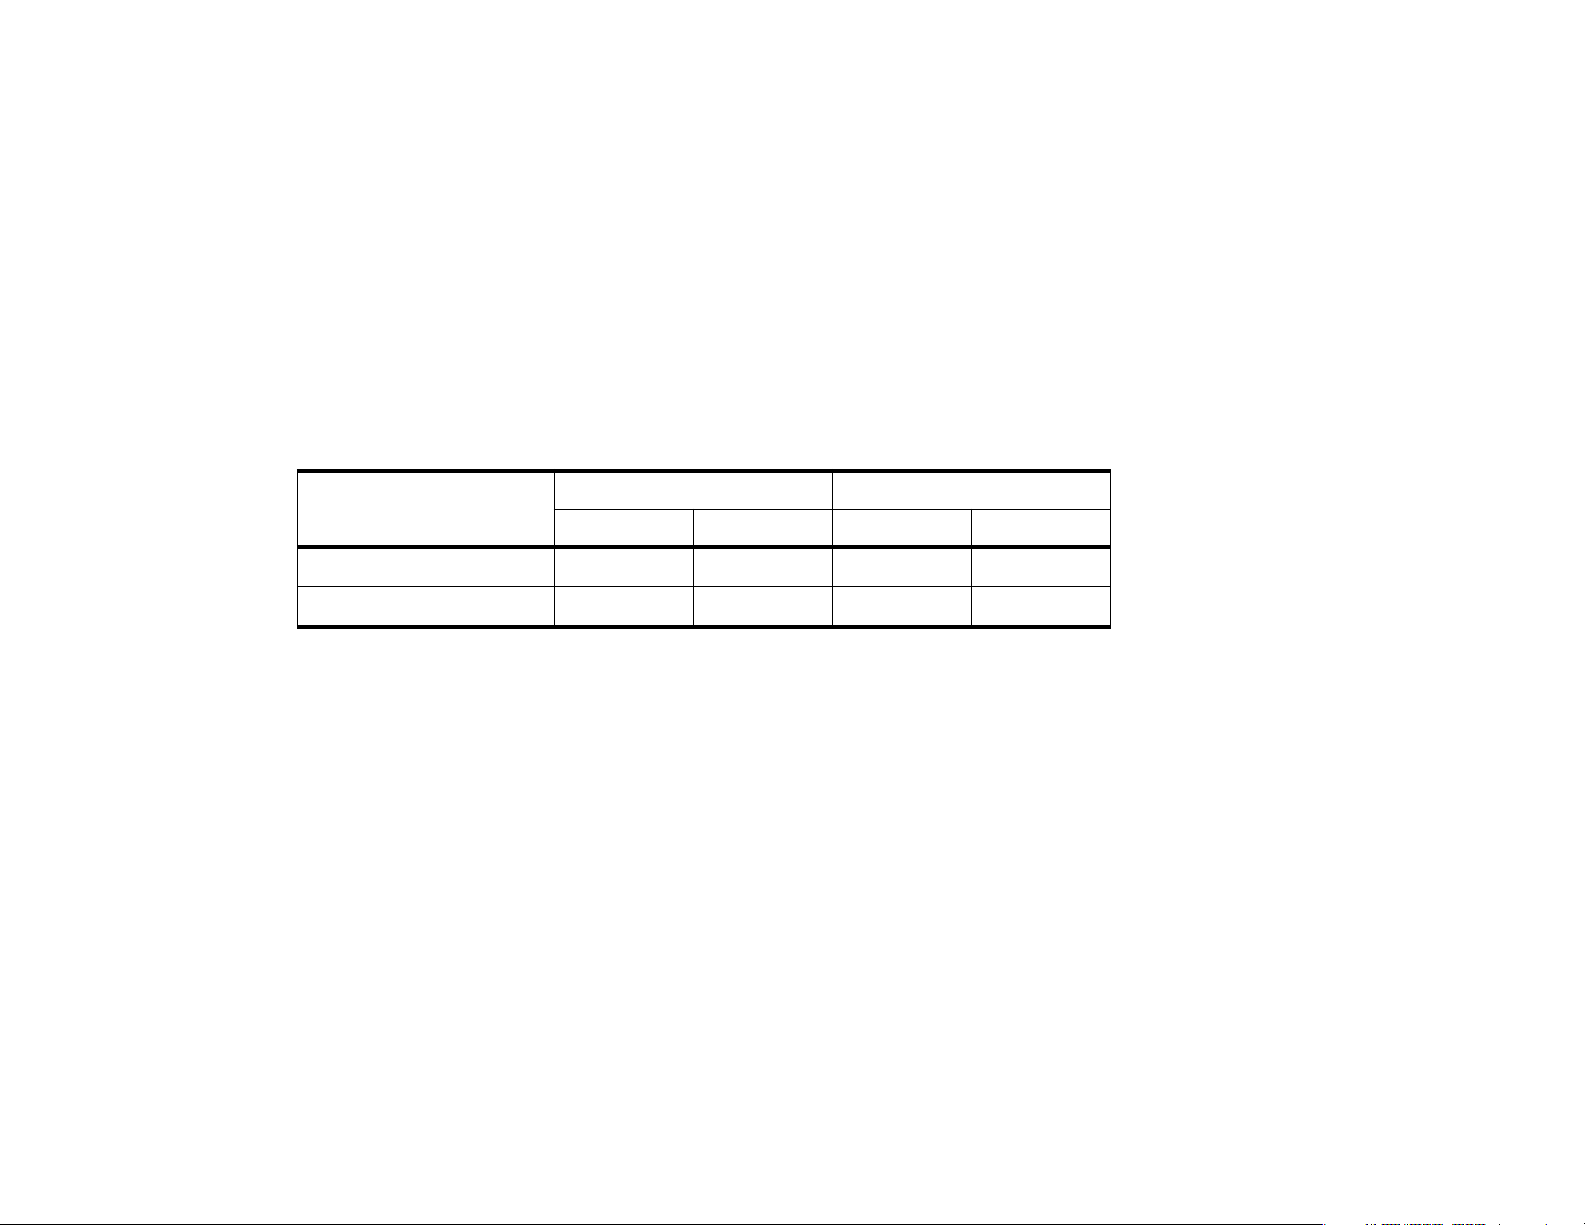
Battery Talk- and Standby-Times
Talk-time refers to the time you can talk on your phone before the battery is fully discharged. Standby-time is
the time that your phone is on but not used for talking.
Battery
Slim Main LiIon (500mAH)
Extra Capacity LiIon (900 mAH)
Talk (up to) Standby (up to) Talk (up to) Standby (up to)
60 min. 50 hrs. 35 min. 10 hrs.
110 min. 60 hrs. 60 min. 15 hrs.
Digital Analog
Keep in Mind: Talking on the phone uses more power than leaving it idle. The more power you use for talking,
the less you’ll have for standby-time, and vice-versa.
All times depend on the network configuration, signal strength, and the features selected. (Times are approximate
for the first 500 charging cycles.)
Your phone will operate more efficiently in Digital mode. If the D icon is on, your phone’s performance will be
reflected in the digital section of the above table. If the D icon is not on, refer to the Analog section of the table.
Getting Started
11

Getting Started
Storing and Disposing of Batteries
To prolong the life of your batteries, do not expose them to temperatures below -10°C (14°F) or above 45°C
(113°F). Always take your phone with you when you leave your car.
To dispose of batteries, check with your local recycling center for a battery recycler near you. Never dispose of
batteries in a fire.
Caution: To prevent injuries or burns, do not allow metal objects to contact or short-circuit the battery terminals.
Removing and Attaching Battery Covers
Your phone’s batteries are shipped uncharged and fitted with protective covers. Before you install the batteries,
remove these covers, and save them for storing unused batteries. The covers prevent metal objects from
contacting the battery terminals, reducing the risk of injury or damage from a battery short circuit. (See
"Charging Batteries" on page 16 when you’re ready to begin charging your battery.)
Removing the Battery Cover
1. Press and hold the release latch.
2. Pull the battery upward, out of its cover.
Attaching the Battery Cover
1. Set the edge of the battery opposite the release latch into the cover.
2. Lower the release latch side of the battery into the cover until the latch clicks into place.
12

Installing and Removing Batteries
Installing a Main Battery
1. Set the edge of the battery opposite the release latch into the cover.
2. Press the release latch side of the battery into the cover until the latch
clicks into place.
2.
1.
Getting Started
13
Getting Started
Removing a Battery
1. Press and hold the release latch.
2. Pull the battery upward, out of the phone.
Release
Latch
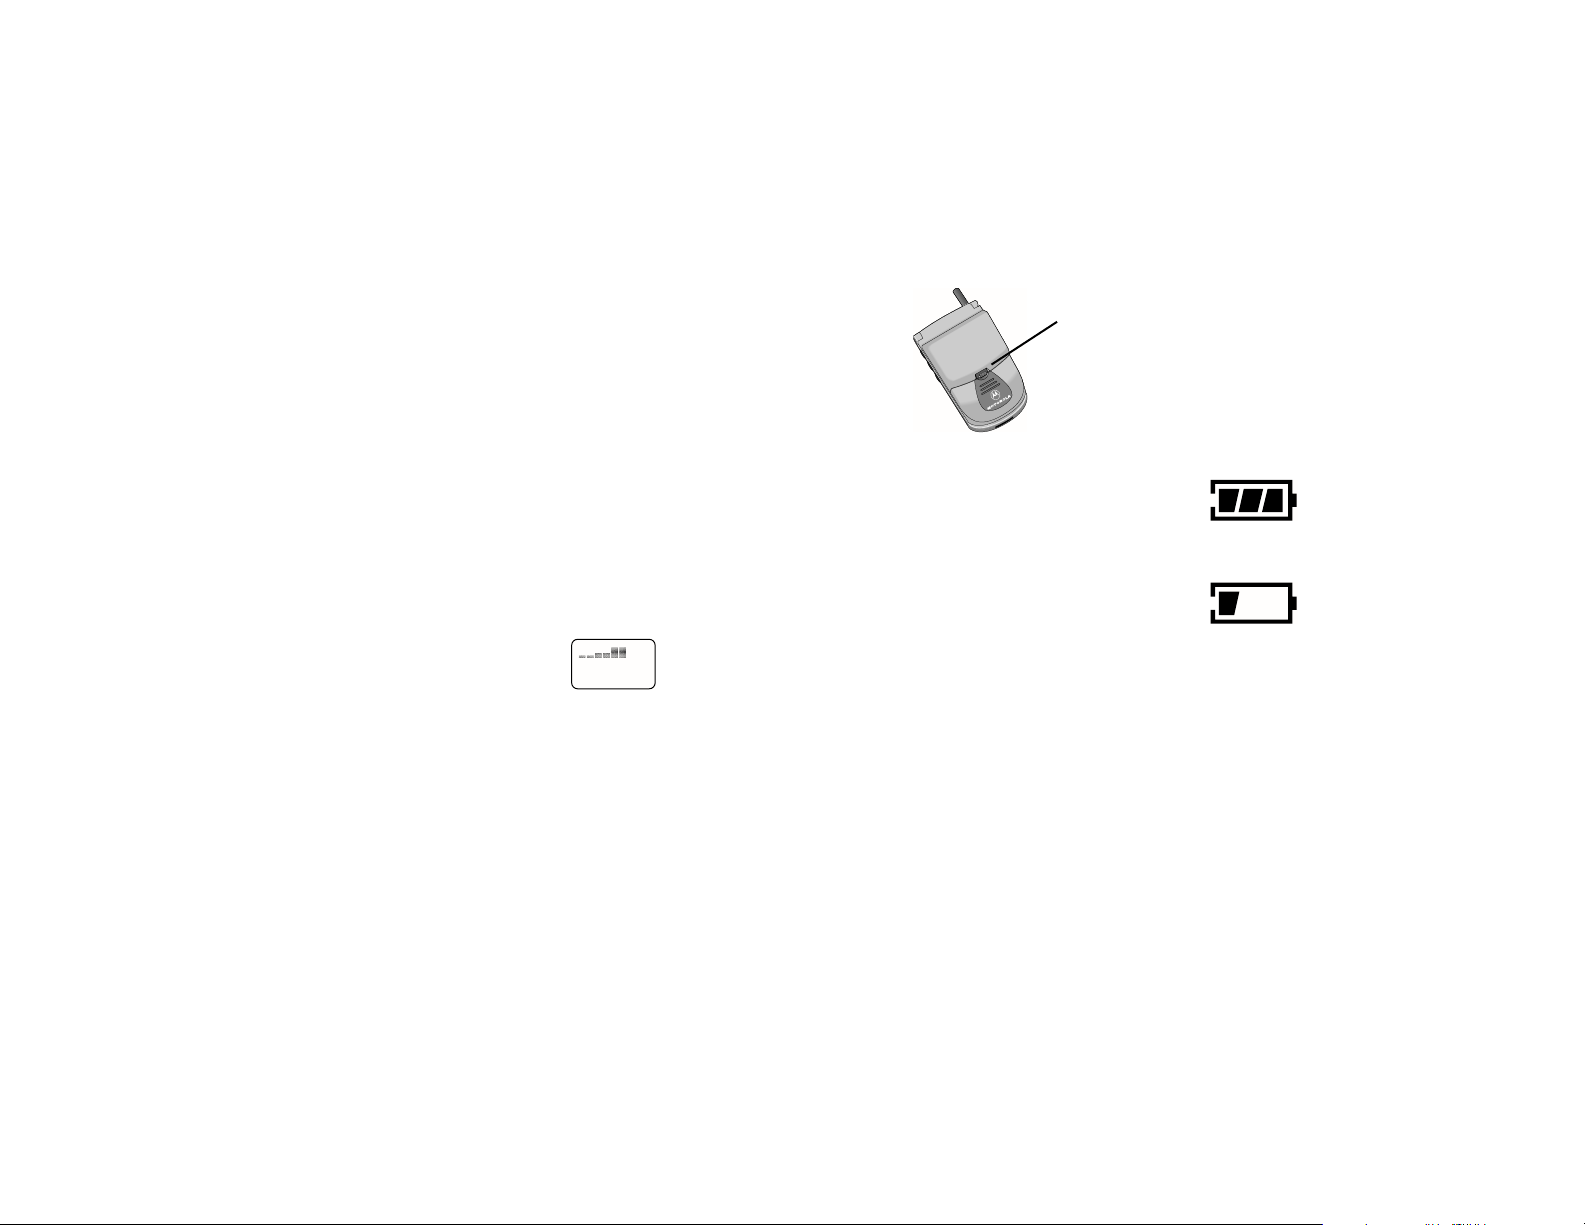
Checking Battery Levels
Battery Level Indicator
The three bar segments on your phone’s Battery Level Indicator display the amount of charge remaining in your
battery. The more segments visible, the greater the charge.
For a detailed battery level reading:
Press ƒ, then press ›.
You will see the following:
Main
The more segments filled on the fuel gauge, the greater the charge.
High
Low
14

Low Battery Warning
When the battery level is low and only a few minutes of talk-time remain, your phone signals you in three ways:
• Low Battry appears in the first line of the display.
• No bar segments are highlighted.
• A short tone plays periodically.
To confirm low battery signals:
Press ƒ, then press ›.
Power Status Messages
You may also see one of the following messages:
Main
Charging Main
Getting Started
Main battery fitted; the phone is operating from the main battery.
Main battery fitted; the main battery is being charged.
15

Getting Started
Charging Batteries
Using the Vehicle’s Battery
Whenever your phone is connected to your Mercedes-Benz vehicle via the coilcord, it operates from the vehicle’s
battery, while at the same time receiving a slow charge.
Using the Internal Charger
Your phone has a built-in battery charger. Using either the AC or vehicle power adapter, you can plug the handset
directly into a power source to charge the attached battery.
To charge:
1. Plug the AC adapter or vehicle power adapter into the accessory connector on
the bottom of your phone as shown, with the release tab facing up.
2. Plug the power adapter into a 110V AC electrical outlet. A beep-tone sounds,
and the battery icon flashes.
See "Charge Times" on page 18 for charge times.
Using the Desktop Charger
You can use the desktop charger front pocket to charge a battery while it is attached to your phone, and the rear
pocket to charge batteries separately.
To charge:
1. Plug the AC adapter into the back of the charger, release tab facing up.
2. Plug the other end of the adapter into an AC wall socket.
H
S
U
3. With battery attached, place the phone into the charger’s pocket. Optionally,
place a second battery in the charger’s rear pocket.
P
Tip:
You can still place
and answer calls
while using either
the rapid charger
or the vehicle
power adapter.
Remember that
talking on the
phone requires
energy, so
charging will take
more time. To
place the phone
in charger-only
mode, press
once.
¡
16

When the phone is charging, the battery level indicator will flash. When the battery is fully charged, this icon will
stop flashing. If your phone cannot charge the battery, this indicator will not appear.
Desktop Charger Indicator Lights
• Red indicates that the battery is charging.
• Flashing yellow indicates that the battery is waiting its turn.
• Green means the battery is charged within approximately 90% of its capacity and can be used. Charging
the battery for an additional hour brings it up to 100% capacity.
• Flashing red indicates that the battery is damaged and cannot be charged.
Battery Charging Tips
To ensure that you enjoy maximum battery life and use your battery to its fullest capacity:
• Always use Mercedes-Benz approved battery chargers.
• For the best results, Li-Ion batteries should be charged using the E•P™ Desktop Charger, or your phone’s
internal charger.
• The battery should be at or near room temperature when charging.
• When you don’t intend to use a battery for a while, store it uncharged in a cool, dark, dry place, such as a
refrigerator.
Getting Started
17

Getting Started
Quick Change Power Source (“Seamless Connection”)
The quick change feature enables you to switch power sources while a call is in progress without losing the call.
If you hear a low-battery warning while you are in a call, plug your phone into the Vehicle Power Adapter or AC
Adapter.
Charge Times
Locate your battery by type to see how long your battery takes to charge to a 95% power level:
Battery Type
Slim LiIon (500 mAH) 2.5
Extra Capacity LiIon (900 mAH) 3.0
After the battery reaches 95%, it begins to slow charge until it is fully charged. It is normal for batteries to
become warm during charging.
Charge Time (hrs)
Rapid Charger
18

Operation When Not Connected to Vehicle - (PORTABLE MODE)
Turning the Phone On and Off
1. Open your phone to expose the keypad.
2. Press and hold ¡ once to turn the phone on.
3. Press ¡ again to turn the phone off.
Note: When connected to the vehicle coilcord, turning on the car’s ignition will power the phone on, and turning the
ignition off will power the phone off, eliminating the need to open the phone once docked in the vehicle’s cradle.
Power On Greeting
When you turn on your Timeport™ phone or, if connected to the coilcord, when you turn on the car’s ignition, it
performs a self-test to let you know it is operational. When the test is completed, the display shows one of several
possible greetings. For example, your Service Provider may broadcast its name in your phone’s display. If you
don’t see the name of your Service Provider, then you will see Home System when inside your local coverage area
or Roam when outside your local coverage area.
Standby Mode
To conserve energy, your phone may turn off its light when in standby mode. The display light comes back the
next time you press a key or open the phone.
How to Hold Your Phone
Hold your cellular phone with the antenna pointing up and over your shoulder. For best performance, make sure
your hand is not covering the antenna. When connected to the vehicle, Mercedes-Benz recommends using Hands
Free operation.
Storing Your Phone in Its Holster
When in Portable Mode, you can place the phone in the holster by making sure the main battery is facing the
outside of the holster. Then clip the holster onto a belt, purse or briefcase.
Note: The holster has been designed for your convenience and is not meant to secure your phone under all circumstances.
Getting Started
19

Getting Started
Reading the Indicators
1
2
3 4567
8
Signal Strength Indicator (1)
The Signal Strength Indicator (SSI) indicates the strength of your phone’s connection with the local cellular
system. A strong signal increases your chances of placing and receiving calls. Low signal strength can occur in a
fringe area of the cellular system. Buildings, tunnels, and bad weather can block or interfere with reception.
Digital Indicator (2)
If you are in a digital coverage area, the indicator illuminates.
In Use Indicator (3)
The In Use (IU) Indicator illuminates when a call is in progress.
In-Building Indicator (4)
The In-Building Indicator ( ) lights when the phone accesses an In-Building Cellular System or other nonpublic system.
No Service Indicator (5)
If you travel beyond the range of a cellular system, the No Service (NS) Indicator illuminates to let you know that
calls cannot be placed or received from your location.
SMS Message Waiting Indicator (6)
The Short Message Service (SMS) Message Waiting Indicator ( ) is displayed when the phone receives a
message.
Voice Message Waiting Indicator (7)
The Voice Message Waiting Indicator ( ) is displayed when your Voicemail has received a message.
High
Low
20
Note: Voicemail and SMS are network- and subscription-dependent features and may not be available in all
areas.
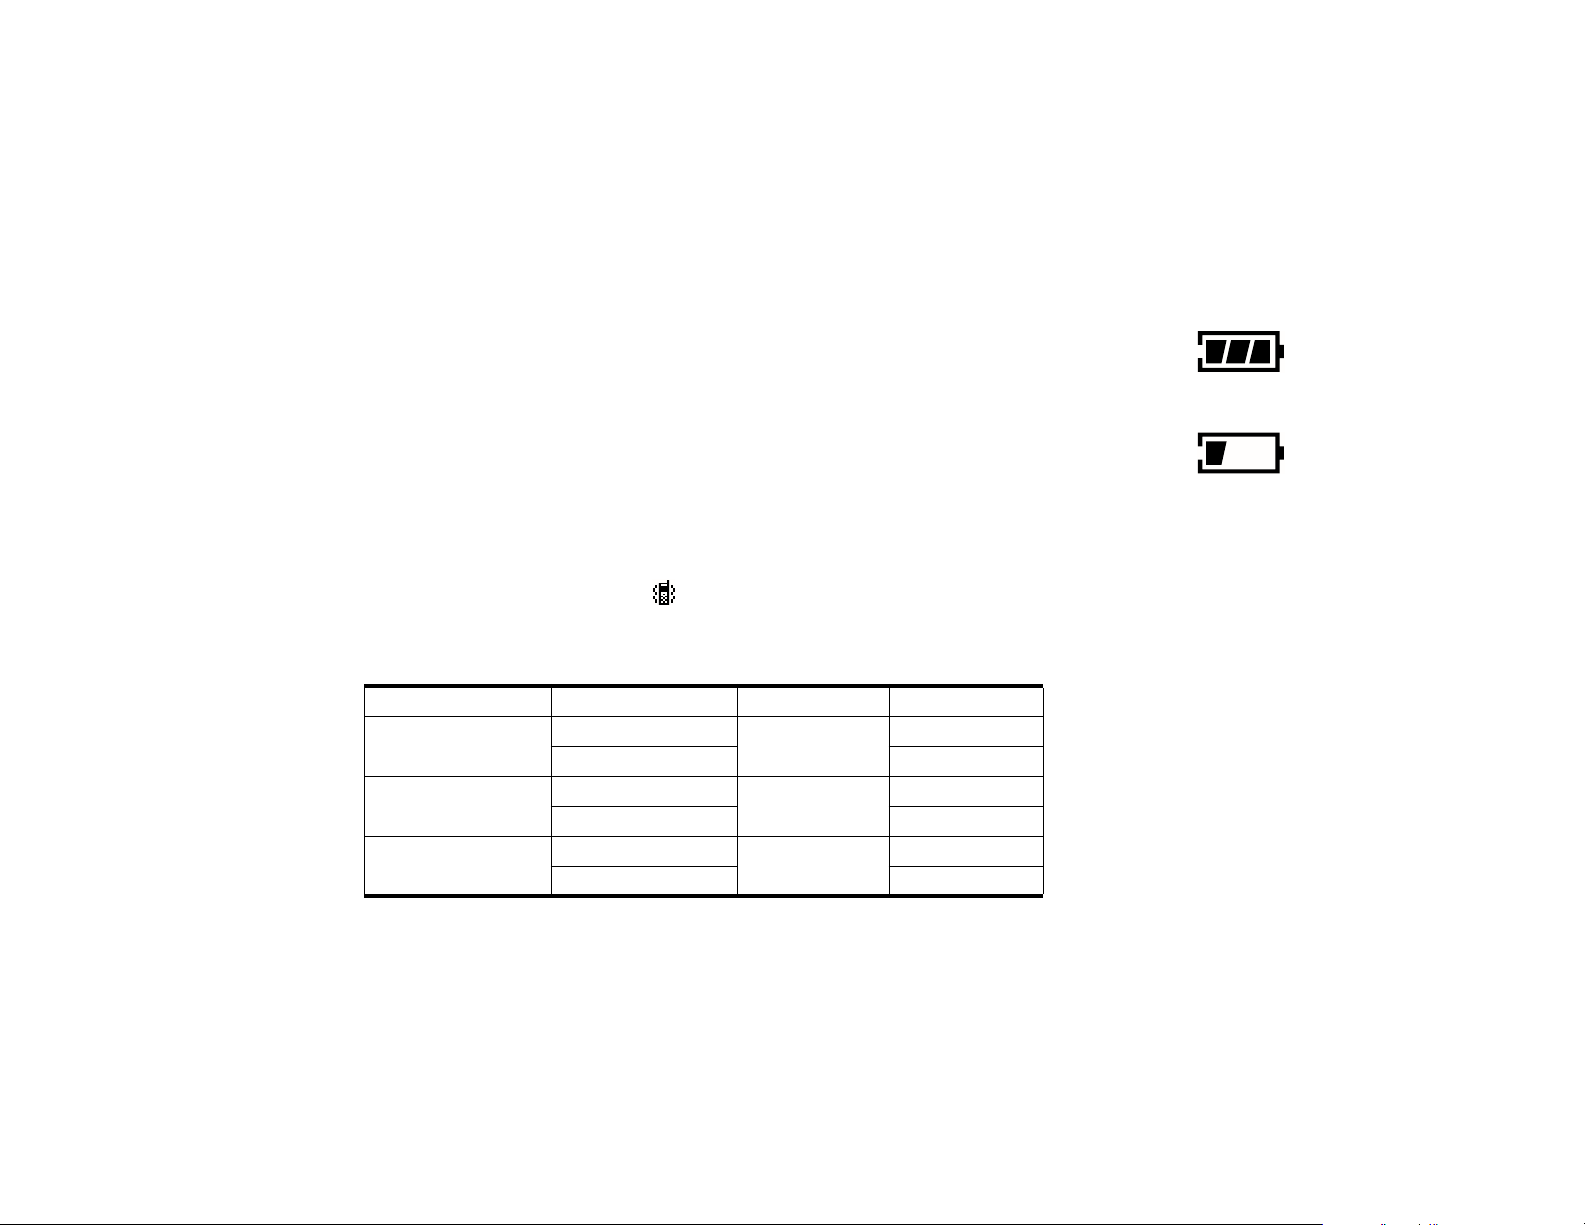
Battery Level Indicator (8)
The three bar segments on the Battery Level Indicator show the amount of charge remaining in your battery. The
more segments you see, the greater the charge. The phone alerts you to a low charge in three ways:
• No bar segments are highlighted.
• Low Battry appears on your screen.
High
• A short tone plays periodically.
The phone automatically turns itself off when the charge is exhausted. Charge the battery to resume normal
operation.
VibraCall™ Alert Indicator
When you select the VibraCall™ alert option, the indicator will appear in the display.
Power/Status Indicator
Whether worn in its holster, carried, or docked to the vehicle, you can check the Power/Status indicator on top of
the phone for status information.
Service Condition First Flash Second Flash
Getting Started
Service in home system
Roaming (service in
non-home type system)
No service
No message
Message waiting Red
No message
Message waiting Red
No message
Message waiting Red
Green
Yellow
Red
21
Green
Yellow
Off
Low

Getting Started
Placing a Call - Handset Mode
To place a call:
1. Press and hold ¡ to turn your phone on.
2. Enter the number you want to call.
• Press Ç to erase one digit at a time if you make a mistake.
• Press and hold Ç to clear the entire entry.
3. Press æ to place the call.
or
Press and hold until you hear a second tone.
You can dial phone numbers with up to 32 digits, but only the last 20 digits appear in the display.
Press ‰ to see the entire phone number.
Ending a Call
To end a call:
Press º or close the phone.
or
1. Press and hold until you hear a second tone.
You will see § To End Call.
2. Press again to end the call.
22

Receiving a Call
Your phone must be powered on to receive calls.
To answer a call:
Press æ or open the phone when the phone rings.
Note: When in VEHICULAR MODE, the telephone utilizes your car’s integrated cellular antenna.
Note: Opening the phone will not answer the call if the Open to Answer feature is off. (See "Open to Answer" on
page 92.)
Unanswered Call Indicator
When you cannot take a call, your Timeport™ Cellular Telephone keeps a count of your unanswered calls. Your
phone alerts you with the message Missed XX Calls, where XX is the number of calls not answered.
Press to view missed calls.
Ringer Suppress
You can terminate either the ring or the vibration by pressing one of the volume keys during the ring/vibrate cycle.
The caller will continue to hear ringing.
Switching from Digital to Analog Mode
During a call, you can switch from digital to analog mode:
To switch to analog mode, press ƒ, then press ¤.
Note: This feature is carrier-specific, and may not be available from all service providers.
Using the Smart Button
Use the Smart Button to place and end calls, enter menus, toggle features on and off, and select items in the
display. The Smart Button is the middle key on the left side—easy to feel, easy to find, and easy to use.
Getting Started
23

Getting Started
The symbol “§” in your display represents the Smart Button.
Selecting Items in the Display
The most basic use of the Smart Button is for making selections. Whenever you are given a choice such as a
ringer setting, press the Smart Button to select the setting you want.
Toggling Features On and Off
Some of your phone’s features toggle on and off. Use the upper or lower volume key to scroll to the desired
feature, then press the Smart Button to select it.
Entering the Menu System
Press ƒ, then press to access the menu. You will see Recent Calls.
Placing a Call
1. Enter the number you want to call.
You can also recall a previously dialed or stored number. (See "Using Memory" on page 35 for details on
storing or recalling.)
2. Press and hold to place the call. You will see Dialing XXXXXXX.
Ending a Call
1. Press and hold . You will see § To End Call.
2. Press again to end the call.
24
Tip:
You can also
enter the menu
system by
pressing ƒ, ⁄.

Redialing a Number
Automatic Redial
A fast busy signal indicates that the cellular system is busy. With Automatic Redial, your phone calls
continuously for the next four minutes. When it makes a connection, the phone rings or vibrates. When the person
you are calling answers, you can begin talking.
If you hear a fast busy signal:
1. Press
, or press æ. You will see Press SND to Redial.
2. Press æ to redial.
If the call does not go through after four minutes:
Press , or press æ to continue the call attempt, or press º at any time to cancel.
If you hear an ordinary busy signal:
1. Press º to hang up.
2. Press , or press æ to redial the busy number. You will see Dialing XXXXXXX.
Displaying the Last Twenty Numbers Dialed
Use this feature to call any one of the last twenty numbers you’ve dialed.
1. Press ‰, then press ‚, ‚. The display will show the last number dialed.
2. Press to scroll through the last twenty numbers.
3. Press and hold , press æ, or press the equivalent key on the radio keypad to call the number in your
Getting Started
or
display. You will see Calling.
25

Getting Started
Controlling Volume
Adjusting Volume
Use the upper and lower volume keys to adjust earpiece, keypad, and ringer volume. When you press these keys,
the phone’s speaker demonstrates the new volume level.
To adjust earpiece and keypad volume:
or
Press to raise or lower the volume, or press the appropriate keys on the radio keypad or steering wheel
controls to adjust speaker volume in VEHICULAR MODE.
To adjust the ringer volume:
1. Press ƒ.
2. Press , or the appropriate key on the radio or steering wheel controls to raise or lower the ringer
Muting the Microphone
For privacy during a call, mute the microphone. You can hear the person on the other end, but he or she cannot
hear you.
1. Press ƒ, then press fl, to mute the microphone. You will see Mute.
2. Press ƒ, then press fl again, to resume normal conversation.
Silent Vibration Mode
In situations where you don’t want your phone to ring, or in noisy places where you may not hear your phone,
select the VibraCall™ Alert function for discreet vibration:
or
volume.
Press ƒ, then press †, to toggle between ringer and vibration mode. You will see Vibrate Only or
Ring Only.
26

Operation When Connected to the Vehicle through the Coilcord
(VEHICULAR MODE)
When you connect your portable to your Mercedes-Benz vehicle, your telephone is connected to a number of
integrated features of your vehicle and its audio system. VEHICULAR MODE is easy to operate; however, it is
important that you familiarize yourself with the system operation prior to using your phone in VEHICULAR
MODE.
A few of the advantages that VEHICULAR MODE offers include:
• The option to use your phone either Hands Free or with the portable handset
• Use of vehicle speakers for better fidelity
• Using the vehicle to charge your phone’s battery
• If your radio is on when you make a call, the audio system will automatically mute to allow the person you
are calling to be heard.
Docking the Phone
Insert the side of the coilcord that says “TOP” face up into the connection port at the bottom of the phone. Be sure
to insert the coilcord straight into the port in one smooth motion.
Next, engage the bottom of the phone into the notch of the phone cradle and pivot the phone forward into the
cradle until it is latched. This is called “docking” the phone.
Note: Each time you connect the coilcord to the phone, your phone will emit a confirmation beep. Wait for this
beep before disconnecting the coilcord again.
Note: When you are using VEHICULAR MODE, the phone operates on the vehicle’s integrated cellular antenna.
Note: Mercedes-Benz recommends keeping the phone docked in the cradle at all times when the vehicle is being
operated. If the handset must be used for privacy operation, stop the vehicle prior to removing the phone from the
cradle and using it in handset mode.
Getting Started
27
Tip:
“mute” is
printed on the
fl key, as a
reminder.

Getting Started
Note: The phone should not be placed in the cradle with the flip open. BE SURE TO CLOSE THE FLIP PRIOR TO
SECURING THE PHONE IN THE CRADLE in order to prevent phone damage when the console cover is closed.
After you have plugged your phone into VEHICULAR MODE, the phone turns on automatically each time you
turn on your ignition.
To turn off the phone, press ¡. Note that if your ignition is on when you turn your phone off, a flashing battery
icon and Pwr will appear in the display. While in this mode, calls cannot be placed or received. The next time the
ignition is turned on, the phone will turn on. To turn the phone back on, press ¡ again.
If your phone is on for more than eight hours when your car’s ignition is off, the phone will automatically shut
itself off to conserve your car’s battery.
To disengage your phone from the VEHICULAR MODE and remove it from your car, perform these steps:
1. Press the release button on the side of the phone cradle to remove the phone.
2. Remove the coilcord from the phone by gently squeezing the top of the connector as you pull the cord
straight out in one smooth motion.
Note: To continue a call when leaving or entering your vehicle, simply tell the party you are talking to that you
will be off the phone briefly. Then, simply plug in or remove the coilcord and continue your call. The party at the
other end will hear a short click as the phone switches modes.
Placing a Call Using Hands Free Operation
Hands Free operation allows you to operate the cellular phone without picking it up, while it is connected to the
coilcord and docked in the cradle. Sound is received through your car’s audio system speakers and you speak
towards the Hands Free microphone. Other parties in your vehicle are also able to participate in the conversation
when you are using the Hands Free operation.
1. The phone must be properly docked in the cradle, or the flip must be closed.
2. Dial the telephone number via the radio keypad or via voice command*. Press Send on the radio keypad or
the steering wheel*.
Note: There is the capacity to dial a 32-digit number. The radio will display 18 of the dialed digits.
*not available on all models
28

3. Begin your conversation.
4. After you are finished with your conversation, press the End key on the radio keypad or on the steering
wheel* to terminate the call.
Placing a Call Using Handset Operation
In handset operation, the cellular phone remains connected to the coilcord, but the phone is lifted from the cradle
and held to your ear with the flip open. Other parties in the vehicle are unable to hear the audio.
With the phone properly docked in the cradle, dial the number you are calling.
Note: You may also dial the number with the phone out of the cradle.
If your audio system is on when you make a call, the audio system will automatically mute to allow the person
you are calling to be heard.
1. Press the Send button on the phone, radio keypad or steering wheel* to initiate the call.
2. Lift the phone to your ear and begin the conversation.
3. After you are finished with the call, press º.
Note: The In Use icon will illuminate while the call is maintained.
Answering a Call Using Hands Free Operation
The phone must be properly mounted in the cradle, have the coilcord connected, and have the flip closed.
1. Press Send on the radio keypad or steering wheel* to answer the call.
2. Direct your conversation to the Hands Free microphone.
*not available on all models
Getting Started
29
 Loading...