

Mercedes-Benz Marco Polo 2017, Marco Polo HORIZON 2017, Marco Polo ACTIVITY 2017 Owner's Manual
Marco Polo / Marco Polo ACTIVITY /
Marco Polo HORIZON
Supplement
Mercedes-Benz

Legal information
Further information about Mercedes-Benz vehi-
cles and about Daimler AG can be found on the
following websites:
http://www.mercedes-benz.com
http://www.daimler.com
You are welcome to forward any queries or sug-
gestions you may have regarding these Operat-
ing Instructions to:
Daimler AG, HPC: CAC, Customer Service,
70546 Stuttgart, Germany
©
otherwise reproduced, in whole or in part, with-
out the written permission of Daimler AG.
Daimler AG
Mercedesstraße 137
70327 Stuttgart
Germany
Symbols
G
WARNING
Warning notes make you aware of dangers
which could pose a threat to your health or
life, or to the health and life of others.
H
Environmental note
Environmental notes provide you with information on environmentally aware actions or
disposal.
!
Notes on material damage alert you to dangers that could lead to damage to your vehicle.
i
These symbols indicate useful instructions
or further information that could be helpful to
you.
X
This symbol designates an instruction you must follow.
X
Several consecutive symbols indicate an instruction with several
steps.
(Y page)
This symbol tells you where you can
find further information on a topic.
Y Y
This symbol indicates a warning or an
instruction that is continued on the
next page.
Display
This text indicates a message on the
display.
Parts of the software in the vehicle are protected
by copyright © 2005 The FreeType Project
http://www.freetype.org. All rights reserved.

Welcome to the world of Mercedes-Benz
Before you first drive off, read these Operating
Instructions carefully and familiarise yourself
with your vehicle. Please adhere to the information and warning notes in these Operating
Instructions for your own safety and to ensure a
longer operating duration of the vehicle. Failure
to observe the instructions may lead to damage
to the vehicle or personal injury.
The equipment or model designation of your
vehicle may differ according to:
R
model
R
order
R
country specification
R
availability
The illustrations in this manual show a left-handdrive vehicle. The location of vehicle parts and
controls for right-hand drive vehicles differ
accordingly.
Mercedes-Benz is constantly updating its vehicles to the state of the art.
Mercedes-Benz therefore reserves the right to
introduce changes in:
R
design
R
Equipment
R
technical features
Therefore, the descriptions provided may occasionally differ from your own vehicle.
The following are components of the vehicle:
R
Operating Instructions
R
Maintenance or Service Booklet
R
Equipment-dependent supplements
Keep these printed documents in the vehicle at
all times. If you sell the vehicle, always pass the
documents on to the new owner.
i
You can get to know some of the important
features of your vehicle in German and English in the interactive Operating Instructions
on the Internet at:
www.mercedes-benz.de/
betriebsanleitung-transporter
You can also use the Mercedes-Benz Guide
smartphone app:
Please note that the Mercedes-Benz Guide app
may not yet be available in your country.
The technical documentation team at Daimler
AG wishes you safe and pleasant motoring.
4475842903Z102
É4475842903Z102OËÍ

Index ....................................................... 4
At a glance ............................................. 8
Equipment overview, Marco Polo ............. 8
Equipment overview, Marco Polo
ACTIVITY / HORIZON ............................... 9
Marco Polo central control panel ........... 10
Safety ................................................... 11
Children in the vehicle ........................... 11
Anti-theft protection .............................. 14
Important safety notes .......................... 14
Travel tips ............................................ 15
General information ............................... 15
Before the first journey .......................... 15
Tips on overnight stays .......................... 15
Journeys abroad ..................................... 15
Operation in winter ................................ 15
Opening and closing ........................... 17
Key, Marco Polo ..................................... 17
Pop-up roof ............................................ 17
Sliding sunroof ....................................... 22
Hinged windows .................................... 24
Furniture fasteners, Marco Polo ............ 24
Roller blinds, Marco Polo ....................... 25
Curtains, Marco Polo ACTIVITY /
HORIZON ............................................... 25
Cab curtain ............................................ 25
Seats, berths and table ...................... 26
Marco Polo seat/berth combination ...... 26
Seat/berth combination, Marco Polo
ACTIVITY / HORIZON ............................ 32
Rear bench seat ..................................... 37
Roof bed ................................................ 37
Sliding table, Marco Polo ....................... 39
Lights ................................................... 40
Interior lighting ...................................... 40
Replacing bulbs ..................................... 42
Marco Polo central control panel
...... 43
General notes ........................................ 43
Operating the central control panel ....... 43
Setting the time ..................................... 44
Setting the alarm ................................... 44
Warning messages on the central con-
trol panel ............................................... 45
Problems with the central control
panel ...................................................... 45
Climate control .................................... 47
Auxiliary heating (auxiliary warm-air
heater) ................................................... 47
Rear-compartment air conditioning ....... 51
Kitchen, Marco Polo ............................ 52
Sink ....................................................... 52
Gas cooker ............................................ 53
Coolbox ................................................. 54
Water, gas, electr., Marco Polo .......... 57
Water supply .......................................... 57
Gas system ............................................ 60
Electrical system ................................... 61
Loading, stowing and features .......... 70
Transporting loads with the vehicle ....... 70
Stowage spaces and stowage com-
partments .............................................. 70
Through-loading facility, Marco Polo ...... 73
Stowing camping accessories, Marco
Polo ....................................................... 73
Awning rail ............................................. 75
Awning ................................................... 75
Outside shower, Marco Polo .................. 76
Vanity mirror, Marco Polo ...................... 76
Maintenance and care ........................ 77
Cleaning ................................................ 77
Maintenance .......................................... 79
Vehicle tool kit .................................... 88
Vehicle tool kit ....................................... 88
2
Contents

Technical data ..................................... 89
Identification plate ................................. 89
Dimensions and weights ........................ 89
Operating data ....................................... 90
Capacities .............................................. 91
Tyre pressure ......................................... 91
Contents
3

1, 2, 3 ...
12 V circuit .......................................... 61
12 V socket .......................................... 62
230 V power supply ............................ 63
230 V socket ........................................ 64
A
Accessories
Technical data ................................. 90
ACTIVITY/HORIZON seat/berth
combination
Bed extension .................................. 37
Important safety notes .................... 32
Moving ............................................. 33
Removing/fitting ............................. 35
Retainer loops .................................. 32
Setting up/folding away the
berth ................................................ 35
Additional battery
Battery charger ................................ 65
Charge status .................................. 65
Important safety notes .................... 62
Sleep mode ...................................... 62
Adjusting the seat sliders ................... 88
Air-conditioning system ...................... 51
Alarm .................................................... 44
Ambient lighting .................................. 41
Auxiliary battery
Charging .......................................... 63
Auxiliary heating
Activating/deactivating ................... 48
Faults/warning messages ............... 49
Important safety notes .................... 47
Notes ............................................... 48
Remote control ................................ 51
Setting ............................................. 49
Setting switching times ................... 49
Setting the room temperature ......... 48
Technical data ................................. 91
Timer ............................................... 49
Awning ................................................. 75
B
Battery
Charge level ..................................... 62
Charger ............................................ 65
see Auxiliary battery ........................ 62
Bed
see Roof bed
see Seat/berth combination
Bed extension
Folding up ........................................ 31
Removing/fitting ............................. 31
Separating ....................................... 31
Using ............................................... 31
Blind
Blinds ............................................... 25
C
Cab curtain
General notes .................................. 25
Camper floor
Notes on care .................................. 78
Camping accessories
Stowing ............................................ 73
Care of the vehicle .............................. 77
Central control panel
Coolbox ........................................... 54
Display ............................................. 10
General notes .................................. 43
Main menu ....................................... 43
Main overview .................................. 43
Notes on care .................................. 78
Outside temperature ........................ 43
Setting the time ............................... 44
Warning messages ........................... 45
Central control panel display ............. 10
Charge level display ............................ 62
Child seat
ISOFIX .............................................. 12
Top Tether ....................................... 13
Children
Restraint systems ............................ 11
Cleaning
Cleaning the interior ........................ 77
General notes .................................. 77
Water tank ....................................... 78
Confirmation of the maintenance
work ...................................................... 80
Cooker
see Gas cooker ................................ 53
Coolbox
Load ................................................. 71
4
Index

Malfunctions/warning messages ..... 55
Notes on care .................................. 77
Technical data ................................. 91
Using ............................................... 54
Curtains
General notes .................................. 25
Notes on care .................................. 77
D
Darkening
Cab .................................................. 25
Dimensions .......................................... 89
Drain ..................................................... 52
Drawers ................................................ 71
Driving abroad ..................................... 15
E
Electrical system ................................. 64
12 V power supply ........................... 61
230 V power supply ......................... 63
Charger ............................................ 65
Fuses ............................................... 66
Power supply ................................... 61
Power supply connection ................. 64
Residual current circuit breaker ....... 64
Technical data ................................. 90
What to do in the event of thun-
derstorms ........................................ 14
Emergency operation
Pop-up roof ...................................... 21
Equipment number ............................. 89
Equipment overview ............................. 8
F
Fabric covers
Notes on care .................................. 77
Faults
see Warning messages .................... 45
Fire extinguisher ................................. 14
Fire, what to do in the event of .......... 14
Fresh water tank
Cleaning ........................................... 78
Draining ........................................... 57
Filling ............................................... 57
Filling capacity ................................. 91
General notes .................................. 57
Malfunctions/warning messages ..... 59
Furniture
Fasteners ......................................... 24
Notes on care .................................. 77
Fuse box
Rear ................................................. 68
Fuses
Important safety notes .................... 66
Kitchen cupboard fuse box .............. 67
Residual current circuit breaker ....... 64
G
Gas cooker ........................................... 53
Notes on care .................................. 77
Gas cylinder
Changing ......................................... 60
Gas system .......................................... 60
Guide rails
Notes on care .................................. 78
H
Handle for seat sliders ........................ 88
Heating
see Auxiliary heating ........................ 47
Hinged windows .................................. 24
I
Identification plate .............................. 89
Interior cleaning .................................. 77
Interior lighting
Ambient lighting ............................... 41
Dimming .......................................... 41
Overview .......................................... 40
Reading lamp ................................... 41
Repacing bulbs ................................ 42
Interior motion sensor
Function ........................................... 14
ISOFIX child seat securing system .... 12
K
Key ........................................................ 17
Kitchen
Coolbox ........................................... 54
Kitchenette
Gas cooker ...................................... 53
Index
5

Sink ................................................. 52
L
Layout ..................................................... 8
Linen cupboard .................................... 71
Luggage compartment enlarge-
ment ..................................................... 73
M
Maintenance
Confirmation of the maintenance
work ................................................. 80
Marco Polo seat/berth combination
Adjusting the seat backrest ............. 26
Bed extension .................................. 31
Faults ............................................... 32
Important safety notes .................... 26
Increasing the load compartment
capacity ........................................... 28
Positioning the seat ......................... 27
Resetting ......................................... 29
Setting up/folding away .................. 30
Setting up/folding away the
berth ................................................ 28
Marco Polo the seat/berth combination
Moving ............................................. 27
N
Notes on care ...................................... 77
O
Occupant safety
Children in the vehicle ..................... 11
Opening and closing ........................... 17
Operating data ..................................... 90
Outside shower ................................... 76
Outside temperature display ............. 43
P
Pop-up roof
Electric (Easy-Up) ...................... 18, 67
emergency operation ....................... 21
Faults/warning messages ............... 20
Important safety notes .................... 17
Maintenance .................................... 80
Manual ............................................. 17
Notes on care .................................. 78
Reading lamp ................................... 41
Window ............................................ 17
Power supply
Technical data ................................. 90
Protection against theft
Interior motion sensor ..................... 14
R
Rear bench seat
Additional ........................................ 37
Rear seat
see Rear bench seat
Remote control
Auxiliary heating .............................. 51
Residual current circuit breaker ........ 64
Reversing feature
Sliding sunroof ................................. 22
Roller blinds
Function ........................................... 25
Notes on care .................................. 77
Roof bed ............................................... 37
Roof load (maximum) .......................... 89
Roof stowage box
Interior lamps .................................. 42
Load ................................................. 71
S
Safety
Child restraint systems .................... 11
Children in the vehicle ..................... 11
Safety net ............................................. 38
Seat/berth combination
Notes on care .................................. 77
Stowage compartment .................... 72
Seats and sleeping berths .................. 90
Shower ................................................. 76
Sink
Cleaning the drain ............................ 52
Using ............................................... 52
Sleeping berths ................................... 90
Sliding sunroof
Important safety information ........... 22
6
Index

Opening/closing .............................. 23
Problem (malfunction) ..................... 23
Roller sunblind ................................. 23
Sliding table
Folding in ......................................... 39
Folding out ....................................... 39
Socket .................................................. 64
Sockets
12 V ................................................. 62
230 V ............................................... 64
Stowage compartments
see Stowage spaces and stowage
compartments ................................. 70
Stowage spaces and compartments
Important safety notes .................... 70
Stowage spaces and stowage compartments
Roof stowage box ............................ 73
Stowage compartments under the
seat/berth combination .................. 72
Sunroof ................................................. 75
T
Tank cleaning ....................................... 78
Tap ........................................................ 52
Technical data
Accessories ..................................... 90
Auxiliary heating .............................. 91
Coolbox ........................................... 91
Dimensions ...................................... 89
Filling capacities .............................. 91
Gas system ...................................... 91
Power supply ................................... 90
Seats and sleeping berths ............... 90
Vehicle height .................................. 89
Weights ............................................ 89
Temperature
Interior ............................................. 48
Outside temperature ........................ 43
Through-loading feature ..................... 73
Thunderstorms, what to do in the
event of ................................................ 14
Time
Setting ............................................. 44
Setting the alarm time ..................... 44
Tips on overnight stays ...................... 15
Top Tether ............................................ 13
Transport .............................................. 70
Travel tips ............................................ 15
Tyre pressure ....................................... 91
U
USB port ............................................... 66
V
Vehicle height ...................................... 89
Vehicle key .......................................... 17
Vehicle tool kit
General notes .................................. 88
Handle for seat sliders ..................... 88
Vehicle type identification num-
ber ........................................................ 89
Voltage supply ..................................... 61
W
Wardrobe ............................................. 71
Warning messages .............................. 45
Waste water tank
Cleaning ........................................... 78
Emptying .......................................... 58
Filling capacity ................................. 91
General notes .................................. 58
Malfunctions/warning messages ..... 59
Water pump ......................................... 76
Water supply
Cleaning the water tank ................... 78
Fresh water tank .............................. 57
Water supply system
Waste water tank ............................. 58
Weights ................................................ 89
Winter driving
General notes .................................. 15
Index
7

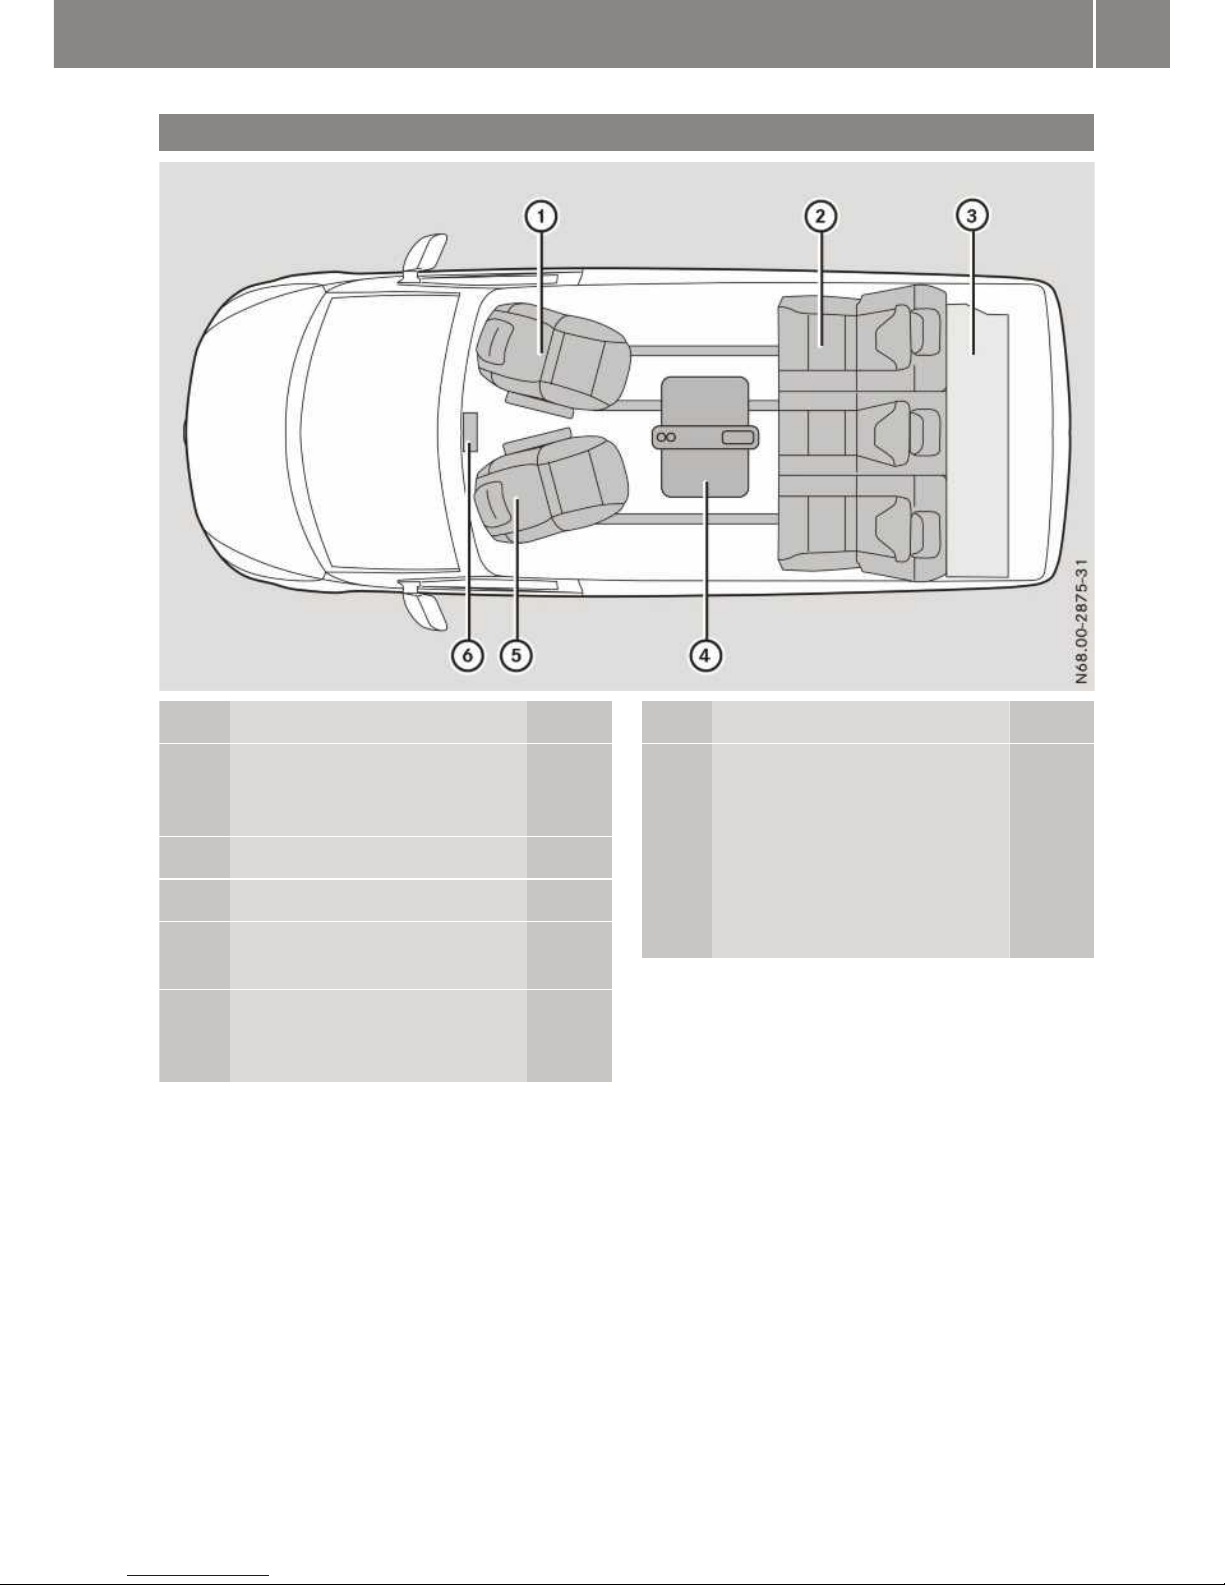
Equipment overview, Marco Polo
Function Page
:
Central control panel 43
;
Swivelling driver's and codriver's seat (see the vehicle
Operating Instructions)
The auxiliary battery is located in the base of the driver's
seat. 62
=
Sliding table 39
?
Seat/berth combination 26
A
Bed extension 31
B
Roof stowage box
with reading lamps
C
Connection for outside
shower
Fresh water tank locking
lever 57
D
Gas cylinder container 60
E
Wardrobe
Fresh water tank 57
F
Service flap with:
• fresh water filler neck 57
• 230 V socket 64
Function Page
G
Coolbox 54
Fuse box 66
Gas shutoff valve for gas
cooker
Electrical connection of the
seat/berth combination 30
H
Kitchen cupboard with:
• gas cooker
• sink
• waste water tank 58
• waste water tank shutoff
valve 58
• pop-up roof emergency
release button 21
I
Function unit with:
• light switch for ambient
lighting 41
• USB port 66
• 230 V socket 64
• residual current circuit
breaker 64
Not illustrated:
Pop-up roof 17
Roof bed 37
Sliding sunroof 22
8
At a glance
Equipment overview, Marco Polo ACTIVITY / HORIZON
Function Page
:
Swivelling co-driver's seat
(see the vehicle Operating
Instructions)
;
Seat/berth combination 33
=
Bed extension 37
?
Folding table (see the vehicle
Operating Instructions)
A
Swivelling driver's seat (see
the vehicle Operating
Instructions)
Function Page
B
Auxiliary heating control
panel (see the vehicle Operating Instructions)
Not illustrated:
Manual pop-up roof 17
Roof bed
Sliding sunroof 22
At a glance
9
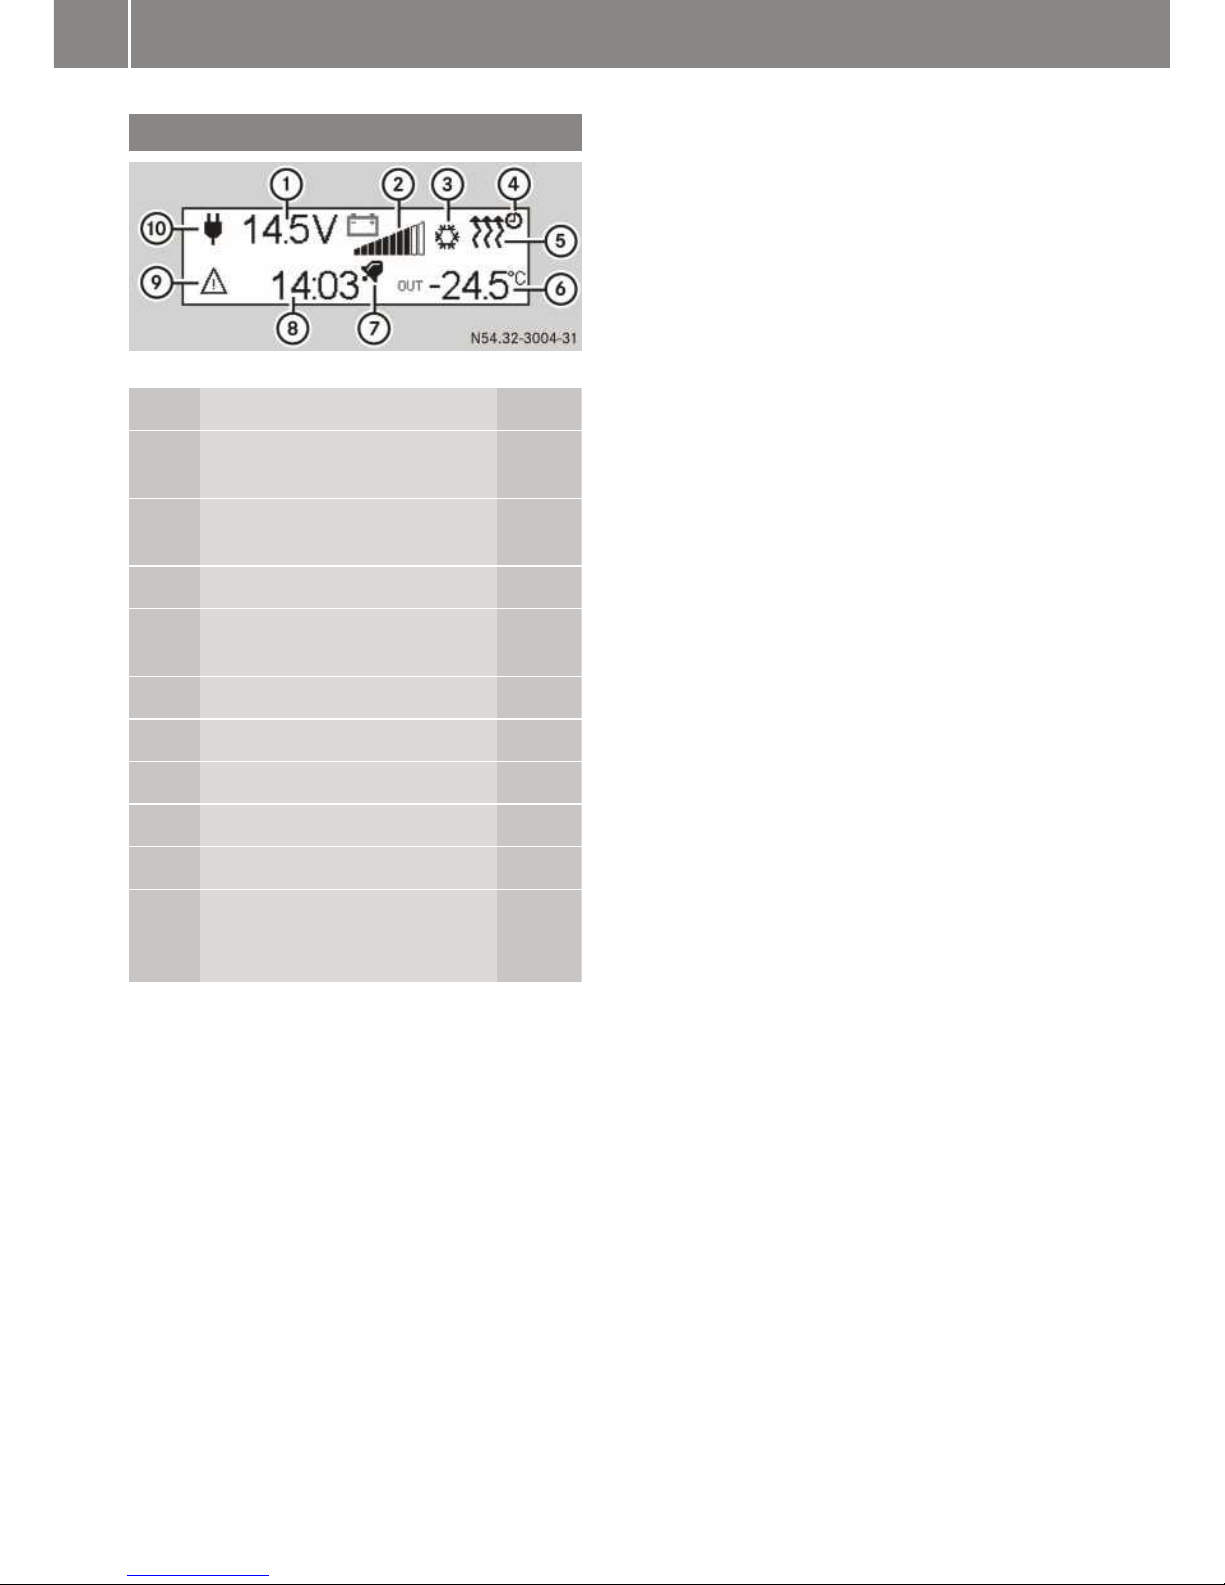
Marco Polo central control panel
Basic display
Function Page
:
Voltage of the auxiliary battery (V) 62
;
Charge status of the auxiliary
battery (%) 62
=
Coolbox on 54
?
Switch-on time of the auxiliary heating programmed 49
A
Auxiliary heating mode 48
B
Outside temperature (†) 43
C
Alarm on
D
Time 44
E
Warning active 45
F
Mains operation – 230 V
power supply and fault interrupter on 64
10
At a glance

Children in the vehicle
Important safety notes
Accident statistics show that children secured
in the rear seats are safer than children secured
in the front seats. For this reason, MercedesBenz strongly advises that you install a child
restraint system on a rear seat. Children are
generally better protected there.
If a child younger than twelve years old and
under 1.50 m in height is travelling in the vehicle:
R
always secure the child in a child restraint
system suitable for Mercedes-Benz vehicles.
The child restraint system must be appropriate to the age, weight and size of the child.
R
be sure to observe the instructions and safety
notes in this section in addition to the child
restraint system manufacturer's installation
instructions
R
always pay attention to the instructions and
safety notes on the automatic co-driver's
front airbag deactivation system (see vehicle
Operating Instructions)
G
WARNING
If you leave children unattended in the vehicle, they may be able to set the vehicle in
motion if, for example, they:
R
release the parking brake
R
shift the automatic transmission out of park
position P or shift manual transmission into
neutral
R
start the engine
In addition, they may operate vehicle equipment and become trapped. There is a risk of
an accident and injury.
When leaving the vehicle, always take the key
with you and lock the vehicle. Never leave
children unattended in the vehicle.
G
WARNING
If persons (particularly children) are exposed
to heat or cold for a prolonged period, there is
a risk of serious or even fatal injuries. Never
leave persons (particularly children) unattended in the vehicle.
G
WARNING
If the child restraint system is placed in direct
sunlight, the parts could become very hot.
Children could be suffer burns by touching
these parts, in particular on the metallic parts
of the child restraint system. There is a risk of
injury.
If you and your child leave the vehicle, always
make sure that the child restraint system is
not in direct sunlight. Cover it with a blanket,
for example. If the child restraint system has
been exposed to direct sunlight, leave it to
cool down before securing the child in it.
Never leave children unattended in the vehicle.
Always ensure that all vehicle occupants have
their seat belts fastened correctly and are sitting
properly. Particular attention must be paid to
children.
Observe the safety notes on the seat belt and
the notes on proper use of the seatbelts (see
vehicle Operating Instructions).
Child restraint system
Be sure to observe the correct use of the child
restraint system (see vehicle Operating Instructions).
If possible, use the child restraint systems recommended by Mercedes-Benz (see vehicle
Operating Instructions).
G
WARNING
If the child restraint system is incorrectly fitted on the seat position suitable for this purpose, it cannot perform its intended protective function. In the event of an accident,
sharp braking or a sudden change in direction,
the child may not be held securely. There is an
increased risk of serious or even fatal injuries.
Observe the manufacturer's installation
instructions and the correct use for the child
restraint system. Make sure that the entire
surface of the child restraint system is resting
on the seat surface. Never place objects
under or behind the child restraint system,
e.g. cushions. Only use child restraint sys-
Children in the vehicle
11
Safety
Z

tems with the original cover designed for
them. Only replace damaged covers with genuine covers.
G
WARNING
If a rearward-facing child restraint system is
mounted facing forwards by mistake, it cannot provide the intended protection. This can,
for example, be the case if a rearward-facing
child restraint system is fitted on a rear seat
which is facing backwards. The child cannot
be restrained in the event of an accident, for
instance. There is an increased risk of injury,
possibly even fatal.
Always ensure the rear seat is facing forwards
before fitting a rearward-facing child restraint
system on it.
G
WARNING
If the child restraint system is fitted incorrectly or is not secured, it can come loose in
the event of an accident, heavy braking or a
sudden change in direction. The child
restraint system could be thrown about, striking vehicle occupants. There is an increased
risk of injury, possibly even fatal.
Always fit child restraint systems properly,
even if they are not being used. Make sure
that you observe the child restraint system
manufacturer's installation instructions.
Observe the loading guidelines for storing
objects, luggage or loads (see vehicle Operating
Instructions).
G
WARNING
Child restraint systems or their securing systems that have been damaged or subjected to
a load in an accident cannot perform their
intended protective function. In the event of
an accident, sharp braking or a sudden
change in direction, the child may not be held
securely. There is an increased risk of serious
or even fatal injuries.
Immediately replace child restraint systems
that have been damaged or subjected to a
load in an accident. Have the child restraint
securing systems checked in a qualified specialist workshop before fitting a child restraint
system again.
If it is absolutely necessary to carry a child on
the co-driver's seat, be sure to observe the
notes on "Child restraint systems on the codriver's seat" (see vehicle Operating Instructions).
Observe the warning labels in the vehicle interior and on the child restraint system.
i
It is advisable to use Mercedes-Benz care
products to clean child restraint systems recommended by Mercedes-Benz. You can
obtain information from a Mercedes-Benz
Service Centre.
ISOFIX child seat securing system
G
WARNING
ISOFIX child restraint systems do not offer
sufficient protective effect for children whose
weight is greater than 22 kg who are secured
using the safety belt integrated in the child
restraint system. The child could, for example,
not be restrained correctly in the event of an
accident. This poses an increased risk of
injury or even fatal injury.
If the child weighs more than 22 kg, only use
ISOFIX child restraint systems with which the
child is also secured with the vehicle seat belt.
Also secure the child restraint system with the
Top Tether belt, if available.
Always observe the notes on using the child
restraint system as well as the installation and
operating instructions provided by the manufacturer for the child restraint system being
used. You can find further information on the
child restraint system in the vehicle Operating
Instructions.
12
Children in the vehicle
Safety
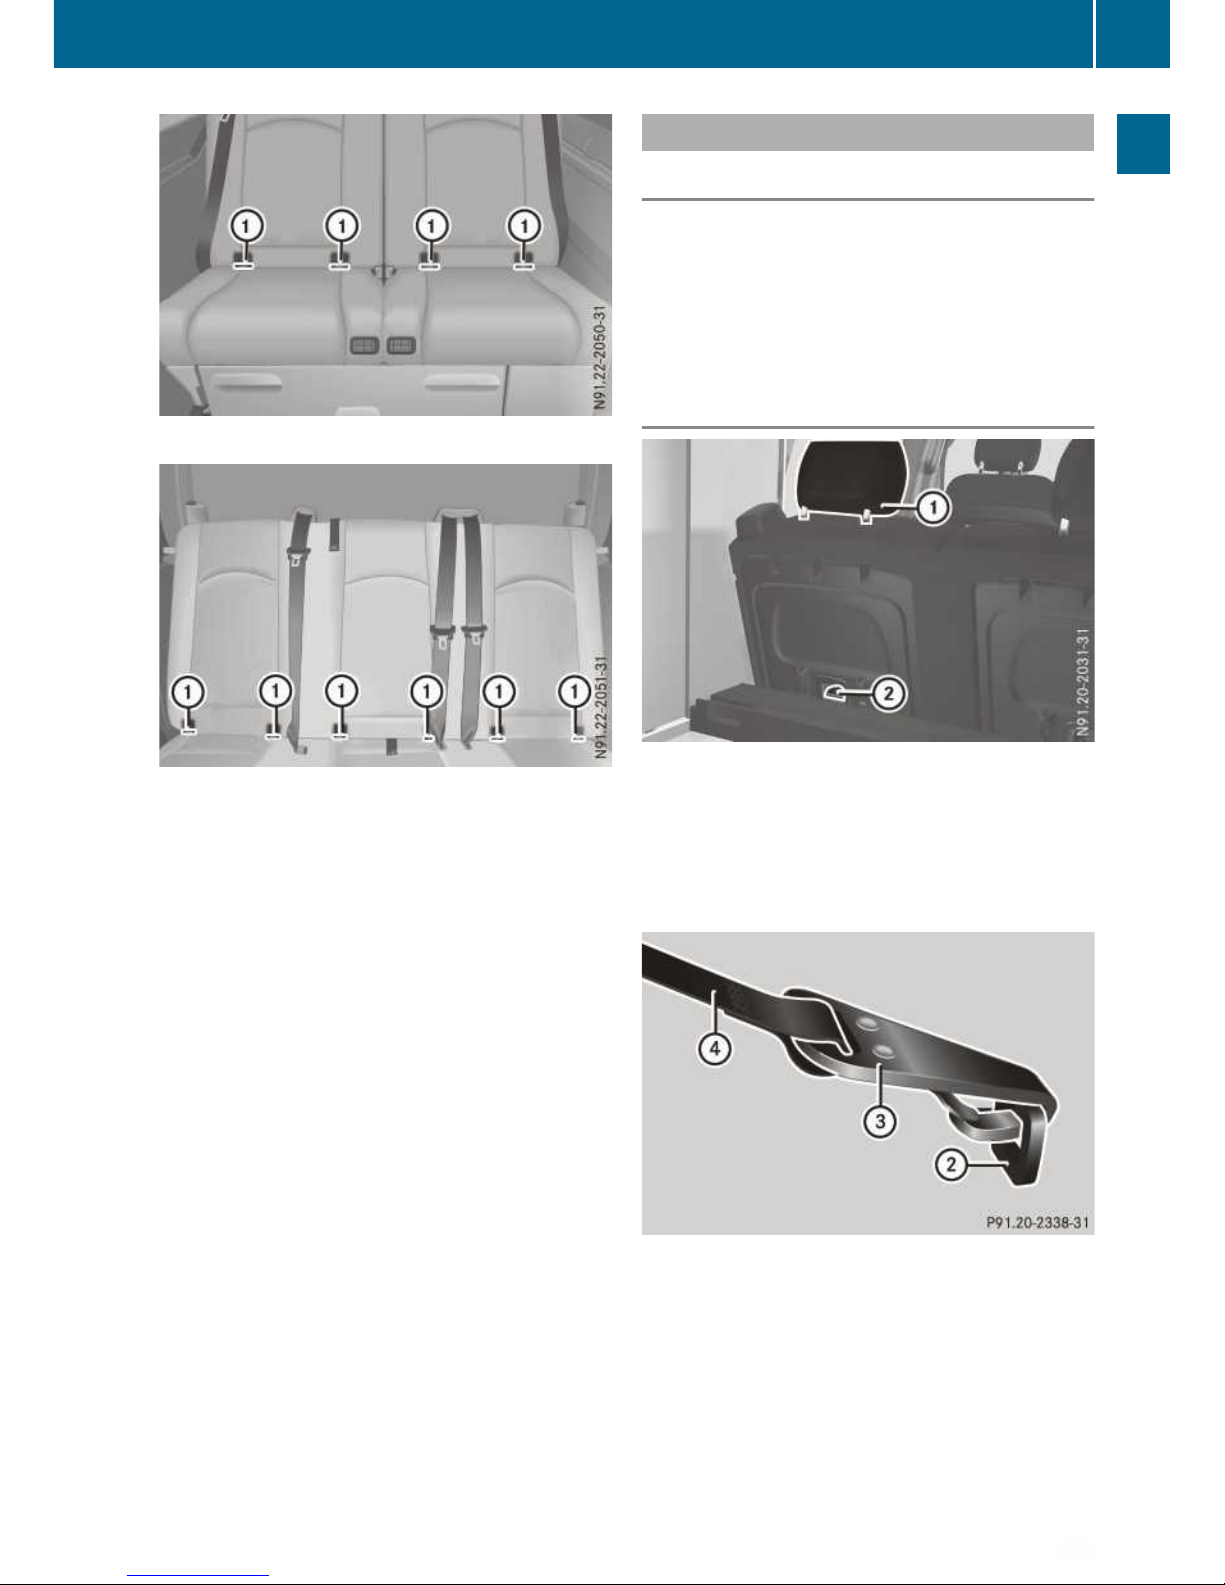
Marco Polo seat/berth combination
ACTIVITY/HORIZON seat/berth combination
All seats on the seat/berth combination have
ISOFIX securing rings : for the child restraint
systems. They are located between the seat
cushions and the seat backrest and indicated by
tags on the seat cushions.
X
To install a child seat: install the child seat
on both ISOFIX securing rings : (see the
manufacturer's operating instructions).
X
Adjust the seat backrest to an upright position suitable for the child seat.
The child seat backrest shell must lie flush
against the seat backrest in order to ensure a
secure hold.
X
To remove the child seat: see the child-seat
manufacturer's operating instructions.
Secure child restraint systems without an ISOFIX child seat securing system using the seat
belts in the vehicle. Always observe the notes on
using the child restraint system as well as the
installation and operating instructions provided
by the manufacturer for the child restraint system being used.
Top Tether
Introduction
Top Tether provides an additional connection
between the child restraint system secured with
ISOFIX and the rear of the seat/berth combination. It helps reduce the risk of injury even further. If the child restraint system is fitted with a
Top Tether belt, this should always be used.
Top Tether anchorage points
Top Tether anchorage
Top Tether anchorage ; is located on the rear
side of the seat/berth combination between the
fixtures for head restraints.
You can find further information on Top Tether in
the vehicle Operating Instructions.
X
Slide head restraint : upwards.
X
Fit the ISOFIX child restraint system with Top
Tether. Make sure that you observe the child
restraint system manufacturer's installation
instructions.
X
Route the Top Tether belt ? under head
restraint : between the two head restraint
bars.
X
Hook Top Tether hook = into Top Tether
anchorage ;.
Children in the vehicle
13
Safety
Z

Make sure that:
R
Top Tether hook = is hooked into Top
Tether anchorage ;, as shown
R
Top Tether belt ? is not twisted
X
Tighten Top Tether belt ?. Make sure that
you observe the child restraint system manufacturer's installation instructions.
X
Move the head restraint back down again
slightly if necessary. Make sure that you do
not interfere with the correct routing of Top
Tether belt ?.
Anti-theft protection
Function
If the primed interior motion sensor detects
motion in the vehicle interior, it triggers a visual
and acoustic alarm. This can happen if someone
reaches into the vehicle interior, for example
(see vehicle Operating Instructions).
i
When the electrical pop-up roof is opened or
the auxiliary heating is switched on, the interior motion sensor is deactivated.
Vehicles with pop-up roof in the United Kingdom
The interior motion sensor is primed when the
pop-up roof is both open and closed.
Deactivate the interior motion sensor when
locking your vehicle (see the vehicle Operating
Instructions):
R
if there are people or animals remaining
inside
R
when transporting it on a ferry or car transporter, for example
This will prevent false alarms.
Important safety notes
What to do in the event of thunderstorms
During a thunderstorm, the vehicle will only provide active protection from the effects of a lightning strike and electric surges when the 230 V
mains connection and, if applicable, other wiring
and cable leads have been disconnected from
the vehicle.
Before the centre of the thunderstorm is directly
above your vehicle:
X
Pull the mains cable out of the vehicle socket
(Y page 64) and place it at least 1 m from
the vehicle together with the cable lead1.
X
Disconnect other power and cable leads from
the vehicle and, if applicable, retract any
extendable antenna masts.
X
Close the pop-up roof (Y page 17).
X
Remain in the vehicle until the thunderstorm
passes.
What to do in the event of a fire
Safety instructions
In the event of fire:
X
Make sure that all occupants exit the vehicle.
X
If the situation permits, close the main shutoff
valve on the gas cylinder (Y page 60) and
disconnect the 230 V power supply
(Y page 64).
X
Warn other persons and alert the fire brigade.
X
Only fight the fire if this is possible without too
great a risk.
Precautions
Keep at least one 1 kg dry powder extinguisher
readily available which has either been
approved or is in accordance with the ISO 7165
standard. Also equip your vehicle with a commercially available fire blanket for the gas
cooker.
Familiarise yourself with the instructions on the
fire extinguisher and with the pertinent fire
safety precautions at your parking location
(campsite). More detailed information can be
found in the vehicle Operating Instructions.
1
Marco Polo only.
14
Important safety notes
Safety

General information
You can find check lists and helpful supplementary information about planning journeys, where
to stay overnight and tips and tricks on the
national Mercedes-Benz homepage under the
vans and recreational vehicles section2 or you
can obtain such information from the national
caravan clubs. In Germany refer to the CIVD
(German caravan industry association) for information.
Before the first journey
Ventilate your vehicle thoroughly before the first
journey. Also open the pop-up roof.
Tips on overnight stays
In order to avoid encountering problems, it is
strongly advised to arrive at your camping site
before dark. This will prevent unpleasant surprises.
Please observe national laws on overnight stays.
In Germany, you are usually permitted to stay
overnight once at any location where you are
allowed to park. However, staying in one location for longer – even for only two nights – can
cause problems. You must never give the
impression that you are camping on public parking places. This means that you must not hang
out laundry, place folding chairs outside, etc.
Some locations in Germany now allow overnight
stays and provide service facilities for fresh
water and waste water without customers having to camp there. Please refer to the publications of the CIVD (German caravan industry
association) for information.
i
To be on the safe side, make sure your vehicle is always parked in the direction in which
you intend to leave the site. You will then be
able to leave quickly in the event of danger.
Journeys abroad
Before embarking on a journey, enquire about
specific requirements and regulations applying
to your vehicle in the countries through which
you will be driving and your destination, e.g.:
R
the required documents
R
nationality plate (in the stipulated size)
R
mains connector plugs if you wish to connect
your vehicle to the mains
R
maximum permissible speed
R
places to park your camper van overnight
Strictly observe the regulations of the host
country when parking overnight. Many of the
rules and regulations that have been passed in
recent years have been reactions by communities and countries to irresponsible behaviour on
the part of wild campers.
Operation in winter
Your vehicle is suitable for use in winter under
certain conditions. If you continuously heat the
vehicle and leave the pop-up roof closed, the
water supply system remains operational down
to approximately −5 †.
!
If the water supply is not in use in winter, the
fresh water and waste water tanks must be
emptied.
Otherwise, the water supply system could
freeze and be damaged.
If there is a risk of frost and you use your vehicle
only for short periods or not at all, drain the fresh
water and waste water tanks (Y page 57).
Additional equipment for winter operation:
R
Snow shovel
R
De-icer
R
Antifreeze
R
Snow chains
R
Starter cable
2
Not available in all countries.
Operation in winter
15
Travel tips

In wintry parking conditions, Mercedes-Benz
recommends:
X
Release the parking brake to prevent it from
freezing.
X
Engage a gear and additionally secure the
vehicle with chocks or similar to prevent it
from rolling away.
X
Never route the power supply cables on the
ground. Otherwise, they will freeze.
X
Keep the ground under the vehicle clear to
provide the auxiliary heating with sufficient
combustion air and to allow the exhaust
fumes to escape. For this reason, do not build
a wall of snow directly around the vehicle.
X
Ventilate the vehicle interior.
i
In winter, ventilation is particularly important. The humidity caused by cooking, breathing, damp clothes and snow brought into the
vehicle must be allowed to escape.
If necessary, use a commercially-available
dehumidifier.
16
Operation in winter
Travel tips
Key, Marco Polo
There are two additional keys provided along
with the vehicle keys. Each of these keys locks
and unlocks the lid of the fresh water tank
(Y page 57).
Pop-up roof
Important safety notes
G
WARNING
If the closed pop-up roof is not locked, it could
open or even be torn off while driving. You
could then lose control of the vehicle and
endanger other road users. There is a risk of
an accident and injury.
Only drive with a fully closed and locked popup roof.
!
The open pop-up roof increases the contact
area for wind. In strong or gusty winds, an
opened pop-up roof may be damaged. Therefore, always park the vehicle so that the rear
of the vehicle faces the wind and as far as
possible is not in a crosswind.
Ensure that there is sufficient clearance when
opening the pop-up roof.
Your vehicle may be equipped with either a manual or an electric (EASY-UP) pop-up roof. The
pop-up roof has two reading lamps and a side
window that you can open partially or fully using
the corresponding zipper.
Manual pop-up roof
G
WARNING
Body parts could become trapped when closing the pop-up roof. There is a risk of injury.
When closing, make sure that no-one has any
parts of the body within the closing area. Do
not reach into the roof mechanism. If someone becomes trapped, open the pop-up roof
immediately.
G
WARNING
If the opened pop-up roof is not secured it
could drop and trap you or other people. There
is a risk of injury.
Always open or close the pop-up roof fully and
make sure it is locked.
When opening and closing the pop-up roof,
there is a slight drop or increase in pressure in
the vehicle.
Therefore, always open a window or door before
you operate the pop-up roof. The bellows could
otherwise be damaged.
Roof lock (example: co-driver's side)
X
To raise: open a window or door.
X
Press button ; on the roof lock on both the
driver's and co-driver's side and fold handle : upwards.
The pop-up roof is released.
Pop-up roof
17
Opening and closing
Z

Gas spring (example: co-driver's side)
X
Push up the pop-up roof with both hands, until
jacket tube ? comes into contact audibly
with the piston of the gas spring.
Both side gas springs keep the pop-up roof
open. The gas spring on the co-driver's side is
secured against unintentional closing.
X
To close: open the window or a door so that
no excess pressure builds up in the vehicle
from the bellows blowing.
X
Remove all objects from the bed frame.
X
Remove the consumer from the USB port in
the pop-up roof.
X
Fold down the bed frame and align the mattress.
X
Engage the reading lamps in the brackets.
X
Close the window zipper in the pop-up roof.
X
On the co-driver's side, from the inside the
vehicle, press the position marked with
„Push“ against jacket tube ? until the jacket
tube catch is resting on cylinder =.
Gas spring cylinder = is guided past the
catch into jacket tube ?.
X
Pull the pop-up roof down using the strap.
!
Make sure that the articulated lever is
engaged above the catch lugs on both the
driver's and co-driver's side. The catch lugs
could otherwise be damaged.
X
Engage articulated lever B into bracket A
on both the driver's and co-driver's side.
X
Make sure that the bellows are not trapped
between the roof and the vehicle body. The
bellows could otherwise be damaged.
X
Fold handle : down until it engages.
The pop-up roof is locked.
Electric pop-up roof (EASY-UP), Marco
Polo
Operating the electrical pop-up roof
G
WARNING
Body parts could become trapped when closing the pop-up roof. Moreover, people, e.g.
children, may be standing in the closing area
or may enter the closing area during the closing process. There is a risk of injury.
Make sure that nobody is in the vicinity of the
closing area during the closing process.
Release the switch immediately if somebody
becomes trapped. Press the 9 button to
reopen the pop-up roof.
G
WARNING
Children could become trapped if they operate the pop-up roof, particularly when unattended. There is a risk of injury.
18
Pop-up roof
Opening and closing
When leaving the vehicle, always take the key
with you and lock the vehicle. Never leave
children unattended in the vehicle.
!
When you open the pop-up roof, the weight
of the luggage on the roof, including the roof
rack, must not exceed 50 kg. A greater roof
load may damage the electric drive.
!
Before closing the pop-up roof, always fold
down the bed frame and straighten the mattress. The bellows could otherwise be damaged.
The pop-up roof can also be closed manually if
the electrics malfunction (Y page 21).
When opening and closing the pop-up roof,
there is a slight drop or increase in pressure in
the vehicle. Therefore, always open a window or
door before you operate the pop-up roof. The
bellows could otherwise be damaged.
You cannot open the pop-up roof when the vehicle's engine is running.
X
Turn the key to position 2 in the ignition lock.
X
To raise: open a window or door.
X
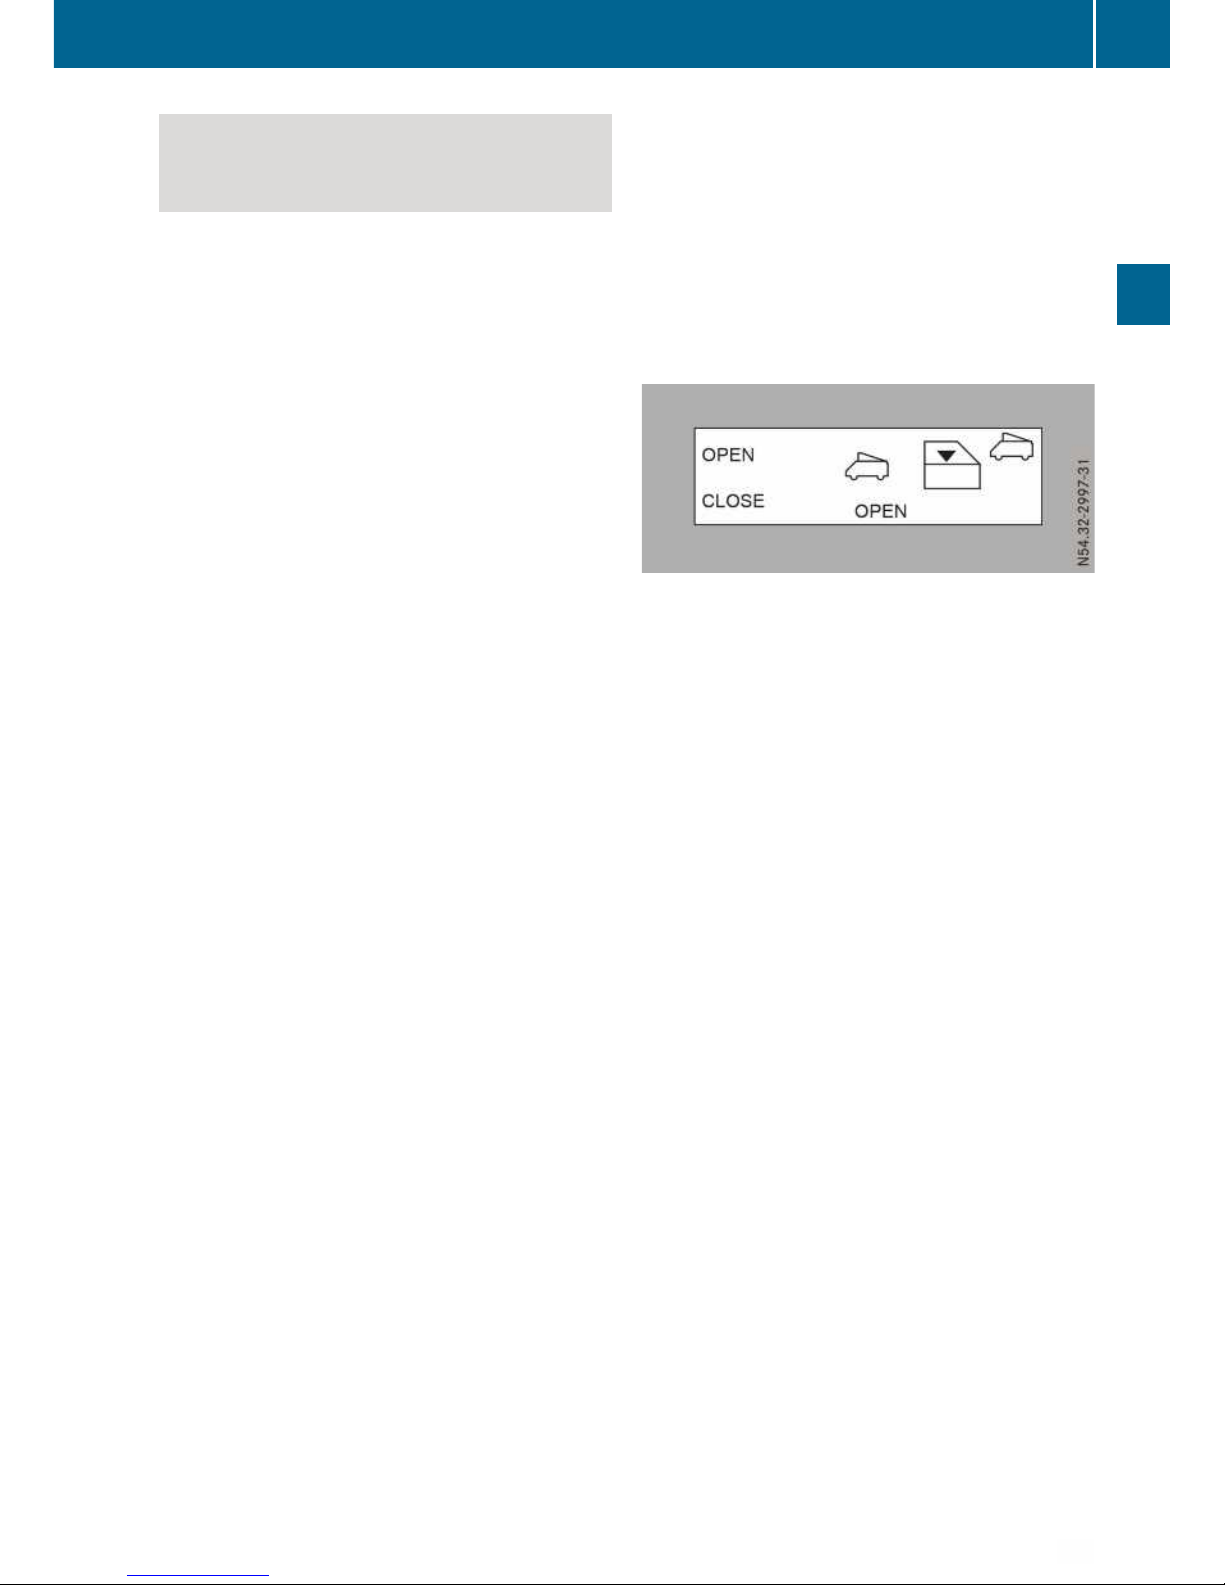
Call up the "pop-up roof" menu using the control knob on the central control panel.
X
Press and hold the 9 (OPEN) button until
the pop-up roof is fully opened.
The drive motor is switched off and the display shows OPEN.
X
To close: make sure that the vehicle is on a
level surface. Otherwise, the pop-up roof may
not close correctly.
X
Open the window or a door so that no excess
pressure builds up in the vehicle from the bellows blowing.
X
Remove all objects from the bed frame.
X
Remove the consumer from the USB port in
the pop-up roof.
X
Fold down the bed frame and align the mattress.
X
Engage the reading lamps in the brackets.
X
Close the window zipper in the pop-up roof.
X
Use the control knob to call up the "Pop-up
roof" menu.
X
Press the : (CLOSE) button.
The window symbol flashes in the display.
X
Press the : (CLOSE) button once more and
hold it.
The pop-up roof stops automatically when it
reaches 2/3 of its extension.
X
Make sure that the bellows are not trapped
between the roof and the vehicle body. The
bellows could otherwise be damaged.
X
Press and hold the : (CLOSE) button until
the pop-up roof is fully closed.
The drive motor is switched off and the display shows CLOSED. The pop-up roof is locked.
i
If you start the engine and the pop-up roof is
not locked, a continuous warning tone warns
you not to pull away.
X
Check that the bellows are in the correct position.
Pop-up roof
19
Opening and closing
Z

Problems with the pop-up roof
Problem
Possible causes/consequences and M Solutions
A continuous warning
tone sounds.
Pull-away warning.
The electrical pop-up roof is open and the engine is running.
X
Switch off the engine.
X
Turn the key to position 2 in the ignition lock.
X
Close the electrical pop-up roof.
The pop-up roof stops
moving. A warning tone
sounds five or six times
at one-second intervals.
Roof load exceeded or pop-up roof unevenly loaded.
X
Check the roof load (Y page 89) and the roof load distribution.
X
If necessary, redistribute the load.
X
If the problem persists, have the pop-up roof checked at a qualified
specialist workshop.
The pop-up roof cannot
be operated; a warning
tone sounds for five seconds.
The safety feature automatically shuts off operation. You have opened
and closed the pop-up roof too many times in succession.
X
Wait ten minutes.
X
Check to see if the pop-up roof can be moved.
X
If the problem persists, have the pop-up roof checked at a qualified
specialist workshop.
The pop-up roof cannot
be operated. A warning
tone sounds until you
press the button on the
central control panel.
The voltage of the auxiliary battery is outside the permitted range.
X
Check the battery voltage.
X
If the battery voltage is within the permitted range, have the pop-up
roof checked at a qualified specialist workshop.
X
If the battery voltage is low, charge the auxiliary battery
(Y page 63).
The pop-up roof does not
lock.
The vehicle is not level.
X
Reopen the pop-up roof by approx. 10 cm.
X
Carefully press on the pop-up roof from above (2nd person).
X
Repeat the locking procedure.
The pop-up roof cannot
be operated.
The pop-up roof is switched off due to undervoltage.
X
Charge the auxiliary battery (Y page 63).
You have pressed a button on the central control panel more than five
times in a row within five seconds. The function was then blocked.
X
Wait for three minutes.
X
Repeat the procedure.
20
Pop-up roof
Opening and closing
Problem
Possible causes/consequences and M Solutions
The fuse is blown.
X
Replace the fuse (Y page 66).
X
Have the cause of the blown fuse determined at a qualified specialist workshop.
The electrical system is malfunctioning.
X
Close and secure the pop-up roof using the emergency operation
(Y page 21).
X
Have the electrical system checked at a qualified specialist workshop.
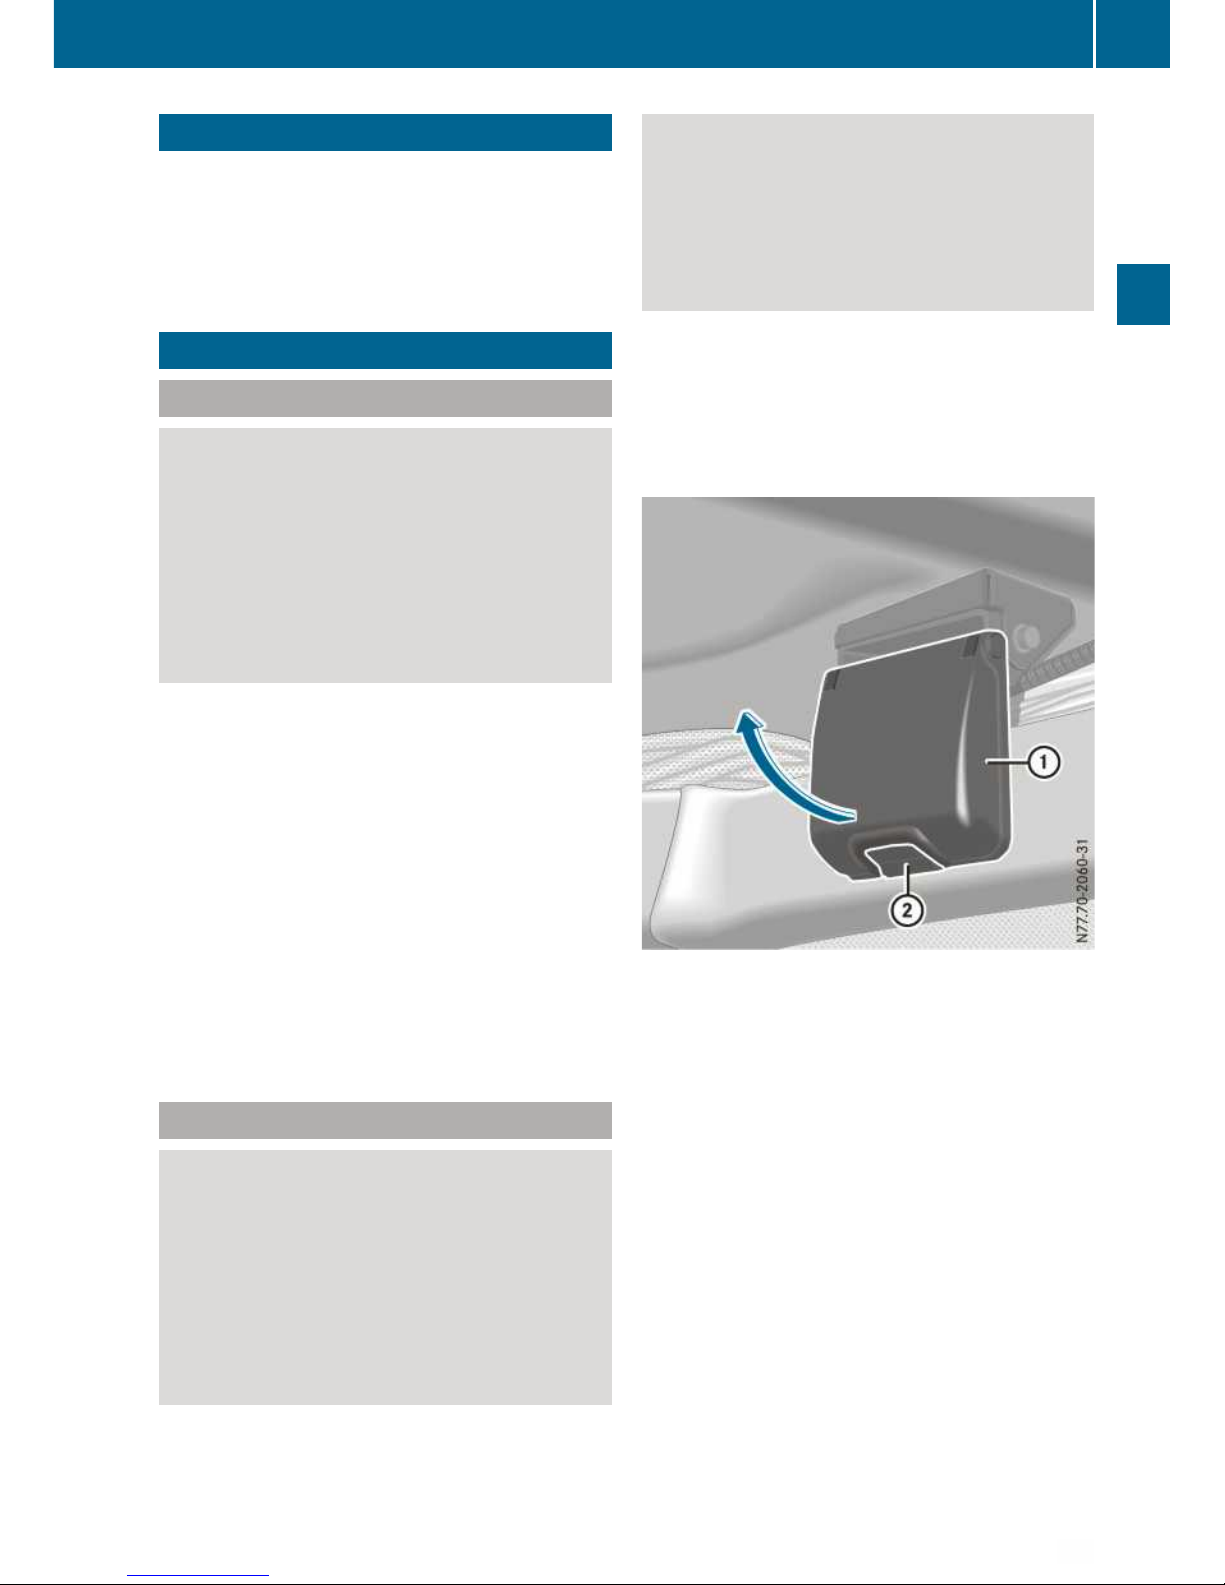
Electric pop-up roof emergency operation
!
If the pop-up roof becomes twisted it may
become damaged. Proceed with caution and
lower the pop-up roof alternately on each side
by a maximum of only 10 cm.
Check several times that the pop-up roof is
lowered to the same extent on both sides.
If the electrics of the electric pop-up roof malfunction you can no longer close the pop-up roof
normally. However, the pop-up roof can still be
closed by emergency operation. The button for
activating the emergency operation is in the
cupboard under the gas cooker behind the sidewall on the left-hand side.
i
Emergency operation is also possible in the
case of a malfunctioning or faulty control unit.
The buttons on the central control panel perform the following functions:
R
9 (OPEN) button: lowers the pop-up roof
on the right side.
R
: (CLOSE) button: lowers the pop-up roof
on the left side.
X
Open a window or door.
X
Remove all objects from the bed frame.
X
Fold down the bed frame.
X
Engage the reading lamps in the brackets.
X
Close the window zipper in the pop-up roof.
X
Turn the key to position 2 in the ignition lock.
X
Call up the "pop-up roof" menu using the control knob on the central control panel.
X
Open the cabinet under the gas cooker.
X
Press the button for activating the emergency
operation for three seconds.
A tone sounds.
i
You must then start the closing procedure
within 15 seconds using the buttons in the
central control panel.
X
Press the 9 and : buttons alternately
so that the pop-up roof is gradually lowered
on each side by a maximum of 10 cm.
i
Always push the : button twice. After
pressing the button for the first time, the display shows a message asking you to open a
window or a door.
X
Continue the procedure until the pop-up roof
is fully closed.
If the pop-up roof cannot be closed using the
emergency release, contact Mercedes-Benz
Service24h3.
3
The Mercedes-Benz Service24h telephone numbers can be found on a sticker in the area of the driver's door
and in the vehicle Maintenance Booklet. The Service Hotline can be reached around the clock.
Pop-up roof
21
Opening and closing
Z

X
To open the pop-up roof again: open the
pop-up roof in the usual way (Y page 18).
X
To close the pop-up roof again: close the
pop-up roof in the usual way (Y page 18)
If the pop-up roof does not open and close as
normal, it may not be locked. Contact
Mercedes-Benz Service24h
4
Sliding sunroof
Important safety notes
G
WARNING
While opening and closing the sliding sunroof,
body parts in close proximity could become
trapped. There is a risk of injury.
Make sure that no body parts are in close
proximity during the opening and closing procedures.
If somebody becomes trapped:
R
release the switch immediately, or
R
during automatic operation, press the
switch briefly in any direction
The opening or closing procedure will be stopped.
G
WARNING
If children operate the sliding sunroof they
could become trapped, particularly if they are
left unsupervised. There is a risk of injury.
When leaving the vehicle, always take the key
with you and lock the vehicle. Never leave
children unattended in the vehicle.
!
Only open the panorama sliding sunroof if it
is free of snow and ice. Otherwise, malfunctions may occur.
Do not allow anything to protrude from the
sliding sunroof. Otherwise, the seals could be
damaged.
!
Water may enter the vehicle and cause damage when the sliding sunroof is open. The
vehicle electronics may be damaged if water
enters the vehicle interior.
Do not open the sliding sunroof until it is dry.
Only clean the sliding sunroof when it is
closed.
!
The sliding sunroof lifts up when it is
opened. If a roof rack is fitted, take care that
the sliding sunroof does not hit the roof rack.
You could thus damage the sliding sunroof
and the roof rack.
!
The sliding sunroof does not close automatically when you lock the vehicle.
Close the sliding sunroof before leaving the
vehicle. Water may enter the vehicle and
cause damage when the sliding sunroof is
open.
!
An extended roller sunblind may be damaged by airflow when driving. Only extend the
roller sunblind when the sliding sunroof is
closed.
i
When the sliding sunroof is open, resonance
noise can occur, as well as the usual airflow
noise. These are caused by low-pressure fluctuations in the vehicle interior. Change the
position of the sliding sunroof or open a side
window slightly to reduce or eliminate these
noises.
Sliding sunroof reversing feature
The sliding sunroof is equipped with an automatic reversing feature. If an object blocks or
restricts the sliding sunroof during the closing
process, the sliding sunroof opens again automatically. The automatic reversing feature is
only an aid and is no substitute for your attention
when closing the sliding roof.
G
WARNING
The reversing feature does not react:
R
to soft, light and thin objects, e.g. small fingers
R
over the last 4 mm of the closing movement
R
during resetting
R
when closing the sliding sunroof again manually immediately after automatic reversing
4
The Mercedes-Benz Service24h telephone numbers can be found on a sticker in the driver's door entrance
area and in the vehicle Maintenance Booklet. The Service Hotline can be reached around the clock.
22
Sliding sunroof
Opening and closing
This means that the reversing feature cannot
prevent someone being trapped in these situations. There is a risk of injury.
When closing make sure that no body parts
are in the closing area.
If someone is trapped:
R
release the switch immediately or
R
press the switch in any direction during the
automatic closing process
The closing process is stopped.
Opening and closing the sliding sunroof
You can still operate the sliding sunroof if the
ignition is switched off.
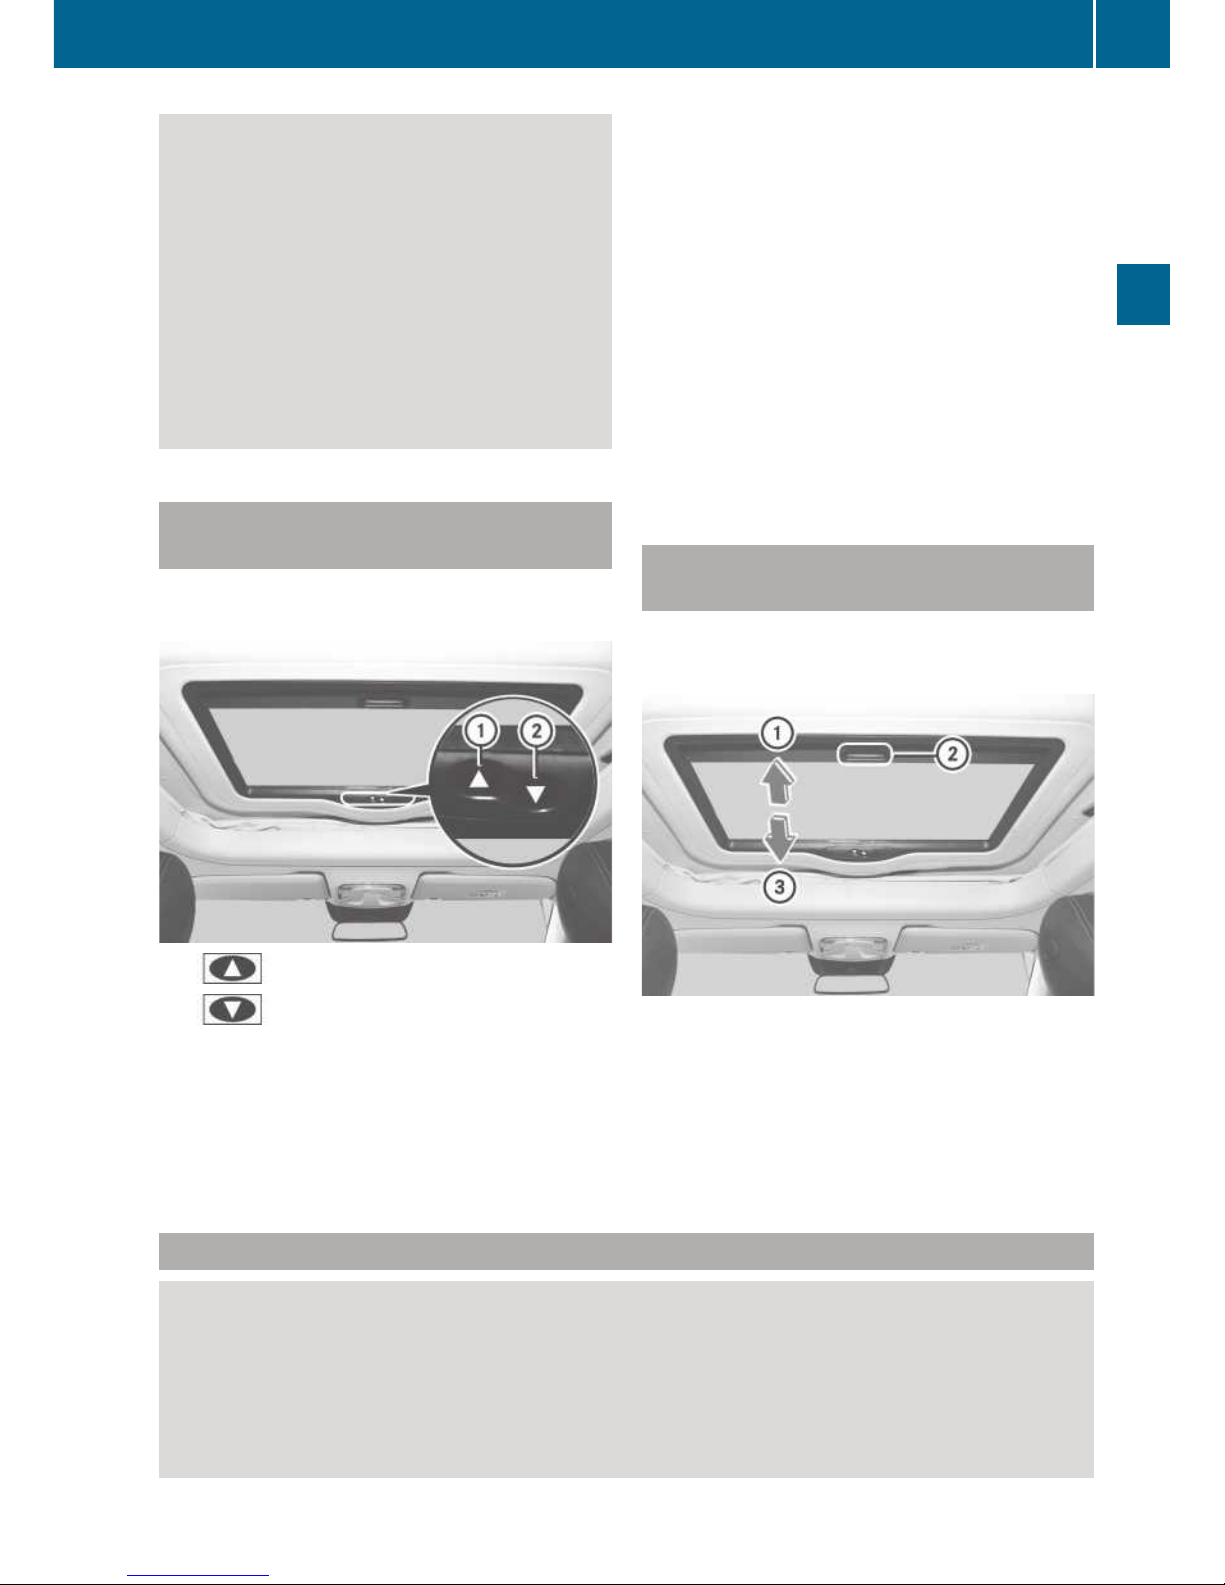
:
To tilt/open
;
To close
X
To tilt: press and hold button :.
The sliding sunroof remains still for approx.
one second when the maximum tilting position has been reached.
X
Release button :.
X
To open manually: press and hold button :.
X
To open completely: briefly press button :.
Automatic operation is started.
X
To close manually: press and hold button ;.
X
To open completely: briefly press button ;.
Automatic operation is started.
X
To interrupt automatic operation: press
button : or ; briefly.
i
The sliding sunroof does not close automatically when you lock the vehicle. To prevent
theft, close the sliding sunroof before leaving
the vehicle.
Opening and closing the roller sunblind
Requirement:
R
the sliding sunroof is closed
X
To close the roller sunblind: pull handle ;
in the direction of arrow =.
X
To open the roller sunblind: pull handle ;
in the direction of arrow :.
Problems with the sliding sunroof
G
WARNING
If you close the sliding sunroof again immediately after it has been blocked or reset, the sliding
sunroof closes with increased or maximum force. The reversing feature is then not active. Parts
of the body could be trapped in the closing area in the process. This poses an increased risk of
injury or even fatal injury.
Make sure that no parts of the body are in the closing area.
Sliding sunroof
23
Opening and closing
Z
If someone is trapped:
R
release the switch immediately or
R
press the switch in any direction during the automatic closing process
The closing process is stopped.
Problem
Possible causes/consequences and M Solutions
The sliding sunroof does
not open or close.
The additional battery is discharged.
X
Charge the additional battery (Y page 63).
There is a malfunction in the circuit. The fuse is malfunctioning.
X
Replace the fuse (Y page 66).
If the sliding sunroof still does not open or close:
X
Have the additional battery and the fuse checked at a qualified
specialist workshop.
The sliding sunroof cannot be closed and you
cannot see the cause.
If the sliding sunroof is obstructed during closing and reopens again
slightly:
X
Press the button immediately after the obstruction and
hold it until the sliding sunroof is closed.
The sliding sunroof is
leaking.
There is dirt in the seal.
X
Remove the dirt from the seal.
X
Clean the seal with a damp cloth.
X
Treat the seal with a non-grease lubricant (silicone spray).
If the sliding sunroof is still leaking:
X
Have the sliding sunroof checked at a qualified specialist workshop.
Hinged windows
The right rear hinged window can also be operated while the ignition is switched off so that you
can open and close it at any time.
You can find further information on the hinged
window in the vehicle Operating Instructions.
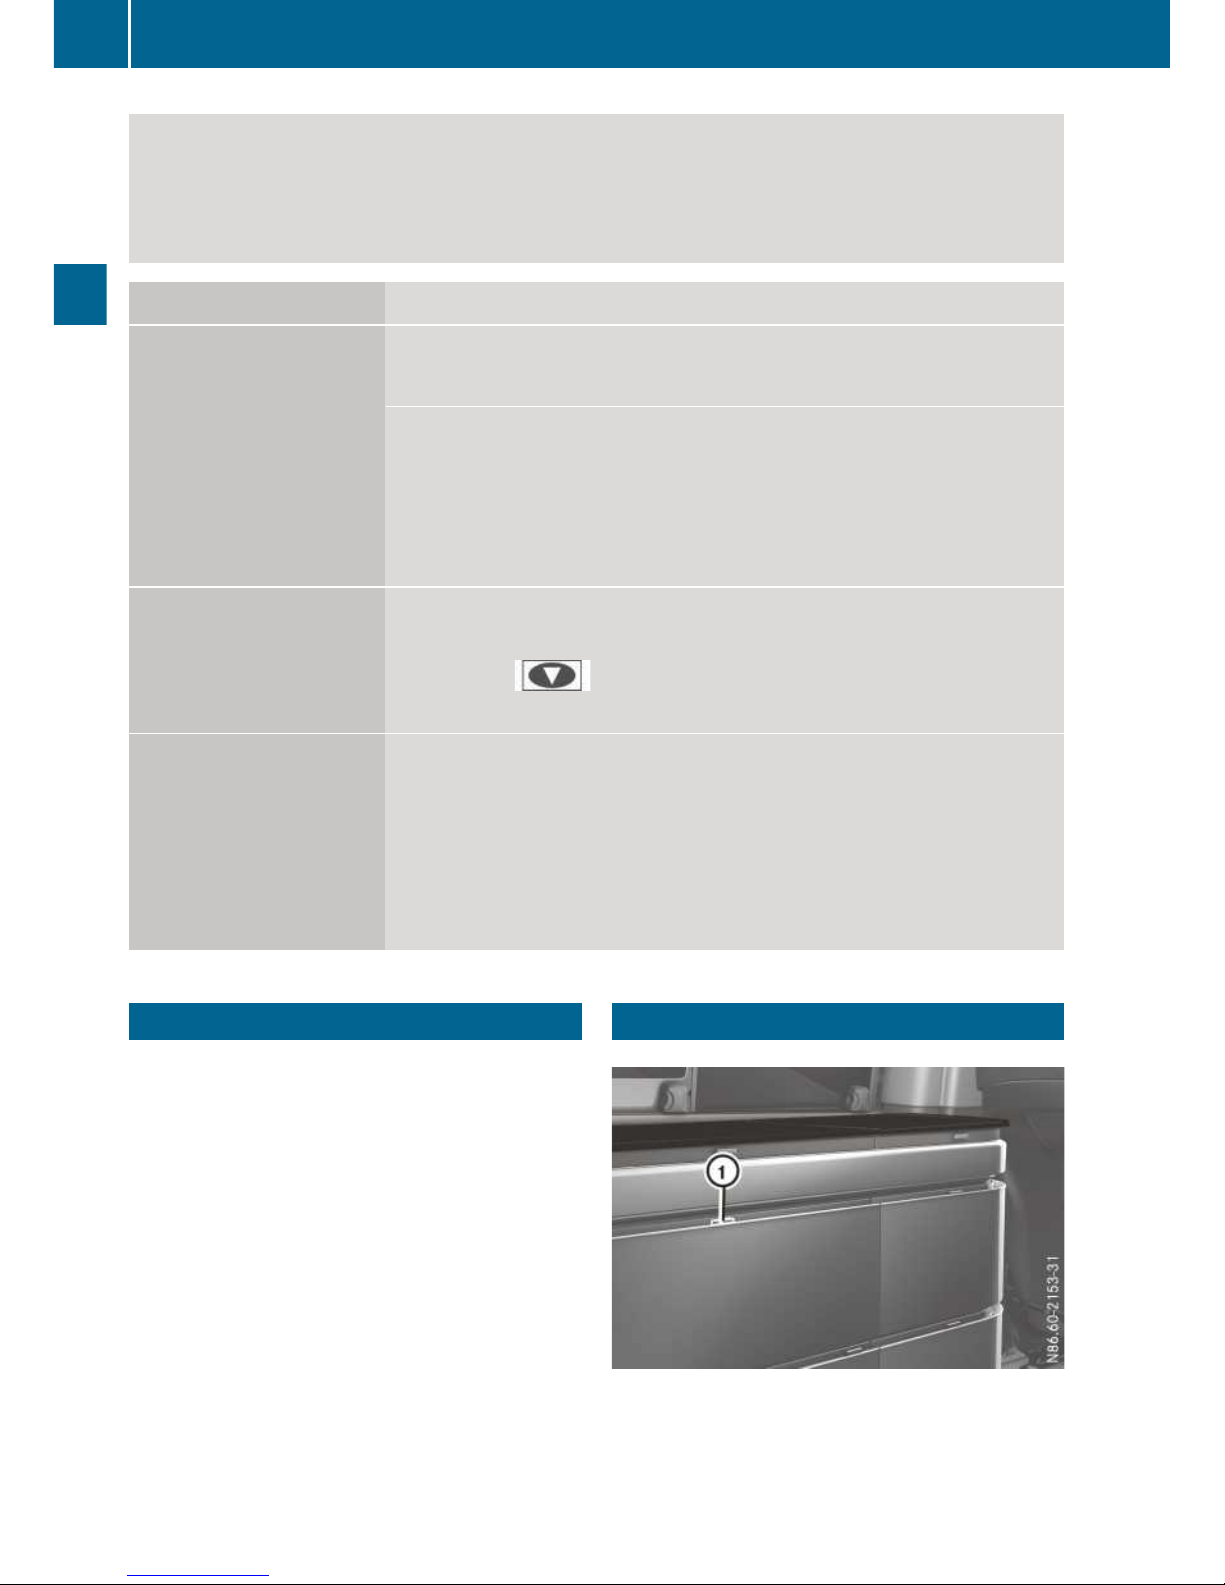
Furniture fasteners, Marco Polo
Stowage compartment
:
Button
All stowage compartments in the kitchen cupboard, all drawers and flaps are equipped with
furniture fasteners. This prevents them from
24
Furniture fasteners, Marco Polo
Opening and closing
opening accidentally while the vehicle is in
motion.
X
To unlock: press button :.
The corresponding compartment is unlocked.
X
To lock: push in the drawer, sliding door or
flap to the stop.
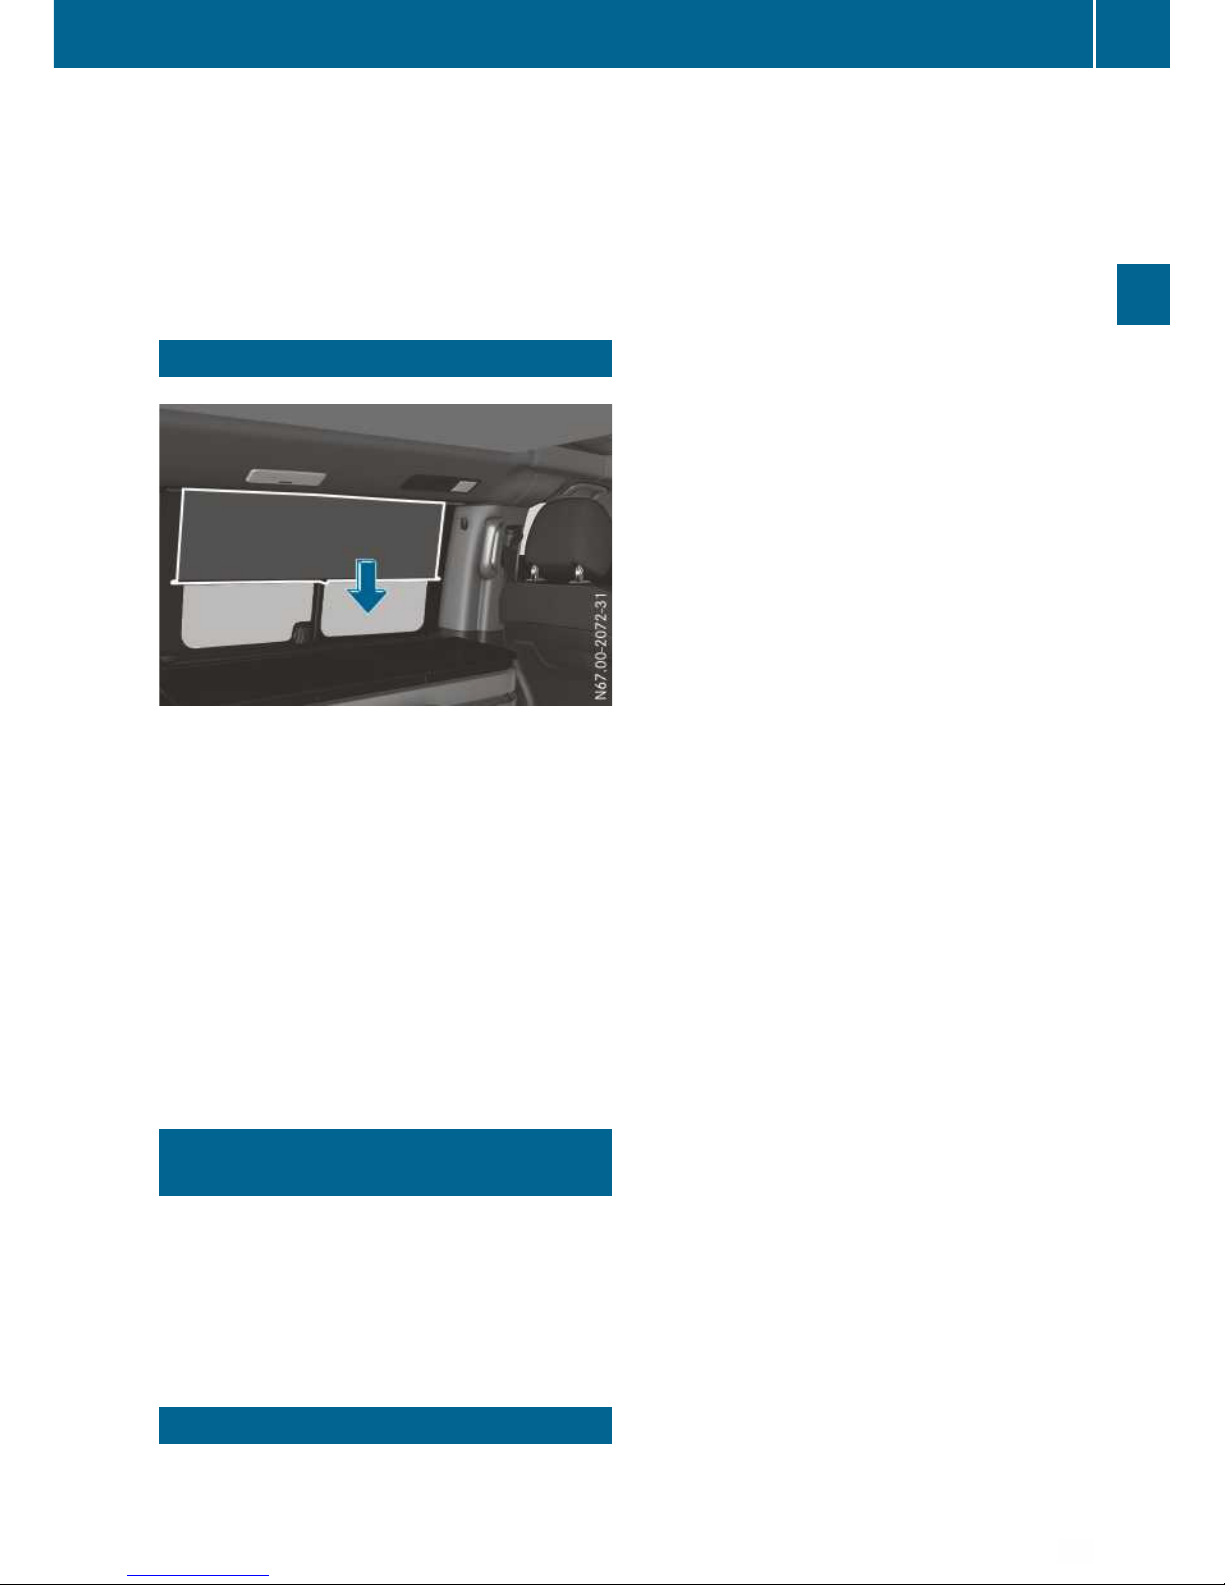
Roller blinds, Marco Polo
All windows in the vehicle interior are equipped
with opaque roller blinds. Open all roller blinds
before starting a journey. Otherwise, they could
slip out of their retainers during the journey and
become damaged. In addition, closed roller
blinds impair your view to the rear and to the
sides.
X
To close roller blinds: pull the roller blind
down using the tab in the middle.
X
Hook the roller blind into the retainer with the
tab.
Please observe the care instructions for roller
blinds in the "Cleaning" section (Y page 77).
Curtains, Marco Polo ACTIVITY /
HORIZON
All windows in the passenger compartment are
equipped with opaque curtains. The curtains run
in rails.
Please observe the care instructions for curtains
in the "Cleaning" section (Y page 77).
Cab curtain
The vehicle is equipped with a cab curtain to
darken the cab.
i
Before attaching the cab curtain, make sure
the inside of the windscreen is clean. In this
way, you can avoid leaving marks and ensure
that both suction cups retain a secure hold.
X
To attach the cab curtain: on the inside,
press both suction cups on the long side of
the cab curtain onto the window surface in the
lower corners of the windscreen.
X
Fold the sun visors forwards.
X
Place the cab curtain straps around the sun
visors and close the opening for the rear-view
mirror with the Velcro fastener.
X
Attach each cab curtain with two suction cups
to the top of the side windows in the front
doors.
Please observe the care instructions for the cab
curtain in the "Cleaning" section (Y page 77).
Cab curtain
25
Opening and closing
Z
Marco Polo seat/berth combination
Important safety notes
G
WARNING
The seat belt does not offer the intended level
of protection if you have not moved the backrest to an almost vertical position. When braking or in the event of an accident, you could
slide underneath the seat belt and sustain
abdomen or neck injuries, for example. This
poses an increased risk of injury or even fatal
injury.
Adjust the seat properly before beginning
your journey. Always ensure that the backrest
is in an almost vertical position and that the
shoulder section of your seatbelt is routed
across the centre of your shoulder.
The seat/berth combination can accommodate
two persons. You can adjust the seat backrest
angle and the seat/backrest contours electrically. If you adjust the seat backrest to the horizontal position, together with the bed extension, you will have a full-length bed. Do not drive
with the backrest reclined too far back.
Also observe the basic information and safety
notes on seats (see the vehicle's Operating
Instructions).
Adjusting the seat backrest and cushion contours
G
WARNING
When adjusting a seat, you or another vehicle
occupant could become trapped by the guide
rail of the seat, for instance. There is a risk of
injury.
Make sure that no one has any part of their
body within the sweep of the seat when
adjusting it.
G
WARNING
If children adjust the seats, they could
become trapped, especially if they are unattended. There is a risk of injury.
When leaving the vehicle, always take the key
with you and lock the vehicle. Never leave
children unattended in the vehicle.
i
If the switches are pressed more than once
in an uncontrolled way, for too long or in quick
repetition, a play-protection feature blocks
the function of the switches. After one
minute, the play-protection feature is cancelled and the seat backrest can be adjusted
again.
i
The seat backrest can be adjusted when the
key is removed from the ignition lock.
X
To adjust the seat backrest: press the
upper or lower section of switch ;.
The seat backrest is lowered or raised.
You will hear the noise of the pump once the
seat backrest angle of approximately 45° is
exceeded. A pump automatically draws air
from the cushions, so that a level bed is created.
If the power supply is disconnected during the
adjustment, the electronics of the seat/berth
combination will subsequently malfunction.
You then need to reset the seat/berth combination (Y page 29).
X
To adjust the cushion contours: press the
upper or lower section of switch :.
The bases of the seat and the backrest are
inflated or deflated.
i
The maximum cushioning effect is achieved
once the noise of the pump stops.
26
Marco Polo seat/berth combination
Seats, berths and table
Moving the seat/berth combination
Important safety notes
G
WARNING
If you move the seat/berth combination while
the vehicle is in motion, the seat may move
unexpectedly or jerk, for instance, when braking. You could become trapped or collide with
parts of the vehicle interior or other vehicle
occupants. There is a risk of injury.
Only move the seat/berth combination when
the vehicle is stationary. Make sure that the
seat/berth combination has engaged properly after it has been moved.
G
WARNING
If the seat/berth combination is not fully
engaged, it may be thrown about while the
vehicle is moving. There is a risk of an accident and injury.
Always ensure that the seat/berth combination is engaged as described.
G
WARNING
If you move the seat position outside the
marked area on vehicles with windowbags in
the rear compartment, then the windowbags
can no longer provide optimum protection.
When moving the seat outside the specified
optimum area of protection, the protective
effect of the windowbag is gradually reduced
and may in some positions no longer be provided at all. As a result of reduced or no protection from the windowbag, there is an
increased risk of injury.
Engage the seat/berth combination within
the marked area on the guide rail to achieve
optimum protection.
G
WARNING
If you position the seat/berth combination
outside the markings on the guide rail, the
distance between a vehicle occupant and the
seat in front may be insufficient. This could
result in the passenger striking their head on
the seat, for example when braking or in the
event of an accident. There is then an
increased risk of injury.
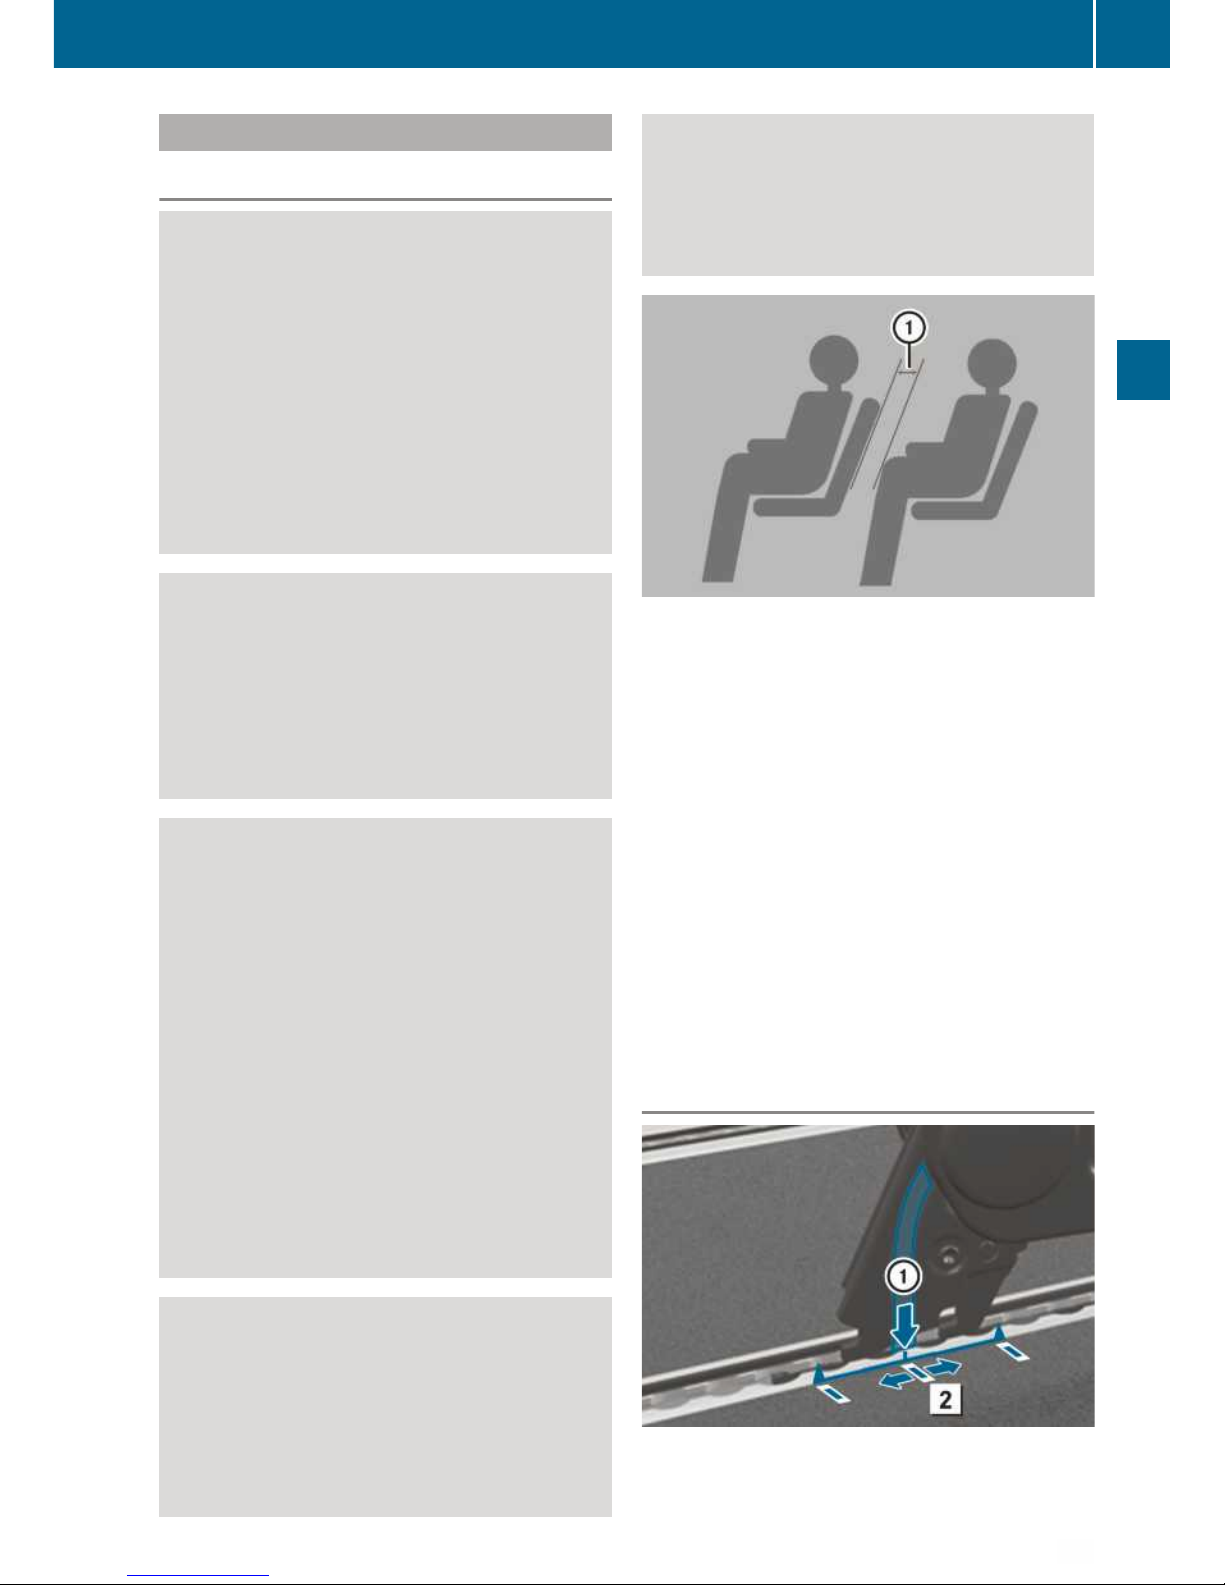
Maintain a minimum distance of 5 cm
between the knees of the respective vehicle
occupants and the seat in front of them.
Maintain a minimum distance of 5 cm :
between the knees of the vehicle occupants and
the seat in front of them.
!
If you grasp and push the seat/berth combination by the plastic cover of the stowage
compartment only, the cover may break off.
For this reason, always grasp the metal
bracket of the seat frame to move the seat/
berth combination.
Before moving the seat/berth combination,
make sure that the space in front of or behind
the seat/berth combination is free and that
no objects can become trapped.
The seat/berth combination, trim or the
objects may become damaged.
Positioning the seats in the optimum
area of protection
:
Marking on the front seat leg of the seat/
berth combination
2
Basic position
Marco Polo seat/berth combination
27
Seats, berths and table
Z
 Loading...