

Mercedes-Benz CL Class Coupe, 2005 CL Coupe Quick Tips
ABOUT THIS GUIDE
This guide has been prepared to help
you get quickly acquainted with your
new Mercedes-Benz and to provide
a convenient reference source for
common questions.
However, it is not intended as a
substitute for your Operator’s Manual.
For complete operational instructions,
maintenance procedures and important
safety messages, please consult your
Operator’s Manual and other warning
labels in your car.
SAFETY REMINDERS
Your Mercedes-Benz is equipped with
many safety engineering features,
including front, side and window
curtain air bags for driver and front seat
passenger; side and window curtain air
bags for rear seat passengers.
Air bags do not replace your seat
belts; they supplement the protection
offered by seat belts.
Air bags can help protect you in a
severe frontal collision and in certain
side impacts, but they do not provide
protection in any other kind of collision.
Always make sure you and your
passengers wear safety belts.
Warning: The forces of a deploying
air bag can cause serious or fatal
injury to a child under age 13.
A child under 13 must be seated
in the rear seat, belted into an
appropriate, properly installed
child restraint. If the child must be
transported in the front passenger
seat, the child must be belted into
an appropriate BabySmart™compatible child seat, which will
deactivate the front passenger front
air bag if the child seat is properly
installed; see Operator’s Manual for
additional warnings and information
on air bags, seat belts and child seats.
MAINTENANCE REMINDERS
Please contact your Mercedes-Benz
dealer or the Mercedes-Benz Customer
Assistance Center with any questions
you may have about your vehicle.
We extend our best wishes for many
miles of safe, pleasurable driving.
Body repairs/paintwork
Due to the innovative materials and
assembly procedures used in the
production of the CL-Class, paintwork
and body repairs should be performed
only by a facility which is certified
and recommended by MBUSA.
Please call 1-800-FOR-MERCEDES
for additional details.
Mercedes-Benz
Customer Assistance Center
1-800-FOR-MERCEDES
1-800-367-6372
©2004 Calcar, Quick Tips
®
is a trademark of Calcar, made in USA / 8
MC-04-604
Quick Tips Mercedes-Benz CL Class Coupe page 1
page 34
Revised February 18, 2005
All illustrations and specifications contained in Quick Tips®are based on the latest product information available at time of publication. BabySmart™ is a trademark of
Siemens Automotive Company. Mercedes-Benz reserves the right to make changes at any time, without notice, in color, material, equipment, specifications and models.
05 CL_Class 2.17.05 4/6/05 1:35 PM Page 1
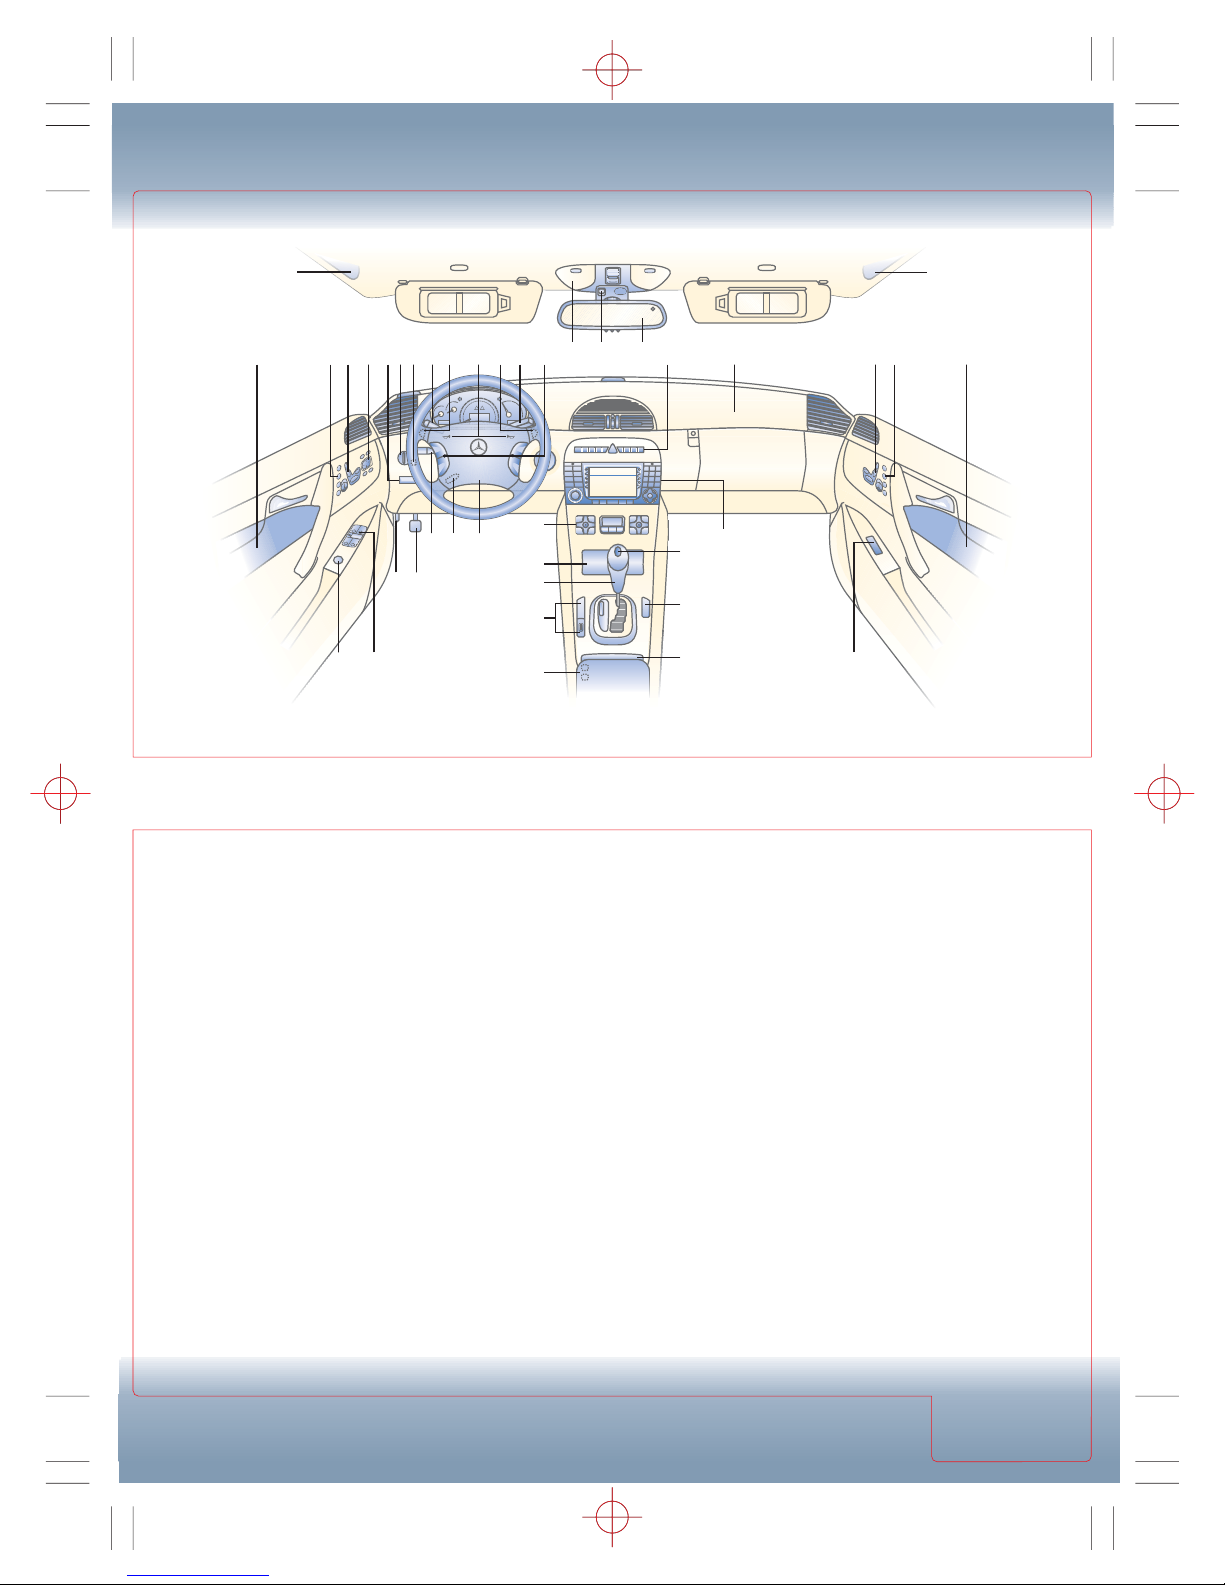
1. Air bag
2. Memory buttons, see Seats
3. Power seat controls, see Seats
4. Power mirror controls,
see Windows/Mirrors
5. Parking brake release
Pull to release
6. Exterior light switch,
see Stalks/Lights
7. Headlamp washing button
Press to wash headlamps
8. Cruise control, see Stalk Controls
9. Gear shifter buttons**,
see Drivetrain
10. Horn
11. Voice control stalk for audio/
cellular phone*,
see Multi-function Controls
12. Multi-function steering wheel
controls, see Multi-function Controls
13. Overhead console,
see Overhead Console
14. Tele Aid emergency call button
15. Auto dimming mirror
16. Center console switches:
Rear window sunshade
Parktronic*
Active Body Control (ABC)
Level control setting
Central locking
Hazard warning flashers
Central unlocking
Electronic Stability Program (ESP)
Rear seat head restraints control
Anti-towaway
see Center Console
17. Power window controls
18. Cockpit Management and Data
system, see COMAND Manual
19. Keyless Go*, see Drivetrain
20. BabySmart™ front passenger
front air bag deactivation light,
see Child Seats
21. Cupholders
see Tele Aid/Armrest
22. Tele Aid buttons
Roadside assistance/information,
see Tele Aid/Armrest
23. Distronic switches*,
see Center Console
24. Gear selector lever, see Drivetrain
25. Ashtray/lighter
26. Climate control panel,
see Climate Controls
27. Steering wheel adjustment,
see Stalks/Lights
28. Combination switch:
Turn signals/high beams/
washer/wiper, see Stalk Controls
29. Parking brake pedal
30. Hood release
Pull to open hood partially
31. Trunk release
DRIVER’S VIEW
DRIVER’S
VIEW
Always check the Operator’s Manual for more operating information and safety features
*Standard and optional equipment will vary
**CL55 AMG and CL65 AMG
1
1 16
2
6 753 4
SRS
AIRBAG
151413
26
27
1
28
25
24
23
22
P
C
S
R
N
+D-
31
2930
17
19
20
21
18
1
1108 99 1211
3 12
17

WARNING LIGHTS
INSTRUMENT PANEL
INSTRUMENT
PANEL
INSTRUMENT
PANEL
Always check the Operator’s Manual for more operating information and safety features
1. Coolant temperature gauge
If needle in red zone, turn off
engine immediately or as soon
as possible; check coolant level
only when engine is cold
2. Fuel gauge
23.2 gallon tank
8. Odometer
9. Trip odometer
10. Outside temperature display
11. Instrument panel lighting knob
Press in/out, then rotate clockwise
to increase light intensity
16. Reset button
Press to clear (9), (19), (18); also
press to activate instrument cluster
when key is OFF
17. Always fasten seat belts
18. Multi-function display,
see Multi-function Display, and
S/CL COMAND System Quick Tips
®
19. Mercedes-Benz
Maintenance System indicator
Indicates regular maintenance
service intervals
See Maintenance Booklet
Displays days/miles to next
service, also days/miles past due
Contact your Mercedes-Benz
Dealer for an appointment
3. Turn signals/hazard warning
4. Speedometer
5. Tachometer
6. Clock
To set: See S/CL COMAND System
Quick Tips®, System Settings tab
7. Transmission position/mode
12. Fuel reserve
Approximately 2.9 gallons
remaining when light comes on,
blinking light indicates fuel cap
not installed correctly
13. ESP
Flashing light =
System operating,
adjust speed and driving style to
road conditions
Steady light =
System deactivated,
see Center Console
14. Antilock Brake System (ABS)
ABS malfunction, normal brake
function only (no ABS); MercedesBenz Center inspection required
15. High beams
20. Engine malfunction indicator
Fuel injection/emission control
system malfunction; Mercedes-Benz
Center inspection required; or fuel
cap not fully tightened
21. Brake warning
Parking brake on/low fluid level
22. Supplemental Restraint
System
Air bag malfunction, unintended air
bag deployment or failure to deploy
possible; Mercedes-Benz Center
inspection required immediately
23. Distronic warning*
Lamp lights and audible warning
sounds to signal danger of collision
24. Tire pressure monitor
One or more tires may have
a loss of air pressure
CHECK
ENGINE
*Standard and optional equipment will vary
1/2
120
22
21
20
11
80
R
40
1/1
20
mph km/h
332121 513 234
80
60
100
80
40
60
40
20
0
0
100
140
120
160
180
200
120
220
240
260
140
160
x1000
1/min
1
2
3
4
5
6
10:00
14
15
R
16
24
8 1719 1810 679
MULTI-FUNCTION DISPLAY
MULTI-FUNCTION
DISPLAY
MULTI-FUNCTION
DISPLAY
Always check the Operator’s Manual for more operating information and safety features
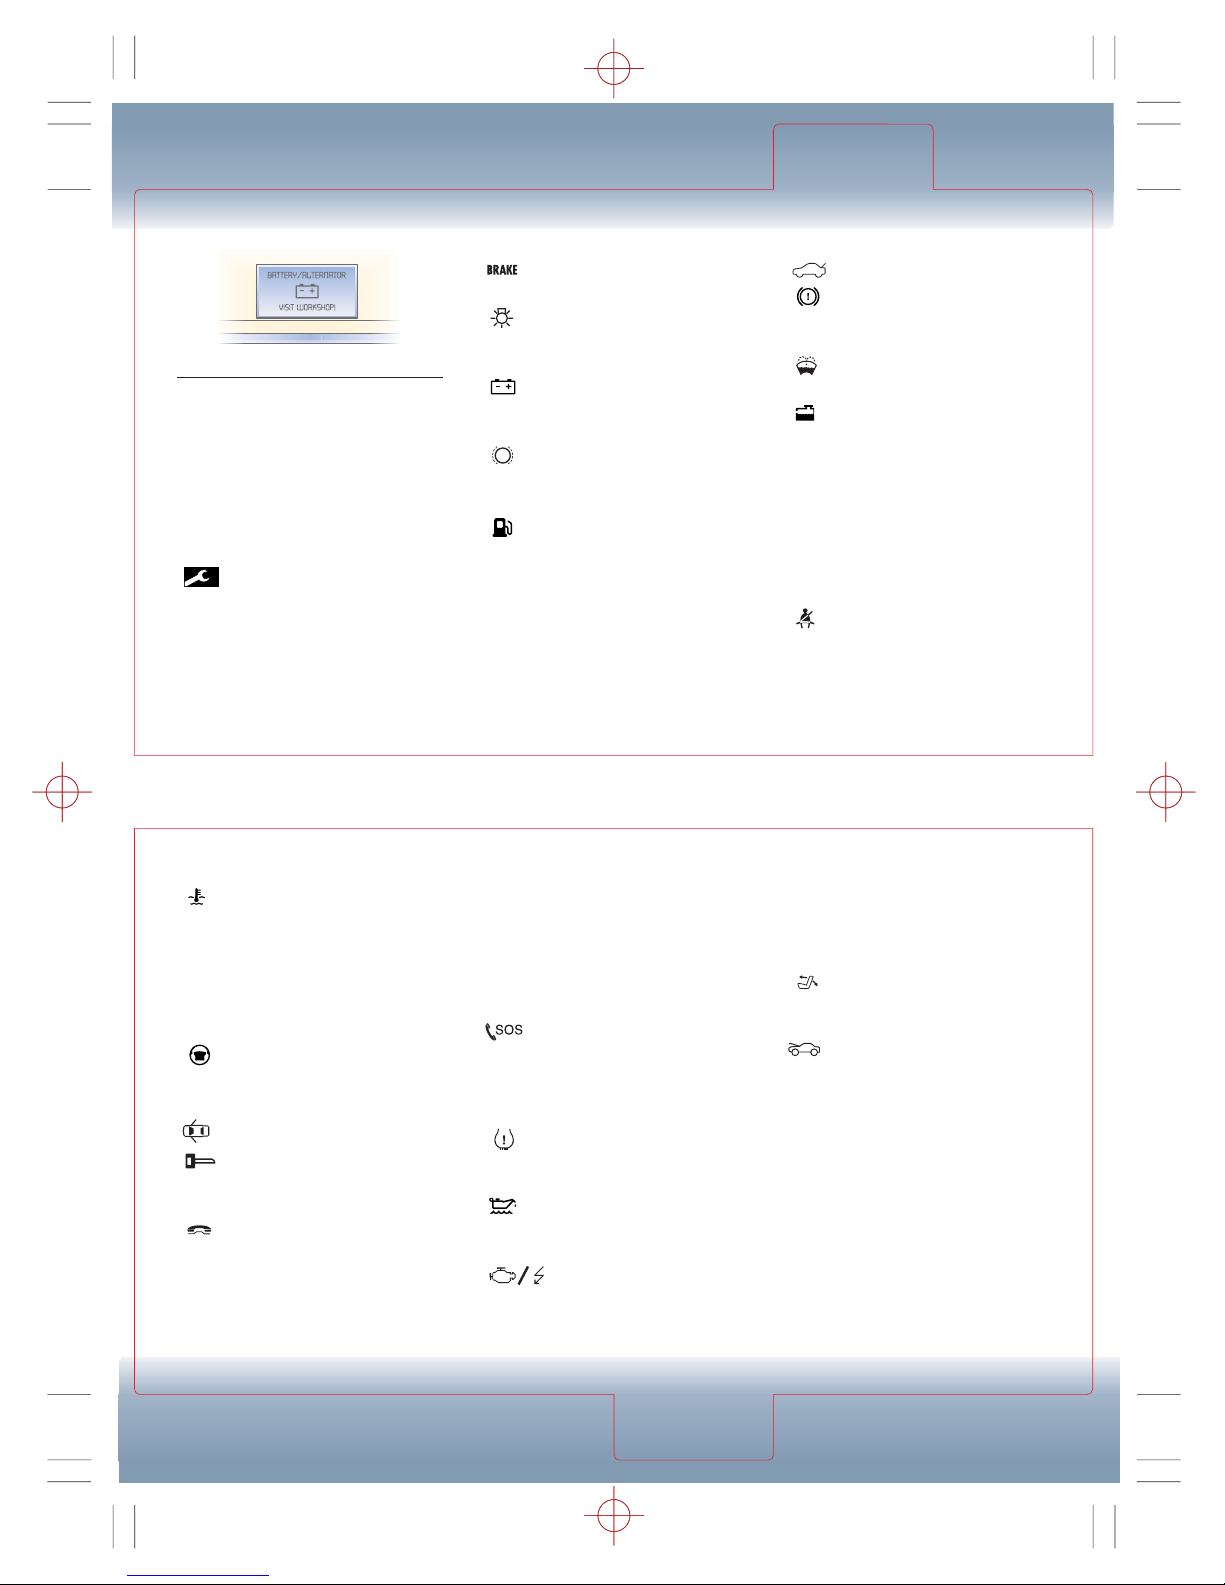
Coolant temperature
Malfunction of cooling fan/fan belt;
Pull over and shut off engine if STOP,
ENGINE OFF appears on display
ESP Electronic Stability Program
Multi-function display will identify
type of ESP malfunction
Entry position
Seat/mirrors/steering wheel moving
to driving position
Door open
SmartKey
Multi-function display will identify
type of SmartKey malfunction
Function not available*
Indicates vehicle is not equipped
with a telephone
Air filter
Mercedes-Benz Center inspection
required
Active Body Control
Multi-function display will identify type
of Active Body Control malfunction
Warning: If secondary message
STOP, CAR TOO LOW appears,
do not drive vehicle
Tele Aid malfunction
Multi-function display will identify
type of Tele Aid system malfunction;
Mercedes-Benz Center inspection
required
Tire pressure monitor*
One or more tires may have
a loss of air pressure
Engine oil level
Multi-function display will identify
type of engine oil malfunction
Display defective
Information relayed to display is
not complete/accurate; MercedesBenz Center inspection required
ABC
Parking brake
Release parking brake
Lamp sensor
Multi-function display will identify
type of lamp malfunction
Battery/Alternator
Battery discharging; Mercedes-Benz
Center inspection required
Brake pad wear
Pads worn down; Mercedes-Benz
Center inspection required
Reserve fuel
The fuel level has dropped below the
reserve mark; refuel at next gas station
Check engine
Multi-function display will identify
type of malfunction; Mercedes-Benz
Center inspection required
CHECK
ENGINE
!
Cruise control
Cruise control or Distronic* malfunction;
Mercedes-Benz Center inspection
required
Seat backrest not locked
Pull over in a safe place and lock
backrest in place
Engine hood open
Close hood
Distronic* malfunction
Multi-function display will identify
type of Distronic malfunction
Brake Assist
Brake Assist System malfunctioning;
normal brake function only (no BAS);
Mercedes-Benz Center inspection
required
P Gear selector lever in
park position
Place gear selector lever in position P
(vehicles equipped with Keyless Go*)
FAULT/WARNING MESSAGES
Fault/warning messages for various
vehicle systems are displayed on the
multi-function display; some messages
can be cleared using the ® button.
Tele Aid status messages also appear
in the multi-function display
Warning: All fault/warning
messages should be addressed
as soon as possible
Mercedes-Benz
Maintenance System indicator
Indicates regular maintenance
service intervals
Displays days/miles to next
service, also days/miles past due
*Standard and optional equipment will vary
Trunk open
Brake fluid
Brake fluid low, do not drive; MercedesBenz Center inspection required
Washer fluid
Check washer fluid level
Coolant
Check coolant level
Warning: To avoid possible
personal injury, check only
when engine is cool
Antilock Brake System
Multi-function display will identify
type of ABS malfunction; MercedesBenz Center inspection required
Seat belt system
Seat belt system malfunction;
Mercedes-Benz Center inspection
required
A
MULTI-FUNCTION
DISPLAY
BS
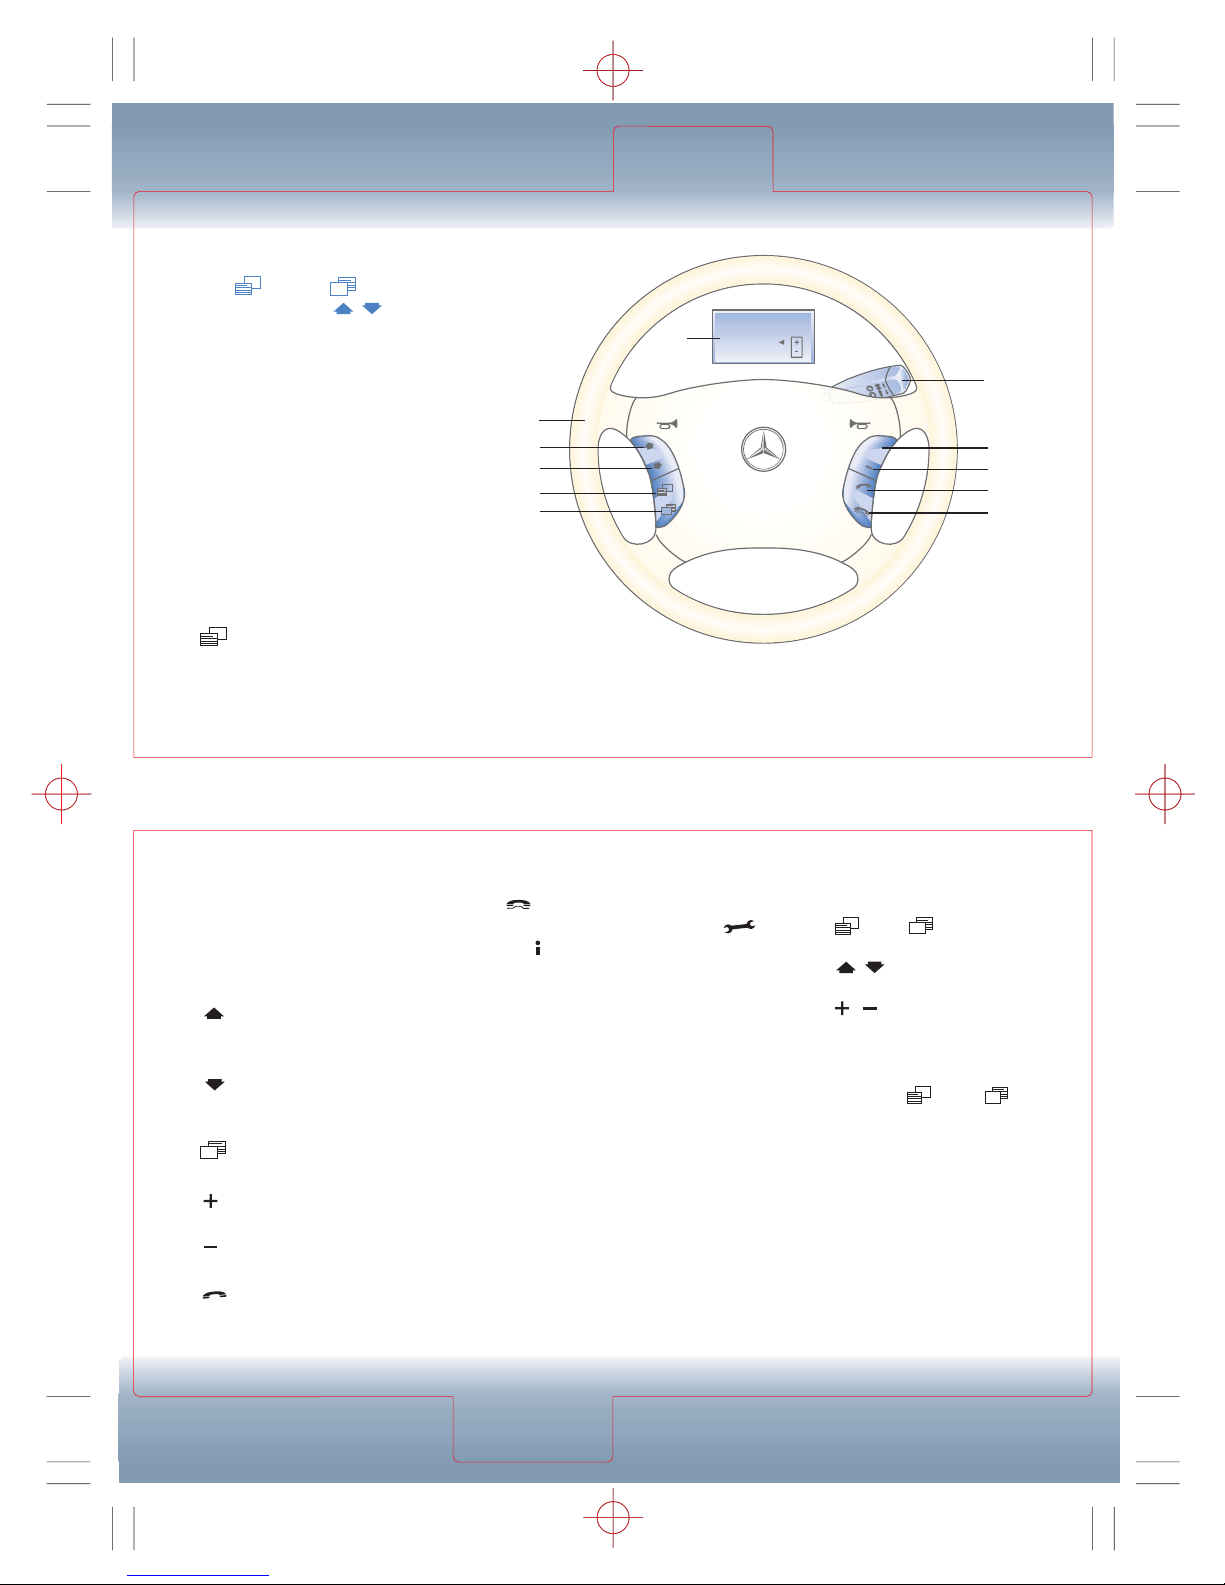
To access multi-function selection:
Press (2) or
(6)
to scroll
menus then press (4 or 5)
to scroll pages
1. Multi-function steering wheel
Operates audio system, telephone*,
trip odometer and selected system
option settings using the steering
wheel controls
The multi-function display (3)
changes dependent on the function
being accessed
For information on operating
the audio system, telephone*
or navigation system, see the
COMAND System manual or
COMAND System Quick Tips
®
2. Next system: Press to scroll
forward through all the systems
3. Multi-function display
Displays information based on
buttons activated on multi-function
steering wheel or information the
vehicle communicates to the driver
4. Next display: Press to scroll
then access the next display in
the system
5. Previous display: Press
to access the previous display in
the system
6. Previous system: Press to
scroll back through all the systems
7. Volume-up: Press to increase
volume/select option
8. Volume-down: Press to
decrease volume/select option
9. Call Pick up: Press to accept
incoming call/place call
10. Hangup: Press to hang up/
reject call, including Tele Aid
and
11. Voice control stalk for audio/
phone function*
To activate: Tap lever rearward
To deactivate: Tap lever forward
See Voice Recognition Operation Guide
For individual settings controlled
by multi-function steering wheel,
see Operator’s Manual
To change multi-function settings:
Press (2) or (6) repeatedly
until SETTINGS appears in display;
press (4 or 5) until the desired
setting menu appears in display;
press (7 or 8) to select or move
highlighted display (this changes
settings within the selected menu)
To reset all submenus to factory
settings: Press (2) or (6)
repeatedly until SETTINGS appears
in display; Press reset button on
instrument panel for 3 seconds;
request to press the reset button
again to confirm appears in
display; press reset button again
to confirm all submenus are
reset to factory settings
/
/
MULTI-FUNCTION STEERING WHEEL
MULTI-FUNCTION
CONTROLS
Always check the Operator’s Manual for more operating information and safety features
/
*Standard and optional equipment will vary
MULTI-FUNCTION
CONTROLS
STATION SEARCH
USING
3
1
4
5
2
6
FREQUENCY
MEMORY
SRS
AIRBAG
11
+
7
8
9
10
Standing (parking), side markers,
tail lights, license plate and instrument
panel lights on plus low or high beam
on (yellow indicator lights)
Front fog lights: Pull out to first
detent with standing (parking), side
marker, tail, license plate and instrument
panel lights and/or low beam headlights
on (green indicator lights)
Front and rear fog lights: Pull out
to second detent (orange indicator lights)
Tip: Fog lights not operational with
headlamp switch in Auto position
Headlamp washers
Night security illumination
With exterior lamp switch in AUTO
position, exterior lights can be set to
switch on from 0 (off) to 60 seconds
after exiting, see Multi-function Controls
Warning: Driver is responsible
for control of vehicle lights; switch
on lights manually if necessary
STALK CONTROLS
STALK
CONTROLS
STALKS/
LIGHTS
Always check the Operator’s Manual for more operating information and safety features
OFF
RESUME
A
C
C
EL
D
E
C
E
L
S
E
T
A
C
D
B
B
B
A
C
A
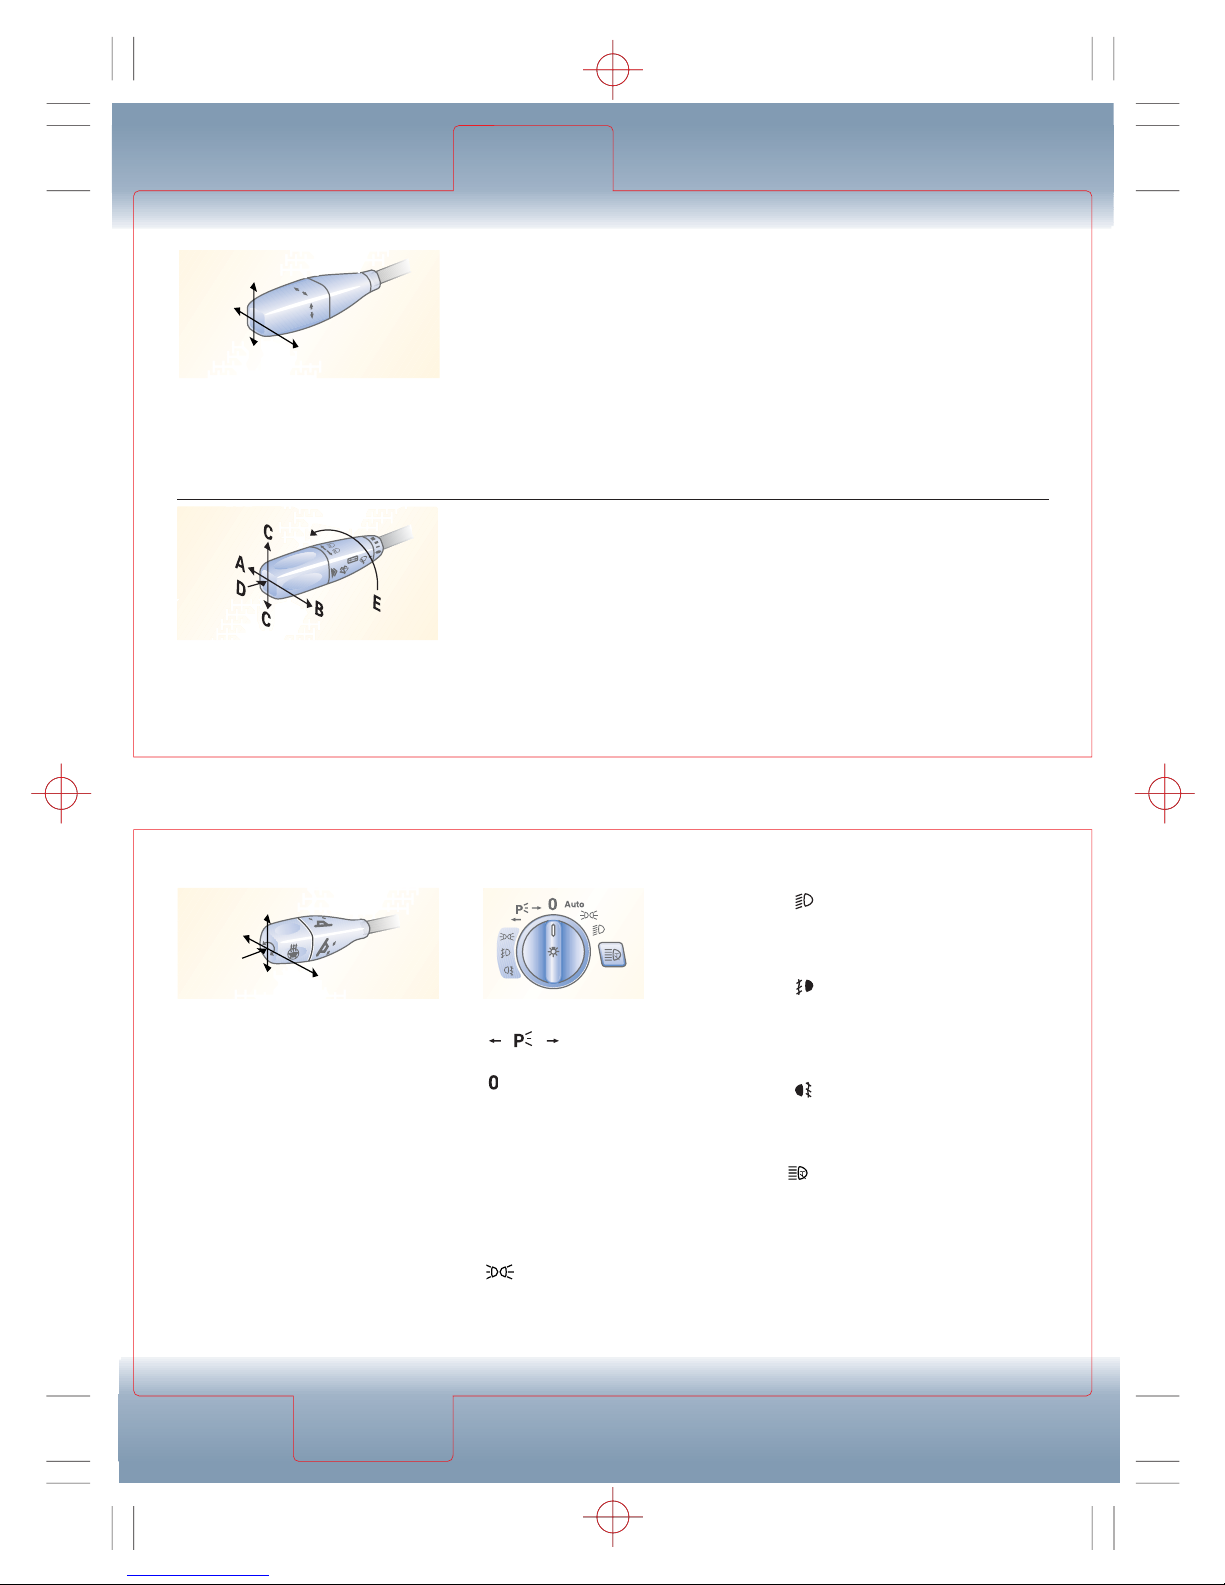
A. High beams on/off: Push forward
to detent/pull back
B. To flash high beams: Pull rearward
and release
C. Turn signals right/left: Move lever
up/down
D. Windshield washers/wipers: Push
briefly for one wipe, no washer fluid;
use only when windshield is wet
E. Windshield wiper:
0 = Wiper off
I = Intermittent; rain sensor adjusts
wipers to rain intensity; always
keep wipers off (0 position) in dry
conditions or damage may occur
II = Normal speed
III = Fast speed
Operates above approximately 20 mph
A. To set speed: Accelerate to desired
speed and lift lever up briefly
To accelerate: Hold lever up
To increase speed incrementally:
Briefly tap lever up
B. To decelerate: Hold lever down
To decrease speed incrementally:
Briefly tap lever down
C. To cancel: Tap brake pedal or
tap lever forward
D. To return to preset speed (after
braking): Tap lever rearward
Tip: Incremental increase/
decrease speed changes
occur in 1 mph increments
Distronic cruise control*,
In vehicles so equipped, Distronic
replaces standard cruise control,
see Center Console
Tip: Standing
(parking) lights
not operable
with ignition in
ON position
Exterior lights
Left/right standing (parking),
side marker and tail light on
When engine is running, daytime
running headlamps are switched on
(if selected in SETTINGS)
Automatically switches low
beams, standing (parking), side marker,
tail, license plate and instrument panel
lights on/off, depending on brightness of
ambient light; daytime running lamps
can also be activated in this position
Standing (parking), side marker,
tail, license plate and instrument
panel lights on
Auto
Cruise control
Warning: Use only when traffic
and weather conditions permit
safe operation; never use on ice
or snow covered roads
Combination switch: Turn signals/
high beams/washer/wiper
Steering wheel adjustment
(Bottom stalk on steering column)
A. To shorten/lengthen (telescope) the
column: Press lever toward front/rear
B. To raise/lower (tilt wheel): Press
lever up/down
Heated steering wheel*
Rotate lever (C) counterclockwise/
clockwise to activate/deactivate
Warning: Adjusting steering
wheel while driving could result
in an accident
Tip: To store wheel position
in memory, see Seats
*Standard and optional equipment will vary
 Loading...