


ma-baker bread maker
|
Model: |
|
|
|||
6 0 0 W |
2 6 5 0 0 |
|
|
|||
PLEASE READ ALL INSTRUCTIONS BEFORE USE |
|
|
||||
|
||||||
MW_CObm26500_Mabaker_IM.indd 1 |
|
|
|
|
12/15/2008 1:53:46 PM |
|
|
|
|
|
|||
|
|
|
|
|||
|
|
|
|
|
|
|

Important safety instructions
The use of any electrical appliance requires the following of basic common sense safety rules.
Primarily there is danger of personal injury and secondly the danger of damage to property and the appliance. These are indicated in the text by the following two conventions:
WARNING: Danger of personal injury
IMPORTANT: Damage to the appliance
In addition we offer the following essential safety advice.
Children
Never allow a child to operate this appliance. Children are vulnerable in the kitchen particularly when unsupervised and if appliances are being used or cooking is being carried out.
Teach children to be aware of dangers in the kitchen, warn them of the dangers of reaching up to areas where they cannot see properly or should not be reaching.
Location
•Always locate your appliance away from the edge of a worktop.
•Ensure that the appliance is used on a firm, flat surface.
•Do not use outdoors.
Mains lead
•The mains lead should reach from the socket to the base unit without straining the connections.
•Do not let the mains lead hang over the edge of a worktop where a child could reach it.
•Do not let the lead run across an open space e.g. between a low socket and table.
•Do not let the lead run across a cooker or toaster or other hot area which might damage the cable.
Your safety
• WARNING: Do not touch hot surfaces. Use oven mitts or oven gloves when removing the hot bread pan. Do not cover the steam vent openings under any circumstances.
•W ARNING: Avoid contact with moving parts.
•To protect against electrical shock, do not immerse cord or plug in water or other liquid.
•Extreme caution must be observed when moving an appliance with hot contents.
•Do not use breadmaker for storage purposes nor insert any utensils, as they may create a fire or electric shock hazard.
•Do not use use the appliance with wet or moist hands.
Other safety considerations
•If the mains lead of this appliance is damaged do not use it. The lead may only be replaced by Morphy Richards Ltd or an agent of the company, since special purpose tools are required. Telephone Morphy Richards helpline for advice.
•The use of accessory attachments not recommended by the manufacturer may cause damage to the breadmaker.
•Do not place the appliance on or near heat sources such as gas or electric stove ovens, or burners.
•To avoid damaging the appliance, do not place the baking pan or any object on top of the unit.
•Do not clean with scouring pads. Do not wash the baking pan, kneading blade measuring cup or spoon in a dishwasher.
•Keep the appliance and the cable away from heat, direct sunlight, moisture, sharp edges and the like.
•The baking pan must be in place prior to switching on the appliance.
•Always remove the plug from the socket whenever the mahine is not in use, when attaching accessory parts, cleaning the machine or whenever a disturbance occurs. Pull on the plug, not the cable.
2
MW_CObm26500_Mabaker_IM.indd 2 |
|
|
12/15/2008 1:53:47 PM |
|
|
||
|
|
|
|

Operating instructions
Important safety instructions |
2 |
Introduction |
4 |
B efore first use |
4 |
E lectrical requirements |
4 |
About this breadmaker |
4 |
About the recipes |
4 |
C omponents |
5 |
Control panels buttons, display and functions |
6 |
P rogram descriptions |
7 |
Using your breadmaker |
8 |
Using the timer |
9 |
B eeper |
9 |
P ower interuption |
9 |
S licing and storing bread |
9 |
C are and cleaning |
10 |
S toring the unit |
10 |
K now your ingredients |
11 |
Measuring ingredients |
12 |
Ingredient temperatures |
13 |
Creating your own yeast breads |
13 |
Special glazes for yeast breads |
13 |
Other tips |
13 |
MW_CObm26500_Mabaker_IM.indd 3
|
|
|
|
|
|
|
|
|
|
|
|
|
|
|
|
|
|
|
|
|
|
|
|
|
|
|
|
|
|
|
|
|
|
|
|
Contents |
|||||
|
Recipes |
|
|
|
|
|
|
|
|||||
|
Basic breads |
|
|
|
|
|
|
|
|||||
|
B asic white bread |
14 |
|
|
|
|
|||||||
|
S oftgrain bread |
14 |
|
|
|
|
|||||||
|
B rown loaf |
14 |
|
|
|
|
|||||||
|
Italian herb bread |
14 |
|
|
|
|
|||||||
|
C heese & onion bread |
14 |
|
|
|
|
|||||||
|
R aisin bread |
14 |
|
|
|
|
|||||||
|
S un-dried tomato loaf |
14 |
|
|
|
|
|||||||
|
Malt loaf |
15 |
|
|
|
|
|||||||
|
French bread |
15 |
|
|
|
|
|||||||
|
Wholewheat breads |
|
|
|
|
|
|
|
|||||
|
Wholewheat bread |
15 |
|
|
|
|
|||||||
|
G ranary loaf |
15 |
|
|
|
|
|||||||
|
Quick setting |
|
|
|
|
|
|
|
|||||
|
B anana and nut bread |
15 |
|
|
|
|
|||||||
|
P orridge oats bread |
15 |
|
|
|
|
|||||||
|
Sweet |
|
|
|
|
|
|
|
|||||
|
Mixed fruit loaf |
15 |
|
|
|
|
|||||||
|
C hocolate bread |
16 |
|
|
|
|
|||||||
|
Fastbake I |
|
|
|
|
|
|
|
|||||
|
Fastbake small white |
16 |
|
|
|
|
|||||||
|
Fastbake II |
|
|
|
|
|
|
|
|||||
|
Fastbake large white |
16 |
|
|
|
|
|||||||
|
Dough recipes |
|
|
|
|
|
|
|
|||||
|
White bread rolls |
16 |
|
|
|
|
|||||||
|
Wholewheat bread rolls |
16 |
|
|
|
|
|||||||
|
Hot cross buns |
16 |
|
|
|
|
|||||||
|
P izza base |
17 |
|
|
|
|
|||||||
|
Jams |
|
|
|
|
|
|
|
|||||
|
Marmalade |
17 |
|
|
|
|
|||||||
|
R aspberry and apple |
17 |
|
|
|
|
|||||||
|
Cake recipes |
|
|
|
|
|
|
|
|||||
|
S tandard cake mix |
17 |
|
|
|
|
|||||||
|
Mixed fruit cake |
17 |
|
|
|
|
|||||||
|
Sandwich |
|
|
|
|
|
|
|
|||||
|
S andwich loaf |
18 |
|
|
|
|
|||||||
|
S oftgrain sandwich loaf |
18 |
|
|
|
|
|||||||
|
Further information |
|
|
|
|
|
|
|
|||||
|
B aking cycle times |
19 |
|
|
|
|
|||||||
|
Need help? (questions and answers) |
20 |
|
|
|
|
|||||||
|
Troubleshooting |
22 |
|
|
|
|
|||||||
3
12/15/2008 1:53:47 PM

Introduction
The smell of homemade bread wafting around the home is one of those great smells. Bread, fresh out
of the oven, with melting butter is a memorable taste sensation. The Morphy Richards automatic breadmaker can create that experience every morning.
There's very little effort on the part of the baker, because the breadmaker is a sophisticated appliance with a computer memory that does all the work for you.
Before first use
Before first use, please take a few minutes to read this instruction book and to find a place to keep it handy for reference. Pay particular attention to the safety instructions.
1Carefully unpack the breadmaker and remove all packaging materials.
2Remove any dust that may have accumulated during packing
3Wipe the baking pan, kneading blade and outside surface of the breadmaker with a clean, damp cloth. The bread pan is non-stick coated. Do not use scouring pads or any abrasives on any part of
It’s as simple as one-two-three. 1 Put in the ingredients.
2 Select program from the menus and press start.
3 Wait for your bread.
But don't stop at baking bread in this appliance. Besides being able to do all kinds of speciality breads, including wholewheat, you can also prepare doughs for bread rolls, pizza, cake and jam. Everything is easy and tastes homemade - because it is.
the breadmaker.
4For first time use use oil, butter or margerine to grease the bread pan and bake empty for about 10 minutes (select the Extrabake program).
5 Clean once more.
6Place the kneading blade on the axle in the baking pan.
In manufacture it is necessary to lightly
grease some parts of the appliance. This may result in the unit emitting some vapour when first used, this is normal.
Electrical requirements
Check that the voltage on the rating plate of your appliance corresponds with your house electricity supply which must be A.C. (Alternating Current).
If the socket outlets in your home are not suitable for the plug supplied with this appliance, the plug should be removed and the appropriate one fitted.
Note: The plug removed from the mains lead, if
severed, must be destroyed as a plug with bared flexible cord is hazardous if engaged into a live socket outlet.
WARNING: THIS APPLIANCE MUST BE EARTHED.
Should the fuse in the 13 amp plug require changing a 13 amp BS1362 fuse must be fitted.
About this breadmaker
• It has two settings to make a small 680g (1.5lb) or |
• The 1.5lb setting can be used to make a 1lb loaf |
large 907g (2lb) loaf (approx weight - depends on |
for some of the recipes. |
recipe). |
|
• A Fruit and Nut beep signals when extra |
|
ingredients can be added so they don’t get |
|
chopped by the kneading blade. |
|
About the recipes |
|
The recipes in this booklet have been thoroughly tested to ensure best results. Recipes have been created by home economists specifically for this machine and may not produce acceptable results in other similar machines.
•Always add ingredients in the order they are listed in the recipe.
•Accurate measuring of ingredients is vital. Do not use larger amounts.
4
MW_CObm26500_Mabaker_IM.indd 4 |
|
|
12/15/2008 1:53:47 PM |
|
|
||
|
|
|
|
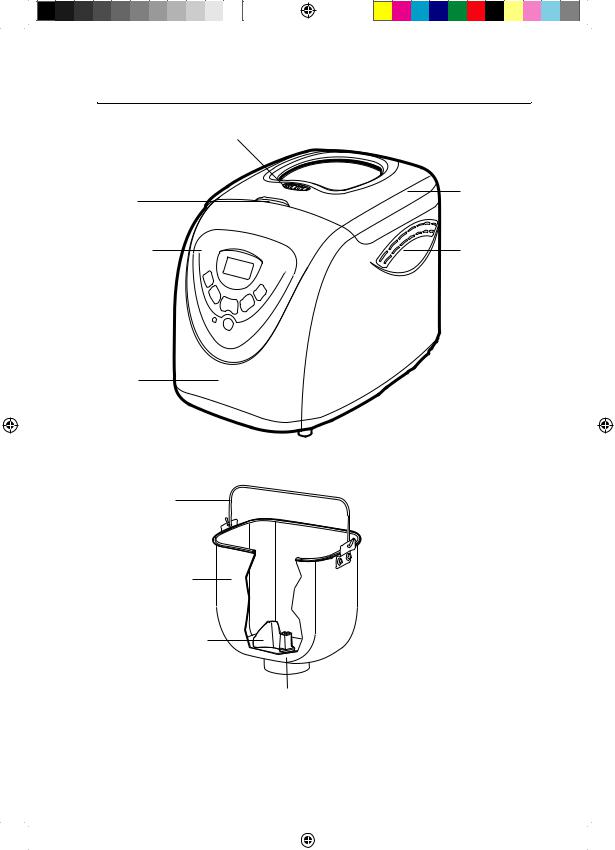
Components
Air vents |
Viewing window |
|
|
|
|
|
|
|
|
Cover |
Lid handle |
|
Control panel |
Air vents |
Main body
Handle
Baking pan
Kneading blade
Rotating shaft
5
MW_CObm26500_Mabaker_IM.indd 5 |
|
|
12/15/2008 1:53:47 PM |
|
|
||
|
|
|
|

Control panel buttons, display & functions
Display window
Shows browning level selected Shows weight selected
Shows the program number Shows time left before completion (3:20, for example, is 3 hours and 20 minutes; 0:20 is 20 minutes)
Shows temperature warning - see ‘Troubleshooting’
1 |
Basic white |
5 |
Sweet |
9 |
Jam |
|
6 |
Fastbake I |
|||||
2 |
French |
10 |
Cake |
|||
7 |
Fastbake II |
|||||
3 |
Wholewheat |
11 |
Sandwich |
|||
8 |
Dough |
|||||
4 |
Quick |
12 |
Extrabake |
|||
|
|
Light Medium Dark 1.5lb 2lb
tim e
time
loaf size
start
stop
colour
menu
Timer |
|
Use to delay the |
colour from light, |
making (all |
(certain programs |
Start |
|
Press to start for approx 1 second, a |
Menu button |
beep sounds and the colon (:) flashes |
For choosing the bread making |
and the program starts |
program from the list 1 to 12 |
Stop |
Loaf size button |
Press to stop for approx 2 seconds, a |
For selecting small (1.5lb) or large |
beep sounds to confirm |
(2lb) loaf size (certain programs only) |
6
MW_CObm26500_Mabaker_IM.indd 6 |
|
|
12/15/2008 1:53:47 PM |
|
|
||
|
|
|
|

Program descriptions
1 B asic white (3:00 and 2:53)
For white and brown bread. Also for flavoured breads with added herbs and raisin.
2French (3:50 and 3:40)
For the baking of light weight bread such as french bread which has a crisper crust and light texture.
3 |
Wholewheat (3:40 and 3:32) |
|
For the baking of bread containing significant |
|
amounts of wholewheat. This setting has longer |
|
preheat time to allow the grain to soak up the |
|
water and expand. It is not advised to use the |
|
delay timer as this can produce poor results. |
4 |
Quick (1:40) |
|
For white bread that is required in a shorter time. |
|
Bread baked on this setting is usually smaller with |
|
a dense texture. |
5Sweet (2:55 and 2:50)
For the baking of sweet type bread which gives a crisper crust than on basic setting. The crisper crust is produced by the sugar ‘burning’.
6 |
Fastbake I |
(0:58) |
|
For preparation of a 1.5lb white loaf in a reduced |
|
|
time period. Loaves made on this setting can be |
|
|
shorter and the texture more moist. |
|
7 |
F astbake II |
(0:58) |
|
For preparation of a 2lb white loaf in a reduced |
|
|
time period. Loaves made on this setting can be |
|
|
shorter and the texture more moist. |
|
8Dough (1:30)
This setting only makes the dough and will not bake the final bread. Remove the dough and shape it to make bread rolls, pizza, etc. Any dough can be prepared on this setting. Do not exceed 1kg (2lb) of combined ingredients.
9 Jam |
(1:20) |
|
Use this setting for making jam from fresh fruits |
||
and marmalade from Seville oranges. Do not |
||
increase the quantity or allow the recipe to boil |
||
over the pan into the baking chamber. Should this |
||
happen, stop the machine immediately. Remove |
||
the pan carefully, allow to cool a little and clean |
||
thoroughly. |
|
|
10 Cake |
(2:50) |
|
This setting will mix ingredients and then bake for |
||
a preset time. It is required to mix two groups of |
||
ingredients in bowls before adding to the |
||
breadmaker (see cake recipes). |
||
11 Sandwich |
(3:00 and 2:55) |
|
This is to bake light texture bread but with a softer |
||
but thicker crust. |
||
12 Extra bake |
(1:00) |
|
This setting is bake only and can be used to |
||
increase the baking time on selected settings. This |
||
is especially useful to help ‘set’ jams and |
||
marmalade. When started the default time is 1 |
||
hour (1:00) minimum and counts down in 10 minute intervals. You will have to manually switch this off by pressing the stop button, when you have completed the Extrabake process. It is advised that you check the condition of the bread or jam after 10 minutes and at 10 minute intervals. Pressing increases the time in increments of 10 minutes.
When selecting Extrabake straight after another program, if the message H:HH is displayed, open the lid, remove the pan and allow to cool for 10 minutes. When cool, replace the baking pan and its contents, set program and press start.
7
MW_CObm26500_Mabaker_IM.indd 7 |
|
|
12/15/2008 1:53:47 PM |
|
|
||
|
|
|
|

Using your breadmaker
1Take out the pan
Open the lid and remove the pan by lifting the handle, turning anti-clockwise and lifting out. Place on the work surface. It is important that the pan is filled with ingredients outside the machine so that any accidental spillage is not ignited by the heating elements.
2Attach the blade
Attach the kneading blade to the shaft by pushing on.
3 Measure ingredients
Measure the ingredients required and add them all into the pan in the order listed. See later section ‘Measuring your ingredients’).
•When adding the yeast to the baking pan, take care that the yeast does not come into contact with the water or any other liquid, as it will start to activate immediately.
•Use tepid water 21-28ºC.
4P ut pan back in
Place the baking pan back in the breadmaker, turning clockwise to lock into place. Close the lid.
5Plug in
Plug into the power supply. The breadmaker will
automatically be set to basic bread menu and normal time.
•Everytime you press a button you will hear a beep to confirm.
6Select program
Choose the desired setting from the list by pressing the Menu button.
7Select weight
Press Loaf size button to choose between small or large.
8Select colour
Choose desired crust colour by pressing Colour button.
9Select the delay time
If you wish the bread to be ready later, set the time delay now, as described in next section.
10 Start
Press the Start Stop button to start the machine. The remaining time will count down in one minute increments.
11 Progress
The breadmaker will automatically proceed through the programmed stages as shown in the ‘Baking cycle times’ section. If the breadmaker has a program selected that has a second kneading process, beeps sound to inform that fruits and/or nuts may be added.
•It is possible that steam will escape through the vents during baking, this is normal.
12 Finish
When the program is completed and the bread is baked the display shows 0:00 and the beeper will sound.
13 Keep warm
The keep warm function will circulate hot air for a further 60 minutes on most settings (see ‘Baking cycle times’ section). For best results, remove the baking pan and loaf within this period or when the initial program is completed. 10 beeps will be heard when the keep warm period is finished.
14 Remove the food
Press Stop. Open the lid.
WARNING: Use oven gloves when removing the baking pan (taking care as it is very hot).
15Turn out the bread
Allow the bread to cool in the pan for 15 minutes,
then turn the pan upside down and tap the bread from the pan onto a rack to cool. Fill the pan with warm water immediately to prevent the blade from sticking to the shaft.
•Occasionally the kneading blade will stay in the loaf. Wait until the loaf is cool and then remove the blade with a wooden or plastic utensil to avoid damage to the non-stick surface.
16 Always unplug the appliance after use.
•Do not open the lid whilst the breadmaker is operating as this will affect the quality of the bread, especially its ability to rise properly. Only open the lid when the recipe needs you to add additional ingredients, see recipes.
Room temperature note
The breadmaker will work well in a wide range of temperatures, but there could be a difference in loaf size between a very warm room and a very cold room. We recomend the room temperature should be between 15ºC and 34ºC.
8
MW_CObm26500_Mabaker_IM.indd 8 |
|
|
12/15/2008 1:53:47 PM |
|
|
||
|
|
|
|
 Loading...