


GoPal Navigator v4
Table of contents
 Loading...
Software manual
GoPal Navigator Version 4

GoPal Navigator Version 4
Contents
CHAPTER 1. INTRODUCTION ................................................................................. 1
Greeting..................................................................................................................................................1
Contents of CD/DVD .............................................................................................................................1
System requirements............................................................................................................................3
Conventions in this manual .................................................................................................................3
Tips and warnings.................................................................................................................................4
Important information...........................................................................................................................4
Trademarks ............................................................................................................................................5
Copyright and Warranty .......................................................................................................................5
CHAPTER 2. MANUAL INSTALLATION AND START-UP ...................................... 6
Initial operation .....................................................................................................................................6
Reinstallation and updating the software...........................................................................................8
Transferring the map material and the POI data to the memory card ............................................. 8
Transferring data to the internal memory of the navigation device ................................................9
CHAPTER 3. INSTALLATION AND START-UP USING THE GOPAL® ASSISTANT
................................................................................................................................. 11
Installing the GoPal® Assistant software..........................................................................................11
User interface of the GoPal® Assistant .............................................................................................12
Manual actions for data exchange ....................................................................................................13
Actions using the Content Import Wizard ........................................................................................15
Functions for device management....................................................................................................15
Changing the device name ............................................................................................................... 16
Formatting the external memory card...............................................................................................16
CHAPTER 4. BASICS OF OPERATION ................................................................. 18
Operation in the menu view ...............................................................................................................18
Operation in the map view .................................................................................................................19
i

Software manual
CHAPTER 5. ADJUSTING THE SETTINGS ........................................................... 21
Basic settings for operation...............................................................................................................21
Security settings................................................................................................................................ 22
Music track title .................................................................................................................................22
Screen settings .................................................................................................................................22
Power management.......................................................................................................................... 23
Auto OFF function............................................................................................................................. 23
Restore factory settings ....................................................................................................................24
Specific settings for the navigation software ..................................................................................25
Adjusting the route options ...............................................................................................................25
Adjusting the Display ........................................................................................................................27
Adjusting the TMC settings ...............................................................................................................28
Adjusting the Program settings .........................................................................................................29
Configure the Points of Interest ........................................................................................................30
Adjusting the device settings ............................................................................................................31
Adjusting the Quick menu settings ................................................................................................... 31
CHAPTER 6. OPERATING THE GOPAL® NAVIGATION SOFTWARE ................. 33
Manually entering destination information ......................................................................................34
Entering destination coordinates ...................................................................................................... 37
Creating favourites during destination input ..................................................................................... 38
Manual entry in the map view ...........................................................................................................38
Adjusting the route options ...............................................................................................................39
Adding more destinations .................................................................................................................39
Starting route calculation ..................................................................................................................40
Selecting Points of interest................................................................................................................40
Managing favourites ...........................................................................................................................41
Creating a new favourite ...................................................................................................................41
Deleting favourites ............................................................................................................................42
Renaming favourites .........................................................................................................................42
Changing the route .............................................................................................................................43
Entering the start position .................................................................................................................43
Adding a destination .........................................................................................................................43
Editing the entries in the tour list....................................................................................................... 44
Optimising the route.......................................................................................................................... 44
Saving and loading a tour .................................................................................................................44
Starting tour calculation ....................................................................................................................45
Route information ...............................................................................................................................45
Directions ..........................................................................................................................................45
Traffic conditions............................................................................................................................... 46
Go to .................................................................................................................................................47
Route simulation ...............................................................................................................................47
Starting and displaying navigation ...................................................................................................48
Compass display............................................................................................................................... 50
Arrow view ........................................................................................................................................51
Trip info .............................................................................................................................................51
ii

Software manual
iii

GoPal Navigator 4
Chapter 1. Introduction
Greeting
Welcome and thank you for choosing our mobile navigation system. While the instructions
included with the device outline the basic operation of your navigation device and additional
applications (MP3 Player, Picture Viewer etc.), this manual will cover the following topics:
• Software installation and start-up
• Operating the navigation software (quickstart and in-depth description)
• Technical support for smooth operation
In addition to this version of the manual, you will find a brief introduction on the CD/DVD, enabling
you to start up your navigation system in just a few steps. Also, your navigation system’s help
function contains information about important operating steps and functions.
Your navigation device software is constantly undergoing development and can be kept current
using updates that are either free or have an associated charge. The information contained in this
manual refers exclusively to the scope of functions at the time your navigation system was
delivered. In the event the software and/or hardware was subsequently changed and/or updated,
the information printed here may vary from actual operating steps. In this case, please consult the
support section of the Medion website (www.medion.de/downloads) for the current version of this
manual, which will document any changes in operation. Please note that the manufacturer can
accept no responsibility for loss or damage as a result of information or potentially incorrect
information contained in this manual.
Contents of CD/DVD
The CD/DVD included contains all of the software packs necessary to operate your navigation
system as well as installation files for additional applications which must either be installed on the
memory of your navigation device or on your Windows PC. As soon as you insert the CD/DVD into
the drive on your PC, a Setup Assistant automatically appears to help you with installation: Simply
follow the instructions on the screen to automatically install the selected data.
If the installation assistant on the CD/DVD does not start automatically, you can also install the
necessary data manually. The following information indicates which components are contained on
the CD/DVD and which directory on the external memory card or on the flash memory of your
navigation device to save them to in order to ensure smooth operation.
1

Introduction
t information
Element Description Target folder
ActiveSync
Adobe
APD
Assistant
Installation
License
Agreements
Manuals
This folder contains the installation data for
the synchronisation software Microsoft®
ActiveSync®. This software synchronises
your navigation device with a Windows PC.
This folder contains the installation data for
Adobe Adobe® Acrobat® Reader®. This
software enables you to open the digital
PDF version of this manual on a Windows
PC.
This folder contains data for the GoPal®
Assistant.
This folder contains the installation data for
the GoPal® Assistant.
This folder contains the installation data for
your navigation software.
This folder contains the licensing terms for
use of your navigation software in the form
of PDF files.
This folder contains the PDF versions of
this manual in the respective language.
This program must be installed to the
Program Files directory on your PC
(manually or using the Setup Assistant).
This program must be installed to the
Program Files directory on your PC
(manually or using the Setup Assistant).
This data is required only when installing
the GoPal® Assistant on your PC and does
not have to be manually copied.
This data is required only when installing
the GoPal® Assistant on your PC and does
not have to be manually copied.
These files must be installed (manually or
using the GoPal® Assistant) in the My
Flash Disk > INSTALL directory on the
external memory card or on the flash
memory of your navigation device.
These files do not need to be copied.
These files can be installed on your PC
(manually or using the Setup Assistant) to
the directory Programs>Medion GoPal
Assistant>Manuals).
POI
AUTORUN
readme.txt
Setup
Assistant
Depending on the version and features of your navigation system, it is possible that some of the
folders and files mentioned above are not contained on this CD/DVD or that the CD/DVD contains
extra data. For more information about the data saved on the CD/DVD included, see the readme
file on the CD/DVD.
This folder contains data your navigation
system needs to identify Points of Interest.
This setup information/application ensures
that the Setup Assistant, which helps you
when installing the software components,
is automatically started once the CD/DVD
has been inserted.
This text file contains importan
about the contents of this CD/DVD and
about the installation of various
applications on the CD/DVD in the relevant
language.
Once the CD/DVD has been inserted, this
application will start automatically and will
help you install the software components.
These files must be installed (manually or
using the GoPal® Assistant) to the
MapRegions directory on the external
memory card or to the flash memory of
your navigation device.
This file does not need to be copied.
This file does not need to be copied.
This file does not need to be copied.
At the time of delivery various components, including the operating system and the navigation
software, have already been pre-installed on your navigation device and/or the memory card
2

Introduction
included: That means that you can use your navigation system straightaway, without having to
install anything else.
We do, however, recommend that you install additional applications like GoPal® Assistant or
Adobe® Acrobat® Reader® to be able to take advantage of the corresponding functions. In addition,
it may be necessary, due to a malfunction, for you to reinstall various software components for
your navigation system after the fact. This procedure is described in Chapter 2, Manual installation
and start-up and Chapter 3, Installation and start-up using the GoPal® Assistant.
System requirements
Your mobile navigation system can be connected to a conventional Windows personal computer to
install (after the fact) application data such as the navigation software, additional map material etc.
. Your PC must meet the following system requirements for smooth communication.
• Supported operating systems Windows 2000 from SP4, Windows XP & VistaTM
• Hardware specifications of the current computer generation, minimum 128 RAM, min. one
available USB 1.1 port
• Necessary additional software: Microsoft ActiveSync® (only Windows 2000/XP) for operation as
mobile device with your PC, GoPal® Assistant for automatic data transfer between navigation
device and PC (as needed)
Tip
If you are working with the Microsoft Windows VistaTM operating system, you do not need
the ActiveSync® communication software. The system files required for the data transfer
are already integrated into your VistaTM operating system. Please connect your device to
your PC using the USB cable supplied: Once your navigation device has been detected
as a new device, the required drivers will be installed automatically. After it has been
installed successfully, your new device is shown under Removable Devices on the
Windows Explorer screen. If you have saved additional data to your navigation device,
ensure that there is sufficient capacity available when transferring the data. If there is not
enough space, remove unneeded files.
If your PC meets these requirements, you can connect your navigation device to an available USB
port on your PC using the USB cable supplied to exchange data. For more information see
Chapter 2, Manual installation and start-up and Chapter 3, Installation and start-up using the
GoPal® Assistant.
Conventions in this manual
The operation of your navigation system is directly based on the user guide in application software
for a PC. That means that entries in the software can be visually displayed on the screen and
executed from there. The operation itself is different: While functions on your PC are performed by
clicking the mouse, you can operate your navigation device either by using the stylus supplied or
by direct manual entry on the touch-sensitive screen of your navigation device. So, the following
applies for the following descriptions:
• For entries that you perform with the mouse on your PC, we use the term "click"
• For entries using the stylus or a finger on the touchscreen of your navigation device, we use the
term "type/tap".
At various points in this manual we refer to entries within a software application or to a path on
your PC/memory card. In the following descriptions, these references are indicated as follows:
3

Introduction
• Entries taken from the software (like buttons, menu items or labels for check boxes) are in bold.
• Specific functions and programs of your navigation system (e. g. MP3 Player etc.) or PC (e. g.
Windows Explorer etc.) are italicised.
• Information about directories and paths (on the external SD card or on the flash memory of your
navigation device) are italicised.
The information in this manual documents the operation of the navigation software, explains the
graphic display on the screen of your navigation device and lists the available selection options for
individual functions. So, the following applies for the following descriptions:
• Descriptions pertaining to executing a function are listed numerically, thus defining the order of
the individual steps.
• Descriptions referring to various elements in a software window or similar, are also listed
numerically, but in colour.
• Descriptions listing various equivalent options (as in this case), are indicated with bullet points.
Tips and warnings
At various places in this manual we give you practical tips or refer to circumstances which could
disrupt the smooth running of your navigation system. These sections are indicated as follows in
the following descriptions.
Tip
This symbol draws your attention to functions and features that speed up your work flow
and facilitate the operation of your navigation system.
Note
This symbol indicates functions and features that are essential to the operation of your
navigation system. Please obey all information to avoid malfunctions through operating
error or incorrect entries.
Important information
The following contains important information regarding the operation of your navigation system.
This information is repeated in the form of comments and tips at appropriate places in this manual.
• For safety reasons, entries may not be made by the driver whilst driving: Please make the
necessary entries before beginning the journey.
• If you need to change your entries during the journey, stop your vehicle at a suitable point
(parking spot etc.).
• Vehicle windscreens made of Thermoglas or metalised windscreens considerably limit the GPS
reception. There is usually a special opening in this metallic coating, behind which the navigation
device can be placed. If that is not the case, a commercially-available GPS antenna must be
mounted outside the passenger cabin (e. g. on the roof of the vehicle).
• The instructions for the navigation system are recommendations only: Always pay attention to
road traffic regulations.
• Please note that your navigation device must receive a valid GPS signal in order to calculate the
route from the current position.
4

Introduction
• Please note that your navigation device must be set to the local time zone to be able to calculate
the correct time of arrival for future route calculations.
• You can also follow your current position on the map without entering a destination. If available,
the name of the street you are currently on will be displayed
• Note that temporary local changes and/or restrictions to road traffic regulations (e. g. permitted
maximum speed) cannot be accounted for in the route planning: Always obey signage and/or
local traffic routing.
• Please note that the map material is current as of the time of delivery. However, the
manufacturer cannot guarantee the information to be completely binding or that it corresponds to
the road layout and/or signage.
Trademarks
All trademarks appearing in this manual and any brands or trademarks protected by third parties
are subject without restriction to the conditions of the applicable trademark law and the right of
ownership of the respective registered owners. All trademarks, trade names or company names
used here are or can be trademarks or registered trademarks of their respective owners. All rights
not expressly granted here are reserved.
The absence of an explicit name of the trademarks used in this manual does not mean that a
name is free and clear of third party rights.
• Windows®, Windows XP®, Windows 2000®, Windows VistaTM and ActiveSync® are trademarks of
the Microsoft® Corporation.
• Acrobat® and Acrobat® Reader® are trademarks of Adobe® Systems Incorporated.
Copyright and Warranty
Copyright © 2008
Version 4
All rights reserved.
Any information in this manual may be changed without notice and in no way represents any
obligation on the side of the manufacturer. The manufacturer accepts no responsibility for loss or
damage as a result of information or potentially incorrect information contained in this manual.
We are grateful for any information regarding errors and for suggestions for improvement in order
to offer you even more efficient products in the future.
This manual may not be reproduced, in whole or in part for any purpose and it may not be stored
to an electronic medium or reproduced in any other form including electrically, optically,
chemically, by photocopy or audio recording without the express, written consent of the
manufacturer.
5

GoPal Navigator 4
Chapter 2. Manual installation and start-up
The Windows CE operating system has already been installed on your navigation device. In
addition, software components such as the navigation software or map material for various
countries (depending on the version) may already be pre-installed on the device or on the memory
card supplied. If that is not the case, you must first install the navigation software as well as the
map material necessary for route planning before operating your navigation system.
If you are updating or would like to install subsequently purchased navigation software or
additional maps or POI files to your navigation device, you must remove individual or all data
installed on your device before installing the newly purchased software. The following data can be
manually installed by the user:
• GoPal® Navigator navigation software
• Map material in the form of PSF files
• Point of interest data (POI data) in the form of PSF data
Tip
Even though it is possible to install files manually, we recommend that you use the
GoPal® Assistant supplied with the software to transfer and update software components
on your navigation system. The next chapter describes the installation and data
exchange using the GoPal® Assistant.
The manual transfer of software components from CD/DVD to your mobile navigation device takes
place in Windows Explorer on your PC. Select one of the two following methods to exchange data
between your navigation system and your PC:
• If you have installed the Microsoft ActiveSync® software from a CD/DVD, you can connect your
navigation device directly to the USB port of your PC using the USB cable supplied in order to
synchronise the desired data. In this case, you have direct access to the internal flash memory
of your navigation device.
• If your PC has a card reading device, you can insert the external memory card supplied directly
and manually move the data in the file explorer. In this case, you do not have direct access to
the internal flash memory of your navigation device.
Initial operation
Depending on the version of your navigation system, the software necessary for operation may not
have been pre-installed on your navigation device and can instead be found on the memory card
supplied: an appropriate comment indicating this can be found in the readme file as well as on the
packaging of your navigation device. In this case, you must install the software to operate your
navigation system.
Proceed as follows to install:
1. Carefully remove the memory card from its packaging. Take care that the contacts are not
touched or contaminated: Otherwise data transfer may no longer be possible.
6
Manual installation and start-up
2. Insert the memory card into the MMC/SD card slot of your navigation device until you hear a
click.
3. Switch on the navigation device by pressing the ON/OFF switch on the device (see device
operating instructions).
The necessary software components will now be installed automatically.
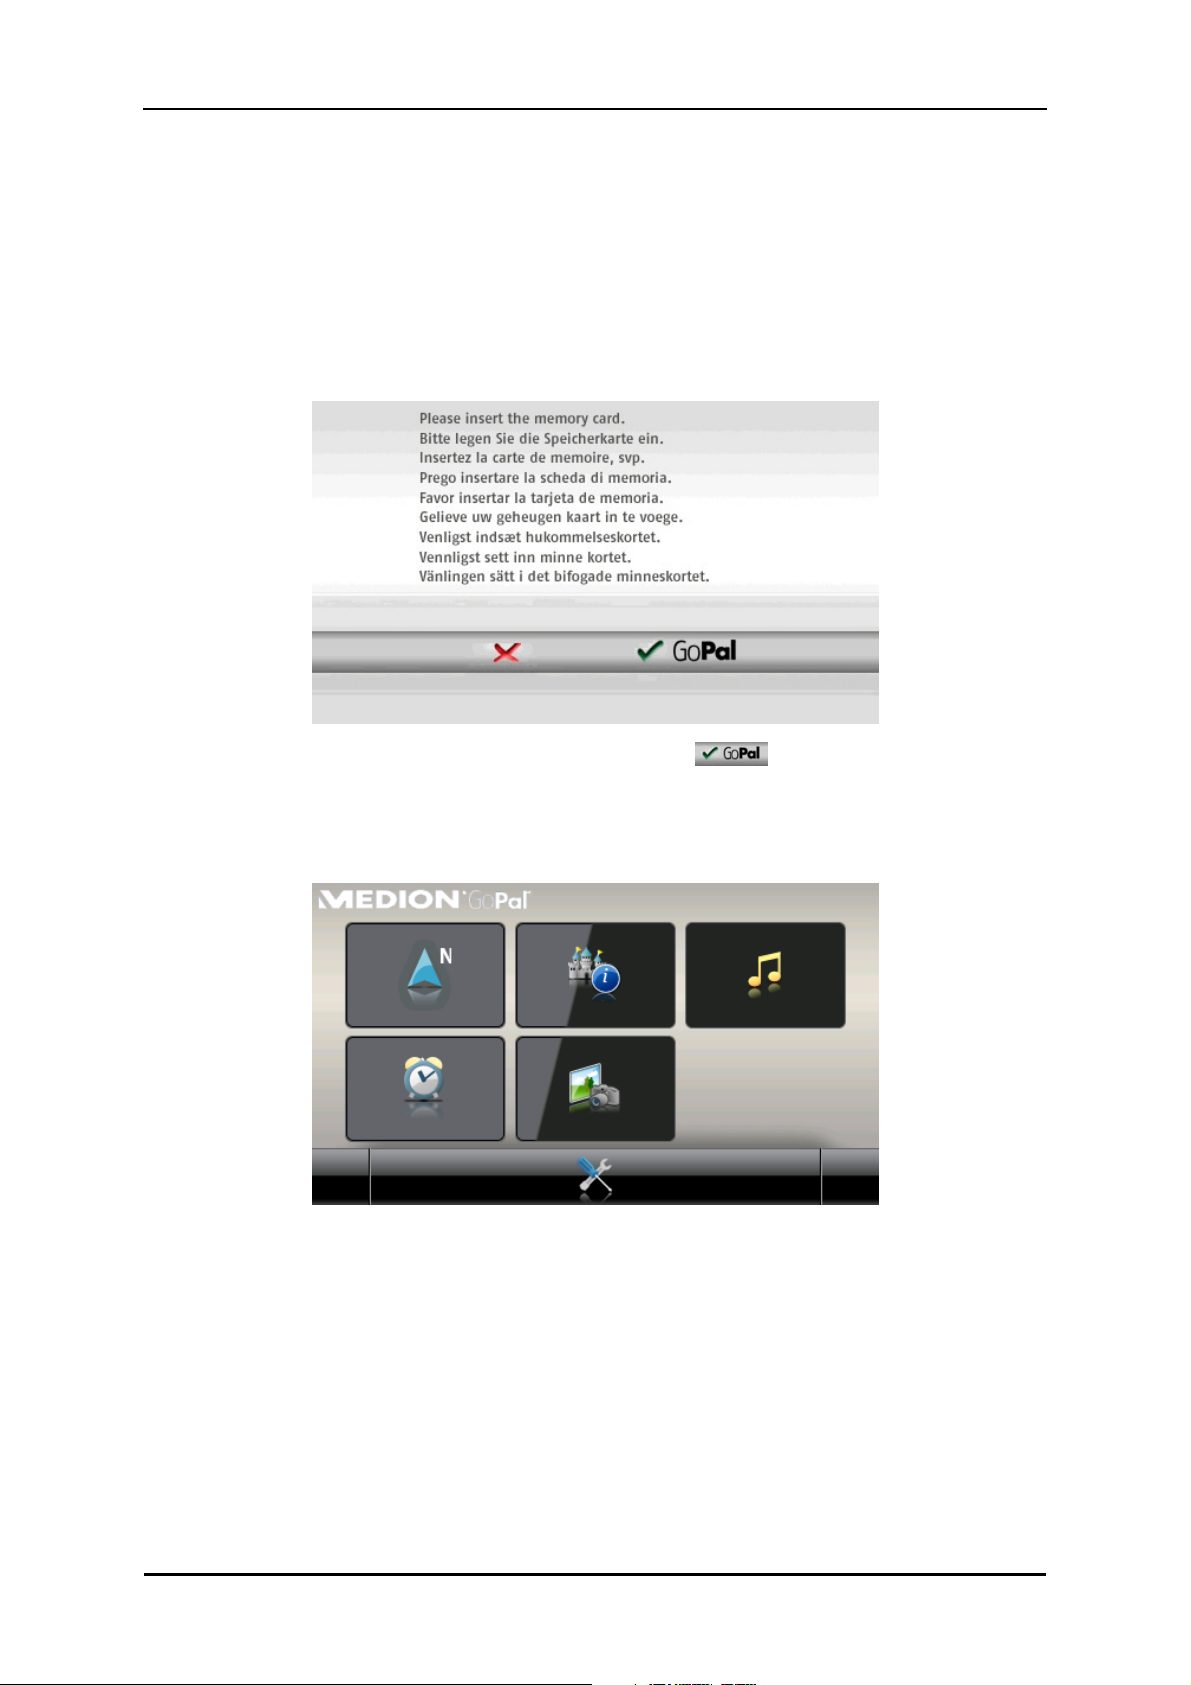
If you switch on your navigation device without inserting the memory card supplied, the following
screen appears.
Insert the memory card into your device and tap the button , to begin automatic
installation.
Once installation is complete, the start screen of your navigation system appears, giving you
access to the various functions such as the navigation or MP3 Player etc..
7

Manual installation and start-up
Reinstallation and updating the software
If necessary, you can remove all or individual application files such as the navigation software or
map material from the memory of your navigation device (see device operating instructions). This
would be necessary, for example, to install a current version of the GoPal® Navigator software that
you purchased at a later date. The software required for reinstallation/updating is located in the
Installation folder on the CD/DVD and can be transferred to the navigation device using the
memory card supplied.
Proceed as follows to manually install the navigation software onto the external memory card:
1. If you have not already done so, carefully remove the memory card from its packaging and
insert it into the card reading device (internal or external) of your PC: The card clicks in and the
contents of the card will be displayed in a new window in Windows Explorer.
2. Open your PC’s CD/DVD drive and insert the CD/DVD. If the CD/DVD Setup Assistant starts,
close it.
3. Open the directory of your CD/DVD drive and go to the directory Installation.
4. Copy all of the folders and files in this directory.
5. Go to the directory window of the external memory card and insert the copied contents.
To install the software copied onto the memory card onto your navigation device, follow the steps
described in the Initial operation section.
Note
You must remove the old software components before you can install the new software
onto your navigation device. For information on how to do this, consult the operating
instructions for your navigation device.
Transferring the map material and the POI data to the memory card
Regardless of the navigation software, you can also install additional map or POI material onto
your device or replace existing data with current material from a CD/DVD purchased subsequently.
However, your navigation device can only read this data automatically if they have been filed in the
MapRegions directory on the memory card.
Proceed as follows to transfer map material and POI data to the memory card:
1. Insert the memory card into the card reading device (internal or external) of your PC: The card
clicks in and the contents of the card will be displayed in a new window in Windows Explorer.
2. Open your PC’s CD/DVD drive and insert the CD/DVD. If the CD/DVD Setup Assistant starts,
close it.
3. Open the directory of your CD/DVD drive and go to the MapRegions directory.
4. Copy all of the desired files with the file ending .psf: The file names indicate the region to
which the map data refers.
8

Manual installation and start-up
5. Go to the directory window of the external memory card and create a new folder called
MapRegions.
6. Now put all of the copied files into this folder.
Proceed as follows to copy additional POI files from the inserted CD/DVD to the memory card:
1. Open the POI folder in the directory of your CD/DVD drive.
2. Copy the desired files (e. g. hotel.de.psf etc.).
3. Go to the directory window MapRegions of the external memory card and insert the copied
contents.
To install the map material and/or POI files copied onto the memory card onto your navigation
device, follow the steps described in the Initial operation section.
Note
You must remove (some of) the old files before you can install the new map and/or POI
files onto your navigation device. For information on how to do this, consult the operating
instructions for your navigation device.
Note that it is only possible to transfer files to the memory card and/or to the internal memory of
your navigation device (see next section) if there is enough free disk space available. You may
have to delete unnecessary data to free up disk space.
Transferring data to the internal memory of the navigation device
Your mobile navigation device has an internal, permanent memory that is located in the My Flash
Disk folder. You can use this memory to transfer and then install the navigation software, map
material and/or voice recognition files to your navigation device. However, you must have
previously installed the software Microsoft ActiveSync® supplied on the CD/DVD onto your PC
either manually or using the Setup Assistant on the CD/DVD. In addition, your navigation device
must be connected to the PC using the USB cable supplied.
The following description assumes that Microsoft ActiveSync® has already been installed. Proceed
as follows to copy the installation files for you navigation software to the internal memory of your
navigation device:
1. Connect the navigation system to your PC using the USB cable.
2. Once the navigation device is detected, your PC displays the New partnership dialog box: To
synchronise existing data between your navigation device and your PC, select Yes. To register
the navigation device as a Guest on your PC, select No (recommended). Then click on the
Continue button.
3. Select Mobile device in your Windows Explorer and go to the My Flash Disk directory.
4. Right click on the directory and select New folder from the context menu: Name the newly
created folder INSTALL and finish the entry by pressing the enter key.
5. Change to the Installation directory in your CD/DVD drive and copy all files and folders in this
directory.
9

Manual installation and start-up
6. Go to the directory Mobile Device > My Flash Disk > INSTALL and put the copied contents
there.
Proceed as follows to also copy map material to the internal memory of your navigation:
1. Go to the MapRegions directory of your CD/DVD drive and copy all of the desired files ending
in .psf : The file names indicate the region to which the map data refers.
2. Select Mobile device in your Windows Explorer and go to the My Flash Disk directory.
3. Right click on the directory and select New folder from the context menu: Name the newly
created folder MapRegions and finish the entry by pressing the enter key.
4. Now put all of the copied files into this folder.
If you have added POI files or the ‘voice command’ feature to your navigation software with an
update requiring a fee, you must transfer the appropriate data to the internal memory of your
navigation device: The respective function is only available following automatic installation of the
data.
Proceed as follows to copy POI and/or voice recognition files to the internal memory of your
navigation device:
1. To transfer POI files, go to the POI directory of your CD/DVD drive and copy the desired PSF
files (e. g. hotel.de.psf).
2. Go to the directory Mobile Device > My Flash Disk > MapRegions and put the copied files
there.
3. To transfer voice command files, go to the TSD directory of your CD/DVD drive and copy your
country-specific folder: The IrelandGreatBritainTSD folder, for example, contains the voice
recognition files for English-speaking countries. Naturally, you can also copy the voice
command files/folder for other countries as needed and install them onto your navigation
device.
Go to the directory Mobile Device > My Flash Disk > MapRegions and put the copied files there.
10

GoPal Navigator 4
Chapter 3. Installation and start-up using the GoPal® Assistant
In addition to manual installation, it is also possible to transfer the necessary data from the
CD/DVD to your mobile device using the GoPal® Assistant software: The GoPal® Assistant is a
special tool which facilitates communication between your navigation device and your PC and
simplifies the transfer of selected files. In addition, it is only with the help of the GoPal® Assistant
that you can transfer GPS track data that you have recorded with your navigation device to the PC
in order to store it there and exchange it with other users. To use GoPal® Assistant, it must first be
installed on your PC.
Tip
Although manual installation and transfer of data is possible on your navigation device,
we recommend performing all installations using the GoPal® Assistant software.
Installing the GoPal® Assistant software
As soon as you insert the supplied CD/DVD into the drive on your PC, a Setup Assistant opens
automatically to help you with the installation of various software components on your PC.
Proceed as follows to install the GoPal® Assistant on your PC:
1. Open your PC’s CD/DVD drive and insert the supplied CD/DVD. Once the CD/DVD has been
read in, the Setup Assistant starts automatically: Continue to follow the on-screen instructions.
2. In the dialog box Select components, click the Medion GoPal Assistant check box (checked) to
select the GoPal® Assistant for installation: If necessary you can now click on other check
boxes to install additional software components (e. g. Medion GoPal Navigator, Microsoft
ActiveSync®, manuals etc.) in this step. After selecting the desired check boxes, click on the
Continue button.
3. You must enter the storage path for the installation in this dialog window: Use the template or
select an individual path and click Continue.
4. This dialog window allows you to rename the folder individually (not recommended): Click
Install to accept the default path and install the selected software components on your PC.
The GoPal® Assistant is installed in the program directory on your PC and is available immediately
following installation. If you no longer need the GoPal® Assistant, you can remove it from your
system either by going to Control panel > Software or by using the Uninstall command located in
the program directory under Start > All Programs > Medion GoPal Assistant.
Microsoft ActiveSync® must be installed on the PC to communicate and transfer data with the
GoPal® Assistant: Installation can also be performed using the Setup Assistant on the CD/DVD. In
addition, the navigation device must be connected to the PC via the USB cable.
Tip
ActiveSync® is only necessary when operating Windows 2000 SP4 or Windows XP. The
software components necessary for data exchange are already integrated into Windows
VistaTM.
11
Installation and start-up using the GoPal® Assistant
User interface of the GoPal® Assistant
Once it has been successfully installed, start the GoPal® Assistant via the item Medion GoPal
Assistant in the folder Start > All Programs > Medion GoPal Assistant.
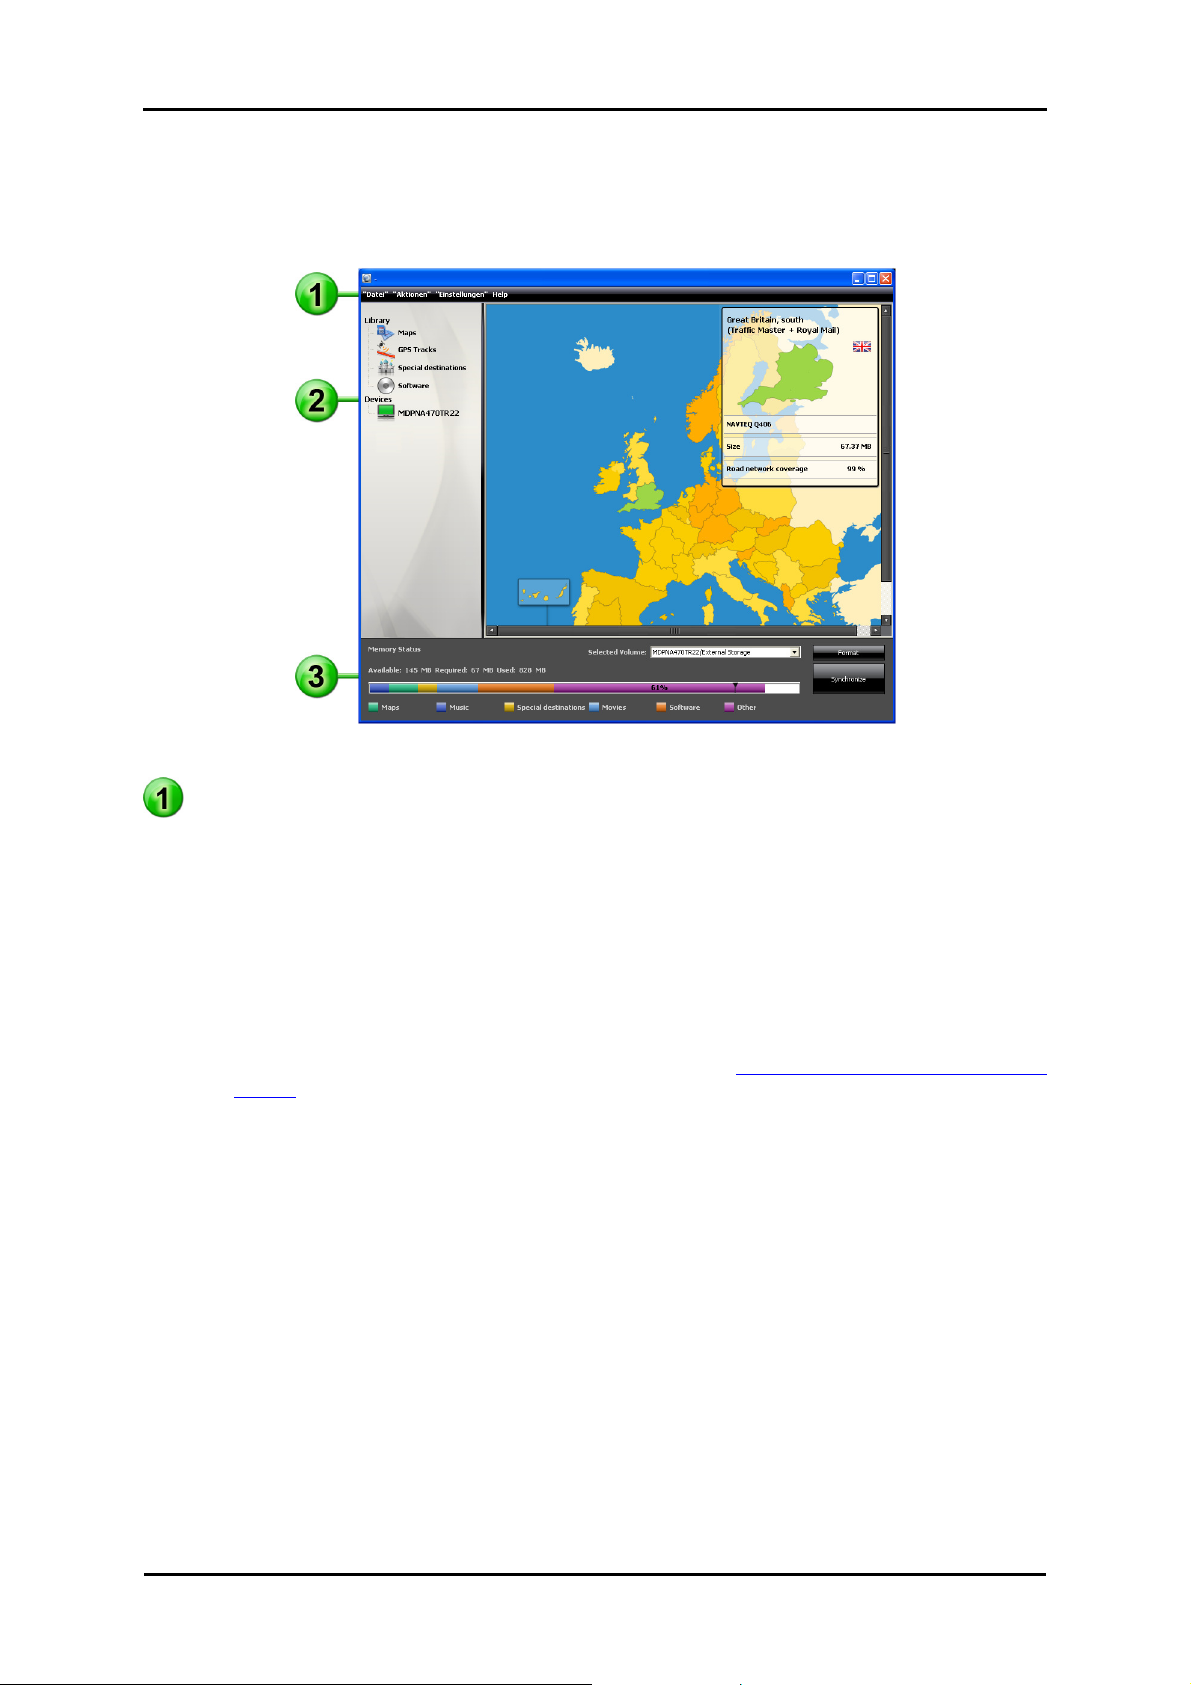
The GoPal® Assistant interface is divided as follows:
Menu bar
You can operate all of the basic functions of the software via the menu bar. The menus are
structured as follows:
• File.
Exit allows you to close the GoPal® Assistant.
• Actions
o Import Content into Library starts the Content Import Wizard, which helps you transfer new
content to the library of your GoPal® Assistant (see Actions using the Content Import
Wizard).
o Using the Check for Software Update entry, you can let the GoPal® Assistant automatically
search the Internet for current software for your navigation system.
o Using Check for Content Update, you can let the GoPal® Assistant automatically search for
current content for the information contained in the library.
• Settings
o Using the box Check for updates on startup, lets the GoPal® Assistant automatically search
the Internet for current software for your navigation system. The current setting is saved
and loaded again the next time the program starts.
o Using the box Check for content updates on startup, lets the GoPal® Assistant automatically
search the Internet for current content for your navigation system. The current setting is
saved and loaded again the next time the program starts.
o Using the box Check for updates on startup, lets the GoPal® Assistant automatically search
the Internet for current software for your navigation system.
12

Installation and start-up using the GoPal® Assistant
• Help
The entry About opens the dialog box of the same name which contains information about the
current version of the GoPal® Assistant as well as legal licensing information.
Library, Data Selection and Device Information
The central area of the GoPal® Assistant manages the software and content files for your
navigation system as well as the connected devices.
• Library
Using the entries in the library you can select specific categories in order to transfer these files
to your navigation device or to import files from the device to your PC. The categories to choose
from are Maps, Points of Interest, Software and GPS Tracks.
• Devices
This is where you can select a connected navigation device, display specific information and
rename the device.
• Data selection area
This area is dynamically adapted to the selected option. When you select a category in the
library, the available data is placed here for selection. When you select the Devices option, the
device information is displayed here.
Volume area
In this area you manage the memory of the internal flash memory or the inserted memory card
of the selected navigation device or a memory card inserted into a card reader connected to the
PC. In addition to selecting the target memory for the import/export functions, you can format the
external memory areas (SD card in the navigation or card reading device) as needed.
Tip
The volume area of the GoPal® Assistant also recognises external USB sticks connected
to your PC. Accordingly, you can also select these volumes via the pop-up menu
Selected Volume and format as needed.
Manual actions for data exchange
You can select specific information using the categories in the library and the graphic display in the
data selection area, which can then either be transferred to the internal flash memory of the
navigation device or to the inserted memory card or imported to the PC. After selecting a category
in the library, the available options are displayed directly in the data selection area and can then be
selected with the mouse. The following actions can be performed:
Use the category... ...to select...
Maps
Points of interest
Software
GPS Tracks
the available regions on the CD/DVD and transfer them automatically to
your navigation system.
the available points of interest on the CD/DVD and transfer them
automatically to your navigation system.
the country-specific installation file on the CD/DVD, to automatically
install the software onto your navigation device.
GPS tracks that have already been transferred to your PC.
13
Loading...