


 Loading...
Meade Instruments Corporation - Meade LX200 Instruction Manuals
go to 
 Home
Home
Meade Instruments Corporation
Telescopes · Binoculars · Microscopes
Meade LX200 Instruction Manual
7" Maksutov-Cassegrain, 8", 10", and 12" LX200 Schmidt-Cassegrain Telescopes
A.Introducing the Meade LX200
1.What Is the LX200? An Overview
a.Heavy Duty Mounts with 9-speed Dual Axis Electronics
b.Built-in 64,359 Object Library
c.Altazimuth Mode Operation
d.Terrestrial Operation
e.Keypad and Power Panel Functions
2.Standard Equipment
a.7" Model LX200
b.8" Model LX200
c.10" Model LX200
d.12" Model LX200
B.Unpacking and Inspection
1.What You Should Have
2.Please Look Everything Over
3.Inspecting the Optics: Note on the "Flashlight" Test
4.Caution: All LX200 Owners
5.Caution: 10" and 12" LX200 Owners
C.Telescope Assembly
1.The Field Tripod (7", 8", 10", and 12" LX200 Models)
2.Mounting the Viewfinder (7", 8", 10", and 12" LX200 Models)
a.Attaching the Viewfinder
b.Focusing the Viewfinder
c.Collimating the Viewfinder
3.Attaching the Diagonal Prism and Eyepiece
4.Checking the Collimation of the Optics
5.12" Tube Swing-Through Limit
6.7" Tube Swing-Through Limit
7.Maksutov Fan
D.Quick Start
1.Using the LX200 Manually
2.Using the LX200 in Land
http://www.meade.com/manuals/lx200/index.html (1 of 4) [7/29/2002 7:27:42 AM]

Meade Instruments Corporation - Meade LX200 Instruction Manuals
3.Using the LX200 in Altazimuth (ALTAZ)
a.Entering Basic Information
1.Latitude and Longitude of Observing Site
2.Local Time and Date
b.Setting Up the Telescope
c.Using the Telescope
1.The MODE Key
2.Library Object Keys
3.Daytime Slewing
E.The LX200 Keypad Hand Controller
1.Enter Key
2.Mode Key
3.Go To Key
4.Direction Keys
5.Speed Keys SLEW, FIND, CENTER, and GUIDE)
6.RET Key
7.FOCUS Key
8.MAP Key
9.Object Keys (M, STAR, and CNGC)
10.PREV and NEXT Keys
F.The LX200 Power Panel
1.ON/ OFF Switch
2.N/S Switch
3.Ammeter
4.DEC Motor Connector
5.CCD Connector
6.Power 12vDC Connector
7.Keypad Connector
8.Reticle Connector
9.Focuser Connector
10.RS-232 Connector
11.Aux Connector
G.Mode Functions
1.Mode One: TELESCOPE/ OBJECT LIBRARY
a.TELESCOPE Menu File:
1.SITE
2.ALIGN
a.ALTAZ
a.1-Star with Known SITE
b.2-Star at Known SITE
c.Unknown SITE
d.Which Alignment Method to Use?
b.POLAR
c.Refined Polar Alignment
d.The Permanently Mounted, Polar Aligned LX200
e.LAND
http://www.meade.com/manuals/lx200/index.html (2 of 4) [7/29/2002 7:27:42 AM]

Meade Instruments Corporation - Meade LX200 Instruction Manuals
3.SMART
4.12/24 HR
5.HELP I
6.REVERSE NS
7.REVERSE EW:
8.BALANCE
9.HP (High-Precision Pointing)
a.LX200 Pointing Accuracy
b.Using HP
10.SLEW RATE
11.DEC. BACKLASH COMPENSATION
b.OBJECT LIBRARY Menu File:
1.OBJECT INFO
2.START FIND
3.FIELD
4.PARAMETERS
a.TYPE GPDCO
b.BETTER
c.HIGHER
d.LARGER
e.SMALLER
f.BRIGHTER
g.FAINTER
h.RADIUS
2.Mode Two: Coordinates/ Go To
a.Coordinates Menu File
b.Go To Menu Option
c.Slew to ALTAZ Coordinates
3.Mode Three: Clock/ Calendar
4.Mode Four: TIMER/ FREQ
a.TIMER = Menu Option
b.FREQ = Menu File
5.Mode Five: Keypad Off/ Brightness Adjust
H. Magnification and Field of View
1.Magnifications
2.Apparent Field and Actual Field
●Appendix A: Equatorial Wedge
1.8" Equatorial Wedge
a.Azimuth Control
b.Deluxe Latitude Adjuster
2.Superwedge
3.Mounting the Telescope on the Wedge
4.Magnetic Compass
a.Setting Magnetic Declination
b.Compass Installation
http://www.meade.com/manuals/lx200/index.html (3 of 4) [7/29/2002 7:27:42 AM]

Meade Instruments Corporation - Meade LX200 Instruction Manuals
c.Finding True North
●Appendix B: Equatorial Use
1.Celestial Coordinates: Declination and Right Ascension
2.Lining Up with the Celestial Pole
3.Precise Polar Alignment
●Appendix C: LX200 Alignment Star Library and Star Charts
1.Alignment Stars
2.Star Charts
●Appendix D: LX200 64,359-Object Library
1.The LX200 64,359-Object Library:
2.The CNGC Catalog:
3.The Star Catalog:
4.Select Star by Name
5.The M Catalog:
6.The Planets:
●Appendix E: Maintaining Your LX200
1.Keeping Your Telescope Clean:
2.Collimation (Alignment) of the Optical System:
3.Adjusting the Right Ascension Lock:
4.Behind the Power Panel:
5.Factory Servicing and Repairs
Related Topics:
●Authorized Dealers
●Meade 8" and 10" LX200 Schmidt-Cassegrain Telescopes
●Meade 7" LX50 and LX200 Maksutov-Cassegrains
●Meade 12" LX200 Schmidt-Cassegrain
●Accessories for Meade LX-Series Catadioptric Telescopes
●Index of Instruction Manuals
●General Catalog Index
●Meade Product Repair and Warranty Information
| home | about meade | product information | dealer referral | gallery | | customer support | investor relations | dealer support |
| employment opportunities | site map |
® The name Meade and the Meade logo are trademarks registered with the United States Patent Office, and in principal countries throughout the world.
Copyright © 1998 Meade Instruments Corporation, All Rights Reserved. This material may not be reproduced in any form without permission.
http://www.meade.com/manuals/lx200/index.html (4 of 4) [7/29/2002 7:27:42 AM]
Meade Instruments Corporation - Meade LX200 Instruction Manuals
go to 
 Home
Home
Meade Instruments Corporation
Telescopes · Binoculars · Microscopes
Meade LX200 Instruction Manual
7" Maksutov-Cassegrain, and 8", 10", and 12" Schmidt-Cassegrain Telescopes
A. INTRODUCING THE MEADE LX200
As a new LX200 owner, you are preparing for a journey into the universe with the most advanced amateur telescope ever produced. The advent of this instrument is the culmination of twenty years of innovation and design at Meade Instruments; never before have the features you have in your hands been available to amateur astronomers: from robotic object location to the revolutionary Smart Drive and the most stable mounting structure ever. Your telescope comes to you ready for adventure; it will be your tour guide and traveling companion in a universe of planets, galaxies, and stars.
IMPORTANT NOTICE! Never use a telescope or spotting scope to look at the Sun!
Observing the Sun, even for the shortest fraction of a
second, will cause irreversible damage to your eye as well as physical damage to the telescope or spotting scope itself.
Meade 8", 10", and 12" LX200 Schmidt-Cassegrain and 7" Maksutov-Cassegrain telescopes are instruments of advanced mirror-lens design for astronomical and terrestrial applications. Optically and mechanically, the 7", 8", 10", and 12" telescope models are perhaps the most sophisticated and precisely manufactured telescopes ever made available to the serious amateur. These telescopes enable the visual astronomer to reach out for detailed observations of the Solar System (the planets: Jupiter, Saturn, Mars) and beyond to distant nebulae, star clusters, and galaxies. The astrophotographer will find a virtually limitless range of possibilities since, with the precision Meade worm-gear motor drive system, long exposure guided photography becomes not a distant goal, but an achievable reality. The capabilities of the instrument are essentially limited not by the telescope, but by the acquired skills of the observer and photographer.
The 7", 8", 10", and 12" LX200 are, with the exception of a few assembly operations and features, almost identical operationally. Most standard and optional accessories are interchangeable between the three telescopes. The instructions in this manual generally apply to all three telescopes; when exceptions to this rule occur, they are clearly pointed out.
IMPORTANT NOTE
If you are anxious to use your Meade LX200 Telescope for the first time, at the very least be sure to read Telescope Assembly and Quick Start sections of this manual. Thereafter, we urge you to read the balance of this manual thoroughly at your leisure, in order that you may fully enjoy the many features offered by the instrument.
http://www.meade.com/manuals/lx200/a.html (1 of 4) [7/29/2002 7:27:44 AM]

Meade Instruments Corporation - Meade LX200 Instruction Manuals
[ toc ] 1. What Is the LX200? An Overview
Meade LX200 SCT's mark a new era in telescope technology for the amateur astronomer, whether beginner or seasoned veteran. For the beginner, LX200 electronics permit the location and observation of the major planets as well as hundreds of deep-sky objects the very first night you use the telescope. For the experienced amateur the telescope's pushbutton electric slewing, digital readouts, Smart Drive, and much more open up visual and photographic capabilities heretofore undreamed of.
[ toc ] a. Heavy-Duty Mounts with 9-speed Dual-Axis Electronics
DC-servo-motor-controlled worm gear drives on both telescope axes permit observatory-level precision in tracking, guiding, and slewing. The 9-speed dual-axis drives cover every possible contingency of telescope positioning: Press the SLEW button on the keypad controller for rapid motion of the telescope across the skies at up to 8 ° per sec. (6 ° per sec. for the 12" LX200) on both axes simultaneously; once near the target, switch instantly to the FIND speed for centering in the viewfinder at 2 ° per sec. Observing the object in the main telescope, use the CNTR speed (32x sidereal) to place the object in the center of the field. During long-exposure astrophotography press the GUIDE button for precise corrections at 2x sidereal speed.
[ toc ] b. Built-in 64,359-Object Library
Enter into the keypad any of the 110 Messier objects, 7,840 of the finest NGC objects (galaxies, diffuse or planetary nebulae, star clusters), one of the 8 major planets from Mercury to Pluto, one of 351 alignment stars or any one of 56,050 SAO, UGC, IC or GCVS objects, press GO TO, and the telescope automatically slews, or moves, to the object at up to 8° per sec., centering it in the main telescope field.
[ toc ] c. Altazimuth Mode Operation
For all visual observing applications, and for lunar and planetary photography, Meade LX200's may be set up in the Altazimuth mode. Just attach the telescope's drive base directly to the tripod, use the fast 1-star alignment procedure, and the telescope's computer actuates 2-axis tracking that keeps objects precisely centered in the field, even at high powers, during the entire observing session.
[ toc ] d. Terrestrial Operation
Meade LX200's make incredible land-view telescopes. Set the telescope up in the Altazimuth format, activate the Land menu option on the telescope's computer, and use the Keypad to track land objects on both axes at any of the same 4 drive speeds!
[ toc ] e. Keypad and Power Panel Functions
The multifunction capability of LX200's includes direct connection of popular CCD autoguider/imagers; RS232 serial interface with a personal computer (PC), allowing the user to perform all of the Keypad functions through, or write custom telescope software for a PC; brightness level control of an illuminated reticle eyepiece from the Keypad and including special pulse-mode reticle operation.
[ toc ] 2. Standard Equipment
http://www.meade.com/manuals/lx200/a.html (2 of 4) [7/29/2002 7:27:44 AM]

Meade Instruments Corporation - Meade LX200 Instruction Manuals
[ toc ] a. 7" Model LX200
lncludes 7" Maksutov-Cassegrain optical tube assembly with EMC Super Multi-Coatings (D = 178mm, F = 2670mm-f/15); heavy-duty fork mount, with 4"-dia. sealed polar ball bearing, quartz-microprocessor- controlled 5.75" worm gears on both axes; setting circles in RA and Dec; handheld keypad Electronic Command Center with digital readout display, permanently-programmable Smart Drive, 9-speed drive control on both axes, GO TO controller, High-Precision Pointing, and 64,359-object onboard celestial software library; internal tube-cooling fan for rapid image stabilization; 25 ft. power cord and adapter for telescope operation from 115v.AC; 8 x 50mm viewfinder; eyepiece-holder and diagonal prism (1.25"); Series 4000 SP26mm eyepiece; variable-height field tripod; operating instructions.
[ toc ] b. 8" Model LX200
lncludes 8" Schmidt-Cassegrain optical tube assembly with EMC Super Multi-Coatings (D = 203mm, F = 1280mm-f/6.3 or 2000mm-f/10); heavy-duty fork mount, with 4"-dia. sealed polar ball bearing, quartz- microprocessor-controlled 5.75" worm gears on both axes, and multi-function power panel display on the drive base; manual and electric slow-motion controls on both axes; setting circles in RA and Dec; handheld keypad Electronic Command Center with digital readout display, PPEC Smart Drive, 9-speed drive control on both axes, GO TO controller, High-Precision Pointing, and 64,359-object onboard celestial software library; 25 ft. power cord and adapter for telescope operation from 115v.AC; 8 x 50mm viewfinder; eyepiece-holder and diagonal prism (1.25"); Series 4000 SP26mm eyepiece; variable-height field tripod; operating instructions.
[ toc ] c. 10" Model LX200
lncludes 10" Schmidt-Cassegrain optical tube assembly with EMC Super Multi-Coatings (D = 254mm, F = 1600mm-f/6.3 or 2500mm-f/10); heavy-duty fork mount, with 4"-dia. sealed polar ball bearing, quartz- microprocessor-controlled 5.75" worm gears on both axes, and multi-function power panel display on the drive base; manual and electric slow-motion controls on both axes; setting circles in RA and Dec; handheld keypad Electronic Command Center with digital readout display, PPEC Smart Drive, 9-speed drive control on both axes, GO TO controller, High-Precision Pointing, and 64,359-object onboard celestial software library; 25 ft. power cord and adapter for telescope operation from 115v.AC; 8 x 50mm viewfinder; eyepiece-holder and diagonal prism (1.25"); Series 4000 SP26mm eyepiece; variable-height field tripod; operating instructions.
[ toc ] d. 12" Model LX200
lncludes 12" Schmidt-Cassegrain optical tube assembly with EMC Super Multi-Coatings (D = 305mm, F = 3048mm-f/10); heavy-duty fork mount, with 4"-dia. sealed polar ball bearing, quartz-microprocessor- controlled 5.75" worm gears on both axes, and multi-function power panel display on the drive base; manual and electric slow-motion controls on both axes; setting circles in RA and Dec; handheld keypad Electronic Command Center with digital readout display, PPEC Smart Drive, 7-speed drive control on both axes, GO TO controller, High-Precision Pointing, and 64,359-object onboard celestial software library; 25 ft. power cord and adapter for telescope operation from 115v.AC; 8 x 50mm viewfinder; 2" diagonal mirror with 1.25" adapter; Series 4000 SP26mm eyepiece; giant field tripod; operating instructions.
Next Page
Related Topics:
http://www.meade.com/manuals/lx200/a.html (3 of 4) [7/29/2002 7:27:44 AM]

Meade Instruments Corporation - Meade LX200 Instruction Manuals
●Authorized Dealers
●Meade 8" and 10" LX200 Schmidt-Cassegrain Telescopes
●Meade 7" LX50 and LX200 Maksutov-Cassegrains
●Meade 12" LX200 Schmidt-Cassegrain
●Accessories for Meade LX-Series Catadioptric Telescopes
●Index of Instruction Manuals
●General Catalog Index
●Meade Product Repair and Warranty Information
| home | about meade | product information | dealer referral | gallery | | customer support | investor relations | dealer support |
| employment opportunities | site map |
® The name Meade and the Meade logo are trademarks registered with the United States Patent Office, and in principal countries throughout the world.
Copyright © 1998 Meade Instruments Corporation, All Rights Reserved. This material may not be reproduced in any form without permission.
http://www.meade.com/manuals/lx200/a.html (4 of 4) [7/29/2002 7:27:44 AM]
Meade Instruments Corporation - Meade LX200 Instruction Manuals
go to 
 Home
Home
Meade Instruments Corporation
Telescopes · Binoculars · Microscopes
Meade LX200 Instruction Manual
7" Maksutov-Cassegrain, and 8", 10", and 12" Schmidt-Cassegrain Telescopes
B. UNPACKING AND INSPECTION
As you begin to unpack your telescope from its cartons, you will probably be interested in setting it up right away; we certainly understand your excitement but please take a few minutes to read this page before doing so. You should verify that you have all the proper equipment, and that it has arrived to you undamaged.
We strongly recommend that you keep your original packing
materials. If it should ever become necessary for you to return your telescope to the Meade factory for servicing, these will help ensure that no shipping damage will occur.
Meade LX200 telescopes supplied to countries outside the U.S.A. are identical to those offered domestically, with the exception of the AC wall adapter.
[ toc ] 1. What You Should Have
Carefully unpack and remove all the telescope parts from their packing material. Compare each part to the product identification label on the outside of each carton. In the case of the LX200 Accessory carton, a seperate list of items is enclosed identifying each item in that carton. You may wish to place a check next to each item as you identify it. Each telescope has been inspected twice at the factory to confirm the inclusion of every item.
[ toc ] 2. Please Look Everything Over
Meade Instruments and your shipper have taken precautions to ensure that no shipping damage will occur, but if your shipment has suffered severe vibration or impact damage (whether or not the shipping cartons show damage) then it is important that you retain all the original packing and contact the shipper to arrange a formal inspection of the package or packages. This procedure is required prior to any warranty servicing by Meade Instruments.
[ toc ] 3. Inspecting the Optics: Note on the "Flashlight" Test
If a flashlight or other high-intensity light source is pointed down the main telescope tube, you may at first be shocked at the appearance of the optics. To the uninitiated, the view (depending on your line of sight
http://www.meade.com/manuals/lx200/b.html (1 of 3) [7/29/2002 7:27:46 AM]

Meade Instruments Corporation - Meade LX200 Instruction Manuals
and the angle the light is coming from) may reveal what would appear to be scratches, dark or bright spots, or just generally uneven coatings, giving the appearance of poor surface quality. These effects are only seen when a high intensity light is transmitted through lenses or reflected off the mirrors, and can be seen on any high quality optical system, including the giant research telescopes in use today. It should be pointed out, however, that optical quality cannot be judged by this grossly misleading "test," but through careful star testing. The Flashlight Test causes even the very best optics to look "terrible."
As the high intensity light passes through the Schmidt corrector plate, most (about 98%+) of it is transmitted through while the rest of the light scatters through the glass. As the light hits the mirrored surfaces, most (about 94%) of it is reflected back while the rest of it scatters across the coatings. The total amount of scattered light will be significant, and its effects allow you to see microscopic details that are normally invisible to the unaided eye. These anomalous details are real, but their combined effects will in no way impose limits on the optical performance, even under the most demanding observing or imaging criteria.
[ toc ] 4. Caution: All LX200 Owners
Serious damage to the drive gears may result from shock in handling, while transporting or commercially shipping the LX200, should the R.A. Lock (7, Fig. 3), and/or the Dec. Lock (2, Fig. 4) be left engaged. Always release the locks when storing in the optional case, or when crating for commercial shipment to allow the telescope to give, if the shipping container is sharply jarred or dropped.
Also, the optical and mechanical axes of all LX200 telescopes have been carefully aligned at the factory to ensure accurate object pointing. Do not loosen or remove the fork arms or optical tube assembly from the drive base; the resulting misalignment of the axes will result in inaccurate slewing of the telescope in the GO TO mode.
[ toc ] 5. Caution: 10" and 12" LX200 Owners
Do not attempt to turn the focuser knob of the optical tube until you have read this note!
Next to the base of the focuser you will see a red-colored slotted head bolt. This bolt is used only for safety in shipment. Remove this bolt before attempting to turn the focuser knob. In its place, insert the rubber plug provided as a dust protector (this rubber plug is included with your hardware package).
Your focuser is now operational.
Warning! The 10" and 12" LX200 should never be commercially shipped without this red-colored bolt in place. This is essential during commercial transport where rough handling may occur. For your personal transport and storage, you will never have to use this bolt again.
a. TO COMMERCIALLY RE-SHIP THE 10" OR 12" LX200, BE SURE TO FOLLOW THIS PROCEDURE:
1.Turn the focuser knob clockwise until it stops. This will bring the primary mirror all the way back in the tube.
2.Remove the rubber plug and insert the red-headed bolt. Thread it in to a firm snug feel. Do not
http://www.meade.com/manuals/lx200/b.html (2 of 3) [7/29/2002 7:27:46 AM]
Meade Instruments Corporation - Meade LX200 Instruction Manuals
overtighten. (If you have misplaced the red-headed bolt, you may use any other bolt that is 1/4-20x1" long.
3. When packaging the 10" or 12" LX200, be sure to release the R.A. Lock (7, Fig. 3), and Dec. Lock
(2, Fig. 3), to prevent shock to the gears in the motor assemblies.
Please note that commercial shipment of the 10" and 12" LX200 Telescope without the safety bolt in place and without being packed in the original factory-supplied shipping cartons as described above is done at the owner's risk and your warranty may be voided if shipping damage results.
6. Keypad Version Number
The current keypad version is 3.20 (see sticker on back of keypad). This does not indicate the telescope software version which is displayed on the keypad LED at power-up.
Next Page
Related Topics:
●Authorized Dealers
●Meade 8" AND 10" LX200 Schmidt-Cassegrain Telescopes
●Meade 7" LX50 and LX200 Maksutov-Cassegrains
●Meade 12" LX200 Schmidt-Cassegrain
●Accessories for Meade LX-Series Catadioptric Telescopes
●Index of Instruction Manuals
●General Catalog Index
●Meade Product Repair and Warranty Information
| home | about meade | product information | dealer referral | gallery | | customer support | investor relations | dealer support |
| employment opportunities | site map |
® The name Meade and the Meade logo are trademarks registered with the United States Patent Office, and in principal countries throughout the world.
Copyright © 1998 Meade Instruments Corporation, All Rights Reserved. This material may not be reproduced in any form without permission.
http://www.meade.com/manuals/lx200/b.html (3 of 3) [7/29/2002 7:27:46 AM]

Meade Instruments Corporation - Meade LX200 Instruction Manuals
go to 
 Home
Home
Meade Instruments Corporation
Telescopes · Binoculars · Microscopes
Meade LX200 Instruction Manual
7" Maksutov-Cassegrain, and 8", 10", and 12" Schmidt-Cassegrain Telescopes
C. TELESCOPE ASSEMBLY
Use the following steps to assemble your telescope. Note: Section headings list which LX200 model (7", 8", 10" or 12") is covered under that heading.
[ toc ] 1. The Field Tripod (7", 8", 10" and 12" LX200 Models)
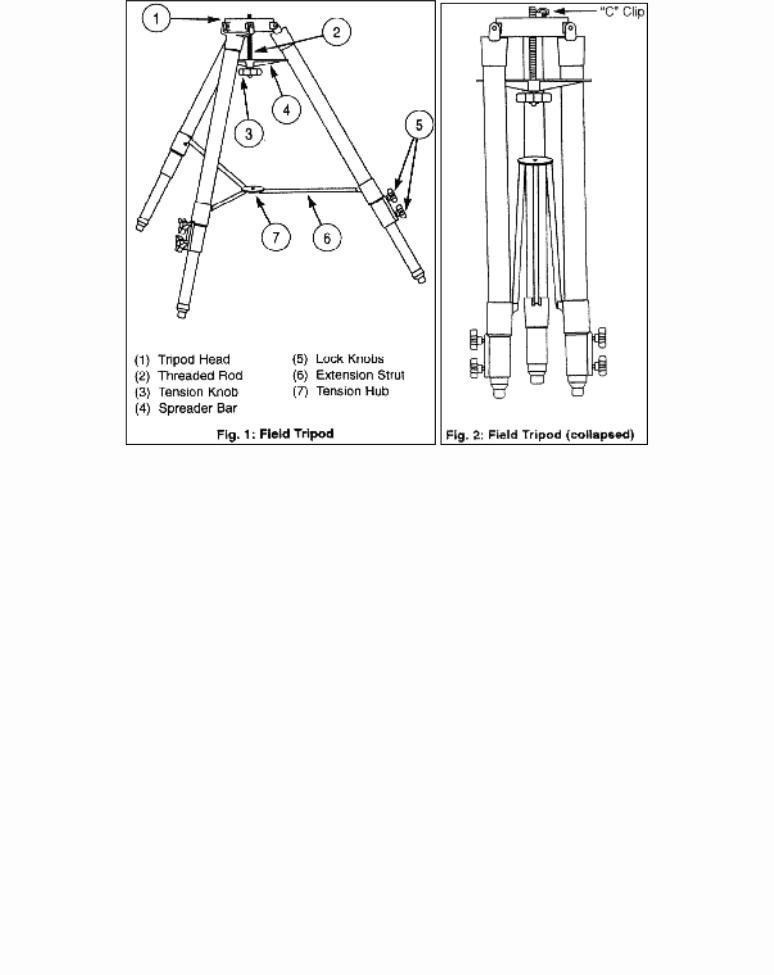
The Field Tripods (Figs. 1 and 2) for Meade 8", 10", and 12" LX200
telescopes are supplied as completely assembled units, except for the spreader bar (4, Fig. 1) and the 6 lock knobs (2 knobs for each of the 3 tripod legs) used to adjust the height of the tripod. These knobs are packed separately for safety in shipment.
For visual (i.e. non-photographic) observations, the drive base (17, Fig. 3) of the telescope's fork mount is attached directly to the field tripod.
The telescope in this way is mounted in an "Altazimuth" ("Altitude-Azimuth," or "vertical-horizontal") format. The telescope in this configuration moves along vertical and horizontal axes, corresponding respectively to the Declination and Right Ascension axes (explained later in this manual) in an astronomical observing mode.
Alternately, the field tripod can be used in conjunction with the appropriate optional equatorial wedge (see Appendix A for instructions of the use of the equatorial wedge) for long exposure astrophotography. The equatorial wedge permits alignment of the telescope's Polar Axis with the Celestial Pole (or North Star). After removing the field tripod from its shipping carton, stand the tripod vertically, with the tripod feet down and with the tripod still fully collapsed (see Fig. 2). Grasp two of the tripod legs and, with the full weight of the tripod on the third leg, gently pull the legs apart to a fully open position.
Thread in the 6 lock-knobs (2 on each tripod leg) near the foot of each tripod leg. Refer to Fig. 1. These lock-knobs are used to fix the height of the inner, extendible tripod leg sections. Note: "Firm feel" tightening is sufficient; over-tightening may result in stripping of the knob threads or damage to the tripod legs and results in no additional strength.
The spreader bar (4, Fig. 1) has been removed for shipment. To replace, first remove the threaded rod (2, Fig. 1) from the tripod head (1, Fig. 1); a small piece of plastic holds the threaded rod in place. Remove the small plastic bag that is stapled to the threaded rod. This bag contains the "C" clip retainer (used below)
http://www.meade.com/manuals/lx200/c.html (1 of 7) [7/29/2002 7:27:50 AM]

Meade Instruments Corporation - Meade LX200 Instruction Manuals
and an extra clip.
Slide the spreader bar onto the threaded rod (note the correct orientation as shown in Fig. 1) and position the threaded rod back through the tripod head. Place the clip retainer ( a "C" clip) into the slot in the threaded rod. This clip holds the threaded rod in place. See Fig. 2.
Position the spreader bar so that the 3 arms of the spreader bar are lined up with the 3 tripod legs.
Place the entire telescope (as shown in Fig. 3) onto the top of the tripod head, and thread the threaded rod into the central threaded hole in the bottom of the drive base of the telescope. Tighten the tension knob (3, Fig. 1); firm tightening of the tension knob is sufficient to result in rigid positioning of the tripod legs.
To vary the tripod height, loosen the 6 lock-knobs, slide the 3 inner tripod leg sections out to the desired height, and firmly re-tighten (but do not overtighten) the 6 lock-knobs.
To collapse the tripod (after removing the telescope and equatorial wedge, if applicable) for storage follow these steps:
1.Rotate the spreader bar 60° from its assembled position, so that one spreader bar arm is located between each adjacent pair of tripod legs.
2.At the base of the tripod is a 3-vane extension strut system, with a circular hub at its center (7, Fig. 1). Grasp the tripod head (1, Fig. 1) with one hand and, with the other hand, pull directly "up" on the central hub of the extension strut system. This operation will cause the tripod legs to move inward to a collapsed position.
PRECAUTIONARY NOTES
1.If the tripod does not seem to extend or collapse easily, do not force the tripod legs in or out. By following the instructions above, the tripod will function properly, but if you are unclear on the proper procedure, forcing the tripod into an incorrect position may damage the extension strut system.
2.Do not overtighten the 6 lock-knobs used to fix the inner tripod leg sections at various heights. "Firm feel" tightening is sufficient.
3.Be sure the spreader bar (4, Fig. 1) is not upside-down on the threaded rod.
http://www.meade.com/manuals/lx200/c.html (2 of 7) [7/29/2002 7:27:50 AM]
Meade Instruments Corporation - Meade LX200 Instruction Manuals
http://www.meade.com/manuals/lx200/c.html (3 of 7) [7/29/2002 7:27:50 AM]

Meade Instruments Corporation - Meade LX200 Instruction Manuals
[ toc ] 2. Mounting the Viewfinder (7", 8", 10", and 12" LX200 Models)
Each 7", 8", 10", and 12" LX200 telescope is supplied as standard equipment with an 8x50mm straightthrough viewfinder. The bracket for this viewfinder is packed separately from the finder itself, and 6 black nylon thumbscrews for collimation are pre-threaded into the viewfinder bracket. The viewfinder bracket mounts onto the telescope with a quick-release mount. See Fig. 3.
http://www.meade.com/manuals/lx200/c.html (4 of 7) [7/29/2002 7:27:50 AM]
Meade Instruments Corporation - Meade LX200 Instruction Manuals
[ toc ] a. Attaching the Viewfinder
The viewfinder is shipped separately from the bracket and must be installed into the bracket. Slide the viewfinder into the bracket and lightly tighten the 6 collimation (alignment) screws (2, Fig. 3).
The quick-release mount allows the viewfinder to be easily attached or removed from the telescope. To attach the unit, simply slide the viewfinder with bracket into the mating base on the telescope and tighten the two thumbscrews.
[ toc ] b. Focusing the Viewfinder
The viewfinder has been pre-focused at the factory. However, should it become necessary to adjust the focus, follow these steps:
1.Loosen the Focus Lock Ring (18, Fig. 3).
2.While looking at a star, rotate the Dew Shield (1, Fig. 3) until the star is in focus. (This refocuses the objective lens.)
CAUTION! Take care when rotating counter clockwise. You
are unthreading the dew shield and it may fall off if rotated too far. Refocusing the objective lens will only require a few turns of the Dew Shield at most.
3. When the Dew Shield is rotated to the sharpest focus for your eye, tighten the Focus Lock Ring against the Dew Shield to fix its position.
[ toc ] c. Collimating the Viewfinder
The viewfinder will require alignment, or collimation, with the main telescope. Using the 26mm eyepiece, point the main
telescope at some easy to find land object (e.g., the top of a telephone pole or corner of a building) at least 200 yards distant. Center a well-defined object in the main telescope. Then, simply turn the 6 nylon collimation thumbscrews (2, Fig. 3) until the crosshairs of the viewfinder are precisely centered on the object already centered in the main telescope. With this collimation accomplished, objects located first in the wide-field viewfinder will then be centered in the main telescope's field of view.
[ toc ] 3. Attaching the Eyepiece Holder and Diagonal Prism, or Diagonal Mirror
The eyepiece holder (6, Fig. 3) threads directly onto the rear-cell thread of the 7", 8" and 10" telescopes. The diagonal prism (13, Fig. 3) slides into the eyepiece holder of the 7", 8" and 10" telescopes, while the 2" diagonal mirror threads directly into the rear-cell thread of the 12" telescope. In turn, both the diagonal prism and diagonal mirror accept the supplied 1 1/4" O.D. eyepiece.
For astronomical observations, the diagonal prism or mirror generally provides a more comfortable rightangle viewing position. Alternately, in the 7", 8" 10", and 12" telescopes, an eyepiece may be inserted
http://www.meade.com/manuals/lx200/c.html (5 of 7) [7/29/2002 7:27:50 AM]

Meade Instruments Corporation - Meade LX200 Instruction Manuals
directly into the eyepiece holder for straight-through observations. In this case, however, the image will appear inverted and reversed left-for-right. (Note that the eyepiece holder is standard equipment on 7", 8", and 10" models, but is an optional accessory for the 12" LX200). With the diagonal prism and mirror, telescopic images appear correctly oriented up-and-down, but still reversed left-for-right. For terrestrial applications, where a fully corrected image orientation is desired, both up-and-down and left-for-right, the optional #928 45° Erect-Image Diagonal Prism should be ordered separately. Eyepieces and the diagonal prism are held in their respective places on the 7", 8", and 10"telescopes by a moderate tightening of the thumbscrews on the diagonal prism and eyepiece holder.
[ toc ] 4. Checking the Collimation of the Optics
The optical systems of all Meade Schmidt-Cassegrains are precisely collimated, or aligned, before leaving the factory. However, if the telescope has received a severe jolt in shipment the optics can become decollimated, a situation which may result in serious image degradation. Recollimating the optics is, however, a simple procedure which is easily performed by the telescope user. We urge all LX200 owners to confirm the collimation of their telescope, and to recollimate the optics if necessary.
There is no collimation procedure required for the Meade 7" Maksutov-Cassegrain telescope. Factory alignment assures optimal viewing accuracies.
[ toc ] 5. 12" Tube Swing-Through Limit
The length of the 12" LX200 optical tube prohibits the correcting plate end of the tube from swinging through the fork arms as the tube will hit the mount. When the telescope is aligned, the software will stop the telescope from moving into the mount. If the telescope is not aligned, there are also mechanical stops.
When in LAND or ALTAZ modes, this limit does not restrict any sections of the sky, since the limit is set at 45° from straight down. But when in the POLAR mode, some parts of the sky might be restricted, depending on the latitude of the observing site.
Observing sites with latitudes higher than 45° will not have any restrictions. Latitudes below 45° will have the southern horizon restricted somewhat. To determine the amount of sky not available, subtract the latitude of the observing site from 45. This will give the number of degrees of southern horizon that the 12" LX200 will not move to. For example, if the latitude of the observing site is 35°, then 10° (45-35) of southern sky is unavailable for observations.
[ toc ] 6. 7" Tube Swing-Through Limit
The length of the 7" LX200 optical tube prohibits the correcting plate end of the tube from swinging through the fork arms–the tube will hit the mount. When the telescope is aligned, the software will stop the telescope from moving into the mount. If the telescope is not aligned, there are also mechanical stops and some parts of the sky might be restricted if using a wedge, depending on the latitude of the observing site.
Observing sites with latitudes higher than 45° will not have any restrictions. Latitudes below 45° will have the southern horizon somewhat restricted when using a wedge and polar aligning. To determine the amount of sky not available, subtract the latitude of the observing site from 45, this will give the number of degrees of the southern horizon that the 7" LX200 will not reach. For example, if the latitude of the observing site is 35°, then 10° (45-35) of southern sky is unavailable for observations. No restrictions of observable sky occur in the altaz mode of alignment and operation.
http://www.meade.com/manuals/lx200/c.html (6 of 7) [7/29/2002 7:27:50 AM]

Meade Instruments Corporation - Meade LX200 Instruction Manuals
[ toc ] 7. Maksutov Fan
The Maksutov optics of the 7" LX200 are equipped with a fan which will assist in the stabilization of the temperature of these optics. The fan will operate when a special power cord (supplied in the accessory box) is plugged into the fan and the LX200 panel plug marked "Aux," and with the power switch in the "On" position. The amount of time required to stabilize the temperature will be dependent upon ambient conditions including the observation site and preexisting condition of the telescope. The fan should be activated at the beginning of the observation session to accelerate the temperature stabilization. As soon as the optics have reached an equilibrium with the environment the fan should be turned off by unplugging the fan power cord. Fan operation time should range between 5 and 25 minutes. While it is permissible to run the fan continuously it is not recommended because the very slight vibration of the fan may cause noticeable movement of the objects observed in the sensitive optics.
Next Page
Related Topics:
●Authorized Dealers
●Meade 8" and 10" LX200 Schmidt-Cassegrain Telescopes
●Meade 7" LX50 and LX200 Maksutov-Cassegrains
●Meade 12" LX200 Schmidt-Cassegrain
●Accessories for Meade LX-Series Catadioptric Telescopes
●Index of Instruction Manuals
●General Catalog Index
●Meade Product Repair and Warranty Information
| home | about meade | product information | dealer referral | gallery | | customer support | investor relations | dealer support |
| employment opportunities | site map |
® The name Meade and the Meade logo are trademarks registered with the United States Patent Office, and in principal countries throughout the world.
Copyright © 1998 Meade Instruments Corporation, All Rights Reserved. This material may not be reproduced in any form without permission.
http://www.meade.com/manuals/lx200/c.html (7 of 7) [7/29/2002 7:27:50 AM]

Meade Instruments Corporation - Meade LX200 Instruction Manuals
go to 
 Home
Home
Meade Instruments Corporation
Telescopes · Binoculars · Microscopes
Meade LX200 Instruction Manual
7" Maksutov-Cassegrain, and 8", 10", and 12" Schmidt-Cassegrain Telescopes
D. QUICK START
To utilize all the features of the telescope, it is necessary to enter some information into the telescope's computer memory, and learn the menu structure of the Keypad hand controller, described later in this manual. As advanced as LX200 electronics are, the telescope is very straightforward to operate even if you have no experience whatsoever in using a personal computer.
IMPORTANT NOTICE! Never use a telescope or spotting scope to look at the Sun!
Observing the Sun, even for the shortest fraction of a
second, will cause irreversible damage to your eye as well as physical damage to the telescope or spotting scope itself.
If you are reading this manual for the first time and are anxious to "look through the telescope," this section will describe how to use the telescope without going through the rest of the manual. But be sure to come back and read the details, for most of the telescope's features can not be accessed without a full knowledge of these details.
[ toc ] 1. Using the LX200 Manually
The easiest way to use the telescope is to operate it manually. With the telescope mounted on the Field Tripod, and with the diagonal prism and eyepiece in place, you are ready to make observations through the telescope. Even without the viewfinder (if not yet installed), terrestrial objects will be fairly easy to locate and center in the telescope's field of view using a low power eyepiece and "gun sighting" along the side of the main telescope tube.
By unlocking the R.A. Lock (7, Fig. 3), the telescope may be turned rapidly through wide angles in Right Ascension (R.A.). The reason for the terminology "Right Ascension" and its complementary term, "Declination" will be made clear further on in this manual. For now, "Right Ascension" simply means "horizontal" and "Declination" means "vertical". Fine adjustments in R.A. are made by turning the R.A. SlowMotion Control Knob (8, Fig. 3), while the R.A. lock is in the "unlocked" position.
DO NOT ATTEMPT TO MOVE THE TELESCOPE MANUALLY IN A HORIZONTAL DIRECTION WHEN THE R.A. LOCK IS IN THE "LOCKED" POSITION.
The R.A. Slow-Motion Control Knob may be turned, if desired, with the R.A. Lock in a "partially locked" position. In this way, a comfortable "drag" in R.A. is created. But do not attempt to operate the R.A. SlowMotion Control Knob with the telescope fully locked in R.A., as such operation may result in damage to the internal gear system.
http://www.meade.com/manuals/lx200/d.html (1 of 10) [7/29/2002 7:27:54 AM]

Meade Instruments Corporation - Meade LX200 Instruction Manuals
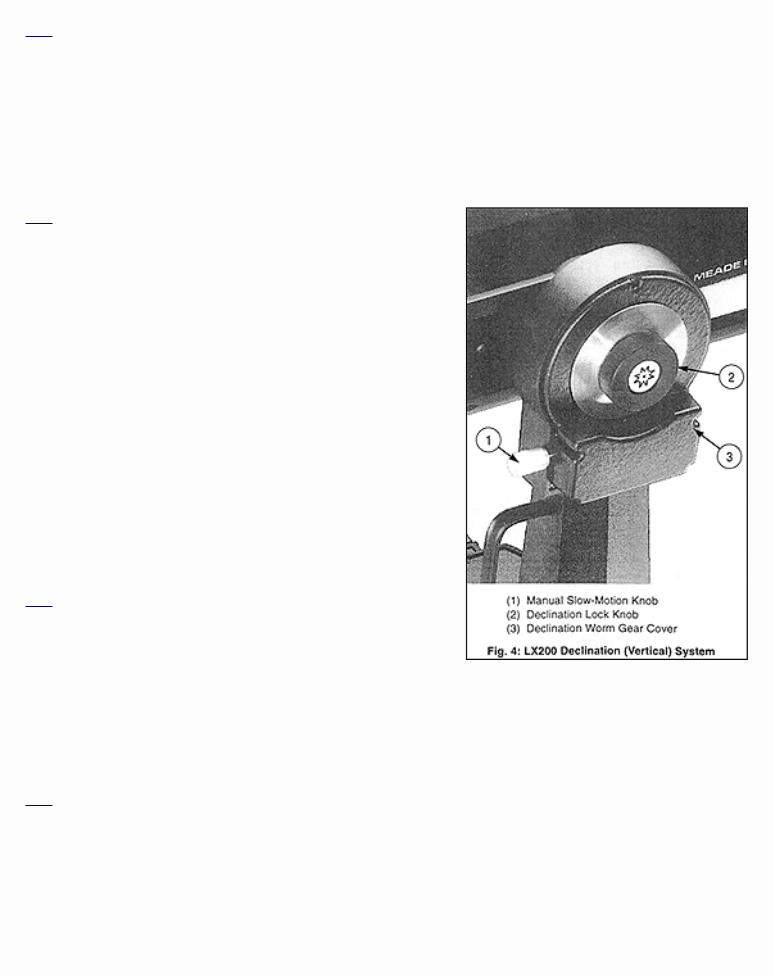
Releasing the Declination Lock Knob (2, Fig. 4), permits sweeping the telescope rapidly through wide angles in Declination.
To use the Declination fine-adjust, or Manual Slow-Motion Knob, lock the telescope in Declination using the Declination Lock Knob (2, Fig. 4), and turn the Declination Slow-Motion Knob (1, Fig. 4).
With the above mechanical operations in mind, select an easy to find terrestrial object as your first telescope subject–for example, a house or building perhaps one-half mile distant.
Unlock the Declination Lock Knob (2, Fig. 4), and R.A. Lock (7, Fig. 3), center the object in the telescopic field of view and then re-lock the Dec. and R.A. locks. Precise image centering is accomplished by using the Dec. and R.A. slow motion controls.
The Focus Knob (5, Fig. 3) is located at the "4 o'clock" position as you face the rear cell of the telescope. Focusing is accomplished internally by a precise motion of the telescope primary mirror so that, as you turn the focus knob, there are no externally moving parts. You will find that if you turn the focus knob counterclockwise you are focusing towards the infinity setting, and turning clockwise is for close distance. There are about 45 complete turns to go from one end of focus to the other, and it is possible to focus past infinity. Be patient during focusing as images quickly go in and out of focus with only a slight amount of turning of the focus knob.
Before using the telescope manually during the daytime, be sure to read "Daytime Slewing."
[ toc ] 2. Using the LX200 In Land
The 7", 8", 10", and 12" LX200 telescopes are shipped with the microprocessor set to Land, the align menu option you will wish to use to view terrestrial objects. In this menu option 4 different motion speeds are active, allowing the telescope to be moved electronically by means of the Keypad. To use the telescope in Land, follow these steps.
1.Loosen the Dec. Lock Knob (2, Fig. 4) and position the optical tube assembly approximately level, so that the Dec. Circle (3, Fig. 3) reads 0°. Retighten the Dec. Lock Knob.
2.Loosen the R.A. Lock (7, Fig. 3) and rotate the telescope so that the R.A. Pointer (9, Fig. 3) and the Hour Angle (HA) Pointer (16, Fig. 3) are approximately in line with each other. This will position the fork arms so that they are parallel to the Power Panel (11, Fig. 3). Tighten the R.A. lock.
The above two steps are not necessary for the telescope to work, so don't worry about having to get it exactly right. The telescope has some "illegal" positions, places where the telescope will not go and these two steps insure proper operation.
3. After setting up the telescope, plug in both coil cords with the Keypad, one of the supplied power sources, either the AC Wall Adapter Power Converter (for AC current wall outlets), or the optional DC Cigarette Lighter Power Cord (used in an automobile's cigarette lighter outlet, with the ignition turned on only to allow the electric power on from the car battery).
http://www.meade.com/manuals/lx200/d.html (2 of 10) [7/29/2002 7:27:54 AM]
Meade Instruments Corporation - Meade LX200 Instruction Manuals
Motion Speeds
4.Turn on the power switch on the Power Panel of the LX200. The Keypad Display (1, Fig. 5) will show "MEADE" for several seconds as the microprocessor does a self-diagnostic test. When the self-diagnostic test is complete, the display will show "TELESCOPE" on the top line, "OBJECT LIBRARY" on the lower line, and the red LED light next to the "SLEW" button will light up.
5.At this point, the LX200 is ready to use. Select the speed at which you want to move the telescope by pressing the appropriate Speed Selection Key (4, Fig. 5). Note that you will be able to "see" the telescope move only in the SLEW and FIND modes; CNTR (center) and GUIDE motions can only be seen while looking through the telescope. The red LED next to that key (3, Fig. 5) will light, indicating the speed selected. Then press one of the four direction keys (2, Fig. 5) to move the telescope in that direction at the selected speed.
The LX200 can also be moved manually with the R.A. and Dec. locks released, or as described above only. The Declination Manual Slow-Motion Knob (1, Fig.4) is non-functional when power is supplied to the telescope. When the power is "On", only use the N, S, E, and W keys on the Keypad
Hand Controller. Serious damage can occur to the internal gears of the motor assembly if the
Declination Manual Slow-Motion Knob is turned even a slight amount by hand.
Before using the telescope during the daytime, be sure to read "Daytime Slewing."
[ toc ] 3. Using the LX200 In Altazimuth (ALTAZ)
The two quick start methods described above allow you to use the telescope, but do not make use of any of the computer features available, including finding objects from the Object Library and automatic tracking of stars. In order for these features to work, the telescope's power needs to be "On", and the computer needs some basic information, which is entered through the Keypad. Once entered, the information is permanently remembered by the telescope's computer and need never be entered again, even if the telescope is turned "On" and "off" many times.
This section will explain what keys to push to get the minimum data required into the computer, without any detailed explanation. Later, see Section G, LX200 Modes for detailed instructions. These steps will only take a few minutes and will allow you to begin making use of all the LX200 features. Note also, much of this information can be skipped if using the UNKNOWN site.
[ toc ] a. Entering Basic Information
In order for the LX200 to make the conversions between the stellar coordinate system (R.A. and Declination) and the Altazimuth coordinate system (Altitude and Azimuth), it needs to know three pieces of information. This information only needs to be entered one time–the LX200 remembers the data even when the power is off.
http://www.meade.com/manuals/lx200/d.html (3 of 10) [7/29/2002 7:27:54 AM]
Meade Instruments Corporation - Meade LX200 Instruction Manuals
[ toc ] 1) Latitude and Longitude of the Observing Site.
NOTE: The SITE information cannot be entered if the telescope is in LAND mode. If the telescope is in LAND mode, the SITE menu option (Display 2, below) will appear in lower case letters. Follow steps 4-8 to change the telescope's operation to Altazimuth (ALTAZ) mode before proceeding.
You should find the position of your observing site to within 1 or 2 minutes of arc in both latitude and longitude. Many automobile, pilot, and topographical maps, as well as most atlases show latitude and longitude in 15 minute increments or better. The accuracy of the LX200 will depend on how close you get, so take a little time to get as accurate as you can.
Once the above information is determined, it can be entered into the telescope. It is easiest to enter the data with the telescope sitting on a table indoors do not try to do it outside at night.
Each step below is given without any details or explanations to keep the process as simple and fast as possible.
As an example, we will enter the data for Costa Mesa, CA (LAT=33°35', LONG=117°42'). If at any time you get "lost," simply turn off the telescope and restart this procedure.
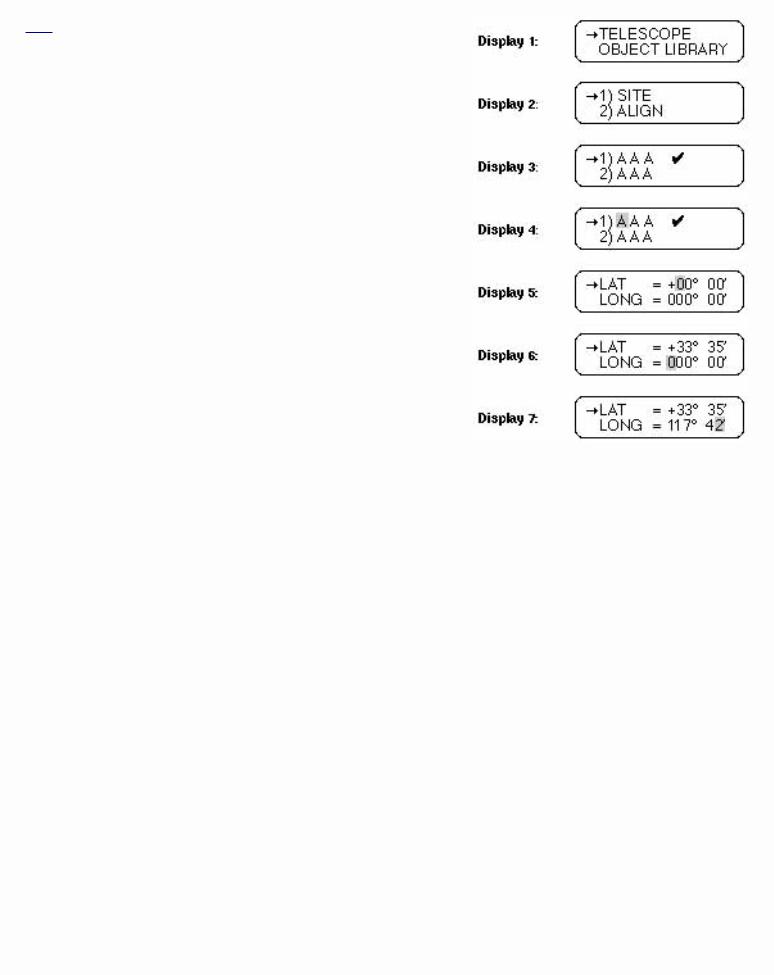
1.Turn the telescope on. After a few seconds (after the self-diagnostic test is complete), the display will look like Display 1.
2.Press the ENTER key. This selects the TELESCOPE functions. The display should look like Display 2.
3.Press the ENTER key. This selects the SITE functions. The display should look like Display 3.
4.Press and Hold the ENTER key until the Keypad Hand Controller beeps. This selects the first site for editing. The display should look like Display 4, with the first "A" flashing.
5.Press the ENTER key. The display should look like Display 5.
6.Use the number keys to enter your Latitude. The underline designates the current cursor position. Mistakes can be corrected by moving back (using the "E" and "W" keys). A negative latitude can be
entered by positioning the cursor under the "+" and hitting the "NEXT" key (lower right-hand key). When the Latitude is correct, press ENTER. The display will look like Display 6.
7.Use the number keys to enter your Longitude as above. When complete, the display will look like Display
8.Press ENTER to complete the site information input. The display will go back to Display 3.
http://www.meade.com/manuals/lx200/d.html (4 of 10) [7/29/2002 7:27:54 AM]
Meade Instruments Corporation - Meade LX200 Instruction Manuals
9.Press MODE to go back to Display 2.
10.Press MODE again to go back to Display 1.
It is important to note that the longitude standard used in the LX200 starts at 0° in Greenwich, U.K. and increases Westerly only to 359° 59mins. Many maps will show Easterly longitudes which cannot be entered into the Keypad Display. As an example, if your map indicates that you are at an Easterly longitude of 18° 27mins, then you would enter 341° 33mins.
Do not be concerned with differences in longitude and latitude as they pertain to different map spheroid projections, those minor differences are too small to adversely affect the longitude and latitude data input.
[ toc ] 2) Local Time and Date.
The local time should be set as accurately as possible, using the 24 hour format. The local time and date are used to determine sidereal time (star time) and the pointing accuracy of the telescope will depend on the accuracy of the time entered. Choose a reliable source as a reference for accurate time such as your local airport, or telephone company. In the U.S.A. you can double check the accuracy of the exact minutes by dialing WWV for the universal coordinated time at (303) 499-7111 (be sure to enter your local time hour information, not the U.T. hour). For the example, we will use 4:25:00 P.M. on Jan. 15, 1992.
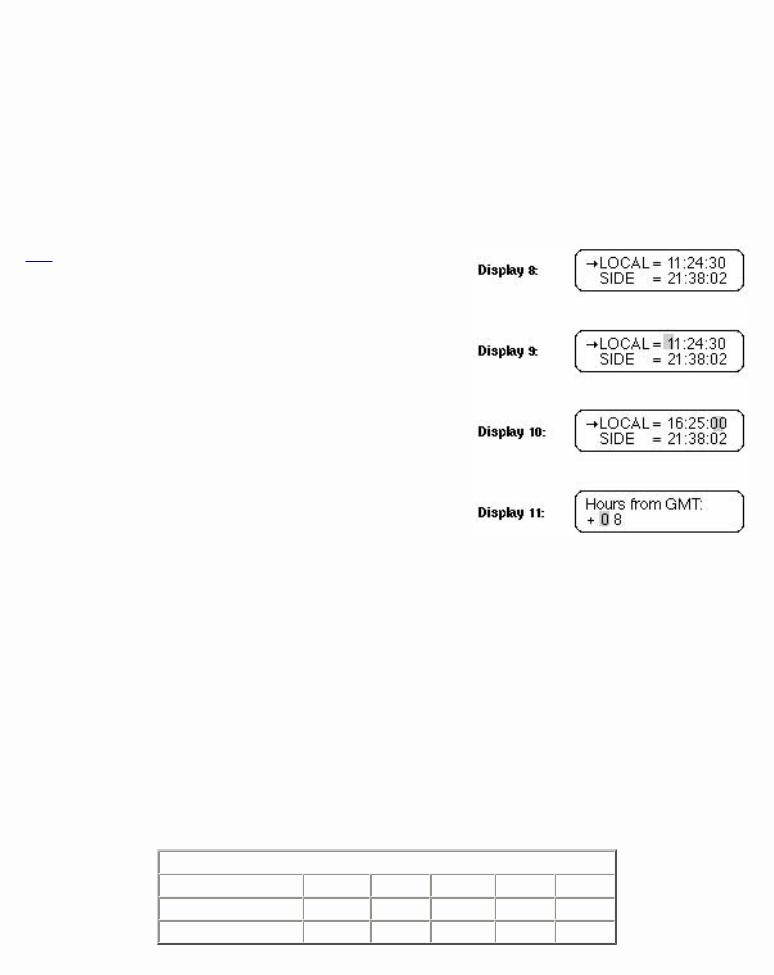
1.The display should look like Display 1. If it does not, press the MODE key until it does.
2.Press the MODE key twice. The display will look like Display 8, but with a random LOCAL and SIDE times.
3.Press and HOLD the ENTER key until the Keypad Hand Controller beeps (display like Display 9).
4.Using the number keys, enter the current local time to within 5 seconds. (Remember, 4:25:00 P.M. is 16:25:00 in the 24 hour format.) Corrections can be made by moving the flashing cursor using the W and E keys. The display should look like Display 10.
5.Press the ENTER key when the time is correct. The display will change to Display 11.
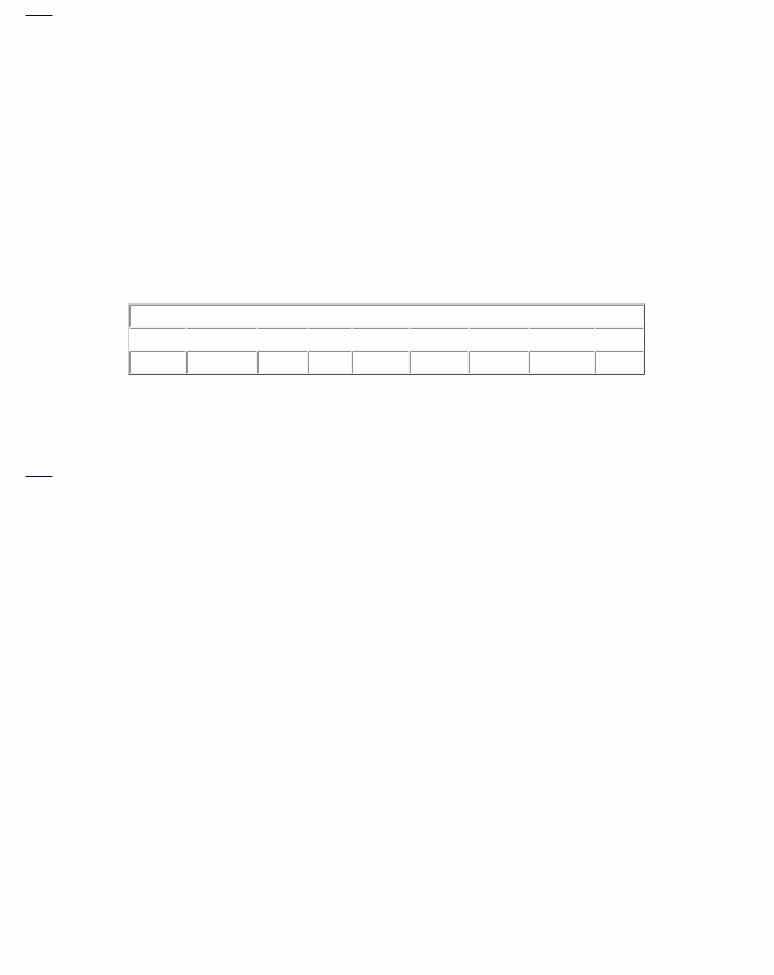
The next step is to enter the Greenwich Mean Time (GMT) time zone shift. (This procedure is a lot easier than it sounds.) For users in the U.S.A., refer to the table below to find the GMT time zone shift.
|
U.S.A. Time Zones |
|
|
||
Region |
Hawaii |
Pacific |
Mountain |
Central |
Eastern |
Standard Time |
+10 Hours |
+8 Hours |
+7 Hours |
+6 Hours |
+5 Hours |
Daylight Savings Time |
+9 Hours |
+7 Hours |
+6 Hours |
+5 Hours |
+4 Hours |
http://www.meade.com/manuals/lx200/d.html (5 of 10) [7/29/2002 7:27:54 AM]
Meade Instruments Corporation - Meade LX200 Instruction Manuals
Use the top row during Standard Time and the bottom row during Daylight Savings Time.
For example: In the Pacific Time Zone during Daylight Savings Time, the GMT time zone shift is +7 hours.
6.Use the number keys to enter the GMT time zone shift. Press ENTER when done; the display will go back to Display 8. If using the LX200 East of Greenwich U.K., enter a - (minus) GMT time zone shift by moving the blinking cursor backwards in the display with the W key, then press the NEXT key. The + (plus) sign will change to - (minus). Use the number keys to enter the GMT time zone shift.
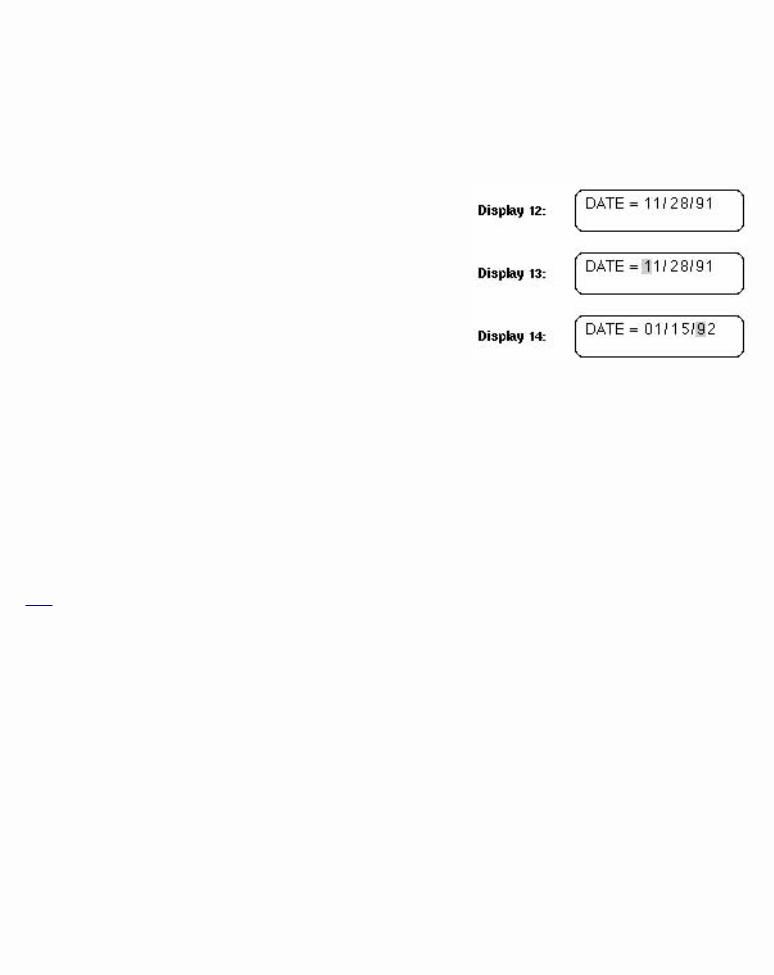
7.Press the ENTER key. This will select the DATE display
(Display 12), with a random date showing.
8.Press and Hold the ENTER key until the Keypad Hand Controller beeps. The display will look like Display 13, with the blinking cursor over the first number.
9.Use the number keys to enter the current date. The display should look like Display 14. Use the W and E keys to move the blinking cursor left and right to correct any mistakes.
10.Press the ENTER key when the date is correct.
After you press the ENTER key, the Keypad Hand Controller will display "Updating planetary data". The position of the planets depends on the date, so anytime the date is changed, the planet positions are recalculated.
This is all the information the LX200 needs to make use of all features. The next steps actually align the telescope with the night sky.
[ toc ] b. Setting Up the Telescope
After the basic information has been entered into the telescope, the telescope is ready to actually set-up and use. Follow Section A: Telescope Assembly to setup the telescope outside, and follow these steps:
1.Using the Bubble Level (15, Fig. 3) located on the telescope's drive base, level the telescope. Position the drive base so that the power panel faces North (i.e. to view the power panel, you must face South.)
2.Loosen the Dec. Lock Knob (2, Fig. 4 ) and position the optical tube assembly approximately level (so that the Dec. Circle (3, Fig. 3) reads 0°. Retighten the Dec. Lock Knob.
3.Loosen the R.A. Lock (7 Fig. 3) and rotate the telescope so that the R.A. Pointer (9, Fig. 3) and the Hour Angle (HA) Pointer (16, Fig. 3) are approximately in line with each other. This will position the fork arms so that they are parallel to the Power Panel (11, Fig. 3). Lock the R.A. lock.
http://www.meade.com/manuals/lx200/d.html (6 of 10) [7/29/2002 7:27:54 AM]
Meade Instruments Corporation - Meade LX200 Instruction Manuals
Steps 2 and 3 above, are not necessary for the telescope to work, so don't worry about having to get it exactly right. The telescope has some "illegal" positions (places where the telescope will not go) and these two steps ensure proper operation.
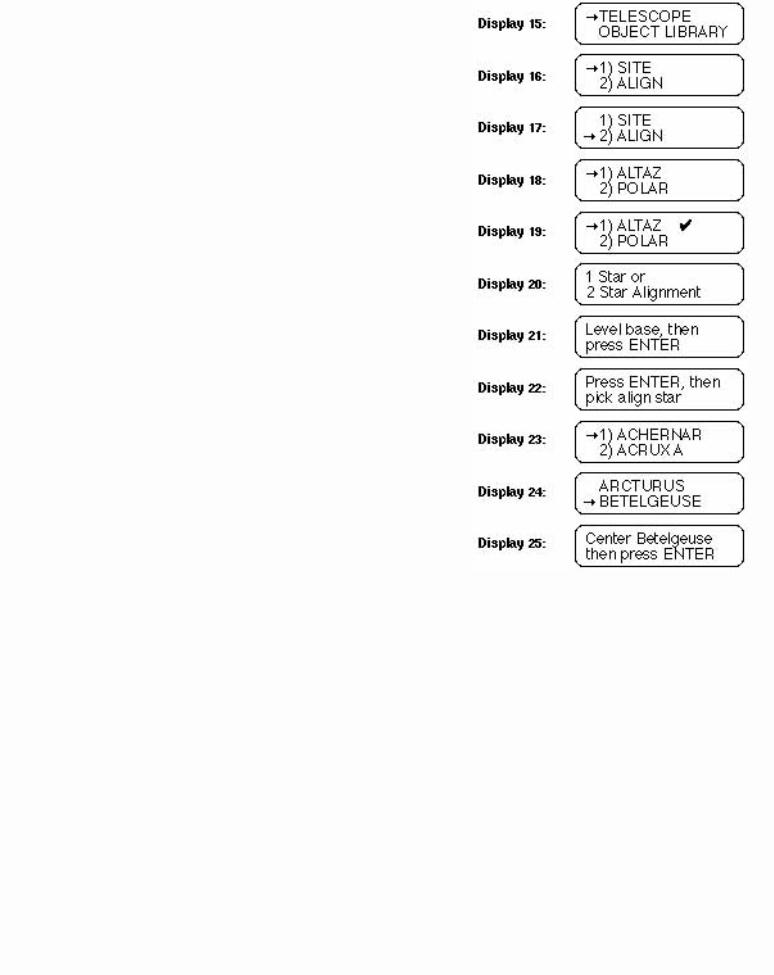
4.Turn the telescope on. After a few seconds (after the selfdiagnostic test is complete), the display will look like Display 15.
5.Press the ENTER key. This selects the TELESCOPE functions. The display should look like Display 16.
6.Press the NEXT key. This will move the arrow to the lower line (see Display 17).
7.Press the ENTER key to select the ALIGN function. The display will look like Display 18. (If the display looks like Display
19- with a checkmark already next to ALTAZ, go to step 9.)
8.Press the ENTER key to activate the ALTAZ mode. The Keypad Hand Controller will beep and display a checkmark next to the ALTAZ (see Display 19).
9.Press the ENTER key to use the checked mode (ALTAZ). The Keypad Hand Controller display will look like Display 20.
10.If you have not already leveled the telescope, do so now. When the telescope is level, select 1 STAR or 2 STAR alignment. The display will look like Display 21.
11.This message simply reminds you what you should do next. Press ENTER to show a display like Display 22.
12.Using the monthly star charts in Appendix C, pick an alignment star. Look at the chart for the current month and face the direction indicated. The constellations shown are easily found–even in the city. The charts are approximately 90° wide, with the top of the chart indicating straight up. If the time is after 9:00 P.M., then use the next month's chart. Once you identify the constellation, pick any of the labeled stars that is not within a 10° radius of overhead, but do not choose Polaris, for reasons made clear below. Polaris is also known as the North Star, and is shown for reference only.
The TELESCOPE and OBJECT LIBRARY features are accessed through a series of menus, which are shown on the Keypad Hand Controller Display. You can scroll up or down through the list of choices by using the PREV and NEXT keys, and select the indicated menu option with the ENTER key. Menu choices that are shown in lower case letters are unavailable in the current operating mode (LAND, ALTAZ, or POLAR). If you try to select a lower case menu option, the Keypad Hand Controller will emit three warning beeps. Three beeps always indicate an attempt to perform an invalid telescope operation.
When aligning in ALTAZ, overhead stars can confuse the LX200 because of an illegal position that prevents the optical tube assembly from slewing past 90° Altitude to protect the viewfinder from hitting the
http://www.meade.com/manuals/lx200/d.html (7 of 10) [7/29/2002 7:27:54 AM]

Meade Instruments Corporation - Meade LX200 Instruction Manuals
fork arm. The LX200 will track an overhead object, but it does so by moving higher in Altitude up to the illegal position, then the drive speeds up and move 180° in Azimuth so that the optical tube assembly can now be lowered in Altitude to keep up with the overhead object. Confusion arises because the LX200 does not know which side of 180° of Azimuth that it is on. Similarly, Polaris presents position problems in ALTAZ alignment because it is so close to the North Celestial Pole. In this region of the sky, the lines of Right Ascension are so close together that even the LX200's high-resolution encoders can yield ambiguous data.
In our example of January 15, we would use the January chart, face Southeast and look up about 45°. Orion is probably the easiest constellation to recognize, and we will use the star Betelgeuse for our example. Use the PREV and NEXT key to scroll through the list of alignment stars until the arrow is positioned on Betelgeuse (Display 23).
13.Press the ENTER key to select Betelgeuse. The Keypad Hand Controller displays a message (Display 24).
14.Center the alignment star (Betelgeuse in our example) in the eyepiece of the telescope. You can manually move the telescope by loosening the Dec. Lock Knob and R.A. Lock or electrically by using the N, S, W, and E keys. If moving the telescope electrically, be sure to use the speed keys, SLEW to get close, FIND to center in the viewfinder, and CNTR to center the star in the eyepiece. When the star is centered, press ENTER.
The telescope is now aligned and fully functional, and will automatically begin to track objects. From this point on, make all telescope movements by use of the Keypad Hand Controller. Manual movements by loosening the Dec. or R.A. locks will cause the LX200 to "lose" position, requiring realignment.
[ toc ] c. Using the Telescope
[ toc ] 1) The MODE Key
The LX200 has 5 basic Keypad Hand Controller displays, and the MODE key is used to move between them. The 5 modes are:
1.Telescope Functions. The TELESCOPE mode is where all telescope functions are changed or activated and the OBJECT LIBRARY is where the features of the object library are accessed.
2.Telescope Position. The first display shows the RA and DEC (telescope position in stellar coordinates) and the second display (accessed by pressing the ENTER key) shows the telescope position in ALTAZ coordinates.
3.Time and Date. The first display shows local time and Sidereal time and the second display (accessed by pressing the ENTER key) shows the date.
4.Timer and Freq. This display is a countdown timer and allows the user to change drive rates. These are advanced features.
5.All Off. This mode simply turns off all displays and backlighting. You can also adjust the backlighting brightness by pressing the ENTER key and using the PREV and NEXT keys to adjust the brightness.
http://www.meade.com/manuals/lx200/d.html (8 of 10) [7/29/2002 7:27:54 AM]
Meade Instruments Corporation - Meade LX200 Instruction Manuals
[ toc ] 2) Library Object Keys
While in any of the 5 main Keypad displays, you can directly access the library objects by using the M, STAR, or CNGC keys (see Appendix D of this manual for a listing of the 64,359 Object Library). Simply press an object key, and type in the number of the object desired, followed by ENTER. For example, a good first object for the first part of the year is M42–the Great Orion Nebula. Press: the M key, the 4 key, the 2 key, and finally the ENTER key. The display will show data on the object (name, rating, object type, brightness, and size). Now press GO TO. The telescope will automatically slew to M42.
If the object entered is not above the horizon, the Keypad Hand Controller will display the message "OBJECT BELOW HORIZON."
Other good first objects (if above the horizon) are any of the M objects, from M1 to M 110, and the planets. To find a planet enter:
OBJECT LIBRARY PLANET LEGEND
 PLANET
  MERCURY
  VENUS
VENUS  MARS
MARS  JUPITER
  SATURN
  URANUS
  NEPTUNE
  PLUTO
PLUTO 
STAR # 901 |
902 |
904 |
905 |
906 |
907 |
908 |
909 |
If the planet is too close to the Sun for safe viewing (closer than 15°) the Keypad will display a message to that effect.
[ toc ] 3) Daytime Slewing
Some amateurs may want to use the slewing feature of the LX200 to locate the planets or other astronomical objects during the daytime. If not done correctly, this can be very dangerous.
The LX200 "knows" where the planets are in relation to the Sun, but the telescope does not "know" where the Sun actually is. When the GO TO button is pushed, the telescope will slew to the object by the most direct route, which may move directly over the Sun. Use extreme caution before using the GO TO feature of the telescope to locate objects in the daytime! Looking into the telescope or viewfinder, even for the shortest fraction of a second, with sunlight entering the optics, will cause instant and irreversible eye damage. The telescope itself may also suffer serious damage if it is pointed at or near the Sun.
A responsible adult should supervise every aspect of telescope operation when children are observing in the daytime.
Use the following procedure to safely locate objects during the daytime, whether by manual slewing, using the N,E,W,S keys, or using the GO TO key:
1.Before allowing the telescope to move, place the dust covers on the main telescope and viewfinder (or remove the viewfinder from the telescope completely). This will keep the Sun's damaging light out of the telescope should it move across the Sun.
2.Press the GO TO button or manually move the telescope.
3.After the telescope has stopped moving, visually check the telescope's position to be sure it is not
http://www.meade.com/manuals/lx200/d.html (9 of 10) [7/29/2002 7:27:54 AM]

Meade Instruments Corporation - Meade LX200 Instruction Manuals
pointing near the Sun. If there is any question in your mind that the telescope may be pointing at or near the Sun, do not look through the telescope.
4.Only when you are absolutely convinced that the telescope is pointing away from the Sun should you remove the telescope's dust cover and observe the object.
5.Above all, be careful and use common sense. Observing the Sun, even for the shortest fraction of a second, will cause instant and irreversible eye damage.
Next Page
Related Topics:
●Authorized Dealers
●Meade 8" and 10" LX200 Schmidt-Cassegrain Telescopes
●Meade 7" LX50 and LX200 Maksutov-Cassegrains
●Meade 12" LX200 Schmidt-Cassegrain
●Accessories for Meade LX-Series Catadioptric Telescopes
●Index of Instruction Manuals
●General Catalog Index
●Meade Product Repair and Warranty Information
| home | about meade | product information | dealer referral | gallery | | customer support | investor relations | dealer support |
| employment opportunities | site map |
® The name Meade and the Meade logo are trademarks registered with the United States Patent Office, and in principal countries throughout the world.
Copyright © 1998 Meade Instruments Corporation, All Rights Reserved. This material may not be reproduced in any form without permission.
http://www.meade.com/manuals/lx200/d.html (10 of 10) [7/29/2002 7:27:54 AM]
Loading...