


Instruction Manual
ETX-60AT Astro Telescope with Autostar Hand Controller ETX-70AT Astro Telescope with Autostar Hand Controller
 Meade Instruments Corporation

WARNING!
Never use a Meade® ETX® Astro Telescope to look at the Sun! Looking at or near the Sun will cause instant and irreversible damage to your eye. Eye damage is often painless, so there is no warning to the observer that damage has occurred until it is too late. Do not point the telescope or its viewfinder at or near the Sun. Do not look through the telescope or its viewfinder as it is moving. Children should always have adult supervision while observing.
CAUTION: Use care to install batteries in the orientation indicated by illustration in the battery slots of the battery holder. Follow battery manufacturer's precautions. Do not install batteries backwards or mix new and used batteries. Do not mix battery types. If these precautions are not followed, batteries may explode, catch fire, or leak. Improperly installed batteries void your Meade warranty.
If you are anxious to use your telescope for the first time, read the QUICK-START GUIDE on page 3.
® The name “Meade,” the Meade logo, and “ETX” are trademarks registered with the U.S. Patent Office and in principal countries throughout the world. All rights reserved.
Design: Automated Telescope - Patent No. D417881
© 2000 Meade Instruments Corporation.
CONTENTS |
|
Quick-Start Guide .......................................................... |
3 |
Telescope Features ...................................................... |
4 |
Autostar Features .......................................................... |
7 |
Getting Started .............................................................. |
10 |
Parts Listing .............................................................. |
10 |
How to Assemble Your Telescope ............................ |
10 |
Choosing an Eyepiece .............................................. |
10 |
Manual Operation Without Using Autostar................ |
11 |
Manual Operation Using Autostar's Arrow Keys ...... |
11 |
Moving Through Autostar’s Menus .......................... |
12 |
Initializing Autostar .................................................... |
12 |
Autostar Operation ........................................................ |
13 |
Autostar Navigation Exercise .................................... |
13 |
Easy Two-Star Alignment.......................................... |
14 |
Observing Exercises ...................................................... |
15 |
Go To Saturn ............................................................ |
15 |
Using the Guided Tour .............................................. |
15 |
Autostar Menus .............................................................. |
16 |
Complete Autostar Menu Structure .......................... |
16 |
Objects Menu............................................................ |
16 |
Event Menu .............................................................. |
17 |
Glossary Menu.......................................................... |
18 |
Utilities Menu ............................................................ |
18 |
Setup Menu .............................................................. |
19 |
Advanced Features ........................................................ |
21 |
Terrestrial and Astronomical Observing .................... |
21 |
Sidereal Rate ............................................................ |
21 |
Alignment (Mount) .................................................... |
21 |
Alt/Az Alignment .................................................. |
21 |
Alt/Az Home Position .................................... |
21 |
Two-Star Alt/Az Alignment.............................. |
21 |
One-Star Alt/Az Alignment ............................ |
21 |
Slew Speeds........................................................ |
22 |
Observing a Satellite .......................................... |
23 |
Photography with the ETX .................................. |
23 |
Optional Accessories ...................................................... |
25 |
Maintenance and Servicing ............................................ |
27 |
Storage and Transport ........................................ |
27 |
Inspecting the Optics .......................................... |
27 |
Troubleshooting .................................................. |
28 |
Meade Customer Service.................................... |
29 |
Specifications ...................................................... |
29 |
Appendix A: Equatorial (Polar) Alignment ...................... |
31 |
Appendix B: Using Autostar to Enter Coordinates ........ |
33 |
Appendix C: Helpful Charts ............................................ |
34 |
Appendix D: Training the Drive ...................................... |
35 |
Appendix E: Initialization Example ................................ |
36 |
Basic Astronomy ............................................................ |
37 |
Roadmap to the Stars .................................................... |
39 |
QUICK-START GUIDE
1
B
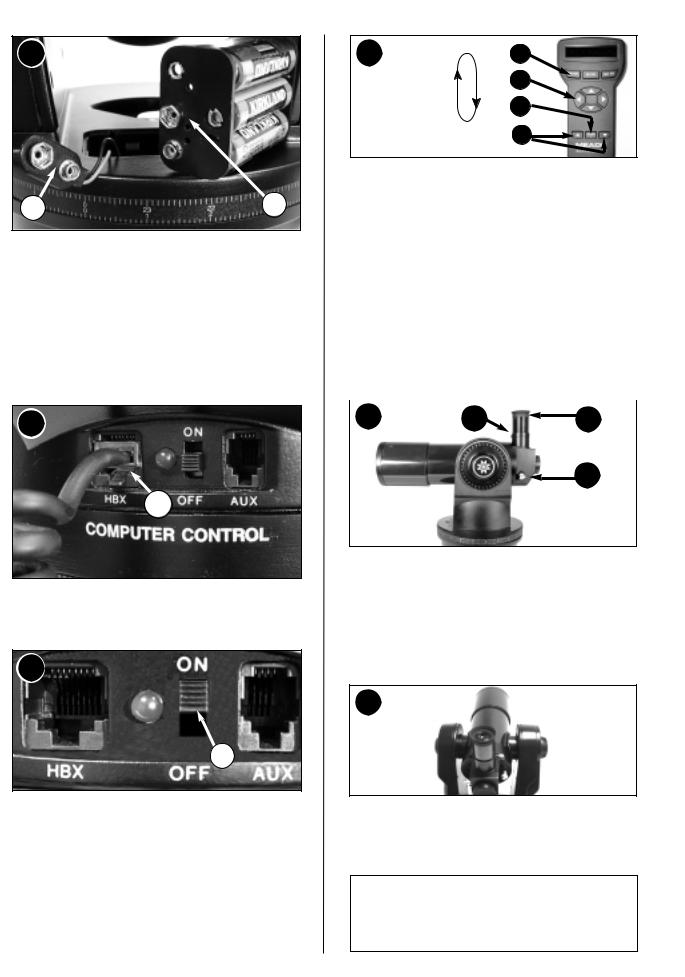
1.Take the ETX from its packaging and place it on a sturdy surface. Remove the cover from the battery compartment (20, Fig. 1, page 4) located on top of the drive base and carefully lift the 9v connector and the battery holder from the compartment. Insert six AA-size batteries into the battery holder, oriented as shown on the battery holder. Connect the 9v connector plug (A) to the connector (B) on the battery holder. Return the battery holder to the battery compartment. Replace the cover. See page 10 for more information.
2
A
2.Make sure that the computer control panel power switch is in the OFF position. Remove Autostar (18, Fig. 1) from the packing materials and plug it into the HBX port (A).
3
A
3.Flip the Power Switch (A) on the computer control panel to the ON position. The copyright message lights on Autostar’s LCD display.
4 |
Slew Speed: |
A |
|
Slow |
|||
|
|
||
|
. |
B |
|
|
. |
||
|
. |
||
|
Medium |
|
|
|
. |
C |
|
|
. |
||
|
. |
|
|
|
Fast |
|
D
4.Press the Speed/? key (C) to accept the Sun warning. Keep pressing the ENTER key (A) until "Country/State" appears on the display. (Ignore the prompts requesting "Date" and "Time" for now
– these functions will be explained later). Use the Scroll keys (D) to cycle through the lists of Country/States, Cities, and Telescope Models. Press ENTER (A) when the correct information for each prompt displays. The display then reads "Setup: Align." See page 11 for more information.
You can now use the Arrow keys (B) to slew (move) the telescope up, down, right, or left. To change the telescope’s slew speed, briefly press the Speed/? key (C). Each press decreases the slew speed down one level, and then will cycle back to the fastest speed.
5 |
B |
A |
C
5.Tighten (to a "firm feel" only, do not overtighten) the vertical and horizontal locks (6, 9, Fig. 1). See page 5 for more information. Remove the dust cover from the end of the telescope tube. Place the MA 25mm eyepiece (A) into the eyepiece holder on the telescope and tighten the attachment thumbscrew (B) to a "firm feel" only. Make sure that the flip-mirror control (C) is in the “up” position. See page 6, for more information.
6
6.Sight along the side of the telescope’s main tube to locate an object. Practice using the Autostar’s Arrow keys to center an object in the telescope’s field of view. Use the telescope’s focus knob (8, Fig. 1) to bring the object into focus.
If you wish to observe using Autostar’s databases, go to:
Page 14 to learn how to perform an Easy Two-Star Alignment; Page 15 for some practice observing exercises;
Page 16 to learn about Autostar’s menus and databases.
Quick Start Guide 3

TELESCOPE FEATURES
|
|
|
|
5 |
19 |
|
|
|
4 |
|
|
2 |
7 |
|
|
|
|
17 |
|
|
|
|
|
1 |
|
|
|
|
|
3 |
|
|
|
|
|
15 |
|
|
|
|
20 |
|
|
|
|
|
|
(opposite side) |
|
|
|
|
(on top of base, |
|
|
|
|
|
not shown) |
14 |
|
|
|
|
6 |
16 |
|
|
|
|
7 |
|
|
|
|
|
|
9 |
|
|
|
|
8 |
13 |
|
|
|
|
18 |
|
|
|
|
|
|
11 |
|
|
|
|
10 |
12 |
|
|
|
|
|
|
|
|
|
|
|
(not shown) |
A |
B |
C |
D |
|
|
|
Fig. 1: The ETX-60AT and ETX-70AT Telescope.
4 Telescope Features

Except for the lens diameter, the Meade ETX-60AT and the ETX-70AT are identical; all procedures and descriptions in this manual apply to both telescopes.
CAUTION:
Using products other than standard Meade accessories may cause damage to the telescope’s internal electronics and may void the Meade warranty.
ETX: Your Personal Window to the Universe
The Meade ETX-60AT and the ETX-70AT are extremely versatile, high-resolution telescopes with features similar to those once available only with larger and more specialized imaging systems. With pushbutton controls, automatic tracking of celestial objects, and software downloading capability, an ETX telescope may be all the telescope ever required by many terrestrial and astronomical observers.
Your ETX telescope reveals nature in an ever-expanding level of detail. Observe the feather structure of an eagle from 50 yards or study the rings of the planet Saturn from a distance of 800 million miles. Focus beyond the Solar System and observe majestic nebulae, ancient star clusters, remote galaxies, and even stars recently discovered to have planets orbiting about them. Meade ETX telescopes are instruments fully capable of growing with your interest and are ideal for both the casual observer and serious astronomer alike.
1Eyepiece - Place the MA 25mm eyepiece into the 90° Eyepiece Holder (3, Fig. 1) and tighten in place with thumbscrew (2, Fig.1).
2Eyepiece Holder Thumbscrew - Tightens the eyepiece in place. Tighten to a "firm feel" only.
390° Eyepiece Holder - Holds the eyepiece upright for easy viewing.
4Optical Tube - The main optical component that gathers the light from distant objects and brings this light to a focus for examination with the eyepiece.
5Movable Objective Lens Cell - This component contains the telescope’s lenses. The focus knob (8, Fig. 1) moves the cell for precise image focus.
6Vertical Lock - Controls the manual vertical movement of the telescope. Turning the vertical lock counterclockwise unlocks the telescope enabling it to be freely rotated by hand about the vertical axis. Turning the vertical lock clockwise (to a "firm feel" only) prevents the telescope from being moved manually, but engages the vertical motor drive for Autostar operation.
NOTE: The vertical lock knob (6, Fig. 1) is a knurled knob located on the fork arm to the right of the focus knob (8, Fig. 1). Mounted beneath the knob is a circular scale with no numbers. Do not confuse this scale with the Dec setting circle (17, Fig. 1) on the opposite fork arm which has a numbered scale used to locate astronomical objects.
CAUTION: When loosening the vertical lock, be sure to support the objective lens cell (5, Fig. 1). The weight of the objective lens could cause the tube to swing downward suddenly and damage the telescope.
7Fork Arms - Hold the optical tube in place.
8Focus Knob - Moves the telescope’s objective lens (5, Fig. 1) in a finely-controlled motion to achieve precise image focus. The ETX-60AT and ETX-70AT telescopes can be focused on objects from a distance of about 17 ft. to infinity. Rotate the focus knob clockwise to focus on distant objects, and counterclockwise to focus on nearby objects.
9Horizontal Lock - Controls the manual horizontal rotation of the telescope. Turning the horizontal lock counterclockwise unlocks the telescope, enabling it to be freely rotated by hand about the horizontal axis. Turning the horizontal lock clockwise prevents the telescope from being rotated manually, but engages the horizontal motor drive for Autostar operation.
Telescope Features 5
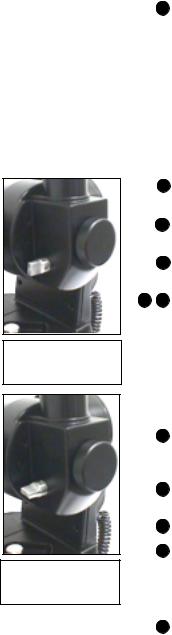
Fig. 2a: Flip mirror control in the “up” position.
Fig. 2b: Flip mirror control in the “down” position.
10Computer Control Panel
A.Handbox (HBX) Port - Plug the Autostar coil cord (9, Fig. 3) into this port.
B.LED - The red power indicator light illuminates when power is supplied to the Autostar handbox and to the telescope’s motor drive.
C.ON/OFF Switch - Turns the Computer Control Panel and Autostar ON or OFF.
D.Auxiliary (AUX) Port - Provides connection for current and future Meade accessories, such as the Meade “AstroFinder Software with Cable Connector Kit,” which allows you to control your ETX from a PC. See “OPTIONAL ACCESSORIES,” page 25.
11Base Housing - Supports the telescope for placement on a flat, level surface, such as a tabletop or optional tripod. See “OPTIONAL ACCESSORIES,” page 25.
12Holes for Optional Tripod (not shown, on the bottom plate) - See your tripod’s instruction sheet for mounting information.
13Right Ascension (R.A.) Setting Circle - See "APPENDIX A," page 31, for detailed information.
14 15 Cellback containing Flip-Mirror and Flip-Mirror Control Knob - ETX telescopes include an internal mirror. With the flip-mirror control in the “up” position, as shown inFig. 2a, light is diverted to the eyepiece. With the flip-mirror control in the “down” position, as shown in Fig. 2b, light proceeds straight out the photo port for photography. See “PHOTOGRAPHY WITH THE ETX,” page 23.
NOTE: The flip-mirror control is in the “up” position when the control is vertical (perpendicular to the telescope tube). To place the flip-mirror in the “down” position, turn the control counterclockwise until it stops.
16Photo Port - Attach any 35mm camera with a removable lens to this port using an optional #64ST T-Adapter or attach the #933 Erecting Prism for correctly oriented images through the eyepiece. See “OPTIONAL ACCESSORIES,” page 25.
17Declination (Dec) Setting Circle (on left fork arm) - See "APPENDIX A," page 31, for detailed information.
18Autostar with attached coil cord - See page 7 for a description of Autostar’s features.
19Dust Cap - Unthread the dust cap counterclockwise from the front lens of the telescope.
NOTE: The dust cap should be replaced after each observing session and the power turned off to the telescope. Verify that any dew that might have collected during the observing session has evaporated prior to replacing the dust cap.
20Battery Compartment - Install batteries in this compartment. See page 10 for more information.
6 Telescope Features
AUTOSTAR FEATURES
1
2 |
4 |
5 |
3 |
|
8 |
6 |
7 |
 9
9
Fig. 3: #494 Autostar Handbox.
Tour the Cosmos with Just the Push of a Button
Control of the ETX-60AT and the ETX-70AT is through the operation of the standard-equipment #494 Autostar. Nearly all functions of the telescope are accomplished with just a few pushes of Autostar’s buttons. Some of the major features of Autostar are:
•Automatically move the telescope to any of the 1400 objects stored in the database or manually enter the astronomical coordinates of any celestial object.
•Take a guided tour of the best celestial objects to view on any given night of the year.
•Download the latest satellite data and software revisions directly from the Meade website (www.meade.com) and share software with other Autostar enthusiasts. (Requires option-
al #506 AstroFinder™ Software and Cable Connector Kit. See “OPTIONAL ACCESSORIES,” page 25.)
•Access a glossary of astronomical terms.
•Calculate which eyepiece to use for optimum viewing of a celestial object.
•Mount the telescope in the “Alt/Az” mode (Altitude - Azimuth, or vertical - horizontal) for fully automatic tracking of celestial objects using a flat, level surface, such as a tabletop, or the optional #882 Standard Field Tripod. (See “OPTIONAL ACCESSORIES,” page 25.)
Autostar Features 7
NOTE:
Throughout this manual, you will notice the term "Alt/Az." Alt/Az is frequently used to refer to altitude or vertical and azimuth or horizontal. Alt/Az is just one of many methods used by amateur astronomers to help locate stars in the night sky.
The Autostar Computer Controller provides control of virtually every telescope function within a compact handbox. Autostar has soft-touch keys designed to have a positive feel. The LCD (Liquid Crystal Display) is backlit with a red LED (Light Emitting Diode) for easy viewing in the dark. The backlit display, key arrangement, and sequential database make Autostar extremely user friendly.
NOTE: Autostar does not require batteries; the telescope’s batteries supply power to Autostar.
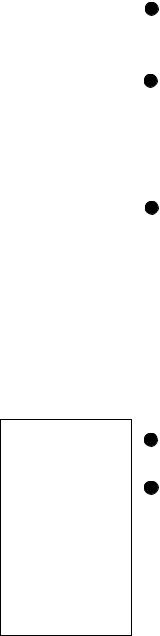
12-Line LCD Display - Provides an interface between Autostar and the telescope.
•Top line: Lists the primary category or menu item.
•Bottom line: Contains a menu option or information about an object or subject, depending on which function is being performed.
2ENTER Key - Accesses, in a sequential manner, the next menu or data level in the Autostar database. See “MOVING THROUGH AUTOSTAR'S MENUS,” page 12 and “AUTOSTAR’S MENUS,” page 16.
NOTE: If ENTER is pressed for two seconds or more and then released, Autostar emits a beep and “ENTER to Sync” is displayed. "ENTER to Sync" is relevant only after the telescope has been aligned and is pointing at an object. If the "ENTER to Sync" feature is accessed by mistake, press MODE to return to the previous screen. See “HIGH PRECISION,” page 20, for more details about this feature.
3MODE Key - Returns to the previous menu or data level in the Autostar database until the top level, “Select Item," is reached. The MODE key is similar to the ESCAPE key on a computer.
NOTE: Pressing MODE while in the “Select Item” level moves Autostar to the topmost screen: “Select Item: Object.”
NOTE: If MODE is pressed and held for two seconds or more, the following information is then available using the Scroll keys (6 and 7, Fig. 3):
•Right Ascension and Declination (astronomical) coordinates (see "APPENDIX A")
•Altitude (vertical) and Azimuth (horizontal) coordinates
•Local Time and Local Sidereal Time (LST)
•Timer and Alarm Status
Press MODE again to return to the previous menu.
4GO TO Key - Slews (moves) the telescope to the coordinates of the currently selected object. While the telescope is slewing, the operation may be aborted at any time by pressing any key except GO TO. Pressing GO TO again resumes the slew to the object.
5Arrow Keys - Slew the telescope in a specific direction (up, down, left, and right), at any one of nine different speeds. Speed selection is explained in “SLEW SPEEDS,” page 22. The following functions are also available with the Arrow keys:
•Data Entry - Use the Up and Down Arrow keys to scroll through the letters of the alphabet and numerical digits. The Down Arrow key starts with the letter "A" and the Up Arrow key starts with the digit "9." The Left and Right Arrow keys are used to move the blinking cursor left and right across the LCD display.
•Alt/Az Alignment - Use the Up and Down Arrow keys to move the telescope vertically up and down. The Left Arrow key rotates the telescope horizontally counterclockwise, while the Right Arrow key rotates it clockwise.
8 Autostar Features

6 7 Scroll Keys - Accesses database options within a selected menu. The menu is displayed on the first line of the screen. Options within the menu are displayed, one at a time, on the second line. Press the Scroll keys to move through the options. Press and hold a Scroll key to move quickly through the options.
The Scroll keys also scroll through the letters of the alphabet and numerical digits.
NOTE: The Scroll Down key and the Down Arrow key move forward through the alphabet & digits (A to Z, 0 to 9). The Scroll Up key and the Up Arrow key move backward (Z to A, 9 to 0). Common symbols are also available in the list.
8Speed/? Key - Pressing the Speed/? key cycles through the nine slew speeds that move the telescope. Each time the Speed/? key is pressed briefly, the current slew speed is shown for about two seconds on the display. See “SLEW SPEEDS,” page 22.
The Speed/? key also accesses the "Help" file. "Help" provides on-screen information on how to accomplish whatever task is currently active.
NOTE: Pressing the Speed/? key very briefly changes the slew speed. Holding down the Speed/? key longer (one to two seconds) accesses the Help function.
Hold down the Speed/? key and then follow the prompts on the display to access details of Autostar functions in the Help feature. The Help system is essentially an on-screen instruction manual.
If you have a question about an Autostar operation, e.g., INITIALIZATION, ALIGNMENT, etc., hold down the Speed/? key and follow the directions that scroll on the second line of the LCD screen. When a word appears in [brackets], press ENTER to access the Autostar Glossary. A definition or more detailed information is displayed. Press MODE to return to the scrolling Autostar Help display.
When satisfied with the Help provided, press MODE to return to the original screen and continue with the chosen procedure.
9Coil Cord - Plug the Autostar coil cord into the HBX port (10A, Fig. 1) of the computer control panel of the telescope.


 TIPS FOR BEGINNERS


Join an Astronomy Club
Attend a Star Party
One of the fun ways to learn about astronomy is to join an astronomy club. Check your local newspaper, school, library, or telescope dealer/store to find out if there’s a club in your area.
At club meetings, you will meet other astronomy enthusiasts with whom you will be able to share your discoveries. Clubs are an excellent way to learn more about observing the sky, to find out where the best observing sites are, and to compare notes about telescopes, eyepieces, filters, tripods, and so forth.
Often, club members are excellent astrophotographers. Not only will you be able to see examples of their art, but you may even be able to pick up some “tricks of the trade” to try out on your ETX telescope. See page 23 for more information about photography with the ETX.
Many groups also hold regularly scheduled Star
Parties at which you can check out and observe with many different telescopes and other pieces of astronomical equipment. Magazines such as Sky & Telescope and Astronomy print schedules for many popular Star Parties around the United States and Canada.
Autostar Features 9
1
4
Fig. 4: View of the ETX telescope showing six AA-size batteries mounted inside the battery compartment:
(1)Battery Compartment
(2)Battery Holder
(3)9v Connector
(4)Battery Holder Connector
Fig.5: MA 25mm and
MA 9mm eyepieces.
GETTING STARTED
Parts Listing
Getting the telescope ready for first observations requires only a few minutes. When first opening the packing box, note carefully the following parts:
•The ETX Astro Telescope with fork mount system.
•#494 Autostar handbox with attached coil cord.
•MA 25mm and MA 9mm eyepieces, each packed in a plastic storage container.
•Hex-wrench, packed with the instruction manual. See “GENERAL MAINTENANCE,” page 27.
How to Assemble Your Telescope
Assembly of the ETX telescope requires only six AA-size (user-supplied) batteries and a few, simple steps:
1.The telescope’s battery compartment (1, Fig. 4) is located on top of the drive base. Open the battery compartment by lifting the release latch and pulling it away from the drive base.
2.Remove the battery holder from the compartment and carefully lift the 9v connector out from the compartment. Take care not to accidentally detach the wires of the battery connector from the base. Whenever you replace the batteries, to safeguard the wires, disconnect the 9v connector from the battery holder before removing the batteries.
3.Insert six AA-size batteries into the battery holder, oriented as shown on the diagram on the battery slots of the battery holder. Insert the center battery on each side last for easier installation. Connect the 9v connector plug to the battery holder. Carefully replace the battery holder back into the battery compartment. Replace the cover.
CAUTION: Use care to install batteries as indicated by the battery compartment. Follow battery manufacturer's precautions. Do not install batteries backwards or mix new and used batteries. Do not mix battery types. If these precautions are not followed, batteries may explode, catch fire, or leak. Improperly installed batteries void your Meade warranty. Always remove the batteries if they are not to be used for a long period of time.
4.Be certain that the power switch on the computer control panel (10C, Fig. 1) is in the OFF position. Plug the coil cord of the Autostar Controller into the HBX port (10A, Fig. 1).
NOTE: Autostar does not require batteries; the telescope’s batteries supply power to Autostar.
5.Remove the MA 25mm eyepiece (1, Fig. 1) from its container and place it in the eyepiece holder (3, Fig. 1). Tighten the thumbscrew (2, Fig. 1) to a "firm feel" only. Unscrew the dust cover counterclockwise to remove it from the telescope.
Basic assembly of the telescope is now complete.
Choosing an Eyepiece
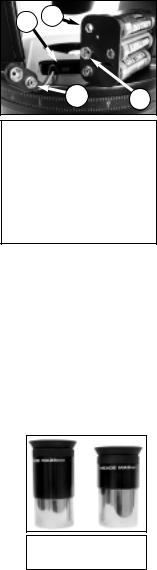
A telescope’s eyepiece magnifies the image formed by the telescope’s main optics. Each eyepiece has a focal length, expressed in millimeters, or “mm.” The smaller the focal length, the higher the magnification. For example, an eyepiece with a focal length of 9mm has a higher magnification than an eyepiece with a focal length of 25mm.
Your telescope comes supplied with two standard eyepieces. The MA 25mm eyepiece gives a wide, comfortable field of view with high image resolution, while the MA 9mm eyepiece provides a smaller field of view but higher magnification when seeing conditions permit.
Low power eyepieces offer a wide field of view, bright, high-contrast images, and eye relief during long observing sessions. To find an object with a telescope, always start with a low power eyepiece such as the MA 25mm. When the object is located and centered in the eyepiece, you may wish to switch to a higher power eyepiece to enlarge the image as much as practical for prevailing seeing conditions.
NOTE: Seeing conditions vary widely from night-to-night and site-to-site. Turbulence in the air, even on an apparently clear night, can distort images. If an image appears fuzzy and ill-defined, back off to a lower power eyepiece for a more wellresolved image (Fig. 7a and 7b).
10 Getting Started
NOTE:
For a list of magnification ratings of the eyepieces available for the ETX-60AT and ETX-70AT telescopes, see "OPTIONAL ACCESSORIES," page 25.
Fig. 6: Autostar's Arrow keys.
NOTE:
Autostar requests the Country/State, City, and Telescope Model information only the first time Autostar is activated. If you wish to change this information, use the "Site" and "Telescope Model" options in the Setup menu.
The power, or magnification of a telescope is determined by the focal length of the telescope and the focal length of the eyepiece being used. To calculate eyepiece power, divide the telescope's focal length by the eyepiece's focal lengthE..g., a 25mm eyepiece is used with the ETX-60AT. The focal length of the ETX-60AT is 350mm (see "SPECIFICATIONS," page 29).
Telescope Focal Length |
= |
350mm |
|||
Eyepiece Power = |
|
|
|
= 14X |
|
Eyepiece Focal Length |
|
||||
|
|
|
25mm |
||
The eyepiece power, or magnification is therefore 14x.
Manual Operation of the Telescope without Autostar
If you wish to observe a distant land object, such as a mountain top or a bird, you can observe by merely pointing the telescope and looking through the eyepiece. Set the telescope on a table top or tripod, loosen the horizontal and vertical locks (6 and 9, Fig. 1), and turn the telescope towards the object you wish to observe. Sight along the top of the tube until you find the object. When the object appears in the eyepiece, focus the image using the by turning the focus knob (8, Fig. 1). Rotate the knob clockwise to focus on distant objects and counterclockwise to focus on nearby objects.
You can also observe stars and objects in the night sky using this method, but note that objects begin to slowly drift across the eyepiece field. This motion is caused by the rotation of the Earth. As you become familiar with Autostar operation, you can counteract the drift using the automatic tracking feature in the Setup menu (see "TO TRACK AN OBJECT AUTOMATICALLY," page 20), or by using Autostar's GO TO capabilities (see "GO TO SATURN," page 15).
Manual Operation of the Telescope Using Autostar's Arrow Keys
You may also observe land and astronomical objects using Autostar's Arrow keys.
If you have not already done so, prepare your telescope following the steps described in "HOW TO ASSEMBLE YOUR TELESCOPE," page 10. Next, flip the On/Off Switch (10, Fig. 1) on the computer control panel to the ON position. The copyright message lights on Autostar’s display. Press the Speed/? key (8, Fig. 3) to accept the Sun warning. The "Getting Started" message displays. Keep pressing the ENTER key (A) until "Country/State" appears on the display. (Ignore the prompts requesting "Date" and "Time" for now – these functions will be explained later in the manual).
Use the Scroll keys (D) to cycle through the database of countries/states. Press ENTER (A) when your location displays. Next, use the Scroll keys (D) to scroll to the nearest city to your observing site and press ENTER. Next, use the Scroll keys (D) to scroll to your telescope model and press ENTER. The display then reads "Setup: Align."
You can now use the Arrow keys (5, Fig. 3) to slew (move) the telescope up, down, right, or left. To change the telescope’s slew speed, briefly press the Speed/? key (8, Fig. 3). Each press decreases the slew speed down one level, and then cycles back to the fastest speed. See page 22 for more information.
Tighten (to a "firm feel" only, do not overtighten) the vertical and horizontal locks (6 and 9, Fig. 1). Sight along the side of the telescope’s main tube to locate an object and practice using the Autostar’s Arrow keys to center the object in the telescope’s field of view. Use the telescope’s focus knob (8, Fig. 1) to bring the object into focus.
This procedure demonstrates just a very small part of Autostar's capabilities. In the next section of this manual, you will begin to learn how to make use of Autostar's extensive and powerful features.


 TIPS FOR BEGINNERS


Too Much Power?
Can you ever have too much power? If the type of power you’re referring to is eyepiece magnification, yes, you can! The most common mistake of the beginning observer is to “overpower” his or her telescope by using high magnifications which the telescope’s aperture and atmospheric conditions can not reasonably support. Keep in mind that a smaller, but bright and well-resolved image is far superior to one that is larger, but dim and poorly resolved
(see below). Powers above 110X should be employed only under the steadiest atmospheric conditions.
Autostar can calculate the best eyepiece for you to use. Try out the “Eyepiece Calc” feature in the Utilities menu.
Most observers should have three or four additional eyepieces to achieve the full range of reasonable magnifications possible with the ETX telescopes. See “OPTIONAL ACCESSORIES,” page 25.
Fig. 7a & b: Jupiter; example of too much magnification.
Getting Started 11

Initialization is a procedure that ensures that Autostar operates correctly. When you first use Autostar, it doesn't yet know where the observation location site is or the time or date of the observation session.
During the procedure, you will enter information, such as the current time and date, observation location, and telescope model. Autostar uses this information to precisely calculate the location of celestial objects (such as stars and planets) and how to move your telescope correctly for various operations.
Moving Through Autostar’s Menus
The Autostar database is organized in levels for quick and easy navigation.
•Press ENTER to go deeper into Autostar's menu levels.
•Press MODE to move back toward the top menu level.
•Press the Scroll keys to move up and down through the options available for each level.
•Press the Arrow keys to enter characters and digits.
The Arrow keys are also used to move the telescope.
Initializing Autostar
This section describes how to initialize Autostar. Perform this procedure the first time you use Autostar or after performing a RESET. An example of this procedure is presented in "APPENDIX E," page 36.
1.Make sure that the vertical and horizontal locks (6 and 9, Fig. 1) are secured as described on page 5.
2.Verify that Autostar is properly connected to your telescope. See “HOW TO ASSEMBLE YOUR TELESCOPE,” page 10.
3.Flip the telescope power switch to the ON position.
The Autostar screen is activated and a copyright message displays briefly, followed by a short beep. Then Autostar takes a few moments to start up the system.
4.A message displays that warns not to look at the Sun. At the end of this message, press the Speed/? key to signify that the message has been read and understood.
5.The Getting Started menu displays a scrolling message with two choices:
a.Hold down the Speed/? key (8, Fig. 3) for information on Autostar functions and controls. When finished, press MODE (3, Fig. 3) to exit Help and to return to the Getting Started procedure, or,
b.Press ENTER (2, Fig. 3) to bypass the Help tutorial and continue with initialization.
6.Autostar then requests the current date. Use the Up and Down Arrow keys (5, Fig. 3) to enter the digits for the date. Use the Right Arrow key (5, Fig. 3) to move from one number to the next in the day display, and also to move to the month. Then, use the Scroll keys (6 and 7, Fig. 3) to cycle through the list of months.
When the current month is displayed, use the Right Arrow (5, Fig. 3) to move to the year. Use the Up and Down Arrow keys to enter all four digits of the current year. Press ENTER when the date has been entered.
7.Autostar then requests the current time. Use the Up and Down Arrow keys to enter the time. (Use a "0" for the first digit if less than 10.) Use the Right (or Left) Arrow key to move from one number to the next. Press one of the Arrow keys (5, Fig. 3) to scroll to "AM" or "PM." If you select the "blank" choice that follows "AM" and "PM," the clock displays time in a 24-hour (military time) format. Then, press ENTER to start the clock.
NOTE: When multiple choices are available within a menu option, the current option is usually displayed first and highlighted by a right pointing Arrow (>).
8.The next screen requests the status of Daylight Savings Time. Pressing a Scroll key toggles between the YES/NO settings. Select the desired setting by pressing ENTER.
NOTE: Daylight Savings Time may be referred to by a different name in various areas of the world.
9.The next screen asks for the Country or State (listed alphabetically) of the observing site. Use the Scroll keys to cycle through the database of countries, states, and provinces. Press ENTER when the correct location displays.
10.The next screen asks for the city (listed alphabetically) closest to the observing site. Use the Scroll keys to cycle through the database of cities. Press ENTER when the correct city appears on screen.
11.The next screen asks for the telescope model. Use the Scroll keys to locate ETX-60 or ETX-70. Press ENTER to select the appropriate model.
12.System initialization is complete and the screen reads "Setup: Align".
12 Getting Started
 Loading...