

Mazda BT-50 2017 Owner's Manual

A Word to Mazda Owners
Thank you for choosing a Mazda. We at Mazda design and build vehicles with complete
customer satisfaction in mind.
To help ensure enjoyable and trouble-free operation of your Mazda, read this manual
carefully and follow its recommendations.
Regular servicing of your vehicle by an expert repairer helps maintain both its
roadworthiness and its resale value. A world-wide network of Authorised Mazda Repairers
can help you with their professional servicing expertise.
Their specially trained personnel are best qualified to service your Mazda vehicle properly
and exactly. Also, they are supported by a wide range of highly specialized tools and
equipment specially developed for servicing Mazda vehicles. When maintenance or service
is necessary we recommend an Authorised Mazda Repairer.
We assure you that all of us at Mazda have an ongoing interest in your motoring pleasure
and in your full satisfaction with your Mazda product.
Mazda Motor Corporation
HIROSHIMA, JAPAN
Important Notes About This Manual
Keep this manual in the glove box as a handy reference for the safe and enjoyable use of your Mazda. Should you
resell the vehicle, leave this manual with it for the next owner.
All specifications and descriptions are accurate at the time of printing. Because improvement is a constant goal at
Mazda, we reserve the right to make changes in specifications at any time without notice and without obligation.
Please be aware that this manual applies to all models, equipment and options. As a result, you may find
some explanations for equipment not installed on your vehicle.
©2017 Mazda Motor Corporation
June 2017 (Print2)

MEMO

Table Of Contents
Introduction
About This Manual ........................ page 1
Symbols Glossary .......................... page 2
Parts and Accessories .................... page 2
At a Glance
At a Glance .................................... page 3
Child Safety
Child Seats ..................................... page 9
Child Seat Positioning ................. page 14
ISOFIX Anchor Points ................ page 16
Booster Seats ............................... page 17
Child Safety Locks ...................... page 19
Occupant protection
Principle of Operation .................. page 20
Fastening the seat belts ................ page 29
Seat belt height adjustment .......... page 30
Seat belt reminder ........................ page 31
Using seat belts during
pregnancy ..................................... page 31
Disabling the passenger airbag .... page 32
Constant monitoring .................... page 33
Keys and Remote Controls
General Information on Radio
Frequencies .................................. page 35
Programming the remote
control .......................................... page 35
Changing the remote control
battery .......................................... page 37
Locks
Locking and Unlocking ............... page 38
Engine immobiliser
Principle of Operation .................. page 42
Coded keys .................................. page 43
Arming the engine immobiliser .... page 43
Disarming the engine
immobiliser .................................. page 44
Alarm
Principle of Operation .................. page 45
Arming the alarm ......................... page 47
Disarming the alarm .................... page 47
Steering Wheel
Adjusting the Steering Wheel ...... page 48
Audio Control .............................. page 49
Voice Control ............................... page 49
Wipers and Washers
Windscreen Wipers ...................... page 50
Autowipers .................................. page 50
Windscreen Washers .................... page 51
Checking the Wiper Blades ......... page 52
Changing the Wiper Blades ......... page 52
Lighting
Lighting Control .......................... page 54
Autolamps ................................... page 55
Front Fog Lamps ......................... page 56
Rear Fog Lamps .......................... page 56
Headlamp Levelling .................... page 57
Hazard Warning Flashers ............. page 58
Direction Indicators ..................... page 58
Interior Lamps ............................. page 59
Changing a Bulb .......................... page 59
Bulb Specification Chart .............. page 66
Windows and Mirrors
Power Windows ........................... page 67
Exterior Mirrors ........................... page 69
Electric exterior mirrors ............... page 70
Instrument Cluster
Gauges ......................................... page 73
Warning Lamps and Indicators .... page 74
Audible Warnings and
Indicators ..................................... page 81
Information Displays
General Information ..................... page 83
Trip Computer .............................. page 83
Personalised Settings ................... page 86

Table Of Contents
Air-Conditioning
Principle of Operation .................. page 88
Air Vents ...................................... page 89
Manual Air-Conditioning ............ page 89
Automatic Air-Conditioning ........ page 92
Heated Windows.......................... page 96
Seats
Sitting in the Correct Position ...... page 97
Front Seats ................................... page 98
Head Restraints .......................... page 103
Rear Seats .................................. page 104
Heated Seats .............................. page 105
Convenience features
Clock ......................................... page 106
Instrument Lighting Dimmer ..... page 106
Cigar Lighter .............................. page 107
Ashtray ....................................... page 107
Auxiliary Power Points .............. page 108
Cup Holders ............................... page 108
Overhead Console ..................... page 109
Storage compartments ................ page 110
Auxiliary input (AUX IN)
socket ......................................... page 111
USB port .................................... page 111
Floor Mats .................................. page 112
Starting and Stopping the Engine
General Information ................... page 113
Ignition Switch .......................... page 113
Steering Wheel Lock ................. page 114
Starting a Petrol Engine ............. page 114
Starting a Diesel Engine ............ page 116
Diesel Particulate Filter .............. page 116
Switching Off the Engine .......... page 117
Fuel and Refuelling
Safety Precautions ..................... page 118
Fuel Quality - Petrol .................. page 118
Fuel Quality - Diesel .................. page 119
Catalytic Converter .................... page 120
Fuel filler flap ............................ page 120
Refuelling .................................. page 122
Fuel Consumption ..................... page 122
Transmission
Manual Transmission ................. page 123
Four-Wheel Drive ...................... page 123
Electronic Locking
Differential ................................. page 125
Automatic Transmission ............ page 126
Brakes
Principle of Operation ................ page 130
Hints on Driving With Anti-Lock
Brakes ........................................ page 131
Parking Brake ............................ page 131
Hill descent control (HDC)
Principle of Operation ................ page 132
Using Hill Descent Control ....... page 132
Dynamic Stability Control
Principle of Operation ................ page 134
Using Dynamic Stability
Control ....................................... page 135
Hill Launch Assist
Principle of Operation ................ page 136
Parking Aids
Principle of Operation ................ page 138
Using the Parking Aid - Vehicles With:
Rear Parking Aid ....................... page 139
Rear View Camera ..................... page 141
Cruise Control
Principle of Operation ................ page 143
Using Cruise Control ................. page 143
Load Carrying
General Information ................... page 146
Tailgate ...................................... page 146
Load Retaining Fixtures ............ page 147
Driving Hints
General Driving Points .............. page 148
Running-In ................................. page 149

Table Of Contents
Cold Weather Precautions .......... page 149
Reduced Engine Performance .... page 150
Driving Through Water .............. page 150
Vehicle Loading ......................... page 152
Towing
Towing a Trailer ......................... page 153
Fuses
Fuse Box Locations ................... page 159
Changing a Fuse ........................ page 160
Fuse Specification Chart ............ page 161
Vehicle recovery
Towing Points ............................ page 166
Towing the Vehicle on Four
Wheels ....................................... page 166
Maintenance
General Information ................... page 168
Opening and Closi ng the
Bonnet ....................................... page 169
Under Bonnet Overview - MZI
2.5 .............................................. page 171
Under Bonnet Overview - MZ-CD
2.2 .............................................. page 172
Under Bonnet Overview - MZ-CD 3.2
I5 ................................................ page 174
Engine Oil Dipstick - MZI 2.5 ... page 176
Engine Oil Dipstick - MZ-CD 2.2/MZ-
CD 3.2 I5 ................................... page 176
Engine Oil Check ...................... page 177
Engine Coolant Check ............... page 178
Power Steering Fluid Check ...... page 179
Brake and Clutch Fluid Check ... page 179
Draining the Fuel Filter Water
Trap............................................ page 180
Washer Fluid Check ................... page 181
Technical Specifications ............ page 182
Scheduled Maintenance ............. page 183
Vehicle Care
Cleaning the Exterior ................. page 188
Cleaning the Interior .................. page 189
Repairing Minor Paint
Damage ...................................... page 189
Vehicle battery
Jump-Starting the Vehicle .......... page 190
Battery connection points .......... page 191
Battery warning symbols ........... page 191
Wheels and Tyres
General Information ................... page 193
Changing a Road Wheel ............ page 194
Tyre Care ................................... page 202
Using Winter Tyres .................... page 203
Using Snow Chains ................... page 204
Tyre pressure monitoring
system ........................................ page 204
Technical Specifications ............ page 209
Vehicle identification
Vehicle Identification Plate ........ page 210
Vehicle Identification Number.... page 210
Capacities and Specific
Technical Specifications ............ page 211
Navigation introduction
General Information ................... page 217
Road Safety ................................ page 218
Navigation Quick start
Navigation Quick start ............... page 219
Navigation unit overview
Navigation unit overview ........... page 221
Loading the navigation data ...... page 224
System settings
System settings .......................... page 225
Navigation system
Route options menu ................... page 228
Route displays ........................... page 229
Traffic Message Channel
Principle of Operation ................ page 231

Table Of Contents
Using TMC ................................ page 231
Map updates
Map updates .............................. page 232
Audio introduction
Important audio information ...... page 233
Audio unit overview
Audio unit overview .................. page 235
Audio system security
Security code ............................. page 242
Audio unit clock and date
Setting the clock on the audio
unit ............................................. page 243
Audio unit operation
On/off contr ol ............................ page 245
Sound button .............................. page 245
Waveband button ....................... page 246
Station tuning control ................ page 246
Station preset buttons ................. page 247
Autostore control ....................... page 248
Traffic information control ........ page 248
Audio unit menus
Automatic volume control ......... page 250
Digital signal processing
(DSP) ......................................... page 250
News broadcasts ........................ page 251
Alternative frequencies .............. page 251
Regional mode (REG) ............... page 252
Compact disc player
Compact disc playback .............. page 253
Track selection ........................... page 253
Fast forward/reverse .................. page 254
Shuffle/random .......................... page 254
Repeat compact disc tracks ........ page 255
Compact disc track scanning ..... page 255
MP3 file playback ...................... page 256
MP3 display opti ons .................. page 259
Ending compact disc playback ... page 259
Auxiliary input (AUX IN)
Auxiliary input (AUX IN)
socket ......................................... page 260
Audio system care
Aerial ......................................... page 261
Audio troubleshooting
Audio troubleshooting ............... page 262
Telephone
General Information ................... page 263
Telephone setup ......................... page 263
Bluetooth® setup ....................... page 264
Telephone controls ..................... page 265
Using the telephone ................... page 266
Voice control
Principle of Operation ................ page 269
Using voice control .................... page 270
Audio unit commands ................ page 271
Telephone commands ................ page 280
Air-conditioning commands ...... page 282
Connectivity
General Information ................... page 284
Connecting an external device ... page 286
Connecting an external device - Vehicles
With: Bluetooth® ...................... page 286
Using a USB device ................... page 287
Using an iPod ............................ page 290
Appendices
Type approvals ........................... page 293
Type approvals ........................... page 293
Type approvals ........................... page 294
Electromagnetic compatibility.... page 295
Introduction
ABOUT THIS MANUAL
Thank you for choosing Mazda. We
recommend that you take some time to get
to know your vehicle by reading this
manual. The more that you know about it,
the greater the safety and pleasure you
will get from driving it.
WARNING
Always drive with due care and
attention when using and operating
the controls and features on your
vehicle.
NOTE
l
This manual describes product
features and options available
throughout the range, sometimes
even before they are generally
available. It may describe options not
fitted to your vehicle.
l
Some of the illustrations in this
manual may be used for different
models, so may appear different to
your vehicle. However, the essential
information in the illustrations is
always correct.
l
Always use and operate your vehicle
in line with all applicable laws and
regulations.
l
Pass on this manual when selling
your vehicle. It is an integral part of
the vehicle.
This vehicle has received the endorsement
of TÜV, the accredited international
testing organisation, for its allergyfriendly properties.
All materials used in the manufacture of
the interior of this vehicle meet strict
requirements of the TÜV TOXPROOF
Criteria Catalogue for Vehicle Interiors by
TÜV Produkt and Umwelt GmbH and are
designed to minimize the risk of allergic
reactions.
Additionally an efficient pollen filter
protects the passengers against allergen
particles in the outdoor air.
For more information, contac t TÜV at
www.tuv.com.
1
Introduction
SYMBOLS GLOSSARY
Symbols in this handbook
WARNING
You risk death or serious injury to
yourself and others if you do not
follow the instructions highlighted by
the warning symbol.
CAUTION
You risk damaging your vehicle if you
do not follow the instructions
highlighted by the caution symbol.
Symbols on your vehicle
PARTS AND
ACCESSORIES
Genuine Mazda parts and accessories
have been designed specifically for your
vehicle. Unless we have specifically
stated, we have not tested non-Mazda
parts and accessories and, therefore, we
will not guarant ee that they are suitable
for your vehicle. We recommend that you
ask your Authorised Mazda Repairer for
advice on parts and accessories suitable
for your vehicle.
When you see these symbols, read and
follow the relev ant instructions in this
handbook before touching or attempting
adjustment of any kind.
2
AT A GLANCE
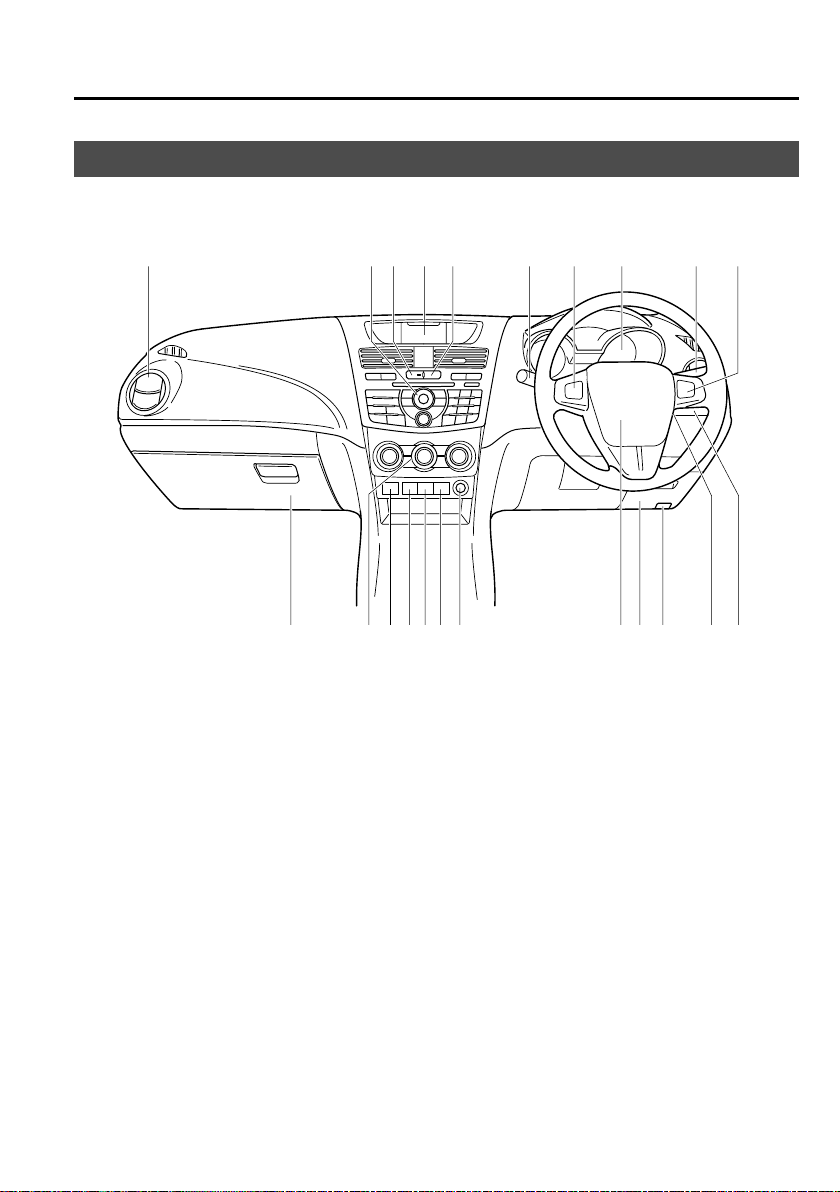
Instrument panel overview - Right-hand drive
IBACTDEFGL
At a Glance
M HJKNQOUVPRS
The equipment and installation position varies by vehicle
3
At a Glance
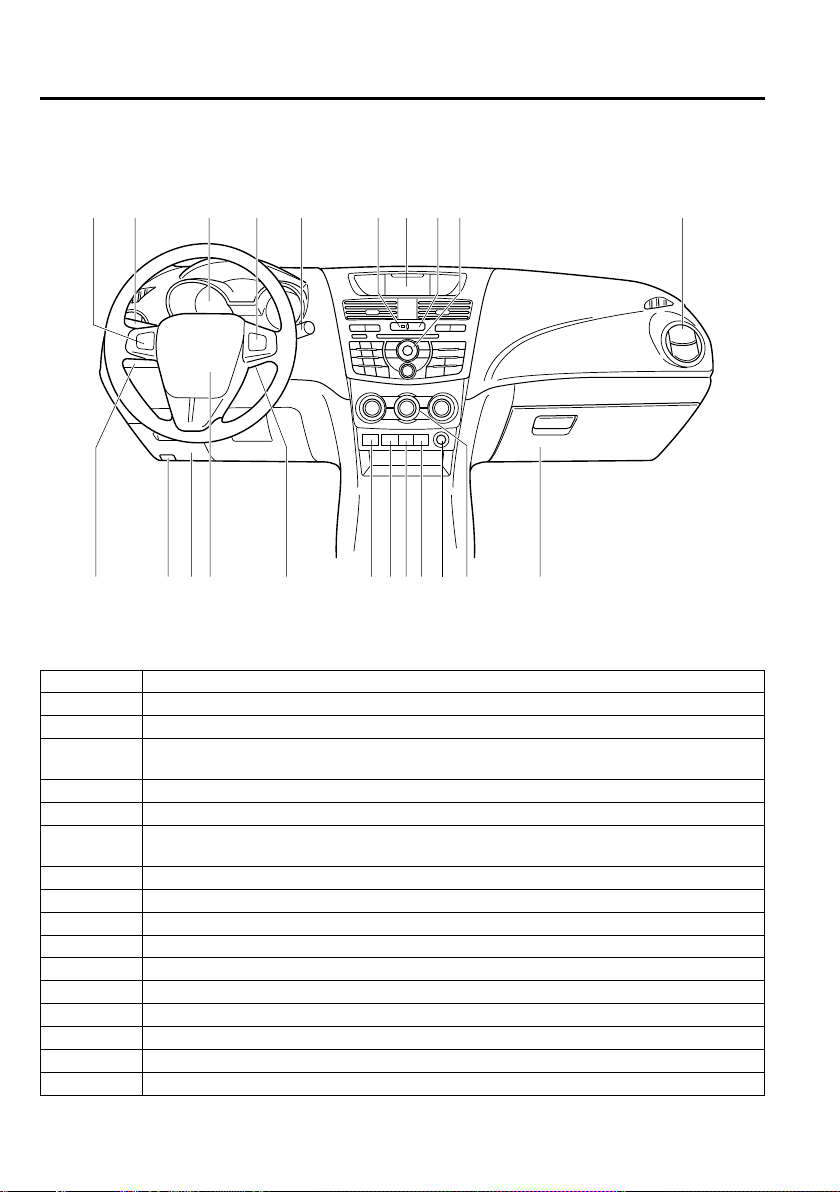
Instrument panel overview - Left-han d drive
ED F L G ACTB I
JKN M PVUOQR SH
The equipment and installation position varies by vehicle
A Door lock button. See Locking and Unlocking (page 38).
B Audio unit. See Audio unit overview (page 235).
C Multi-functional display.
D
E Audio control. See Audio Control (page 49).
F Instrument cluster. See Gauges (page 73). See Warning Lamps and Indicators (page 74).
G
H
K Driver side storage compartment. See Storage compartments (page 110).
L Cruise control. See Cruise Control (page 143).
M Ignition switch. See Ignition Switch (page 113).
N Horn.
O Dynamic stability control (DSC) off switch. See Using Dynamic Stability Control (page 135).
P Passenger airbag deactivation warning lamp. See Disabling the passenger airbag (page 32).
Q Auxiliary power sockets. See Auxiliary Power Points (page 108).
Multi-function lever: Direction indicators. See Direction Indicators (page 58). High Beam. See
Lighting Control (page 54). or Wiper lever. See Wipers and Washers (page 50).
Multi-function lever: Direction indicators. See Direction Indicators (page 58). High Beam. See
Lighting Control (page 54). or Wiper lever. See Wipers and Washers (page 50).
*
Headlamp levelling switch. See Headlamp Levelling (page 57).
I Air vents. See Air Vents (page 89).
J Bonnet release lever. See Opening and Closing the Bonnet (page 169).
4
At a Glance
Air-conditionings. See Manual Air-Conditioning (page 89), See Automatic Air-Conditioning
R
(page 92).
Auxiliary input and USB. See Auxiliary input (AUX IN) socket (page 111). See USB port
S
(page 260).
T Hazard warning flasher switch. See Hazard Warning Flashers (page 58).
U Electronic Locking Differential (ELD) button. See Electronic Locking Differential (page 125).
V Hill descent control on switch. See Hill descent control (HDC) (page 132).
* Some models.
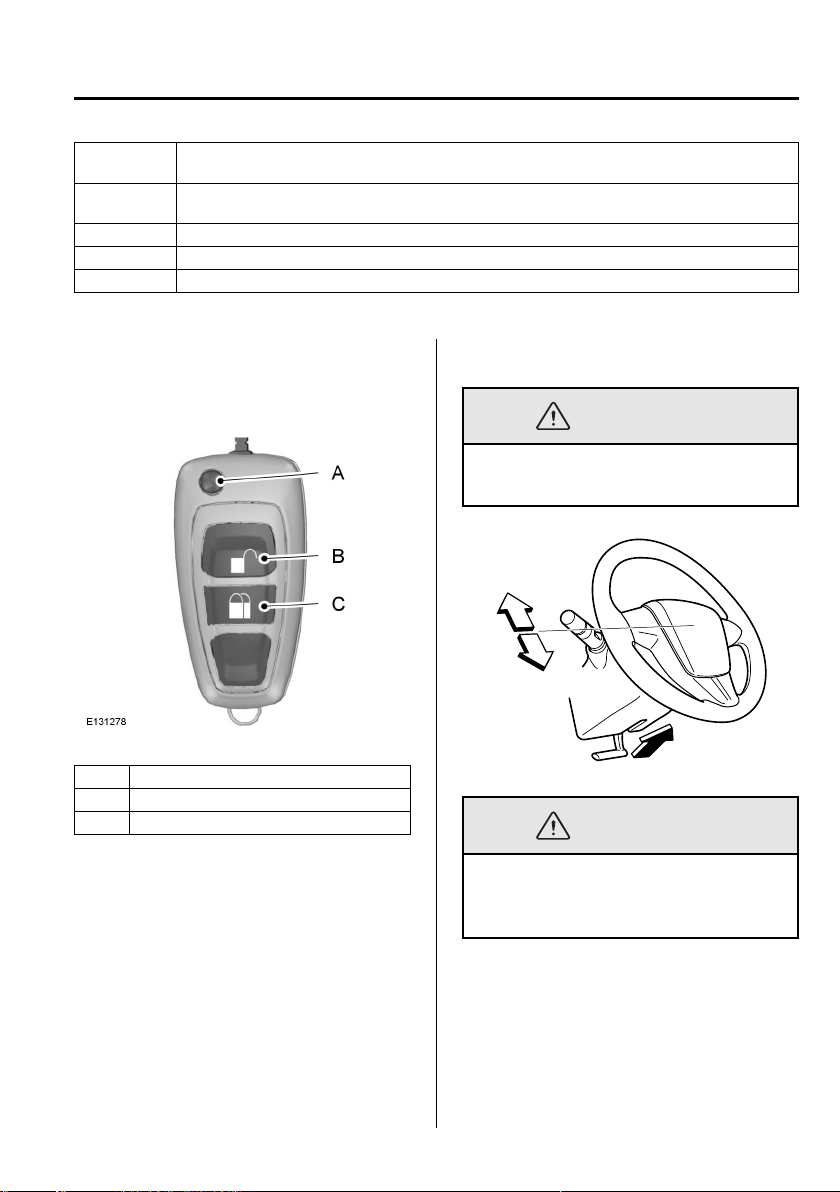
qLocking and unlocking
Unlocking the vehicle
A Key fold/unfold button
B Unlock
C Lock
Press the unlock button once to unlock the
vehicle.
Press the lock button once to activate
central locking.
Press the lock button twice within three
seconds to double lock the doors.
qAdjusting the steering wheel
WARNING
Never adjust the steering wheel when
the vehicle is moving.
2
1
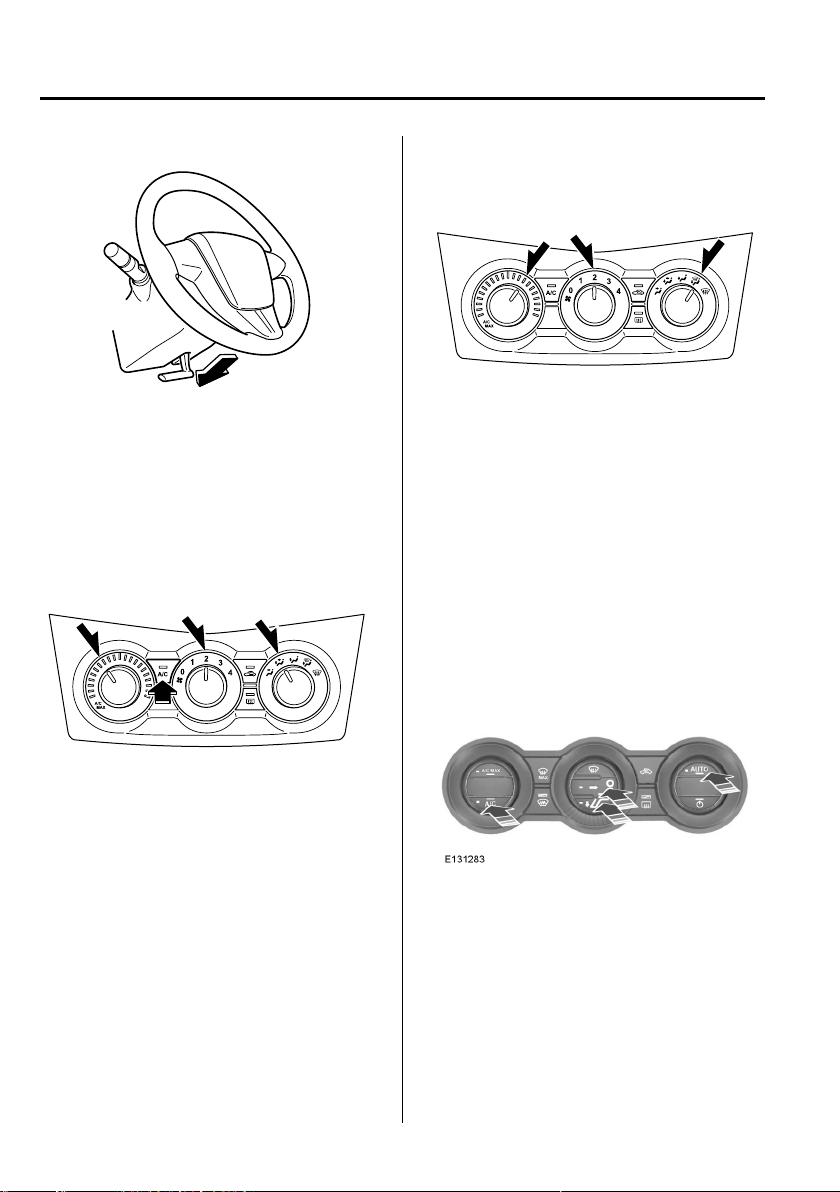
WARNING
Make sure that you fully engage the
locking lever when returning it to its
original position.
5
At a Glance
Recommended settings for heating
3
See Adjusting the Steering Wheel (page
48).
qManual air-conditioning
Recommended settings for cooling
Select the outside air.
Open the centre and side air vents.
Direct the ce ntre air vents upwards and
the side air vents toward the side
windows.
Select the outside air.
Close the centre air vents and open the
side air vents.
Direct the side air vents toward the side
windows.
See Manual Air-Conditioning (page 89).
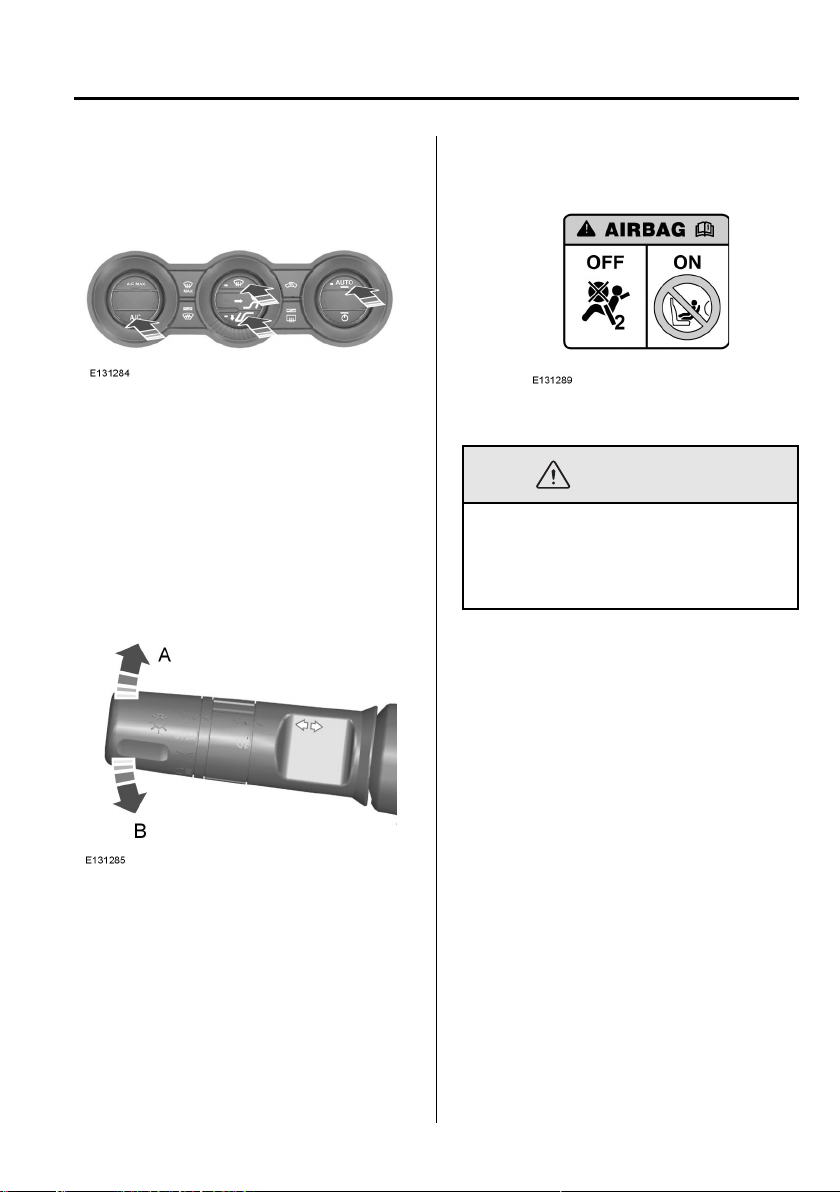
qAutomatic air-conditioning
Recommended settings for cooling
Select the outside air.
Set the temperature to 22 °C (72 °F).
Open the centre and side air vents.
Direct the ce ntre air vents upwards and
the side air vents toward the side
windows.
6
At a Glance
Recommended settings for heating
Select the outside air.
Set the temperature to 22 °C (72 °F).
Open the centre and side air vents.
Direct the ce ntre air vents upwards and
the side air vents toward the side
windows.
qDirection indicators
qAirbag
WARNING
To avoid the risk of death or serious
injury, never use a rearward facing
child restraint in the front, unless the
air bag is OFF.
See Child Se at Positioning (page 14).
If the lever is tapped up or down, the
direction indicators will flash three time.
See Direction Indicators (page 58).
7
At a Glance
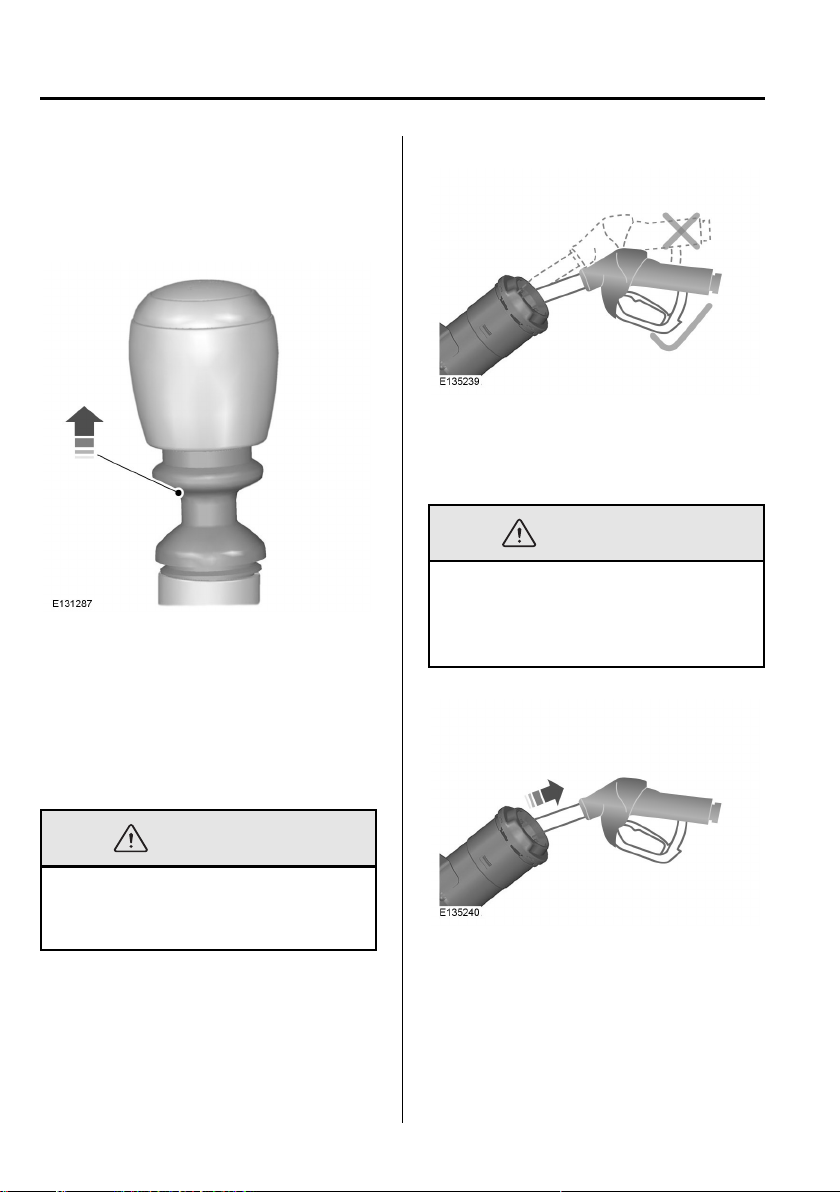
qManual transmission
Selecting reverse gear - 6 speed
Insert the fuel pipe nozzle up to the first
notch on the nozzle, and keep it in
position on the fuel filler opening.
WARNING
We recommend that you wait at least
10 seconds before removing the fuel
nozzle to allow any residual fuel to
drain into the fuel tank.
It is necessary to raise the collar whilst
selecting reverse gear in 6-speed vehicles.
See Manual Transmission (page 123).
qRefuelling
WARNING
Take care when refuelling to avoid
spilling any residual fuel from the fuel
pipe nozzle.
8
Slightly raise the fuel nozzle to remove it.
See Fuel filler flap (page 120).

Child Safety
CHILD RESTRAINT PRECAUTIONS
Mazda strongly urges the use of child-restraint systems for children small enough to use
them.
Mazda recommends use of a Mazda genuine child-restraint system or one that complies
with the UNECE
restraint system, please contact an Authorised Mazda Repairer.
Check your local and state or provincial laws for specific requirements regarding the safety
of children riding in your vehicle.
*1 UNECE stands for United Nations Economic Commission for Europe.
Whatever child-restraint system you consider, please pick the appropriate one for the age
and size of the child, obey the law and follow the instructions that come with the individual
child-restraint system.
A child who has outgrown child-restraint systems should sit in the rear and use seat belts.
The child-restraint system should be installed on the rear seat.
Statistics confirm that the rear seat is the best place for all chil dren up to 12 years of agethe more so with a supplementary restraint system (air bags).
A rear-facing child-res traint system should NEVER be used in the front passenger seat
with the air bag system activated. The front passenger's seat is also the least preferred seat
for other child-restraint systems.
For some models, we have provided a deactivation switch that will disable front passenger
air bag inflation. Do not switch off the front passenger air bag without reading the
“Disabling the Passenger Airbag”.SeeDisabling the Passenger Airbag (page 32).
*1
44 regulation. If you would like to purchase a Mazda genuine child-
9
Child Safety
WARNING
Use the correct size child-restraint system:
For effective protection in vehicle accidents and sudden stops, a child must be
properly restrained using a seat belt or child-restraint system depending on age and
size. If not, the child could be seriously injured or even killed in an accident.
Follow the manufacturer's instructions and always keep the child-restraint system
buckled down:
An unsecured child-restraint system is dangerous. In a sudden stop or a collision it
could move causing serious injury or death to the child or other occupants. Make sure
any child-restraint system is properly secured in place according to the child-restraint
system manufacturer's instructions. When not in use, remove it from the vehicle or
fasten it with a seat belt, or latch it down to BOTH ISOFIX anchors, and attach the
corresponding tether anchor.
Always secure a child in a proper child-restraint system:
Holding a child in your arms while the vehicle is moving is extremely dangerous. No
matter how strong the person may be, he or she cannot hold onto a child in a sudden
stop or collision and it could result in serious injury or death to the child or other
occupants. Even in a moderate accident, the child may be exposed to air bag forces
that could result in serious injury or death to the child, or the child may be slammed
into an adult, causing injury to both child and adult.
10
Child Safety
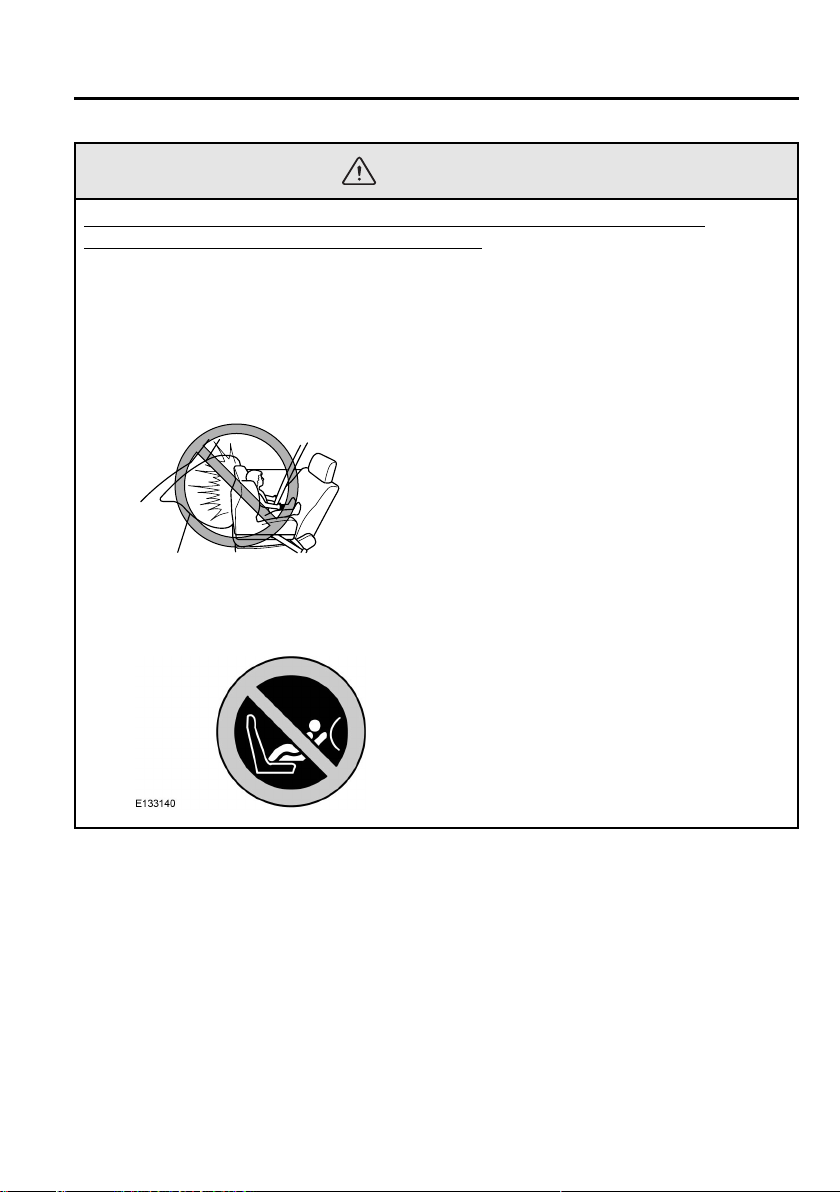
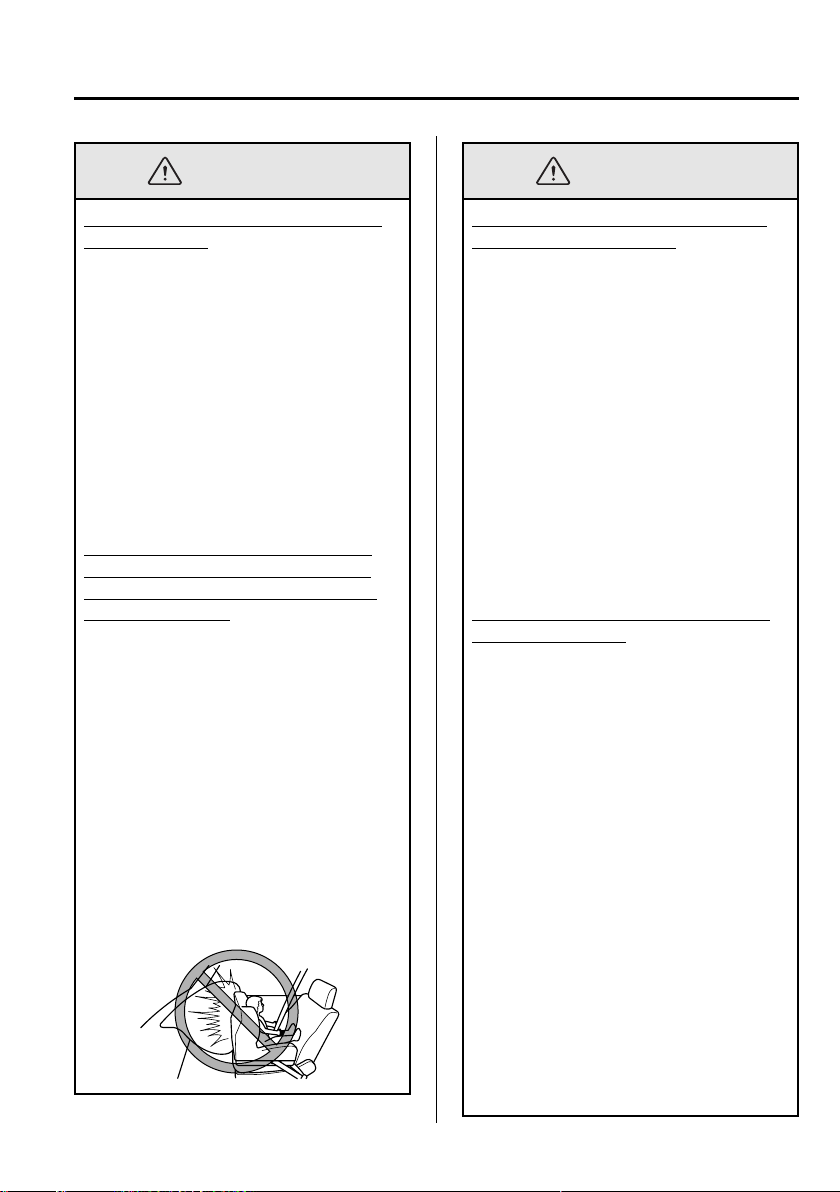
WARNING
Extreme Hazard! Never use a rear-facing child-restraint system on the front
passenger seat with an air bag that could deploy:
Extreme Hazard! Do not use a rearward facing child restraint on a seat protected by
an airbag in front of it!
Even in a moderate collision, the child-restraint system can be hit by a deploying air
bag and moved violently backward resulting in serious injury or death to the child. If
your vehicle is equipped with a front passenger air bag deactivation switch, always set
the switch to the OFF position when installing a rear-facing child-restraint system on
the front passenger seat.
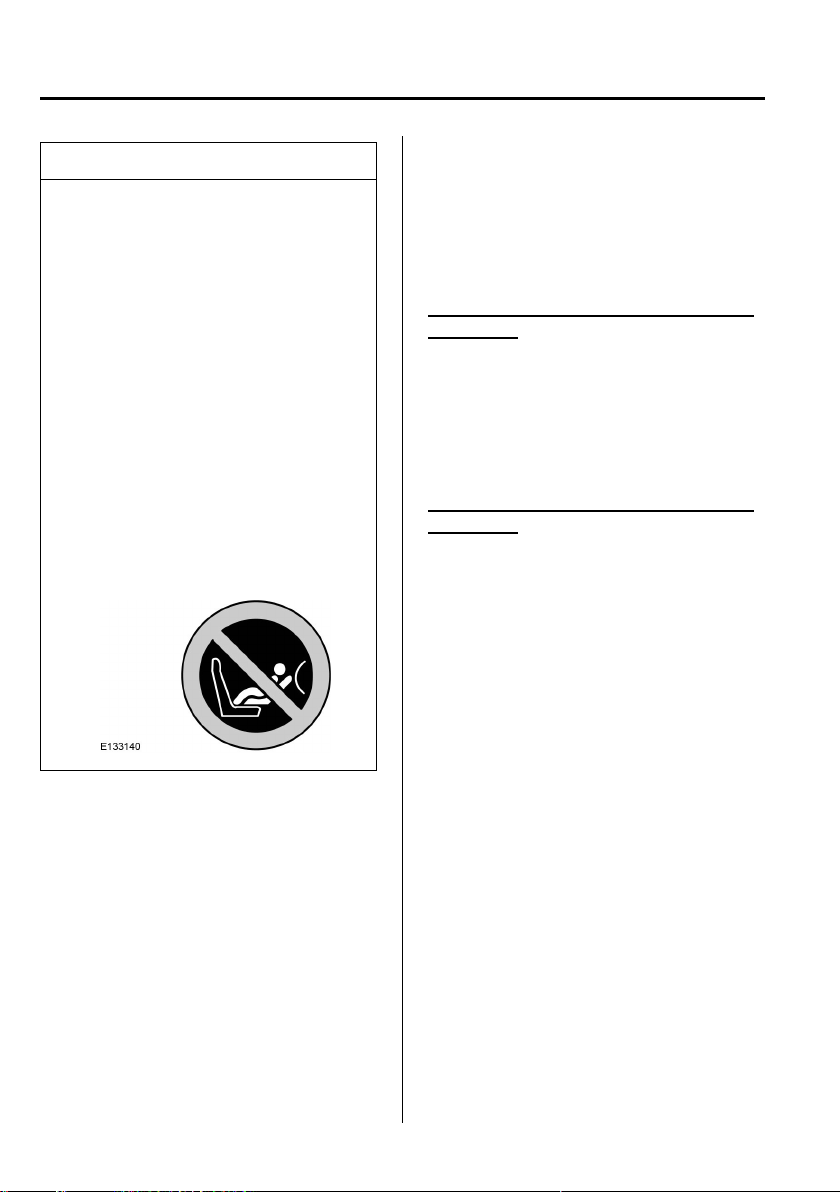
Vehicles with a front passenger air bag have a warning label attached as shown below.
The warning label reminds you not to put a rear-facing child-restraint system on the
front passenger seat at any time.
11
Child Safety
WARNING
Do not install a front-facing child-restraint system on the front passenger seat unless
it is unavoidable:
In a collision, the force of a deploying air bag could cause serious injury or death to
the child. If installing a front-facing child-restraint system on the front passenger seat
is unavoidable, move the front passenger seat as far back as possible and make sure
that the front passenger air bag deactivation switch is in the OFF position. See
Disabling the Passenger Airbag (page 32).
Do not allow a child or anyone to lean over or against the side window of a vehicle
with side and curtain air bags:
It is dangerous to allow anyone to lean over or against the side window, the area of
the front passenger seat, the front and rear window pillars and the roof edge along
both sides from which the side and curtain air bags deploy, even if a child-restraint
system is used. The impact of inflation from a side or curtain air bag could cause
serious injury or death to an out of position child. Furthermore, leaning over or
against the front door could block the side and curtain air bags and eliminate the
advantages of supplementary protection. With the front air bag and the additional side
air bag that comes out of the front seat, the rear seat is always a better location for
children. Take special care not to allow a child to lean over or against the side
window, even if the child is seated in a child-restraint system.
Use the tether and tether anchor only for a child-restraint system:
Child-restraint system anchorages are designed to withstand only those loads imposed
by correctly installed child-restraint systems. Under no circumstances are they to be
used for adult seat belts, harnesses, or for attaching other items or equipment to the
vehicle.
Always route the tether strap between the head restraint and the seatback:
Routing the tether strap on top of the head restraint is dangerous. In a collision the
tether strap could slide off the head restraint and loosen the child-restraint system.
The child-restraint system could move which may result in death or injury to the child.
12
Child Safety
WARNING
Always attach the tether strap to the correct tether anchor position:
Attaching the tether strap to the incorrect tether anchor position is dangerous. In a
collision, the tether strap could come off and loosen the child-restraint system. If the
child-restraint system moves it could result in death or injury to the child.
CAUTION
A seat belt or child-restraint system can become very hot in a closed vehicle during
warm weather. To avoid burning yourself or a child, check them before you or your child
touches them.
13
Child Safety
CHILD SEAT
POSITIONING
WARNING
l
Please consult your Repairer for
the latest details relating to Mazda
recommended child seats.
l
Extreme Hazard! Do not use a
rearward facing child restraint on a
seat protected by an air bag in front
of it!
l
When using a child seat with a
support leg, the support leg must
rest securely on the floor.
l
When using a child seat with a
seatbelt, make sure that the seat belt
is not slack or twisted.
CAUTION
The child seat must rest tightly against
the vehicle seat. It may be necessary to
lift or remo ve the head restraint.
However, when installing a booster
cushion, always install the vehicle head
restraint to the seat where the booster
cushion is installed. See Head
Restraints (page 103).
NOTE
When using a child seat on a front seat,
always adjust the front passenger seat to
its fully rearwards position. If it proves
difficult to tighten the lap section of the
seatbelt without slack remaining, adjust
the seatback to the fully upright
position and raise the height of the seat.
See Seats (page 97).
14
Child Safety
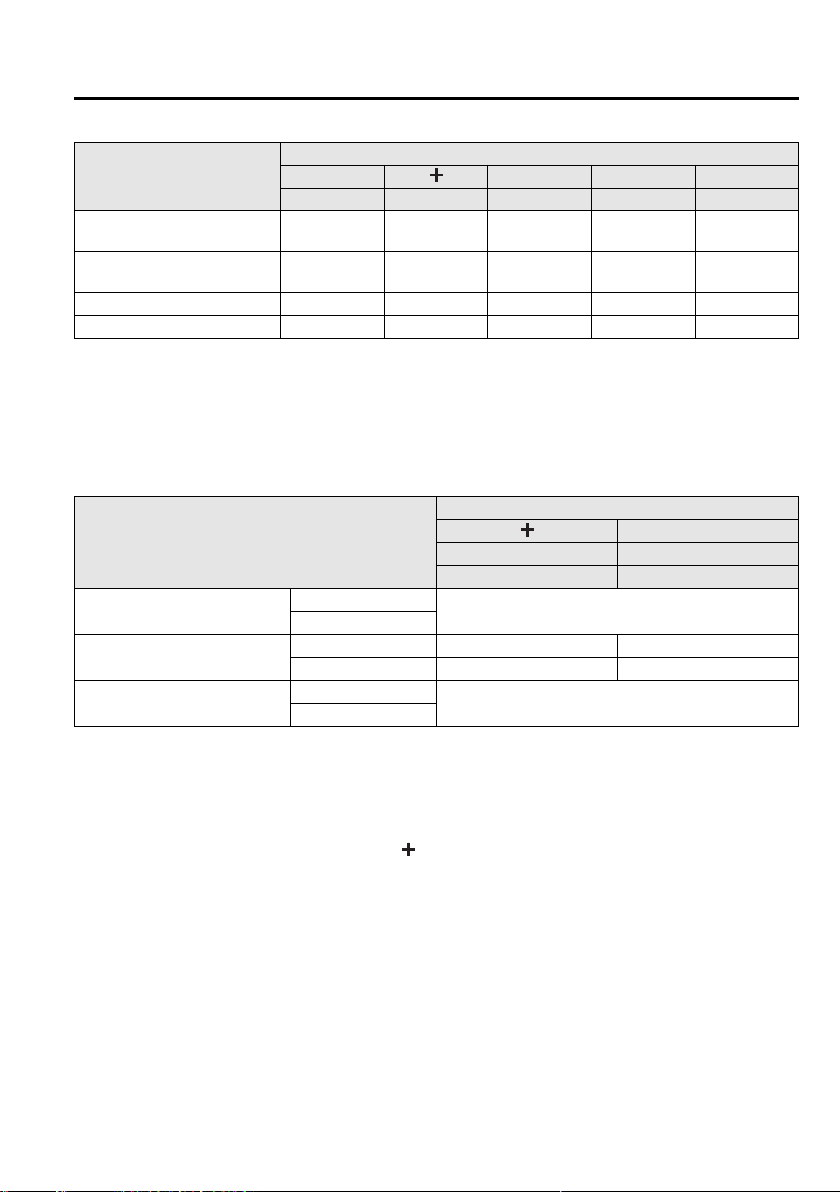
Mass group categories
Seating positions
Front outboard passenger seat
with airbag ON
Front outboard passenger seat
with airbag OFF
Rear seats U U U U U
Regular cab centre seat X X X X X
X Not suitable for children in this mass group.
U Suitable for universal category child seats approved for use in this mass group.
1
Suitable for universal category child seats approved for use in this mass group. However, we recommend that
U
you secure children in a government approved child seat, in the rear seat.
1
Suitable for universal category forward facing child seats approved for use in this mass group. However, we
UF
recommend that you secure children in a government approved child seat, in the rear seat.
ISOFIX child seatsí- Doubl e cab
Seating positions
Front seat
Rear outboard seat ISOFIX
Rear centre seat
IL Suitable for particular ISOFIX child restraints systems of the semi-universal category. Please consult child
restraints systems suppliers' vehicle recommendation lists.
IUF Suitable for ISOFIX forward facing child restraints systems of universal category approved for use in this
mass group and ISOFIX size class.
*
The ISOFIX size class for both universal and semi-universal child restraints systems is defined by the capital
letters A to G. These identification letters are displayed on ISOFIX child restraints.
**
At time of publishing the recommended Group O ISOFIX baby safety seat is the Britax Roemer Baby Safe.
Please consult your Repairer for the latest details relating to Mazda recommended child seats.
***
At time of publishing the recommended Group 1 ISOFIX child seat is the Britax Roemer Safefix PLUS. Please
consult your Repairer for the latest details relating to Mazda recommended child seats.
00 123
Up to 10 kg Up to 13 kg 9―18 kg 15―25 kg 22―36 kg
XXUF
1
U
1
U
1
1
U
UF
1
1
U
UF
1
1
U
Mass group categories
0
1
Rear facing Forward facing
Up to 13 kg 9―18 kg
Size class
Seat type
Size class E, D, C
Seat type IL
Size class
Seat type
Not ISOFIX equipped
*
**
Not ISOFIX equipped
A, B, B1, C, D
IL,IUF
***
*
í
Some models.
15
Child Safety
ISOFIX ANCHOR POINTS
í
WARNING
Use an anti-rotation device when
using the ISOFIX system. We
recommend that you use a top tether
or a support leg.
NOTE
When you are purchasing an ISOFIX
restraint, make sure that you know the
correct mass group and ISOFIX size
class for the intended seating locations.
See Child Seat Positioning (page 14).
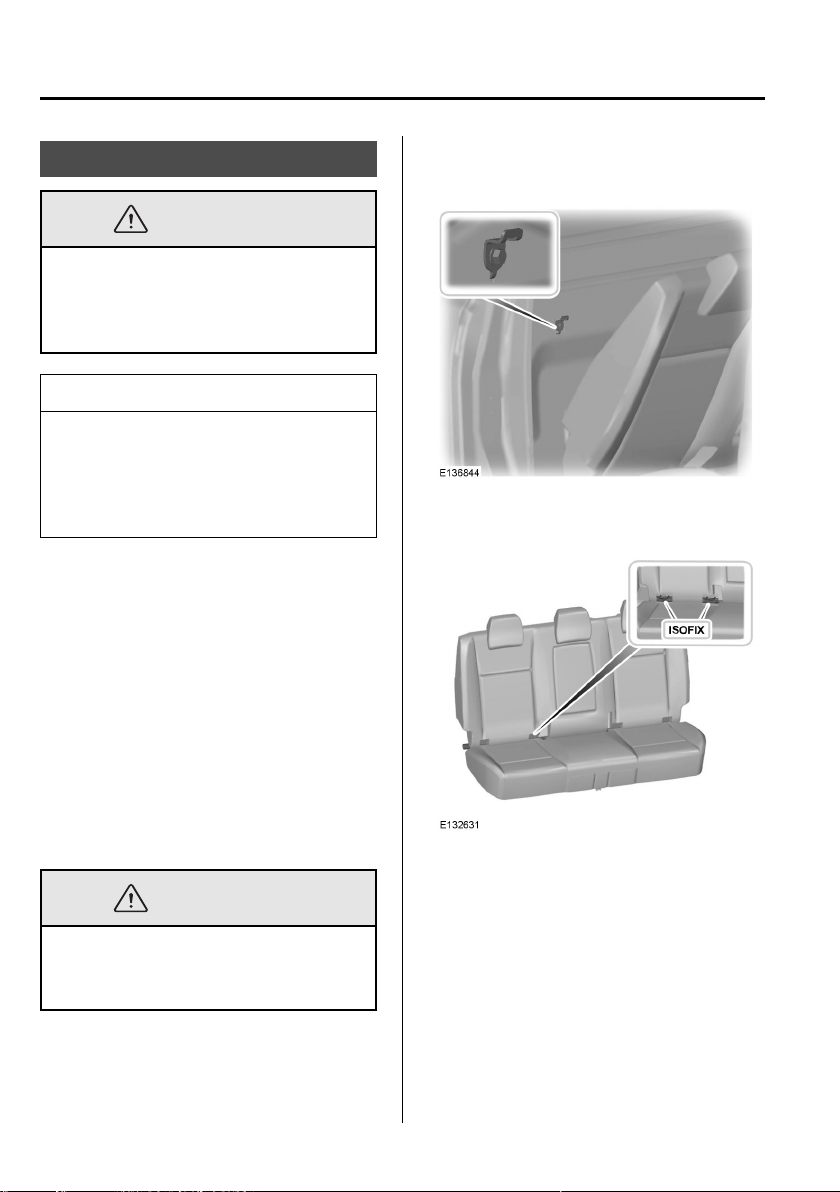
Your vehicle is fitted with ISOFIX anchor
points that accommodate universally
approved ISOFIX child restraints.
The ISOFIX system comprises two rigid
attachment arms on the child restraint that
attach to anchor points on the 2nd row
seats, where the cushion and backrest
meet. Tether anchor points are fitted to the
back panel trim for child restraints with a
top tether.
Double cab
qAttaching a child restraint with a
top tether
WARNING
Do not attach a tether strap to
anything other than the correct tether
anchor point.
16
í
Some models.
1. Remove the head restraint. However,
when installing a booster cushion,
always install the vehicle head restraint
to the seat where the booster cushion is
installed. See Head Restraints (page
103).
2. Place the child seat on the back seat
cushion and fold the relevant seatback
forward. See Rear Seats (page 104).
Child Safety
3. Route the tether strap to the anchor
point.
WARNING
Make sure the top tether strap is not
slack or twisted and is properly located
on the anchor point.
4. Push the seatback to the upright
position.
WARNING
l
Make sure that the seatback is
secure and fully engaged in the
catch.
l
Make sure the safety seat is fitted
correctly. There is a risk of injury.
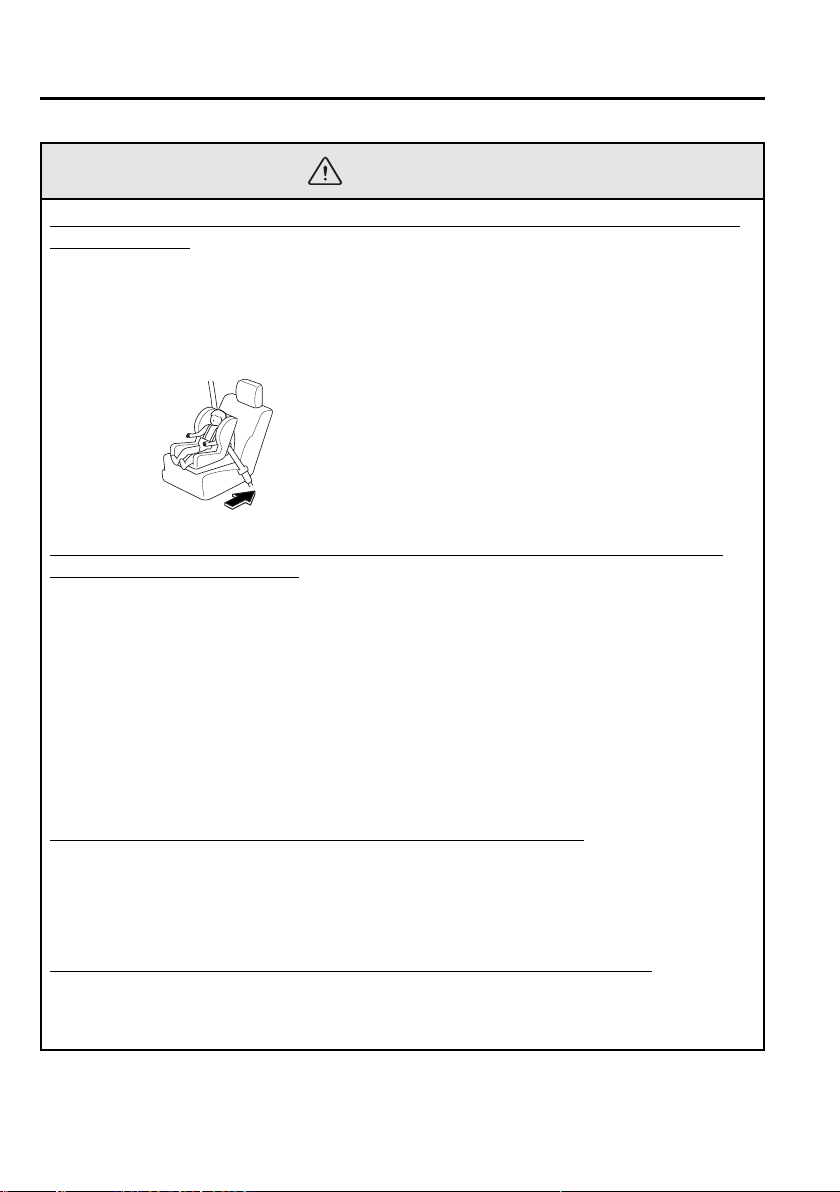
5. Push the child seat back firmly to
engage the ISOFIX lower anchor
points.
6. Tighten the tether strap in line with the
child seat manufacturers instructions.
We recommend that you use a tether strap
where fitted.
BOOSTER SEATS
WARNING
l
Do not install a booster seat or a
booster cushion with only the lap
strap of the seat belt.
l
Do not install a booster seat or a
booster cushion with a seat belt that
is slack or twisted.
l
Do not put the seat belt under your
child's arm or behind its back.
l
Do not use pillows, books or towels
to boost your child's height.
l
Make sure that your children sit in
an upright position.
l
Secure children that weigh more
than 15 kilograms (33 pounds) but
are less than 150 centimetres (59
inches) tall in a booster seat or a
booster cushion.
CAUTION
When using a child seat on a rear seat,
make sure that the child seat rests
tightly against the vehicl e seat. It
maybe necessary to lift or remove the
head restraint. However, when
installing a booster cushion, always
install the vehicle head restraint to the
seat where the booster cushion is
installed. See Head Restraints (page
103).
17
Child Safety
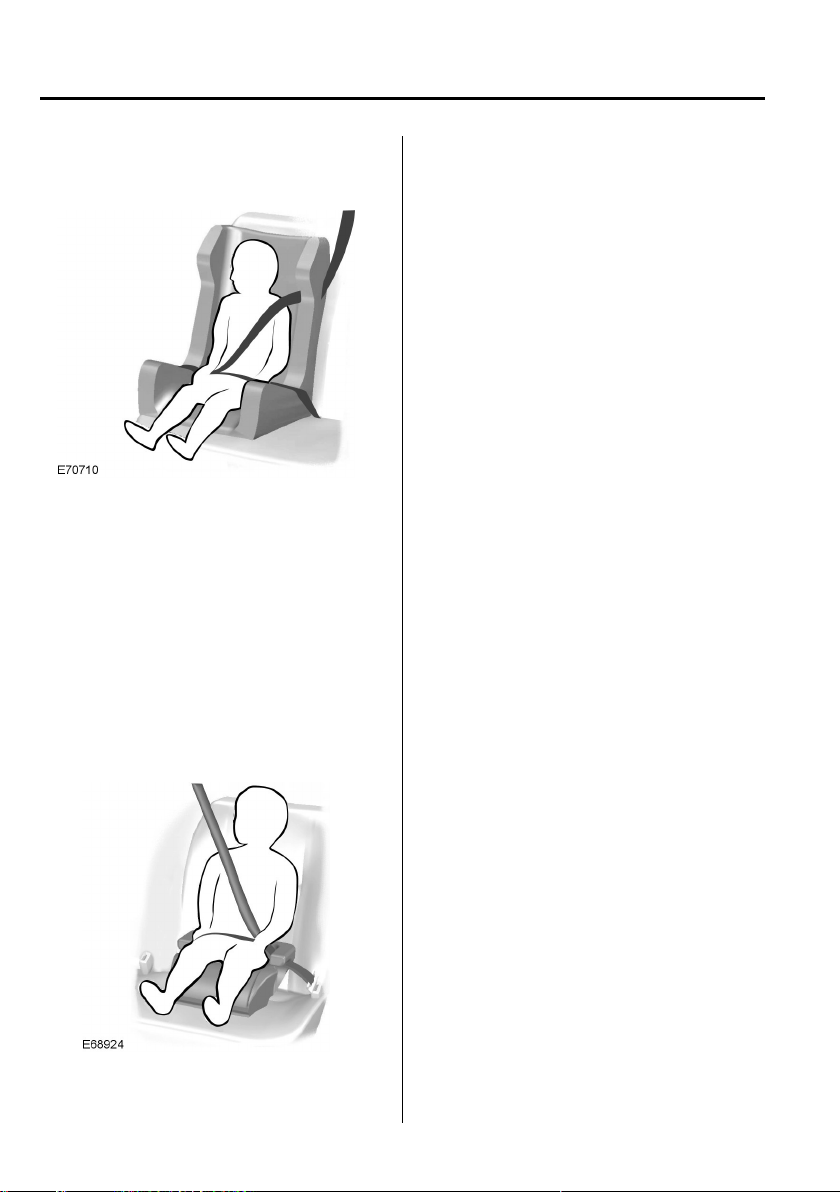
Booster seat (Group 2)
We recommend that you use a booster
seat that combines a cushion with a
backrest instead of a booster cushion only.
The raised seating position will allow you
to position the shoulder strap of the adult
seat belt over the centre of your child's
shoulder and the lap strap tightly across
its hips.
Booster cushion (Group 3)
When using a booster cushion, always
install the vehicle head restraint to the seat
where the booster cushion is installed.
18
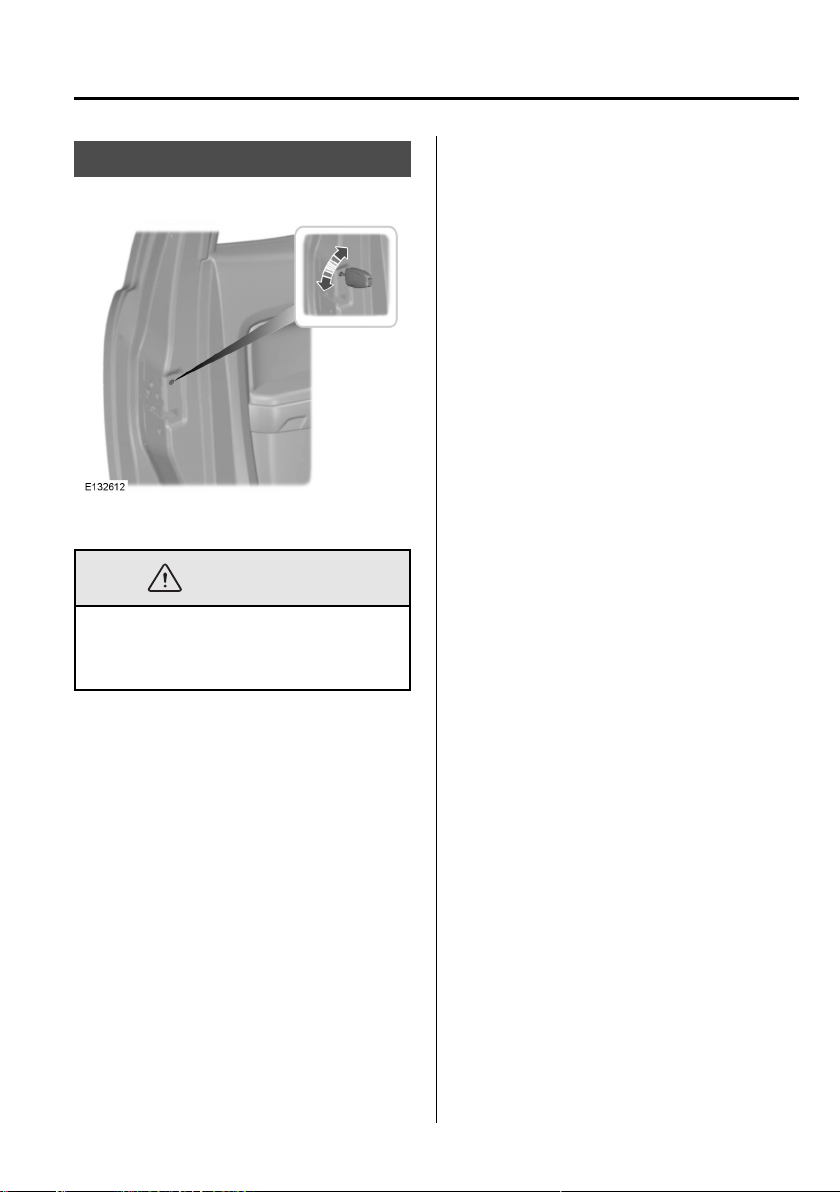
CHILD SAFETY LOCKS
WARNING
You cannot open the doors from inside
if you have put the child safety locks
on.
Child Safety
Left-hand side
Turn anti-clockwise to lock and clockwise
to unlock.
Right-hand side
Turn clockwise to lock and anti-clockwise
to unlock.
19
Occupant protection
PRINCIPLE OF
OPERATION
qSupplementary Restraint Systems
(SRS) Precautions
These systems operate independently
depending on the type of accident
encountered; if you have side and curtain
air bags, the side and curtain air bags are
not likely to deploy on both sides in the
same accident because a vehicle is not
often hit from both sides. The side and
curtain air bags and the frontal air bag
system will not normally deploy during
the same type of accident unless a
combination of frontal and side impacts
occur.
The air bag supplementary restraint
systems are designed to provide
supplementary protection only in the front
seats in certain situations and the rear
outside passenger positions only in sameside collisions, so seat belts are always
important in the following ways:
Without seat belt usage, the air bags
cannot provide adequate protection during
an accident. Seat belt usage is necessary
to:
l
Keep the occupant from being thrown
into an inflating air bag.
l
Reduce the possibility of injuries
during an accident that is not designed
for air bag inflation, such as roll-over
or rear impact.
l
Reduce the possibility of injuries in
frontal or side collisions that are not
severe enough to activate the air bags.
l
Reduce the possibility of being thrown
from your vehicle.
l
Reduce the possibility of injuries to
lower body and legs during an accident
because the air bags provide no
protection to these parts of the body.
l
Hold the driver in a position which
allows better control of the vehicle.
A child who is too small to use a seat belt
must be properly secured using a childrestraint system.
See Child Restraint Precautions (page
9).
Carefully consider which child-restraint
system is necessary for your child and
follow the inst allation directions in this
Owner's Manual as well as the childrestraint system manufacturer's
instructions.
WARNING
Seat belts must be worn in air bag
equipped vehicles:
Depending only on the air bags for
protection during an accident is
dangerous. Alone, air bags may not
prevent serious injuries. The
appropriate air bags can be expected
to inflate only in the first collision with
frontal, near frontal or side forces that
are at least moderate. Vehicle
occupants should always wear seat
belts.
20
Occupant protection
WARNING
Children should not ride in the front
passenger seat:
Placing a child, 12 years or under, in
the front seat is dangerous. The child
could be hit by a deploying air bag
and be seriously injured or even killed.
A sleeping child is more likely to lean
against the door and be hit by the side
air bag in moderate, right-side
collision. Whenever possible, always
secure a child 12 years and under on
the rear seats with an appropriate
child-restraint system for the child's
age and size.
Extreme Hazard! Never use a rearfacing child-restraint system on the
front passenger seat with an air bag
that could deploy:
Extreme Hazard! Do not use a
rearward facing child restraint on a
seat protected by an airbag in front of
it!
Even in a moderate collision, the
child-restraint system can be hit by a
deploying air bag and moved violently
backward resulting in serious injury
or death to the child. If your vehicle is
equipped with a front passenger air
bag deactivation switch, always set the
switch to the OFF position when
installing a rear-facing child-restraint
system on the front passenger seat.
WARNING
Do not sit too close to the driver and
front passenger air bags:
Sitting too close to the driver and front
passenger air bag modules or placing
hands or feet on them is extremely
dangerous. The driver and front
passenger air bags inflate with great
force and speed. Serious injuries could
occur if someone is too close. The
driver should always hold onto only
the rim of the steering wheel. The
front seat passenger should keep both
feet on the floor. Front seat occupants
should adjust their seats as far back as
possible and always sit upright against
the seatbacks with seat belts worn
properly.
Sit in the centre of the seat and wear
seat belts properly:
Sitting too close to the side air bag
modules or placi ng hands on them is
extremely dangerous. The side air
bags inflate with great force and speed
directly out of the outboard side of the
front seat and expand along the front
door on the side the car is hit. Serious
injury could occur if someone is sitting
too close to the door or leaning
against a window, or if rear seat
occupants grab the sides of the front
seatbacks. Furthermore, sleeping up
against the door or hanging out the
windows in the vehicle could block the
side and curtain air bags and
eliminate the advantages of
supplementary protection. Give the
side and curtain air bags room to work
by sitting in the centre of the seat
while the vehicle is moving with seat
belts worn properly.
21
Occupant protection
WARNING
Do not attach objects on or around the
area where driver and front passenger
air bags deploy:
Attaching an object to the driver and
front passenger air bag modules or
placing something in front of them is
dangerous. In an accident, an object
could interfere with air bag inflation
and injure the occupants.
Do not attach objects on or around the
area where a side air bag deploys:
Attaching articles to the front seat in
such a way as to cover the outboard
side of the seat in any way is
dangerous. In an accident the object
could interfere with the side air bag,
which inflates from the outboard side
of the front seats, impeding the added
protection of the side air bag system or
redirecting the air bag in a way that is
dangerous. Furthermore, the bag
could be cut open releasing the gas.
Do not hang net bags, map pouches or
backpacks with side straps on the front
seats. Never use seat covers on the
front seats. Always keep the side air
bag modules in your front seats free to
deploy in the event of a side collision.
WARNING
Do not attach objects on or around the
area where a curtain air bag deploys:
Attaching objects to the areas where
the curtain air bag activates such as
on the windscreen glass, side door
glass, front and rear window pillars
and along the roof edge and assist
grips is dangerous. In an accident the
object could interfere with the curtain
air bag, which inflates from the front
and rear window pillars and along the
roof edge, impeding the added
protection of the curtain air bag
system or redirecting the air bag in a
way that is dangerous. Furthermore,
the bag could be cut open releasing
the gas.
Do not place hangers or any other
objects on the assist grips. When
hanging clothes, hang them on the
coat hook directly. Always keep the
curtain air bag modules free to deploy
in the event of a side collision.
Do not touch the components of the
supplementary restraint system after
the air bags have inflated:
Touching the components of the
supplementary restraint system after
the air bags have inflated is
dangerous. Immediately after
inflation, they are very hot. You could
get burned.
22
Occupant protection
WARNING
Never install any front-end equipment
to your vehicle:
Installation of front-end equipment,
such as frontal protection bar
(kangaroo bar, bull bar, push bar, or
other similar devices), snowplow, or
winches, is dangerous. The air bag
crash sensor system could be affected.
This could cause air bags to inflate
unexpectedly, or it could prevent the
air bags from inflating during an
accident. Front occupants could be
seriously injured.
Do not modify the suspension:
Modifying the vehicle suspension is
dangerous. If the vehicle's height or
the suspension is modified, the vehicle
will be unable to accurately detect a
collision resulting in incorrect or
unexpected air bag deployment and
the possibility of serious injuries.
WARNING
Do not modify the supplementary
restraint system:
Modifying the components or wiring
of the supplement ary restraint system
is dangerous. You could accidentally
activate it or make it inoperable. Do
not make any modifications to the
supplementary restraint system. This
includes installing trim, badges, or
anything else over the air bag
modules. It also includes installing
extra electrical equipment on or near
system components or wiring. An
expert repairer, we recommend an
Authorised Mazda Repairer can
provide the special care needed in the
removal and installation of front seats.
It is important to protect the side and
curtain air bag wiring and
connections to assure that the bags do
not accidentally deploy and that the
seats retain an undamaged air bag
connection.
Do not place luggage or other objects
under the front seats:
Placing luggage or other objects
under the front seats is dangerous.
The components essential to the
supplementary restraint system could
be damaged, and in the event of a side
collision, the appropriate air bags may
not deploy, which could result in death
or serious injury. To prevent damage
to the components essential to the
supplementary restraint system, do not
place luggage or other objects under
the front seats.
23
Occupant protection
NOTE
l
When an air bag deploys, a loud
inflation noise can be heard and
some smoke will be released. Neither
is likely to cause injury, however, the
texture of the air bags may cause
light skin injuries on body parts not
covered with clothing through
friction.
l
Should you sell your Mazda, we urge
you to tell the new owner of its air
bag systems and that familiarization
with all instructions about them,
from the Owner's Manual, is
important.
l
This highly-visible label warns
against the use of rear-facing childrestraint systems in the front seat.
qSeat Belt Precautions
Seat belts help to decrease the possibility
of severe injury during accidents and
sudden stops. Mazda recommends that the
driver and all passengers always wear seat
belts.
With 3-point type seat belt for the rear
centre seat
All the seats have lap/shoulder belts.
These belts have retractors with inertia
locks that keep them out of the way when
not in use. The locks allow the belts to
remain comfortable on users, but they'll
lock in position during a collision.
With 2-point type seat belt for the rear
centre seat
The front and rear outboard seats have
lap/shoulder belts. These be lts have
retractors with inertia locks that keep
them out of the way when not in use. The
locks allow the belts to remain
comfortable on users, but they'll lock in
position during a collision. The centrerear seat has a lap belt with manual
adjustment.
In some models (with automatic locking
mode), the rear outboard seat belt
retractors operate in two modes,
emergency locking mode and, for childrestraint systems, automatic locking
mode.
24
 Loading...