

Mazda 1978 GLC Workshop Manual
1-
* -
'--
. ,
MazdaGLC
•
••
laZDa

www.carburetor-manual.com
Would you like some Free Manuals?
http://carburetor-manual.com/free-shop-manual-club-t-13.html
Also visit http://freeshopmanual.com for more Free Manuals
Also Visit my website for 7 FREE Download Manuals starting
with this one.
"The ABC's of Carburetion"
Click Here Now
file:///C|/Documents%20and%20Settings/Tim/Desktop/carburetor-manual-welcome/index.htm[4/25/2009 11:42:20 AM]
j
'
-
~
.
j"
Important Instructions
for
Owner and Driver
Description.
Maintenance
and
Servicing
MazdaGLC
© 1977
TOYO
KOGYO
CO,,
LTD,
PRINTED,
IN
JAPAN
AUG"
'7 7
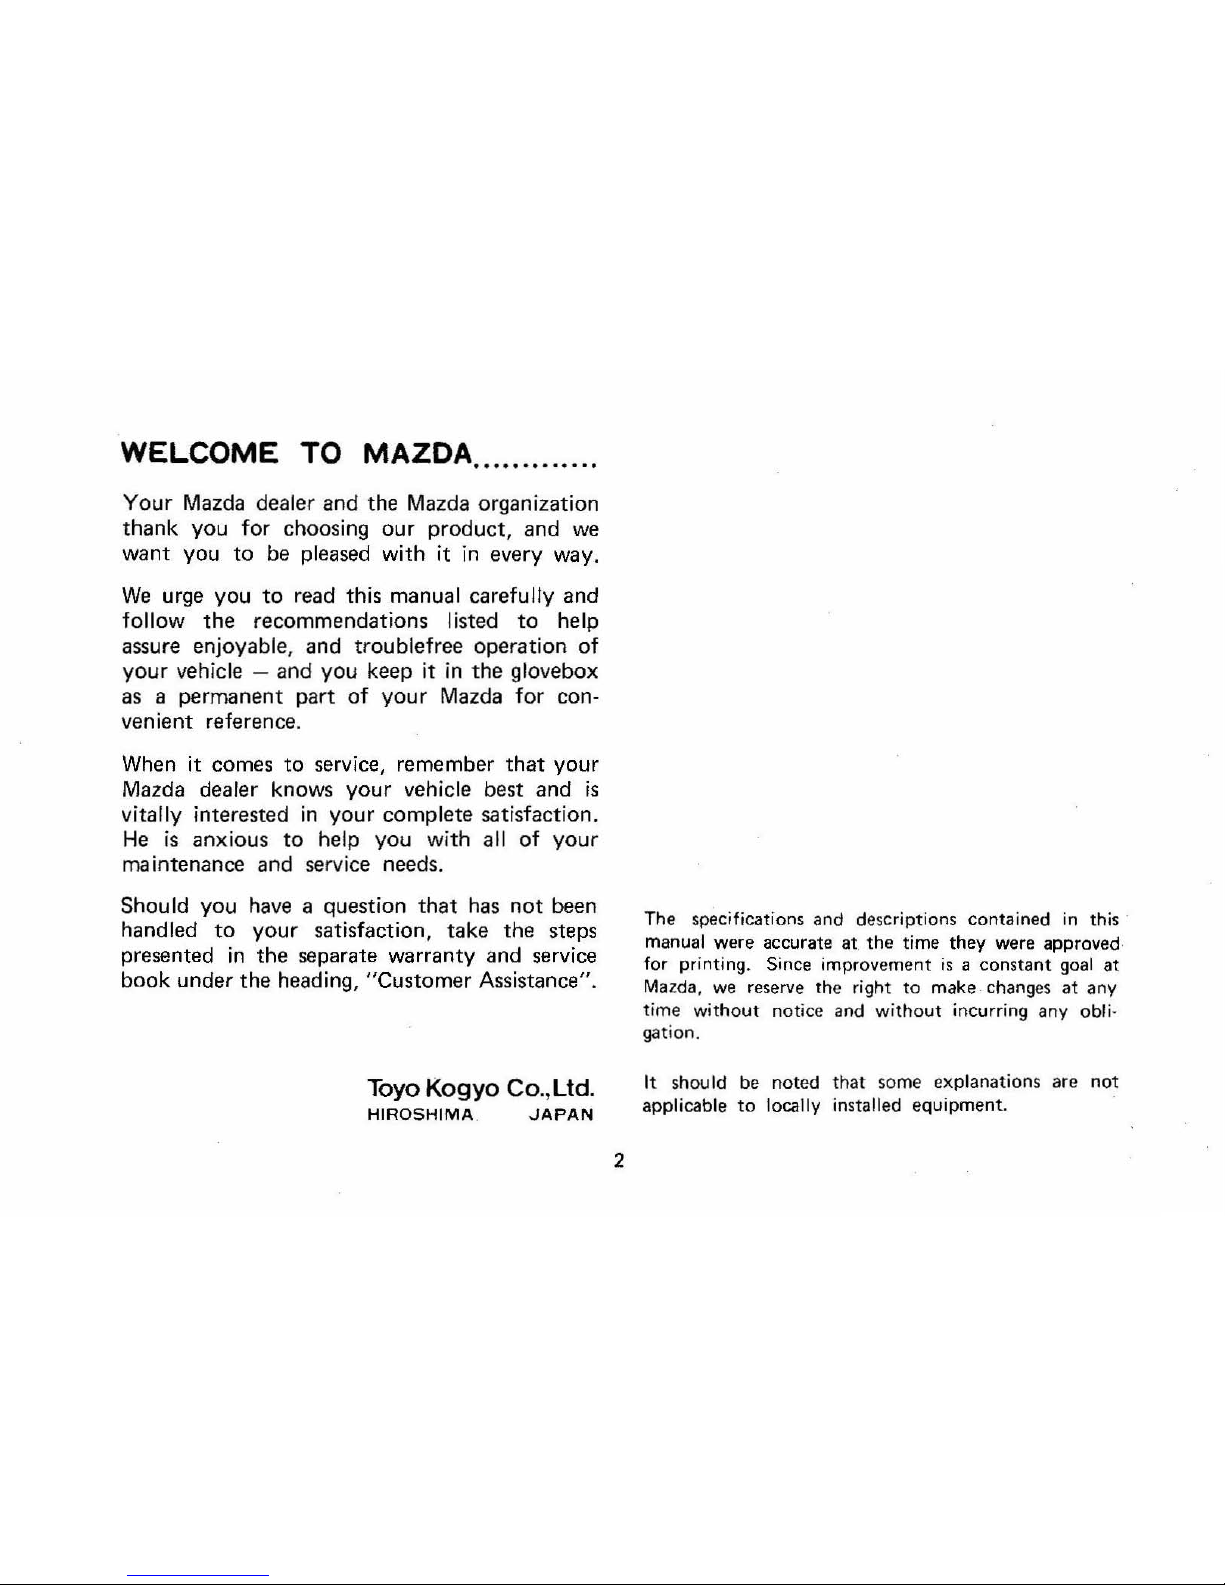
WELCOME
TO
MAZDA
............
.
Your Mazda dealer and the Mazda organization
thank
you for choosing
our
product, and
we
want
you
to
be pleased with it
in
every way.
We
urge you
to
read this manual carefully and
follow
the
recommendations listed
to
help
assure enjoyable, and troublefree operation of
your
vehicle - and you keep it
in
the
glovebox
as a permanent part
of
your
Mazda for con·
venient reference.
When it comes
to
service, remember
that
your
Mazda dealer knows
your
vehicle best and
is
vitally interested
in
your complete satisfaction.
He
is
anxious
to
help you with all of
your
ma
intenance and service needs.
Shou
Id
you have a question
that
has
not
been
handled
to
your
satisfaction,
take
the steps
presented
in
the
separate warranty and service
book
under
the
heading, "Customer Assistance".
Toyo
Kogyo CO.,Ltd.
HIROSHIMA
.
JAPAN
2
The specifications and desc
riptions contained
in
this
manual were accurate
at.
the time they were approved
for printing. Since improv e
ment
is
a constant
goal
at
Mazda,
we
reserve
the right to make
changes
at any
time
without
notice and
without
incurri
ng
any obli-
gation.
It
should be noted that some explanations are not
applicable
to
locally installed equipment.
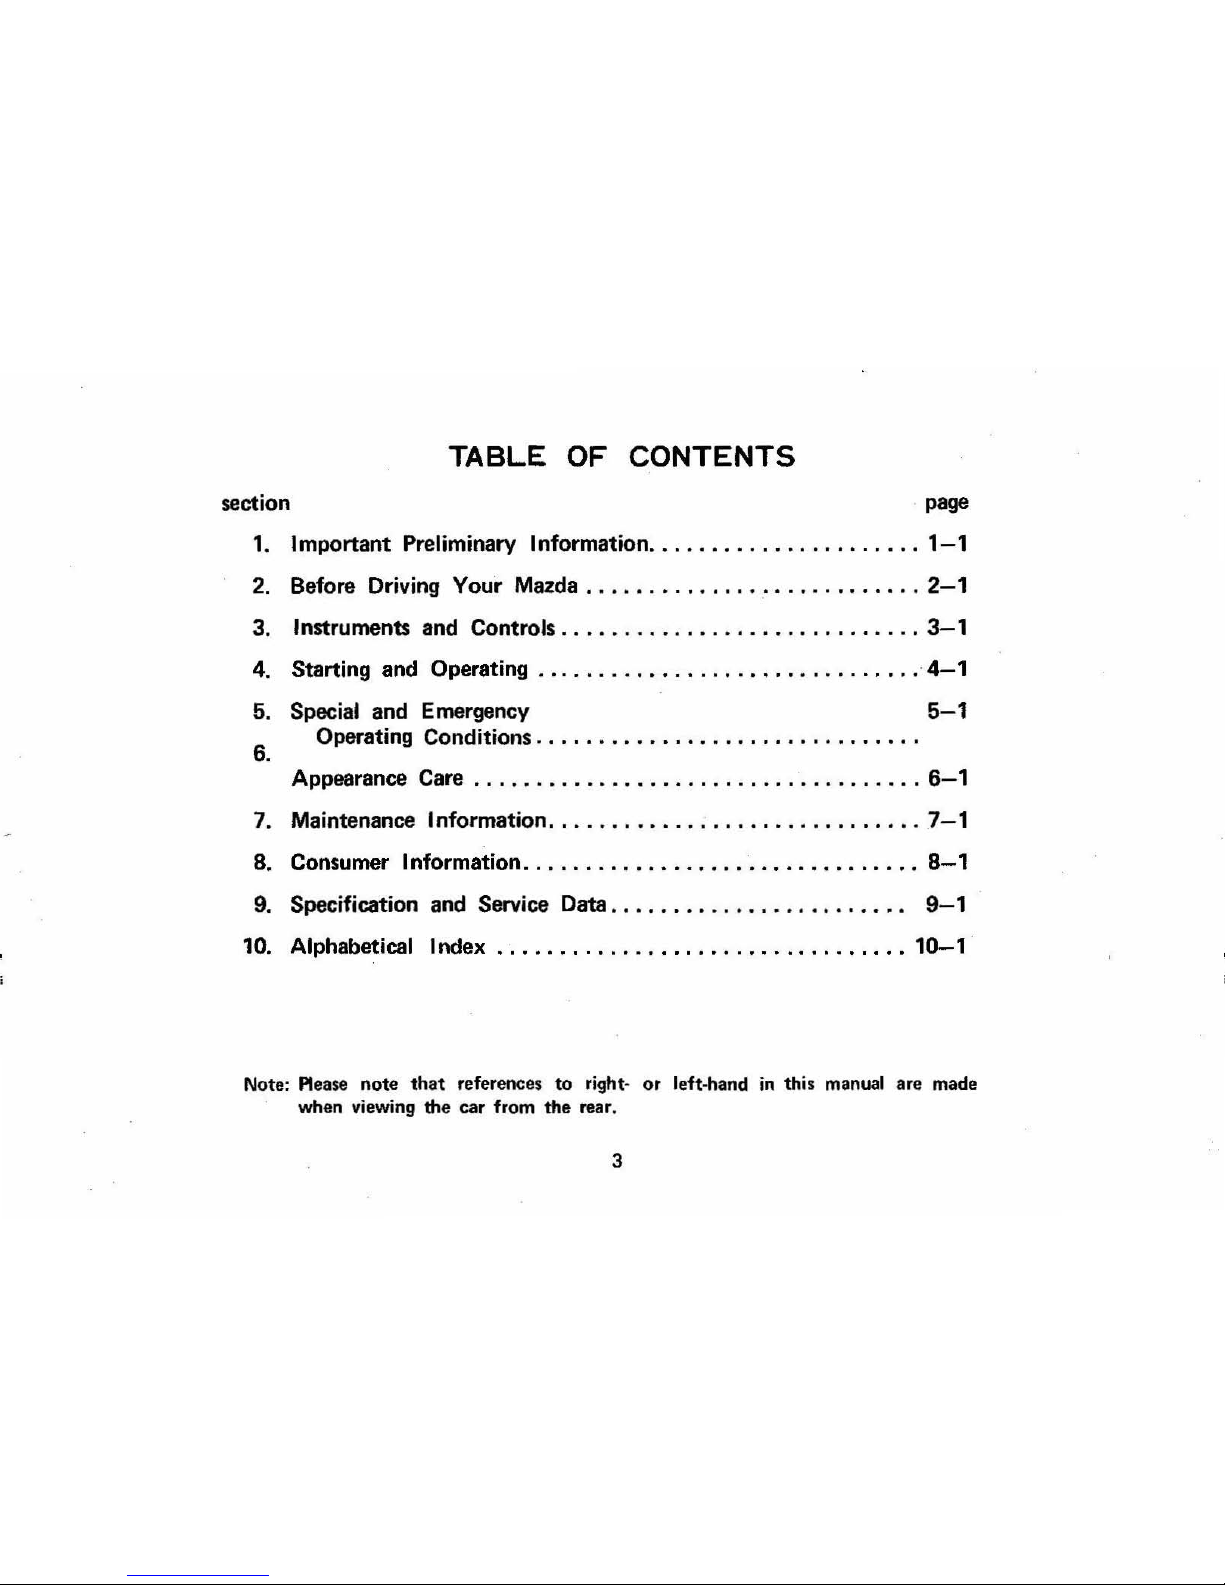
TABLE
OF
CONTENTS
section
page
1.
I mportant Preliminary Information
......................
1-1
2.
Before Driving Your Mazda
...........................
2-1
3. Instruments and Controls
............................
.
3-1
4. Starting and Operating
...............................
·
4-1
5. Special and Emergency
5-1
6.
Operating Conditions
..............................
.
Appearance Care
....................................
6-1
7. Maintenance Information
..............................
7-1
8. Consumer Information
................................
8-1
9. Specification and Service
Data........
..
. . . . . . . . . . . .
..
9-1
10. Alphabetical Index
..........
.
......................
10-1
Note:
Please
note that references to right· or left-hand
in
this
manual
are
made
when
viewing
the
car
from the
rear.
3
1_
IMPORTANT PRELIMNARY INFORMATION
BREAK-IN PERIOD
Following a few simple precautions for
the
first few
handfed
miles
can
add
to
the
future
performance,
economy
and long
life
of
your
car.
•
Do
not race the engine.
• Drive
at
varying speeds, trying
not
to
"strain"
the
engine.
• Avoid hard stops, except
in
emergencies.
This will allow
the
brakes
to
seat
properly.
After
2,000
miles
of
driving,
your
vehicle's first
maintenance
should
be
performed
at
your
Mazda dealer.
1- 1
WARRANTIES
Please refer
to
the
separate
warranty
and service
book,
as
furnished
with
each
Mazda vehicle
for
details.
FUEL REQUIREMENTS
Your
new Mazda
is
designed
to
operate
only
on
UNLEADED GASOLINE
of
approximately
91
Research
Octane
or
higher when
the
engine
is
adjusted
to
factory
recommended specifications.
The
gasoline
should also have a Motor Octane
of
at
least 83.
Unleaded
gasoline
is
essential for proper emission
control system operation,
and
it will minimize spark
plug fouling.
Caution:
Never use fuel system cleaning agents
added
to
the
fuel
tank
or
added
to
the
carburetor.
These materials may
be
detrimental
to
the
catalytic
converter.
Operation
In
Foreign Countries
If
you
plan
to
drive
your
vehicle outside
the
United
States and Canada, check
the
quality
of
gasoline
available
in
area you
expect
to
visit.
In
some
count-
ries are so low
in
octane
rating
that
excessive knock-
ing and lead fouling
of
spark plugs may result
from
their use.
Also,
if
leaded fuels are used
in
vehicle
with
the
CATALYTIC CONVERTER, it can damage
the
con-
verter and can cause
other
related problem.
OPERATING CAUTION
Your Mazda Emission Control
System
can produce
oonsiderable heat. T 0 - avoid problems, please be sure
to
observe
the
following precaution:
Do
not
operate
or
park
the
vehicle in areas where
flammable materials such as
dry
grass may
come
into contact
with
the
hot exhaust system.
Under certain weather conditions, these materials
could be ignited by a
hot
exhaust system.
Failure
to
observe
the
above precaution could result
in damage
to
your
vehicle.
CATAL
VTIC CONVERTER
The catalytic converter
is
an emission control device
added
to
the exhaust system. The converter
has
pellets
coated
with
a catalytic material containing platinum
and
palladium. These material stimulate a chemical
reaction
that
assists
in
converting carbon
monoxide
(CO)
and
hydrocarbons
(He)
into harmless carbon
dioxide
and
water
vapor.
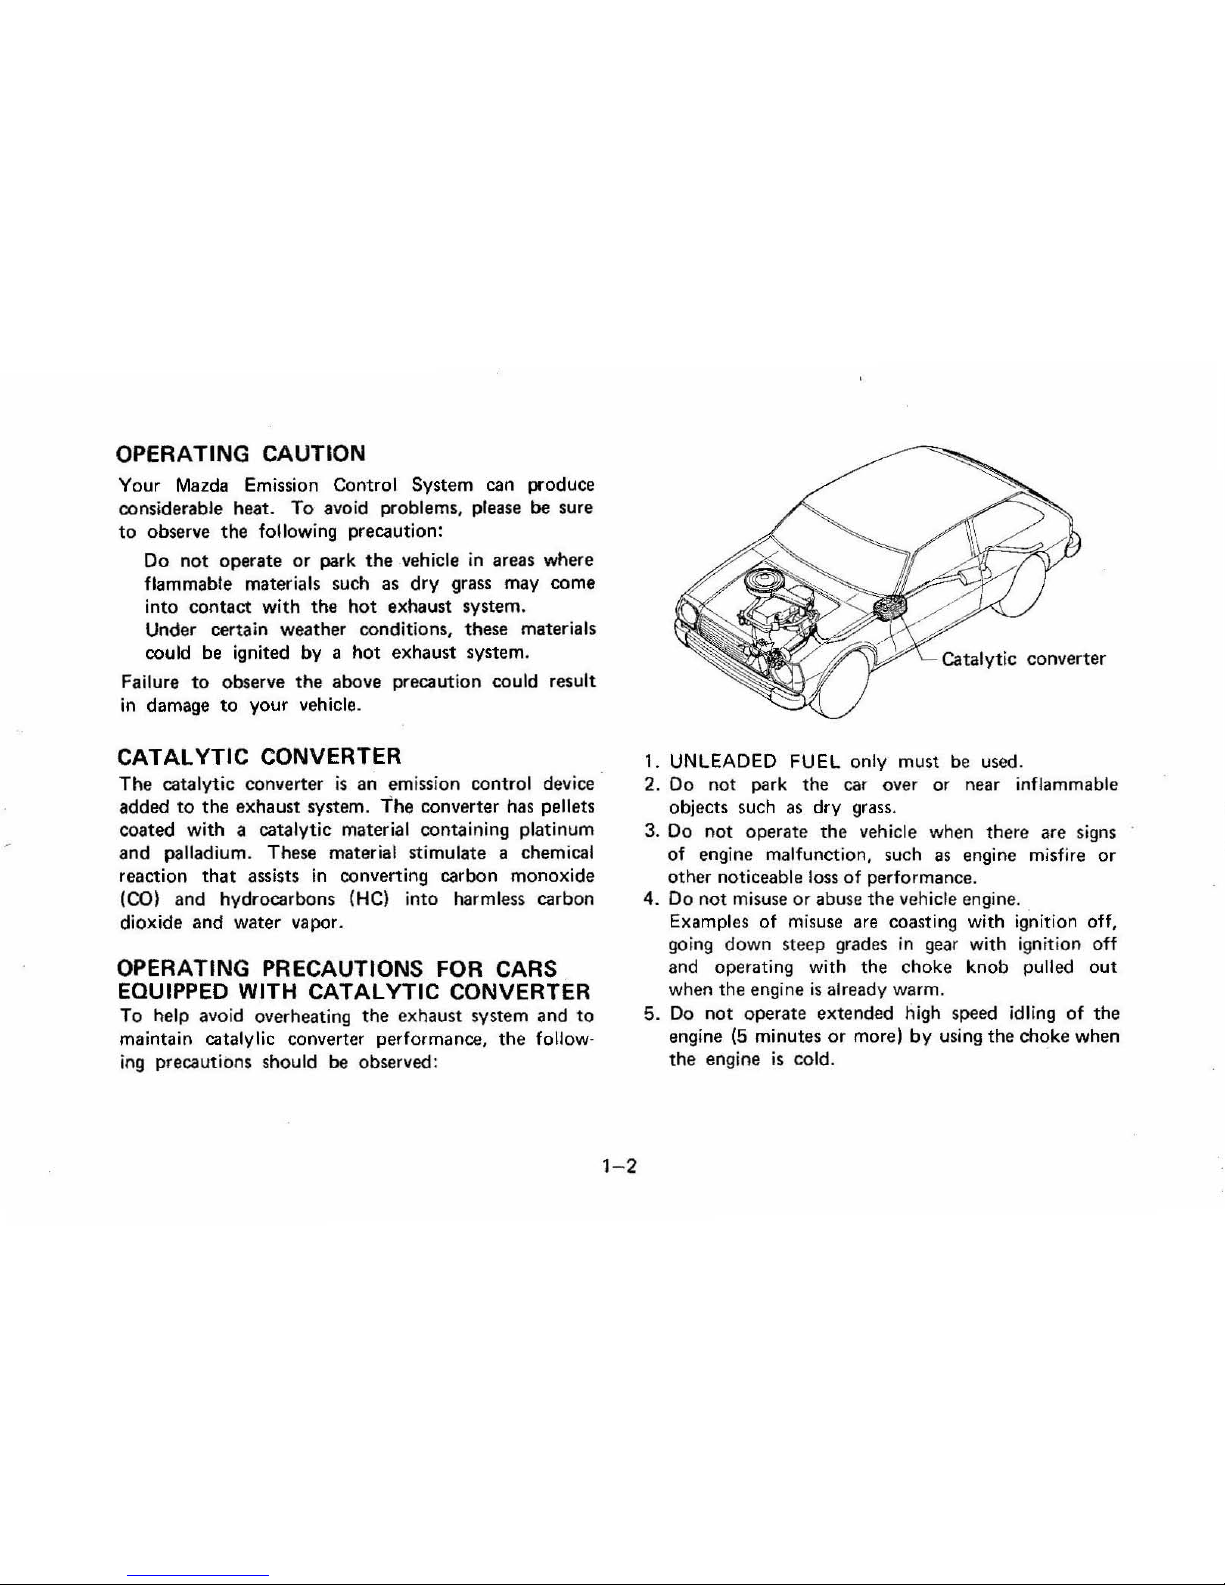
OPERATING PRECAUTIONS FOR CARS
EQUIPPED WITH
CATAL
VTIC CONVERTER
To
help avoi
d overheating
the
exhaust system and
to
maintain catalylic converter performance,
the
follow-
ing
precautions should
be
observed:
1
-2
1. UNLEADED FUEL only must be used .
2.
00
not park
the
car over or near inflammable
objects such
as
dry
grass.
3.
00
not
operate
the
vehicle when there are signs
of engine malfunction, such
as
engine misfire
or
other noticeable loss
of
performance.
4. Do
not
misuse
or
abuse
the
vehicle engine.
Examples
of
misuse are coasting with ignition off,
going
down
stee p grades
in
gear with ignition off
and operating with the
choke
knob pulled
out
when the engine
is
already warm.
5.
Do
not
operate extended high speed idling
of
the
engine
(5
minutes
or
more)
by
using
the
choke when
the engine
is
cold.
6. Avoid the fuel tank from becoming empty.
7. Do not modify or tamper with any part of
the
engine or emission control system.
All
inspections
and adjus
tments
req uire a qualified technician.
Failure
to
observe
the
above precautions could result
in damages
to
the
catalytic converter and
your
vehicle.
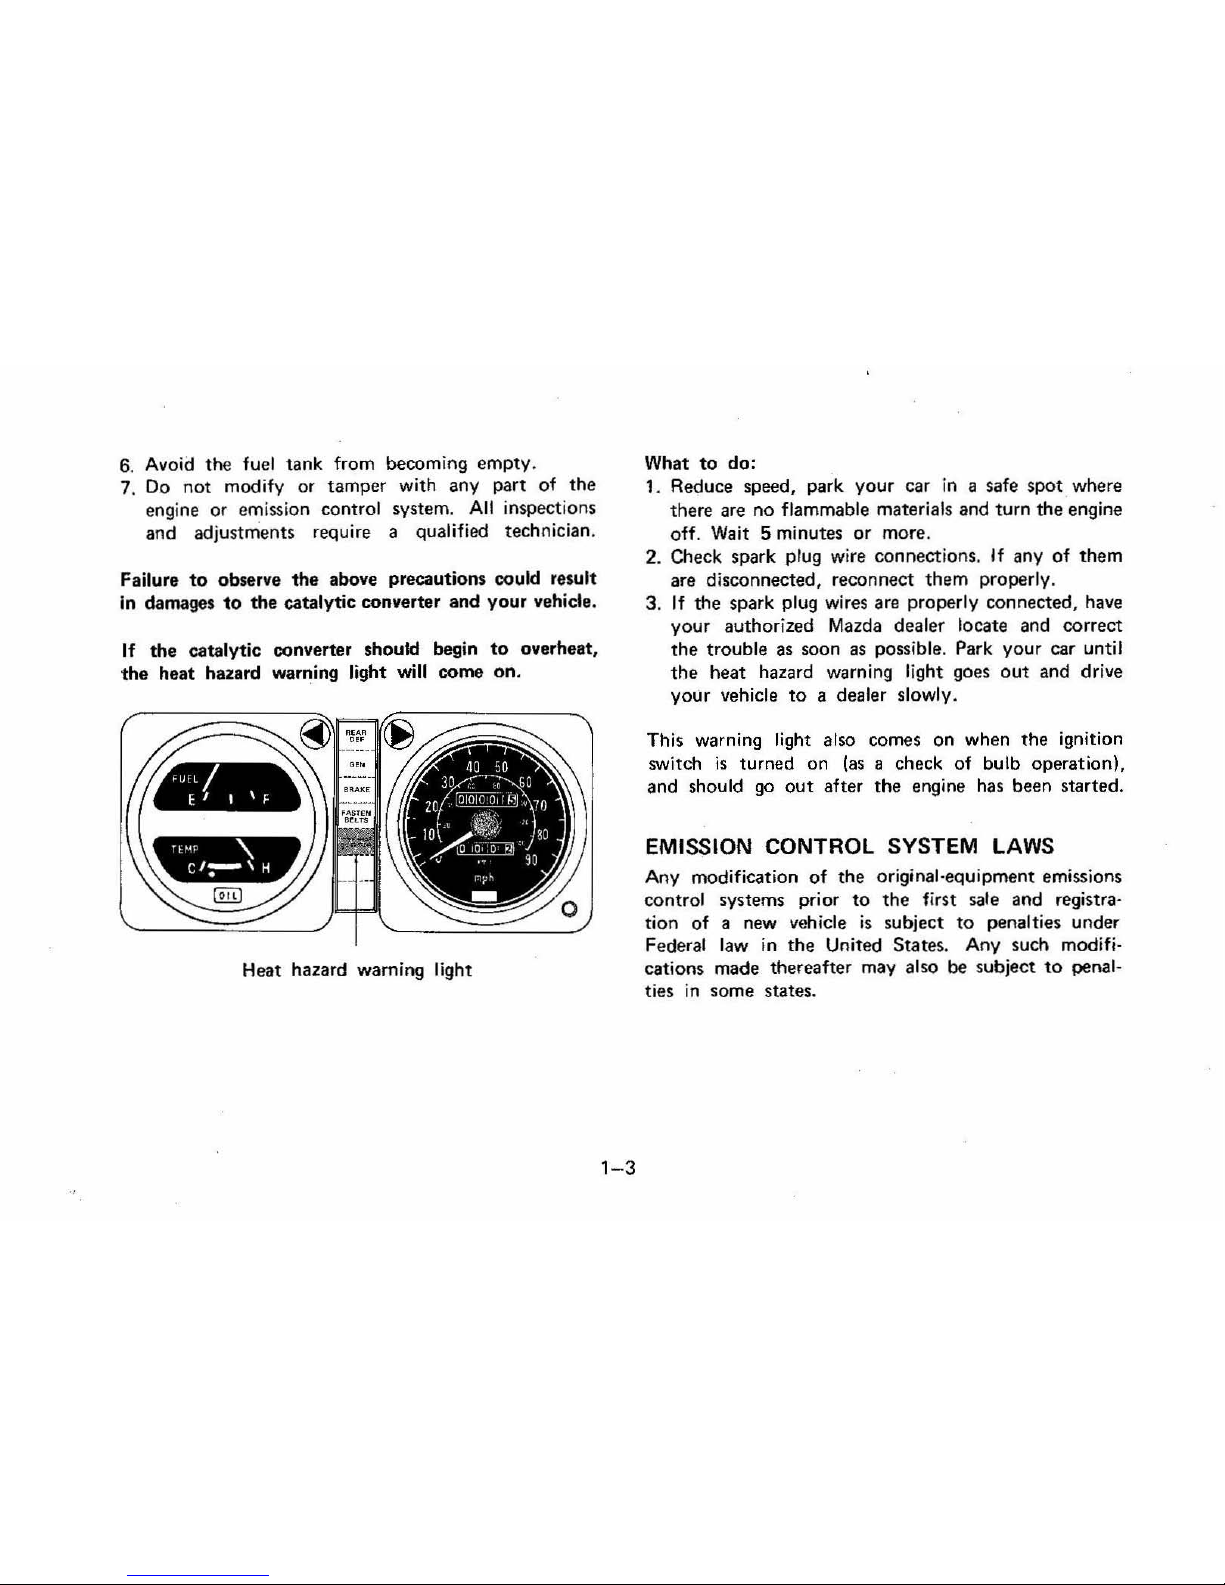
If
the
catalytic converter should begin
to
overheat,
the
heat hazard warning light will come
on.
'
I"l
~
c
':--'
H
Heat hazard warning light
1-3
What
to
do:
1. Reduce speed, park your car
in
a safe spot where
there are
no
flammable materials and
turn
the
engine
off
. Wait 5 minutes
or
more .
2. Check spark
plug wire connections. If any
of
them
are disconnected, reconnect
them
properly.
3.
If
the spark plug wires are properly connected , have
your
author
ized
Maz
da dealer locate and
correct
the
trouble
as
soon
as
possible. Park
your
car until
the
heat hazard warning light goes
out
and drive
your
vehicle
to
a dealer slowly.
This warning
light also comes on when
the
ignition
switch
is
turned on
(as
a check of bulb operation),
and should
go
out
after
the
engine has been started.
EMISSION CONTROL SYSTEM LAWS
Any modification of
the
original 'equipment emissions
control systems prior
to
the
first sale and registra·
tion
of
a new vehicle
is subject
to
penalties under
Federal
law in
the
United States. Any such modifi -
cations made thereafter may also
be
subject
to
penal-
ties
in
som e states.
ENGINE EXHAUST GAS CAUTION
(CARBON MONOXIDE)
Engine exhilust gases, though colorless
and
odorless,
contain carbon
monoxide,
which
is dangerous
or
even
lethal
if
inhaled.
1.
If
at
any
time you suspect
that
exhaust
fumes are
entering
the
passenger
compartment,
have
the
source
located and corrected
as
soon
as
possible.
2.
If
it
is
necessary
to
drive under such
conditions
,
do
so only with all windows fully
open.
3.
Do
not
operate
the
engine
in
confined areas such as
garages
or
other
closed areas any more
than
needed
to
move vehicle
in
or
out
of
area.
1- 4
4. When
the
vehicle
is
stopped
in
an unconfined area
with the engine
running
for
more than a short length
of
time, adjust the heating
or
cooling system
to
draw
outside air into
the
vehicle.
REGISTRATION IN FOREIGN COUNTRIES
If
you
plan
to
register your Mazda
in
another
countries,
first make sure
that
it
meets
that
country's
regulations
(e.g. safety standards, air
pollution control standards
etc
.'.
We
advise
you
to
consult us through authorized Mazda
dealer before acting.
2.
BEFORE DRIVING
YOUR VEHICLE
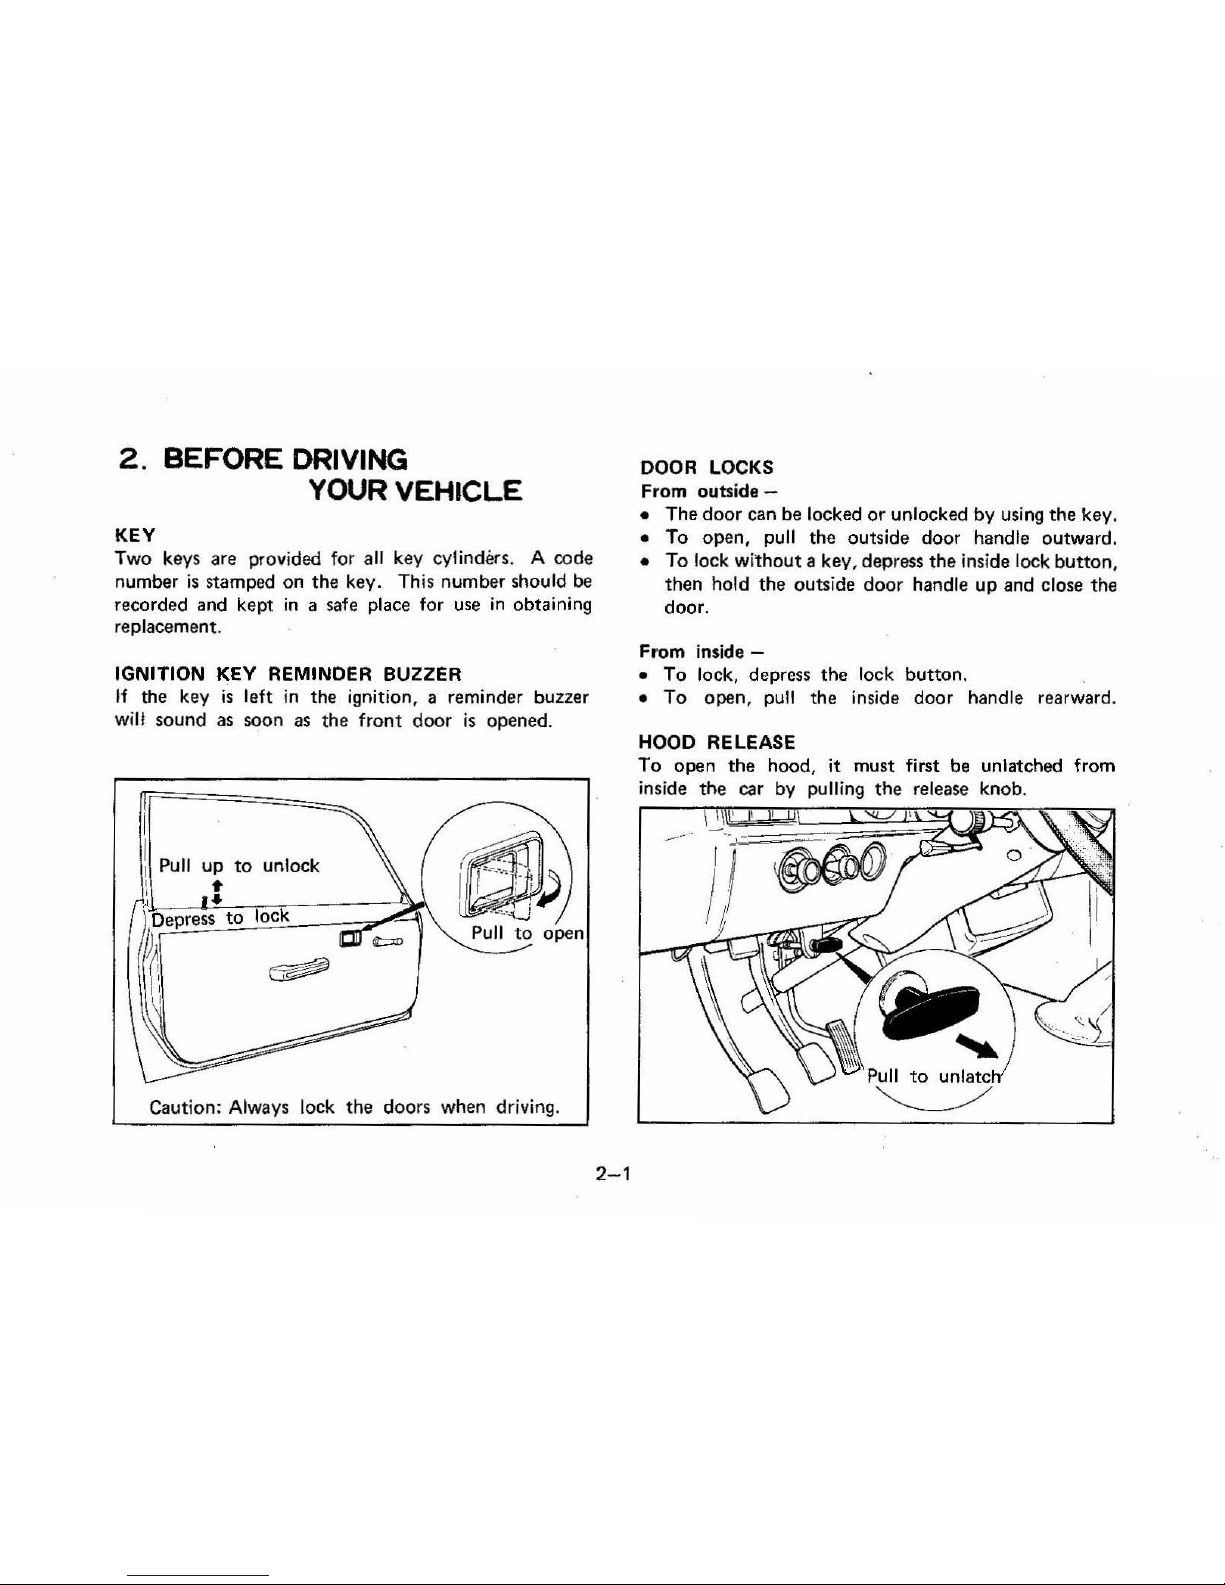
KEY
Two keys are provided for all key cylinders. A code
number
is
stamped on the key. This number should
be
recorded
and
kept
in a safe
place
for
use
in
obtaining
replacement.
IGNITION
KEY
REMINDER BUZZER
If the key
is
left
in
the ignition, a reminder buzzer
will sound
as
soon
as
the front door
is
opened.
Pull
up
to
unlock
•
..
lock
(
d
l~
Pull
to
open
Caution: Always lock the doors when driving.
2-1
DOOR LOCKS
From
outside-
• The door can be locked
or
unlocked by using the key.
• To open. pull the outside door handle outward.
• To lock without a key. depress the inside lock
button.
then hold the outside door handle up and close the
door.
From
inside-
• To lock, depress the lock button.
•
To
open, pull the inside door handle rearward.
HOOD RELEASE
To open the hood,
it
must first
be
unlatched from
inside the car by pulling the release knob.
'I
'
-
I !
I j
~
':,./
-
-.J
_
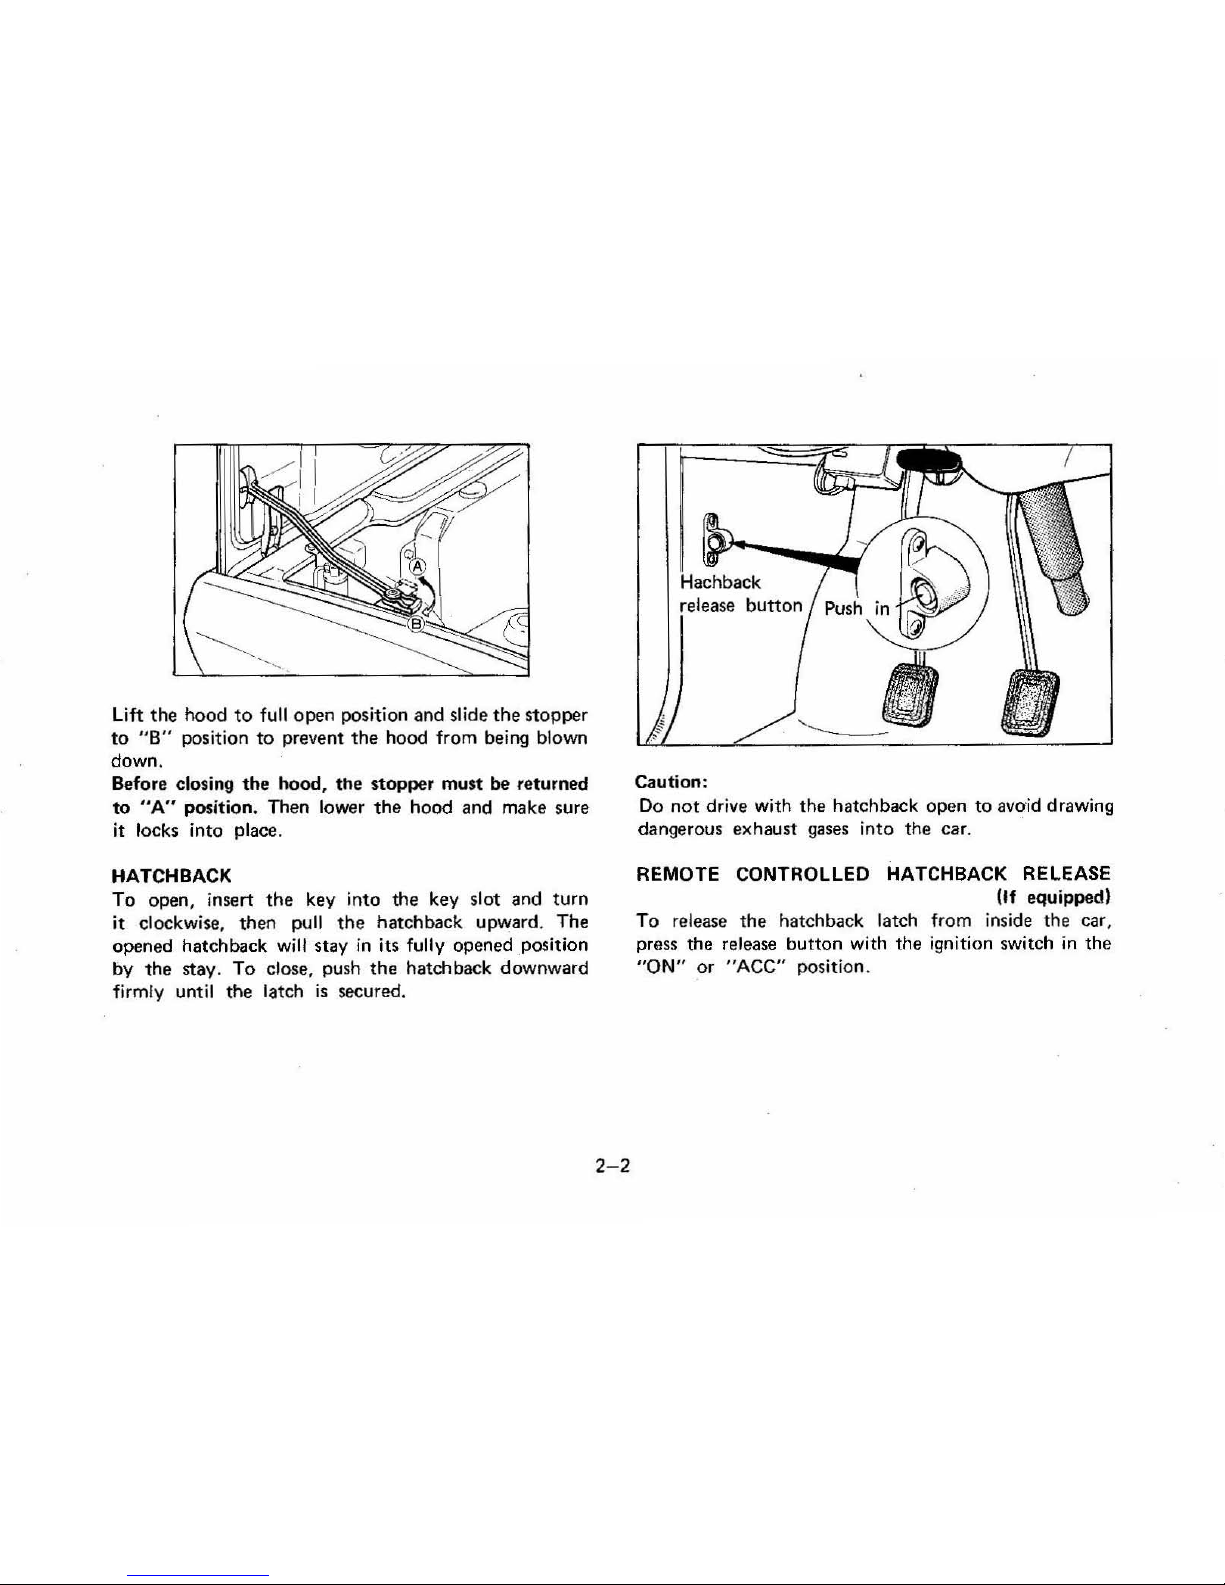
Lift the hood
to
full open position and slide
the
stopper
to "B" position to prevent the hood from being blown
down.
Before closing the hood, the stopper must
be
returned
to "Au position. Then lower the hood
and
make
sure
it
locks
into place.
HATCHBACK
To open, insert the key into the key slot
and
turn
it clockwise, then pull the hatchback upward. The
opened hatchback will stay
in
its fully opened position
by the stay . To close, push the hatchback downward
firmly until the latch
is
secured.
2-2
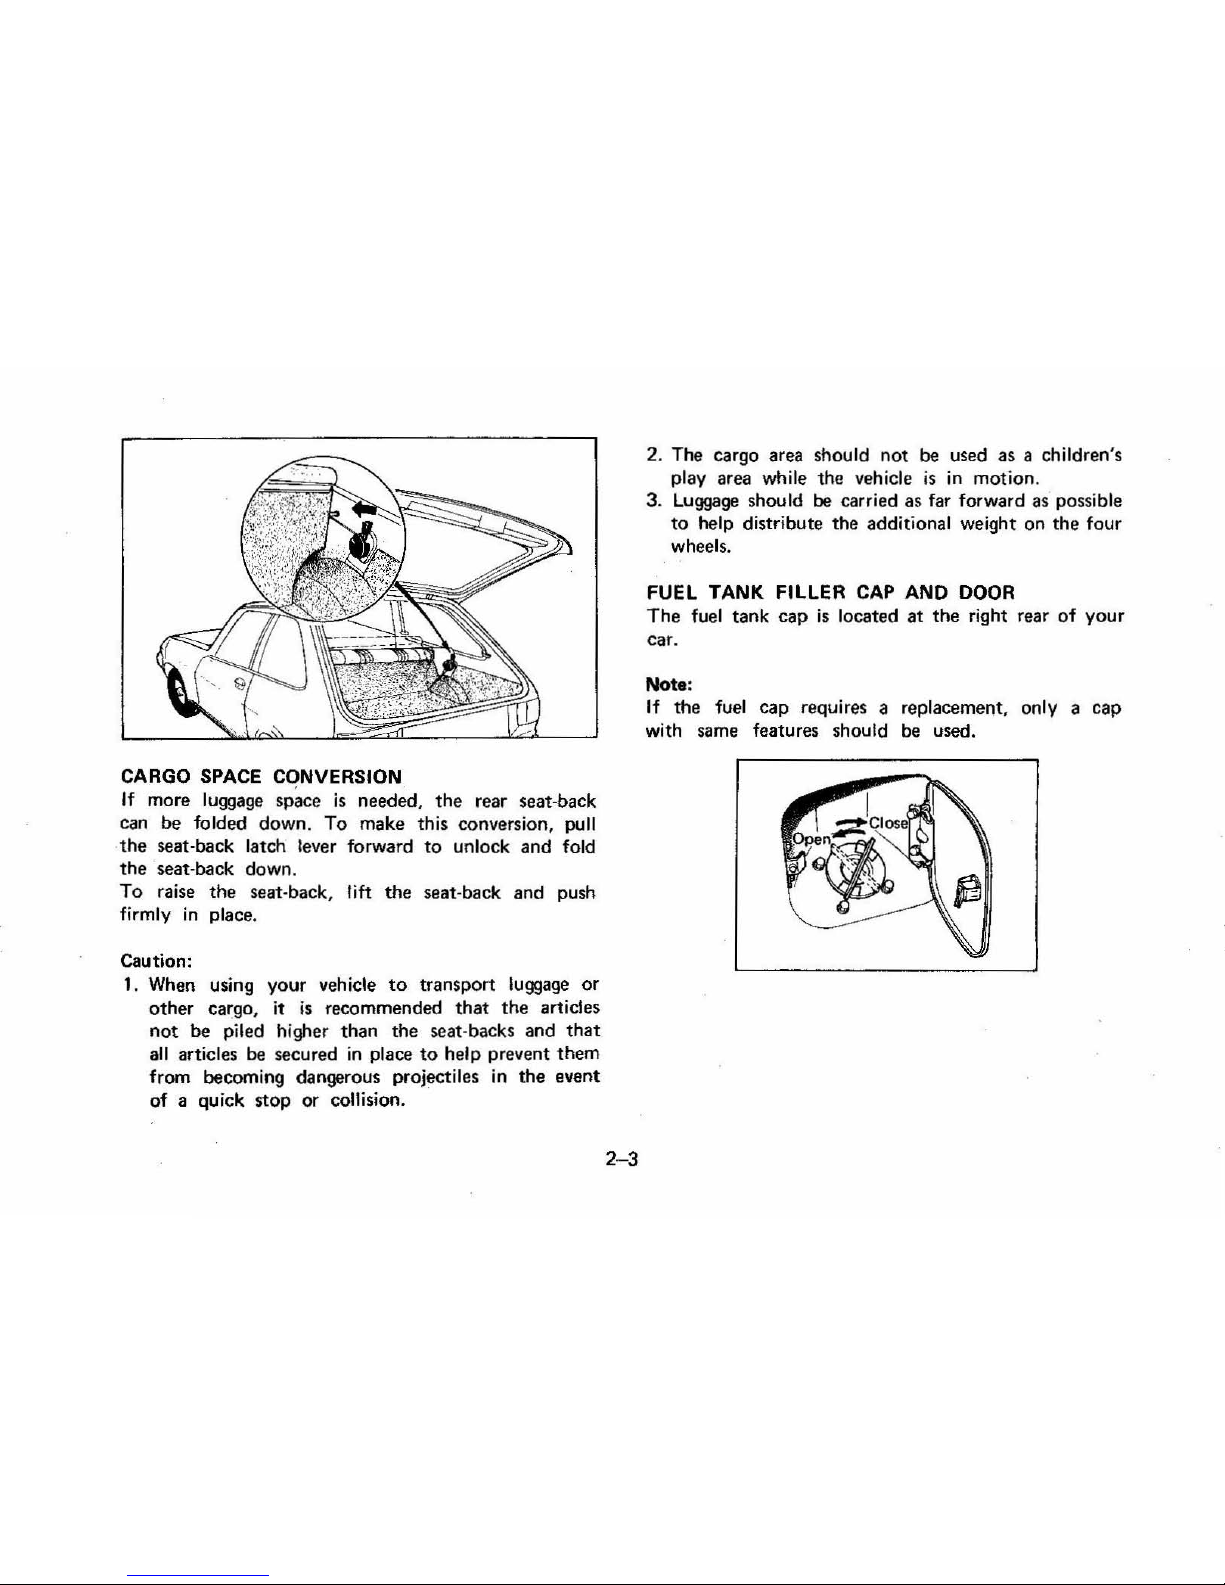
Caution:
Do
not
drive with the hatchback
open
to
avo'id
drawing
dangerous exhaust gases into the car.
REMOTE CONTROLLED HATCHBACK RELEASE
(If
equipped)
To release the hatchback latch from inside the car,
press the release button with the ignition switch
in
the
"ON"
or "ACC" position.
CARGO SPACE CONVERSION
If more luggage
space
is
needed,
the
rear seat-back
can
be folded
down. To
make this conversion, pull
the
seat-back latch lever forward
to
unlock
and
fold
the -seat-back down.
To raise the seat-back,
lift
the
seat-back and push
firmly in place.
Caution:
1. When using
your
vehicle
to
transport luggage or
other
cargo, it
is
recommended
that
the articles
not
be piled higher than the seat -backs and
that
all articles
be
secured
in
place
to
help prevent them
from becoming
dangerous projectiles
in
the event
of a quick stop or
collision.
2-3
2. The cargo area should
not
be
used as a children's
play area while
the
vehicle
is
in
motion
.
3. Luggage should
be
carried as far forward
as
possible
to
help distribute the additional weight on
the
four
wheels.
FUEL
TANK
FILLER
CAP
AND
DOOR
The
fuel tank
cap
is
located
at
the right rear
of
your
car.
Not.:
If the fuel cap requires a replacement, only a cap
with same features
should be used.
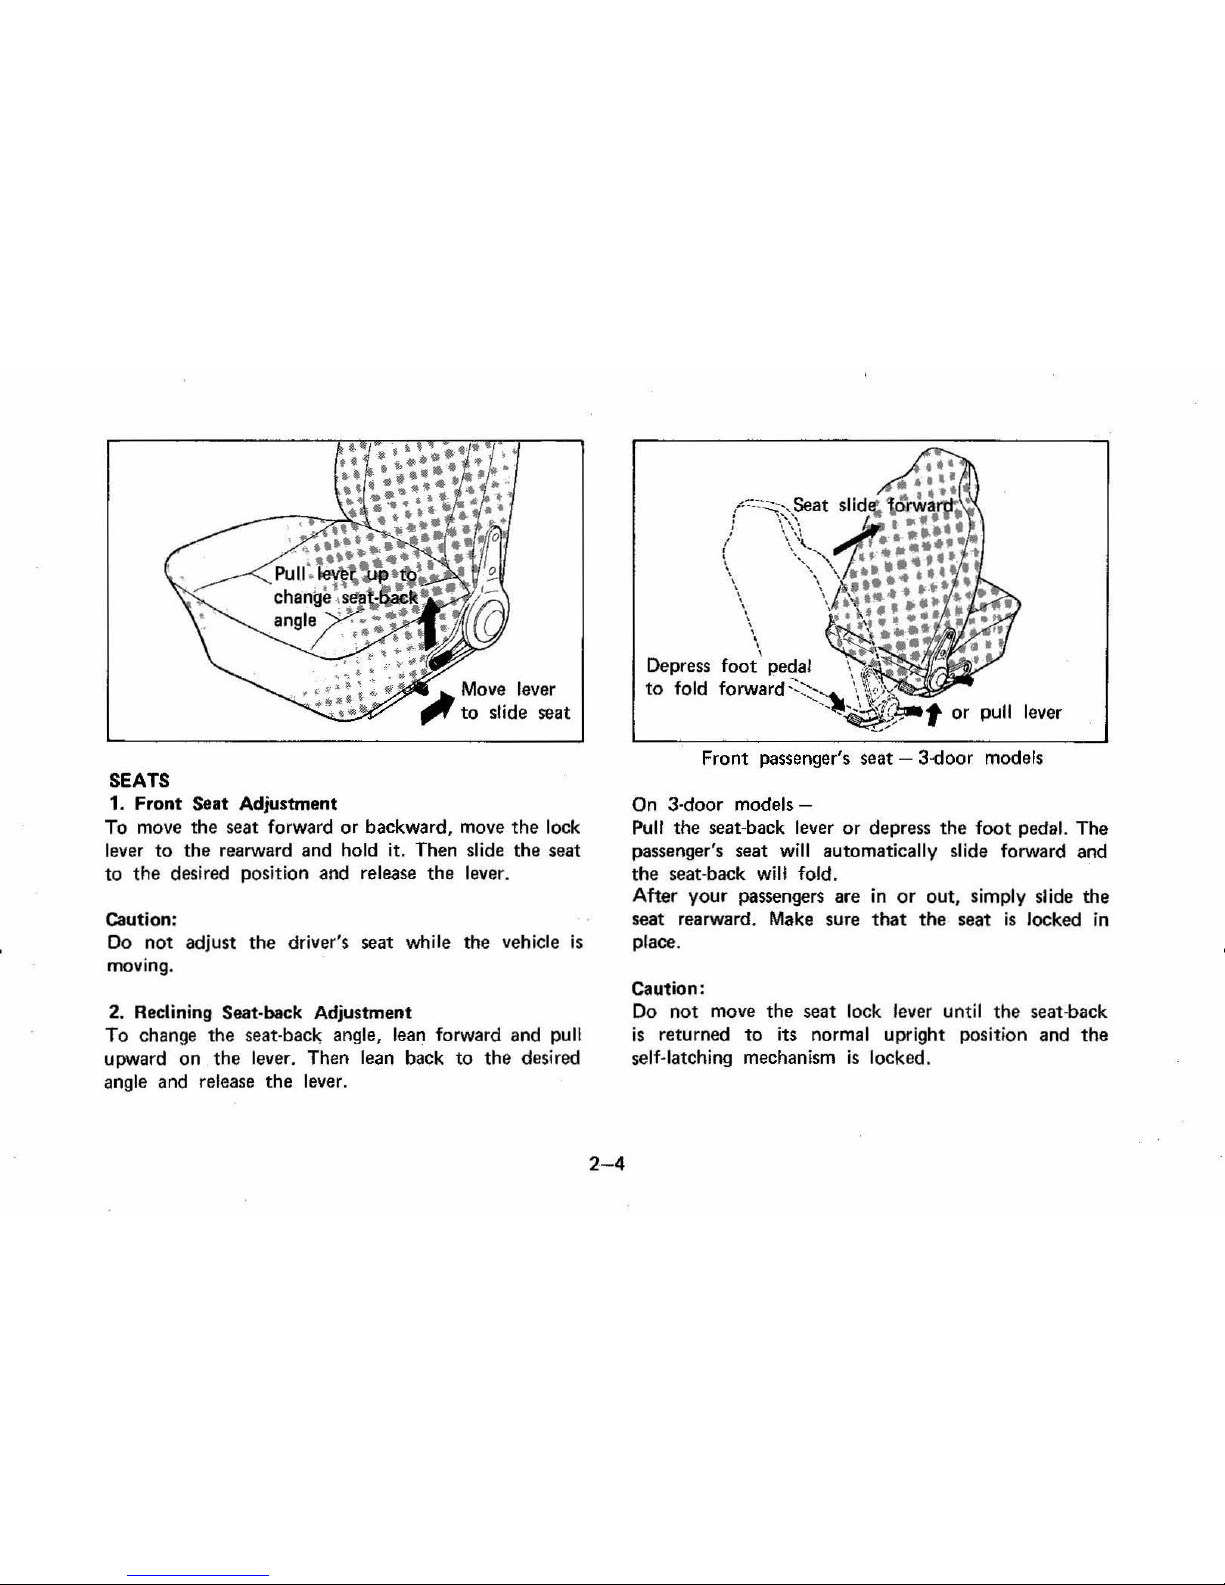
SEATS
1. Front Seat Adjustment
To move the seat forward
or
backward, move the lock
lever
to
the
rearward
and
hold it. Then slide the seat
to
the
desired position and release the lever.
Caution:
Do
not adjust the
driver's
seat while the vehicle
is
moving.
2.
Reclining Seat· back Adjustment
To change the
seat·back angle, lean forward and pull
upward on the lever. Then lean back
to
the desired
angle
and
release
the
lever.
2-4
pull lever
Front passenger's seat - 3-door models
On 3·door
models-
Pull
the seat·back lever
or
depress the foot pedal. The
passenger's seat will automatically slide forward and
the
seat·back
will
fold.
After your passengers
are
in
or out, simply slide the
seat rearward.
Make
sure that the seat
is
locked
in
place.
Caution:
Do
not
move the seat lock lever until the seat-back
is
returned to
its
normal
upright position
and
the
self·latching mechanism
is
locked.
To
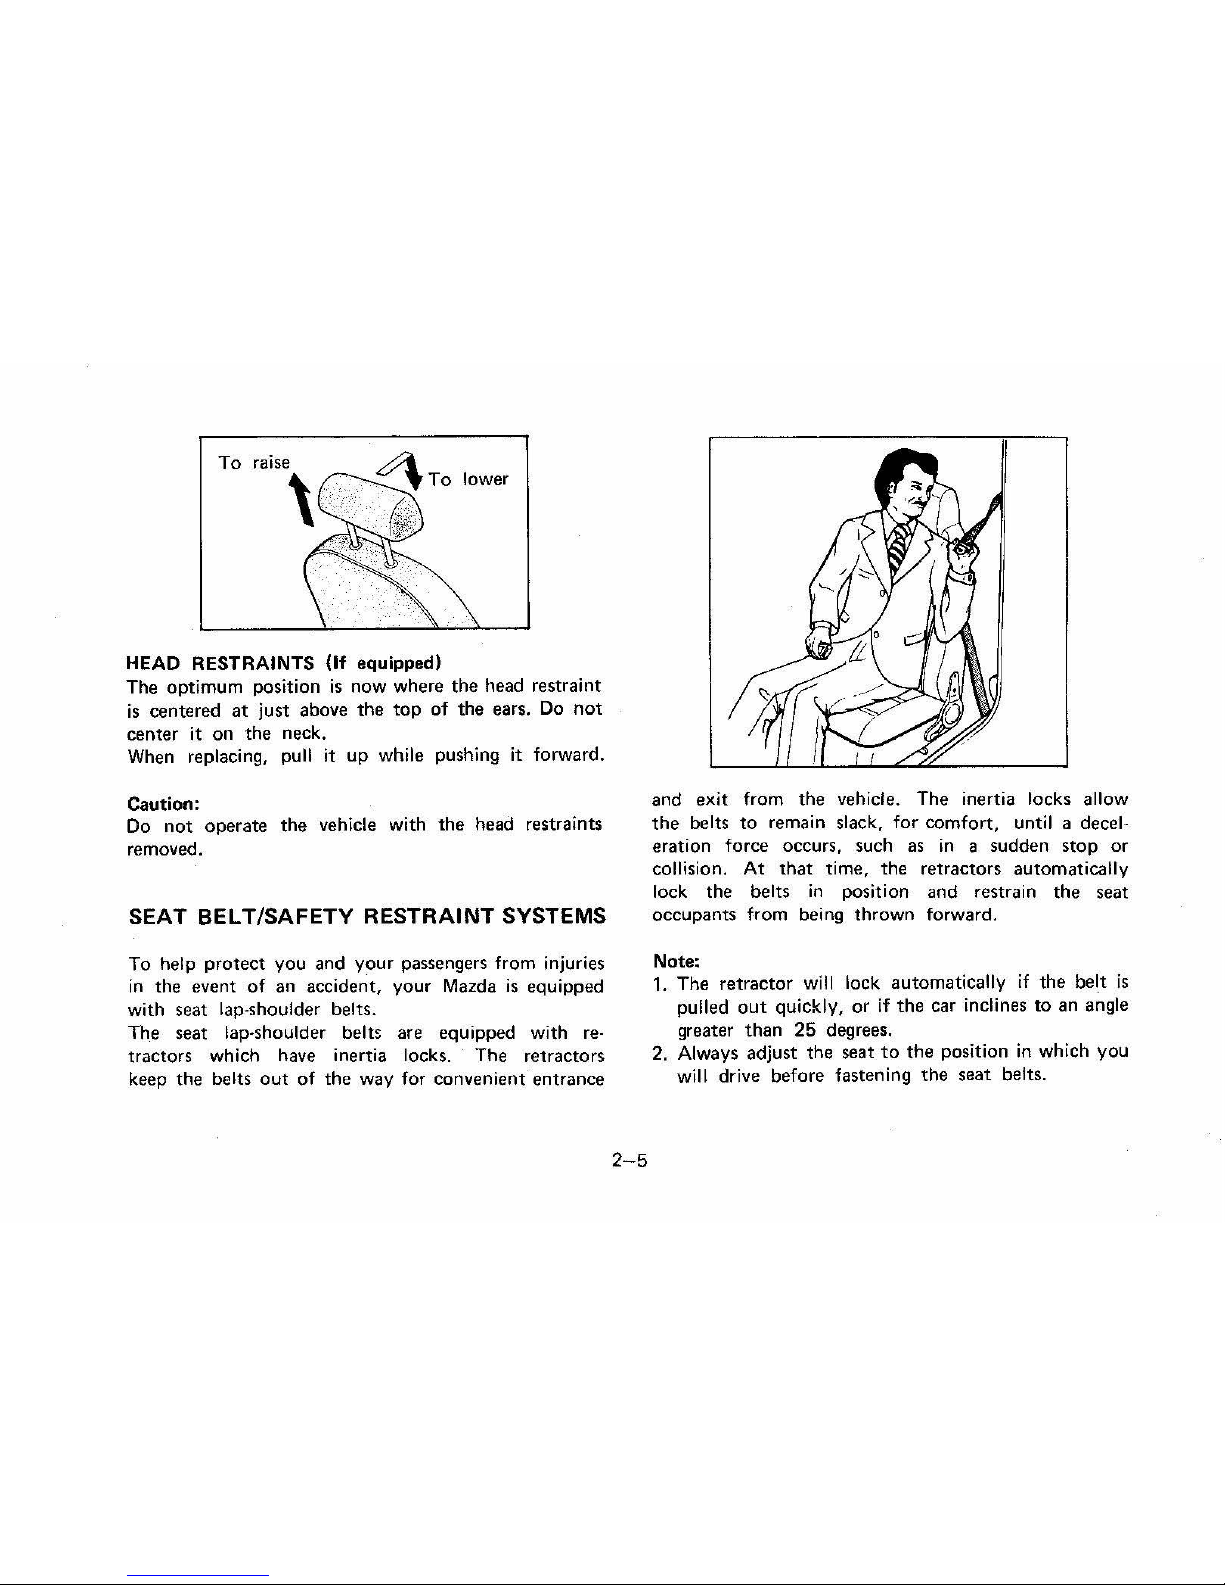
HEAD RESTRAINTS (If equipped)
The
optimum
position
is
now where
the
head restraint
is
centered at just above the top of the ears.
Do
not
center
it
on the neck.
When replacing, pull it
up
while pushing it forward.
Caution:
Do
not
operate
the
vehicle with
the
head restraints
removed.
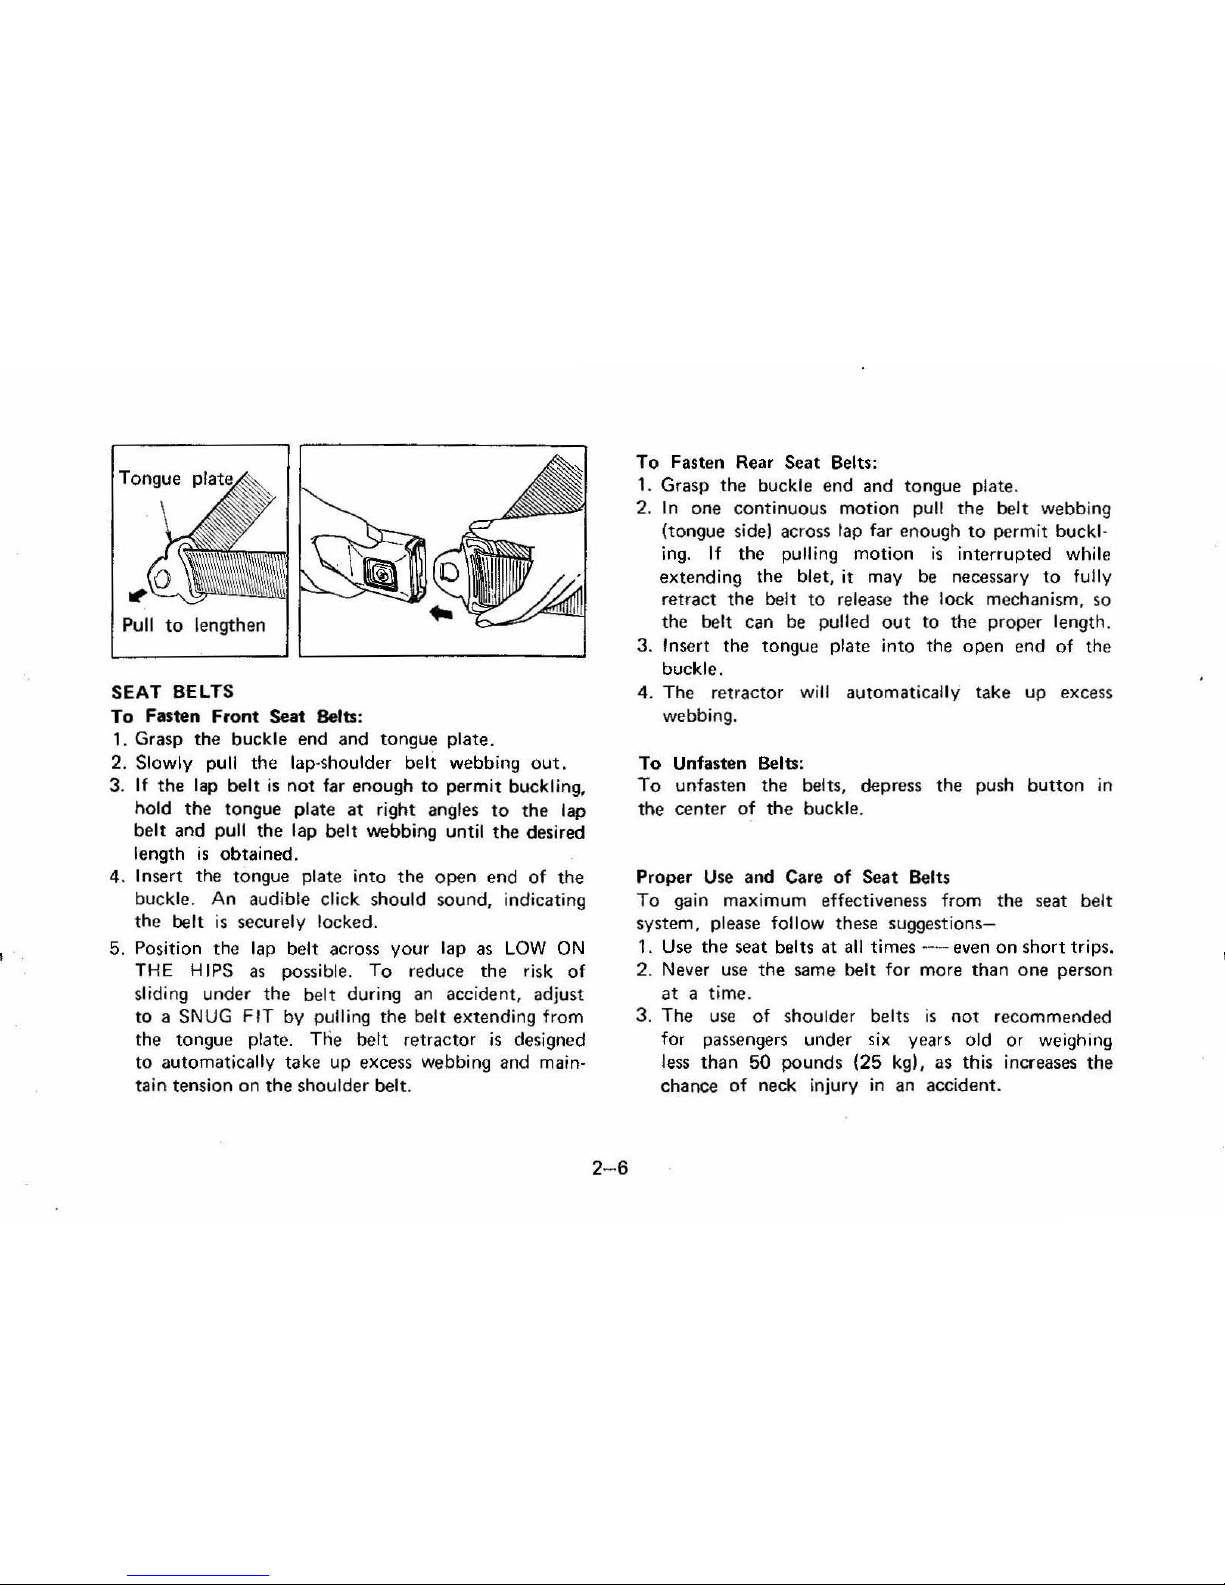
SEAT BEL
T/SAFETY
RESTRAINT
SYSTEMS
To
help
protect
you
and
your
passengers
from
injuries
in the event
of
an
accident,
your
Mazda
is
equipped
with
seat lap-shoulder belts.
The
seat lap-shoulder belts are equipped with
re-
tractors which have inertia locks.
The
retractors
keep
the
belts
out
of
the
way for
convenient
entrance
2-5
and
exit
from
the vehicle. The inertia locks
allow
the
belts
to
remain slack,
for
comfort,
until a decel-
eration force occurs, such
as
in a sudden stop
or
collision.
At
that
time,
the
retractors automatically
lock
the
belts
in
position and restrain
the
seat
occupants from being
thrown
forward.
Note:
1. The
retractor
will lock automatically
if
the
belt
is
pulled
out
quickly,
or
if
the
car inclines
to
an angle
greater
than
25
degrees.
2. Always adjust the seat
to
the
position
in
which you
will drive before fastening
the
seat
belts.
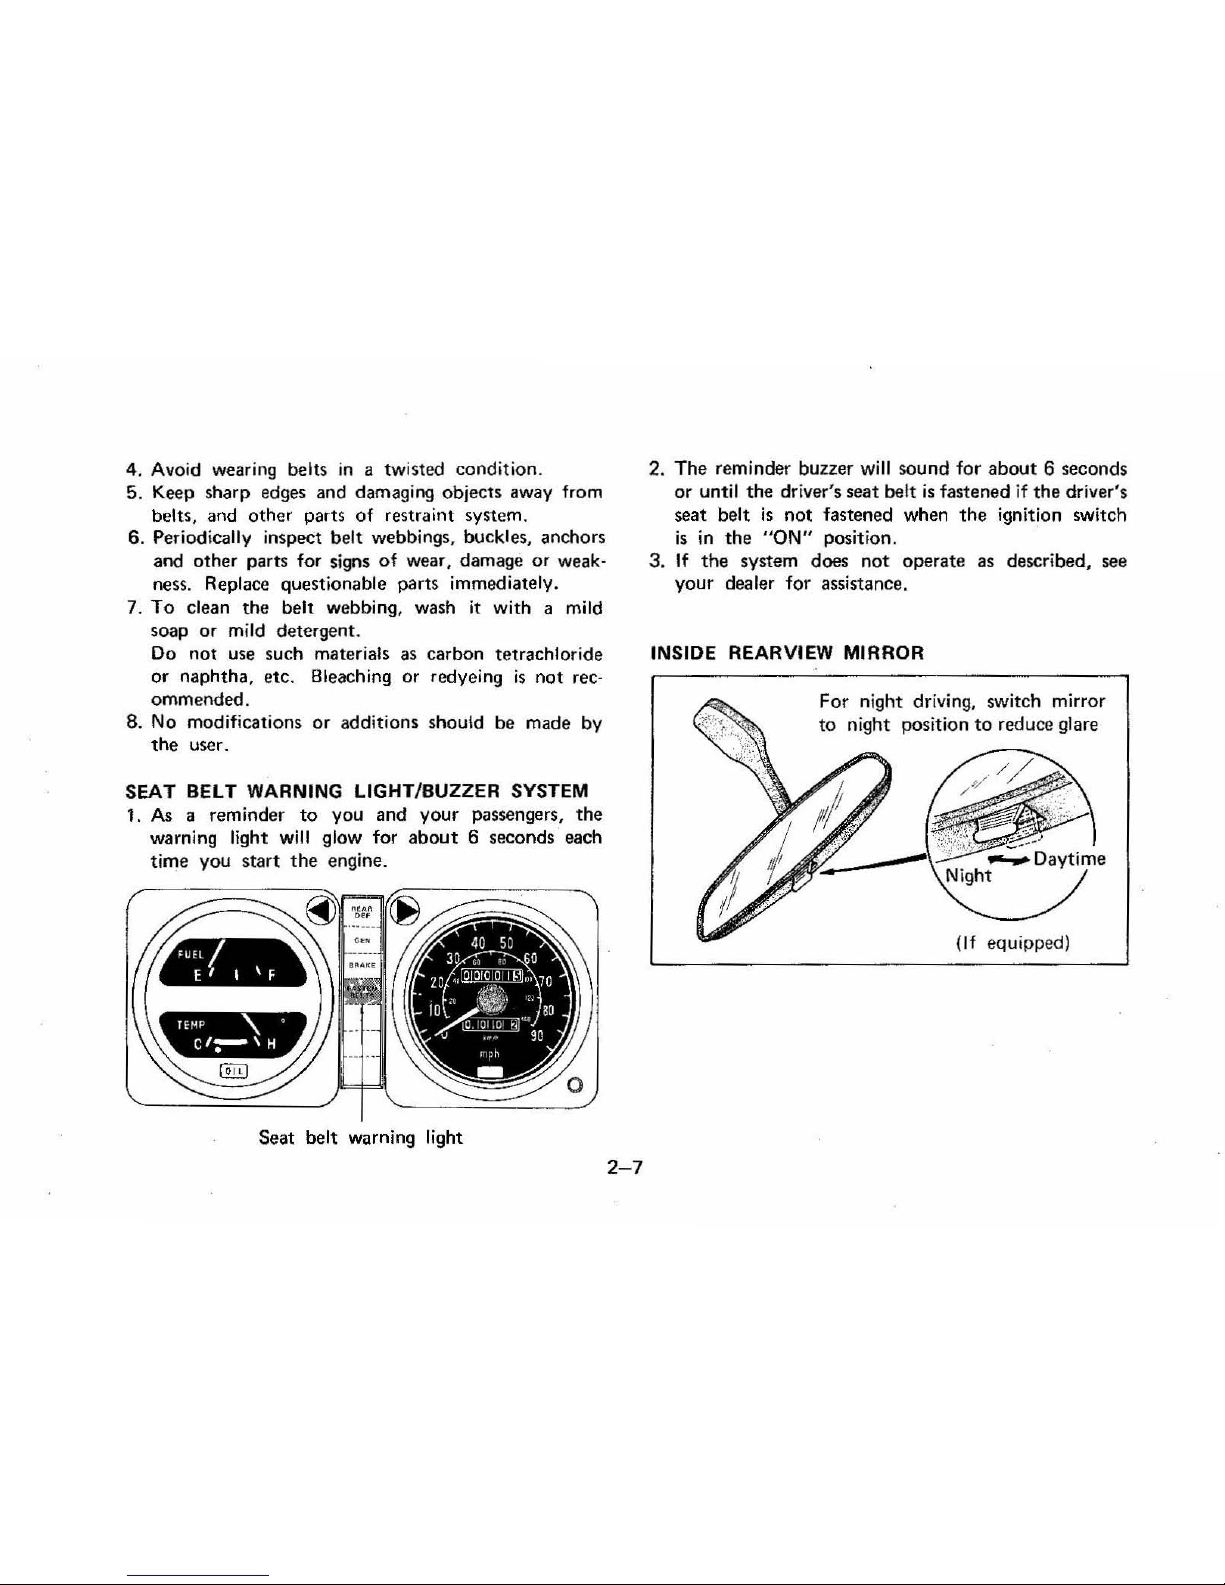
SEAT BELTS
To
Fasten
Front
Seat Belts:
1.
Grasp the buckle end and tongue plate.
2. Slowly pull
the
lap-shoulder belt webbing
out.
3.
If
the lap
belt
is
not
far enough
to
permit
buckling.
hold
the
tongue plate
at
right angles
to
the
lap
belt
and pull
the
lap
bell
webbing until
the
desired
length
is
obtained.
4. Insert the tongue plate into
the
open
end
of
the
buckle.
An
audible
click
should sound, indicating
the
belt
is
securely locked.
5.
Position the lap belt across
your
lap as
LOW
ON
THE H IPS
as
possible.
To
reduce the risk
of
sliding under the
belt
during
an
accident, adjust
to
a SNUG
FIT
by pulling
the
belt extending from
the
tongue plate.
Tne
belt retractor
is
designed
to
automatically
take
up excess webbing and main-
tain tension on
the
shoulder belt.
2- 6
To
Fasten Rear
Seat
Belts:
1. Grasp
the
buckle end and longue plate.
2. In one
continuous
motion
pull
the
belt
webbing
(tongue side) across lap far enough
to
permit buckl·
ing.
If
the pulling motion
is
interrupted while
extending the
blet, it may be necessa
ry
to
fully
retract the belt
to
release the
lock
mechanism, so
the
belt can be pulled
out
to
the proper length.
3. Insert the tongue plate into the open end
of
the
buckle.
4. The retractor
will
automatically take
up
excess
webbing.
To
Unfasten Belts:
To
unfasten the belts, depress the push
button
in
the center
of
the
buckle.
Proper Use and
Car.
of
Seat
Belts
To
gain maximum effectiveness from
the
seat belt
system, please
follow these
suggestions-
1. Use
the
seat belts at
all
times - even
on
short
trips.
2.
Never use
the
same belt for more than
one
person
at
a time.
3. The use
of
shOUlder belts
is
not reco mmended
for passengers under
six years old
or
weighing
less
Ihan
50
pounds
(25
kg), as this increases
the
chance
of
neck injury
in
an accident.
4. Avoid wearing belts
in
a twisted
condition.
5. Keep sharp edges and damaging objects away from
belts, and
other
parts
of
restraint system.
6. Periodically inspect belt webbings, buckles, anchors
and
other
parts for signs
of
wear, damage
or
weak-
ness. Replace questionable parts immediately.
7.
To
clean
the
belt webbing, wash it with a mild
soap
or
mild detergent.
Do
not
use such materials as carbon tetrachloride
or
naphtha, etc. Bleaching
or
redyeing
is
not
rec-
ommended .
8. No modifications
or
additions should be made by
the
user.
SEAT
BELT
WARNING
LIGHT/BUZZER
SYSTEM
1.
As a reminder
to
you
and
your
passengers,
the
warning light will glow for
about
6 seconds each
time
you
start
the
engine.
n"p
,,
'
C
':--'
H
Seat belt warning light
2-7
2.
The
reminder buzzer will
sound
for
about
6 seconds
or
until
the
driver's seat belt
is
fastened if
the
driver's
seat
belt
is
not
fastened when
the
ignition switch
is
in
the
"ON"
position.
3.
If
the
system does
not
operate
as described, see
your
dealer for assistance.
INSIDE REARVIEW
MIRROR
For night driving, switch mirror
to
night position
to
reduce glare
(If
equipped)
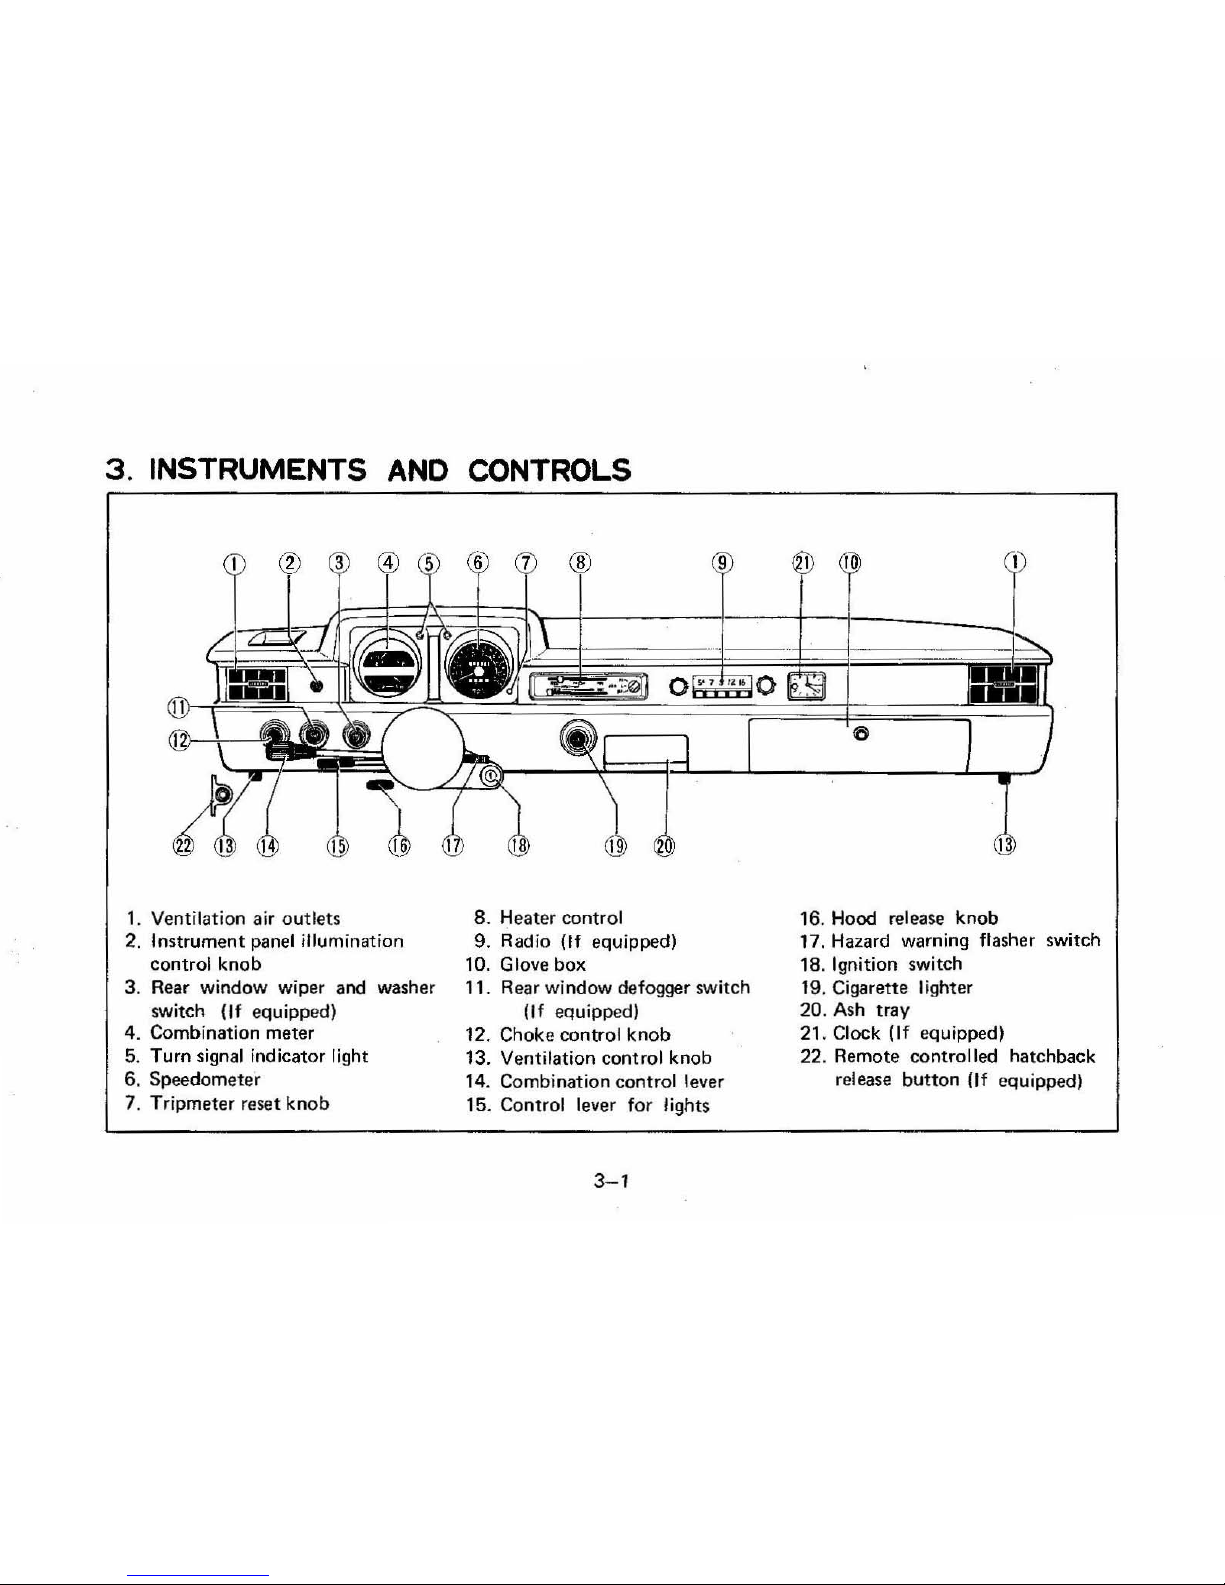
3.
INSTRUMENTS
AND
CONTROLS
1.
Ventilation
air
outlets
2. Instrument
panel
illumination
control knob
3.
Rear
window wiper
and
washer
switch
(If
equipped)
4.
Combination meter
5. Turn
signal
indicator light
6.
Speedometer
7. Tripmeter reset knob
8.
Heater control
9.
Radio (If equipped)
10. G
love box
11.
Rear
window defogger switch
(If equipped)
12. Choke
control
knob
13. Ventilation control knob
14. Combination control lever
15. Control lever for lights
3-1
16, Hood release
knob
17. Hazard
warning flasher switch
18. Ignition switch
19, Cigarette lighter
20,
Ash tray
21. Clock (If equipped)
22, Remote controlled hatchback
release
button
(If equipped)
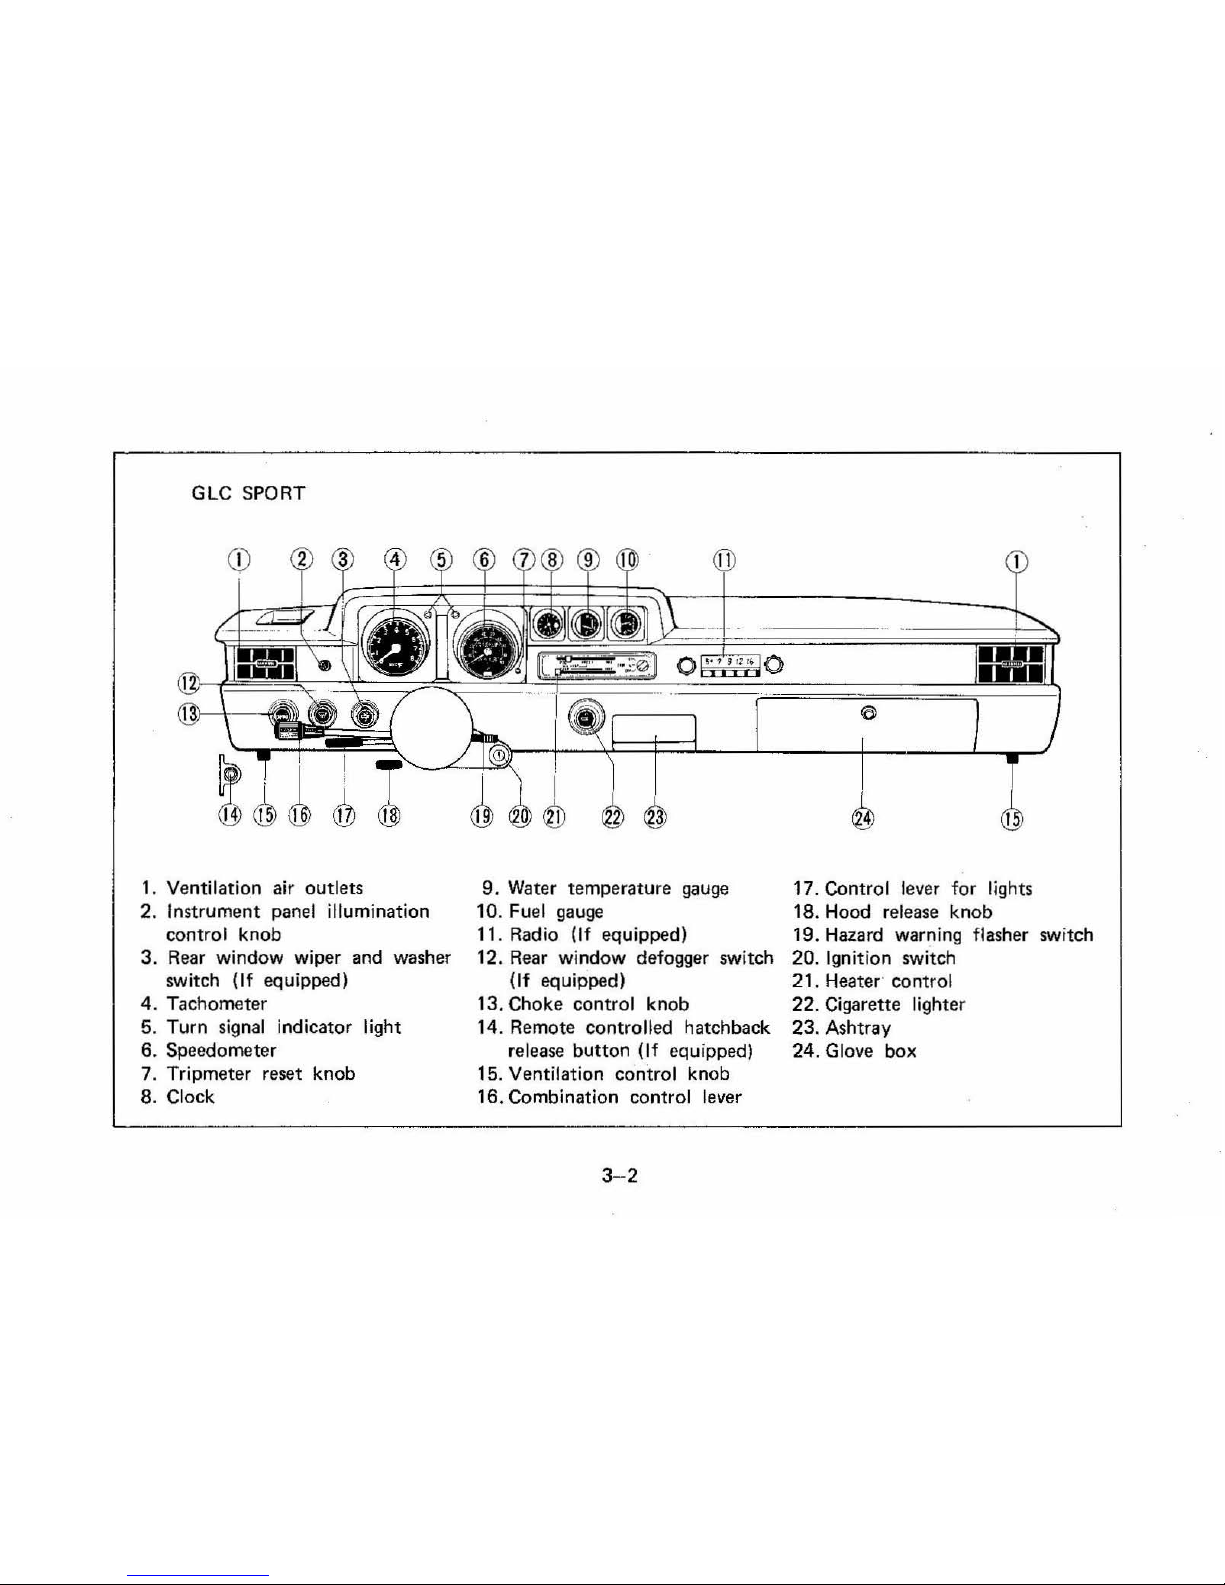
GLC
SPORT
1.
Ventilation air outlets
2. Instrument
panel
illumination
control knob
3.
Rear
window wiper
and
washer
switch (If equipped)
4. Tachometer
5. Turn
signal
indicator light
6.
Speedometer
7. Tripmeter reset knob
8. Clock
9.
Water
temperature
gauge
10. Fuel gauge
11. Radio
(If
equipped)
12.
Rear
window defogger switch
(If equipped)
13. Choke
control knob
14. Remote
controlled hatchback
release button (If equipped)
15. Ventilation control knob
16. Combination
control lever
3-2
17. Control lever for lights
18. Hood release knob
19. Hazard warning flasher switch
20. Ignition switch
21.
Heater· control
22. Cigarette lighter
23. Ashtray
24.
Glove box
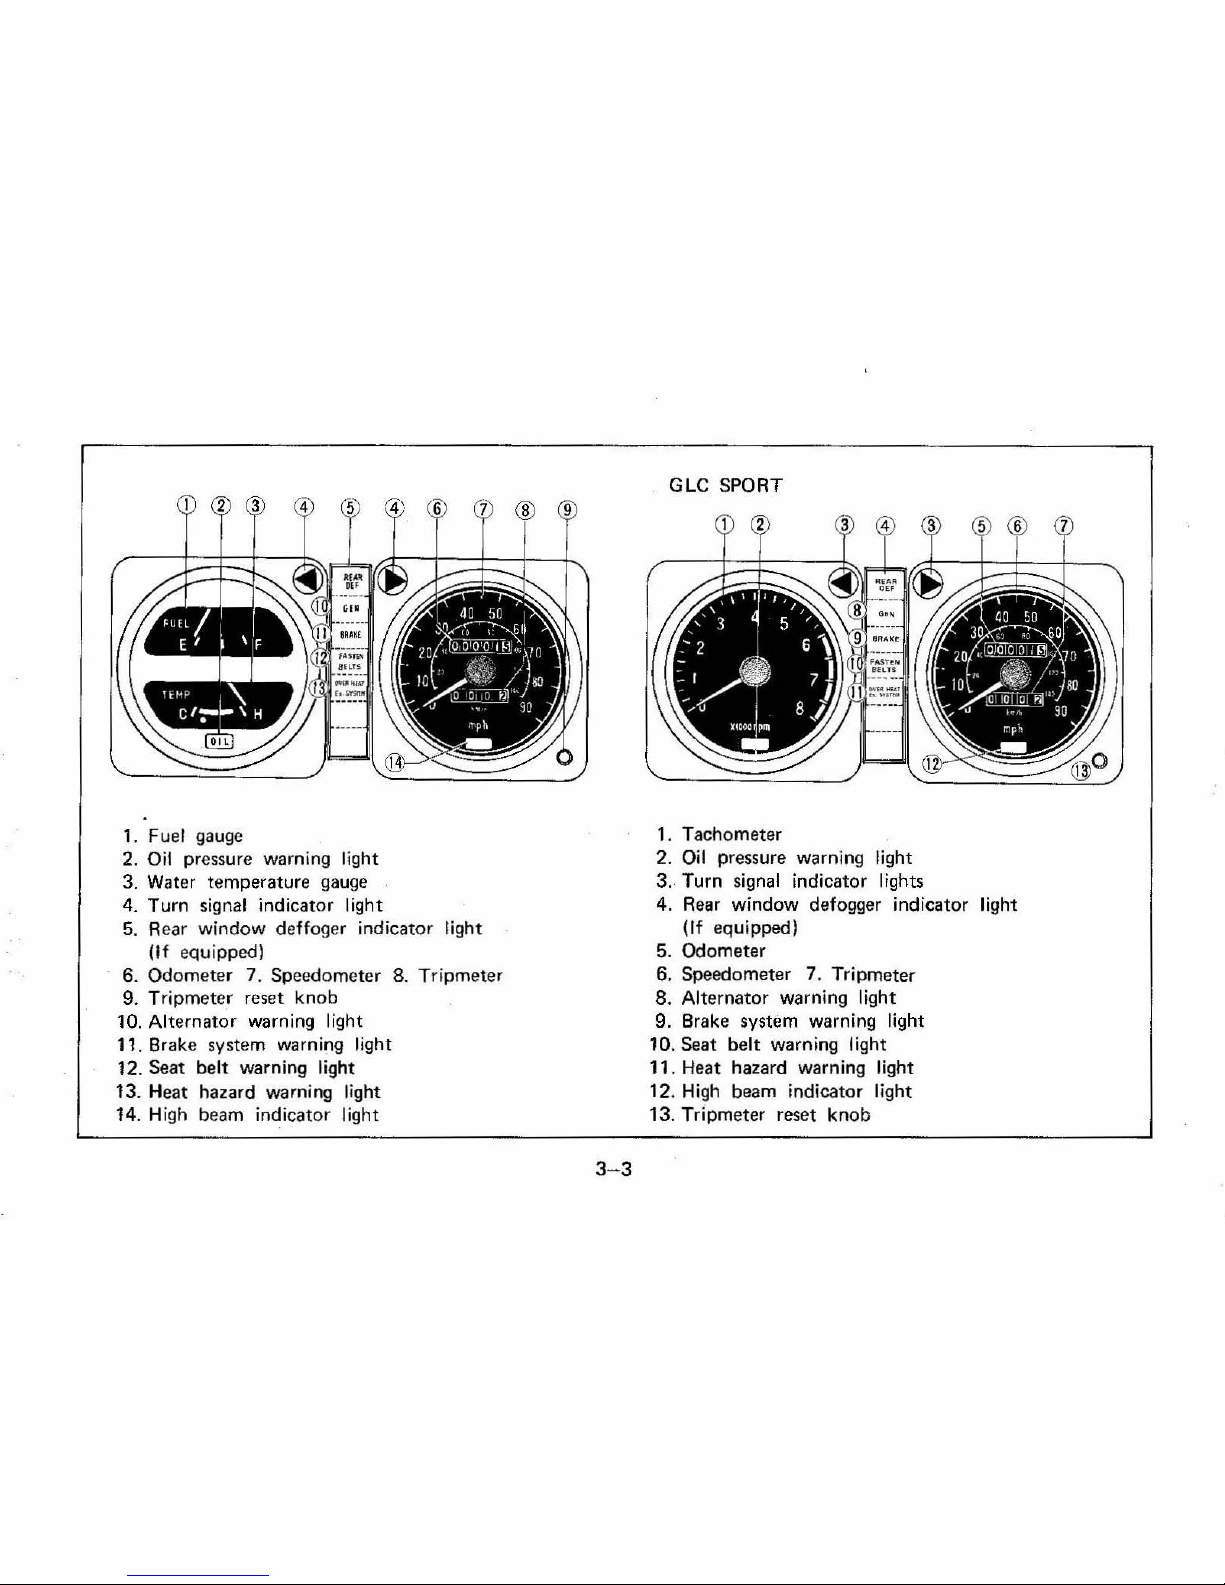
GLC SPORT
1.
Fuel gauge
1. Tachometer
2. Oil pressure warning light
2. Oil pressure
warning
light
3. Water temperature
gauge
3. Turn
signal
indicator lights
4. Turn
signal
indicator light
4.
Rear
window defogger indicator light
5.
Rear window deffoger indicator light
(If
equipped)
(If
equipped) 5. Odometer
6. Odometer 7. Speedometer 8. Tripmeter
6. Speedometer 7. Tripmeter
9. Tripmeter reset knob
8.
Alternator warning light
10. Alternator warning light 9. Brake system warning light
11.
Brak
e system
warni~g
light 10. Seat belt warning light
12. Seat belt warning light 11. Heat hazard warning light
13.
Heat
hazard
warning
light
12.
High
beam indicator light
14. High beam indicator light 13. Tripmeter reset knob
3- 3
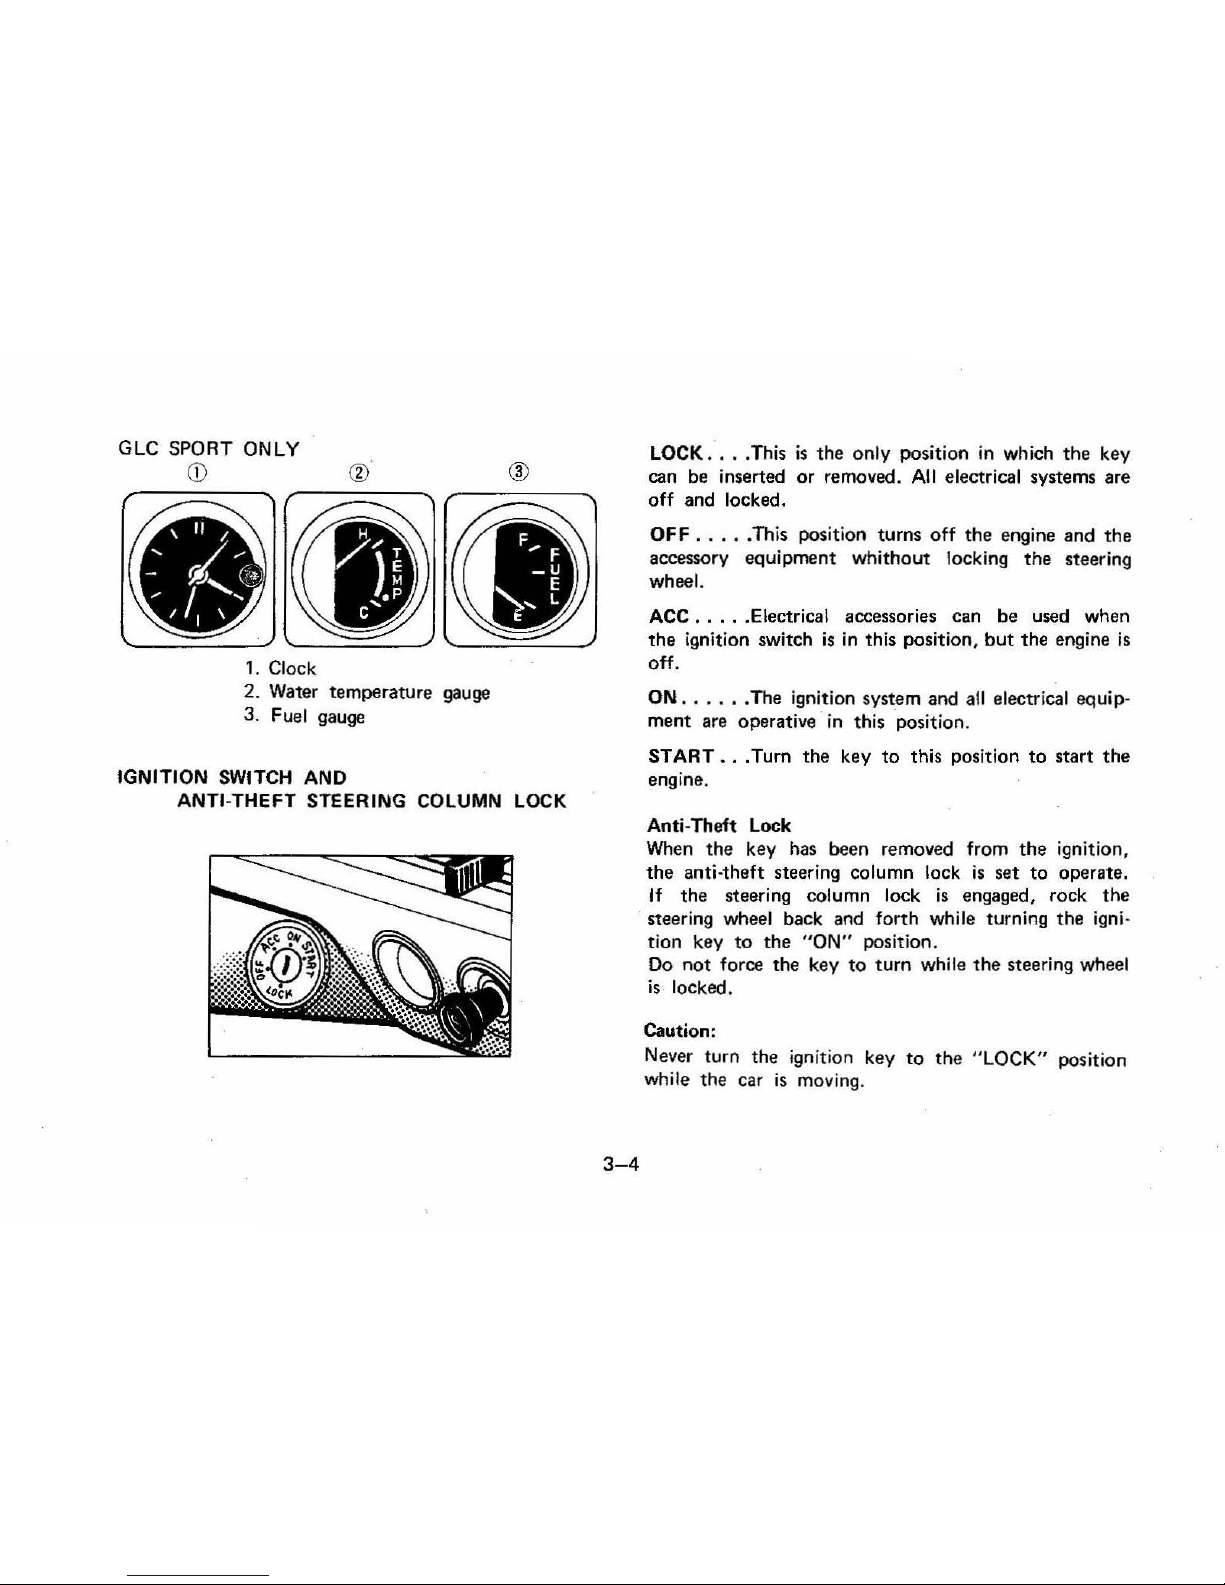
GLC SPORT ONLY
CD
1.
Clock
2. Water temperature gauge
3. Fuel gauge
IGNITION SWITCH AND
®
ANTI-THEFT STEERING COLUMN LOCK
3-4
LOCK
....
This
is
the
only position
in
which
the
key
can
be
inserted or removed. All electrical
systems
are
off
and locked.
OFF
....•
This position turns
off
the
engine and
the
accessory equipment whithout locking the steering
wheel.
ACe
.....
Electrical accessories
can
be used when
the ignition switch
is
in
this position, but the
engine
is
off
.
ON
.....•
The ignition system and all electrical equip·
ment
are
operative
in
this position.
START
...
Turn
the
key
to
this position
to
start
the
engine.
Anti-Theft Lock
When
the
key has been removed from
the
ignition,
the
anti-theft steering column lock
is
set
to
operate.
If
the
steering
column lock
is
engaged,
rock the
steering wheel back and forth while turning the igni-
tion key
to
the "ON" position.
Do not force the key to
turn
while the steering wheel
is
locked.
Caution:
Never turn the ignition key to the
"LOCK"
position
while the
car
is
moving.

INSTRUMENT PANEL
FUEL GAUGE
When
the
ignition
is
switched
on,
the
fuel gauge shows
approximately how much gasoline
is
in
the
tuel tank.
When
the
gauge needle shows
the "E"
position, a reserve
of
approximately
1.0
U.S. gallon (0.9 Imp. gallon,
4 liters) remains in
the
tank.
Fuel
tank
capacity
-10.6
U.s. gallons
(8.8 Imp. gallons, 40 liters)
OIL
PRESSURE WARNING LIGHT
This warning light comes on when the ignition
is
switch·
ed on
and
should
go
out
after
the
engine
is
started
and
proper
oil pressure
is
reached.
If
the
oil pressure warning light comes
on
while
the
vehicle
is
being driven:
1. Pull safely
off
the
road
and
stop
the
engine.
2. Check
the
engine oil level.
If
the
oil level
is
low
for
engine
operation,
add oil as required.
3.
If
the
oil level
is
normal.
yet
the
light remains on
with
the
engine running.
contact
your
nearest Mazda
dealer before
continuing
to
drive.
Note:
Ignoring
the
above instructions could result in
extensive damage
to
the
engine.
3- 5
WATER TEMPERATURE GAUGE
This gauge shows
the
temperature
of
the
engine
coolant.
If
the
gauge needle moves beyond
the
normal range
area
(lie"
for cold to
"H"
for ho!), it indicates engine
overheating.
If this happens, follow this procedure:
1.
Pull safely
off
the
road
and
stop
your
car.
2.
Allow
the
engine
to
idle
and
open
the
hood
to
let
the
engine gradually cool.
3.
If
the
temperature
does
not
go
down
while
the
engine
is
idling,
shut
the
engine
off
and
allow suf-
fident
time
for it
to
cool
down.
4.
Once
the
engine
is
cool,
the
coolant
level
may
be
checked.
If
coolant
is
needed,
add a 50/50
mixture
of
high·quality
ethylene
glycol anti·freeze (for
aluminum
engine parts)
and
water
.
Caution:
Do
not
remove
the
radiator
cap
when
the
engine
and
radiator
are
hot.
Scalding
hot
fluid
and
steam
may
be
blowout
under
pressure,
which
could
cause serious
injury.
TURN
SIGNAL
INDICATOR LIGHT
If
the
indicator light does
not
flash
or
remains on
continuouslY, this signaling system
is
malfunctioning
.
Have this
condition
corrected
as
soon
as possible .

HAZARD
WARNING
FLASHER
Both
turn
signal indicator lights will flash
at
the
same
time when the hazard warning flasher switch
is
on.
TRIPMETER RESET KNOB
Push
the
knob
in
to
reset
the
tripmeter
to zero.
This should
be
done
only
when
the
vehicle
is
stopped.
REAR WINDOW DEFOGGER
INDICATOR
LIGHT
IIf
equipped)
This indicator lights
up
when
the
rear
window
defogger
is
operated.
ALTERNATOR
WARNING
LIGHT
This warning light indicates
that
the
battery
is
being
discharged. When
the
ignition
is
switched
on,
this
warning light comes
on;
it
should go
out
when
the
engine
is
started.
3-6
If
the
light
comes
on
while driving:
1.
Pull
off
the road
and
stop
your
car.
2. Check
the
alternator
drive
belt
for
looseness
or
breakage.
3.
If
the
belt
is
OK,
there
is a problem
somewhere
in
the
charging system.
The
problem
should
be
located
and
corrected
as
soon
as possible, preferably
by
an
authorized
Mazda
dealer.
Do
not
continue
driving
if
the
belt
is
broken
or
loose.
The
engine will
overheat
.
BRAKE
SYSTEM WARNING
LIGHT
1.
Function
as a Parking Brake Warning Light
This indicator
lights
up
when
the
parking brake
is
applied
with
the
ignition on. Make sure
the
parking
brake
is
fully released before driving.
The
light
should
go
out.
2.
Function
a.
a Brake Fluid Level Warning Light
If
the
same indicator lights
up
even when
the
parking
brake
is
completely
released
with
the
ignition
on,
it may indicate
that
the
brake fluid level in
the
reservoir
is
low
due
to a malfunction
of
the
brake system.
If
the
warning light
comes
on:
1.
Be
sure
the
parking brake
is
released. If
it
is
..... .
2.
Pull
off
the
road
and
stop
your
car carefully.
3. Check
the
brake fluid level
and add
fluid as required.
4.
If
the
brake
are
not
working, have
the
car
towed
to
dealer
for
repair.
Continued operation
of
the
car
in
this condition
is
dangerous. Get
the
brakes repaired immediately.
As
a check
of
bulb operation,
the
warning light
grows when
the
ign
ition key
is
in
the "
START"
position and should go
out
when the ignition key
in
the
"ON"
position.
HIGH
BEAM
INDICATOR LIGHT
This indicator lights up in
blue when the headlight
hi
gh beams are switched on.
SEAT BELT WARNING LIGHT
See page
2-7
for detailed information.
HEAT HAZARD
WARNING LIGHT
See page 1- 3 for
detailed information.
Maintenance Note:
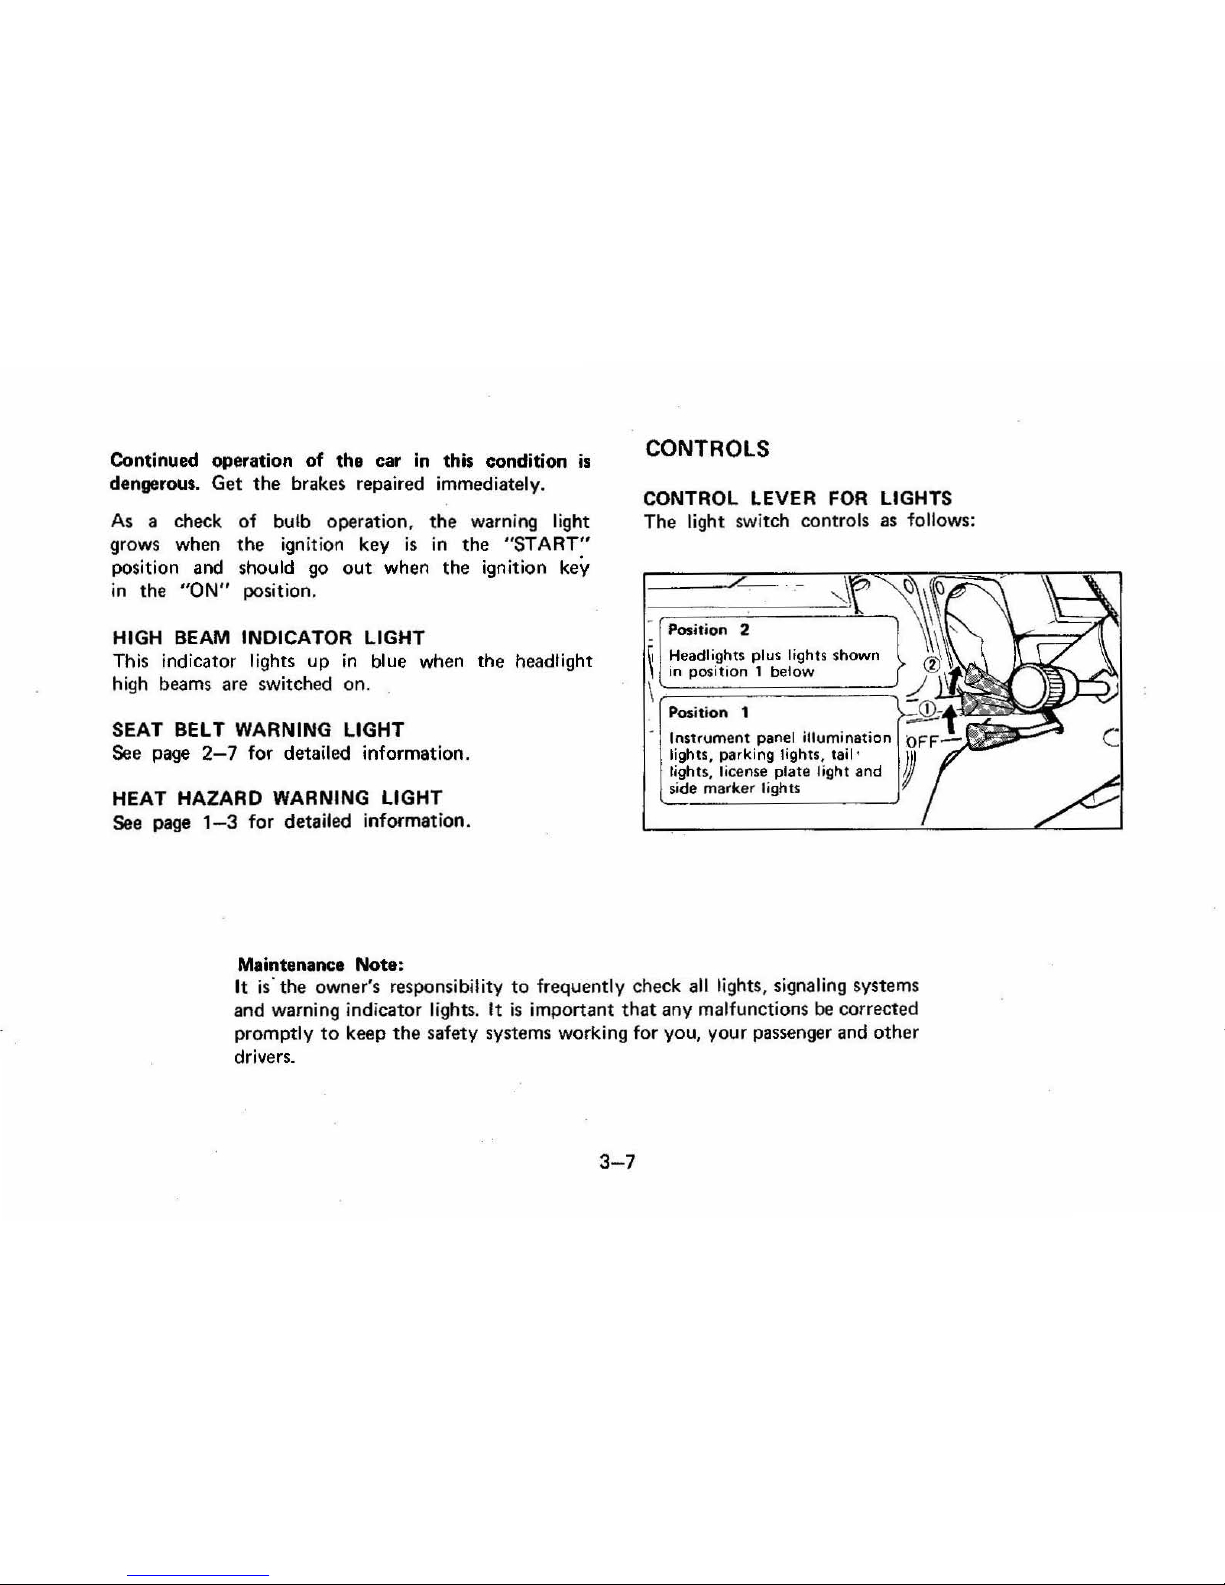
CONTROLS
CONTROL LEVER FOR LIGHTS
The light switch controls
as
follows:
Position 2
I Headl ig
hts
pi
us
I ights s
hown
in
positi
on 1 below
Posi
tion
1
Instrument
panel
illumination
lights, parking lights ,
tail'
lights, license
plate
light
and
side
marker
lights
It is' the owner's responsib ility
to
frequently check all lights, signaling systems
and warning indicator lights. It is important
that
any malfunctions
be
corrected
promptly
to
keep the safety syste
ms
working for you, your passenger and
other
drivers.
3-7
 Loading...