


MYR FRONT MOUNT ADAPTER PLATE
INSTALLATION INSTRUCTIONS
FOR USE ONLY WITH COMMERCIAL WASHERS
INSTRUCTION D’INSTALLATION DE LA PLAQUE D’ADAPTATION DE MONTAGE AVANT MYR
POUR UTILISATION EXCLUSIVE AVEC LES LAVEUSES COMMERCIALES
INSTRUCCIONES DE INSTALACIÓN DE LA PLACA ADAPTADORA DE MONTAJE FRONTAL MYR
PARA USO EXCLUSIVO CON LAVADORAS COMERCIALES
Table of Contents/Índice/Table des matières
FRONT MOUNT ADAPTER |
|
SÉCURITÉ POUR LA PLAQUE |
|
MEDIDAS DE SEGURIDAD PARA |
|
PLATE SAFETY........................................... |
2 |
D’ADAPTATION DE MONTAGE AVANT..6 |
EL USO DE LA PLACA ADAPTADORA |
|
|
DIMENSIONS.............................................. |
2 |
DIMENSIONS.............................................. |
6 |
DE MONTAJE FRONTAL......................... |
10 |
INSTALLATION REQUIREMENTS........... |
3 |
EXIGENCES D’INSTALLATION................ |
7 |
DIMENSIONES.......................................... |
10 |
Tools Needed............................................ |
3 |
Outils nécessaires..................................... |
7 |
REQUISITOS DE INSTALACIÓN............ |
11 |
Location Requirements............................. |
3 |
Exigences d’emplacement....................... |
7 |
Herramientas necesarias........................ |
11 |
INSTALLATION INSTRUCTIONS............. |
4 |
INSTRUCTIONS D’INSTALLATION.......... |
8 |
Requisitos de ubicación......................... |
11 |
Installing The Washer................................ |
4 |
Installation de la laveuse........................... |
8 |
INSTRUCCIONES DE INSTALACIÓN.... |
12 |
COMMERCIAL FRONT MOUNT |
|
GARANTIE DE LA PLAQUE |
|
Instalación de la lavadora....................... |
12 |
ADAPTER PLATE WARRANTY................. |
5 |
D’ADAPTATION DE MONTAGE |
|
GARANTÍA DE LA PLACA |
|
|
|
AVANT COMMERCIALE............................ |
9 |
ADAPTADORA DE MONTAJE |
|
|
|
|
|
FRONTAL COMERCIAL.......................... |
13 |
WFR111504B

FRONT MOUNT ADAPTER PLATE SAFETY
DIMENSIONS
A |
12.7 mm |
116.9 mm
Model |
MYR20/MYR25 |
MYR30 |
|
|
|
|
|
A |
534 mm (21.0") |
634 mm (25.0") |
|
Length |
|||
|
|
||
Weight |
6 kg (14 lbs) |
7 kg (16 lbs) |
|
|
|
|
|
|
Model |
MYR20 |
MYR25 |
MYR30 |
|
|
Stud |
A |
65 mm |
65 mm |
65 mm |
|
|
|
|||||
|
|
(2.5") |
(2.5") |
(2.5") |
||
|
|
|
||||
|
Hole/Mounting |
B |
392 mm |
392 mm |
492 mm |
|
|
Location |
(15.4") |
(15.4") |
(19.4") |
||
|
Front Mount |
|
519 mm |
615 mm |
615 mm |
|
|
Adapter Plate |
C |
||||
|
(20.4") |
(24.2") |
(24.2") |
|||
E |
|
|
||||
|
D |
70.5 mm |
67.5 mm |
67.5 mm |
||
B |
Machine |
|||||
(2.8") |
(2.7") |
(2.7") |
||||
|
(20R/25R |
|
686 mm |
725 mm |
840 mm |
|
|
or 30R) |
E |
||||
|
(27.0") |
(28.6") |
(33.0") |
|||
|
|
|
||||
|
|
F |
660 mm |
750 mm |
750 mm |
|
|
|
(26.0") |
(29.5") |
(29.5") |
||
|
|
|
||||
A |
|
NOTE: Dimension “B” for a washer with Front Mount Adapter |
||||
|
|
|||||
D |
C |
Plates is not the same as it is for a washer without them. |
||||
|
|
|
|
|||
|
F |
|
|
|
|
|
2
INSTALLATION REQUIREMENTS
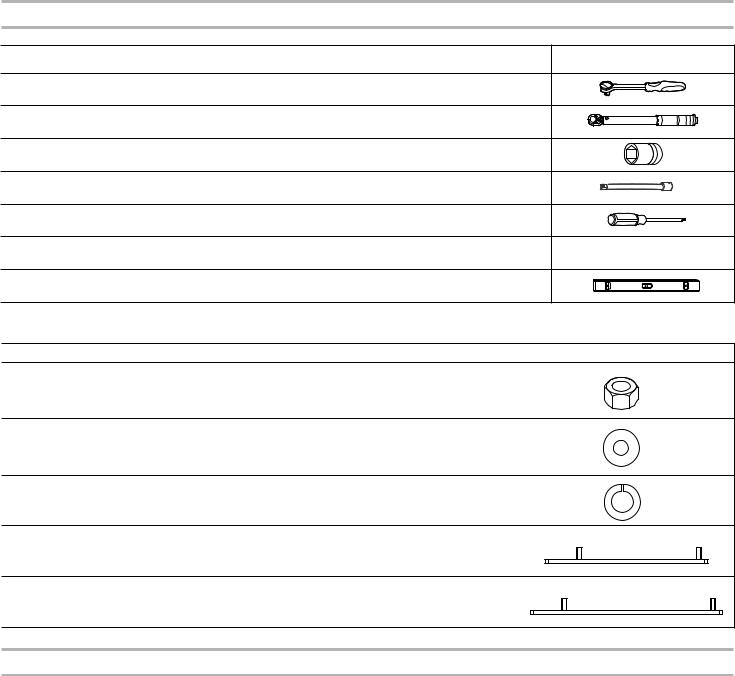
Tools Needed
|
|
Specifications |
|
|
Description |
|||
|
|
|
1/2" Drive |
|
|
Ratchet |
||
|
|
|
1/2" Drive |
Torque wrench (Capable of 100 ft-lbs (136 Nm)) |
||||
|
|
15/16" |
|
|
|
Socket |
||
|
|
|
1/2" Drive |
|
Extension (9" or longer) |
|||
|
|
|
T27† |
|
Security Torx† Screwdriver |
|||
|
|
- |
|
Lifting device capable of lifting the washer 6" off the floor |
||||
|
|
24" |
|
|
|
Level |
||
|
|
|
|
|
|
|
|
|
Parts supplied MYR20, MYR25, MYR30: |
|
|
|
|||||
|
Qty. |
|
Part number |
|
Specification |
|
Description |
|
|
|
|
|
|
||||
|
4 |
|
WFR152010 |
|
5/8"-11 HEX NUT |
|
HEX NUT |
|
|
4 |
|
WFR153016 |
|
5/8" |
|
FLAT WASHER ZINC |
|
|
4 |
|
WFR153015 |
|
5/8" |
|
SPLIT LOCK WASHER ZINC |
|
|
2 |
|
WFR185822 |
|
- |
|
ADAPTER PLATE-FRONT |
|
|
|
|
|
MOUNT, 20-25R |
|
|||
|
|
|
|
|
|
|
|
|
|
2 |
|
WFR185823 |
|
- |
|
ADAPTER PLATE-FRONT |
|
|
|
|
|
MOUNT, 30R |
|
|||
|
|
|
|
|
|
|
|
|
|
|
|
|
|
|
|
|
|
Image
 0
0
 5
5
Image
Location Requirements
The floor under the washer must be capable of supporting the substantial static and dynamic forces created by the weight of the washer and the spinning of an out of balance load.
See the washer installation instructions for details on the flooring requirements for your washer model.
IMPORTANT: The use of Front Mount Adapter Plates does not alter the cement foundation requirements for mounting the washer as listed in the washer installation manual.
†TORX and T27 are trademarks of Acument Intellectual Properties, LLC.
3
INSTALLATION INSTRUCTIONS
Installing The Washer
 WARNING
Excessive Weight Hazard
Use two or more people and mechanical equipment to lift, move and install washer.
Failure to do so can result in back or other injury.
1.Unpack the washer.
2.The washer is attached to the pallet with (4) carriage bolts. To access the bolts use the T27† security screwdriver to remove the upper back guard, the front toe panel (below the main loading door) and it's mounting bracket.
IMPORTANT: The washer must be transported and handled in an upright position at all times.
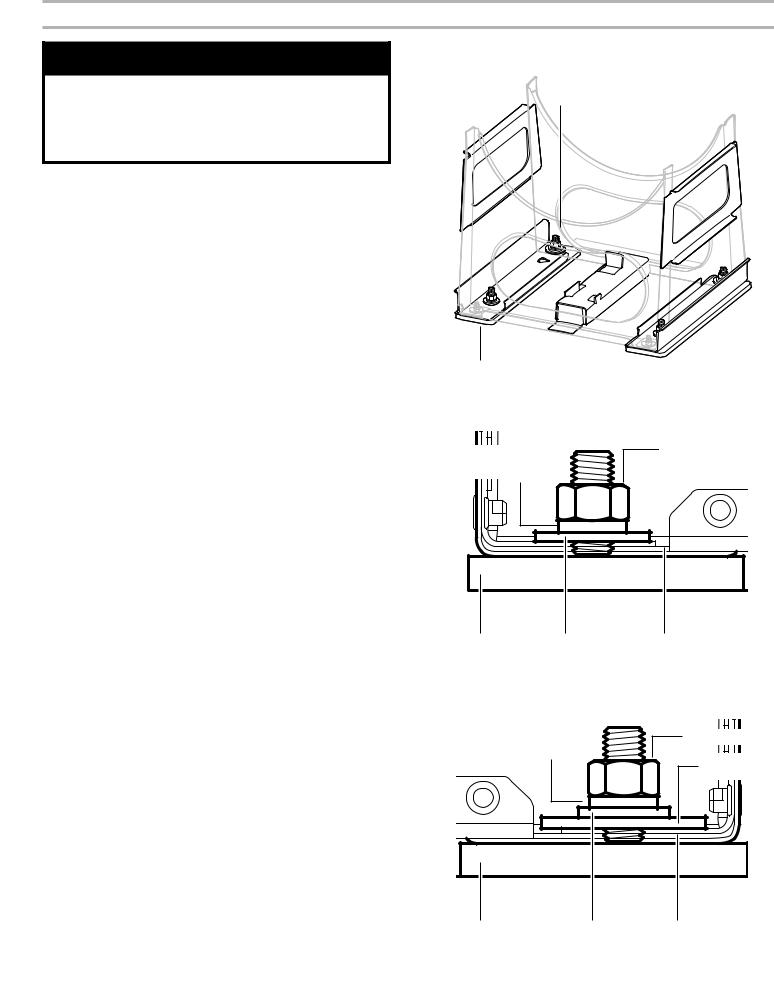
3.Lift the washer and block it in a manner that allows for the installation of the Front Mount Adapter Plates.
4.Adapter Plates are installed with the large hole to the front and the stud to the rear. See the illustrations to the right.
IMPORTANT: All fasteners must be tightened with a torque wrench.
5.Install hardware as shown in the illustrations. The large thick washer is included in the washer's installation kit. Torque all fasteners to 100 ft-lbs with a torque wrench.
6.If installing washer directly on the floor;
Complete the installation of the washer as per the installation instructions that came with it and check its operation.
7.If installing washer on a pedestal;
Follow the installation instructions that came with the pedestal.
Front Mount Adapter Plates Mounted On 30R Frame
Rear
Front |
|
|
Front |
WFR153015 |
WFR152010 NUT |
|
|
LOCK WASHER |
|
Adapter Plate |
WFR153016 |
WASHER FRAME |
|
||
|
WASHER |
|
|
|
Rear |
|
WFR153015 |
WFR152010 NUT |
|
|
|
|
LOCK WASHER |
Thick Washer |
|
|
|
|
|
WFR398325 |
Adapter Plate |
WFR153016 WASHER FRAME |
|
WASHER |
4
 Loading...