


FRONT-LOADING AUTOMATIC |
|
LAVEUSE AUTOMATIQUE À |
WASHER |
|
CHARGEMENT FRONTAL |
Use &CareGuide |
|
Guided'utilisation etd'entretien |
For questions about features, operation/performance, |
|
Pour assistance, installation, ou service, composez le : |
parts, accessories, or service, call: 1-800-688-9900 |
1-800-807-6777 |
|
or visit our website at... |
|
ou visitez notre site internet à.. |
|
|
www.maytag.ca |
www.maytag.com |
|
|
In Canada, call: 1-800-807-6777 |
|
|
or visit our website at... |
|
|
www.maytag.ca |
|
|
|
|
|
W10295008A

TABLE OF CONTENTS |
|
WASHER SAFETY........................................................................................... |
3 |
INSTALLATION REQUIREMENTS................................................................. |
4 |
Tools and Parts........................................................................................... |
4 |
Options...................................................................................................... |
4 |
Location Requirements .............................................................................. |
4 |
Drain System.............................................................................................. |
6 |
Electrical Requirements.............................................................................. |
7 |
INSTALLATION INSTRUCTIONS.................................................................. |
8 |
Remove Transport System.......................................................................... |
8 |
Connect the Inlet Hoses ............................................................................. |
8 |
Connect the Drain Hose ............................................................................ |
9 |
Secure the Drain Hose ............................................................................. |
10 |
Level the Washer ..................................................................................... |
10 |
Complete Installation ............................................................................... |
10 |
FEATURES AND BENEFITS.......................................................................... |
11 |
WASHER USE .............................................................................................. |
12 |
Starting Your Washer ............................................................................... |
12 |
Using the Proper Detergent...................................................................... |
12 |
Using the Dispenser................................................................................. |
13 |
Pausing or Restarting................................................................................ |
13 |
Changing Cycles and Options.................................................................. |
14 |
Status Lights ............................................................................................. |
14 |
Cycles ...................................................................................................... |
15 |
Normal Sounds ........................................................................................ |
16 |
Options & Modifiers ................................................................................ |
16 |
Laundry Guide......................................................................................... |
17 |
LAUNDRY TIPS ........................................................................................... |
18 |
Loading.................................................................................................... |
18 |
Stain Removal Guide ............................................................................... |
19 |
WASHER CARE............................................................................................ |
20 |
Cleaning Your Washer ............................................................................. |
20 |
Water Inlet Hoses..................................................................................... |
20 |
Vacation, Storage, and Moving Care........................................................ |
21 |
TROUBLESHOOTING................................................................................. |
22 |
WARRANTY................................................................................................. |
26 |
ASSISTANCE OR SERVICE......................................................... |
BACK COVER |
TABLE DES MATIÈRES |
|
SÉCURITÉ DE LA LAVEUSE ......................................................................... |
27 |
EXIGENCES D'INSTALLATION ................................................................... |
28 |
Outillage et pièces................................................................................... |
28 |
Options.................................................................................................... |
28 |
Exigences d'emplacement........................................................................ |
28 |
Système de vidange ................................................................................. |
30 |
Spécifications électriques......................................................................... |
31 |
INSTRUCTIONS D'INSTALLATION ........................................................... |
32 |
Élimination des accessoires de transport.................................................. |
32 |
Raccordement des tuyaux d'alimentation ................................................ |
32 |
Raccordement du tuyau de vidange......................................................... |
33 |
Immobilisation du tuyau de vidange........................................................ |
34 |
Réglage de l'aplomb de la laveuse........................................................... |
34 |
Achever l'installation ............................................................................... |
34 |
CARACTÉRISTIQUES ET AVANTAGES ....................................................... |
35 |
UTILISATION DE LA LAVEUSE................................................................... |
36 |
Mise en marche de la laveuse.................................................................. |
36 |
Utilisation du détergent approprié ........................................................... |
36 |
Utilisation du distributeur ........................................................................ |
37 |
Pause ou remise en marche ..................................................................... |
38 |
Modification des programmes et options ................................................. |
38 |
Témoins lumineux ................................................................................... |
38 |
Programmes............................................................................................. |
39 |
Sons normaux.......................................................................................... |
41 |
Options et Modificateurs ......................................................................... |
41 |
Guide de lessivage................................................................................... |
42 |
CONSEILS DE LESSIVAGE........................................................................... |
43 |
Chargement ............................................................................................. |
43 |
Guide pour l'élimination des taches ........................................................ |
44 |
ENTRETIEN DE LA LAVEUSE....................................................................... |
45 |
Nettoyage de la laveuse........................................................................... |
45 |
Tuyaux d'arrivée d'eau ............................................................................ |
46 |
Précautions à prendre avant les vacances, ! |
|
un entreposage ou un déménagement ..................................................... |
46 |
DÉPANNAGE .............................................................................................. |
47 |
GARANTIE................................................................................................... |
51 |
ASSISTANCE OU SERVICE ....................................... |
COUVERTURE ARRIÉRE |
2

WASHER SAFETY
Your safety and the safety of others are very important.
many important safety messages in this manual and on your appliance. Always read and obey all safety
safety alert symbol.
alerts you to potential hazards that can kill or hurt you and others.
messages will follow the safety alert symbol and either the word “DANGER” or “WARNING.” mean:
 DANGER
 WARNING
You can be killed or seriously injured if you don't immediately follow instructions.
You can be killed or seriously injured if you don't follow instructions.
All safety messages will tell you what the potential hazard is, tell you how to reduce the chance of injury, and tell you what can happen if the instructions are not followed.
3
INSTALLATION REQUIREMENTS
Tools and Parts
Gather the required tools and parts before starting installation. The parts supplied are in the washer drum.
Tools needed for connecting the water inlet hoses
■Pliers (that open to 19/16" [39.5 mm])
■Flashlight (optional)
Tools needed for connecting the drain hose
■Locking pliers (that open to 19/16" [39.5 mm])
Tools needed for installation
■Open end wrenches 14 mm and 13 mm
■Level
■Wood block
■Ruler or measuring tape
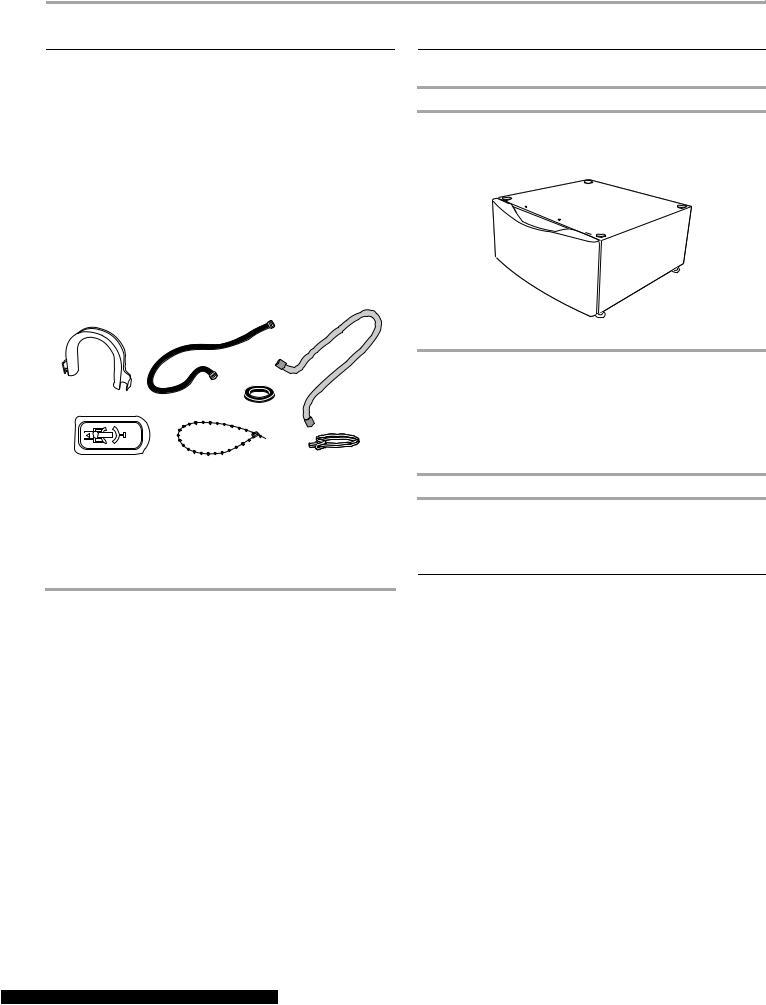
Parts supplied
A
E F
A.Drain hose form
B.Inlet hose (2)
C.Inlet hose washer (4)
D.Drain hose
B
C
G
E.Transport bolt hole plug (4)
F.Beaded strap G. Hose clamp
Alternate Parts
Your installation may require additional parts. If you are interested in purchasing one of the items listed here, call the toll-free number on the cover or in the “Assistance or Service” section.
If You Have |
You Will Need to Buy |
|
|
Laundry tub or |
Sump pump system (if not already |
standpipe taller |
available) |
than 96" (2.4 m) |
|
|
|
Overhead sewer |
Standard 20 gal. (76 L), 30" (762 mm) tall |
|
drain tub or utility sink and sump pump |
|
(available from local plumbing suppliers) |
|
|
Floor drain |
Siphon break, Part Number 285834; |
|
additional drain hose |
|
Part Number 8318155; and connector kit, |
|
Part Number 2858835 |
|
|
Drain hose too |
4 ft. (1.2 m) drain hose extension kit, |
short |
Part Number 2858863 |
|
|
Water faucets |
2 longer water fill hoses: ! |
beyond reach of fill |
6 ft. (1.8 m) Part Number 76314! |
hoses |
10 ft. (3.0 m) Part Number 350008 |
|
|
Options
Pedestal
You have the option of purchasing pedestals of different heights separately for this washer. You may select a 10" (254 mm) or a 15.5" (394 mm) pedestal. The pedestal will add to the total height of the washer.
Optional pedestal
Pedestal ! |
Approximate |
Color |
Model! |
Height |
Height with! |
|
Number |
|
Washer |
|
|
|
|
|
|
10" (254 mm) |
46" (1168 mm) |
White |
WHP1000SQ |
|
|
|
|
15.5" (394 mm) |
51.5" (1308 mm) |
White |
WHP1500SQ |
Stack Kit
Are you planning to stack your washer and dryer? To do so you will need to purchase a Stack Kit.
To order, call the dealer from whom you purchased your washer or refer to the “Assistance or Service” section. Ask for Part Number 8572546.
Location Requirements
Selecting the proper location for your washer improves performance and minimizes noise and possible washer “walk.”
Your washer can be installed under a custom counter, or in a basement, laundry room, closet, or recessed area. See “Drain System.”
Companion appliance location requirements should also be considered. Proper installation is your responsibility.
You will need:
■A water heater set to deliver 120°F (49°C) water to the washer.
■A grounded electrical outlet located within 6 ft. (1.8 m) of where the power cord is attached to the back of the washer. See “Electrical Requirements.”
■Hot and cold water faucets located within 4 ft. (1.2 m) of the hot and cold water fill valves, and water pressure of 20-100 psi (137.9-689.6 kPa).
■A level floor with a maximum slope of 1" (25 mm) under entire washer. Installing the washer on soft floor surfaces, such as carpets or surfaces with foam backing, is not recommended.
■A sturdy and solid floor to support the washer with a total weight (water and load) of 400 lbs (180 kg).
Do not operate your washer in temperatures below 32°F (0°C). Some water can remain in the washer and can cause damage in low temperatures.
4
Installation clearances
■The location must be large enough to allow the washer door ! to be fully opened.
■Additional spacing should be considered for ease of installation and servicing. The door opens more than 90°, and it is not reversible.
■Additional clearances might be required for wall, door, and floor moldings.
■Additional spacing of 1" (25 mm) on all sides of the washer ! is recommended to reduce noise transfer.
■Companion appliance spacing should also be considered.
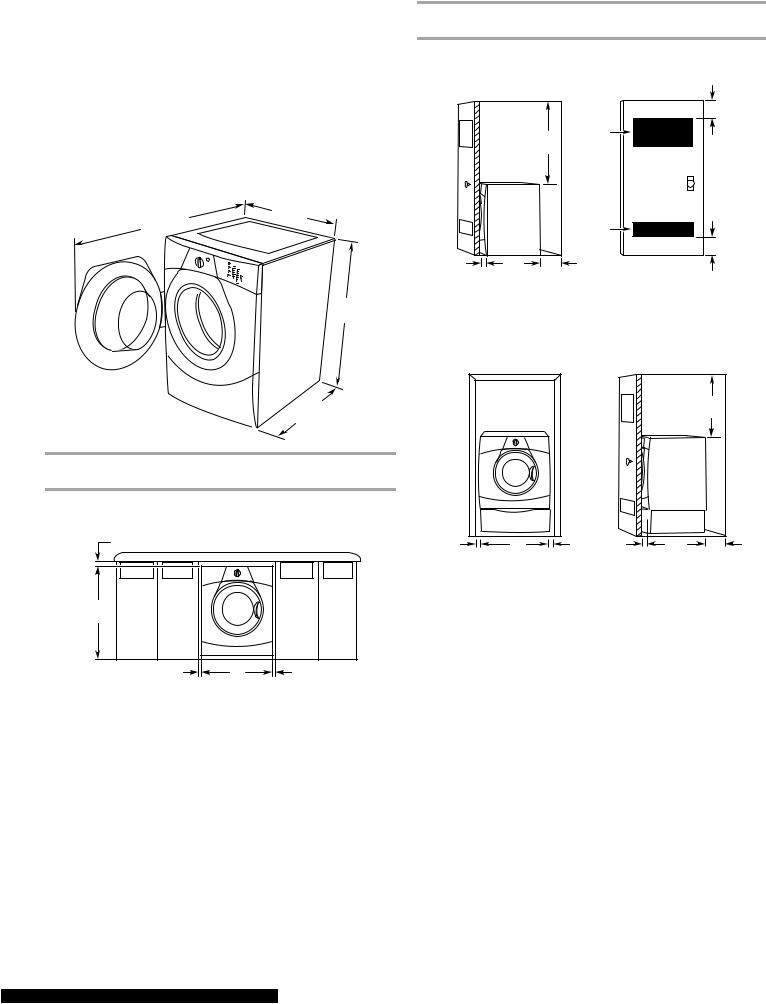
Washer Dimensions
501/4" |
27" |
|
(686 mm) |
||
(1276 mm) |
||
|
36"
(914 mm)
301/2"
(775 mm)
Recommended installation spacing for custom undercounter installation
The dimensions shown are for the recommended spacing.
Custom undercounter installation - Washer only
2" (50 mm) |
|
|
36" min. |
|
|
(914 mm) |
|
|
1" |
27" |
1" |
(25 mm) |
(686 mm) |
(25 mm) |
Recommended installation spacing for recessed or closet installation, with or without a pedestal
The dimensions shown are for the recommended spacing.
Recessed area or closet installation
|
|
|
|
3" |
|
|
|
|
(76 mm) |
|
|
48" |
48 in.2 |
|
|
|
(310 cm2) |
|
|
|
(1220 mm) |
|
|
|
|
|
|
24 in.2 |
3" |
|
|
|
(155 cm2) |
|
|
|
|
|
(76 mm) |
1" |
301/2" |
4" |
|
|
(25 mm) |
(775 mm) |
(102 mm) |
|
|
|
A |
|
|
B |
A.Side view - closet or confined area
B.Closet door with vents
Recessed or closet installation - Washer on pedestal
|
|
|
|
38" min. |
|
|
|
|
|
(965 mm) |
|
1" |
27" |
1" |
1" |
301/2" |
4" |
(25 mm) |
(686 mm) |
(25 mm) |
(25 mm) |
(775 mm) |
(102 mm) |
|
A |
|
|
B |
|
A.Recessed area
B.Side view - closet or confined area
5
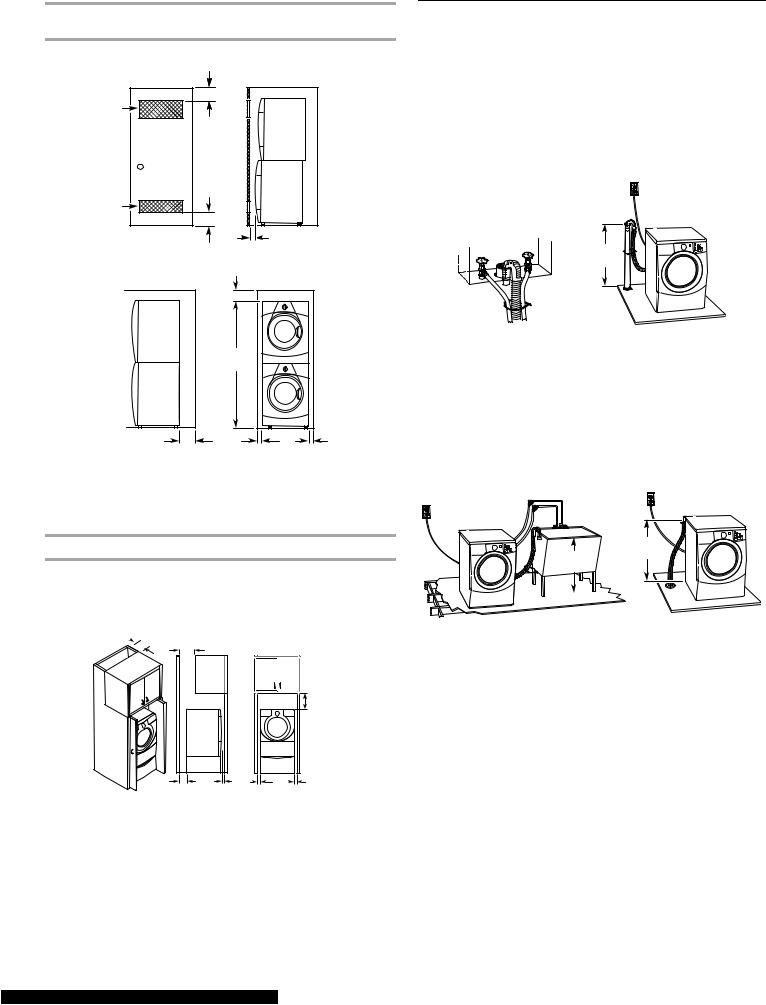
Recommended installation spacing for recessed or closet installation, with stacked washer and dryer
The dimensions shown are for the recommended spacing.
48 in.2* |
|
|
|
(310 cm2) |
3" |
|
|
|
|
|
|
|
(76 mm) |
|
|
|
3" |
|
|
|
(76 mm) |
|
|
24 in.2* |
|
|
|
(155 cm2) |
|
|
|
|
|
1" (25 mm) |
|
|
12" (305 mm) |
|
|
|
72" |
|
|
|
(1829 mm) |
|
|
51/4"** |
1"*** |
27" |
1"*** |
(133 mm) |
(25 mm) |
(686 mm) |
(25 mm) |
*Min. top and bottom air openings for closet door. **External exhaust elbow requires additional space.
***Wall, door, and floor molding may require additional spacing.
Recommended installation spacing for cabinet installation
The dimensions shown are for the recommended spacing.
For cabinet installation, with a door, the minimum ventilation openings in the top are required.
7" |
|
|
|
|
(178 mm) |
7" |
|
|
|
(178 mm) |
|
|
|
|
|
|
|
|
9" |
|
|
|
|
(229 mm) |
4" |
311/2" |
|
27" |
1" |
1" |
(25 mm) |
|||
(102 mm) |
(800 mm) (25 mm) (686 mm) |
|
||
Drain System
The washer can be installed using the standpipe drain system (floor or wall), the laundry tub drain system, or the floor drain system. Select the drain hose installation method you need. See “Tools and Parts.”
Standpipe drain system - wall or floor (views A & B)
The standpipe drain requires a minimum diameter standpipe of ! 2" (50 mm). The minimum carry-away capacity can be no less than 17 gal. (64 L) per minute.
The top of the standpipe must be at least 30" (762 mm) high and no higher than 96" (2.4 m) from the bottom of the washer.
30" min. 
(762 mm)
A B
Laundry tub drain system (view C)
The laundry tub needs a minimum 20 gal. (76 L) capacity. The top of the laundry tub must be at least 30" (762 mm) above the floor.
Floor drain system (view D)
The floor drain system requires a siphon break that may be purchased separately. See “Tools and Parts.”
The siphon break must be a minimum of 28" (710 mm) from the bottom of the washer. Additional hoses might be needed.
28" min. 30" min. (710 mm) (762 mm)
C D
6
■ Do not have a fuse in the neutral or ground circuit.
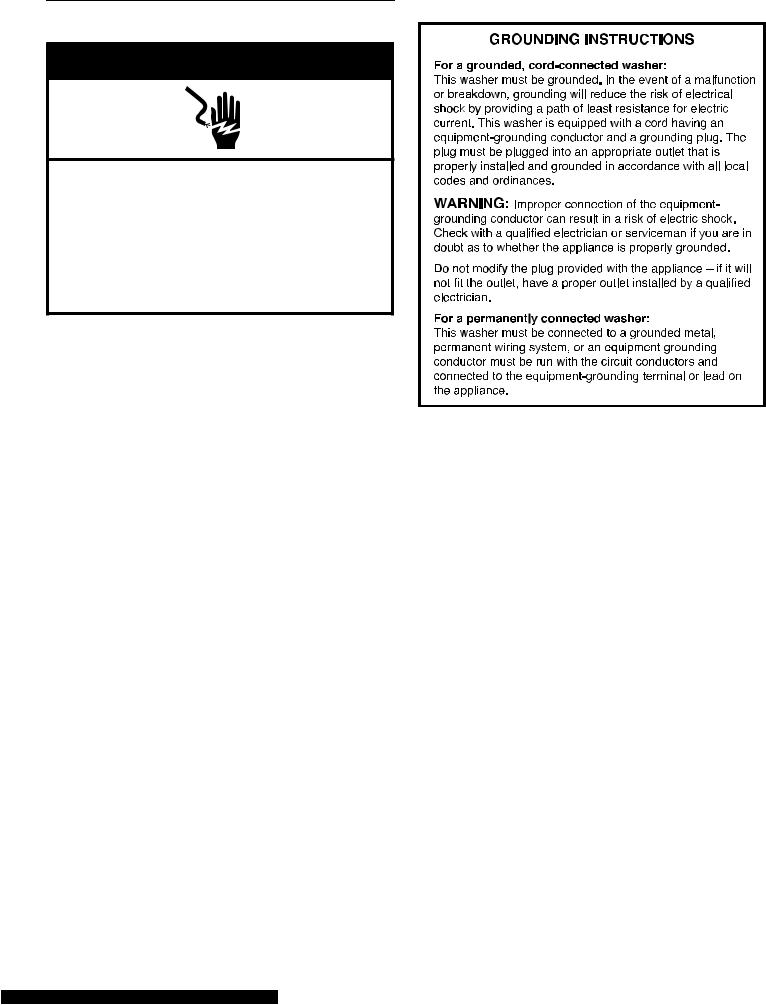
Electrical Requirements
 WARNING
Electrical Shock Hazard
Plug into a grounded 3 prong outlet.
Do not remove ground prong.
Do not use an adapter.
Do not use an extension cord.
Failure to follow these instructions can result in death, #re, or electrical shock.
■ A 120 volt, 60 Hz., AC only, 15or 20-amp, fused electrical supply is required. A time-delay fuse or circuit breaker is recommended. It is recommended that a separate circuit serving only this appliance be provided.
■This washer is equipped with a power supply cord having a 3 prong grounding plug.
■To minimize possible shock hazard, the cord must be plugged into a mating, 3 prong, grounding-type outlet, grounded in accordance with local codes and ordinances. If a mating outlet is not available, it is the personal responsibility and obligation of the customer to have the properly grounded outlet installed by a qualified electrician.
■If codes permit and a separate ground wire is used, it is recommended that a qualified electrician determine that the ground path is adequate.
■Do not ground to a gas pipe.
■Check with a qualified electrician if you are not sure the washer is properly grounded.
7
INSTALLATION INSTRUCTIONS
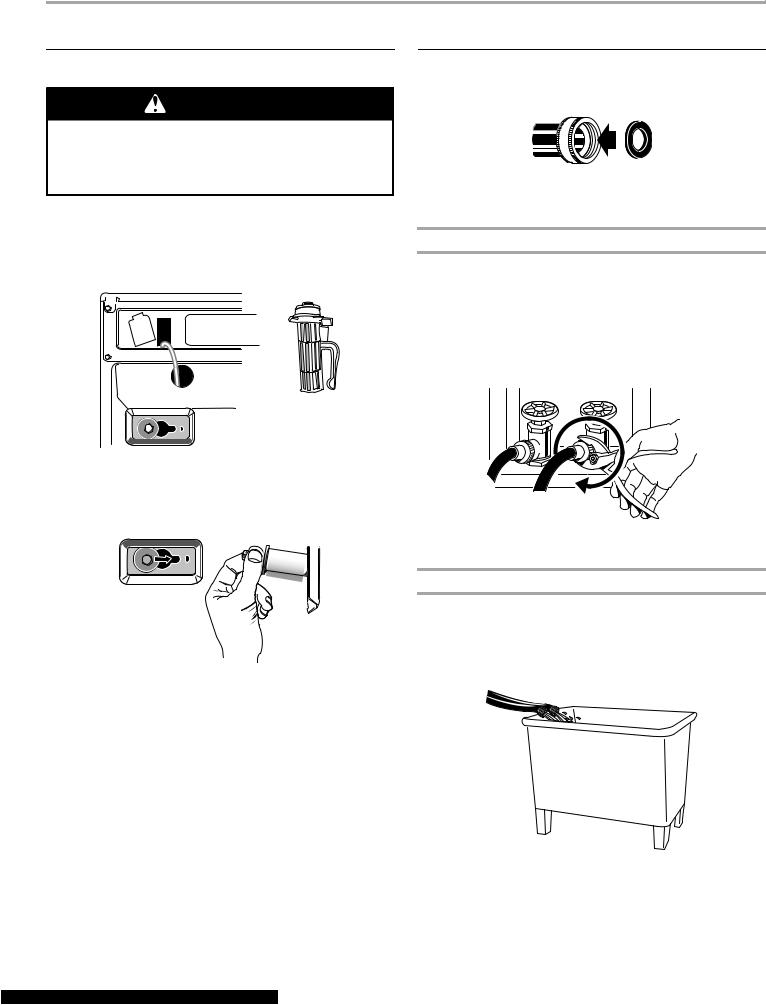
Remove Transport System
WARNING
Excessive Weight Hazard
Use two or more people to move and install washer. Failure to do so can result in back or other injury.
IMPORTANT: Position the washer so that the rear of the washer is within approximately 3 ft. (900 mm) of its final location.
There are 4 transport bolts in the rear panel of the washer that support the suspension system during transportation. These bolts also retain the power cord inside the washer until the bolts are removed.
1.On the back of the washer, loosen the 4 transport bolts using a 13 mm wrench.
2.Once the bolt is loose, move it to the center of the hole and completely pull out the bolt, including the plastic spacer covering the bolt.
3.Once all 4 bolts are removed, discard the bolts and spacers. Then pull the power cord through the opening of the rear panel and close the hole with the attached cap.
4.Cover the bolt holes with the 4 transport bolt hole plugs.
NOTE: If the washer is to be transported at a later date, call your local service center. To avoid suspension and structural damage, your machine must be properly set up for relocation by a certified technician.
Connect the Inlet Hoses
Insert new flat washers (supplied) into each end of the inlet hoses. Firmly seat the washers in the couplings.
AB
A.Coupling
B.Washer
Connect the inlet hoses to the water faucets
Make sure washer drum is empty and flat washers have been placed into hose couplings. Both hoses must be used for the washer to work properly.
1.Attach a hose to the hot water faucet. Screw on coupling by hand until it is seated on the washer.
2.Attach a hose to the cold water faucet. Screw on coupling by hand until it is seated on the washer.
3.Using pliers, tighten the couplings with an additional ! two-thirds turn.
NOTE: Do not overtighten. Damage to the coupling or water faucet can result. Both faucets must be turned on for the washer to work properly.
Clear the water lines
■Run water through both faucets and inlet hoses, into a laundry tub, drainpipe or bucket, to get rid of particles in the water lines that might clog the inlet valve screens.
■Check the temperature of the water to make sure that the hot water hose is connected to the hot water faucet and that the cold water hose is connected to the cold water faucet.
8
 Loading...