


Table of Contents |
|
Introduction . . . . . . . . . . . . . . . . . . . . . . . . . . . . . . . . . . . . . . . . . . . . . . . . . . . . . . |
.2 |
Quattro Features . . . . . . . . . . . . . . . . . . . . . . . . . . . . . . . . . . . . . . . . . . . . . . . . . . . |
.2 |
What’s in the Box? . . . . . . . . . . . . . . . . . . . . . . . . . . . . . . . . . . . . . . . . . . . . . . . . . |
.2 |
Minimum System Requirements . . . . . . . . . . . . . . . . . . . . . . . . . . . . . . . . . . . . . . . |
.3 |
Windows . . . . . . . . . . . . . . . . . . . . . . . . . . . . . . . . . . . . . . . . . . . . . . . . . . . . |
.3 |
Macintosh . . . . . . . . . . . . . . . . . . . . . . . . . . . . . . . . . . . . . . . . . . . . . . . . . . . . |
.3 |
Quattro Front Panel: . . . . . . . . . . . . . . . . . . . . . . . . . . . . . . . . . . . . . . . . . . . . . . . |
.3 |
Quattro Rear Panel: . . . . . . . . . . . . . . . . . . . . . . . . . . . . . . . . . . . . . . . . . . . . . . . . |
.4 |
Quattro Quick Start . . . . . . . . . . . . . . . . . . . . . . . . . . . . . . . . . . . . . . . . . . . . . . . . |
.5 |
Theory of Operation . . . . . . . . . . . . . . . . . . . . . . . . . . . . . . . . . . . . . . . . . . . . . . . . |
.5 |
Hardware & Software Installation on the PC . . . . . . . . . . . . . . . . . . . . . . . . . . . . . |
.7 |
Windows XP Installation . . . . . . . . . . . . . . . . . . . . . . . . . . . . . . . . . . . . . . . . |
.7 |
Windows 2000 Installation . . . . . . . . . . . . . . . . . . . . . . . . . . . . . . . . . . . . . . . |
.8 |
Windows ME Installation . . . . . . . . . . . . . . . . . . . . . . . . . . . . . . . . . . . . . . . . |
.8 |
Windows 98 Second Edition Installation . . . . . . . . . . . . . . . . . . . . . . . . . . . . . |
.9 |
Hardware & Software Installation on the Mac . . . . . . . . . . . . . . . . . . . . . . . . . . . . |
10 |
Configuring OMS . . . . . . . . . . . . . . . . . . . . . . . . . . . . . . . . . . . . . . . . . . . . . . . . . . |
11 |
Hooking up your USB Audio Quattro . . . . . . . . . . . . . . . . . . . . . . . . . . . . . . . . . . . |
12 |
MIDI Operation . . . . . . . . . . . . . . . . . . . . . . . . . . . . . . . . . . . . . . . . . . . . . . . . . . . |
13 |
Using the Input and Output Level Switches . . . . . . . . . . . . . . . . . . . . . . . . . . . . . . |
14 |
Using Direct Monitoring . . . . . . . . . . . . . . . . . . . . . . . . . . . . . . . . . . . . . . . . . . . . . |
14 |
Quattro Operation on the PC . . . . . . . . . . . . . . . . . . . . . . . . . . . . . . . . . . . . . . . . . |
15 |
The USB Audio Configuration Manager . . . . . . . . . . . . . . . . . . . . . . . . . . . . . |
15 |
Quattro and the Windows Sound System . . . . . . . . . . . . . . . . . . . . . . . . . . . . . |
16 |
ASIO Operation . . . . . . . . . . . . . . . . . . . . . . . . . . . . . . . . . . . . . . . . . . . . . . . |
17 |
ASIO Control Panel and Operating Modes on the PC . . . . . . . . . . . . . . . . . . . |
18 |
Advanced Tab . . . . . . . . . . . . . . . . . . . . . . . . . . . . . . . . . . . . . . . . . . . . . . . . . |
21 |
Quattro Operation on the Macintosh . . . . . . . . . . . . . . . . . . . . . . . . . . . . . . . . . . . . |
21 |
The Macintosh Sound Manager . . . . . . . . . . . . . . . . . . . . . . . . . . . . . . . . . . . . |
21 |
Optimize for Slower Systems . . . . . . . . . . . . . . . . . . . . . . . . . . . . . . . . . . . . . |
24 |
Optimizing Your System for Audio . . . . . . . . . . . . . . . . . . . . . . . . . . . . . . . . . . . . . |
25 |
Troubleshooting . . . . . . . . . . . . . . . . . . . . . . . . . . . . . . . . . . . . . . . . . . . . . . . . . . . |
26 |
Technical Specs . . . . . . . . . . . . . . . . . . . . . . . . . . . . . . . . . . . . . . . . . . . . . . . . . . . |
27 |
Limited Lifetime Warranty . . . . . . . . . . . . . . . . . . . . . . . . . . . . . . . . . . . . . . . . . . . |
28 |
1
Introduction
Thank you for purchasing the USB Audio Quattro USB Audio Interface, designed and manufactured by M-Audio. The Quattro provides four audio inputs and four audio outputs, plus a 1x1 MIDI port on your USB equipped PC or Macintosh computer. High performance, 24-bit/96kHz audio is now possible in a compact, portable package. All audio inputs and outputs are switch-able between balanced (+4dBu) and unbalanced (-10dBV) operation to accommodate any audio need.
The USB port is a convenient, high-speed connection that requires no tools to install, no IRQ or additional resources, with no need to open or reconfigure your computer. By following the instructions in this manual, you will be up and running in no time.
Quattro Features
•Four (4) analog audio inputs on 1/4” TRS jacks.
•High performance, 24-bit/96kHz A/D and D/A converters, with 101dB dynamic range on input and 104dB on output.
•ASIO 2.0 drivers included.
•Input Level switch for +4/-10 input line level settings (one for each stereo pair, 1/2 & 3/4).
•Output Level switch for +4/-10 output line level settings (one for each stereo pair, 1/2 & 3/4).
•Direct Monitor switch for computer bypass monitoring option (one for each stereo pair, 1/2 & 3/4).
•One (1) MIDI Input and one (1) MIDI Output on front panel.
•Expansion jack for connection to the Omni I/O Desktop System by M-Audio.
What’s in the Box?
Your Quattro USB Audio Interface box contains:
•This manual.
•The Quattro USB Audio Interface.
•One (1) USB cable.
•One (1) 9vAC 1,000mA wall-wart power supply.
•One (1) driver disk containing drivers and additional software.
Minimum System Requirements
Windows
•Windows 98 SE, Windows ME or Windows 2000, Windows XP.
•Pentium III 500MHz for 96kHz operation. Pentium II 400MHz for 48kHz or less.
•128 MB or more of RAM for 96kHz operation. 64MB RAM for 48kHz or less.
Macintosh
•Mac OS 9.1 minimum.
•Mac G3 with onboard USB.
•128 MB RAM for 96kHz operation, 64MB RAM for 48kHz or less.
•Opcode’s OMS required for MIDI operation.
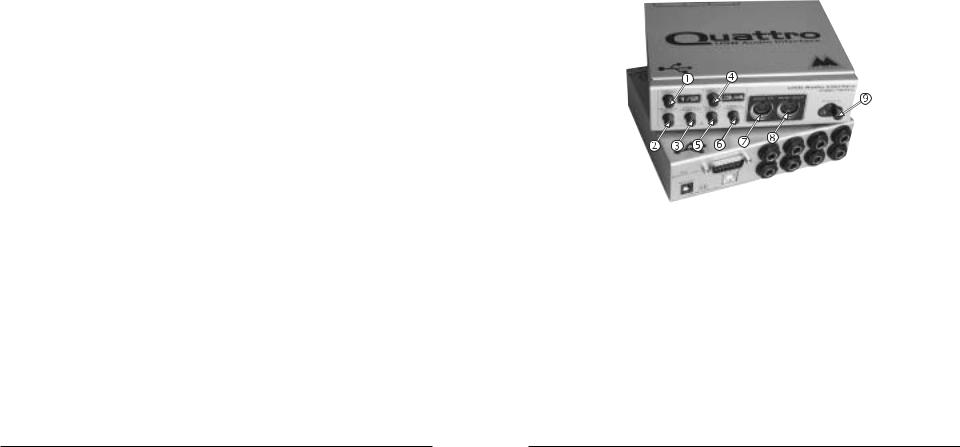
Quattro Front Panel:
1.1/2 “Input Level” switch: In the ‘out’ position, the Quattro Inputs 1 & 2 are set to +4dBu line level operation. Pressing in and engaging this switch sets the these inputs to -10dBV line level.
2.1/2 “Output Level” switch: In the ‘out’ position, the Quattro Outputs 1 & 2 are set to +4dBu line level operation. Pressing in and engaging this switch sets these outputs to -10dBV line level.
3.1/2 “Direct Monitor” switch: In the ‘out’ position, Quattro Outputs 1 & 2 are fed from the computer for monitoring. Pressing in and engaging this switch connects Inputs 1/2 directly to the Quattro Outputs 1/2.
4.3/4 “Input Level” switch: In the ‘out’ position, the Quattro Inputs 3 & 4 are set to +4dBu line level operation. Pressing in and engaging this switch sets the these inputs to -10dBV line level.
2 |
3 |

5.3/4 “Output Level” switch: In the ‘out’ position, the Quattro Outputs 3 & 4 are set to +4dBu line level operation. Pressing in and engaging this switch sets these outputs to -10dBV line level.
6.3/4 “Direct Monitor” switch: In the ‘out’ position, Quattro Outputs 1 & 2 are fed from the computer for monitoring. Pressing in and engaging this switch connects Inputs 3/4 directly to the Quattro Outputs 3/4.
7.“MIDI In” port: This MIDI jack provides MIDI input to your computer.
8.“MIDI Out” port: This port provides MIDI Output from your computer.
9.Power switch and LED: Pressing in and engaging this switch will power on the Quattro and light the corresponding LED.
Quattro Rear Panel:
1.“9VAC” power jack: This jack accepts the wall-wart power supply that came with the unit. Only the proper power-rated supply should be used.
2.“To Omni I/O” connector: This 15-pin DB connector accepts the female end of the Omni I/O connection cable (available thru Midiman Inc.).
3.USB jack: This jack accepts the device-end of a standard USB cable.
4.Audio “In 4” through “In 1”: These 1/4” jacks accept either TRS or TS 1/4” plugs. These are line level inputs, and generally will be connected to the outputs of a line level instrument or preamp.
5.Audio “Out 4” through “Out 1”: These 1/4” jacks accept either TRS or TS 1/4” plugs. These are line level outputs, and generally will be connected to a mixer, power amp, powered speakers, or a sound system.
Quattro Quick Start
It is recommended that you read this manual fully before installing and using your USB Audio Quattro. This Quick Start guide may serve as an overview to the steps ahead.
1.Plug the Quattro wall-wart into your wall receptacle and into the Quattro 9vAC power jack.
2.Connect the USB cable to your computer and the Quattro. Power up the computer with the Quattro attached, and proceed with the driver installation.
3.With all audio levels turned down, connect your instruments to the Quattro audio inputs, and connect the Quattro’s audio outputs to a mixer or monitoring system.
4.Configure your music software and start recording.
Theory of Operation
The USB port provides a high-speed connection to your computer. Devices can be “hot-plugged” into the USB port with no need to power down the computer. Additionally, there’s no need to open the computer, no tools are required, nor is it necessary to configure the device other than plugging it in to the USB port and installing the drivers.
The USB Audio Quattro utilizes the convenience of your computer’s USB port to bring high quality, high resolution audio to your desktop or laptop computer. The PC requires no IRQ other than the one that is already dedicated to the USB controller when it is enabled.
In theory, multiple devices can be connected to the USB port (with the addition of a USB hub). The USB Audio Quattro requires all of the bandwidth that is available on the USB port, and therefore it is required that you plug the Quattro directly into your computer’s USB port, and not into a USB hub with other USB devices. Of course, if you are using a USB keyboard and mouse, you may have those plugged into your computer’s other USB port (two are usually supplied on PC and Mac).
Your USB Audio Quattro USB Audio Interface is a 24-bit/96kHz capable device. That means that you can record at any sampling rate that your recording software will allow, up to 96kHz at a bit width of 24-bits, and at 16or 24-bits with a sampling rate of 48kHz or less. An ASIO control panel is included with your driver software which allows you to set the Quattro to its different operating modes.
The Quattro has several operating modes, and when using the included ASIO drivers, will function as a 4 input, 4 output audio device. On the PC, the ASIO drivers as well as the Windows MME drivers will load automatically during the driver installation procedure. Driver installation will also load a driver configuration control panel that allows you to switch between the ASIO and Windows MME drivers. When working with Windows MME (multimedia extensions), the USB Audio Quattro functions as a 2 input, 2 output device only.
4 |
5 |

When working with the Macintosh Sound Manager, the USB Audio Quattro also functions as a 2 input, 2 output device only. An ASIO Control Panel is installed which allows you to configure the Quattro’s operating modes. It is also within the ASIO format that the Quattro may function as a 4 input, 4 output device.
The Quattro provides four audio inputs as two stereo pairs, i.e. 1/2 and 3/4, and four audio outputs, also as stereo pairs 1/2 and 3/4, The Quattro adds 1x1 MIDI operation (one input and one output port) to your USB equipped PC computer, which can be used as your only MIDI interface or in conjunction with additional MIDI devices.
When all four input and output stereo pairs (two input pairs and two output pairs) are enabled, the Quattro will operate in 16-bit mode at either the 44.1k or 48k sampling rates. With three stereo pairs enabled, i.e., either one input and two output pairs or two input and one output pair, the Quattro will operate at 48kHz sampling rate or lower, and at either 24or 16-bit. When one stereo pair is enabled and in 24-bit mode, the Quattro will operate at the 96kHz sampling rate or lower. This is explained more fully in the section, “ASIO Control Panel Operating Modes.”
The USB Audio can be configured for +4 or -10 line level operation simply by pressing a button on the front panel. This allows for seamless integration into the studio, compatible with professional balanced (balanced TRS, +4dBu) or semi-pro (unbalanced TS, -10dBV) audio devices (see section, “Using the Input and Output Level Switches”).
The USB Audio Quattro can be used with the Sound Manager on the Macintosh, or with the Windows Sound System in Windows, and therefore can operate as your system sound card. If your software is ASIO compliant, we suggest using the ASIO drivers. ASIO will allow you to monitor audio through your music program with greatly reduced latency. However, if you are not using ASIO or otherwise wish to monitor the signal at the Quattro inputs, a “Direct Monitor” switch is provided on the USB Audio for bypassing the computer and directly monitoring the input signal present at the USB Audio Quattro (see section, “Using Direct Monitoring).
Additionally, the USB Audio Quattro can be used in conjunction with the Omni I/O Desktop Recording System by M-Audio. The Omni will add two microphone/instrument preamps to the Quattro inputs, plus add a mixer to the Quattro outputs. This Omni mixer will allow you to blend MIDI keyboards with audio tracks, add effects to the Quattro outputs, control monitor and headphone levels while separately mixing down. Check the M-Audio website, www.m-audio.com, for more info on the Omni for the Quattro.
Hardware & Software Installation on the PC
Here is a simple, step-by-step procedure for attaching and powering up the Quattro. See the section, “ASIO Operation” for information on configuring ASIO drivers.
1.Plug the Quattro wall-wart into your wall receptacle and to the Quattro 9vAC power jack.
2.Connect the USB cable to your computer and the Quattro. Find an appropriate spot on your desktop or work area for the Quattro. Whether or not you turn on the Quattro now or later depends on the version of Windows you have, so proceed to the installation instructions that correspond to your current version of Windows.
Windows XP Installation
1.Boot Windows XP with your M-Audio USB Quattro powered OFF. After Windows XP has been booted, connect the USB cable and power on the Quattro.
2.Windows XP will then detect and automatically install it’s own drivers for the USB Composite Device and USB Audio Devices.
3.Insert the included driver CD into your computer’s CD drive.
4.When Windows XP prompts for drivers, select “Install from a list or specific location” and click “Next”.
5.Check the box marked “include this location in the search” and click “browse”. Click on “My Computer” and click on the CD-Rom drive containing the Midiman Driver disk. Assuming that your CD drive is the “D” drive, locate the Quattro driver at D:\USB_Audio\Quattro\WinXP. Click “OK” and then “Next”.
6.At this point Microsoft Windows will display a page attempting to install the “Midiman USB Audio Sport Quattro MIDI Driver (WDM)”, click “Continue Anyway”. When complete, click “Finish”.
7.Now Windows will repeat the process as it will find another driver, click “Install from a list or specific location” and click “Next”.
8.Check the box marked “include this location in the search” and click “browse”, click on “My Computer”, and click on the CD-Rom drive containing the Midiman Driver disk. Assuming your CD Drive is the “D” drive; locate the Quattro driver at D:\USB_Audio\Quattro\WinXP. Click “OK” and then click “Next”.
9.At this point Microsoft Windows XP will display a page attempting to install the “Midiman USB Audio Sport Quattro MIDI Driver (VxD)”, click “Continue Anyway”. When complete, click “Finish”.
10.Windows will show a little balloon that states, “Your new hardware is installed and is ready to use”. Please note: Installation of USB ASIO drivers is still necessary.
11.Open “My Computer”, click on the Midiman Driver Disk in your CD-Rom drive. Open “USB-Audio” Folder, Open Quattro Folder, and then WinXP folder, and double click “XPPostInstaller.exe”.
12.Windows will prompt for installing “Midiman USB Audio Quattro ASIO 1/2”, click “Continue Anyway”.
13.Windows will prompt for installing “Midiman USB Audio Quattro ASIO 3/4”, click “Continue Anyway”.
14.After a few short seconds a small black “M-Audio” Icon will appear in the system tray at the lower right hand corner of the desktop. Your USB Audio Quattro is now installed.
15.Restart the computer after the installation is finished.
6 |
7 |

Windows 2000 Installation
1.Boot Windows 2000 with your M-Audio USB Quattro powered OFF.
2.Insert the included Driver CD into your computer’s CD drive. Assuming that your CD drive is the “D” drive, locate the Quattro driver at D:\USB_AUDIO\QUATTRO\WIN2000.
3.Run the "Quattro W2k Installer" program by double clicking on it.
4.Connect and power ON your M-Audio USB Quattro.
5.Windows will show a Dialog box. Press "Yes."
6.You will then see Windows 2000 detect and automatically install the driver for the USB Composite Device.
7.Windows will detect and automatically install a number of drivers. As it does this, it will show a Dialog box for M-Audio USB Quattro MIDI Driver (WDM) - click Yes. Next, it will show a Dialog box for M-Audio USB Quattro ASIO 3/4 - click Yes. Then, it will show a Dialog box for M-Audio USB Quattro ASIO 1/2 - click Yes. Finally, it will show the Dialog box for M-Audio USB Quattro MIDI Driver (VxD) - again, click Yes.
8.At this point, a small black M-Audio Icon will appear in the lower right corner of the desktop system tray indicating that the driver is installed.
9.Restart the computer after the installation is finished.
Windows ME Installation
1.Boot Windows ME with your M-Audio USB Quattro powered OFF. After Windows ME has been booted, power On the Quattro.
2.Windows will proceed with the installation of the "USB composite Device" driver.
Note: If the "USB Composite Device" has already been installed then Windows will skip this step. This will occur if another USB audio device had been installed on your system at any time.
3.When the Add New Hardware Wizard reports that it wants to search for a driver for a USB Audio Device, select "Specify the location of the driver", and then click "Next".
4.Windows will ask you where you want it to search for the drivers. Remove the check marks from all of the optional search locations except "Specify a location." Insert the included Driver CD; click “Browse,” then, on your computer’s CD drive, locate the folder “USB_AUDIO\QUATTRO\WINME.” Click “Ok”, then Click "Next".
5.Windows will report that is it ready to install the driver. Click "Next" to continue.
6.Windows will process the files and then indicate it has finished installing the software that your new hardware device requires. Click the "Finish" button. You will need to repeat these steps as many times as Windows finds a new hardware device. By the time everything is finished you will have installed the Quattro’s Windows MME drivers, plus the ASIO and EASI drivers.
7.Windows might indicate it cannot find a file it is attempting to copy from the Windows ME CD. If so, insert your Windows ME CD, and then use the Browse button to point to this CD and browse to the “WinME” folder. Highlight the “WinME” Folder. Click OK, to close window. Click OK to continue with the installation.
8.Windows will process the files and then indicate it has finished installing the software that your new hardware device requires. Click the "Finish" button.
Note: It is very important at this point you might need to wait for several minutes while Windows configures the hardware and installs the MIDI drivers. Please be patient.
9.At this point, a small black M-Audio Icon will appear in the lower right corner of the desktop system tray indicating that the driver is installed.
10.Restart the computer after the installation is finished.
Windows 98 Second Edition Installation
1.Boot Windows 98 SE with your M-Audio USB Quattro powered OFF. After Windows 98 SE has been booted, power On the Quattro.
2.Windows will proceed with the installation of the "USB Composite Device" driver.
Note: If the "USB Composite Device" has already been installed then Windows will skip this step. This will occur if a USB audio device had previously been installed in your system.
3.When the Add New Hardware Wizard reports that it wants to search for a driver for a USB Composite Device, click "Next".
4.On the next screen select the "Search for the best driver for your device" item and click “Ok”, then click "Next".
5.On the next screen, remove the check marks from all of the optional search locations except "Specify a location." Insert the included Driver CD, click “Browse,” then, on your computer’s CD drive, locate the folder “USB_AUDIO\QUATTRO\WIN98SE.” Click "Next".
6.Windows will report that is it ready to install the driver. Click "Next" to continue.
7.Windows will process the files and then indicate it has finished installing the software that your new hardware device requires. Click the "Finish" button. You will need to repeat these step as many times as Windows finds a new hardware device. By the time everything is finished you will have installed the Quattro’s Windows MME drivers, plus the ASIO and EASI drivers.
8.Windows might indicate it cannot find a file it is attempting to copy from the Windows 98 CD. If so, insert your Windows 98 CD, and then use the Browse button to point to this CD and browse to the “Win98” folder. Highlight the “Win98” Folder. Click OK, to close window. Click OK to continue with the installation.
9.Windows will process the files and then indicate it has finished installing the software that your new hardware device requires. Click the "Finish" button.
Note: It is very important at this point you might need to wait for several minutes while Windows configures the hardware and installs the MIDI drivers. Please be patient.
10.At this point, a small black M-Audio Icon will appear in the lower right corner of the desktop system tray indicating that the driver is installed.
11.Restart the computer after the installation is finished.
8 |
9 |
 Loading...