


User Guide
English ( 3 – 5 )
Guía del usuario
Español ( 6 – 8 )
Guide d'utilisation
Français ( 9 – 11 )
Guida per l'uso
Italiano ( 12 – 14 )
Benutzerhandbuch
Deutsch ( 15 – 17 )
Appendix
English ( 18 )

User Guide (English)
Introduction
Box Contents
M-Track (MKII) |
User Guide |
USB Cable |
Safety & Warranty Manual |
Software Download Cards |
|
Support
For the latest information about this product (system requirements, compatibility information, etc.) and product registration, visit m-audio.com.
For additional product support, visit m-audio.com/support.
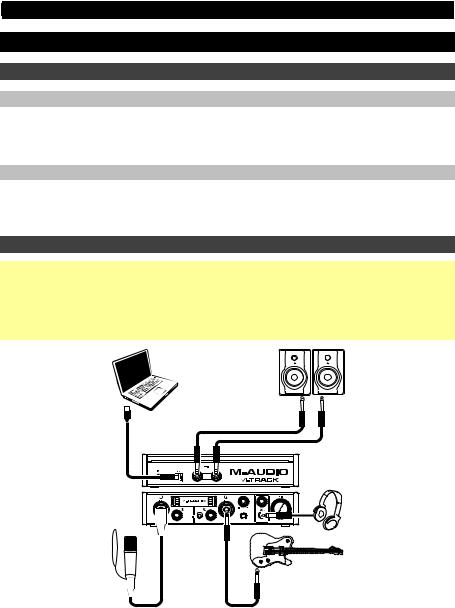
Quick Start / Connection Diagram
Windows users: Before connecting M-Track to your computer, install the drivers:
1.Go to m-audio.com/drivers and download the latest M-Track driver for your operating system.
2.Open the file you downloaded and double-click the driver installer file.
3.Follow the on-screen instructions to install the drivers. (You may be asked to connect M-Track to your computer during the installation process.)
|
Powered |
Computer |
Monitors |
Headphones
Vocal
Microphone |
Guitar |
Items not listed under the
Box Contents are sold
separately.
Note:
•Remember to select M-Track as your interface in the Preferences, Options, Device Setup, etc. in your digital audio workstation (DAW).
•When recording a microphone or a guitar or bass with an active pickup into Input 2, set the Instrument Selector to Line. If your instrument uses a passive pickup, set the selector to Inst.
•Use the +48V Switch only if a microphone requires phantom power. Dynamic microphones and ribbon microphones do not require phantom power, but most condenser microphones do. Consult your microphone's documentation to find out whether it needs phantom power.
3
Features
Front Panel
|
|
1 |
|
|
6 |
8 |
|
|
|
|
|
3 |
9 |
2 |
4 |
5 |
4 |
2 |
7 |
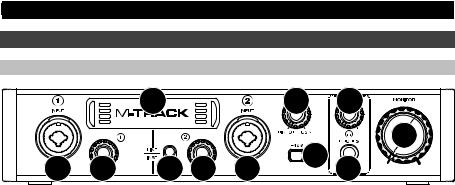
1.Display: This display shows the signal level of the inputs. The edges of the display will light up when M-Track is powered on.
2.Inputs 1 and 2: Connect microphones, line-level devices, or guitars to these inputs with an XLR or 1/4" (6.35 mm) TRS or TS cable. For microphones, use an XLR cable. For linelevel signals, use a 1/4" (6.35 mm) TRS cable. For instrument signals (for Input 2 only), use a 1/4" (6.35 mm) TS cable. View the input signal levels in the display.
3.+48V Switch: This switch activates and deactivates phantom power for Inputs 1 and 2. When activated (lit), phantom power supplies +48V to the XLR mic inputs. Please note that dynamic microphones and ribbon microphones do not require phantom power, while most condenser microphones do. Consult your microphone's documentation to find out whether it needs phantom power.
4.Input Gain: Adjusts the input's gain level. Set this knob so the corresponding level meter in your DAW displays a "healthy" level during performance—but not so high that the meter "clips" or peaks, causing distortion in the audio.
5.Instrument Selector: When the switch is in the Line position, Input 2 will accept microphoneor line-level signals. When this switch is in the Inst position, Input 2 will serve as a high-impedance input for connecting guitar or bass instruments.
6.Monitor Mix: Blends any amount of zero-latency signal from all your inputs (Direct) with the output of your computer (USB).
This knob is useful during recording when dealing with the "buffer size" and "latency." The computer takes a short amount of time to process the incoming audio before sending it back out; this time is determined by the buffer size setting. Latency is the resulting delay between the incoming sound (playing your instrument, singing, etc.) and outgoing sound (when you hear it in the DAW). Higher buffer sizes result in higher latency.
If your computer is powerful enough, you may be able to set your buffer size low enough such that you may never need direct monitoring. In this case, set the knob all the way to the USB position to monitor only the audio output of your DAW.
In other cases, though, low buffer sizes can consume a lot of your computer's CPU and cause audio glitches, so you may need to use a higher buffer setting, resulting in latency. In this case, use a higher buffer size and turn the knob more towards the Direct position to monitor your incoming signal without latency. When listening to the playback, turn it all the way to the USB position.
7.Headphone Output: Connect 1/4" (6.35 mm) TRS headphones to this output. The mix you hear from this output will be determined by the Monitor Mix knob.
8.Headphone Volume: Adjusts the output volume of the Headphone Output.
9.Monitor Level: Adjusts the output volume of Main Outputs L and R, which should be connected to your powered monitors or amplifier system.
4
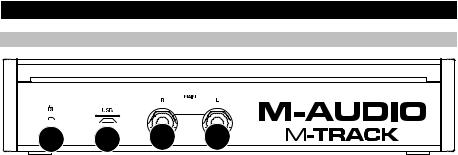
Rear Panel
3


 1
1


 2
2

 2
2

1.USB Port: This connection will allow you to send audio to/from a computer. Use a USB cable to connect the M-Track to a computer. The M-Track requires a USB 2.0 connection.
2.Main Outputs L and R: Use standard 1/4" (6.35 mm) TRS cables to connect these outputs to your powered monitors, an amplifier system, etc. Their levels are controlled by the Monitor Level knob.
3.Kensington Lock Slot: You can use this Kensington lock slot to secure M-Track to a table or other surface.
5
Guía del usuario (Español)
Introducción
Contenido de la caja
M-Track (MKII) |
Guía del usuario |
Cable USB |
Manual sobre la seguridad y garantía |
Tarjetas de descarga de software |
|
Soporte
Para obtener la información más reciente acerca de este producto (requisitos de sistema, información de compatibilidad, etc.) y el registro del producto, visite m-audio.com.
Para obtener soporte adicional del producto, visite m-audio.com/support.
Diagrama de inicio y conexión rápida
Usuarios de Windows: Antes de conectar el M-Track a su computadora, instale los drivers:
1.Vaya a m-audio.com/drivers y descargue el driver M-Track más reciente para su sistema operativo.
2.Abra el archivo que descargó y haga doble clic en el archivo instalador del driver.
3.Siga las instrucciones de la pantalla para instalar los drivers. (Es posible que el sistema le solicite que conecte el M-Track a la computadora durante el proceso de instalación).
Computadora
Micrófono
vocal
Nota:
Monitores alimentados
Auriculares
Guitarra
Los elementos que no se enumeran en Contenido de la caja se venden por separado.
•Recuerde seleccionar M-Track como su interfaz en las Preferences (Preferencias), Options (Opciones), Device Setup (Configuración de dispositivo), etc. de su estación de audio digital (DAW).
•Cuando grabe un microfóno o una guitarra o bajo con captor active en la entrada 2, ajuste el selector de instrumento a Line. Si su instrumento usa un captor pasivo, ajuste el selector a
Inst.
•Utilice el interruptor +48 V solamente si un micrófono requiere potencia fantasma. Los micrófonos dinámicos y de cinta no requieren alimentación fantasma, mientras que la mayoría de los micrófonos de condensador la requieren. Consulte la documentación de su micrófono para averiguar si necesita alimentación fantasma.
6
 Loading...