


 Loading...
USER MANUAL
ENGLISH ( 3 – 12 )
MANUAL DEL USUARIO
ESPAÑOL ( 13 – 22 )
MANUEL D'UTILISATION
FRANÇAIS ( 23 – 32 )
GUIDA PER L'USO
ITALIANO ( 33 – 42 )
BENUTZERHANDBUCH
DEUTSCH ( 43 – 53 )

USER GUIDE (ENGLISH)
Box Contents
Axiom AIR Mini 32; mini-USB cable; User Guide; Safety & Warranty Manual
Support
For complete system requirements, compatibility information, and product registration, visit the support section of the M-Audio website: m-audio.com/support.
Quick Start
Setup Scenario 1 |
Setup Scenario 2 |
|
Computer |
Computer |
Monitors |
Headphones
USB |
MIDI IN |
MIDI OUT |
R |
L |
R |
L |
VOL |
 USB Audio Interface
1.Use the included USB cable to connect your Axiom to an available USB port on your computer. (If you are connecting to a USB hub, ensure that it is a powered hub.) When connected properly, and when your computer is on, Axiom's Sustain, Edit, and Octave buttons will illuminate.
2.Open your digital audio workstation (DAW).
3.You may need to open your DAW's Preferences and select your Axiom as the control surface or device. See your software's documentation for more information.
Recommended Downloads
To get the most out of your Axiom, we recommend downloading and installing the following files from their respective websites:
•Ignite (airmusictech.com/download_ignite): Ignite is a music creation tool designed to be easiest way to capture, build, and share musical ideas. Ignite works well on its own or as a writing companion to the production capabilities of your DAW. Axiom's controls are fully integrated with Ignite, providing easy control of common tasks like preset selection, parameter control, and interface navigation. See the "Controlling Ignite" section of this manual for more information.
•HyperControl personalities (m-audio.com/support): HyperControl offers fast, easy, automatic mapping of the Axiom A.I.R. Mini 32’s buttons and knobs to many frequently used software features and settings. When used with a supported DAW application, you can control the transport, mixing controls (faders and panning) and virtual instrument or signal processing plug-in parameters. Furthermore, you can switch between HyperControl and custom MIDI operation on the fly to match your particular needs. To enable HyperControl with your Axiom A.I.R. Mini 32, some applications require additional software to be installed. Visit m-audio.com/hypercontrol for a current list of applications that support HyperControl.
•Optional Axiom device drivers for Windows (m-audio.com/support): These drivers let you use your Axiom with more than one application simultaneously and/or in conjunction with other classcompliant USB devices with audio capabilities. Mac systems do not need these device drivers.
3

Controls & Connections
4 |
5 |
9 |
8 |
11 |
10 |
3 |
2 |
6 |
7 |
1 |
12 |
|
|
|
13 |
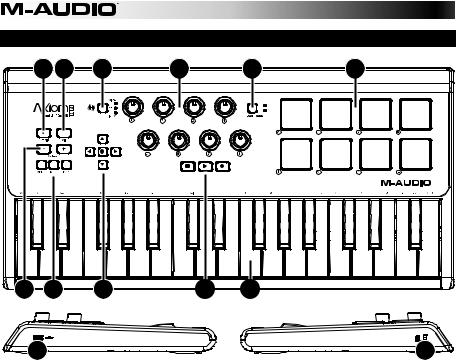
1.Keyboard: This 32-note keyboard is velocity-sensitive and, in conjunction with the OCTAVE DOWN/UP buttons, can control a ten-octave range. You can also use it to access extended programming functions when your Axiom is in Edit Mode.
2.Pitch Bend and Modulation Buttons: These controls let you bend pitch and trigger parameter modulation when controlling a MIDI instrument.
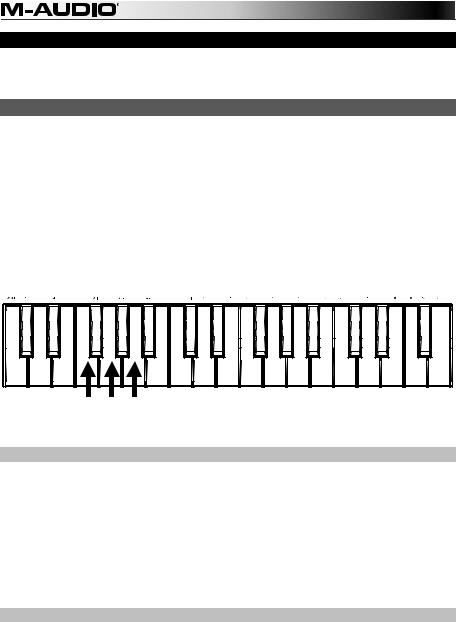
3.Octave/Transpose Buttons ( – / + ): By default, these buttons shift the keyboard up or down one octave at a time, extending its playable range. The "+" shifts it upward (e.g., Note F3 becomes F4), while the "–" button shifts it downward (e.g., Note F3 becomes F2). These buttons can also be used to transpose the keyboard in half-steps or to send MIDI Program Changes and user-assigned MIDI messages.
4.Sustain Button: This button acts like the sustain pedal on a piano; it sustains all currently held notes (on the keyboard or trigger pads). Its action can be momentary (sustaining only when the button is pressed and held) or latching (sustain will be switched on or off with each button press). To switch the button between momentary and latching behavior, see the Sustain section later in this manual.
5.Edit Button: This button puts your Axiom in Edit Mode, allowing you to use its keyboard's special functions to create or edit MIDI control assignments, global settings, and utility functions. The button will illuminate when the keyboard is in Edit Mode.
4

6.Directional Control Buttons: You can use these buttons in HyperControl Mode for various navigational functions, depending on your DAW software. You can also assign them to output standard MIDI messages.
7.Transport Controls: These buttons control standard transport functions in DAW software (stop, play, and record). When a HyperControl-enabled DAW is running, these buttons automatically map to those functions (or their closest alternatives). You can also map these buttons to a variety of MIDI messages.
8.Knob Controls: You can use these eight knobs to send standard MIDI messages or to take control of volume, pan, and plug-in parameters in HyperControl Mode (depending on the setting of the HyperControl Mode button).
9.HyperControl Mode Button: This button cycles your Axiom between the following four control modes:
•HyperControl Volume Mode: The knobs will control volume levels for the currently selected bank of tracks. The Directional buttons, Transport controls, and Trigger Pads work in HyperControl Mode, with functions depending on the HyperControl implementation in your DAW. When this mode is selected, the Volume LED is lit.
•HyperControl Pan Mode: The knobs will control panning values for the currently selected bank of tracks. The Directional buttons, Transport controls, and Trigger Pads work in HyperControl Mode, with functions depending on the HyperControl implementation in your DAW. When this mode is selected, the Pan LED is lit.
•HyperControl Inst/FX Mode: The knobs will control parameters in the currently selected instrument or effects plug-in. The Directional buttons, Transport controls, and Trigger Pads work in HyperControl Mode, with functions depending on the HyperControl implementation in your DAW. When this mode is selected, the Inst/FX LED is lit.
•MIDI Mode: All Axiom controls send MIDI messages as assigned by the user. This Mode is selected when none of the HyperControl mode LEDs are lit. (If you are not using a HyperControl-supported program, this button will be disabled since MIDI Mode will be the only mode available.)
10.Trigger Pads: These velocity-sensitive trigger pads are perfect for composing drum parts or triggering samples in a live setting.
11.Pad Bank Button: This button switches the trigger pads between two assignable banks of MIDI notes.
12.USB Port: When Axiom is connected to a computer via USB, this USB connection powers Axiom and transmits MIDI data to and from the computer.
13.Kensington® Security Slot: This connector is compatible with standard laptop-style Kensington security cables for theft protection.
5
Edit Mode
Edit Mode lets you reconfigure your Axiom's controls and functions in a variety of ways. Please see Edit Mode Functions in the Appendix for a full-page illustration of all Axiom A.I.R. Mini 32 advanced functions, which you can print and use as a quick visual reference.
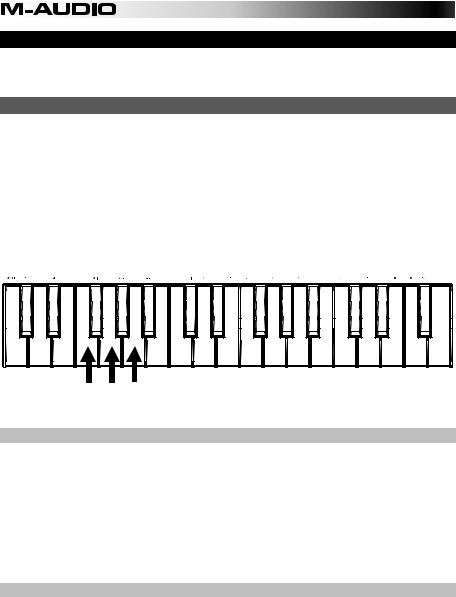
Octave Buttons
By default, the Octave "+" and "–" buttons shift the keyboard's range up or down one octave at a time. Each time you power up your Axiom, the octave setting will be at the default value of "0," and the buttons will be red in color at half-brightness.
When you use the "+" button to raise the octave of the keyboard, it will either illuminate or flash at fullbrightness based on the octave chosen. The "–" will remain at half-brightness. Pressing the "–" button has the opposite effect; it will illuminate or flash at full-brightness based on the octave chosen, while the "+" button will remain at half-brightness.
Each octave is identified by color, as follows:
•Dim red: 0 (default)
•Green: +1 or -1 octave
•Amber: +2 or -2 octaves
•Red: +3 or -3 octaves
•Flashing red: +4 or -4 octaves
Cancel |
Rate Bend Pitch |
Channel MIDI |
Rate Modulation |
Mode Sustain |
Octave = Oct |
Assign Control |
Program = Oct |
Location Memory |
Transpose = Oct |
Change Program |
Backup |
Store |
Curve Velocity |
0 |
Maximum Control |
1 |
2 |
Minimum Control |
3 |
MSB Bank |
4 |
LSB Bank |
5 |
6 |
Panic MIDI |
7 |
8 |
9 |
Learn Pad |
Enter |
Octave Button keys
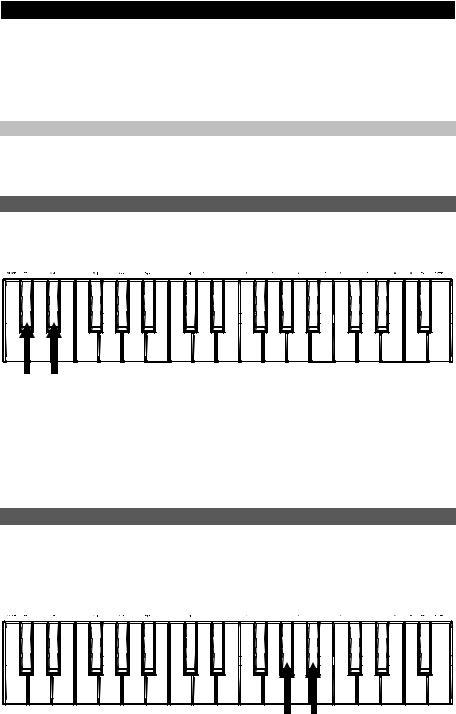
The Octave buttons can also be assigned to control two additional MIDI functions: transposition and program changes.
Transpose
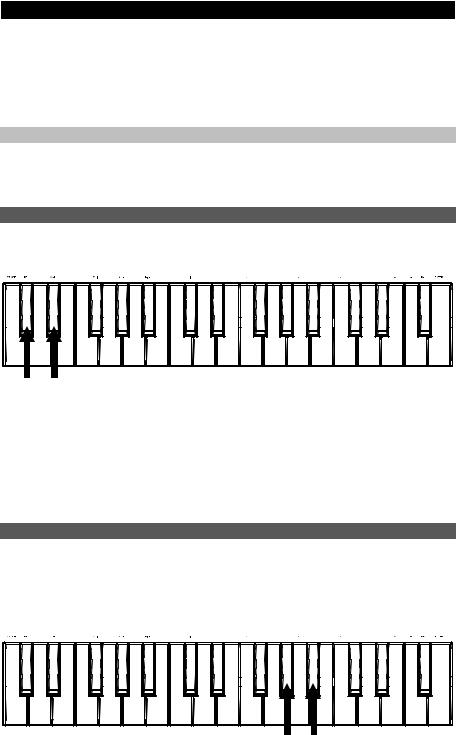
You can also use the Octave "+" and "–" buttons to transpose the keyboard, raising or lowering its pitch by a number of semitones (half-steps) as opposed to an entire octave. For example, if you are playing a song with a singer that is having difficulty singing the top notes, you may want to lower the pitch by one or two semitones. You can transpose the keyboard a maximum of two octaves in either direction.
To assign the Octave "+" and "–" buttons to the Transpose function:
1.Press the Edit button. It will illuminate to full-brightness.
2.Press the Oct = Transpose key. The Edit button will return to half-brightness, indicating the Octave "+" and "–" buttons now control transposition (and that your Axiom is no longer in Edit Mode).
3.Now, you can press the "+" or "–" buttons to raise or lower the pitch, respectively.
Press both "+" and "–" simultaneously to return the keyboard to the default "0" transposition.
Program Change
You can also use the Octave "+" and "–" buttons to send MIDI Program Change messages, moving to the next highest or lowest program between 0 and 127. Alternatively, you can use your Axiom's Program Change button and the numerical keys (0–9) to enter a desired program number.
To assign the Octave "+" and "-" buttons to send Program Change messages:
1.Press the Edit button. It will illuminate to full-brightness.
2.Press the Oct = Program key. The Edit button will return to half-brightness, indicating the Octave "+" and "–" buttons now send Program Change messages (and that your Axiom is no longer in Edit Mode).
3.Now, you can press the "+" or "–" buttons to move to the next highest or lowest program, respectively. You can continue playing notes as you move through the programs to hear what each sounds like.
6
To send a Program Change message using the numerical keys:
1.Press the Edit button. It will illuminate to full-brightness.
2.Press the Program Change key.
3.Use the numerical keys (0–9) to enter the desired program number.
4.Press the Enter key. The Edit button will return to half-brightness, indicating that you have selected a new Program (and that your Axiom is no longer in Edit Mode).
Press both "+" and "–" simultaneously to return to the default program "0."
Returning the Octave Buttons to Octave Mode
To return the Octave buttons to Octave mode:
1.Press the Edit button. It will illuminate to full-brightness.
2.Press the Oct = Octave key. The Edit Mode button will return to half-brightness, indicating that the Octave buttons control the octave range (and that your Axiom is no longer in Edit Mode).
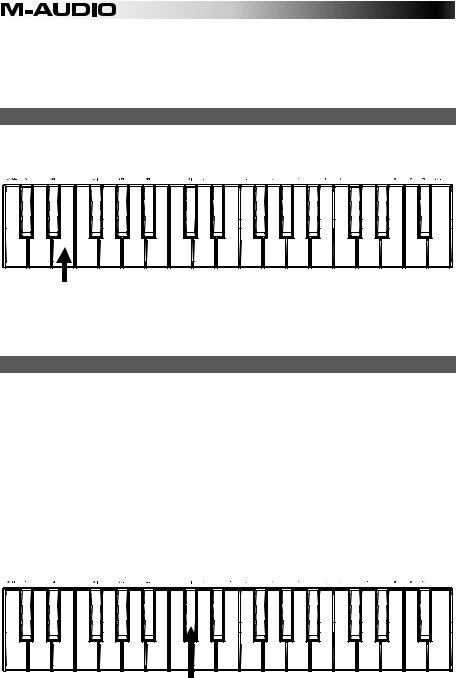
Pitch Bend & Modulation Rate
Because the keyboard uses buttons to control the Pitch Bend and Modulation functions (as opposed to variable controls like wheels), we've added a variable rate feature, which lets you set the rate at which these buttons change pitch or modulation (or MIDI values, in MIDI mode).
Cancel |
Rate Bend Pitch |
Channel MIDI |
Rate Modulation |
Mode Sustain |
Octave = Oct |
Assign Control |
Program = Oct |
Location Memory |
Transpose = Oct |
Change Program |
Backup |
Store |
Curve Velocity |
0 |
Maximum Control |
1 |
2 |
Minimum Control |
3 |
MSB Bank |
4 |
LSB Bank |
5 |
6 |
Panic MIDI |
7 |
8 |
9 |
Learn Pad |
Enter |
Pitch Bend and Modulation Rate keys
To set the Pitch Bend or Modulation rate:
1.Press the Edit button. It will illuminate to full-brightness.
2.Press the Pitch Bend Rate or Modulation Rate key.
3.Use the numerical keys (0–9) to enter the desired setting (0-127). The settings are as follows:
•0: Ramp occurs slowly, over 2 seconds
•64 (default, center): Ramp occurs more quickly
•126: Ramp occurs very quickly
•127: No ramp. Value varies instantly from min to max
4.Press the Enter key. The Edit button will return to half-brightness, indicating that you have set the Pitch Bend or Modulation rate (and that your Axiom is no longer in Edit Mode).
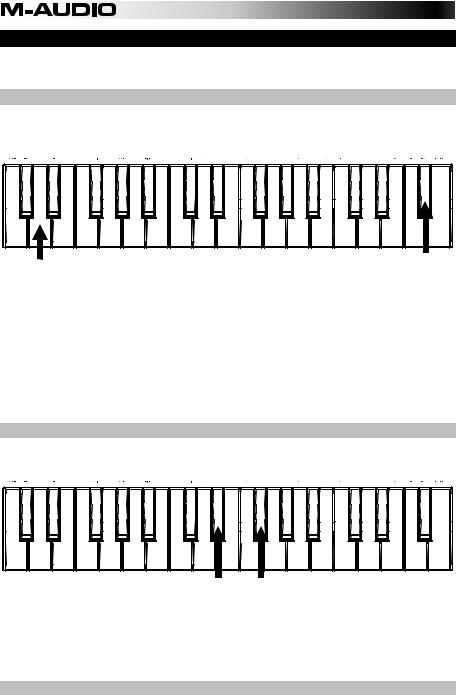
Bank Changes
If you have a need to switch between banks of programs on a connected instrument, you can send MIDI Program Changes and Bank LSB (Least Significant Byte) and Bank MSB (Most Significant Byte) messages right from Axiom.
Most instruments have fewer than 127 banks of programs, so bank-switching can be done purely by sending a Bank LSB message (0-127). Bank MSB messages are useful when very large numbers of banks are present. For more information, see your instrument's user guide.
Cancel |
Rate Bend Pitch |
Channel MIDI |
Rate Modulation |
Mode Sustain |
Octave = Oct |
Assign Control |
Program = Oct |
Location Memory |
Transpose = Oct |
Change Program |
Backup |
Store |
Curve Velocity |
0 |
Maximum Control |
1 |
2 |
Minimum Control |
3 |
MSB Bank |
4 |
LSB Bank |
5 |
6 |
Panic MIDI |
7 |
8 |
9 |
Learn Pad |
Enter |
Bank LSB and Bank MSB keys
7
To send a Bank LSB or Bank MSB message:
1.Press the Edit button. It will illuminate to full-brightness.
2.Press the Bank LSB or Bank MSB key, depending on the kind of message you want to send.
3.Use the numerical keys (0–9) to enter the desired bank value (0-127).
4.Press the Enter key. The Edit button will return to half-brightness, indicating that you have sent the Bank LSB or Bank MSB message (and that your Axiom is no longer in Edit Mode).
Sustain
The Sustain button acts like the sustain pedal on a piano; it sustains all currently held notes (on the keyboard or trigger pads). Its action can be momentary (sustaining only when the button is pressed and held) or latching (sustain will be switched on or off with each button press).
Cancel |
Rate Bend Pitch |
Channel MIDI |
Rate Modulation |
Mode Sustain |
Octave = Oct |
Assign Control |
Program = Oct |
Location Memory |
Transpose = Oct |
Change Program |
Backup |
Store |
Curve Velocity |
0 |
Maximum Control |
1 |
2 |
Minimum Control |
3 |
MSB Bank |
4 |
LSB Bank |
5 |
6 |
Panic MIDI |
7 |
8 |
9 |
Learn Pad |
Enter |
Sustain key
To select the desired Sustain button mode:
1.Press the Edit button. It will illuminate to full-brightness.
2.Press the Sustain Mode key to switch between momentary and latching behavior.
3.Wait one second. Your Axiom will automatically exit Edit Mode.
Velocity Curves
The keyboard and trigger pads on Axiom are velocity-sensitive; playing with more force results in a higher volume, while playing with less force results in a lower volume. This dynamic range gives your performance a more natural sound and feel. You can vary the touch sensitivity of the keyboard by selecting a velocity curve, tailoring the keys' response to your particular playing style.
To select a velocity curve:
1.Press the Edit button. It will illuminate to full-brightness.
2.Press the Vel Curve key.
3.Use the numerical keys (0–9) to enter the desired value (0-127). The velocity curve settings are as follows:
•0: Low velocity curve (low sensitivity)
•1 (default): Normal velocity curve (default sensitivity)
•2: High velocity curve (high, exponential sensitivity)
•3: Stepped velocity (outputs only velocity values 100 and 127)
•4-127: Fixed velocity (outputs only a fixed velocity from 4 to 127)
4.Press the Enter key to save the new velocity curve setting, or press Cancel or Edit to exit Edit Mode and discard any new settings.
Cancel |
Rate Bend Pitch |
Channel MIDI |
Rate Modulation |
Mode Sustain |
Octave = Oct |
Assign Control |
Program = Oct |
Location Memory |
Transpose = Oct |
Change Program |
Backup |
Store |
Curve Velocity |
0 |
Maximum Control |
1 |
2 |
Minimum Control |
3 |
MSB Bank |
4 |
LSB Bank |
5 |
6 |
Panic MIDI |
7 |
8 |
9 |
Learn Pad |
Enter |
Velocity Curve key
8

Trigger Pads
You can easily assign sounds from the keyboard to the trigger pads by using the Pad Learn function. This can be useful if you want to use the trigger pads to send certain MIDI notes to trigger a sound in your virtual instrument.
Cancel |
Rate Bend Pitch |
Channel MIDI |
Rate Modulation |
Mode Sustain |
Octave = Oct |
Assign Control |
Program = Oct |
Location Memory |
Transpose = Oct |
Change Program |
Backup |
Store |
Curve Velocity |
0 |
Maximum Control |
1 |
2 |
Minimum Control |
3 |
MSB Bank |
4 |
LSB Bank |
5 |
6 |
Panic MIDI |
7 |
8 |
9 |
Learn Pad |
Enter |
To assign the MIDI note of a trigger pad: |
Pad Learn key |
|
1.Press the Edit button. It will illuminate to full-brightness.
2.Press the Pad Learn key.
3.If necessary, press the Pad Bank button to select the pad bank containing the desired pad.
4.Press a keyboard key to select the desired MIDI note.
5.Press the desired trigger pad to assign the chosen note to the pad. Your Axiom will automatically exit Edit Mode.
MIDI Settings
Cancel |
Rate Bend Pitch |
Channel MIDI |
Rate Modulation |
Mode Sustain |
Octave = Oct |
Assign Control |
Program = Oct |
Location Memory |
Transpose = Oct |
Change Program |
Backup |
Store |
Curve Velocity |
0 |
Maximum Control |
1 |
2 |
Minimum Control |
3 |
MSB Bank |
4 |
LSB Bank |
5 |
6 |
Panic MIDI |
7 |
8 |
9 |
Learn Pad |
Enter |
MIDI Panic key
MIDI Channel key
Global MIDI Channel
The "global" MIDI channel is the default MIDI channel over which Axiom sends MIDI messages. Because this is a global setting, it applies across all memory locations, overridden only by custom channel selections for controls in MIDI Mode.
To set the global MIDI Channel:
1.Press the Edit button. It will illuminate to full-brightness.
2.Press the MIDI Channel key.
3.Use the numerical keys (0–9) to enter the desired MIDI channel (1-16).
4.Press the Enter button to save the new global MIDI channel assignment, or press Cancel or Edit to exit Edit Mode and discard any new settings.
MIDI Panic
When you trigger a MIDI Panic message, it sends an "All Notes Off" message on all channels and through all outputs. This is useful when a connected hardware or software synthesizer has a stuck Note On.
To send a MIDI Panic message:
1.Press the Edit button. It will illuminate to full-brightness.
2.Press the MIDI Panic key. An "All Notes Off" MIDI message will be sent. Your Axiom will automatically exit Edit Mode.
9
Custom MIDI Configuration
When you want more control flexibility than HyperControl Mode offers, you can many of Axiom A.I.R. Mini 32's knobs and buttons to output a variety of MIDI messages.
Assigning MIDI Messages to Controls
Editing Axiom's MIDI configuration all starts with the Edit button. Pressing Edit causes your Axiom to enter Edit Mode. The Edit button will flash to signify the Edit Mode is selected.
To exit Edit Mode, press the Edit button a second time.
Cancel |
Rate Bend Pitch |
Channel MIDI |
Rate Modulation |
Mode Sustain |
Octave = Oct |
Assign Control |
Program = Oct |
Location Memory |
Transpose = Oct |
Change Program |
Backup |
Store |
Curve Velocity |
0 |
Maximum Control |
1 |
2 |
Minimum Control |
3 |
MSB Bank |
4 |
LSB Bank |
5 |
6 |
Panic MIDI |
7 |
8 |
9 |
Learn Pad |
Enter |
Pad Learn key
MIDI Channel key
To assign a specific MIDI message to a physical control:
1.Press the Edit button. It will illuminate to full-brightness.
2.Select the control to assign by moving or pressing it.
3.Press the Control Assign key to enter Control Assign Mode.
4.Use the numerical keys (0–9) to enter the desired MIDI message type (0-127, 129, or 130) for this control:
•0-127: MIDI CC; works with all controls except Octave/Transpose buttons
•129: Pitch Bend; works with all knobs and Pitch Bend buttons.
•130: MMC (MIDI Machine Control); works with Transport buttons only (sets each button to standard MMC values)
5.Press the Enter button to save the new assignment, or press Cancel or Edit to exit Edit Mode and discard any new settings.
Control Min/Max
In some cases you may want to set a minimum and/or maximum control value for a knob or button, to better align that control to a desired range of values.
Cancel |
Rate Bend Pitch |
Channel MIDI |
Rate Modulation |
Mode Sustain |
Octave = Oct |
Assign Control |
Program = Oct |
Location Memory |
Transpose = Oct |
Change Program |
Backup |
Store |
Curve Velocity |
0 |
Maximum Control |
1 |
2 |
Minimum Control |
3 |
MSB Bank |
4 |
LSB Bank |
5 |
6 |
Panic MIDI |
7 |
8 |
9 |
Learn Pad |
Enter |
Control Max and Control Min keys
To set the minimum or maximum value sent by a control:
1.Press the Edit button. It will illuminate to full-brightness.
2.Select the control to edit by moving or pressing it.
3.Press the Control Min key or Control Max key.
4.Use the numerical keys (0–9) to enter the desired value (0-127).
5.Press the Enter button to save the new setting, or press Cancel or Edit to exit Edit Mode and discard any new settings.
Customize MIDI Assignments in HyperControl
When using your Axiom with a HyperControl-enabled DAW, you can access your custom MIDI configurations by pressing the HyperControl Mode button until none of the mode LEDs are lit. To return to HyperControl Mode, press the button until the desired HyperControl mode LED is lit.
10
Memory Locations
Once you've made some MIDI control assignments to fit a specific device or task, you may want to save them to one of Axiom's 10 memory locations for later use.
Cancel |
Rate Bend Pitch |
Channel MIDI |
Rate Modulation |
Mode Sustain |
Octave = Oct |
Assign Control |
Program = Oct |
Location Memory |
Transpose = Oct |
Change Program |
Backup |
Store |
Curve Velocity |
0 |
Maximum Control |
1 |
2 |
Minimum Control |
3 |
MSB Bank |
4 |
LSB Bank |
5 |
6 |
Panic MIDI |
7 |
8 |
9 |
Learn Pad |
Enter |
Memory Location key
Store key
To store the current set of MIDI assignments to a memory location:
1.Press the Edit button. It will illuminate to full-brightness.
2.Press the Store key.
3.Use the numerical keys (0–9) to enter the desired memory location slot (0-9). Your Axiom will automatically exit Edit Mode.
To recall a memory location:
1.Press the Edit button. It will illuminate to full-brightness.
2.Press the Memory Location key.
3.Press the numerical key (0-9) to select its memory location. Your Axiom will automatically exit Edit Mode.
Memory Backup & Restoring
You can back up and restore individual memory locations or the entire memory (10 locations) of your Axiom A.I.R. Mini 32 using MIDI SysEx. Use a SysEx librarian application or simply record it to a MIDI track in your DAW and play it back when needed.
Cancel |
Rate Bend Pitch |
Channel MIDI |
Rate Modulation |
Mode Sustain |
Octave = Oct |
Assign Control |
Program = Oct |
Location Memory |
Transpose = Oct |
Change Program |
Backup |
Store |
Curve Velocity |
0 |
Maximum Control |
1 |
2 |
Minimum Control |
3 |
MSB Bank |
4 |
LSB Bank |
5 |
6 |
Panic MIDI |
7 |
8 |
9 |
Learn Pad |
Enter |
Memory Location Backup key
To backup one or all memory locations:
1.Ensure that Axiom is connected to the computer and functioning correctly.
2.Ensure that a MIDI track in your DAW is recording (and set to receive MIDI from Axiom), or that your SysEx librarian utility is ready to receive data.
3.Press the Edit button. It will illuminate to full-brightness.
4.Press the Backup key. Your Axiom will automatically exit Edit Mode.
To restore one or all memory locations from a MIDI backup:
1.Ensure that Axiom is connected to the computer and functioning correctly.
2.Ensure that your DAW (with a MIDI track containing backup data) or SysEx librarian utility is set to transmit MIDI to your Axiom.*
3.Press Play on your DAW or enable SysEx transmission on your SysEx librarian application. Your Axiom will automatically exit Edit Mode.
* Before loading SysEx data from a MIDI track in your DAW, ensure that the transport or playhead is positioned before the desired data in the timeline.
11
Controlling Ignite
Ignite, included with your Axiom A.I.R. Mini 32, is a creative tool designed for rapid and fluid capture, refinement, and sharing of musical ideas. You can use it on its own or as a counterpart to your favorite DAW.
To download Ignite, visit airmusictech.com/download_ignite.
For more in-depth information on Ignite, please see the Ignite documentation.
Axiom A.I.R. keyboards come pre-configured to control Ignite through HyperControl. When you launch Ignite with your Axiom connected to the computer, you can use Axiom's controls in the following ways:
Transport Controls
Press the Transport buttons on Axiom A.I.R. Mini 32 to control those transport functions in Ignite.
Tabs & Submenus
When you've selected the Sounds, Players, Editors, or Sharing tab at the top of Ignite's interface, you can use the left and right Directional buttons on your Axiom to switch between those tabs. Additional control features are available for each of the following tabs:
Sounds Tab:
•Navigation. When the Sounds tab is selected, press the up and down Directional buttons to cycle through the Browse Sounds and Edit Sound sections.
•Sound Selection. When the Browse Sounds section is selected, use the Directional buttons to choose the desired sound category and preset. Once you've chosen a sound, press the center Directional button to load it.
•Sound Editing. When the Edit Sound section is displayed, eight of the most common controls for the currently selected sound are mapped to the knobs. Ignite displays text labels of the current function of each knob.
Players Tab: Mode Selection. When the Players tab is selected, press the up and down Directional buttons to switch the Players function between Chord, Phrase, and Arp Mode.
Editors Tab: Scrolling. When the Editors tab is selected and a clip is being displayed in the Editors window, you can use the Directional buttons to scroll the MIDI display left, right, up, or down.
Arranger
Sound Selection: When one of the currently loaded sounds is selected in the Arranger area, use the left and right Directional buttons to shift focus from sound to sound.
Mix Control Show/Hide: When a sound is selected in the Arranger, use the up and down Directional buttons to show or hide the mix controls for that sound.
Trigger Pads
When a Drum kit is loaded and selected, the Trigger Pads are automatically mapped to the sounds in the kit. Use the Pad Bank button to switch between two banks of drum sounds in the current kit.
12

GUÍA DEL USUARIO (ESPAÑOL)
Contenido de la caja
Axiom AIR Mini 32; cable mini USB; Guía del usuario; Manual sobre la seguridad y garantía
Soporte
Para obtener información sobre los requisitos completos de sistema, la compatibilidad y el registro del producto, visite la sección de soporte del sitio web de M-Audio: m-audio.com/support.
Inicio rápido
Escenario de instalación 1 |
Escenario de instalación 2 |
|
Computadora |
Computadora |
Monitores |
Auriculares |
|
|
USB |
MIDI IN |
MIDI OUT |
R |
L |
R |
L |
VOL |
Interfaz Audio USB
1.Use el cable USB incluido para conectar su Axiom a un puerto USB disponible en la computadora. (Si se conecta a un concentrador (hub) USB, asegúrese de que sea un concentrador alimentado). Cuando está conectado correctamente y su computadora está encendida, se iluminan los botones Sustain (Sostenido), Edit (Edición), y Octave (Octava) del Axiom.
2.Abra su estación de trabajo de audio digital (DAW).
3.Es posible que deba abrir Preferences (Preferencias) de su DAW y seleccionar su Axiom como superficie o dispositivo de control. Para más información, consulte la documentación de su software.
Descargas recomendadas
Para obtener lo máximo de su Axiom, recomendamos bajar e instalar los siguientes archivos desde sus sitios web respectivos:
•Ignite (airmusictech.com/download_ignite): Ignite es una herramienta de creación musical diseñada para ser la manera más fácil de capturar, construir y compartir ideas musicales. Ignite funciona bien por sí mismo o como complemento de redacción de las capacidades de producción de su DAW. Los controles del Axiom están totalmente integrados con Ignite, a fin de brindar un fácil control de las tareas comunes como selección de presets, control de parámetros y navegación de interfaces. Para más información, consulte la sección "Cómo controlar Ignite" de este manual.
•Personalidades (perfiles) de HyperControl (m-audio.com/support): HyperControl ofrece una asignación automática rápida y sencilla de los botones del Axiom A.I.R. Mini 32 a numerosas funciones y configuraciones de software de uso frecuente. Cuando lo usa con una aplicación compatible con la DAW, es posible controlar el transporte, los controles de mezcla (faders y balanceo) y los parámetros de plug-in de procesamiento de señales o instrumentos virtuales. Además, es posible conmutar entre HyperControl y la operación MIDI personalizada sobre la marcha, a fin de satisfacer sus necesidades particulares. Para habilitar HyperControl con el Axiom A.I.R. Mini 32, algunas aplicaciones requieren instalar software adicional. Para obtener una lista de las aplicaciones compatibles con HyperControl, visite m-audio.com/hypercontrol.
•Drivers de dispositivos opcionales de Axiom para Windows (m-audio.com/support): Estos drivers le permiten usar el Axiom con más de una aplicación simultáneamente y/o en conjunto con otros dispositivos USB compatibles con la clase y con capacidades de audio. Los sistemas Mac no necesitan estos drivers de dispositivos.
13
Controles y conexiones
4 |
5 |
9 |
8 |
11 |
10 |
3 |
2 |
6 |
7 |
1 |
12 |
|
|
|
13 |
1.Teclado: Este teclado de 32 notas es sensible a la velocidad y, en conjunto con los botones OCTAVE (Octava) ARRIBA/ABAJO puede controlar un rango de diez octavas. También puede usarlo para acceder a funciones de programación extendidas cuando el Axiom está en modo Edit (Edición).
2.Botones de inflexión de pitch y modulación: Estos controles le permiten realizar la inflexión del tono y disparar la modulación de parámetros cuando controla un instrumento MIDI.
3.Botones de octava/transposición ( – / + ): Por defecto, estos botones desplazan el teclado una octava hacia arriba o abajo por vez, extendiendo su gama de interpretación. El "+" la desplaza hacia arriba (por ejemplo, la nota F3 (Fa 3) pasa a ser F4 (Fa4)), mientras que el botón "–" la desplaza hacia abajo (por ejemplo, la nota F3 (Fa 3) pasa a ser F2 (Fa 2)). Estos botones se pueden usar también para transponer el teclado en medios pasos o enviar cambios de programa MIDI y mensajes MIDI asignados por el usuario.
4.Botón de sostenido: Este botón funciona como el pedal de sostenido de un piano: sostiene todas las notas presionadas en ese momento (en el teclado o pads de disparo). Su acción puede ser momentánea (sostenido únicamente mientras se mantiene pulsado el botón) o con enganche (el sostenido se activa o desactiva con cada pulsación del botón). Para conmutar este botón entre el funcionamiento momentáneo y con enganche, consulte la sección Sostenido más adelante en este manual.
5.Botón de edición: Con este botón se coloca el Axiom en modo de edición, que le permite usar las funciones especiales del teclado para crear o editar parámetros globales, funciones de utilidades y asignaciones de control MIDI. Este botón se ilumina cuando el teclado está en modo de edición.
14

6.Botones de control direccional: Puede usar estos botones en modo HyperControl para diversas funciones de navegación, que dependen del software de su DAW. Puede asignarlos también para transmitir mensajes MIDI estándar.
7.Controles de transporte: Estos botones controlan funciones de transporte estándar en el software de la DAW (parar, reproducir y grabar). Cuando se ejecuta una DAW habilitada para HyperControl, estos botones se asignan automáticamente a esas funciones (o a sus alternativas más próximas). También es posible asignar estos botones a una variedad de mensajes MIDI.
8.Perillas de control: Puede usar estas ocho perillas para enviar mensajes MIDI estándar o tomar control de los parámetros de plug-in, volumen y balanceo (panning) en modo HyperControl (en función de la configuración del botón de modo de HyperControl).
9.Botón de modo de HyperControl: Con este botón se realiza un recorrido del Axiom entre los siguientes cuatro modos de control:
•Modo de volumen de HyperControl: Las perillas controlan los niveles de volumen del banco de pistas seleccionado en ese momento. Los botones direccionales, controles de transporte y pads de disparo funcionan en modo HyperControl, con funciones dependientes de la implementación de HyperControl en su DAW. Cuando se selecciona este modo, se enciende el LED Volume (Volumen).
•Modo de panning de HyperControl: Las perillas controlan los valores de balanceo (panning) del banco de pistas seleccionado en ese momento. Los botones direccionales, controles de transporte y pads de disparo funcionan en modo HyperControl, con funciones dependientes de la implementación de HyperControl en su DAW. Cuando se selecciona este modo, se enciende el LED Pan.
•Modo de instrumentos/efectos de HyperControl: Las perillas controlan los parámetros del plug-in de instrumentos o efectos seleccionado en ese momento. Los botones direccionales, controles de transporte y pads de disparo funcionan en modo HyperControl, con funciones dependientes de la implementación de HyperControl en su DAW. Cuando se selecciona este modo, se enciende el LED Inst/FX.
•Modo MIDI: Todos los controles del Axiom envían mensajes MIDI según la asignación que realiza el usuario. Este modo está seleccionado cuando no está encendido ninguno de los LED de modo HyperControl. (Si no está usando un programa compatible con HyperControl, este botón se desactiva, puesto que el único modo disponible es el modo MIDI).
10.Pads de disparo: Estos pads de disparo sensibles a la velocidad son ideales para componer partes de batería o disparar muestras en un entorno en vivo.
11.Botón de bancos de pads: Con este botón se conmutan los pads de disparo entre dos bancos de notas MIDI asignables.
12.Puerto USB: Cuando el Axiom está conectado a una computadora por USB, esta conexión USB alimenta al Axiom y transmite datos MIDI a y desde la computadora.
13.Ranura de seguridad Kensington® : Este conector es compatible con cables de seguridad Kensington tipo laptop estándar para protección antirrobo.
15
Modo de edición
El modo de edición le permite reconfigurar los controles y funciones del Axiom de diversas maneras. Consulte Funciones del modo de edición en el Apéndice para obtener una ilustración de página completa de todas las funciones avanzadas del Axiom A.I.R. Mini 32, que puede imprimir y usar como referencia visual rápida.
Botones de octava
Por defecto, los botones Octave "+" and "–" desplazan la gama del teclado una octava hacia arriba o abajo por vez. Cada vez que usted enciende el Axiom, la configuración de octavas está en el valor predeterminado "0" y los botones se iluminan con luz roja con medio brillo.
Cuando usa el botón "+" para elevar la octava del teclado, se ilumina o destella con brillo máximo en función de la octava elegida. El "–" permanece con medio brillo. La pulsación del botón "–" tiene el efecto contrario, se ilumina o destella con brillo máximo en función de la octava elegida, mientras que el botón "+" permanece con medio brillo.
Cada octava se identifica por el color, a saber:
•Rojo atenuado: 0 (valor predeterminado)
•Verde: +1 o -1 octava
•Ámbar: +2 o -2 octavas
•Rojo: +3 o -3 octavas
•Rojo destellante: +4 o -4 octavas
Cancel |
Rate Bend Pitch |
Channel MIDI |
Rate Modulation |
Mode Sustain |
Octave = Oct |
Assign Control |
Program = Oct |
Location Memory |
Transpose = Oct |
Change Program |
Backup |
Store |
Curve Velocity |
0 |
Maximum Control |
1 |
2 |
Minimum Control |
3 |
MSB Bank |
4 |
LSB Bank |
5 |
6 |
Panic MIDI |
7 |
8 |
9 |
Learn Pad |
Enter |
Teclas de botones de octava
Los botones Octave se pueden asignar también para controlar dos funciones MIDI adicionales: transposición y cambios de programa.
Transposición
También es posible usar los botones Octave "+" y "–" para transponer el teclado, elevando o bajando su tono en un cierto número de semitonos (medios pasos) en lugar de una octava completa. Por ejemplo, si está tocando un tema con un cantante que tiene dificultades para cantar las notas más altas, es conveniente que baje el tono en uno o dos semitonos. Es posible transponer el teclado hasta un máximo dos octavas en cada sentido.
Para asignar los botones Octave "+" y "–" a la función de transposición:
1.Pulse el botón Edit. Se iluminará con brillo máximo.
2.Pulse la tecla Oct = Transpose. El botón Edit vuelve a medio brillo, indicando que los botones Octave "+" y "–" controlan ahora la transposición (y que su Axiom ya no está más en modo de edición).
3.Puede pulsar ahora los botones "+" o "–" para elevar o bajar el tono respectivamente.
Pulse ambos botones "+" y "–" simultáneamente para regresar el teclado a la transposición predeterminada "0".
Cambio de programa
Es posible usar también los botones Octave "+" y "–" para enviar mensajes de cambio de programa MIDI, desplazándolos al programa superior o inferior siguiente entre 0 y 127. Como alternativa, puede usar el botón Program Change (Cambio de programa) del Axiom y las teclas numéricas (0–9) para ingresar el número de programa deseado.
Para asignar los botones Octave "+" y "-" al envío de mensajes de cambio de programa:
1.Pulse el botón Edit. Se iluminará con brillo máximo.
2.Pulse la tecla Oct = Program. El botón Edit vuelve a medio brillo, indicando que los botones Octave "+" y "–" envían ahora mensajes de cambio de programa (y que su Axiom ya no está más en modo de edición).
3.Ahora, puede pulsar los botones "+" o "–" para desplazarse al programa superior o inferior siguiente respectivamente. Puede continuar tocando notas mientras se mueve por los programas, a fin de oír cómo suena cada uno.
16
Para enviar un mensaje de cambio de programa usando las teclas numéricas:
1.Pulse el botón Edit. Se iluminará con brillo máximo.
2.Pulse la tecla Program Change.
3.Use las teclas numéricas (0–9) para ingresar el número de programa deseado.
4.Pulse la tecla Enter. El botón Edit vuelve a medio brillo, indicando que usted ha seleccionado un nuevo programa (y que su Axiom ya no está más en modo de edición).
Pulse ambos botones "+" y "–" simultáneamente para regresar al programa predeterminado "0".
Cómo regresar los botones Octave al modo de octavas
Para regresar los botones Octave al modo de octavas:
1.Pulse el botón Edit. Se iluminará con brillo máximo.
2.Pulse la tecla Oct = Octave. El botón Edit vuelve a medio brillo, indicando que los botones Octave controlan la gama de octavas (y que su Axiom ya no está más en modo de edición).
Velocidad de la inflexión de pitch y la modulación
Puesto que el teclado (Modulación) (en lugar variable, que le permite MIDI, en modo MIDI).
usa botones |
para controlar las funciones Pitch Bend (Inflexión de pitch) |
y Modulation |
de controles |
variables como ruedas), hemos agregado una característica |
de velocidad |
ajustar la velocidad con que estos botones cambian el tono o la modulación (o los valores
Cancel |
Rate Bend Pitch |
Channel MIDI |
Rate Modulation |
Mode Sustain |
Octave = Oct |
Assign Control |
Program = Oct |
Location Memory |
Transpose = Oct |
Change Program |
Backup |
Store |
Curve Velocity |
0 |
Maximum Control |
1 |
2 |
Minimum Control |
3 |
MSB Bank |
4 |
LSB Bank |
5 |
6 |
Panic MIDI |
7 |
8 |
9 |
Learn Pad |
Enter |
Teclas de velocidad de inflexión de pitch y modulación
Para ajustar la velocidad de la inflexión de pitch o la modulación:
1.Pulse el botón Edit. Se iluminará con brillo máximo.
2.Pulse la tecla Pitch Bend Rate (Velocidad de inflexión de pitch) o Modulation Rate (Velocidad de modulación).
3.Use las teclas numéricas (0–9) para ingresar el ajuste deseado (0-127). Los valores son los siguientes:
•0: La rampa se produce lentamente, más de 2 segundos
•64 (valor predeterminado, central): La rampa se produce más rápidamente
•126: La rampa se produce muy rápidamente
•127: No hay rampa. El valor varía instantáneamente de mínimo a máximo
4.Pulse la tecla Enter. El botón Edit vuelve a medio brillo, indicando que usted ha ajustado la velocidad de inflexión de pitch o modulación (y que su Axiom ya no está más en modo de edición).
Cambios de banco
Si tiene necesidad de conmutar entre bancos de programas de un instrumento conectado, puede enviar mensajes MIDI de cambios de programa, Bank LSB (Byte menos significativo del banco) y Bank MSB (Byte más significativo del banco) directamente desde el Axiom.
La mayoría de los instrumentos tienen menos de 127 programas, de modo que la conmutación entre bancos puede hacerse enviando un mensaje de LSB del banco (0-127). Los mensajes de MSB del banco son útiles cuando hay presentes grandes cantidades de bancos. Para más información, consulte la guía del usuario de su instrumento.
Cancel |
Rate Bend Pitch |
Channel MIDI |
Rate Modulation |
Mode Sustain |
Octave = Oct |
Assign Control |
Program = Oct |
Location Memory |
Transpose = Oct |
Change Program |
Backup |
Store |
Curve Velocity |
0 |
Maximum Control |
1 |
2 |
Minimum Control |
3 |
MSB Bank |
4 |
LSB Bank |
5 |
6 |
Panic MIDI |
7 |
8 |
9 |
Learn Pad |
Enter |
Teclas de LSB y MSB del banco
17
Loading...