


 Loading...
User Guide
English

User Guide (English)
Chapter 1: Introduction
Congratulations on your purchase of an M-Audio Axiom Series MIDI Controller. Designed for both studio and stage, Axiom offers 25, 49, or 61 semi-weighted velocity-sensitive keys with aftertouch, and DirectLink. Once installed and configured, DirectLink automatically maps Axiom faders, buttons, knobs, and Transport Controls to numerous functions in qualified versions of Digital Audio Workstations (DAWs).
Axiom faders, knobs buttons, and trigger pads can be mapped to various parameters in your DAW or virtual instrument, by using the DAW's MIDI Learn function (if available), or by manual assignment as described in Chapter 5, "Advanced Programming Functions."
Refer to the documentation provided with your software for further information about its MIDI Learn capabilities and functions. For a current list of qualified recording applications, the most recent Windows drivers, and DirectLink installers and User Guides, visit www.m-audio.com.
A single USB connection not only sends MIDI data to the computer, but also provides power to the device. Axiom functions as a class-compliant device, and will be recognized by a host computer without the need for additional drivers. However, downloading and installing the latest Axiom drivers (from www.m-audio.com) is strongly recommended before installing DirectLink, controlling more than one application at the same time, or simultaneously using other class-compliant USB audio devices. Otherwise, connect Axiom to an available USB port on a computer using the included USB cable, and set the power switch to the On position.
The 5-pin MIDI connectors transmits MIDI data to and from Axiom when controlling external hardware synthesizers or sound modules. Axiom will also function as a USB MIDI interface between a host computer and external MIDI hardware while connected via USB.
For more information about installing drivers on Windows systems, as well as Axiom setup and DAW configuration for Windows and Mac OS X, see Chapter 2, "Driver Installation." Further information on installing and configuring DirectLink can be found in the appropriate DirectLink User Guide at www.m-audio.com/hypercontrol. (DirectLink is the original name of what M-Audio calls "HyperControl" today. The technology is identical—just keep in mind that it might be called "HyperControl" in newer documentation you find on our website.)
Features
•25, 49, or 61 velocity-sensitive, semi-weighted keys with aftertouch
•4 programmable Keyboard Zones
•Octave/Transpose buttons
•DirectLink - Automatic mapping of top panel controls to qualified DAWs
•2 Dedicated Patch Select buttons
•8 Trigger Pads; MIDI re-assignable
•9 Faders (1 on Axiom 25); MIDI re-assignable
•9 Fader buttons (Axiom 49/61 only); MIDI re-assignable
•8 "Endless" Encoder Knobs; MIDI re-assignable
•6 Transport buttons; MIDI re-assignable
•Pitch Bend and Modulation wheels; MIDI re-assignable
•Sustain and Expression Pedal inputs; MIDI re-assignable
•20 user editable memory locations
•LCD Screen
•5-pin MIDI In and MIDI Out connectors
•USB 2.0 port (backward compatible with USB 1.1)
•Powered by USB bus power or external power supply (sold separately)
Minimum System Requirements
Minimum System Requirements can be found at www.m-audio.com.
3

Chapter 2: Driver Installation
Windows
Axiom functions as a class-compliant device and will be recognized by a computer without additional drivers on Windows XP, Windows Vista, Windows 7, or Windows 8. Simply connect the device to a computer using the supplied USB cable, configure your recording software and start making music.
However, we recommend that Windows users download and install the latest Axiom Series drivers found on the M-Audio website to do any of the following:
•Control more than one application at the same time.
•Simultaneously use other class-compliant USB audio devices.
•Use long System Exclusive (SysEx) commands.
Installation Steps
Make sure Axiom is not connected to the computer before beginning the installation. The installer will prompt you to connect Axiom during the installation procedure.
To install the Windows drivers from a download:
Double-click the installer to begin the installation process. Follow the on-screen instructions to complete the installation.
To install the Windows drivers from the Installer disk:
1.Insert the disk in your computer CD or DVD drive. The driver installer launches when the Installation disk is inserted.
If your computer fails to launch this application automatically, you can manually start it by going to the Start menu, opening My Computer (or Computer in Windows Vista , Windows 7, and Windows 8), and opening the disk that appears in your computer's CD or DVD drive.
2.Select Axiom from the Product pop-up menu and click Install.
3.Follow the on-screen instructions. At various points in the process, you may be notified that the driver being installed has not passed Windows Logo Testing, or asked whether the program you wish to run is a trusted application. Click Continue Anyway (Windows XP) or Install (Windows Vista, Windows 7, and Windows 8) to proceed with the installation.
4.Once the installer has completed, click Finish.
5.Connect Axiom to an available USB port on your computer. If you are using Windows Vista, Windows 7, or Windows 8, your Axiom is now ready to use. If you are using Windows XP, proceed to the next step.
6.For Windows XP only, do the following:
•After Windows XP identifies the keyboard and asks if you want to search the Internet for a driver, select No, not this time and click Next.
•When the Found New Hardware Wizard appears, select Install the software automatically and click Next.
•Once the Wizard has completed, click Finish. If you are presented with another Found New Hardware Wizard dialog, repeat step 6.
7.When the installation is complete, you will see a message stating "Your new hardware is installed and ready to use."
8.Proceed to "Configuring Music Software."
If you plan to use DirectLink so that Axiom controllers are automatically mapped to functions in your DAW, the DirectLink software must be installed separately. Refer to the separate DirectLink documentation applicable to your DAW for complete installation and configuration instructions at www.m-audio.com/hypercontrol.
Mac
The class-compliant drivers built into Mac OS X provide support for Axiom, therefore no additional drivers are necessary (or available) when using the device with Mac OS X. Simply connect it to the computer using the supplied USB cable, configure your recording software, and start making music.
If you plan to use DirectLink so that Axiom controls are automatically mapped to functions in your DAW, the DirectLink software must be installed separately. Refer to the separate DirectLink documentation applicable to your DAW at www.m-audio.com/hypercontrol for complete installation and configuration instructions.
Configuring Music Software
When using Axiom with your computer, you may need to configure your music software to receive MIDI data. This process varies from one application to another, but is usually done through a "Preferences," "Setup," or "Options" menu. Refer to the documentation included with your DAW software for further information.
Because Axiom does not contain built-in sounds, pressing a key will only send MIDI data to the computer, giving instructions on when and how a note should play. A virtual instrument loaded onto a track of your DAW software then creates the sound based on the instructions received from Axiom. For more details on using virtual instruments, refer to the documentation for your DAW software.
4

Chapter 3: Controls and Connectors
Top Panel
Using DirectLink
Once installed and configured, DirectLink is activated by launching a qualified DAW application on the host computer. This automatically maps Axiom controls to functions in your recording software and offers the following modes of operation:
•Mixer Mode: This is the default mode which maps Axiom Faders, Encoder knobs, and Fader buttons to their corresponding DAW mixer functions.
•Instrument Mode: Pressing the Instrument Mode button (See "Function Buttons") switches DirectLink to Instrument Mode, and assigns Axiom controls to virtual instrument parameters within a selected DAW track.
Because DirectLink configuration and operation varies slightly in different DAW applications, please refer to the DirectLink documentation for your qualified DAW for further details and installation instructions at www.m-audio.com/hypercontrol.
Where applicable, this section provides an overview of these controls using DirectLink, as well as their default MIDI assignments.
1.Modulation Wheel – This wheel changes the intensity of certain effects during performance. By default, most synthesizers assign this wheel to control vibrato (change in intonation) or tremolo (change in volume). Rolling it upward increases the modulation effect, while rolling downward reduces the effect.
When this control is moved the LCD screen will display the assigned MIDI CC number ("cc 1"), the active keyboard Zone (for example "z1"), and the values sent. If the Control Mute function is active (See "Additional Functions") the LCD will display the same information, with the addition of "MUTE." This signifies that MIDI data will not be transmitted.
The Modulation Wheel can be assigned to MIDI messages other than Modulation data (see Chapter 5, "Advanced Programming Functions"), and different assignments can be made for each of the 4 keyboard Zones. This means the type of messages sent is determined by the active Zones. See Chapter 6, "Keyboard Zones"for further details.
2.Pitch Bend Wheel – This wheel raises and lowers pitch during performance. Rolling the Pitch Bend wheel upward raises the pitch. Rolling it downward lowers the pitch. The upper and lower pitch bend limit is determined by settings on your hardware or software synthesizer, not by the Pitch Bend wheel on Axiom. This wheel is spring-mounted and returns to the center position when released.
When this control is moved the LCD screen will display the assigned message type (such as "P.bENd"), the active keyboard Zone (for example "z1"), and values sent. If the Control Mute function is active (See "Additional Functions") the LCD will display the same information, with the addition of "MUTE." This signifies that MIDI data will not be transmitted.
This wheel can be assigned to MIDI messages other than Pitch Bend data, and different assignments can be made for each of the 4 keyboard Zone. This means the type of messages sent is determined by the active Zones. See Chapter 6, "Keyboard Zones"for further details.
3.Octave/Transpose Buttons – These buttons shift the keyboard up or down in one octave increments to extend the range of playable notes. The Right button (+) shifts upward (for example, note F3 becomes F4), while the Left button (–) shifts downward (for example, note F3 becomes F2).
The Transpose function is activated by pressing the Left (–)and Right (+) buttons simultaneously. In this mode, pressing the Right button shifts the keyboard upward by one half-step (semi-tone). For example, note F3 becomes F#3. Pressing the Left button shifts the keyboard downward by one half-step (F3 becomes E3).
Global and Zone Shift Functions: As described in Chapter 6, "Keyboard Zones," keyboard Zones can have individual Octave and/or Transpose settings. The Global and Zone Octave/Transpose settings work in combination to shift the pitch of the entire keyboard while preserving relative pitch offsets between Zones. The Zone Octave and Transpose functions are useful when different Octave or Transpose shift settings are needed across multiple Zones.
4.Group F Button (Axiom 49 & 61 only)
•DirectLink Operation: When this button is pressed, all nine Axiom Faders, and Fader buttons (F1–18) are released from their DirectLink assignments, and mapped according to the active Patch. A new Axiom Patch can be selected at any time by using the "Recall" function (see "Additional Functions"). Pressing the Group F button again, returns all controls to their DirectLink assignments. The button also illuminates confirming the group is in DirectLink mode.
5

•Default Operation: The Group F button is used to enable or disable the control group when a Patch is stored or recalled. When the button is illuminated the group is enabled for the operation.
For example, when storing a Patch, the group is enabled by default. Pressing the button disables and excludes the controls from the newly stored patch. When the patch is recalled, the state of the group is remembered as being disabled, and the Group F button will not illuminate.
5.Faders – There are nine Faders (F1–F9) on Axiom 49 and 61, and one Fader (F1) on Axiom 25. These faders function based on the type of operation, as follows:
DirectLink Operation: Refer to the separate DirectLink documentation applicable to your DAW at www.m-audio.com/hypercontrol.
•Default Operation: All nine Faders (Axiom 49 & 61) send different types of standard MIDI CC messages, or advanced MIDI messages based on the parameter they are assigned to. When a fader is moved the LCD screen will display the assigned MIDI message (for example "cc 74"), its name (for example "F1"), and the values sent. If the Control Mute function (see "Additional Functions") is active the LCD will display the same information, with the addition of "MUTE." This signifies that MIDI data will not be transmitted, and the fader can be moved with affecting external software devices. All faders are fully assignable as described in Chapter 5, "Advanced Programming Functions."
6.Fader Buttons – Axiom 49 and 61 feature nine Fader buttons. These buttons function based on the type of operation, as follows:
DirectLink Operation: Refer to the separate DirectLink documentation applicable to your DAW at www.m-audio.com/hypercontrol.
•Default Operation: All nine buttons (Axiom 49 & 61) send different types of standard MIDI CC, MIDI note, or other advanced MIDI messages based on the parameter they are assigned to as described in Chapter 5, "Advanced Programming Functions."
Pressing a Fader button causes the LCD screen to display the assigned MIDI message (for example "cc 74"), its name (for example "F10"), and the value sent. This will also be the case when the button is released. If the Control Mute function is active pressing one of these buttons with deactivate it.
7.LCD Screen – The LCD screen displays operational, programming, and status information. In DirectLink mode the data seen on the LCD screen is entirely dictated by the DAW.
8.Group E Button
•DirectLink Operation: When this button is pressed, all eight Axiom Encoder knobs (E1–E8) are released from their DirectLink assignments, and mapped according to the current active preset Patch. A new Axiom Patch can be selected at any time by using the "Recall" function (see "Additional Functions").
Pressing the Group E button again, returns all controls to their DirectLink assignments. The button also illuminates confirming the group is in DirectLink mode.
The Axiom Transport buttons are not affected by the Group E button, and they will always retain their default DirectLink assignments.
•Default Operation: The Group E button is used to enable or disable the control group when a Patch is stored or recalled. When the button is illuminated the group is enabled for the operation.
For example, when storing a Patch, the group is enabled by default. Pressing the button disables and excludes the controls from the newly stored patch. When the patch is recalled, the state of the group is remembered as being disabled, and the Group E button will not illuminate.
9.Encoder Knobs – There are eight Encoder Knobs (E1–E8) with functions based on the type of operation, as follows:
DirectLink Operation: Refer to the separate DirectLink documentation applicable to your DAW at www.m-audio.com/hypercontrol.
•Default Operation: These knobs send different types of standard MIDI CC messages or advanced MIDI messages based on the parameter they are assigned to, or the active preset. When a knob is moved the LCD screen will display the assigned MIDI message (for example "cc 74"), its name (for example "E1"), and the value sent. If the Control Mute function (see "Additional Functions") is active the LCD will display the same information, with the addition of "MUTE." This signifies that MIDI data will not be transmitted. All Encoder knobs are fully assignable as described in Chapter 5, "Advanced Programming Functions."
10.Transport Buttons – These buttons (E9–E14) function based on the type of operation, as follows:
•DirectLink Operation: In both Mixer and Instrument Modes, these buttons map to the Transport buttons in qualified DAW applications to control playback, record, start/stop, fast forward and rewind, as well as enabling (or disabling) the loop function.
Within in qualified versions of Pro Tools, holding the Loop button while pressing one of the other Transport Control buttons gives access to additional functions. Further information on how to access these functions can be found in the DirectLink User Guide for Pro Tools.
•Default Operation: These buttons send standard MIDI CC, MIDI note, MMC (MIDI Machine Control), or other advanced MIDI messages based on the parameter they are assigned to. When a button is pressed, the LCD screen will display the assigned MIDI message (for example "cc 74"), its name (for example "E9"), and the value sent. This will also be the case when it is released. If the Control Mute function (see "Additional Functions") is active it is deactivated when on of these buttons is pressed.
All Axiom Transport buttons are fully assignable as described in Chapter 5, "Advanced Programming Functions."
11.Group P Button
•DirectLink Operation: When this button is pressed, all eight Trigger pads (P1–P8) are released from their DirectLink assignments, and mapped according to the current preset Patch. A new Axiom Patch can be selected at any time by using the "Recall" function (see "Additional Functions").
Pressing the Group P button again, returns all pads to their DirectLink assignments. The button also illuminates confirming the group is in DirectLink mode.
•Default Operation: The Group P button is used to enable or disable the control group when a Patch is stored or recalled. When the button is illuminated the pad is enabled for the operation.
For example, when storing a Patch, the group is enabled by default. Pressing the button disables and excludes the pads from the newly stored patch. When the patch is recalled, the state of the group is remembered as being disabled, and the Group P button will not illuminate.
6

12.Trigger Pads – There are eight Trigger Pads (P1–P8) that send different types of standard MIDI CC, MIDI note, or other advanced MIDI messages based on the parameter they are assigned to.
Generally these pads transmit MIDI notes using MIDI Message "147." Please see Chapter 5, "Advanced Programming Functions" for more information.
When assigned to a standard MIDI CC number, the pad is pressure sensitive. In this instance, the value sent is determined by the amount of pressure applied while it is held down. The greater the pressure, the higher the value and vice versa.
Pads assigned to advanced MIDI messages operate in the same way as the Fader buttons or transport controls. When a pad is struck, or when pressure is applied to it, the LCD screen will display the assigned MIDI message (for example "cc 74"), its name (for example "P1"), and the value sent. This will also be the case when pressure has been removed.
The Trigger Pads are generally not affected by DirectLink in either Mixer or Instrument Mode. For further information about these Pads and DirectLink, refer to the DirectLink Guide for your DAW.
13.Function Buttons – These buttons access the following features:
•Instrument Mode Button (Inst): Refer to the separate DirectLink documentation applicable to your DAW at www.m-audio.com/hypercontrol.
•Null: This button activates and de-activates Null Mode. By default, Null mode is always active and the Null button will illuminate when this is the case. In Null Mode, the position of Axiom Faders is stored as part of a user Patch. This is known as their Null value. If a fader is at a different position or value when the patch is recalled the LCD will display "MUTE" and a value representing how far off they are from the Null value. The fader will not transmit MIDI data until the Null Value has been reached. This prevents corresponding parameters in the software from jumping to a different value as the Axiom control is adjusted. The Axiom Fader will be "un-muted" as soon as the position matches the value stored in the user patch.
For example, in qualified versions of Pro Tools, Axiom Preset 9 can be used to control the virtual instrument called Velvet. When an instrument parameter is edited using an Axiom Fader, its new position is retained as the Null value when a new preset is selected. If the same fader is used to edit the new preset, it is likely to be in a different position when Preset 9 is recalled. Because Null Mode is active by default, the fader will not transmit MIDI data to Velvet until it has been adjusted to its Null Value. This prevents it from transmitting a MIDI CC value that will cause an unwanted parameter change in Velvet.
•Program (Prog): When this button is pressed it will illuminate and the LCD screen will show the current Program Change number (for example, "PRG 0") and the active keyboard Zone (for example, "z 1"). Pressing either of the Patch buttons ("Up" arrow or "Down" arrow) will increase or decrease this number, and the resulting program change message is sent on the active Zone channel. After 1 second, the display returns to normal and the patch buttons return to their default functionality.
Program Change massages for all active keyboard Zones are included whenever a patch is stored. For more information on Zones, please refer to Chapter 6, "Keyboard Zones."
When the Program button is held down for at least one second Axiom enters Edit Mode, which overrides both Performance and DirectLink Modes. The Program and Edit buttons will illuminate, and the LCD screen will show the current Program change and active Zone number. A direct Program change can then be sent by entering the desired program number using the numerical keys and pressing the enter key to confirm.
For more information about these parameters, see Chapter 4, "Advanced Keyboard Functions," Chapter 5, "Advanced Programming Functions," and Chapter 6, "Keyboard Zones."
•Channel (Chan): When this button is pressed it illuminates and the LCD screen shows the current Global MIDI Channel number (for example, "G.CHAN 1." Pressing either of the Patch buttons ("Up" arrow or "Down" arrow) will change the Channel number.
Holding the Channel button for at least one second takes Axiom into Edit Mode, which overrides both Performance and DirectLink Modes. The Channel and Edit buttons will illuminate, and the LCD screen will show the current Global Channel number. This value can be changed by entering the new Channel number using the numbered keys and Enter key on the keyboard.
•Edit: When this button is pressed it illuminates and activates Edit Mode. The LCD screen will read "Edit," and display the current Control Number (for example "E 1" - the first Encoder Knob). This function lets you access the extended parameters listed along the top edge of the keybed. Moving the currently selected control changes the value.
In Edit Mode, the Patch buttons increment and decrement the selected parameter value at any time.
For more information on Edit Mode, refer to Chapter 4, "Advanced Keyboard Functions," Chapter 5, "Advanced Programming Functions," and Chapter 6, "Keyboard Zones."
•Additional Functions: The Function buttons allow access to four additional functions as follows:
oRecall: In both Performance and DirectLink Mode, simultaneously pressing the Instrument Mode and Null buttons activates Edit Mode. The Edit button illuminates and the LCD screen will show the current Patch selection (for example "PATCH 01"). This value can be changed by entering the new Patch number using the numbered keys on the keyboard, or the Patch buttons. Pressing the Enter key or Edit button will confirm the new patch number and edit mode is disabled.
oControl Mute (Ctrl Mute): Simultaneously pressing the Null and Program (Prog) buttons will activate and deactivate Control Mute (Ctrl Mute mode). When this function is active, the LCD screen will read "MUTE ON." In Ctrl Mute mode, Axiom controls can be moved without transmitting MIDI Data. This function will be automatically turned off as soon as a key or button is pressed, or as soon as the Null and Program buttons are simultaneously pressed again.
oPanic: Simultaneously pressing the Program (Prog) and Channel (Chan) buttons will send "All Notes Off" and "Reset All Controllers" messages on all MIDI Channels. The LCD screen will read "Panic" during this operation. This stops stuck notes that continue to play even after their keys have been released.
oVelocity Lock (Vel Lock): Simultaneously pressing the Channel (Chan) and Edit buttons will activate Velocity Lock. The LCD screen will read "VLock ON." The note velocity sent by the Trigger Pads is restricted to the range of values specified by the Data 2 and Data 3 parameters.
For more information on how to edit the Data 2 and Data 3 parameters, please refer to Chapter 4, "Advanced Keyboard Functions."
Pressing the buttons again will de-activate this function, returning it to the default setting. The LCD screen will read "VLock OFF," and the note velocity is determined by how hard the Pads are struck. By default, Velocity Lock is set to off.
The VLock setting can be stored as part of a Patch using the Store function described in Chapter 4, "Advanced Keyboard Functions."
7
14.Mute Button – In DirectLink mode, this button will mute and "un-mute" the targeted track in a qualified DAW. Pressing this button while holding down the Shift button will solo the keyboard's target track. If the Zone button is active, the Mute button activates and deactivates Zone 4. For more information, see section 17 "Zone Buttons (1,2,3, & 4)" in this chapter.
15.Track Buttons – These buttons function based on the type of operation, as follows:
•DirectLink Operation: Refer to the separate DirectLink documentation applicable to your DAW at www.m-audio.com/hypercontrol.
•Default Operation: The Track buttons (< and >) are used for activating and deactivating Zones 2 (<) and 3 (>) as described below in section 17 "Zone Buttons (1,2,3, & 4)" of this chapter.
16.Shift Button – This button functions based on the type of operation, as follows:
•DirectLink (Default) Operation: Holding down the Shift button allows you to access additional functions and mapping options performed by the Encoder knobs, Fader buttons, Track buttons, and Mute buttons, in qualified DAW applications.
•Default Operation: This button is used for activating and deactivating Zone 1 as described below in Section 17, "Zone Buttons (1, 2, 3, & 4)" of this chapter.
17.Zone Buttons (1,2,3, & 4) – These buttons activate and de-activate keyboard Zones 1 though 4 respectively. Zone 1 is the default Zone. Activating a Zone will cause its corresponding button to illuminate, and all other Zones will be deactivated. Multiple Zones can be activated by simultaneously pressing any combination of these buttons.
18.Zone Button – This button is used for accessing the individual Zone buttons described above. Holding down the this button for at least one second, in both Performance and DirectLink Modes, will put Axiom into Zone Edit Mode. For more information, see Chapter 6, "Keyboard Zones."
19.Patch Buttons – These buttons function based on the type of operation, as follows:
•DirectLink Operation: Refer to the separate DirectLink documentation applicable to your DAW at www.m-audio.com/hypercontrol.
•Default Operation: These buttons allow you to scroll the 20 Axiom Patch presets. In Edit Mode, the Patch buttons are used to increment/decrement the selected parameter value.
20.Keyboard – The velocity-sensitive, semi-weighted keyboard is not only the primary method of sending Note On/ Off and Velocity data when performing, it is also used to access extended programing functions listed along its upper edge. For more information on the extended programming functions, refer to Chapter 4, "Advanced Keyboard Functions."
•Aftertouch: Axiom features a fully assignable Aftertouch Strip under the keybed. When additional pressure is applied to a key that has been pressed, the Aftertouch Strip will transmit MIDI data based on the assigned MIDI CC. When pressure is applied to the Strip the LCD screen will display the assigned message type ("CH AT"), the active keyboard Zone (for example "z1"), and the value sent (for example "0").
A unique MIDI CC can be assigned to the Aftertouch Strip for each active keyboard Zone, so that the messages sent are defined by the active Zones.
For more information on reassigning the Strip see Chapter 5, "Advanced Programming Functions."
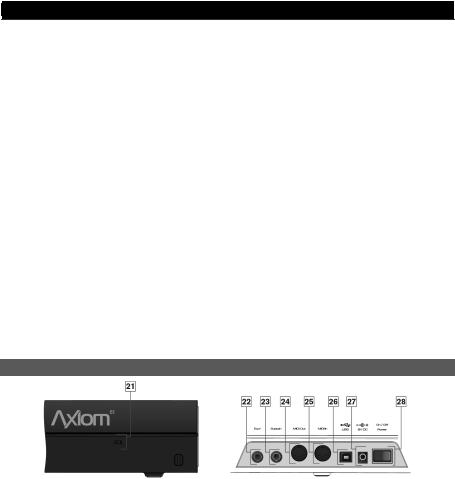
Rear Panel
21.Kensington® Lock Connector – This connector is compatible with standard laptop-style Kensington® security cables for theft protection.
22.Expression Pedal Input – This socket accepts both "switch type" and standard expression pedals (not included) such as M-Audio EX-P for adding expressive changes during performances. The Expression Pedal input is fully MIDI-assignable, and a unique MIDI CC can be assigned for each keyboard Zone, so that the message(s) sent are defined by the active Zone(s).
23.Sustain Pedal Input – This socket accepts momentary-contact foot pedals (not included). When pressed, this Pedal will sustain the notes you are playing, without having to keep your fingers pressing down the keys. The Sustain Pedal input is fully MIDI-assignable, and a unique MIDI CC can be assigned for each keyboard Zone, so that the message(s) sent are defined by the active Zone(s).
The polarity of the Sustain Pedal is determined by Axiom upon startup. When powering up, it assumes the Pedal is in the "up" (off) position. It is important that the Sustain Pedal is not pressed down during startup, otherwise its operation will be reversed.
24.MIDI In Port – This standard 5-pin MIDI connector receives data from any MIDI compatible device such as a synthesizer or drum machine.
This port also allows you to use Axiom as a MIDI interface to send MIDI data from external hardware to your DAW. In this instance, the 3rd USB MIDI input should be selected from those available in the DAW preferences. Please refer to the documentation provided with your DAW for further information on MIDI configuration.
25.MIDI Out Port – This standard 5-pin MIDI connector transmits data to any MIDI compatible device such as a synthesizer, sound module, or drum machine. In MIDI Out "From USB" Mode, data sent to the Axiom USB MIDI Output port (not the DirectLink port) will be streamed to the external MIDI Out port. Please refer to Chapter 4, "Advanced Keyboard Functions" for further information on MIDI Out from USB.
26.USB Port – The USB 2.0 port (backward compatible with USB 1.1) delivers power to Axiom and transmits MIDI data to and from the host computer.
27.Power Supply Jack – Connect an optional 9VDC power supply here when using the keyboard as a standalone MIDI controller without a USB connection to a computer. The power supply cannot be used when Axiom is connected to a computer via USB.
28.On/Off Switch – Use this switch to power the device on or off whether Axiom is connected via USB or using an external power supply.
8
Loading...