


 Loading...
Contents |
Connections |
Playback |
Settings |
Tips |
Appendix |
You can print more than one page of a PDF onto a single sheet of paper.
|
|
|
|
|
|
|
|
|
|
|
Front panel |
|
|
Rear panel |
|
|
Remote |
|
|
Index |
|
|
|
|
|
|
|
|
|
|
|
|
|
|
|
|
|
|
|
|
|
|
|
CD Receiver
M-CR610
Owner’s Manual
Contents |
Connections |
Playback |
Settings |
Tips |
Appendix |
Contents
Accessories························································································ 5 Inserting the batteries······································································· 6 Operating range of the remote control unit······································ 6
Features······························································································ 7 Multiple music formats are supported, all in a compact
form factor························································································ 7 Easy operation·················································································· 7
Part names and functions
Front panel························································································· 8 Rear panel························································································ 10 Remote control unit······································································ 12
Connections
Speaker connection······································································· 16 Connecting the speaker cables······················································· 16 Connection the subwoofer····························································· 17 Speaker A connection (Standard)···················································· 17 About the speaker B connections··················································· 18 About the Bi-Amp connection························································· 19
Connecting an analog device····················································· 20
Connecting a digital device························································· 20
Connecting an iPod or USB memory device
to the USB port··············································································· 21
Connecting an FM/AM antenna················································ 23 Connecting to a home network (LAN)····································· 25 Wired LAN······················································································ 25 Wireless LAN·················································································· 26
Connecting the power cord························································ 27
Playback
Basic operation··············································································· 29 Turning the power on····································································· 29 Selecting the input source······························································ 29 Adjusting the master volume·························································· 30 Turning off the sound temporarily··················································· 30
Playing CDs······················································································ 31 Playing CDs····················································································· 31 Playing tracks in the desired order (Program playback)·················· 32
Playing DATA CDs·········································································· 33 Playing files····················································································· 34
Listening to Internet Radio························································· 35 Listening to Internet Radio····························································· 36 Playing the last played Internet Radio station································· 37 Using vTuner to add Internet Radio stations to favorites··············· 37
Playing back files stored on a PC and NAS···························· 38 Applying media sharing settings····················································· 39 Playing back files stored on a PC and NAS····································· 40
|
|
|
|
|
|
|
|
2 |
|
|
Front panel |
|
|
Rear panel |
|
|
Remote |
|
Index |
|
|
|
|
|
|
|
|
|
|
|
|
|
|
|
|
|
|
|
|
|
|
|
|
Contents |
Connections |
Playback |
Settings |
Tips |
Appendix |
Listening to Pandora®·································································· 42 Listening to Pandora®······································································ 43 Creating a new station···································································· 43 Listening to an existing station······················································· 44 Play random songs from your stations (Quick Mix)························ 44 Giving Feedback and Managing Stations········································ 45 Sign Out·························································································· 45
Listening to SiriusXM Internet Radio······································ 46 Listening to SiriusXM Internet Radio·············································· 47 Sign Out·························································································· 47
Listening to Spotify······································································· 48 Listening to Spotify········································································· 48 Listening to FM/AM broadcasts················································ 51 Listening to FM/AM broadcasts····················································· 51 Changing the FM tuning mode (Tune Mode)·································· 52 Automatically presetting FM stations (Auto Preset)······················· 52
Favorite function············································································ 53 Registering stations or files to the favorites list····························· 54 Calling stations or files from the favorites list································· 54 To switch between registered stations and files
during playback··············································································· 54 Deleting stations or files from the favorite list································ 54
Playing iPod····················································································· 55 Listening to music on an iPod························································· 56 Setting operation mode (Remote iPod Mode)································ 57 Charging the iPod/iPhone······························································· 58
Playing a USB memory device··················································· 59 Playing files stored on USB memory devices································· 60
Listening to ANALOG IN······························································ 61 Listening to DIGITAL IN······························································· 61
AirPlay function·············································································· 62 Streaming music stored in iPhone, iPod touch,
or iPad directly to the unit······························································· 62 Playing iTunes music with this unit················································ 63 Selecting multiple speakers (devices)············································· 63 Perform iTunes playback operations with the remote control unit
of this unit······················································································· 64
Remote play function···································································· 65 Settings required for each device··················································· 66
Web control function···································································· 67 Controlling the unit from a web control·········································· 67
Other functions··············································································· 72 Listening to music in two locations using
a multi-drive connection·································································· 73 Adjusting the tone·········································································· 75 Sleep timer function······································································· 76 Checking the current time······························································ 76 Switching the display’s brightness················································· 76
|
|
|
|
|
|
|
|
3 |
|
|
Front panel |
|
|
Rear panel |
|
|
Remote |
|
Index |
|
|
|
|
|
|
|
|
|
|
|
|
|
|
|
|
|
|
|
|
|
|
|
|
Contents |
Connections |
Playback |
Settings |
Tips |
Appendix |
Settings
Menu map························································································ 77 Menu operation·············································································· 79
Inputting characters······································································ 80 Using the number buttons······························································ 80 Using the cursor buttons································································ 80
General······························································································ 81 Alarm······························································································ 81 Clock······························································································· 82 Speaker Configuration···································································· 82
Language························································································ 83
Auto-Standby·················································································· 83 Firmware························································································· 84
Network···························································································· 86 Network Information······································································· 86 Network Control············································································· 86 Friendly Name················································································· 86 Settings··························································································· 87
Tips
Contents··························································································· 90 Tips································································································· 91 Troubleshooting·············································································· 92
Resetting factory settings························································· 103
Appendix
Playing back DATA CDs································································ 104 Playing back USB memory devices············································ 105
Playing back Internet Radio·························································· 106 Playing back files stored on PC or NAS······································ 107
About Discs····················································································· 108 Last function memory··································································· 109 Explanation of terms······································································ 110 Trademark information·································································· 114 Specifications·················································································· 115 Index································································································· 118 License····························································································· 120
|
|
|
|
|
|
|
|
4 |
|
|
Front panel |
|
|
Rear panel |
|
|
Remote |
|
Index |
|
|
|
|
|
|
|
|
|
|
|
|
|
|
|
|
|
|
|
|
|
|
|
|

Contents |
Connections |
Playback |
Settings |
Tips |
Appendix |
Thank you for purchasing this Marantz product. To ensure proper operation, please read this owner’s manual carefully before using the product. After reading this manual, be sure to keep it for future reference.
Accessories
Check that the following parts are supplied with the product.
q Quick Setup Guide |
w CD-ROM (Owner’s Manual) |
e Safety Instructions |
r Warranty |
|
(for USA) |
||||
|
|
|
||
|
|
|
(for CANADA) |
t Notes on radio |
y Power cord |
u Remote control unit (RC011CR) i R03/AAA batteries |
o AM loop antenna |
Q0FM indoor antenna |
|
|
|
|
|
|
|
|
5 |
|
|
Front panel |
|
|
Rear panel |
|
|
Remote |
|
Index |
|
|
|
|
|
|
|
|
|
|
|
|
|
|
|
|
|
|
|
|
|
|
|
|

Contents |
Connections |
Playback |
Settings |
Tips |
Appendix |
Inserting the batteries
qRemove the rear lid in the direction of the arrow and remove it.
Operating range of the remote control unit
Point the remote control unit at the remote sensor when operating it.
w Load the two batteries properly as |
R03/AAA |
Approx. 23 ft/7 m |
|
indicated by the q and w marks in the |
|
|
|
|
|
|
|
battery compartment. |
|
30° |
30° |
e Put the rear cover back on.
NOTE
•When inserting the batteries, be sure to do so in the proper direction, following the q and w marks in the battery compartment.
•To prevent damage or leakage of battery fluid:
•Do not use a new battery together with an old one.
•Do not use two different types of batteries.
•Remove the batteries from the remote control unit if it will not be in use for long periods.
•If the battery fluid should leak, carefully wipe the fluid off the inside of the battery compartment and insert new batteries.
|
|
|
|
|
|
|
|
6 |
|
|
Front panel |
|
|
Rear panel |
|
|
Remote |
|
Index |
|
|
|
|
|
|
|
|
|
|
|
|
|
|
|
|
|
|
|
|
|
|
|
|
Contents |
Connections |
Playback |
Settings |
Tips |
Appendix |
Features
Multiple music formats are supported, all in a compact form factor
•Supports Internet Radio and music streaming Supports AirPlay® (vpage 62)
You can enjoy a wide variety of content, including listening to Internet Radio, playing audio files stored on your PC.
This unit also supports Apple AirPlay which lets you stream your music library from an iPhone®, iPad®, iPod touch® or iTunes®.
•DLNA ver. 1.5 support for audio networks
•Supports online music, including Pandora®, SiriusXM, Spotify
•Support for High Quality Audio playback WAV/FLAC/ALAC (Apple Lossless Audio Codec)
•Support for Gapless playback
Playback with no gap between music files (for WAV/FLAC only)
•Wi-Fi network capability with built-in diversity antenna, and is certified under WMM (Wi-Fi Multi Media) for efficient wireless connectivity
•High quality & high power digital amplifier. Bi-Amp operation.
Easy operation
•Easy wireless connection is possible by pressing the Wi-Fi CONNECT button (WPS and Wi-Fi Sharing)
See the separate “Quick Setup Guide”.
•iPod auto detect charges your device even after the unit switches to standby mode
•Compatible with “Marantz Remote App” for performing basic operations of the unit with an iPad, iPhone or Androidzsmartphone
“Marantz Remote App” is application software that allows you to perform basic operations with an iPad, iPhone, Android smartphone or Android tablet such as turning the unit ON/OFF, controlling the volume, and switching the source.
zz Download the appropriate “Marantz Remote App” for iOS and Android devices. This unit needs to be connected to your LAN and the iPad, iPhone, Android smartphone, Android tablet or other device needs to be connected to the same network by Wi-Fi (wireless LAN).
•3 Line OLED (Organic Light Emitting Diode) display
•Auto Standby mode for energy savings
|
|
|
|
|
|
|
|
7 |
|
|
Front panel |
|
|
Rear panel |
|
|
Remote |
|
Index |
|
|
|
|
|
|
|
|
|
|
|
|
|
|
|
|
|
|
|
|
|
|
|
|

Contents |
Connections |
Playback |
Settings |
Tips |
Appendix |
Part names and functions
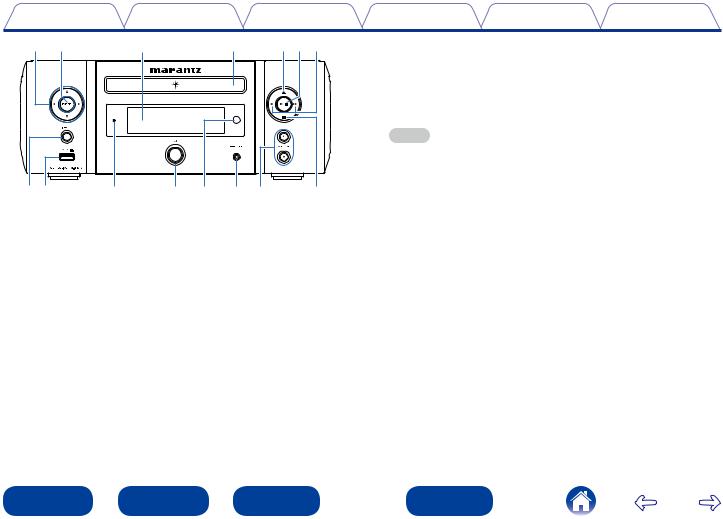
Front panel
|
Q5 |
Q4 |
Q3 |
Q2 |
|
|
|
|
|
|
|
|
|
|
|
|
|
|
|
|
|
|
|
|
qw |
e |
r |
t |
y |
Q1Q0 o |
u i
|
|
|
|
|
|
|
|
8 |
|
|
Front panel |
|
|
Rear panel |
|
|
Remote |
|
Index |
|
|
|
|
|
|
|
|
|
|
|
|
|
|
|
|
|
|
|
|
|
|
|
|
Contents |
|
Connections |
|
Playback |
Settings |
Tips |
Appendix |
Q5Q4 |
|
Q3 |
Q2 |
Q1Q0o |
tRemote control sensor |
|
|
|
|
|
|
|
This receives signals from the remote control unit (vpage 6). |
||
|
|
|
|
|
yHeadphones jack (PHONES) |
|
|
|
|
|
|
|
Used to connect headphones. |
|
|
|
|
|
|
|
When the headphones are plugged into this jack, audio will no longer |
||
|
|
|
|
|
be output from the connected speakers. |
|
|
|
|
|
|
|
NOTE |
|
|
|
|
|
|
|
• To prevent hearing loss, do not raise the volume level excessively when using |
||
|
|
|
|
|
headphones. |
|
|
qw |
e |
r t |
y u |
i |
uVolume up/down button (VOLUME df) |
|
|
Adjusts the audio volume. |
|
|
|||||
qINPUT button
Selects the input source.
wUSB port (Front)
Used to connect iPod or USB memory devices (vpage 21).
eStandby indicator
The standby indicator changes as shown below according to the status of the unit.
•Power on : Off
•Standby : Off
•When “Network Control” is set to “On” : Red (vpage 86)
•iPod charge standby : Red (vpage 58)
•Alarm standby : Orange (vpage 81)
•Display off : Green (vpage 76)
rPower operation button (X)
Turns power to this unit on and off (standby).
iStop button (2)
oReverse-skip/Forward-skip buttons (8, 9) Q0Play/Pause button (1/3)
Q1Disc tray open/close button (5)
Used to open/close the disc tray.
Q2Disc tray
Tray used to insert a compact disc.
Q3Display
Various information is displayed here.
Q4ENTER button
This determines the selection.
Q5Cursor button (uiop)
These select items.
|
|
|
|
|
|
|
|
9 |
|
|
Front panel |
|
|
Rear panel |
|
|
Remote |
|
Index |
|
|
|
|
|
|
|
|
|
|
|
|
|
|
|
|
|
|
|
|
|
|
|
|

Contents |
Connections |
Playback |
Settings |
Tips |
Appendix |
Rear panel
Q1 Q0 |
o |
i |
q |
w |
e r |
t |
y u |
|
|
|
|
|
|
|
|
10 |
|
|
Front panel |
|
|
Rear panel |
|
|
Remote |
|
Index |
|
|
|
|
|
|
|
|
|
|
|
|
|
|
|
|
|
|
|
|
|
|
|
|
Contents |
Connections |
Playback |
Settings |
Tips |
Appendix |
||
|
|
|
Q1Q0 o |
i |
yNETWORK connector |
|
|
|
|
|
|
|
Used to connect this unit to the network (vpage 25). |
||
|
|
|
|
|
uUSB port (Rear) |
|
|
|
|
|
|
|
Used to connect iPod or USB memory devices (vpage 21). |
||
|
|
|
|
|
iWi-Fi CONNECT button |
|
|
|
|
|
|
|
Used to connect to the wireless LAN. |
|
|
|
|
|
|
|
(See the separate “Quick Setup Guide”.) |
|
|
|
|
|
|
|
oDIGITAL IN connector |
|
|
|
|
|
|
|
Used to connect devices equipped with digital audio connector |
||
|
|
|
|
|
(vpage 20). |
|
|
q |
w |
er t |
yu |
Q0AM antenna terminal (ANTENNA) |
|
||
Used to connect AM antennas (vpage 23). |
|
||||||
|
|
|
|
|
|
||
qAC inlet (AC IN)
Used to connect the power cord (vpage 27).
wSpeaker terminals (SPEAKERS)
Used to connect speakers (vpage 16, 17, 18, 19).
eANALOG IN connectors
Used to connect devices equipped with analog audio connectors (vpage 20).
rSW OUT connector
Used to connect a subwoofer with a built-in amplifier (vpage 17, 19).
tAUDIO OUT connectors
Used to connect devices equipped with analog audio inputs connectors or an external pre-main amplifier.
Q1FM antenna terminal (ANTENNA)
Used to connect FM antennas (vpage 23).
|
|
|
|
|
|
|
|
11 |
|
|
Front panel |
|
|
Rear panel |
|
|
Remote |
|
Index |
|
|
|
|
|
|
|
|
|
|
|
|
|
|
|
|
|
|
|
|
|
|
|
|

Contents |
Connections |
Playback |
Settings |
Tips |
Appendix |
Remote control unit |
|
|
|
|
|
|
q |
|
qRemote control signal transmitter |
|
|
|
w |
|
This transmits signals from the remote control unit (vpage 6). |
||
|
e |
|
wCLOCK button |
|
|
|
|
|
The current time appear on the unit (vpage 82). |
|
|
|
r |
|
eSLEEP button |
|
|
|
|
This sets the sleep timer (vpage 76). |
|
||
|
|
|
rInput source select buttons |
|
|
|
t |
|
These select the input source (vpage 29). |
|
|
|
|
tSystem buttons |
|
|
|
|
y |
|
|
|
|
|
|
These perform playback related operations |
|
||
|
|
|
(vpage 31, 34, 36, 40, 42, 46, 48, 57, 60). |
|
|
|
|
|
•Previous / Next buttons (8, 9) |
|
|
|
|
|
•Play/pause button (1/3) |
|
|
|
|
|
•Fast-reverse / Fast-forward buttons (6, 7) |
|
|
|
|
|
•Stop button (2) |
|
|
|
|
|
Channel buttons (CH +, –) |
|
|
|
|
|
These operate the Favorite function (vpage 53). |
|
|
|
|
|
Tuning buttons (TUNE +, –) |
|
|
|
|
|
These operate the tuner (vpage 51). |
|
|
|
|
|
yMUTE button ( |
) |
|
|
|
|
This mutes the output audio (vpage 30). |
|
|
|
|
|
|
|
|
|
|
12 |
|
|
Front panel |
|
|
Rear panel |
|
|
Remote |
|
Index |
|
|
|
|
|
|
|
|
|
|
|
|
|
|
|
|
|
|
|
|
|
|
|
|

Contents |
Connections |
Playback |
Settings |
Tips |
Appendix |
Q5


 Q6
Q6
u


i o
o
Q0
Q1
Q2
Q3
Q4
uFAVORITES ADD / CALL buttons
•To add radio stations or files to the favorite list, press ADD.
•To call up a radio station or file registered in the favorite list, press CALL (vpage 53).
iTOP MENU button
To back to the top of the menu (vpage 79).
oENTER button
This determines the selection (vpage 79).
Q0Cursor buttons (uio p)
These select items (vpage 79).
Q1SEARCH button
This displays the search menu (vpage 36, 52, 60).
Q2Number buttons (0 – 9, +10)
These enter letters or numbers into the unit (vpage 80).
Q3RANDOM button
Switches the random playback.
Q4REPEAT button
Switches the repeat playback (vpage 31, 34, 40, 48, 57, 60).
Q5DIMMER button
Adjust the display brightness of this unit (vpage 76).
Q6POWER button (X)
This turns the power on/standby (vpage 29).
|
|
|
|
|
|
|
|
13 |
|
|
Front panel |
|
|
Rear panel |
|
|
Remote |
|
Index |
|
|
|
|
|
|
|
|
|
|
|
|
|
|
|
|
|
|
|
|
|
|
|
|

Contents |
Connections |
Playback |
Settings |
Tips |
Appendix |
 Q7
Q7 


 Q8
Q8

 Q9
Q9
Q7DBB/TONE button
Adjusting the tone (vpage 75).
Q8VOLUME buttons (df)
These adjust the volume level (vpage 30).
Q9Information button (INFO)
This switches display items such as the elapsed time, album name and title name in the playback screen (vpage 31, 40, 52, 57).
W0SETUP button
This displays the setup menu on the display (vpage 79).
W1CLEAR button
This cancels the settings (vpage 32, 54, 80).
W2SPEAKER A/B button
This sets up the speaker output (vpage 74).
W3PROGRAM / MODE button
•PROGRAM button
Playing tracks in a specific order (vpage 32).
•MODE button
Switching the operation mode (vpage 34, 52, 57).

 W0
W0


 W1
W1


 W2
W2
W3
|
|
|
|
|
|
|
|
14 |
|
|
Front panel |
|
|
Rear panel |
|
|
Remote |
|
Index |
|
|
|
|
|
|
|
|
|
|
|
|
|
|
|
|
|
|
|
|
|
|
|
|

Contents |
Connections |
Playback |
Settings |
Tips |
Appendix |
Connections
Speaker connection (vpage 16)
Connecting an analog device (vpage 20)
Connecting a digital device (vpage 20)
Connecting an iPod or USB memory device to the USB port (vpage 21)
Connecting an FM/AM antenna (vpage 23)
Connecting to a home network (LAN) (vpage 25)
Connecting the power cord (vpage 27)
NOTE
22Cables used for connections
Provide necessary cables according to the devices you want to connect.
Speaker cable
Subwoofer cable
Optical cable
Audio cable |
L |
L |
|
R |
R |
||
|
LAN cable
•Do not plug in the power cord until all connections have been completed.
•Do not bundle power cords together with connection cables. Doing so can result in noise.
|
|
|
|
|
|
|
|
15 |
|
|
Front panel |
|
|
Rear panel |
|
|
Remote |
|
Index |
|
|
|
|
|
|
|
|
|
|
|
|
|
|
|
|
|
|
|
|
|
|
|
|

Contents |
Connections |
Playback |
Settings |
Tips |
Appendix |
Speaker connection
Here we connect the speakers in the room to this unit.
This section explains how to connect them using typical examples.
NOTE
•Disconnect this unit’s power plug from the power outlet before connecting the speakers. Also, turn off the subwoofer.
•Connect so that the speaker cable core wires do not protrude from the speaker terminal. The protection circuit may be activated if the core wires touch the rear panel or if the + and – sides touch each other (vpage 112 “Protection circuit”).
•Never touch the speaker terminals while the power cord is connected. Doing so could result in electric shock.
•Use speakers with an impedance of 6 – 8 Ω/ohms. The protection circuit may be activated if speakers with an impedance other than specified are used.
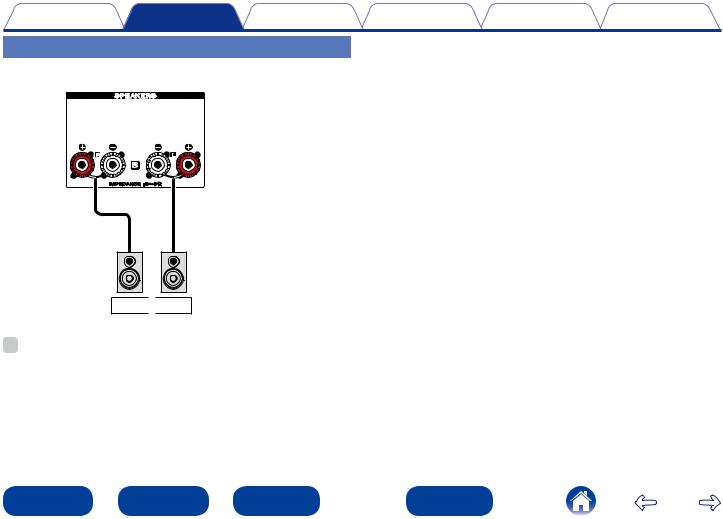
Connecting the speaker cables
Carefully check the left (L) and right (R) channels and + (red) and – (black) polarities on the speakers being connected to this unit, and be sure to connect the channels and polarities correctly.
1 Peel off about 3/8 inch (10 mm) of sheathing from the tip of the speaker cable, then either twist the core wire tightly or terminate it.
2 Turnthespeakerterminalcounterclockwise to loosen it.
3 |
Insert the speaker cable’s core wire to the |
hilt into the speaker terminal. |
4 Turn the speaker terminal clockwise to tighten it.
|
|
|
|
|
|
|
|
16 |
|
|
Front panel |
|
|
Rear panel |
|
|
Remote |
|
Index |
|
|
|
|
|
|
|
|
|
|
|
|
|
|
|
|
|
|
|
|
|
|
|
|

Contents |
Connections |
Playback |
Settings |
Tips |
Appendix |
Connection the subwoofer |
|
Speaker A connection (Standard) |
|||
Use a subwoofer cable to connect the subwoofer.
R (A) 
 L (A)
L (A)
SW
|
|
|
|
|
|
|
|
17 |
|
|
Front panel |
|
|
Rear panel |
|
|
Remote |
|
Index |
|
|
|
|
|
|
|
|
|
|
|
|
|
|
|
|
|
|
|
|
|
|
|
|
Contents |
Connections |
Playback |
Settings |
Tips |
Appendix |
About the speaker B connections
R (B) 
 L (B)
L (B)
%
•When using this connection, also set “Bi-Amp” in the menu to “Disable” (vpage 82).
|
|
|
|
|
|
|
|
18 |
|
|
Front panel |
|
|
Rear panel |
|
|
Remote |
|
Index |
|
|
|
|
|
|
|
|
|
|
|
|
|
|
|
|
|
|
|
|
|
|
|
|
Contents |
Connections |
Playback |
Settings |
Tips |
Appendix |
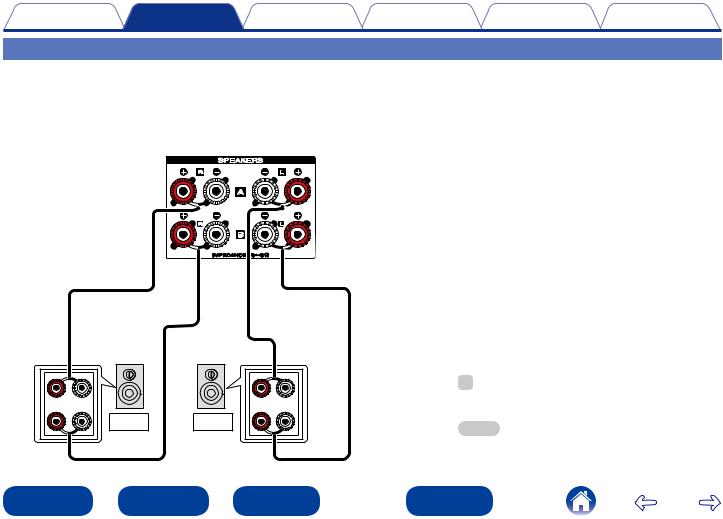
About the Bi-Amp connection
Some audiophile loudspeakers can be connected to an amplifier with two separate amp-to-speaker connections per each speaker. One amplifier channel’s output is hooked up to the speaker’s bass driver (woofer), while the other amplifier drives the upper range transducers (tweeter, or in some cases midrange and tweeter). This connection method has one amplifier channel driving one half of the bi-amp speaker, and avoids electrical interference between the speaker’s bass and treble drivers and the driving amplifier channels. You can assign 4 amp channels to connect to one pair of bi-amp capable speakers. Bi-amp capable speakers always have two sets of speaker input connector pairs, one for the bass range and one for the treble range. If you’re unsure about whether or not your speakers are bi-amp capable, consult the owner’s manual that came with the speakers.
|
(R) |
|
(L) |
q |
w |
q |
w |
|
R |
L |
|
%
•When using this connection, also set “Bi-Amp” in the menu to “Enable” (vpage 82).
NOTE
•When making bi-amp connections, be sure to remove the short-circuiting plate or wire between the speaker’s woofer and tweeter terminals.
|
|
|
|
|
|
|
|
19 |
|
|
Front panel |
|
|
Rear panel |
|
|
Remote |
|
Index |
|
|
|
|
|
|
|
|
|
|
|
|
|
|
|
|
|
|
|
|
|
|
|
|

Contents Connections Playback Settings Tips Appendix
Connecting an analog device |
Connecting a digital device |
|
Analog |
Digital |
|
device |
device |
|
AUDIO |
AUDIO |
|
AUDIO |
||
OPTICAL |
||
OUT |
||
OUT |
||
R L |
||
|
||
R L |
|
R |
L |
|
|
|
|
|
|
|
|
20 |
|
|
Front panel |
|
|
Rear panel |
|
|
Remote |
|
Index |
|
|
|
|
|
|
|
|
|
|
|
|
|
|
|
|
|
|
|
|
|
|
|
|
Contents |
Connections |
Playback |
Settings |
Tips |
Appendix |
Connecting an iPod or USB memory device to the USB port
To connect an iPod to this unit, use the USB adapter cable that was supplied with the iPod.
For operating instructions see “Playing iPod” (vpage 55) or “Playing a USB memory device” (vpage 59).
USB |
Front |
iPod |
|
memory |
|
device |
|
|
or |
Rear |
%
•Marantz does not guarantee that all USB memory devices will operate or receive power. When using a portable USB hard disk drive (HDD) which came with an AC adapter, use that device’s supplied AC adapter.
NOTE
•USB memory devices will not work via a USB hub.
•It is not possible to use this unit by connecting the unit’s USB port to a PC via a USB cable.
•Do not use an extension cable when connecting a USB memory device. This may cause radio interference with other devices.
|
|
|
|
|
|
|
|
21 |
|
|
Front panel |
|
|
Rear panel |
|
|
Remote |
|
Index |
|
|
|
|
|
|
|
|
|
|
|
|
|
|
|
|
|
|
|
|
|
|
|
|
Contents |
Connections |
Playback |
Settings |
Tips |
Appendix |
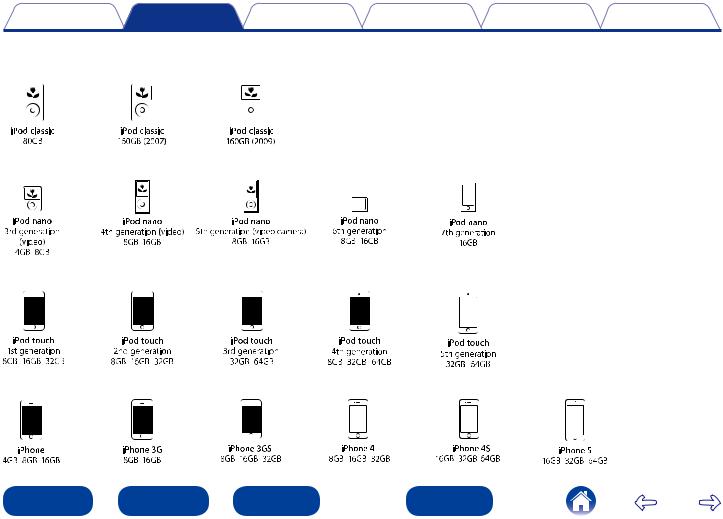
22Supported iPod / iPhone models
•iPod classic
•iPod nano
•iPod touch
•iPhone
|
|
|
|
|
|
|
|
22 |
|
|
Front panel |
|
|
Rear panel |
|
|
Remote |
|
Index |
|
|
|
|
|
|
|
|
|
|
|
|
|
|
|
|
|
|
|
|
|
|
|
|

Contents |
Connections |
Playback |
Settings |
Tips |
Appendix |
Connecting an FM/AM antenna
After connecting the antenna and receiving a broadcast signal (vpage 51 “Listening to FM/AM broadcasts” ), fix the antenna with tape in a position where the noise level becomes minimal.
Direction of broadcasting station |
|
|
FM outdoor |
AM loop antenna |
|
(supplied) |
||
antenna |
||
|
||
75 Ω/ohms |
|
|
coaxial cable |
|
Black  White
White
FM indoor antenna |
|
|
(supplied) |
|
|
q |
w |
e |
NOTE
•Do not connect two FM antennas simultaneously.
•Even if an external AM antenna is used, do not disconnect the AM loop antenna.
•Make sure the AM loop antenna lead terminals do not touch metal parts of the panel.
•If you are unable to receive a good broadcast signal, we recommend installing an outdoor antenna. For details, inquire at the retail store where you purchased the unit.
|
|
|
|
|
|
|
|
23 |
|
|
Front panel |
|
|
Rear panel |
|
|
Remote |
|
Index |
|
|
|
|
|
|
|
|
|
|
|
|
|
|
|
|
|
|
|
|
|
|
|
|
Contents |
Connections |
Playback |
Settings |
Tips |
Appendix |
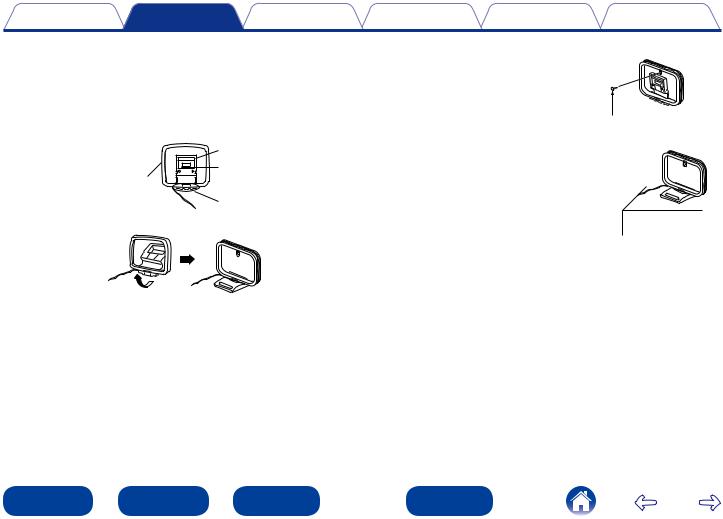
22AM loop antenna assembly
1 |
Put the stand section through the bottom of the loop |
antenna from the rear and bend it forward. |
2 Insertstand. the projecting part into the square hole in the
|
Stand |
|
Loop |
Square |
|
hole |
||
antenna |
||
|
||
|
Projecting |
|
|
part |
22Using the AM loop antenna
Suspending on a wall
Suspend directly on a wall without assembling.
Nail, tack, etc.
Standing alone
Use the procedure shown above to assemble.
|
|
|
|
|
|
|
|
24 |
|
|
Front panel |
|
|
Rear panel |
|
|
Remote |
|
Index |
|
|
|
|
|
|
|
|
|
|
|
|
|
|
|
|
|
|
|
|
|
|
|
|

Contents |
Connections |
Playback |
Settings |
Tips |
Appendix |
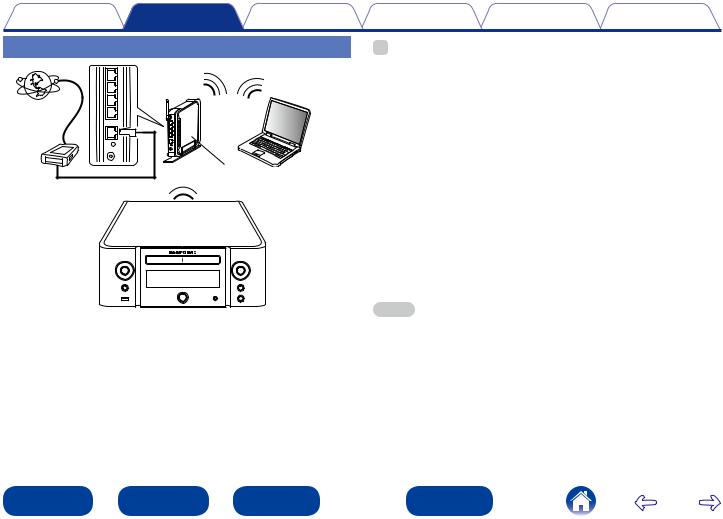
Connecting to a home network (LAN)
You can connect this unit to your home network (LAN) to perform various types of playbacks and operations as follows.
•Playback of network audio such as Internet Radio and from your media server(s)
•Playback of music content from online streaming services
•Using the Apple AirPlay function
•Operation on this unit via the network
•Firmware Update
Wired LAN
|
NAS |
|
PC |
(Network Attached |
|
Storage) |
||
|
||
Modem |
|
|
Internet |
|
|
To WAN side |
|
To LAN port |
LAN port/ |
LAN port/ |
To LAN port |
||
|
Ethernet |
Ethernet |
Router |
connector |
connector |
|
|
For connections to the Internet, contact an ISP (Internet Service
Provider) or a computer shop.
|
|
|
|
|
|
|
|
25 |
|
|
Front panel |
|
|
Rear panel |
|
|
Remote |
|
Index |
|
|
|
|
|
|
|
|
|
|
|
|
|
|
|
|
|
|
|
|
|
|
|
|
Contents |
Connections |
Playback |
Settings |
Tips |
Appendix |
Wireless LAN
Internet |
Modem |
To WAN side
PC
Router with  access point
zz This unit comes with a built-in Wi-Fi antenna.
%
•With this unit, it is possible to use the DHCP and Auto IP functions to make the network settings automatically.
•When using this unit with the broadband router’s DHCP function enabled, this unit automatically performs the IP address setting and other settings.
When using this unit connected to a network with no DHCP function, make the settings for the IP address, etc., at “Network” (vpage 86).
•When using this unit, we recommend you use a router equipped with the following functions:
•Built-in DHCP server
This function automatically assigns IP addresses on the LAN.
•Built-in 100BASE-TX switch
When connecting multiple devices, we recommend a switching hub with a speed of 100 Mbps or greater.
•Use only a shielded STP or ScTP LAN cable which is easily available at electronics stores (CAT-5 or greater recommended).
•The normal shielded-type LAN cable is recommended. If a flat-type cable or unshielded-type cable is used, other devices could be affected by noise.
•When using a WPS (Wi-Fi Protected Setup) compatible router, easy wireless connection is possible by pressing this unit’s Wi-Fi CONNECT button. (See the separate “Quick Setup Guide”.)
NOTE
•The types of routers that can be used depend on the ISP. Contact your ISP or a computer shop for details.
•This unit is not compatible with PPPoE. A PPPoE-compatible router is required if you have a contract for a type of line set by PPPoE.
•Do not connect an NETWORK connector directly to the LAN port/ Ethernet connector on your computer.
|
|
|
|
|
|
|
|
26 |
|
|
Front panel |
|
|
Rear panel |
|
|
Remote |
|
Index |
|
|
|
|
|
|
|
|
|
|
|
|
|
|
|
|
|
|
|
|
|
|
|
|
Contents |
Connections |
Playback |
Settings |
Tips |
Appendix |
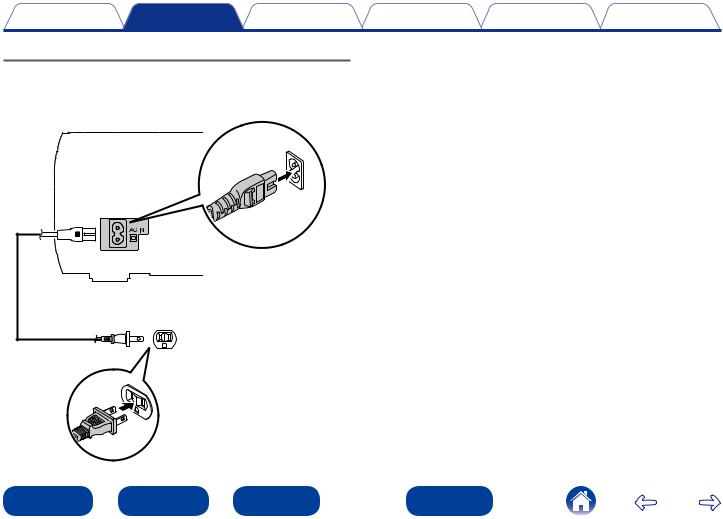
Connecting the power cord
After completing all the connections, insert the power plug into the power outlet.
Power cord |
|
(supplied) |
To household power outlet |
|
(AC 120 V, 60 Hz) |
|
|
|
|
|
|
|
|
27 |
|
|
Front panel |
|
|
Rear panel |
|
|
Remote |
|
Index |
|
|
|
|
|
|
|
|
|
|
|
|
|
|
|
|
|
|
|
|
|
|
|
|

Contents |
Connections |
Playback |
Settings |
Tips |
Appendix |
Playback
Turning the power on (vpage 29)
Selecting the input source (vpage 29)
Adjusting the master volume (vpage 30)
Turning off the sound temporarily (vpage 30)
Playing CDs (vpage 31)
Playing DATA CDs (vpage 33)
Listening to Internet Radio (vpage 35)
Playing back files stored on a PC and NAS (vpage 38)
Listening to Pandora® (vpage 42)
Listening to SiriusXM Internet Radio (vpage 46)
Listening to Spotify (vpage 48)
Listening to FM/AM broadcasts (vpage 51)
Favorite function (vpage 53)
Playing iPod (vpage 55)
Playing a USB memory device (vpage 59)
Listening to ANALOG IN (vpage 61)
Listening to DIGITAL IN (vpage 61)
AirPlay function (vpage 62)
Remote play function (vpage 65)
Web control function (vpage 67)
Listening to music in two locations using a multi-drive connection (vpage 73)
Adjusting the tone (vpage 75)
Sleep timer function (vpage 76)
Checking the current time (vpage 76)
Switching the display’s brightness (vpage 76)
|
|
|
|
|
|
|
|
28 |
|
|
Front panel |
|
|
Rear panel |
|
|
Remote |
|
Index |
|
|
|
|
|
|
|
|
|
|
|
|
|
|
|
|
|
|
|
|
|
|
|
|
Contents |
Connections |
Playback |
Settings |
Tips |
Appendix |
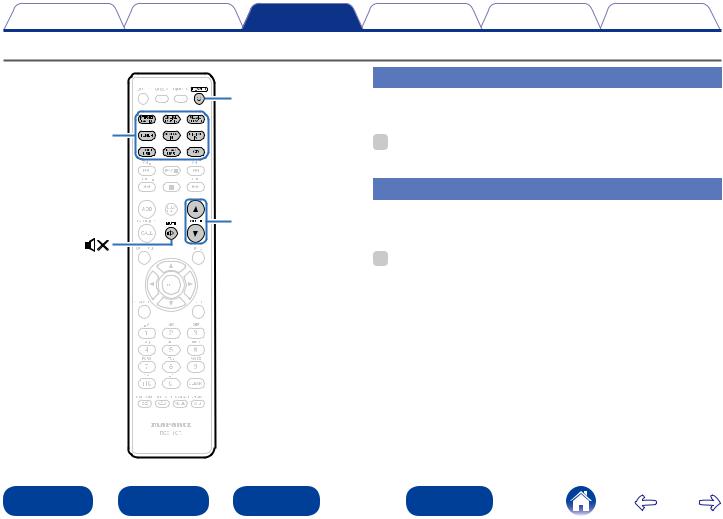
Basic operation
POWER X |
Turning the power on |
|
1 Press POWER X to turn on power to the unit. |
||
Input source |
||
|
||
select buttons |
% |
|
|
• You can also switch the power to standby by pressing X on the main unit. |
|
|
Selecting the input source |
|
VOLUME df |
Press the input source select button to be played back. |
|
1 The desired input source can be selected directly. |
||
MUTE |
% |
|
|
||
|
• Press the TUNER again to switch between FM/AM. |
|
|
• Press the ANALOG IN again to switch between Analog In 1/2. |
|
|
• You can also select the input source by pressing INPUT on the main unit. |
|
|
|
|
|
|
|
|
29 |
|
|
Front panel |
|
|
Rear panel |
|
|
Remote |
|
Index |
|
|
|
|
|
|
|
|
|
|
|
|
|
|
|
|
|
|
|
|
|
|
|
|
|
Contents |
Connections |
Playback |
Settings |
Tips |
Appendix |
Adjusting the master volume |
|
|
|
|
||
1 |
Use VOLUME df to adjust the volume. |
|
|
|
|
|
The volume level is displayed. |
|
|
|
|
||
%
• You can also adjust the master volume by turning VOLUME df on the main unit.
Turning off the sound temporarily
1 |
Press MUTE |
|
. |
|
|||
|
|||
|
The “MUTING” is displayed. |
||
%
• To cancel, press MUTE 
 again.
|
|
|
|
|
|
|
|
30 |
|
|
Front panel |
|
|
Rear panel |
|
|
Remote |
|
Index |
|
|
|
|
|
|
|
|
|
|
|
|
|
|
|
|
|
|
|
|
|
|
|
|
Loading...