


|
|
|
|
|
|
|
Cordless Cutter |
Instruction Manual |
|
|
GB |
|||
|
|
|
|
|
|
|
Scie diamant sans fil |
Manuel d'instructions |
|
|
F |
|||
|
|
|
|
|
|
|
Akku-Glas- und Fliesenschneider |
Betriebsanleitung |
|
|
D |
|||
|
|
|
|
|
|
|
Sega al diamante a batteria |
Istruzioni per l'uso |
|
|
I |
|||
|
|
|
|
|
|
|
Snoerloze diamantslijper |
Gebruiksaanwijzing |
|
|
NL |
|||
|
|
|
|
|
|
|
Cortadora a batería |
Manual de instrucciones |
|
|
E |
|||
|
|
|
|
|
|
|
Cortadora a bateria |
Manual de instruçoÄ es |
|
|
P |
|||
|
|
|
|
|
|
|
Akku glas-fliseskñrer |
Brugsanvisning |
|
|
DK |
|||
|
|
|
|
|
|
|
Sladdlös glasoch kakelskärare |
Bruksanvisning |
|
|
S |
|||
|
|
|
|
|
|
|
Accu fresemaskin |
Bruksanvisning |
|
|
N |
|||
|
|
|
|
|
|
|
Akku-timanttileikkuri |
Käyttöohje |
|
|
SF |
|||
|
|
|
|
|
|
|
ºÔÚËÙfi˜ ÎfiðÙ˘ |
√‰ËÁ›Â˜ ¯Ú‹Ûˆ˜ |
|
|
GR |
|||
|
|
|
|
|
4190D/4190DW
4190DB/4190DWB
4190DW/4190DWB |
|
|
With battery charger |
Met acculader |
Inkl. batteriladdar |
Avec chargeur |
Con cargador de batería |
Med batterilader |
Mit Ladegerät |
Com carregador de bateria |
Akkulataaja |
Con carica batteria |
Med akku-ladeaggregat |
ªВ ˇФЪЩИЫЩ‹˜ Мр·Щ·Ъ›·˜ |
1 |
|
|
|
2 |
|
|
|
|
|
|
|
|
|
|
|
|
|
|
|
|
|
|
|
|
|
|
|
|
|
|
|
|
|
|
|
|
|
|
|
|
|
|
|
|
|
|
|
3
5 |
6 |
|
|
|
|
|
|
|
7 |
8 |
2
9 |
10 |
|
|
|
|
|
|
|
11 |
12 |
|
|
|
|
|
|
|
13 |
14 |
|
|
|
|
|
|
|
15 |
16 |
3

ENGLISH |
|
Explanation of general view |
||
1 |
Set plate |
0 |
Bolt |
|
2 |
Battery cartridge |
q Flange |
||
3 |
Charging light |
w Blade stopper pin |
||
4 |
Tank holder installing portion |
e Tighten |
||
5 |
Tank |
r Loosen |
||
6 |
Screw (A) |
t Hex wrench |
||
7 |
Screw (B) |
y Depth guide |
||
8 |
Tank holder |
u Bolt (A) |
||
9 |
Diamond wheel |
i Bevel scale plate |
||
o Bolt (B)
p Blade case a Base
s For straight cuts
d For 45° bevel cuts f Lock-off lever
g Switch trigger h Cap
SPECIFICATIONS
Model |
4190D |
4190DB |
|
Wheel diameter ............................................................................ |
80 mm |
80 mm |
|
Cutting depth |
|
|
|
90° ............................................................................................. |
0 ± 18 mm |
0 |
±18 mm |
45° ............................................................................................. |
0 ± 16 mm |
0 |
± 16 mm |
No load speed (min-1) .................................................................. |
1,000 |
1,000 |
|
Overall length ............................................................................... |
313 mm |
313 mm |
|
Net weight .................................................................................... |
1.9 kg |
1.9 kg |
|
Rated voltage ............................................................................... |
D.C. 9.6 V |
D.C. 9.6 V |
|
|
|
|
|
·Due to our continuing program of research and development, the specifications herein are subject to change without notice.
·Note: Specifications may differ from country to country.
Safety hints
For your own safety, please refer to the enclosed safety instructions.
IMPORTANT SAFETY INSTRUCTIONS FOR CHARGER & BATTERY CARTRIDGE
1.SAVE THESE INSTRUCTIONS Ð This manual contains important safety and operating instructions for battery charger.
2.Before using battery charger, read all instructions and cautionary markings on (1) battery charger, (2) battery, and (3) product using battery.
3.CAUTION Ð To reduce risk of injury, charge only MAKITA type rechargeable batteries. Other types of batteries may burst causing personal injury and damage.
4.Do not expose charger to rain or snow.
5.Use of an attachment not recommended or sold by the battery charger manufacturer may result in a risk of fire, electric shock, or injury to persons.
6.To reduce risk of damage to electric plug and cord, pull by plug rather than cord when disconnecting charger.
7.Make sure cord is located so that it will not be stepped on, tripped over, or otherwise subjected to damage or stress.
8.Do not operate charger with damaged cord or plug Ð replace them immediately.
9.Do not operate charger if it has received a sharp blow, been dropped, or otherwise damaged in any way; take it to a qualified serviceman.
10.Do not disassemble charger or battery cartridge; take it to a qualified serviceman when service or repair is required. Incorrect reassembly may result in a risk of electric shock or fire.
11.To reduce risk of electric shock, unplug charger from outlet before attempting any maintenance or cleaning. Turning off controls will not reduce this risk.
ADDITIONAL SAFETY RULES FOR CHARGER & BATTERY CARTRIDGE
1.Do not charge battery cartridge when temperature is BELOW 10°C (50°F) or ABOVE 40°C (104°F).
2.Do not attempt to use a step-up transformer, an engine generator or DC power receptacle.
3.Do not allow anything to cover or clog the charger vents.
4.Always cover the battery terminals with the battery cover when the battery cartridge is not used.
5.Do not short the battery cartridge:
(1)Do not touch the terminals with any conductive material.
(2)Avoid storing battery cartridge in a container with other metal objects such as nails, coins, etc.
(3)Do not expose battery cartridge to water or rain.
A battery short can cause a large current flow, overheating, possible burns and even a breakdown.
4

6.Do not store the machine and battery cartridge in locations where the temperature may reach or exceed 50°C (122°F).
7.Do not incinerate the battery cartridge even if it is severely damaged or is completely worn out. The battery cartridge can explode in a fire.
8.Be careful not to drop, shake or strike battery.
9.Do not charge inside a box or container of any kind. The battery must be placed in a well ventilated area during charging.
ADDITIONAL SAFETY RULES
FOR MACHINE
1.Be aware that this is always in an operating condition, because it does not have to be plugged into an electrical outlet.
2.Check the wheel carefully for cracks or damage before operation. Replace cracked or damaged wheel immediately.
3.Use only flanges specified for this machine.
4.Be careful not to damage the spindle, flanges (especially the installing surface) or bolt. Damage to these parts could result in wheel breakage.
5.Hold the machine firmly.
6.Keep hands away from rotating parts.
7.Make sure the wheel is not contacting the workpiece before the switch is turned on.
8.Wait until the wheel attains full speed before cutting.
9.Stop operation immediately if you notice anything abnormal.
10.Do not attempt to lock the trigger in the ``ON'' position.
11.Never attempt to cut with the machine held upside down in a vise. This can lead to serious accidents, because it is extremely dangerous. (Fig. 1)
12.Before setting the machine down after completing a cut, be sure that the wheel has come to a complete stop.
SAVE THESE INSTRUCTIONS.
OPERATING INSTRUCTIONS
Installing or removing battery cartridge (Fig. 2)
·Always switch off the machine before insertion or removal of the battery cartridge.
·To remove the battery cartridge, pull out the set plate on the machine and grasp both sides of the cartridge while withdrawing it from the machine.
·To insert the battery cartridge, align the tongue on the battery cartridge with the groove in the housing and slip it into place. Snap the set plate back into place. Be sure to close the set plate fully before using the machine.
·Do not use force when inserting the battery cartridge. If the cartridge does not slide in easily, it is not being inserted correctly.
Charging
For 4190D (Fig. 3)
1.Plug the battery charger into your power source.
2.Insert the battery cartridge so that the plus and minus terminals on the battery cartridge are on the same sides as their respective markings on the battery charger. Insert the cartridge fully into the port so that it rests on the charger port floor.
3.When the battery cartridge is inserted, the charging light color will flash in red color and charging will begin.
4.When charging is completed, the charging light goes out. The charging time is as follows: Battery 7000, 7100, 7120, 9000, 9100, 9100A, 9120: approx. 60 minutes.
5.If you leave the battery cartridge in the charger after the charging cycle is complete, the charger will switch into its ``trickle charge (maintenance charge)'' mode.
6.After charging, remove the battery cartridge from the charger and unplug the charger from the power source.
Battery type |
Capacity |
Number of |
|
(mAh) |
cells |
||
|
|||
9000 |
1,300 |
8 |
CAUTION:
·The battery charger is for charging Makita battery cartridge. Never use it for other purposes or for other manufacturer's batteries.
·When you charge a new battery cartridge or a battery cartridge which has not been used for a long period of time, it may not accept a full charge. This is a normal condition and does not indicate a problem. You can recharge the battery cartridge fully after discharging it completely and recharging a couple of times.
·When you charge a battery cartridge from a justoperated machine or a battery cartridge which has been left in a location exposed to direct sunlight or heat for a long time, let it cool off. Then re-insert it and try to charge it once more.
·When you charge a new battery cartridge or a battery cartridge which has not been used for a long period, sometimes the charging light will go out soon. If this occurs, remove the battery cartridge and re-insert it. If the charging light goes out within one minute even after repeating this procedure a couple of times, the battery cartridge is dead. Replace it with a new one.
5

For 4190DB (Fig. 4)
Plug the battery charger into your power source. Insert the battery cartridge so that the plus and minus terminals on the battery cartridge are on the same sides as their respective markings on the battery charger. Insert the cartridge fully into the port so that it rests on the charger port floor.
When the battery cartridge is inserted, the charging light will come on and charging will begin. The charging light will keep lighting up steadily during charging. When charging is completed, the charging light goes out. The charging time is approx. 100 minutes.
After charging, unplug the charger from the power source.
Battery type |
Capacity |
Number of |
|
(mAh) |
cells |
||
|
|||
9033 |
2,200 |
8 |
CAUTION:
·If you charge a battery cartridge from a justoperated machine or a battery cartridge which has been left in a location exposed to direct sunlight for a long time, the charging light may flash in red color. If this occurs, wait for a while. Charging will begin after the battery cartridge cools.
·Any of the following conditions indicates damage to the charger and/or battery cartridge. Ask your Makita Authorized or Factory Service Center to check them.
1)The charging light does not light up or flash (red) when the battery is inserted in the charger port.
2)Charging is not completed at even more than three hours after red light comes ON at start of charging.
Trickle charge (Maintenance charge)
If you leave the battery cartridge in the charger to prevent spontaneous discharging after full charge, the charger will switch into its ``trickle charge (maintenance charge)'' mode and keep the battery cartridge fresh and fully charged.
Tips for maintaining maximum battery life
1.Charge the battery cartridge before completely discharged.
Always stop machine operation and charge the battery cartridge when you notice less machine power.
2.Never recharge a fully charged battery cartridge. Overcharging shortens the battery service life.
3.Charge the battery cartridge with room temperature at 10°C ± 40°C (50°F ± 104°F).
Let a hot battery cartridge cool down before charging it.
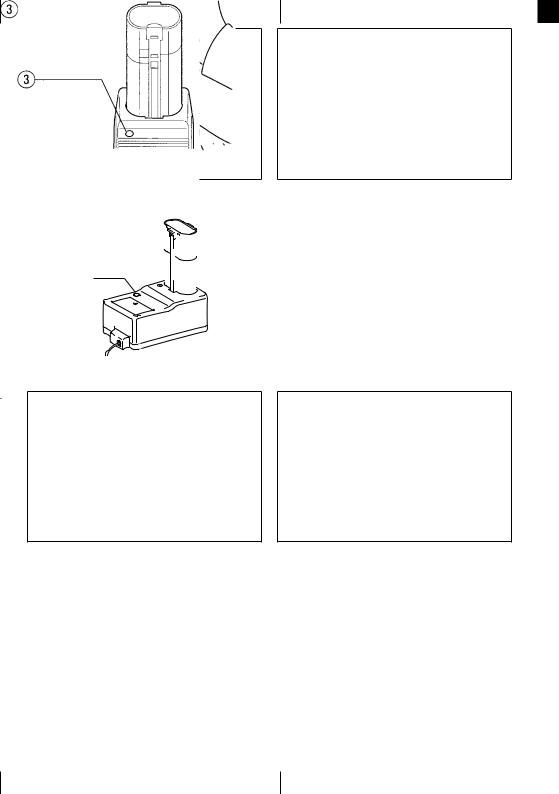
Installing water supply
Attach the tank holder on the tank. The tank holder should be attached around the portion shown with the dotted line. Tighten the screw (A) to the extent that the tank can still turn within the tank holder. (Fig. 5)
Attach the tank holder onto the motor housing. Tighten the screw (B) securely. (Fig. 6)
Connect the cap on the end of the polyvinyl tube to the mouth of the tank. Turn the tank clockwise when making the connection. Then tighten the screw (A) securely to secure the tank. (Fig. 7)
CAUTION:
If you find the polyvinyl tube is bent like a ``V'' or has been strained excessively after installing the water supply, loosen the screw (B) and adjust the position of the tank to alleviate the bent, pinched or strained condition.
Installing or removing diamond wheel (Fig. 8 & 9)
Important:
Always be sure that the machine is switched off and the battery cartridge is removed before installing or removing the wheel.
To install the wheel, first loosen the bolt with the hex wrench and remove the bolt and the flange. Then mount the wheel, the flange and the bolt. The wheel should be mounted with the Makita name on the flange side.
Press the blade stopper pin and insert it through the hole in the wheel so that the wheel cannot revolve. Use the hex wrench to tighten the bolt securely.
To remove the wheel, follow the installation procedure in reverse.
CAUTION:
·When installing the wheel, be sure to tighten the bolt securely.
·Use only the Makita hex wrench to install or remove the wheel.
Hex wrench storage (Fig. 10)
When not in use, the hex wrench can be conveniently stored.
Adjusting depth of cut (Fig. 11)
Loosen the bolt (A) on the depth guide with the hex wrench and move the base up or down. At the desired depth of cut, secure the base by tightening the bolt
(A).
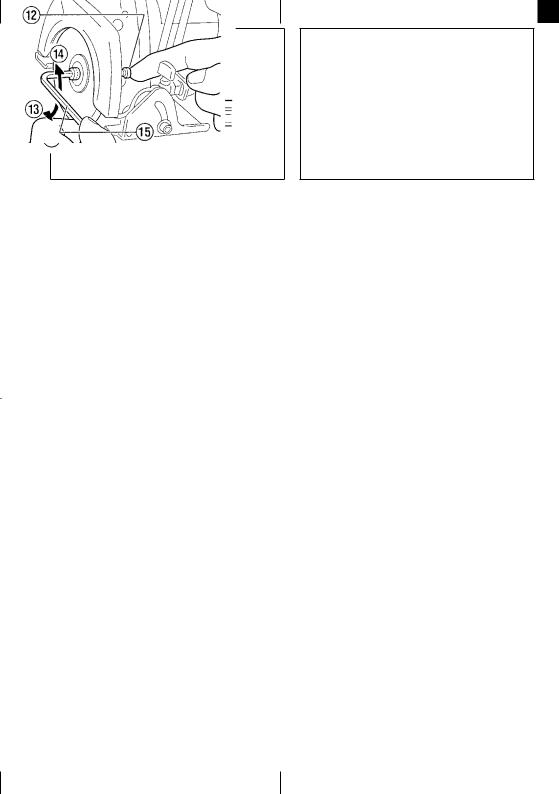
Bevel cutting (Fig. 12)
Loosen the bolt (A) on the depth guide and the bolt (B) on the bevel scale plate with the hex wrench. Set for the desired angle (0 ± 45°) by tilting accordingly, then tighten the bolts (A) and (B) securely.
CAUTION:
After adjusting depth of cut and bevel cutting angle, be sure to tighten the bolts (A) and (B) securely.
Sighting (Fig. 13)
For straight cuts, align the edge of the base with your cutting line on the workpiece. For 45° bevel cuts, align the notch in the front of the base with it.
CAUTION:
When making bevel cuts, view the cutting line on the workpiece through the window in the blade case in order to cut more accurately. If you have difficulty seeing it because of the water tank, adjust the position of the tank by tilting it backward slightly.
6
 Loading...